JKTS10U - Rice cooker Tiger - Free user manual and instructions
Find the device manual for free JKTS10U Tiger in PDF.
Frequently Asked Questions - JKTS10U Tiger
User questions about JKTS10U Tiger
0 question about this device. Answer the ones you know or ask your own.
Ask a new question about this device
Download the instructions for your Rice cooker in PDF format for free! Find your manual JKTS10U - Tiger and take your electronic device back in hand. On this page are published all the documents necessary for the use of your device. JKTS10U by Tiger.
USER MANUAL JKTS10U Tiger
Thank you for purchasing this TIGER rice cooker/warmer.
Please read these instructions carefully before use and observe them during use.
When using electrical appliances, basic safety precautions should always be followed including the following:
- Read all instructions.
- Do not touch hot surfaces. Use handles or knobs.
- To protect against electrical shock do not immerse cord, plugs, or (state specific part or parts in question) in water or other liquid.
- Close supervision is necessary when any appliance is used by or near children.
- Unplug from outlet when not in use and before cleaning. Allow to cool before putting on or taking off parts.
- Do not operate any appliance with a damaged cord or plug or after the appliance malfunctions or has been damaged in any manner. Return appliance to the nearest authorized service facility for examination, repair, or adjustment.
- The use of accessory attachments not recommended by the appliance manufacturer may cause injuries.
- Do not use outdoors (this item may be omitted if the product is specifically intended for outdoor use).
- Do not let cord hang over edge of table or counter, or touch hot surfaces.
- Do not place on or near a hot gas or electric burner, or in a heated oven.
- Extreme caution must be used when moving an appliance containing hot oil or other hot liquids.
- Always attach plug to appliance first, then plug cord into the wall outlet. To disconnect, turn any control to "off", then remove plug from wall outlet.
- Do not use appliance for other than intended use.
SAVE THESE INSTRUCTIONS
Servicing should be performed by an authorized service representative.
This rice cooker is intended for household use.
A short power supply cord is provided to reduce the risk of becoming entangled in or tripping over a longer cord. Extension cords may be used if care is exercised in their use. If an extension cord is to be used: (1) the marked electrical rating of the extension cord should be at least as great as the electrical rating of the appliance; (2) if the appliance is of the grounded type, the extension cord should be a grounding-type 3-wire cord; and (3) the cord should be arranged so that it will not drape over the countertop or tabletop where it can be pulled down by children or tripped over accidentally.
The following instructions are applicable to 120V only:
This appliance has a polarized plug (one blade is wider than the other). To reduce the risk of electrical shock, this plug is intended to fit into a polarized outlet in only one way. If the plug does not fit fully into the outlet, reverse the plug. If it still does not fit, contact a qualified electrician. Do not attempt to defeat this safety feature.
The appliance is not intended for use by young children or disabled persons without supervision. Ensure that young children do not play with the rice cooker.
GARANTIES DE SECURITE IMPORTANTES
1 Safety Instructions 6
2 Names and Functions of Component Parts 11
Menu options and features 13
Tips on making delicious rice 14
3 Before Cooking Rice 16
4 How to Cook Rice 18
Cooking time guidelines 19
5 Once the Rice Is Done Cooking 20
6 How to Cook Oatmeal ("Oatmeal" menu) 21
7 Setting the Timer 22
8 Keeping the Rice Warm 24
9 Reheating Cooked Rice 25
10 Cooking Rice and Side Dishes Together ("Synchro-Cooking" Menu) 27
11 Slow Cooking ("Slow Cook" Menu) 29
12 How to Bake Bread ("Bread Fermentation" and "Bread Bake" menus) 31
13 Cleaning and Maintenance 36
14 If Rice Does Not Cook Properly 42
15 If Synchro-Cooking Does Not Go As Expected 44
16 If Slow Cooking or Bread Baking Does Not Go As Expected 45
17 Troubleshooting 46
If these indications appear 47
Setting the present time 48
Specifications 49
In case of a power outage 49
Purchasing consumables and optional accessories 49
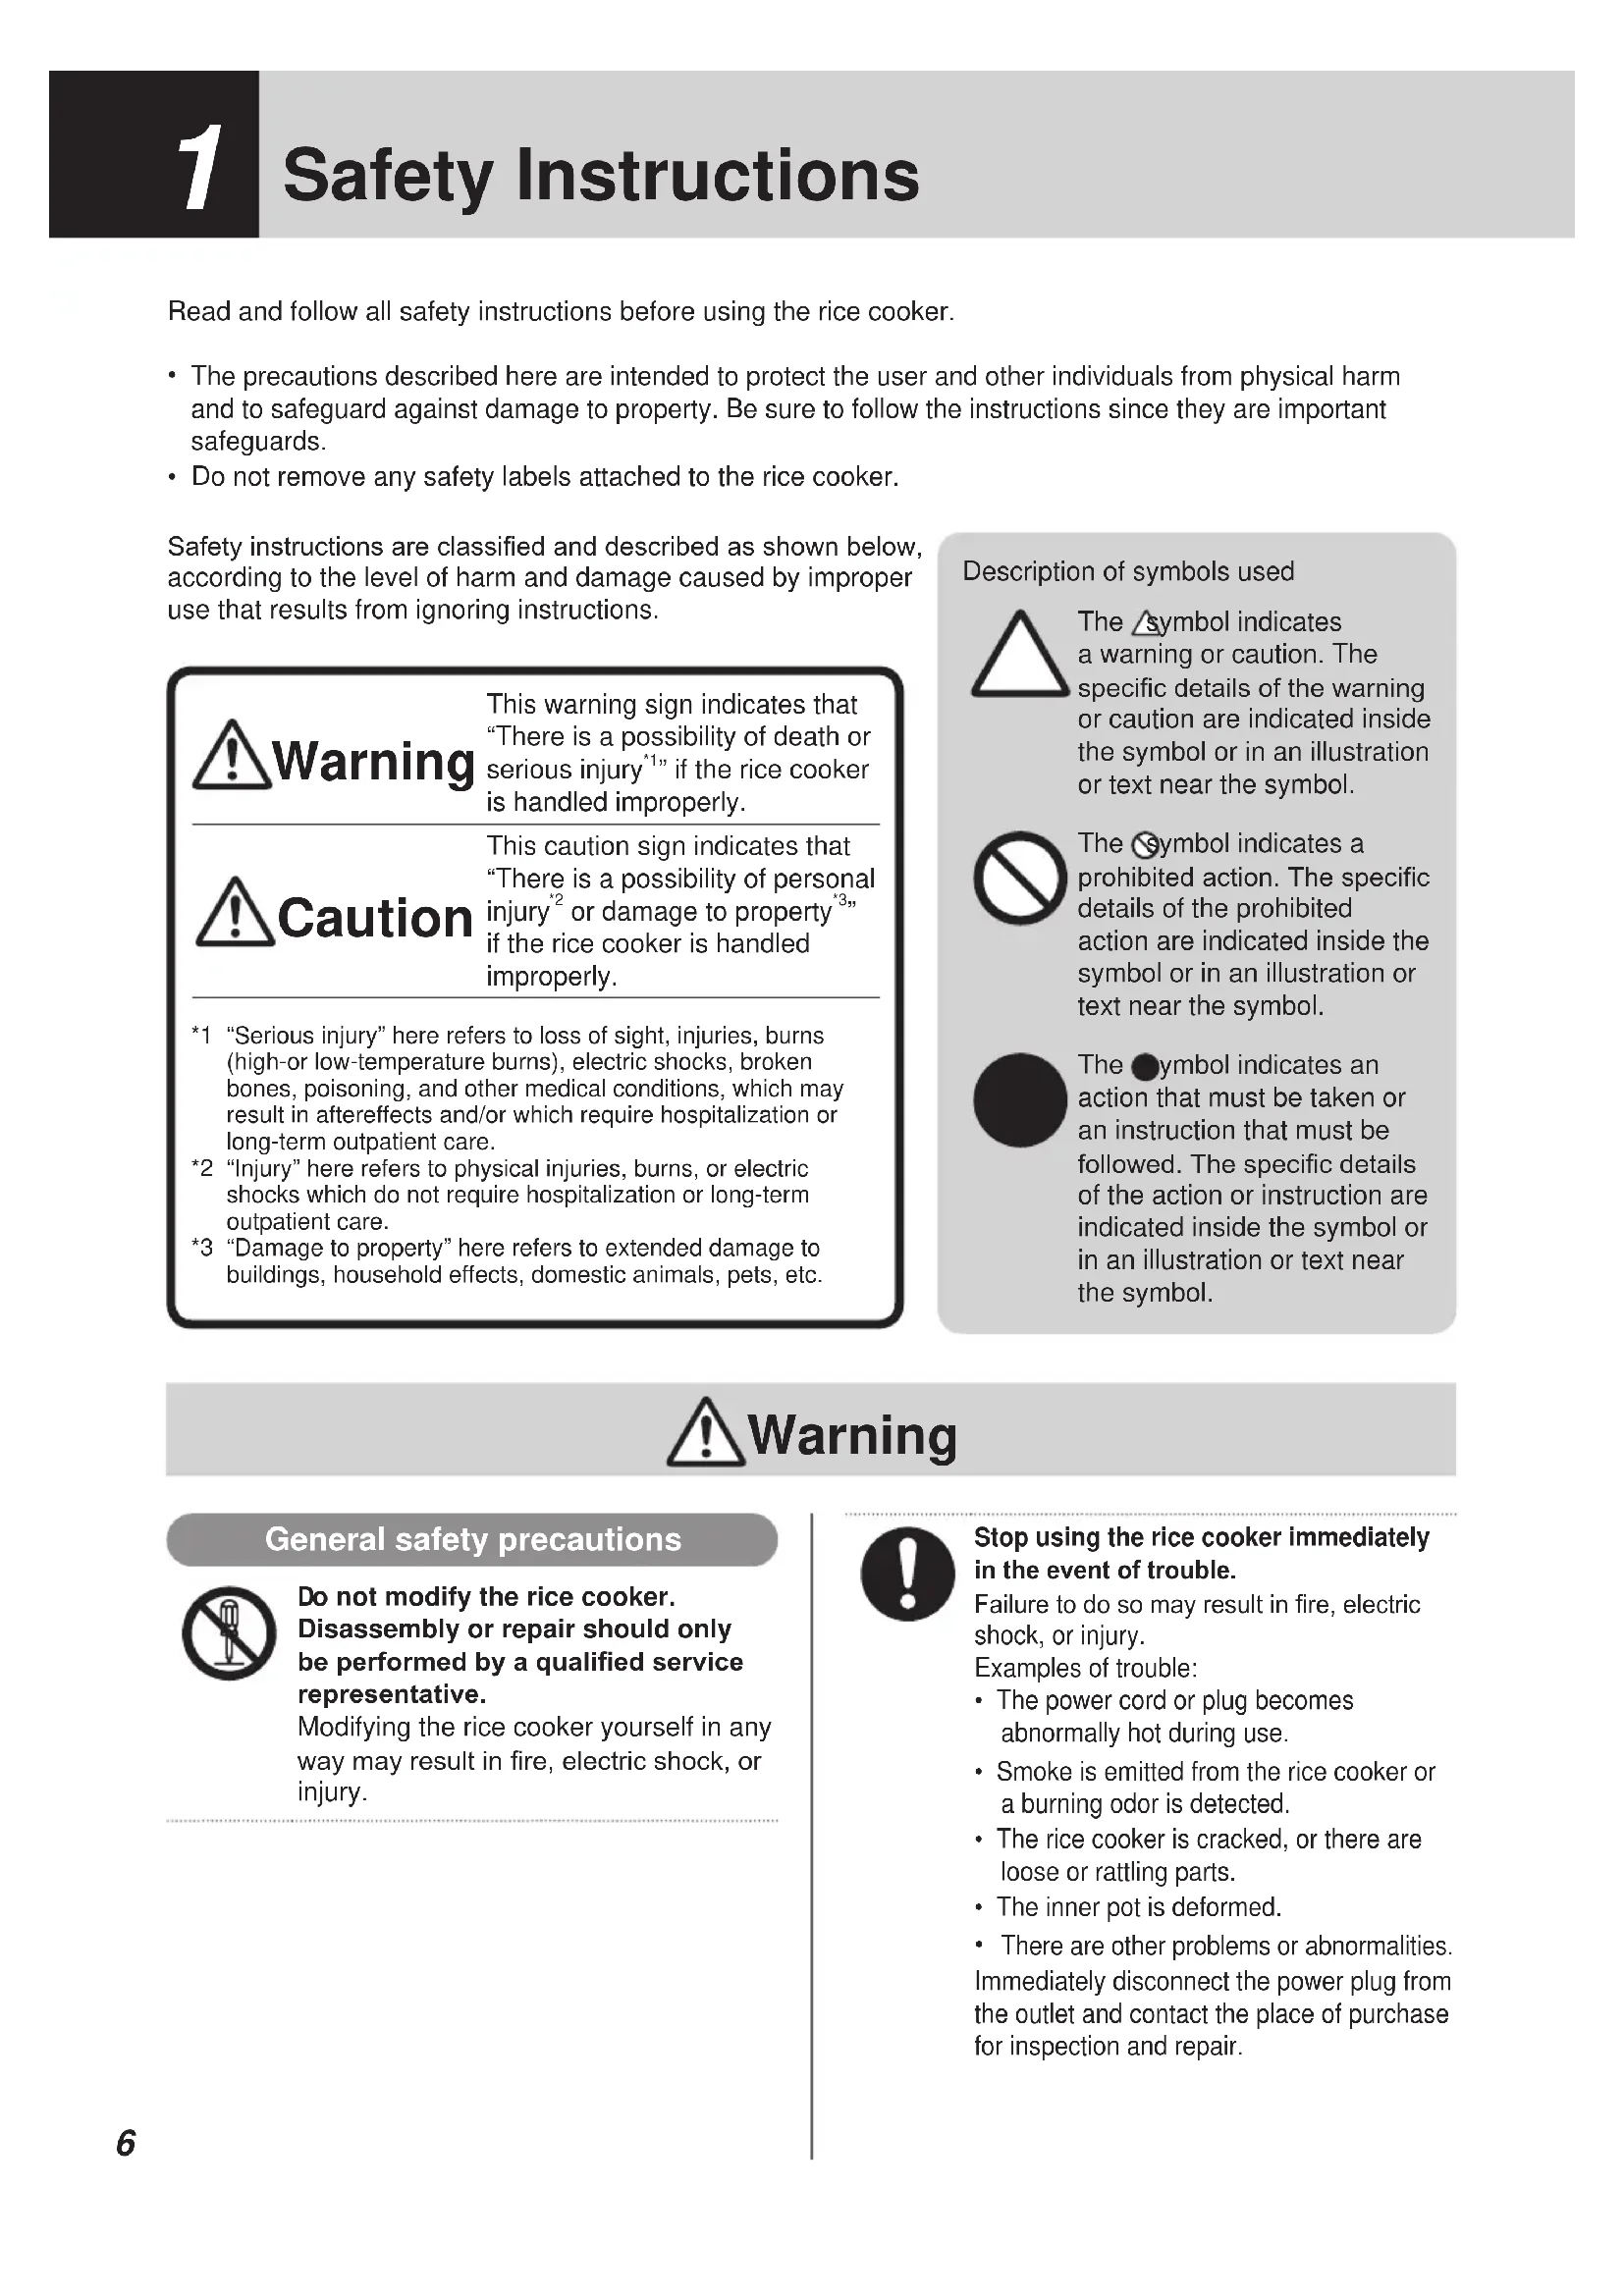
1 Safety Instructions
Read and follow all safety instructions before using the rice cooker.
- The precautions described here are intended to protect the user and other individuals from physical harm and to safeguard against damage to property. Be sure to follow the instructions since they are important safeguards.
- Do not remove any safety labels attached to the rice cooker.
Safety instructions are classified and described as shown below, according to the level of harm and damage caused by improper use that results from ignoring instructions.

This warning sign indicates that "There is a possibility of death or serious injury" if the rice cooker is handled improperly.

This caution sign indicates that "There is a possibility of personal injury" or damage to property if the rice cooker is handled improperly.
1 "Serious injury" here refers to loss of sight, injuries, burns (high-or low-temperature burns), electric shocks, broken bones, poisoning, and other medical conditions, which may result in aftereffects and/or which require hospitalization or long-term outpatient care.
2 "Injury" here refers to physical injuries, burns, or electric shocks which do not require hospitalization or long-term outpatient care.
*3 "Damage to property" here refers to extended damage to buildings, household effects, domestic animals, pets, etc.
Description of symbols used

The symbol indicates a warning or caution. The specific details of the warning or caution are indicated inside the symbol or in an illustration or text near the symbol.

The symbol indicates a prohibited action. The specific details of the prohibited action are indicated inside the symbol or in an illustration or text near the symbol.

The symbol indicates an action that must be taken or an instruction that must be followed. The specific details of the action or instruction are indicated inside the symbol or in an illustration or text near the symbol.
Warning
General safety precautions

Do not modify the rice cooker. Disassembly or repair should only be performed by a qualified service representative.
Modifying the rice cooker yourself in any way may result in fire, electric shock, or injury.

Stop using the rice cooker immediately in the event of trouble.
Failure to do so may result in fire, electric shock, or injury.
Examples of trouble:
The power cord or plug becomes abnormally hot during use.
Smoke is emitted from the rice cooker or a burning odor is detected.
The rice cooker is cracked, or there are loose or rattling parts.
- The inner pot is deformed.
- There are other problems or abnormalities. Immediately disconnect the power plug from the outlet and contact the place of purchase for inspection and repair.
Warning
Who should use the rice cooker

Do not allow children to use the rice cooker unsupervised. Keep out of reach of infants.
Unsupervised use by children or infants may result in burns, electric shock, or injury.

This rice cooker is not intended for use by persons with physical difficulties or lack of adequate knowledge of its proper use.
A person with sufficient knowledge should always be present to confirm the appropriate use of the rice cooker.
Inappropriate use may result in burns, electric shock, or injury.
Using the rice cooker

Do not use the rice cooker in any ways not specifically covered in this instruction manual (and the supplied "COOKBOOK").
Doing so may enable steam or the contents of the rice cooker to spray out, resulting in burns or other injury.
Examples of procedures that should not be performed:
- Heating ingredients or seasoning inside of plastic bags, etc.
- Using a cooking sheet or other utensils to cover food in the rice cooker.
Power supply

Use only 120 V AC power.
Use of any other power source may result in fire or electric shock.

Use an independent outlet rated for 15 A or higher.
Connecting other instruments to the same outlet may cause the branch socket to overheat, resulting in fire.
Power cord and plug

Do not use a damaged power cord. Also, be careful not to damage the power cord yourself.
(Do not modify, forcibly bend, pull, twist, or bundle the cord. Do not expose it to heat.
Do not rest anything heavy on the power cord or sandwich it between any objects.) Doing so may result in fire or electric shock.

Clean the power plug if it is dirty.
Failure to do so may result in fire.

Insert the power plug fully into the outlet.
Failure to do so may result in electric shock, short-circuiting, smoke, or fire.

Do not use the rice cooker if there is any damage to the power cord or plug, or if the plug cannot be securely inserted into the outlet.
Doing so may result in electric shock, short-circuiting, or fire.

Do not connect or disconnect the power plug with wet hands.
Doing so may result in electric shock or injury.

Do not expose the power plug to steam.
Doing so may result in electric shock or fire. When using the rice cooker on a sliding tabletop, position the cooker so that the power plug is not exposed to the emitted steam.
Warning
Handling the rice cooker

Do not immerse the rice cooker in or splash it with water.
Doing so may result in short-circuiting or electric shock.

Do not insert pins, needles, or other metal objects, etc., into the air inlet or air outlet, or gaps between parts.
Doing so may result in electric shock or in injury due to malfunction.

Starting to cook

Do not use the cooking plate without the inner pot.
Doing so may result in fire, smoke, or burns.
During and after cooking

Never open the lid during cooking.
Doing so may result in burns.

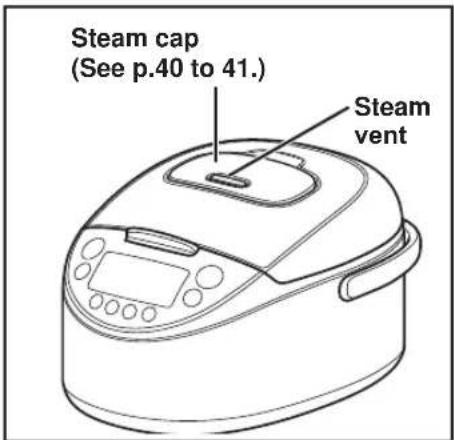
Do not place your face or hands near the steam cap or steam vent.
Doing so may result in burns. Be especially careful to keep out of reach of small children.
!Caution
General safety precautions

Handle the rice cooker with care.
Dropping the rice cooker or exposing it to a strong impact may result in injury or in malfunction of the unit itself.

Only use the cooking plate supplied with this rice cooker.
Using another cooking plate may result in fire or burns.

Do not touch the handle of the inner pot with your bare hands when the rice cooker is or has recently been in operation; use oven mitts to pick up the pot.
Touching the hot pot may result in burns.

Handle of the inner pot

People who use medical pacemakers should consult a medical specialist before using the rice cooker.
Operation of the rice cooker may cause adverse effects on pacemakers.
Environment for use

Do not use the rice cooker on unstable surfaces or heat sensitive tables or mats.
Doing so may result in fire or damage to the table or mat.
Caution

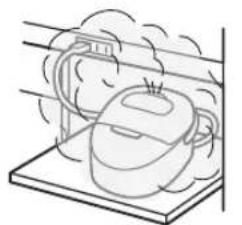
Do not use the rice cooker near walls or furniture.
Steam and heat may cause damage, discoloration and/or deformation. Use the rice cooker at least 11.81 inches (30 cm) away from walls or furniture. When using the rice cooker in a hide-away-type of shelf or counter, be careful not to allow the steam to remain trapped inside the enclosed area.
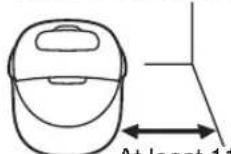
At least 11.81 inches (30 cm

Do not use the rice cooker on a sliding tabletop that can not easily bear its weight.
Falling from the tabletop may result in injury, burns, or malfunction of the unit itself.
Before using the rice cooker, confirm that the sliding tabletop is sufficiently able to bear its weight.

Do not use the rice cooker near a heat source or where it may be splashed with water.
Doing so may result in electric shock, short-circuiting, fire, or deformation or malfunction of the rice cooker.

Do not use the rice cooker in a small space where the operation panel is exposed to steam.
Steam and heat may result in deformation of the operation panel, and/or damage, discoloration, deformation, and/or malfunction of the rice cooker. When using the rice cooker on a sliding tabletop, pull the tabletop out so that the operation panel is not exposed to the emitted steam.

Do not use the rice cooker in situations where the air inlet or air outlet may be blocked or where the room temperature is high.
Do not place the rice cooker on top of carpets, plastic bags, etc.
Doing so may result in electric shock, short-circuiting, fire, or malfunction of the rice cooker.

Do not use the rice cooker on an IH cooking heater.
Doing so may result in malfunction.

Do not use the rice cooker on an aluminum sheet or electric carpet.
Doing so may generate heat from the aluminum material, which could result in smoke or fire.
Power cord and plug

Be sure to hold the power plug when disconnecting the cord from an outlet.
Failure to do so may cause an electric shock or short-circuiting, resulting in fire.


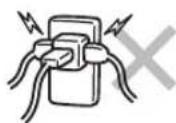
Do not plug multiple appliances into a single outlet.
Doing so may result in fire.
Handling the rice cooker

Only use the inner pot made exclusively for this rice cooker.
Using any other pot may result in overheating or malfunction.

Do not cook with the inner pot empty.
Doing so may result in overheating or malfunction.

Do not place anything susceptible to magnetism near the rice cooker, as the rice cooker generates magnetic waves.
If the rice cooker is located near a TV or radio, it may generate noise in the TV or radio. If it is located near a cash card, commuter pass for automatic ticket gates, cassette tape, or video tape, it may erase the data on those devices.

Be careful of the escaping steam when opening the lid.
Exposure to steam may result in burns.
Caution

Disconnect the power plug from the outlet when the rice cooker is not in use.
Failure to do so may result in injury or burns, or in electric shock or a short-circuit-induced fire due to degradation of the insulation.

Do not touch the open/lock button while carrying the rice cooker.
Doing so may cause the lid to open, resulting in injury or burns.
During and after cooking

Do not touch hot parts during or immediately after cooking.
Doing so may result in burns.

Do not move the rice cooker during cooking.
Doing so may result in burns or enable the contents to boil over.
Cleaning the rice cooker

Wait until the rice cooker has cooled down before cleaning it.
Failure to do so may result in burns.

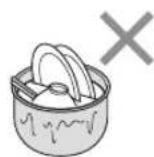
Do not wash the entire rice cooker.
Do not wash the entire rice cooker or pour water into the rice cooker or its bottom section. Doing so may result in short-circuiting or electric shock.
Cautions towards enabling the long-term use of this rice cooker
- Remove burned rice and any other remaining grains of rice.
Failure to do so may cause steam to leak out or the contents to boil over, resulting in a malfunction of the unit or simply in improperly cooked rice. - Do not cover the rice cooker with a cloth or other object during cooking.
Doing so may cause the rice cooker or the lid to become deformed or discolored.
- The holes on the rice cooker are designed to maintain its functions and performance. In extremely rare cases, dust or even insects may enter these holes and cause a malfunction. To prevent this, a commercially available insect-prevention sheet, etc., is recommended. If a malfunction does occur due to this problem, it will not be covered by warranty. Contact the place of purchase.
- The inner pot's fluorocarbon resin coating may wear and peel with extended use. This material is harmless to humans and this situation presents no hindrance to actual cooking or to the rice cooker's heat insulating capability.
If you would like, or if the inner pot becomes deformed or corroded, a new one may be purchased. Contact the place of purchase.
- Strictly observe the following to keep the fluorocarbon resin coating from blistering or peeling:
- Do not place the inner pot over a gas fire, or use it on an electromagnetic cooker or in a microwave oven, etc.
- Use the Keep Warm function for white rice (rinse-free rice) only; do not use for seasoned rice, etc.
- Do not use vinegar inside the inner pot.
- Use only the supplied spatula or a wooden spatula.
- Do not use hard utensils such as metal ladles, spoons, or whisks.
- Do not place a basket inside the inner pot.
- Do not place tableware and other hard utensils or objects inside the inner pot.
- Do not clean the inner pot with hard materials such as metal spatulas or nylon scouring sponges.
- Do not use a dishwasher/dryer to clean the inner pot.
- Be careful not to scratch the inner pot when washing rice.
If the inner pot becomes deformed, contact the place of purchase.
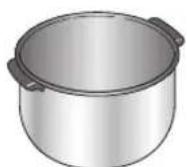
2 Names and Functions of Component Parts
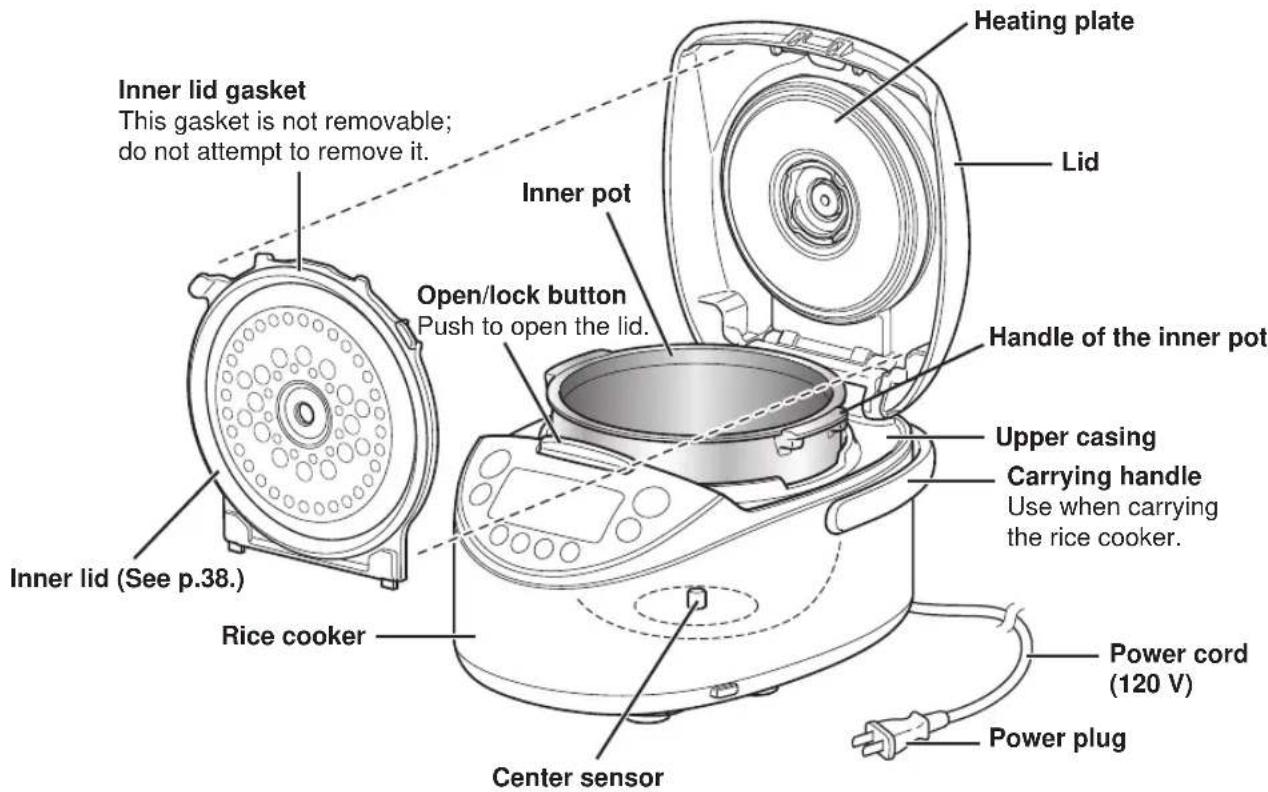
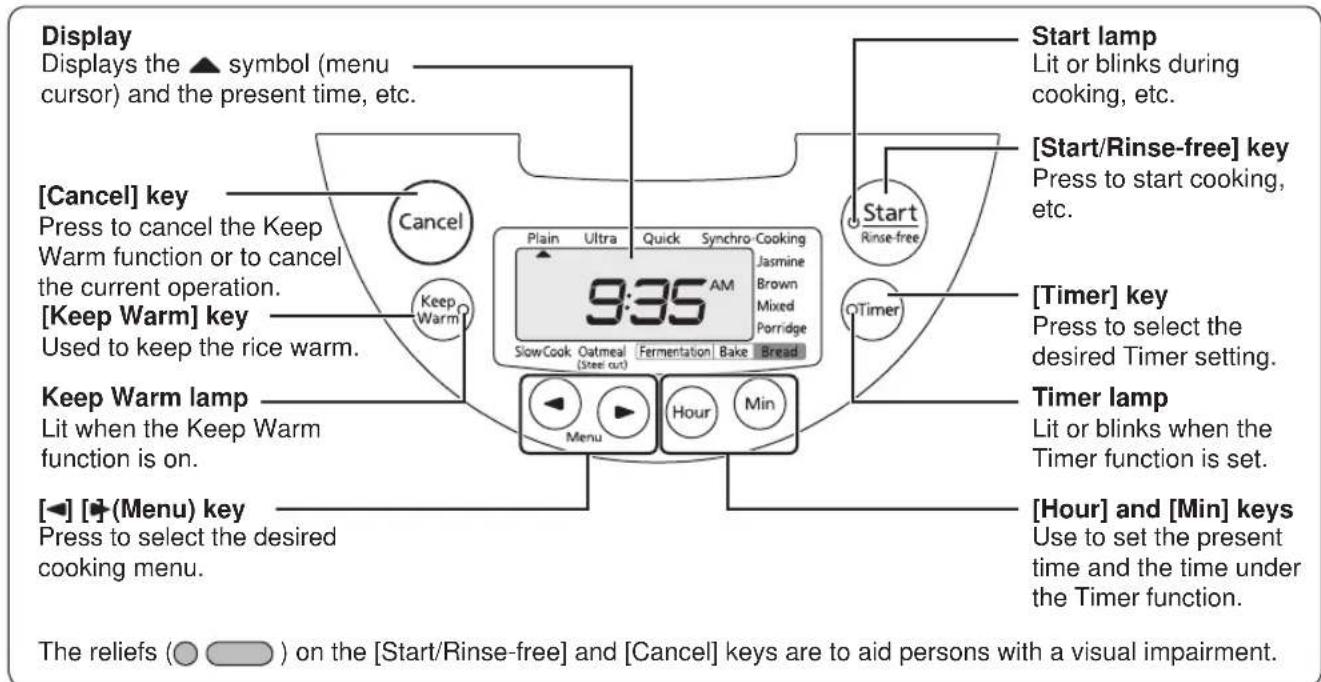
Operation panel
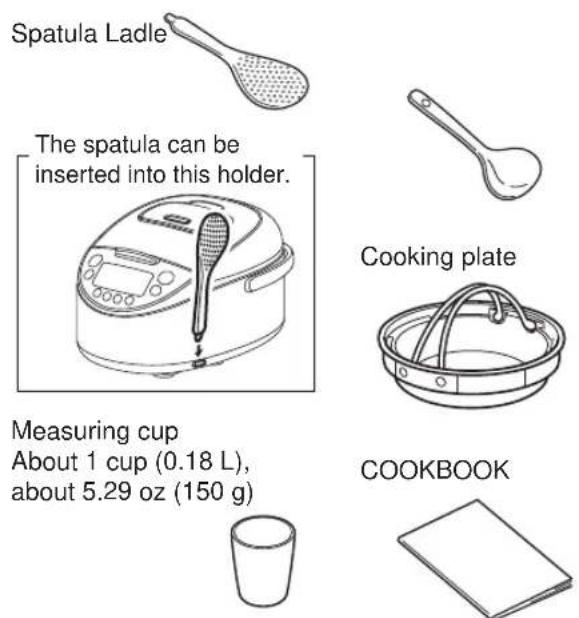
■ Checking the accessories
■ Sounds emitted by the rice cooker
The following sounds coming from the rice cooker during cooking, reheating, or when the Keep Warm function is on is normal and does not indicate a problem:
- Humming (This is the sound of the rotating fan.)
- Buzzing or tweeting (This is the sound of IH operation.)
Checking the present time
The time is displayed in a 12-hour format. It should be adjusted if the correct time is not displayed. (See p.48.)
The lithium battery
The rice cooker has a built-in lithium battery that stores the present time and the preset timer settings even with the power plug disconnected.
- This lithium battery has a four-to-five-year life expectancy with the power plug disconnected.
- If the lithium battery runs out, "0:00" will blink on the display when the power cord is plugged back in. Normal cooking is still possible, but the present time, preset timer settings, and elapsed Keep Warm time will no longer be stored in memory when the power plug is disconnected.
Note
- Do not attempt to replace the lithium battery yourself.
To replace the battery, contact the place of purchase.
Menu options and features
| Menu | Rinse-free rice function availability | Timer function availability | Keep Warm function availability | Feature |
| Plain 000 Select when cooking white rice (rinse-free rice). | ||||
| Ultra 000 | Select when cooking white rice (rinse-free rice) to bring out its maximum sweetness, flavor, and stickiness. Cooking using this menu will soak the rice twice as long as with the "Plain" menu and take extra time to heat and cook delicious rice. | |||
| Quick | 0 | N/A | 0 | Select when quickly cooking white rice (rinse-free rice). |
| Synchro-Cooking | 0 N/A | △ | Select when using the cooking plate to cook rice and side dishes together. | |
| Jasmine N/A 000 Select when cooking long-grain rice. | ||||
| Brown N/A 000 Select when cooking brown rice and/or multi-grain rice. | ||||
| Mixed 0 N/A | △ | Select when cooking seasoned rice or steamed sweet rice. | ||
| Porridge 000 Select when making porridge. | ||||
| Oatmeal (Steel cut) | N/A 0 N/A Select when cooking steel cut oatmeal. | |||
See p.49 for cooking capacities.
: Rice can be kept warm. However, its flavor may not be maintained.
Note
- Rinse-free rice can be cooked using the "Plain", "Ultra", "Quick", "Synchro-Cooking", "Mixed", and "Porridge" menus. You can cook delicious rinse-free rice easily without being concerned about the water amount or soaking time.
Since the bran has already been removed, rinse-free rice does not require washing. It is also good for the environment because the water left over after rinsing the rice does not affect the rivers or ocean.
- When using the "Porridge" menu, the porridge can become pasty if kept warm for too long; serve as soon as possible.
Tips on making delicious rice

Read p.16 to 17 for preparations before cooking rice, and p.18 to 23 for how to cook rice.
Select high quality rice and store it in a cool location.
Choose freshly polished, glossy rice with a uniform grain size. Store in a cool, dark, well-ventilated place.
Carefully measure the rice with the supplied measuring cup.
One cup equals about 5.29 oz (0.18 L). Use the supplied measuring cup for rinse-free rice as well. This product contrives the cooking method. It is not necessary to use the measuring cup for rinse-free rice.

Wash the rice quickly.
Stir the rice around with your hand in a generous amount of water, pour out the water, and repeat until the water remains clear.
When cooking germinated brown rice, whole rice or semi-polished rice, select the "Plain" or "Ultra" menu.
Cooking rinse-free rice
- Add the rinse-free rice and water, and then stir well from the bottom so that every individual grain of rice becomes immersed in the water. (Merely adding water to the rice will prevent it from soaking in the water and may result in improperly cooked rice.)
- If the added water turns white, we recommend you wash the rice thoroughly by replacing the water once or twice. (The water turning white is due to the starch in the rice and not its bran; however, cooking it with the starch left in the water may result in burned rice, the contents boiling over, or improperly cooked rice.)
Adding other ingredients to the rice
The total amount of ingredients should be no more than 2.5 oz (70 g) per cup of rice. Stir in any seasoning well and then add the extra ingredients on top of the rice. If other ingredients are to be added to the rice, be sure to use no more than the acceptable maximum amount (refer to the table below).
| Type of rice | 1.0 L (5.5-cup) type | 1.8 L (10-cup) type |
| Synchro-Cooking | 2 cups or less 4 cups or less | |
| Brown 3 cups or less | 5 cups or less | |
| Mixed 4 cups or less | 6 cups or less | |
| Sweet 3 cups or less | 5 cups or less | |
| Porridge • Hard 0.5 cups or less | 1.5 cups or less |
- Add water prior to adding the ingredients. Adding water after the ingredients will result in the cooked rice being too firm.
Add water according to the type of rice and your personal preference.
- Amount of water to add
| Type of rice | Corresponding scale (Use the corresponding scale on the inner pot as a guide and add water according to your personal preference.) |
| PlainQuickSynchro-Cooking | "Plain" scale |
| UltraMixed | "Ultra" scale |
| Jasmine "Jasmine" scale | |
| Brown "Brown" scale | |
| Porridge | Hard porridge: "Porridge • Hard" scale Soft porridge: "Porridge • Soft" scale |
Water levels in the above table also apply to rinse-free rice.
- If you choose to use more or less water than the recommended amount, do not deviate from that amount by any more than 1/3 of one line.
- When cooking germinated brown rice, whole rice or semi-polished rice, use the "Plain" or "Ultra" scale as a reference.
- When cooking steamed sweet rice, use the "Sweet" scale as a reference.
When cooking sweet and non-sweet rice mixed together, use the scale between "Plain" and "Sweet" as a reference. (In this case, add a little extra water to the level used when cooking only sweet rice.)
- If the amount of water to add is specified on a package of germinated brown rice or multi-grain rice, follow those directions and add water according to your personal preference.
- When cooking paella or pilaf described in the supplied "COOKBOOK", use the "Plain" scale as a reference.
Cooking brown rice and/or multi-grain rice mixed in with white rice
- If the rice to be cooked includes more brown rice and/or multi-grain rice than white rice, use the "Brown" menu.
- If there is an equal amount of brown rice and white rice, or there is more white rice than brown rice, use the "Plain" menu. (The brown rice should be soaked separately for 1 to 2 hours before cooking.)
- If there is an equal amount of multi-grain rice and white rice, or there is more white rice than multi-grain rice, use the "Plain" menu. (The multi-grain rice should be soaked separately for 1 to 2 hours before cooking.)
Cooking sweet rice
When cooking sweet rice, select the "Mix menu.
Wash the rice, and then level it out so that all of the rice is under water.
Cooking grains together with white rice
- The amount of multi-grain rice should equal less than 20% of the volume of the white rice. The maximum acceptable amount for the combination of white rice and grains is 5.5 cups with the 1.0 L type and 10 cups with the 1.8 L type.
- The grains should be placed on top of the white rice. Mixing them together may result in improperly cooked food.
Cooking grains together with brown rice
Always use the "Brown" menu.
- The maximum acceptable amount for the combination of brown rice and grains is 3.5 cups with the 1.0L type and 6 cups with the 1.8L type.
Cooking short-grain rice
- When cooking short-grain rice, select the "Plain" menu.
When cooking seasoned rice with various ingredients using short-grain rice, select the "Mixed" menu.
Selecting any other menu may result in the contents boiling over or in improperly cooked food.
Cooking long-grain rice
- When cooking long-grain rice, select the "Jasmine" menu. When cooking seasoned rice with various ingredients using long-grain rice, select the "Mixed" menu. Selecting any other menu may result in the contents boiling over.
1 Measure the rice.
Always use the measuring cup supplied with the rice cooker (for rinse-free rice as well). A level filling of rice in the supplied measuring cup equals about 5.29 oz (0.18 L).

ill the measuring cup as shown below.
Correct measurement
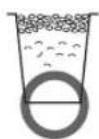
Incorrect measurement
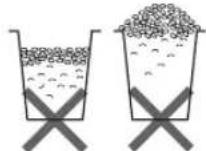
Note
- Always use the specified volume of rice (see "Specifications" on p.49). Otherwise the rice may not cook properly. If other ingredients are to be added to the rice, see p.14.
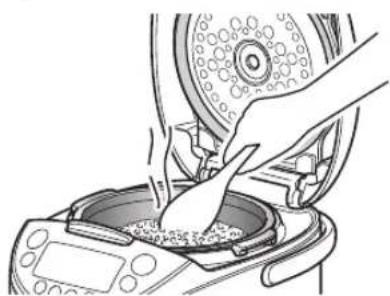
2 Wash the rice. (This can be done using the inner pot.)
For rinse-free rice, see p.14.
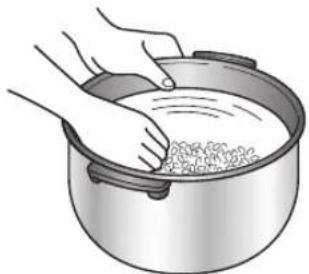
Note
- Do not use hot water (over 95^ [35^] ) to wash the rice or when adding water. It may prevent the rice from cooking properly.
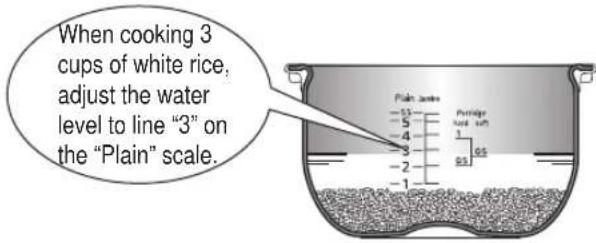
3 Adjust the water level.
Place the inner pot on a level surface and adjust the water level to the appropriate line of the corresponding scale on the inside of the pot.

- The water level should be selected according to the type of rice and the selected cooking menu, but can be fine-adjusted to your personal preference. (See the guidelines on p.14.)
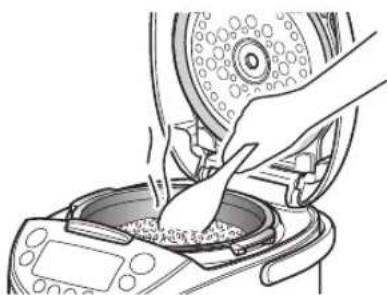
4 Wipe off any water and rice, etc.
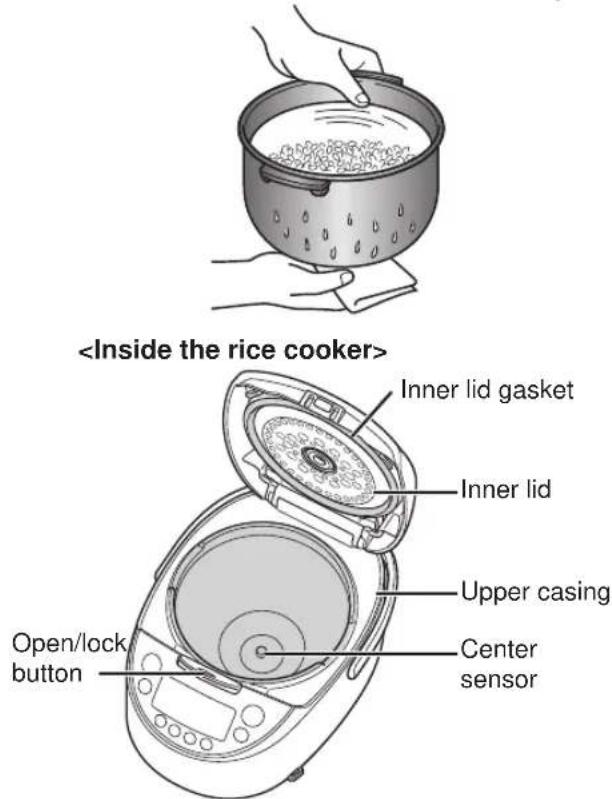
Caution
- Be sure to remove any rice or other material adhering to and around the center sensor, upper casing, and the open/lock button. (See p.37.) Adhering material can prevent the lid from closing, allow steam to leak out during cooking, or enable the lid to open and the contents to spray out, resulting in burns or other injury.
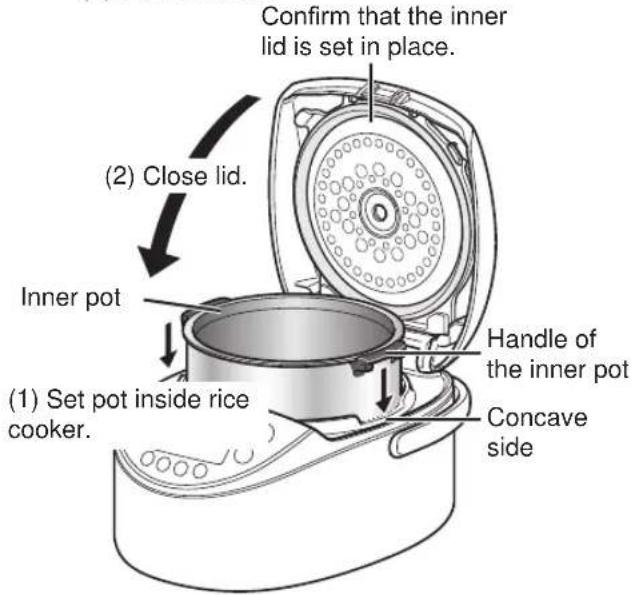
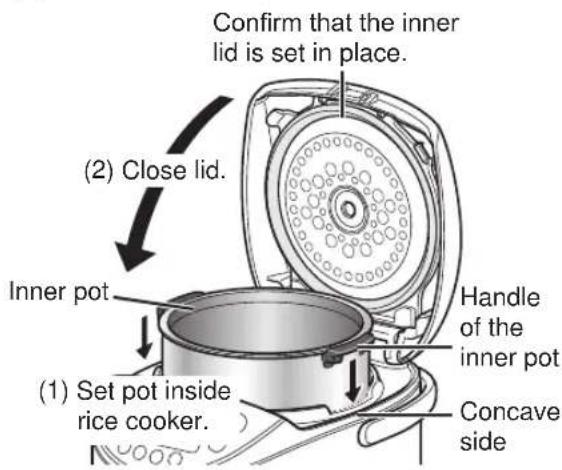
5 Place the inner pot in the rice cooker.
(1) Be sure to set the pot properly (not set at an angle).
(2) Close the lid.
6 Connect the power plug to an outlet.

Power plug
The power will turn on and the symbol will blink.
Note
- If the Keep Warm lamp is on, press the [Cancel] key to turn off the lamp.

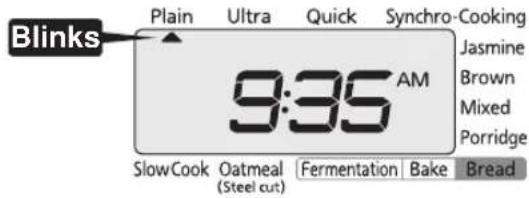
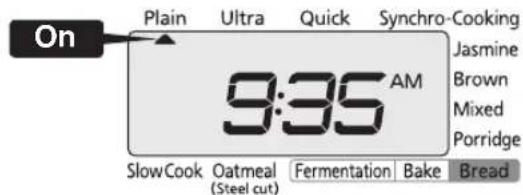
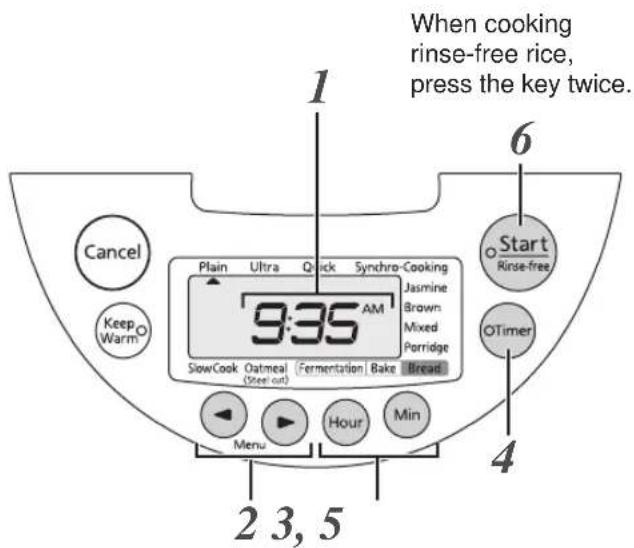
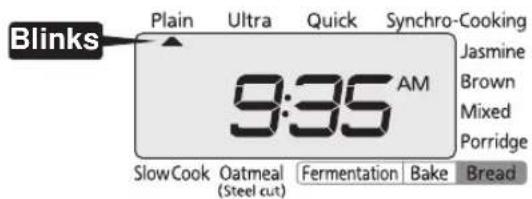
1 Press the [or] key to select the desired menu.
![Tiger JKTS10U - Press the [or] key to select the desired menu. - 1](/content/2026/02/403911/images/4dd4b9d77f41fed932a67138cccfb9e919bbbcdc556cedf5925650ebdf73a095.jpg)
Each time the [Menu] key is pressed, the selected menu will change in the order shown below. The symbol will blink while the menu is being selected.
![Tiger JKTS10U - Press the [or] key to select the desired menu. - 2](/content/2026/02/403911/images/37478b0cde8976724e9f9830cde10a3b1cd278a6527be147d864b98a35a9d5c9.jpg)
![Tiger JKTS10U - Press the [or] key to select the desired menu. - 3](/content/2026/02/403911/images/331f2dbced1fd387f7743f258260fc74a92a266d55f55fd55079c1cde7b7cfc9.jpg)
- It is not necessary to press the [Menu] key if the desired menu is already selected.
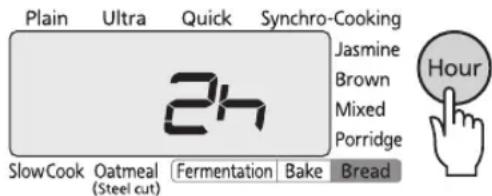
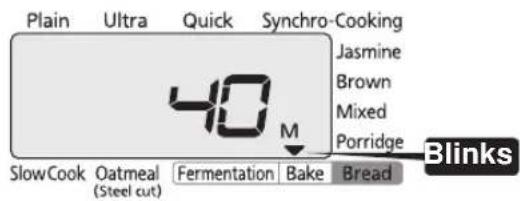
2 If you selected the "Porridge" menu, use the [Hour] and [Min] keys to set the desired cooking time.
Each time the [Hour] key is pressed, the set time will increase by 5 minutes. Each time the [Min] key is pressed, that time will decrease by 5 minutes.
The cooking time can be set to any 5-minute increment between 40 and 90 minutes.
![Tiger JKTS10U - If you selected the "Porridge" menu, use the [Hour] and [Min] keys to set the desired cooking time. - 1](/content/2026/02/403911/images/407309712289b20ecb49605d66f86463fb01d84b9cfb2700340ca0e875b0b26f.jpg)
The default setting is for 60 minutes. Adjust as desired.
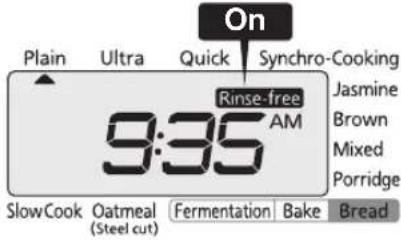
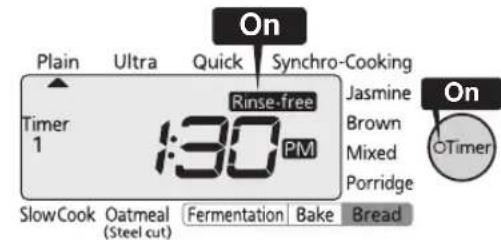
3 Press the [Start/Rinse-free] key once. When cooking rinse-free rice, press the key twice.
![Tiger JKTS10U - Press the [Start/Rinse-free] key once. When cooking rinse-free rice, press the key twice. - 1](/content/2026/02/403911/images/cb6a2caa5be9366185c5e4b827a673d76bc64aab9efeb7afdfa5aaa00312420d.jpg)
- Rinse-free rice can be cooked under the "Plain", "Ultra", "Quick", "Synchro-Cooking", "Mixed", and "Porridge" menus.
- To cancel "Rinse-free", press the [Start/Rinse-free] key again within 20 seconds.
For normal cooking
When you selected the "Plain" menu, a one-short, one-long beep alarm will sound. In other menus, only a one-beep alarm will sound.
When cooking rinse-free rice
"Rinse-free" appears on the display. When you selected the "Plain" menu, a one-short, one-long, another one-short beep alarm will sound. In other menus, a one-long, one-short beep alarm will sound.
Cooking will start.
Appropriate amounts
See p.14 to 15 for the appropriate amounts of grains and ingredients.
Cooking time guidelines
| Type of rice Unit size | Plain Ultra Quick Synchro-Cooking | ||
| 1.0 L (5.5-cup) type 41 | to 49 min 63 to 71 min 1 | 7 to 35 min 41 to 48 min | |
| 1.8 L (10-cup) type 44 | to 51 min 65 to 73 min 1 | 8 to 35 min 50 to 62 min | |
| Type of rice Unit size | Jasmine Brown | Mixed Oatmeal (Steel cut) | |
| 1.0 L (5.5-cup) type 16 | to 34 min 63 to 73 min 3 | 39 to 61 min 42 to 46 min | |
| 1.8 L (10-cup) type 16 | to 34 min 72 to 80 min 4 | 40 to 61 min 43 to 47 min |
- The above times indicate the amount of time to the end of steaming after cooking is completed when the rice is not soaked prior to cooking. (Voltage: 120 V, Room temperature: 73.4^ [23°C], Water temperature: 73.4^ [23°C], Amount of water: normal level)
- When rinse-free rice is selected, cooking takes 1 to 10 minutes longer than each menu time.
- Cooking times will differ somewhat depending upon the amount being cooked, the type of rice, the type and quantity of ingredients, the room temperature, the water temperature, the amount of water, electrical voltage, and whether the Timer function is used or not, etc.
Once the final steaming process begins, the remaining time will be displayed.
The time until steaming is completed will be shown on the display in 1-minute increments.
- Steaming times will vary depending upon the selected menu.
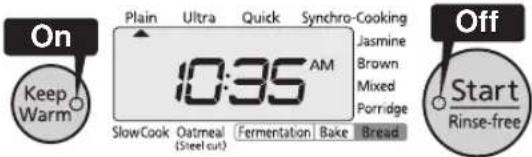
Once the rice is fully cooked, the Keep Warm function will automatically engage (the Start lamp will turn off).
The Keep Warm lamp will turn on and an alarm (8 beeps) will sound.
- If you added ingredients under the "Porridge" menu, or a longer cooking time is required, etc., you can set the desired additional cooking time. Simply press the [Hour] and [Min] keys once the Keep Warm lamp turns on, and then press the [Start/Rinse-free] key. The cooking time can be extended up to 15 minutes in increments of 1 minute, a maximum of 3 times.
- Stir the rice well before reheating.
1 Stir and loosen the cooked rice.
Be sure to stir and loosen the rice as soon as cooking is complete.
- Due to the shape of the inner pot, the rice is slightly sunken at the center when cooking is finished.

Note
- Be sure to wipe off any hot water that collects on the upper casing or that runs onto the outside of the rice cooker when you open the lid immediately after cooking or while the Keep Warm function is on.
When you are done using the rice cooker...
1 Press the [Cancel] key to turn off the Keep Warm function.
The Keep Warm lamp will turn off.

2 Disconnect the power plug from the outlet. (See p.11.)
3 Clean the rice cooker. (See p.36 to 41.)
6 How to Cook Oatmeal ("Oatmeal" menu)
You can easily make oatmeal (steel cut).
1 Set oatmeal and water into the inner pot, and close the lid.
Amount of oatmeal
| 1.0 L type 1.8 L type |
| 1.0 to 2.5 cups 1.0 to 3.0 cups |
- Amount of water to add
- Be sure to use the measuring cup supplied with the rice cooker.
| Amount of oatmeal | 1.0 L type 1.8 | L type |
| 1.0 cup 3.0 | cups 3.5 cups | |
| 1.5 cups 4.5 | cups 4.5 cups | |
| 2.0 cups 5.0 | cups 5.0 cups | |
| 2.5 cups 5.5 | cups 6.5 cups | |
| 3.0 cups – 7.0 | cups |
2 Connect the power plug to an outlet. (See p.17.)
3 Press the [or [key to select [Oatmeal (Steel cut)].
![Tiger JKTS10U - Press the [or [key to select [Oatmeal (Steel cut)]. - 1](/content/2026/02/403911/images/0cbe0c0242822fee4e8a8899027417b0a49629ccc23ed8ddd9464af20399301e.jpg)
4 Press the [Start/Rinse-free] key once.
The Rinse-free function is not available.
![Tiger JKTS10U - Press the [Start/Rinse-free] key once. - 1](/content/2026/02/403911/images/6796b5007cbfd4f0391e68c66fd89885c06f036ff53c176f81e891d8becaff43.jpg)
A one-long beep will sound and cooking will start.
5 Once cooking is completed, an alarm (8 beeps) will sound (the Start lamp will turn off).
The Keep Warm lamp will blink and the present time will appear on the display.

6 Stir the oatmeal well and even it out in the inner pot.
- Serve the cooked oatmeal as soon as possible, as it is not kept warm.
When you are done using the rice cooker...
1 Press the [Cancel] key to turn off the Keep Warm function.
The Keep Warm lamp will turn off.
![Tiger JKTS10U - Press the [Cancel] key to turn off the Keep Warm function. - 1](/content/2026/02/403911/images/20157b01157dc7c0b895cd5fda10fc90df421b396ff0f6cba1c60cc7d0ca1465.jpg)
2 Disconnect the power plug from the outlet. (See p.11.)
3 Clean the rice cooker. (See p.36 to 41.)
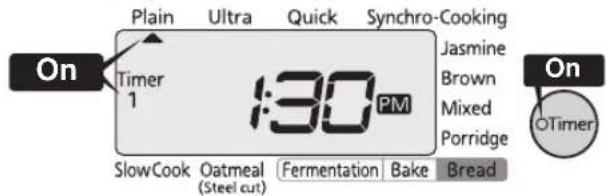
7 Setting the Timer
Using the Timer function (Timer 1 / Timer 2)
You can preset the time that you want cooking to be actually completed.
- Select either "Timer 1" or "Timer 2" and set the desired completion time. The start of cooking will be automatically adjusted so that the operation is completed at the preset time.
Each timer can be set to different times. e.g. "Timer 1" for breakfast and "Timer 2" for dinner. - The preset timer settings will be stored in memory.

- Example setting: If "Timer 1" is set to 1:30 PM, cooking will be completed at 1:30 PM.
1 Check the present time.
See p.48 for the procedure to set the present time.
2 Press the [+] key to select the desired menu.
![Tiger JKTS10U - Press the [+] key to select the desired menu. - 1](/content/2026/02/403911/images/8b12fcebf550c65cbff115049511018ce025ddbe29f1c87f7ba9cfd3ff653635.jpg)
The symbol will blink while the menu is being selected.
![Tiger JKTS10U - Press the [+] key to select the desired menu. - 2](/content/2026/02/403911/images/bee5d99e196d4e7fc0ce09c46bf7998036af98d47d71f1f90d0672bc19dc3013.jpg)
- Confirm that the Keep Warm lamp is off.
![Tiger JKTS10U - Press the [+] key to select the desired menu. - 3](/content/2026/02/403911/images/70b23fc2fd70053e2c719016764dade354c991ae820bf20a454e2d430b471204.jpg)
- It is not necessary to press the [Menu] key if the desired menu is already selected.
3 If you selected the "Porridge" menu, use the [Hour] and [Min] keys to set the desired cooking time.
Each time the [Hour] key is pressed, the set time will increase by 5 minutes. Each time the [Min] key is pressed, that time will decrease by 5 minutes.
The cooking time can be set to any 5-minute increment between 40 and 90 minutes.
![Tiger JKTS10U - If you selected the "Porridge" menu, use the [Hour] and [Min] keys to set the desired cooking time. - 1](/content/2026/02/403911/images/4fd3461ee253fddebd815842e508d57660353c9a98e551b203f450e3f3b2454d.jpg)
The default setting is for 60 minutes. Adjust as desired.
4 Press the [Timer] key to select either "Timer 1" or "Timer 2".
![Tiger JKTS10U - Press the [Timer] key to select either "Timer 1" or "Timer 2". - 1](/content/2026/02/403911/images/d91a4343c5330fd0113f1d48eb176e0f9e57c23c68b32ce35fe04b549958ca03.jpg)
The selected setting will switch back and forth between "Timer 1" and
"Timer 2" each time the [Timer] key is pressed. Both the Timer lamp and the displayed "Timer 1" or "Timer 2" will blink.
![Tiger JKTS10U - Press the [Timer] key to select either "Timer 1" or "Timer 2". - 2](/content/2026/02/403911/images/60931723853a75f5e56f8011298189e7eb27ceff22b5f4ea2ffb06cf229bd9ed.jpg)
- The previously preset time will be displayed. It is not necessary to set the timer again if the desired completion time is already displayed.
Note
The Timer function is not available in the following cases.
- When the "Quick", "Synchro-Cooking", "Mixed", "Bread" or "Slow Cook" menu is selected
- When the preset time is less than that indicated in the following table (The times in the table below also apply to rinse-free rice.)
| Menu Minimum preset time | |
| Plain 1 h 5 min | |
| Ultra 1 h 30 min | |
| Jasmine 45 min | |
| Brown 1 h 30 min | |
| Porridge Cooking time + 1 min | |
| Oatmeal (Steel cut) | 55 min |
- When "0:00" is blinking on the display
- If the Keep Warm lamp is on, press the [Cancel] key to turn off the lamp. (The Timer function is not available while the Keep Warm lamp is on.)
- If you do not operate the rice cooker within about 30 seconds after pressing the [Timer] key, an alarm (3 beeps) will sound.
- If the [Timer] or [Start/Rinse-free] key is pressed while the rice cooker is in a state where the Timer function is not available, an alarm (3 beeps) will sound.
Use the [Hour] and [Min] keys to set the desired completion time.
![Tiger JKTS10U - Use the [Hour] and [Min] keys to set the desired completion time. - 1](/content/2026/02/403911/images/b8b830586314a7d1a98a55f686f9d968c02e0adc040078440dad50fb3b6170fa.jpg)
Press the [Hour] key to change the set time in 1-hour increments. Press the [Min] key to change that time in 10-minute increments. Hold down the corresponding key to change the time more rapidly.
![Tiger JKTS10U - Use the [Hour] and [Min] keys to set the desired completion time. - 2](/content/2026/02/403911/images/3088e1e9d5cedcc89c0e0285f1857f4f72d2d51c76e4b02cb1702830415996db.jpg)
The time is displayed in a 12-hour format.
Note
- Do not set the timer to more than 12 hours, as it may result in spoiled rice.
- Check whether "AM" or "PM" currently displayed.
6 Press the [Start/Rinse-free] key once. When cooking rinse-free rice, press the key twice.
![Tiger JKTS10U - Press the [Start/Rinse-free] key once. When cooking rinse-free rice, press the key twice. - 1](/content/2026/02/403911/images/2214992908a24f376ed93878d6bc4cd8e3797887df346e1de897a394623077a2.jpg)
The Timer lamp will turn on and the Timer function is set.
- Rinse-free rice can be cooked under the "Plain", "Ultra", and "Porridge" menus.
For normal cooking
When you selected the "Plain" menu, a one-short, one-long beep alarm will sound. In other menus, only a one-beep alarm will sound.
When cooking rinse-free rice
"Rinse-free" appears on the display. When you selected the "Plain" menu, a one-short, one-long, another one-short beep alarm will sound. In other menus, a one-long, one-short beep alarm will sound.
If you make a mistake or otherwise want to reset the timer, press the [Cancel] key and repeat the procedure from step 2 on p.22.
8
Keeping the Rice Warm
The Keep Warm function will especially maintain the shiny, delicious taste of white rice (rinse-free rice). The Keep Warm function will automatically engage when cooking is completed.
Turning off the Keep Warm function
Press the [Cancel] key.
The Keep Warm lamp will turn off.

- Restarting the Keep Warm function
Confirm that the Keep Warm lamp is off and press the [Keep Warm] key.
The Keep Warm lamp will turn on.

- Keeping a small amount of rice warm
Gather the rice at the center of the inner pot; serve as soon as possible.
■ Elapsed Keep Warm time display
Hold down the [Hour] key to display the elapsed Keep Warm time. The elapsed time will be displayed in 1-hour increments up to 24 hours ("24h").
After 24 hours have elapsed, "24" will blink and "h" will turn on.
Note
- Avoid the following, as they may result in unusual odors, dryness, discoloration, and spoiling of the rice, or corrosion of the inner pot.
- Using the Keep Warm function with cold rice
- Adding cold rice to rice that is being kept warm
- Leaving a spatula in the inner pot while the Keep Warm function is on
- Using the Keep Warm function with the power plug disconnected
- Using the Keep Warm function for longer than 24 hours
- Keeping less than the minimum required amount of rice warm (See "Specifications" on p.49.)
- Using the Keep Warm function for anything other than white rice (including rinse-free rice)
- When using the "Porridge" menu, the porridge can become pasty if kept warm for too long; serve as soon as possible.
- Be sure to remove any grains of rice that adhere to the brim of the inner pot as well as to any gaskets. Failure to do so can result in dryness, discoloration, odors, and stickiness of the rice being cooked.
- Serve cooked rice as soon as possible in cold climates and high temperature environments.
- Do not leave the cooking plate or food cooked using the cooking plate inside the rice cooker while the Keep Warm function is on.
For piping hot rice, reheat the rice that is being kept warm before serving it.
Note
- Rice will not be fully heated if more than half of the inner pot is full.
The rice will end up being dry if reheated under any of the following conditions. - The rice is still hot, such as immediately after cooking.
- There is less than the minimum required amount of rice (1 cup with the 1.0 L type, 2 cups with the 1.8 L type).
The rice is reheated 3 times or more.
1 Stir and loosen the rice that was being kept warm.
2 Add 1 to 2 tablespoons of water evenly over the rice.


- Adding water will prevent the rice from drying out and result in plumper rice.
3 Make sure that the Keep Warm lamp is on.

- Reheating is not available if the Keep Warm lamp is not on. If the lamp is not on, press the [Keep Warm] key. (See p.24.)
4 Press the [Start/Rinse-free] key.
The Start lamp will blink and reheating will start.
The remaining time will be displayed and an alarm (3 long beeps) will sound when the operation is completed.
![Tiger JKTS10U - Press the [Start/Rinse-free] key. - 1](/content/2026/02/403911/images/3ef8a27c73a24dd28498b5a92f26adfdd919608a4ba10d0096760a0343dd4269.jpg)
![Tiger JKTS10U - Press the [Start/Rinse-free] key. - 2](/content/2026/02/403911/images/992b55781cd45fbc153b58a58abfe2878572dce4017c41e2db92c151dc9d4c55.jpg)
- To stop reheating, press the [Cancel] key.
- Reheating is not available if the rice is too cold (131°F [55°C] or lower as a guideline). In this case, a repeated beeping alarm will sound.
5 Stir and loosen the reheated rice well, and even it out in the inner pot.
How to reheat oatmeal
Note
- Oatmeal will end up being dry if reheated under any of the following conditions.
The oatmeal is reheated without adding water or milk.
The volume of oatmeal is below the minimum required volume (1 cup).
The oatmeal is reheated 3 times or more.
1 Stir the cooked oatmeal.

- You can add some water or milk to the cooked oatmeal and reheat it.
Note
- When adding water or milk, add it immediately after cooking. Otherwise, the temperature will decrease and the oatmeal may not be reheated.
Maximum cooking amount when adding some water or milk to reheat oatmeal 1.0 L type: 5.5 scale for "Plain" 1.8 L type: 8 scale for "Plain"
2 Make sure that the Keep Warm lamp is blinking.

- Reheating is not available if the [Cancel] key is pressed after the oatmeal has been cooked.
3
Press the [Start/Rinse-free] key.
The Start lamp will blink and reheating will start. The remaining time will be displayed and an alarm (3 long beeps) will sound when the operation is completed.
![Tiger JKTS10U - Press the [Start/Rinse-free] key. - 1](/content/2026/02/403911/images/3cb160c09f26dae0274db8d51f5d29522756b57db0547698bc52eaa6792077dd.jpg)
![Tiger JKTS10U - Press the [Start/Rinse-free] key. - 2](/content/2026/02/403911/images/f67cac9b514249178b69bfb21799dbd767c74d8244118483f20660e2f6f33112.jpg)
Note
- Reheating is not available if the oatmeal is too cold (131°F [55°C] or lower as a guideline). In this case, a repeated beeping alarm will sound.
4
Stir the heated oatmeal well and even it out in the inner pot.
10
Cooking Rice and Side Dishes Together ("Synchro-Cooking" Menu)
You can use the cooking plate to cook side dishes described in the supplied "COOKBOOK" at the same time as you cook rice. You can also add water to the inner pot and cook side dishes without making rice.
Refer to the supplied "COOKBOOK" for directions.
Note
- Do not make dishes other than those described in the supplied "COOKBOOK".
- Do not cook with a greater volume of ingredients than that indicated in the supplied "COOKBOOK". Doing so may cause the contents to boil over or result in improperly cooked food.
- Be careful of the following points when using the cooking plate.
- When cooking dishes with a strong odor, the odor may adhere to the cooking plate.
- When cooking ingredients with a strong color, that color may be transferred to the cooking plate through the broth, etc.
- Do not use sharp instruments like kitchen knives, table knives, or forks inside the cooking plate.
Prepare the ingredients and place them in the cooking plate.
Stacking ingredients on top of each other may result in the contents boiling over or in improperly cooked food. Spread ingredients over the whole of the cooking plate.
2 Make the necessary preparations for cooking rice.
(See p.16.)
Note
- Refer to the following table for the acceptable amounts of rice that can be cooked concurrently with food. Do not cook more than the acceptable maximum or less than the minimum required amounts. Doing so may cause the contents to boil over or result in improperly cooked food.
| 1.0 L type 1.8 L type | |
| Maximum Minimum Maximum Minimum | |
| 2 cups 1 cup 4 cups 2 cups | |
3 Place the cooking plate inside the inner pot and close the lid.
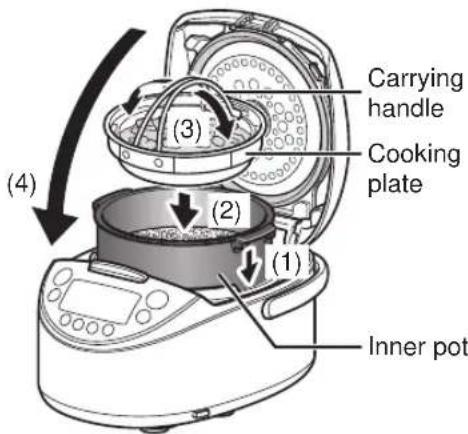
Note
- Always place the cooking plate inside the inner pot.
- Make sure that the cooking plate is level (not set at an angle).
- Tilt the carrying handle of the cooking plate outward before closing the lid.
4 Connect the power plug to an outlet.
Note
- If the Keep Warm lamp is on, press the [Cancel] key to turn off the lamp.
5 Press the [or] key to select the "Synchro-Cooking"
![Tiger JKTS10U - Press the [or] key to select the "Synchro-Cooking" - 1](/content/2026/02/403911/images/b47c0fc9876e7ad1fd1589a48393362c9216cdd153cf47f035cdd7996c57f16c.jpg)
menu.
The symbol will blink while the menu is being selected.
Always select the "Synchro-Cooking" menu when cooking concurrently.
6 Press the [Start/Rinse-free] key.
The Start lamp will turn on and concurrent cooking will start.
![Tiger JKTS10U - Press the [Start/Rinse-free] key. - 1](/content/2026/02/403911/images/81de7f4cbbceaae3177b99f4cb7f3172f9d29ef440d457b46acdf8f36ecf33df.jpg)
7 Once cooking is completed, an alarm (8 beeps) will sound (the Start lamp will turn off).
The Keep Warm lamp will turn on.
8 Remove the cooking plate and stir and loosen the rice.
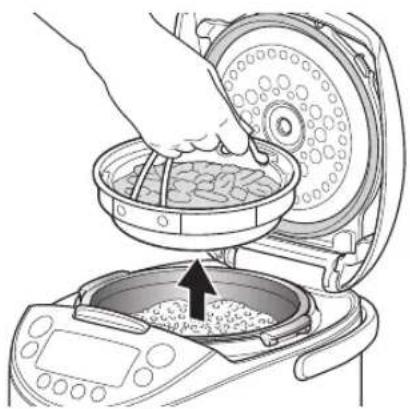
Note
- Do not leave the cooking plate in the rice cooker while the Keep Warm function is on.
- Be careful when removing the cooking plate after cooking, as it will be hot.
- Do not tilt the cooking plate while removing it. The broth, etc., may spill out and result in burns.
- Do not return the cooking plate to the inner pot after removing it.
Doing so may result in the rice spoiling or not being kept warm.
- When cooking with ingredients that release a lot of liquid, oils or fats when heated, or that expand during heating, such as eggs and the like, some of the broth may overflow down into the rice.
Cooking without making rice
1 Add water up to the scale of white rice (1.0 L type: scale 2, 1.8 L type: scale 4), place the cooking plate in the inner pot, and then close the lid.
2 Select the "Slow Cook" menu.
3 Set the desired cooking time. (See p.29.)
Set the cooking time to between 20 and 30 minutes, depending on the type of food being cooked.
4 When cooking is completed, press the [Cancel] key and remove the cooking plate.
When you are done using the rice cooker...
1 Press the [Cancel] key to turn off the Keep Warm function.
The Keep Warm lamp will turn off.

2 Disconnect the power plug from the outlet. (See p.11.)
3 Clean the rice cooker. (See p.36 to 41.)
11
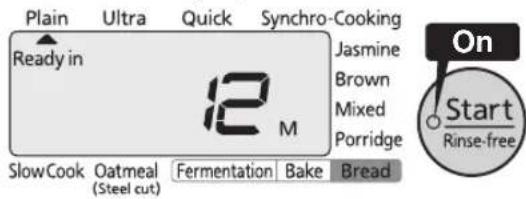
Slow Cooking ("Slow Cook" Menu)
Refer to the supplied "COOKBOOK" for directions.
With this menu, food is first brought to near boiling, the heat is then lowered to about 199^ (93^) and the food left to simmer. The temperature is then lowered even further to about 190^ (88^) and simmering is continued. By gradually lowering the heating temperature in this way, flavors are enhanced and the liquids do not boil down even when heated for a long period of time.
Menu examples
Salmon chowder, yuzu citrus-flavored oden

for how to cook "salmon chowder" and zzu citrus-flavored oden", see the supplied BOOKBOOK".
Note
- Caution should be exercised when making dishes other than those described in the supplied "COOKBOOK", as they may boil over.
- Stir well before cooking to prevent seasonings from settling at the bottom of the inner pot.
- When simmering foods in broth, cool the broth before cooking.
- When thickening with starch, add the starch at the end of cooking.
- Since fish-paste products like "chikuwa" tube-shaped fish paste and "kamaboko" fish paste cake will swell when heated, the amount being used should be adjusted with that in mind.
1 Prepare the ingredients.
2 Add ingredients to the inner pot and close the lid.
Note
- Use the "Plain" scale on the inside of the inner pot as a reference. Using more than the maximum acceptable amount (see the table below) can prevent proper boiling or cause the contents to boil over. Be careful also not to use less than the minimum required amount either, as that can also cause the contents to boil over.
| "Plain" scale |
| 1.0 L type 1.8 L type |
| Maximum Minimum Maximum Minimum |
| 5.5 or below 2 or above 8 or below 3 or above |
3 Connect the power plug to an outlet.
Note
- If the Keep Warm lamp is on, press the [Cancel] key to turn off the lamp.
4 Press the [or] key to select the "Slow Cook" menu.
The symbol will blink while the menu is being selected.
![Tiger JKTS10U - Press the [or] key to select the "Slow Cook" menu. - 1](/content/2026/02/403911/images/4a828ca254d2523f457c2525fab89d6d620db1f7c2b39e43c4eda1453991ba58.jpg)
![Tiger JKTS10U - Press the [or] key to select the "Slow Cook" menu. - 2](/content/2026/02/403911/images/a3d62c191603580658a96a3a84ace65934036711b5bfb6fa026ea710a1a912d7.jpg)
Use the [Hour] and [Min] keys to set the desired cooking time.
![Tiger JKTS10U - Use the [Hour] and [Min] keys to set the desired cooking time. - 1](/content/2026/02/403911/images/3dce25856b090d78e1681667b8441e5d5581ea0bf55238f450cce77dd04cc01a.jpg)
Each time the [Hour] key is pressed, the set time will increase by 5 minutes. Each time the [Min] key is pressed, that time will decrease by 5 minutes.
The cooking time can be set to any 5-minute increment between 5 and 180 minutes.
![Tiger JKTS10U - Use the [Hour] and [Min] keys to set the desired cooking time. - 2](/content/2026/02/403911/images/65242ccde6b3d1a21a55fb8ce667155d2f9ae47b2fb03af5a1a53d428790a2f5.jpg)
6 Press the [Start/Rinse-free] key.
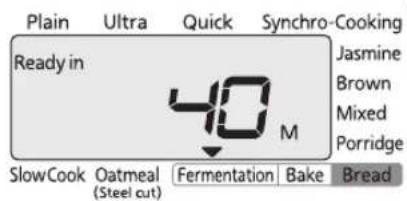
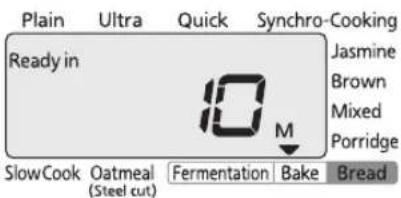
The Start lamp will turn on and cooking will start.
"Ready in" will appear on the display.
![Tiger JKTS10U - Press the [Start/Rinse-free] key. - 1](/content/2026/02/403911/images/e7d938bc2e2b315d67890f2bd8aa88096058b4a45fc2ef82965657440f6ec798.jpg)
![Tiger JKTS10U - Press the [Start/Rinse-free] key. - 2](/content/2026/02/403911/images/3217777ee6da2d4bff92bdc049ebe698cecf0d9916327cf13189a49389cee296.jpg)
Note
- Do not open the lid during cooking.
7 Once cooking is completed, an alarm (8 beeps) will sound (the Start lamp will turn off).
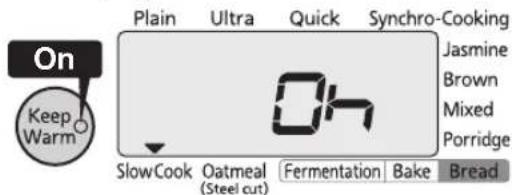
The Keep Warm lamp will turn on and "Oh" will be displayed.
- To simmer the food further, use the [Hour] and [Min] keys to set the additional cooking time and then press the [Start/Rinse-free] key. The cooking time can be extended up to 30 minutes, a maximum of 3 times.
Note
-
When food is not sufficiently cooked, do not press the [Cancel] key before additional cooking. Doing so will cause the Keep Warm lamp to go out and additional cooking will not be possible. If you mistakenly pressed the [Cancel] key, perform the following procedure.
-
Remove the inner pot and set it on a wet towel or cloth.
- Leave the rice cooker lid open and cool down the unit and the inner pot for about 10 minutes.
- Place the inner pot back inside the rice cooker.
- Repeat the procedure from step 4 on p.29.
If you want food that is being kept warm to be piping hot before serving it, press the [Start/
Rinse-free] key when the Keep Warm lamp is on in order to reheat that food. The remaining reheating time will be displayed and an alarm (3 long beeps) will sound when the operation is completed. After reheating, the Keep Warm lamp will turn on and the elapsed Keep Warm time will be displayed.
Once cooking is completed...
1 Press the [Cancel] key to turn off the Keep Warm function.
The Keep Warm lamp will turn off.
![Tiger JKTS10U - Press the [Cancel] key to turn off the Keep Warm function. - 1](/content/2026/02/403911/images/4d76001d9b5d0eae899f30070ae21e618a6244aebac89a538837339df89e09a2.jpg)
2 Remove any odors. (See p.41.)
Note
- If the [Cancel] key is not pressed when cooking is completed, the Keep Warm function will automatically engage and the elapsed Keep Warm time will be displayed in hourly increments from the first hour ("1h") up to 6 hours ("6h") after that. After 6 hours has elapsed, "6h" will blink on the display.
- Do not use the Keep Warm function continuously for more than 6 hours as some foods will lose their taste.
12
How to Bake Bread
"Bread Fermentation" and "Bread Bake" menus)
You can bake bread according to the following procedure. You can also bake other types of bread described in the supplied "COOKBOOK".
Note
- Do not try to bake types of bread other than those described in the supplied "COOKBOOK", as they may not be baked properly.
- Only use dry yeast to leaven the bread.
Ingredients (Measure the ingredients accurately.)
| 1.0 L type (2 to 3 servings) |
| Bread flour............1-1/2 cups (7 oz / 200 g) |
| Dry yeast............1 teaspoon |
| Sugar............1-1/2 teaspoons |
| Salt............1/3 teaspoon |
| Butter............1-1/4 tablespoons |
| Dry skim milk............1-1/3 tablespoons |
| Lukewarm water (Approx. 86°F [30°C])...1/2 cup (130 ml) |
| 1.8 L type (3 to 4 servings) |
| Bread flour............2-1/4 cups (10-1/2 oz / 300 g) |
| Dry yeast............1-1/2 teaspoons |
| Sugar............3 teaspoons |
| Salt............1/2 teaspoon |
| Butter............2 tablespoons |
| Dry skim milk............2 tablespoons |
| Lukewarm water (Approx. 86°F [30°C])...3/4 cup (200 ml) |
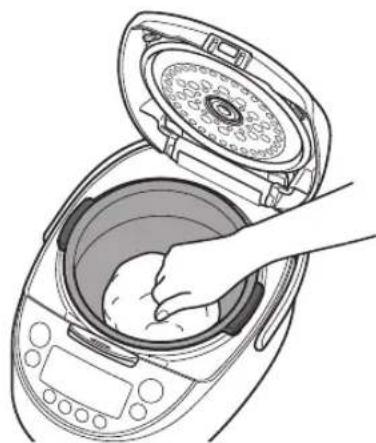
1 Put all the ingredients into a bowl and roll them into a ball.
- Sift the bread flour and soften the butter by warming it at room temperature.
- Put the bread flour into a bowl, and then add the dry skim milk, sugar, and dry yeast in the given order. Add the salt so that it does not directly contact the dry yeast.

- Add the butter and pour lukewarm water over the dry yeast.
- Using a wooden spatula, mix all the ingredients together and roll them into a ball by hand.
2 Place the dough on a counter and knead it for about 20 minutes.
Knead the dough well by stretching it out and folding it over several times.
When the dough is smooth on the outside and can be stretched thinly without tearing, it has been sufficiently kneaded.

3 Roll the dough into a ball and place it in the center of the inner pot.
4 Place the inner pot in the rice cooker.
(1) Be sure to set the pot properly (not set at an angle).
(2) Close the lid.
5 Connect the power plug to an outlet.
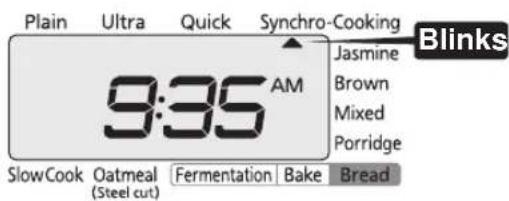
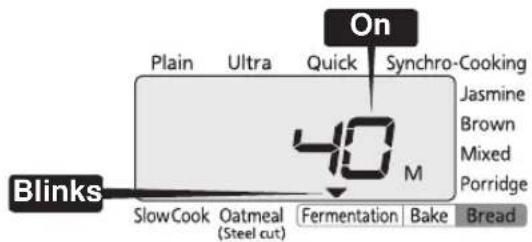
6 Press the [or key to select the "Fermentation"

menu.
The symbol will blink while the menu is being selected.
Leaven the dough (first rise). The default rising time is set to 40 minutes.
To change the rise time from 40 minutes, first select "Fermentation" and set the time using the [Hour] and [Min] keys, and then press the [Start/Rinse-free] key.
Each time the [Hour] key is pressed, the set time will increase by 5 minutes. Each time the [Min] key is pressed, that time will decrease by 5 minutes.
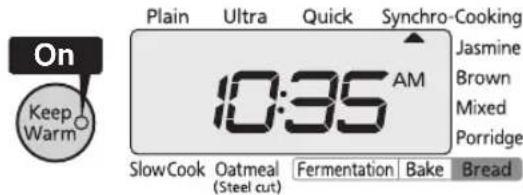
7 Press the [Start/Rinse-free] key.
The Start lamp will turn on and the dough will start to rise.
![Tiger JKTS10U - Press the [Start/Rinse-free] key. - 1](/content/2026/02/403911/images/6253085917dbcbf1e2e93aee86483db1e61e766685b4da6f328619d72f7c6fd5.jpg)
![Tiger JKTS10U - Press the [Start/Rinse-free] key. - 2](/content/2026/02/403911/images/89f9220a8986ded53616ca40ffe9857d0cbe961f09b183948ffcc6eb331cb1e3.jpg)
When the first rise is completed, the Keep Warm lamp and "0" will start blinking on the display, and an alarm (8 beeps) will sound. The Start lamp will turn off.
![Tiger JKTS10U - Press the [Start/Rinse-free] key. - 3](/content/2026/02/403911/images/77803783cbee0647c11519f516205760aacf4ef170f33d63ece565fe1a607e7b.jpg)
8 Open the lid and check that the dough has risen.
In the first rise, the dough grows by 2 to 2.5 times from its original size.
Coat a finger with bread flour and press the center of the dough. If a hole remains, the first rise is complete.

- If the hole disappears, the dough has not yet risen enough. In this case, press the [Hour] key with the Keep Warm lamp blinking, set the additional rise time, and then press the [Start/Rinse-free] key. The cooking time can be extended up to 15 minutes in increments of 5 minutes, a maximum of 3 times.
9 Press the [Cancel] key. The Kean Wamolao will be
The Keep Warm lamp will turn off.
![Tiger JKTS10U - Press the [Cancel] key. The Kean Wamolao will be - 1](/content/2026/02/403911/images/ea093108eaede93ef94c3f310fabaadfea69515fd4436a436486f91ed5af2a8b.jpg)
![Tiger JKTS10U - Press the [Cancel] key. The Kean Wamolao will be - 2](/content/2026/02/403911/images/1f2ba42bc60852b6401943873b10d5046199f2d7101353dbc16e1db58a0d710c.jpg)
10 Slightly press on the dough to release any trapped gas.
11 Roll the dough back into a neatly shaped ball, place it in the center of the inner pot, and then close the lid.


- When the second rise is completed, the dough will have grown by 1.5 to 2 times in size, therefore remember this size.
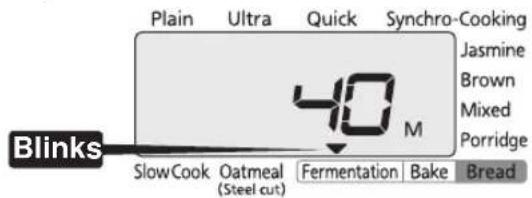
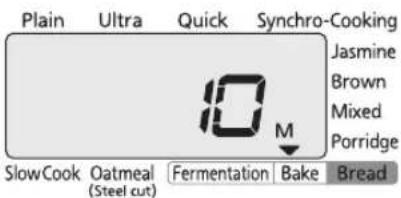
12 Confirm that the "Fermentation" menu is selected.
Confirm that "40" is displayed.
Leaven the dough (second rise).
13 Press the [Start/Rinse-free] key.
The Start lamp will turn on and the dough will start to rise.

When the second rise is completed, the Keep Warm lamp and "0" will start blinking on the display, and an alarm (8 beeps) will sound. The Start lamp will turn off.
14 Open the lid and check that the dough has grown from 1.5 to 2 times its original size after releasing the gas as described in step 11.
15 Close the lid and press the [Cancel] key.
Menu can now be selected. The Keep Warm lamp will turn off.

16 Press the [or] key to select the "Bake" menu.

The symbol will blink while the menu is being selected.
To change the bake time from 40 minutes, first select "Bake" and set the time using the [Hour] and [Min] keys, and then press the [Start/Rinse-free] key.
Each time the [Hour] key is pressed, the set time will increase by 1 minutes. Each time the [Min] key is pressed, that time will decrease by 1 minutes.
17 Press the [Start/Rinse-free] key.
The Start lamp will turn on and baking will start.
![Tiger JKTS10U - Press the [Start/Rinse-free] key. - 1](/content/2026/02/403911/images/72024126be15f6bbd8d52c42201c3ccdd7f784ca7919c499d5026c3f5cf0e1bb.jpg)
![Tiger JKTS10U - Press the [Start/Rinse-free] key. - 2](/content/2026/02/403911/images/d27501a07f313dc5c9dda3541522dc958f76d8f0a810126a07b8703a5fd443dd.jpg)
When the baking is completed, the Keep Warm lamp and "0" on the display will start blinking, and an alarm (8 beeps) will sound. The Start lamp will turn off.
18 Open the lid and poke the center of the bread with a bamboo skewer.
If the bamboo skewer comes out clean, the bread is baked on the inside.
- If dough sticks to the bamboo skewer, press the [Hour] key with the Keep Warm lamp blinking, set the additional bake time, and then press the [Start/Rinse-free] key. The cooking time can be extended up to 15 minutes in increments of 5 minutes, a maximum of 3 times.
Note
-
Do not press the [Cancel] key before additionally baking the bread or darkening the bread crust. Doing so will cause the Keep Warm lamp to go out and additional baking will not be possible. If you have mistakenly pressed the [Cancel] key, perform the following procedure.
-
Remove the inner pot and set it on a wet cloth.
- Leave the rice cooker lid open and cool down the unit and the inner pot for about 10 minutes.
- Place the inner pot back inside the rice cooker.
- Select "Bake" and set the additional bake time, and then bake the bread.
19 Remove the inner pot, and turn it over to take out the bread.
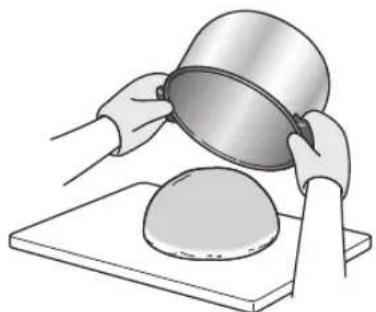
Note
- Wear oven mitts, etc. when removing the inner pot. Be careful not to touch it with your bare hands. Doing so may result in burns.
- Serve the bread as soon as baking is completed. If it is left in the rice cooker, condensation on the inner lid will drip onto the bread, making it sticky.
To darken the crust
To darken the crust of the baked bread, bake it again using the following procedure.
1 Place the bread in the inner pot with the unbaked side of the bread facing down.

Note
- Wear oven mitts, etc. Be careful not to touch the inner pot with your bare hands.
2 Place the inner pot back inside the rice cooker.
3 Press the [Hour] key with the Keep Warm lamp blinking and set the bake time to 10 minutes.

4 Press the [Start/Rinse-free] key.
The Start lamp will turn on.

When the baking is completed, take out the bread according to step 19 on p.34.
Once bread baking is completed...
1 Press the [Cancel] key to turn off the Keep Warm function.
The Keep Warm lamp will turn off.

2 Disconnect the power plug from the outlet. (See p.11.)
3 Remove any odors. (See p.41.)
13 Cleaning and Maintenance
Perform cleaning and maintenance procedures as described on the following p.36 to 41.
Any other servicing should be performed by an authorized service representative.
Clean all parts by hand. Do not use a dishwasher/dryer.
To maintain cleanliness, always clean the rice cooker on the same day it is used. Also clean the rice cooker at regular intervals as well.
The rice cooker should also be cleaned on the day that it is used in order to remove any odors that remain from cooking or bread baking. (See p.41.)
Note
- Be sure to disconnect the power plug and allow the rice cooker, inner pot, inner lid, and steam cap to cool down before cleaning.
- When cleaning the rice cooker with a detergent, use only standard kitchen detergent (for tableware and kitchen utensils).
- Clean with a soft sponge and cloth.
- Rinse the parts thoroughly since detergent constituent remaining on them may result in deterioration and discoloration of part's materials such as resin.
Parts to wash after every use
Inner pot

Cooking plate

Measuring cup

Spatula

Ladle

Inner lid
Clean with a soft sponge and with tap or lukewarm water.
2 Wipe off water with a dry cloth and completely dry all parts.
Note
- Do not clean the inner pot with the abrasive side of a heavy-duty scrub sponge. Doing so may damage the fluorocarbon resin coating.
Do not use the abrasive side of a heavy-duty scrub sponge.
- Do not wash dishes, etc., inside the inner pot. Also, do not place the inner pot upside down on top of dishes, etc., to dry. Doing so may damage the fluorocarbon resin coating or cause it to peel.

| Steam cap (Can be disassembled into two parts. See p.40 to 41.) | Lid | These parts can be washed under running water. 1 Clean with a sponge using tap or lukewarm water. 2 Wipe off water with a dry cloth and completely dry all parts. Note ·Do not wash parts in the following manners as they can cause those parts to become deformed. ·Washing with hot water ·Soaking ·Washing the hot inner pot with running water immediately after cooking rice ·Always wash the steam cap after cooking with grains (amaranths, etc.). The steam cap may clog and cause problems, like preventing the lid from opening, resulting in improperly cooked food. |
Parts to wash when dirty
| Inside and outside the rice cooker Wet a towel or cloth, wring out excess water, and wipe. Center sensor Remove burned rice and any other adhering grains of rice. If adhering objects are hard to remove, use commercially available sandpaper (around #320), then wet a towel or cloth, wring out excess water, and wipe. Around the upper casing and open/lock button Remove any adhering grains of rice, etc. Note ·Do not allow water to get inside the rice cooker unit. ·Do not immerse the power cord in or splash it with water. Doing so may result in short-circuiting or electric shock. | |
| Power cord and plug | Wipe with a dry cloth. |
Note
- Always keep the inner pot and lid clean to prevent corrosion and odors.
- Do not clean the rice cooker or its parts with thinner, cleanser, bleach, disposable cloth, metal spatulas, nylon scouring sponges or the like.
-
Always clean each part separately.
-
Do not immerse the steam cap, measuring cup, spatula or ladle in hot water. Doing so may cause them to become deformed.
- Do not use a dishwasher/dryer to clean the rice cooker or its parts. Doing so may cause them to become deformed.
- When cleaning the rice cooker with a detergent, do not use alkaline kitchen detergent.
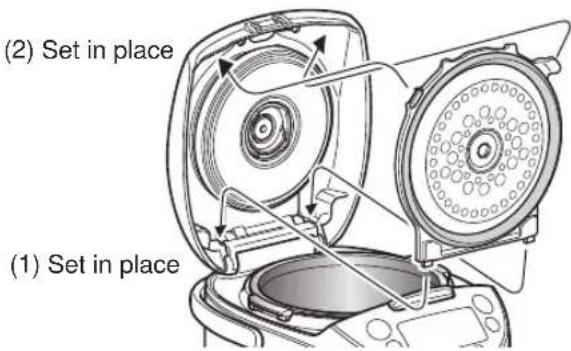
Removing and attaching the inner lid
■ Removing the inner lid
Push down and pull the inner lid levers to the front to detach.

- Attaching the inner lid
Set the inner lid securely in the lid as shown in the figure below.

Note
- Do not pull the lid gasket.
Once it is detached, it cannot be reattached. If the lid gasket is detached, contact the place of purchase.

Removing and attaching the lid
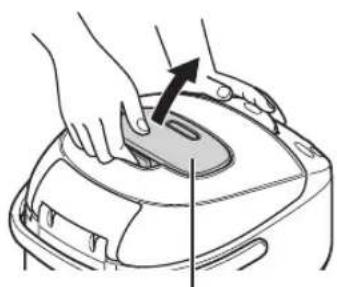
Remove the steam cap, and then fully open the lid and pull it upwards.
1 Remove the inner lid.
2 Remove the lid as shown in the figure below.
To attach it, reverse the above steps.

Note
- As the heat sink is extremely hot immediately after use, wait until the lid has been cooled enough before removing it.
Removing and attaching the steam cap
Removing the steam cap
1 Insert your finger into the hole in the lid and lift the steam cap upward.
Steam cap
Note
- Be careful of the hot steam contained in the steam cap immediately after cooking.
2 Flip the steam cap over and remove the cap lid as shown in the figure below.
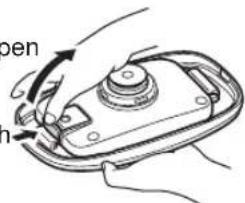
(2) Open
(1)Push

This part is not removable; do not attempt to remove it.

(3) Remove
- Attaching the steam cap
1 Hook the cap lid onto the cap.

2 Push the lid until you can here it clicks.

3 Attach the cap lid securely onto the cap body.
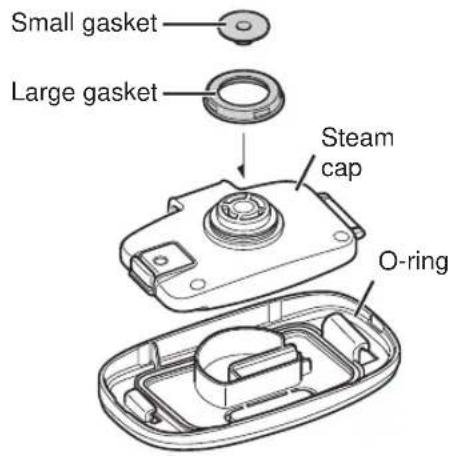
■ Installing the steam cap gaskets
Set the gaskets securely onto the steam cap as shown in the figure below. If the gaskets are not set securely, they can become loose and this may result in problems due to steam leaking out, etc.
Note
- Do not remove the O-ring. If it is removed, set it back in place securely.
If it is difficult to attach, slightly moisten the O-ring with water to make it easier to attach.
Removing odors (When odors remain in the rice cooker and/or cooking plate)
The following procedure should be performed each time after cooking, or if odors become bothersome.
Note
- Be careful of the hot inner pot, cooking plate, and rice cooker after cleaning. Touching them may result in burns.
Rice cooker
Do not place the cooking plate inside the inner pot.
1 Fill the inner pot to about 70 to 80% with water, select the "Plain" menu and press the [Start/Rinse-free] key. Confirm that the Keep Warm lamp is on and press the [Cancel] key.
Note
- If odors become bothersome, use about 0.71 oz (20 g) of citric acid added to the water for more effective deodorizing.
It may be impossible to remove some odors completely. In this case, contact the place of purchase.
2 Wash the inner pot, inner lid, and steam cap with a standard kitchen detergent, and then rinse sufficiently with water.
3 Allow the rice cooker and all parts to dry in a well-ventilated location.
Cooking plate
Immerse the cooking plate in hot water and allow it to soak for about 1 hour.
14 If Rice Does Not Cook Properly
Check the following points if you experience a problem with the cooked rice or with the operation of the rice cooker, etc.
| Problem\Check point | Is too hard···········································································································································································································. Is too soft·····································································································································································································. Is not cooked completely | ··· | ||||||||||
| Has a hard center······································································································································································································ | ······ | |||||||||||
| Is burned····································································································································································································· | ||||||||||||
| During cooking | Steam leaks······ | |||||||||||
| Boils over······ | ||||||||||||
| The cooking time is excessively long | ······ | ··· | ||||||||||
| Reference page | 14-16, 49 | 49-- | 18-20 | 16, 36-41 | -20 | 49 | ||||||
| Problem\Check point | Is too hard | ● | ● | ● | ● | ● | ||||||||
| Is too soft | ● | ● | ● | ● | ● | ● | ● | ● | ● | |||||
| Is not cooked completely | ● | ● | ● | |||||||||||
| Has a hard center | ● | ● | ● | ● | ||||||||||
| Is burned | ● | ● | ● | ● | ● | |||||||||
| Smells like rice bran | ● | |||||||||||||
| Cooked rice | Steam leaks | ● | ● | ● | ||||||||||
| Boils over | ● | ● | ● | ● | ||||||||||
| The cooking time is excessively long | ● | |||||||||||||
| Reference page | 16,36-41 | 14, 16 | 16 - | - | 17,36-41 | 14 - | - | 36-41 | ||||||
| Problem Cause | |
| There is a thin film covering the rice. | A thin, tissue-like film is formed by melted and dried starch. This is not harmful to your health. |
| Rice sticks to the inner pot. Soft rice and sticky rice can easily stick to the pot. | |
| Was there a prolonged power outage? | |||||||||
| Problem | Check point | Was the amount of rice and water correct? | Was the water stirred? | Were there any grains of burned rice on the outside bottom of the inner pot or the center sensor? | Were there any grains of gaskets, the brim of the inner pot, or the inner lid, etc.? | Were there any grains of rice adhering to gaskets, the brim of the inner pot, or the inner lid, etc.? | Was the rice stirred and loosened well? | Was the rice (other than rinse-free rice) washed sufficiently? | Was the rice (other than rinse-free rice) washed sufficiently? |
| Has an odor | |||||||||
| Is discolored | |||||||||
| Is dry | |||||||||
| Is sticky | |||||||||
| Reheated rice is dry | |||||||||
| Reference page | 14-16, 49 | 16, 36-41 | 20 | 16, 36-41 | 14, 16 | 25 | 23 | 24 | 49 |
| Problem\Check point | Has an odor | ● | ● | ● | ● | ● | ● | ||
| Is discolored | ● | ● | ● | ● | ● | ||||
| Is dry | ● | ● | ● | ● | ● | ||||
| Is sticky | ● | ● | ● | ● | |||||
| Reheated rice is dry | ● | ● | |||||||
| Reference page | 24 | 24, 25 | - | 24 | 24 | 36-41 | 25 | 30, 35, 41 |
Check the following points when you experience a problem with food cooked concurrently using the cooking plate.
| Problem\Check point | Were more ingredients and seasonings used than indicated in the "COOKBOOK"? | Were the ingredients arranged unevenly in the cooking plate? | Were the ingredients arranged unevenly in the cooking plate? | Were more than the acceptable maximum or less than the minimum required amounts used? | Was a menu other than "Synchrono-Cooking" used? | Was a menu other than "Synchrono-Cooking" used? | Was a menu other than "Synchrono-Cooking" used? | Was a menu other than "Synchrono-Cooking" used? | |
| Cooked rice | Is too hard······ | ||||||||
| Is too soft······ | |||||||||
| Is not cooked completely | ······ | ||||||||
| Has a hard center··· | |||||||||
| Is burned······ | |||||||||
| Has an odor······ | |||||||||
| Is sticky······ | |||||||||
| Cooked food | Is too hard······ | ||||||||
| Is too soft······ | |||||||||
| Is not fully heated··· | ······ | ||||||||
| Overflows into the rice | ······ | ||||||||
| During cooking | Steam leaks······ | ||||||||
| Boils over······ | |||||||||
| The cooking time is excessively long | ······ | ||||||||
| Reference page - 27 | 27- | -49 | |||||||
Check the following points if you experience a problem with the cooked food, leavened dough, or baked bread, etc.
| Reference page | Check point | |||||||||||||||||||
| Sticky on outside | Unvenbrowning on | Wrinkled | Smells | Sticks | Does not brown on | Does not brown on | Sticks to inner lid(rose too much) | Sticks uncooked(12) | Sticky inside(Bread) | Coarse grain and dry | Small and hard | Is sticky | Is sticky | Rose too much | Rise enough | Does not rise/Did not | Bolts down | Bolts over | Does not boll | |
| Bolts down | Bolts over | Bolts over | ||||||||||||||||||
| Bolts down | Bolts over | Bolts over | ||||||||||||||||||
| Bolts down | Bolts over | Bolts over | ||||||||||||||||||
| Bolts down | Bolts over | BOLTS | ||||||||||||||||||
| Bolts down | Bolts over | Bolts over | ||||||||||||||||||
| Bolts down | Bolts over | Bolts over | ||||||||||||||||||
| Bolts down | Bolts over | Bols | ||||||||||||||||||
| Bolts down | Bolts over | Bolts over | ||||||||||||||||||
| Bolts down | Bolts over | Bolts over | ||||||||||||||||||
| Bolts down | Bolts over | Bbolts | ||||||||||||||||||
| Bolts down | Bolts over | Bolts over | ||||||||||||||||||
| Bolts down | Bolts over | Bolts over | ||||||||||||||||||
| Bolts down | Bolts over | Bb | ||||||||||||||||||
| Bolts down | Bolts over | Bolts over | ||||||||||||||||||
| Bolts down | Bolts over | Bolts over | ||||||||||||||||||
| Bolts down | Bolts over | B | ||||||||||||||||||
| Bolts down | Bolts over | B | ||||||||||||||||||
| Bolts down | Bolts over | B | ||||||||||||||||||
| Bolts down | Bolts over | B | ||||||||||||||||||
*1 Dough does not rise enough if its temperature is low, the wrong ingredients or proportions are used, or the rising time is too short. *2 Dough rises too much if its temperature is high, the wrong ingredients or proportions are used, or the rising time is too long.
Check the following before requesting repair service.
| Symptom Check point Action | Reference page | ||
| The rice have not been cooked. The food has not been cooked. | Is the power plug properly connected to an outlet? | Insert the power plug fully into an outlet. | 17 |
| Rice was not cooked completely by the preset time. | Does the display show the correct present time? | Set the correct present time. | 48 |
| Check "The cooking time is excessively long" under "If Rice Does Not Cook Properly" and take the necessary action. | 42 | ||
| The Timer function cannot be set. Does the display show the correct present time? | Set the correct present time. | 48 | |
| Is "0:00" blinking on the display? Set the present time. | |||
| Was the "Quick", "Synchro-Cooking", "Mixed", "Bread", or "Slow Cook" menu selected? | The Timer function is not available under those menus. | 23 | |
| Was an unacceptable time set? Set a time that is acceptable under the Timer function. | |||
| The display is blurred. Are there any grains of burned rice or any other remaining grains of rice adhering to gaskets or the brim of the inner pot? | Completely remove all remaining rice. | 16, 36-41 | |
| Is the outer surface of the inner pot wet? | Wipe with a dry cloth. | ||
| Reheating is disabled. An alarm (3 beeps) will sound if you press the [Start/Rinse-free] key. | The rice is cold. Rice of below approximately 131°F (55°C) cannot be reheated. | 25 | |
| Is the Keep Warm lamp off? Press the [Keep Warm] key and check that the Keep Warm lamp lights up. Then, press the [Start/Rinse-free] key again. | 23 | ||
| Sound is heard during cooking, reheating, or when the Keep Warm function is on. | Do you hear a humming sound? The fan is operating. It is not a malfunction. | 12 | |
| Do you hear a buzzing or twittering sound? | The IH is operating. It is not a malfunction. | ||
| Do you hear a completely different sound from the above? | Contact the place of purchase. | - | |
| An alarm (3 beeps) will sound if you press the [Start/Rinse-free] or [Keep warm] key. | Is the inner pot set in the rice cooker? | Set the inner pot in the rice cooker. | 17 |
| An alarm (3 beeps) sounds when the Timer function is set. | An alarm will sound if you do not operate the rice cooker within about 30 seconds after pressing the [Timer] key. Continue setting the Timer function. | 23 | |
| Water or rice has gotten inside the rice cooker unit. | Water or rice inside the rice cooker unit may cause problems. Contact the place of purchase. | - | |
| When setting the present time, pressing the [Hour] or [Min] key does not access the time setting mode. | The time cannot be set during cooking, when the Keep Warm function is on, when the Timer function is in use, or during reheating. 48 | ||
| The Keep Warm lamp is blinking. Was "Oatmeal" or "Bread" menu set? | Oatmeal can become pasty or bread can become sticky if they are left in the rice cooker. Serve them as soon as possible. | 21 | |
| The elapsed Keep Warm time blinks on the display when the [Hour] key is pressed while the Keep Warm function is on. | Was the Keep Warm function used continuously for more than 24 hours? | The elapsed Keep Warm time will blink on the display when the Keep Warm function has been on for more than 24 hours. | 24 |
| Was the Keep Warm function used continuously for more than 6 hours under the "Slow Cook" menu? | The elapsed Keep Warm time will blink on the display when the Keep Warm function has been on for more than 6 hours. | 30 | |
| The present time, preset timer settings, and elapsed Keep Warm time are lost when the power plug is disconnected. | Does “0:00” blink on the display when the power plug is connected again? | The lithium battery has run out.Contact the place of purchase. | 12 |
| The lid will not open, or it opens during cooking. | Are there any grains of rice adhering to the upper casing, inner lid gasket, or around the open/lock button? | Completely remove all remaining rice. | 16,36-41 |
| Nothing happens when a key is pressed. | Is the power plug properly connected to an outlet? | Insert the power plug fully into an outlet. | 17 |
| Is the Keep Warm lamp on? Press the [Cancel] key to turn off the Keep Warm function, then try the operation again. | 17 | ||
| Sparks fly from the power plug. | Inserting/disconnecting the power plug may sometimes cause small electric sparks. This is specific to the IH feature and therefore not a malfunction. | - | |
| There is a smell of plastic. | Such smells may occur when the rice cooker is first used, but they should go away over time as the rice cooker gets used. | - | |
| There are stripes or waves on plastic parts. | Such stripes and waves are produced when the resin is being molded. They do not affect the performance of the rice cooker. | - | |
| Bubbles can be seen coming from the steam vent of the steam cap during cooking. | It is due to boiling and therefore not a malfunction. | - | |
| The lid cannot be closed. Is the inner lid attached? Attach the inner lid. 38 | |||
| Food adheres to the inner lid during concurrent cooking. | When cooking with ingredients that expand during heating, such as eggs and the like, some of that may adhere to the inner lid. If it is bothersome, reduce the amount of the ingredients. | - | |
If these indications appear
| Display Action | Reference page |
| “Err” appears on the display and a long-lasting or continuous beeping alarm sounds. Plain Ultra Quick Synchro-Cooking Jasmine Brown Mixed Porridge SlowCook Oatmeal Fermentation Bake Bread | If the rice cooker is placed on the carpet or where the room temperature is high, the air inlet and outlet can be blocked, causing the temperature inside to rise. In this case, the rice cooker may not respond to any key operations. Resolve the problem according to the following procedure. (1) Disconnect the power plug. (2) Relocate the rice cooker to where the air inlet and outlet are not blocked and the room temperature is low. (3) Insert the power plug into the outlet again and operate the keys. If the rice cooker does not respond to key operations, it is a malfunction of the rice cooker. Disconnect the power plug and contact the place of purchase. |
Plastic parts
Plastic parts that come into contact with heat or steam will deteriorate over time. In this case, contact the place of purchase.
Setting the present time
The present time is displayed in a 12-hour format.
The time cannot be set during cooking, when the Keep Warm function is on, when the Timer function is in use, or during reheating.
Example: Changing the present time from "9:30" to "9:35"
1 Connect the power plug to an outlet.
2 Display the time setting mode.
Press the [Hour] or [Min] key to display

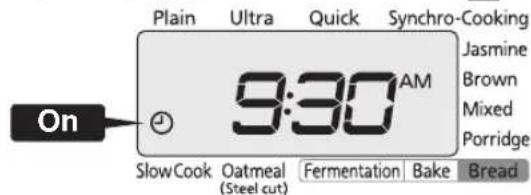
3 Set the present time. Hour Min Set the hour with the [Hour] key and the minute with the [Min] key. Hold down the corresponding key to change the time more rapidly.
4 Once you are finished setting the time, press the [key.

The present time is set.
will go out and “:” will blink on the display.
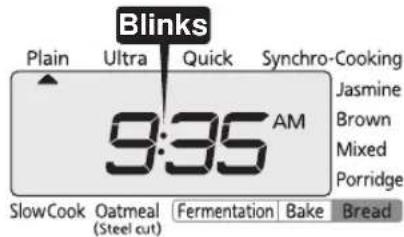
Note
- The present time setting may vary about 30 to 120 seconds a month from the actual time depending on room temperature and the conditions of use.
Specifications
| Unit size 1.0 L (5.5-cup) type 1.8 L | (10-cup) type | ||
| Power source 120 V, 60 Hz | |||
| Rated power (W) 1,080 1,198 | |||
| Cooking capacity (L) | Plain 0.18 to 1.0 | (1 to 5.5 cups [5.29 to 29.10 oz]) | 0.36 to 1.8 (2 to 10 cups [10.58 to 52.91 oz]) |
| Ultra 0.18 to 1.0 | (1 to 5.5 cups [5.29 to 29.10 oz]) | 0.36 to 1.8 (2 to 10 cups [10.58 to 52.91 oz]) | |
| Quick 0.18 to 1.0 | (1 to 5.5 cups [5.29 to 29.10 oz]) | 0.36 to 1.8 (2 to 10 cups [10.58 to 52.91 oz]) | |
| Synchro-Cooking 0.18 to 0.36 | (1 to 2 cups [5.29 to 10.58 oz]) | 0.36 to 0.72 (2 to 4 cups [10.58 to 21.16 oz]) | |
| Jasmine 0.18 to 1.0 | (1 to 5.5 cups [5.29 to 29.10 oz]) | 0.36 to 1.8 (2 to 10 cups [10.58 to 52.91 oz]) | |
| Brown 0.18 to 0.63 | (1 to 3.5 cups [5.29 to 18.52 oz]) | 0.36 to 1.08 (2 to 6 cups [10.58 to 31.74 oz]) | |
| Mixed 0.18 to 0.72 | (1 to 4 cups [5.29 to 21.16 oz]) | 0.36 to 1.08 (2 to 6 cups [10.58 to 31.74 oz]) | |
| Sweet 0.18 to 0.54 | (1 to 3 cups [5.29 to 15.87 oz]) | 0.36 to 0.9 (2 to 5 cups [10.58 to 26.48 oz]) | |
| Porridge Hard | 0.09 to 0.18 (0.5 to 1 cup [2.65 to 5.29 oz]) | 0.09 to 0.36 (0.5 to 2 cups [2.65 to 10.58 oz]) | |
| Soft | 0.09 (0.5 cups [2.65 oz]) | 0.09 to 0.27 (0.5 to 1.5 cups [2.65 to 7.94 oz]) | |
| Oatmeal (Steel cut) | 0.18 to 0.45 (1 to 2.5 cups [5.29 to 13.23 oz]) | 0.18 to 0.54 (1 to 3 cups [5.29 to 15.87 oz]) | |
| Maximum amount of bread (oz) | Bread flour: 7.05 (200 g) | Bread flour: 10.58 (300 g) | |
| Outside dimensions (inch) | Width | 10.2 (26.0 cm) | 11.3 (28.8 cm) |
| Depth | 13.9 (35.4 cm) | 15.2 (38.6 cm) | |
| Height | 8.4 (21.3 cm) | 9.8 (25.0 cm) | |
| Weight (oz) | 158.7 (4.5 kg) | 201.0 (5.7 kg) | |
Note
- One cup of white rice is about 5.29 oz (150 g).
In case of a power outage
If a power outage does occur, the rice cooker will resume its normal functions once power is restored.
| State when power outage occurs | Once power is restored |
| While the Timer function is set | The timer will resume operation. (If the power outage lasts for an extended period of time and the preset time has passed when power is restored, the rice cooker will immediately begin cooking.) |
| During cooking (reheating) | The rice cooker will resume cooking (reheating). Cooking may not be completed properly. |
| While the Keep Warm function is on | The Keep Warm function is cancelled in case of a power outage for over 30 minutes. |
Purchasing consumables and optional accessories
Gaskets will need replacing over time. Though the amount of wear will vary according to conditions of use, gaskets will wear down as they are used. For stubborn dirt, odors, or serious damage, contact the place of purchase.
The inner pot's fluorocarbon resin coating may wear and peel with extended use. (See p.10.)
Table des matieres
Touche [Start/Rinse-free]
| Quantité de gruau | Cuisur de 1,0 L | Cuisur de 1,8 L |
| 1,0 tasse 3,0 | tasses 3,5 tasses | |
| 1,5 tasses 4,5 | tasses 4,5 tasses | |
| 2,0 tasses 5,0 | tasses 5,0 tasses | |
| 2,5 tasses 5,5 | tasses 6,5 tasses | |
| 3,0 tasses - | 7,0 tasses |
Specifications techniques
신체가부자유스려운 사配偶이내 사용방CPP 言Confidently, you should be aware that the use of this property may not be appropriate for your specific situation.
JiJiJiJiJiJiJiJiJiJiJiJi

前回内容之同在,

| ).[5] | [1] | [2] |
| "Plain" of the [3] | "Plain" of the [4] | |
| "Jasmine" of the [5] | "Jasmine" of the [6] | |
| Brown | "Brown" of the [7] | |
| Porridge | [8] |
6 Oetlil J (Oatmeal"
OoTm(sTt)
1 内含在鸟和Otetil和歌上
- 原式:
| 1.0LTKIN 1.8LTKIN |
| 1.0~2.5cm 1.0~3.0cm |
·默的上用大一国中
| 류사류 1.0 | 타워 1.8L 키�� | |
| 1.0 썸 3.0 | ège 3.5 썸 | |
| 1.5 썸 4.5 | ège 4.5 썸 | |
| 2.0 썸 5.0 | ège 5.0 썸 | |
| 2.5 썸 5.5 | ège 6.5 썸 | |
| 3.0 썸 - | 7.0 썸 |
2 2 P.150
3 [←][→]버닝을 흦로고 [Oatmeal(Steel cut)]을선棄해내다
![Tiger JKTS10U - [←][→]버닝을 흦로고 [Oatmeal(Steel cut)]을선棄해내다 - 1](/content/2026/02/403911/images/98b4d597b1c8322476b54c49f6cc8249f6e6b295c8216b60edbb137f1dc93ed8.jpg)
4 [Start/Rinse-free]버류을 1遍 퍼름내다
·末期可到者在单击后,
![Tiger JKTS10U - [Start/Rinse-free]버류을 1遍 퍼름내다 - 1](/content/2026/02/403911/images/e21f8079591938e3c101b6e151204b9755ed1d0ad7b810fd27913009954580ae.jpg)
「」」有之,如古人,言其言者,皆自言。
5 副立到用「」的上之有8句上
把运澳元加,当默加,丰自用,是
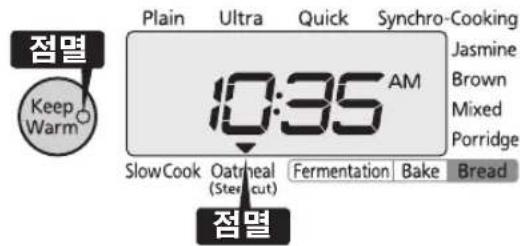
6 6
·本运是的,自之,归或动默贝
敲击音用i 转n
BouLEmPfKa SuDmDnNiTa

2 核苷酸、脱氧族苷酸、DNA
3 3
7 崩사에어kestार機能
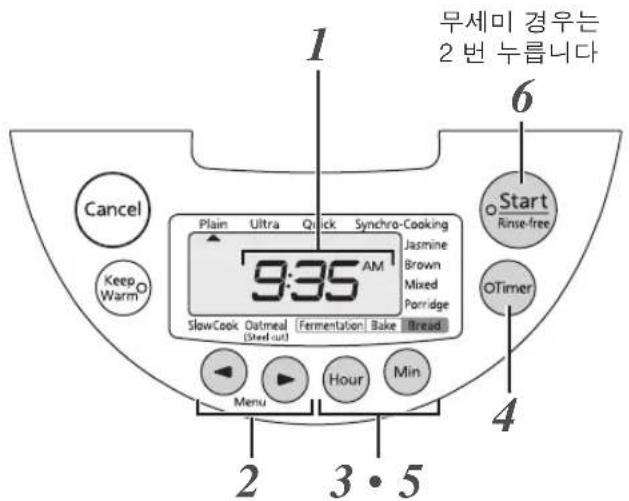
BouLEmPfKa SuDmDnNiTa

2 2
Note
12 “Bread Fermentation" "Bread Bake"
aRcKoKooK
Note
BouLEmPfKa SuDmDnNiTa

2 核苷酸序列的种类 2
3 3
13 金句
P.168 172 3
4 [Start/Rinse-free] + - 100000000000000000000000000000000000000000000000000000000000000000000000000
炊飯拉蒙加点灯」。
![Tiger JKTS10U - [Start/Rinse-free] + - 100000000000000000000000000000000000000000000000000000000000000000000000000 - 1](/content/2026/02/403911/images/864efa0c83682e0f250b06542f6e1ac294e0ba4080b5a66719cdeb69b0122c6c.jpg)
![Tiger JKTS10U - [Start/Rinse-free] + - 100000000000000000000000000000000000000000000000000000000000000000000000000 - 2](/content/2026/02/403911/images/6d0c72c2179679bc151cc6d74ed589e444f6a5f3d563db80f0435d93905e8053.jpg)
SHTIUMJHAPsPbehul、taiKoKofoafofofofofofofofofofofofofofofofofofofofofofofofofofofofofofofofofofofofofofofofofofofofofofofofofofofofofofofofofofofofofofofofofofofofofofo
1 内心力をはす
2 2.
取のは、取ははしの逆手順。

Note
Declaration of Conformity
Model Number: JKT-S10U, JKT-S18U
Trade Name: TIGER
Responsible party: Japan Tiger Corporation of U.S.A.
Address: 2730 Monterey Street Suite 105 Torrance, CA 90503
Phone: (310) 787-1985
The device complies with part 18 of the FCC Rules.
This ISM device complies with Canadian ICES-001.
For the United States and Canada
U.S.A. 1-866-55-TIGER (84437)
Canada 1-866-9090-TCD (823)
URL: http://www.japantigercorp.com
For All Other Countries
Please contact the nearest Tiger Customer Service in your area, or the dealer where the original purchase was made.

TIGER
TIGER CORPORATION