JAXT18U - Rice cooker Tiger - Free user manual and instructions
Find the device manual for free JAXT18U Tiger in PDF.
Frequently Asked Questions - JAXT18U Tiger
User questions about JAXT18U Tiger
0 question about this device. Answer the ones you know or ask your own.
Ask a new question about this device
Download the instructions for your Rice cooker in PDF format for free! Find your manual JAXT18U - Tiger and take your electronic device back in hand. On this page are published all the documents necessary for the use of your device. JAXT18U by Tiger.
USER MANUAL JAXT18U Tiger
Electric Rice Cooker
OPERATING INSTRUCTIONS
Thank you for purchasing this TIGER rice cooker/warmer. Please read these instructions carefully before use and observe them during use.
When using electrical appliances, the following basic safety precautions should always be followed.
- Read all instructions.
- Do not touch hot surfaces. Use handles or knobs.
- To protect against electrical shock, do not immerse cord or plugs in water or other liquid.
- Close supervision is necessary when any appliance is used by or near children.
- Unplug from outlet when not in use and before cleaning. Allow to cool before putting on or taking off parts.
- Do not operate any appliance with a damaged cord or plug, after the appliance has malfunctioned, or has been damaged in any manner. Return appliance to the nearest authorized service facility for examination, repair, or adjustment.
- The use of accessory attachments not recommended by the appliance manufacturer may cause injuries.
- Do not use outdoors.
- Do not let cord hang over edge of table or counter, or touch hot surfaces.
- Do not place the rice cooker on or near a hot gas or electric burner, or in a heated oven.
- Extreme caution must be used when moving an appliance containing hot oil or other hot liquids.
- To disconnect, turn any control to "off", then remove plug from wall outlet.
- Do not use the rice cooker for other than intended use.
SAVE THESE INSTRUCTIONS
Servicing should be performed by an authorized service representative. This rice cooker is intended for household use.
A short power supply cord is provided to reduce the risk of becoming entangled in or tripping over a longer cord. Extension cords may be used if care is exercised in their use. If an extension cord is to be used: (1) the marked electrical rating of the extension cord should be at least as great as the electrical rating of the appliance; (2) if the appliance is of the grounded type, the extension cord should be a grounding-type 3-wire cord; and (3) the cord should be arranged so that it will not drape over the countertop or tabletop where it can be pulled down by children or tripped over accidentally.
The following instructions are applicable to 120V only:
This appliance has a polarized plug (one blade is wider than the other). To reduce the risk of electrical shock, this plug is intended to fit into a polarized outlet in only one way. If the plug does not fit fully into the outlet, reverse the plug. If it still does not fit, contact a qualified electrician. Do not attempt to defeat this safety feature.
The appliance is not intended for use by young children or disabled persons without supervision. Ensure that young children do not play with the rice cooker.
GARANTIES DE SECURITE IMPORTANTES
1 Safety Instructions 6
2 Names and Functions of Component Parts 11
Menu options and features 13
Tips on making delicious rice 14
3 Before Cooking Rice. 16
4 How to Cook Rice 18
Cooking time guidelines 19
5 Once the Rice Is Done Cooking 20
6 Setting the Timer 21
7 Keeping the Rice Warm 23
8 Reheating Cooked Rice 24
9 Cooking Rice and Side Dishes Together ("Synchro-Cooking" Menu) 25
10 Slow Cooking ("Slow Cook" Menu) 27
11 Steaming Food ("Steam" Menu) 29
12 Cleaning and Maintenance 32
13 If Rice Does Not Cook Properly 38
14 If Synchro-Cooking Does Not Go As Expected 40
15 If Slow Cooking Does Not Go As Expected 41
16 Troubleshooting 42
If these indications appear 43
Setting the present time 44
Specifications 45
In case of a power outage 45
Purchasing consumables and optional accessories 45
1 Safety Instructions
Read and follow all safety instructions before using the rice cooker.
- The precautions described here are intended to protect the user and other individuals from physical harm and to safeguard against damage to property. Be sure to follow the instructions since they are important safeguards.
- Do not remove any safety labels attached to the rice cooker.
Safety instructions are classified and described as shown below, according to the level of harm and damage caused by improper use that results from ignoring instructions.
Warning
This warning sign indicates that "There is a possibility of death or serious injury" if the rice cooker is handled improperly.
Caution
This caution sign indicates that "There is a possibility of personal injury" or damage to property if the rice cooker is handled improperly.
1 "Serious injury" here refers to loss of sight, injuries, burns (high-or low-temperature burns), electric shocks, broken bones, poisoning, and other medical conditions, which may result in aftereffects and/or which require hospitalization or long-term outpatient care.
2 "Injury" here refers to physical injuries, burns, or electric shocks which do not require hospitalization or long-term outpatient care.
*3 "Damage to property" here refers to extended damage to buildings, household effects, domestic animals, pets, etc.
Description of symbols used

The symbol indicates a warning or caution. The specific details of the warning or caution are indicated inside the symbol or in an illustration or text near the symbol.

The Symbol indicates a prohibited action. The specific details of the prohibited action are indicated inside the symbol or in an illustration or text near the symbol.

The symbol indicates an action that must be taken or an instruction that must be followed. The specific details of the action or instruction are indicated inside the symbol or in an illustration or text near the symbol.

Warning
General safety precautions

Do not modify the rice cooker. Disassembly or repair should only be performed by a qualified service representative.
Modifying the rice cooker yourself in any way may result in fire, electric shock, or injury.

Stop using the rice cooker immediately in the event of trouble. Failure to do so may result in fire, electric shock, or injury. Examples of trouble:
The power cord or plug becomes abnormally hot during use.
Smoke is emitted from the rice cooker or a burning odor is detected.
The rice cooker is cracked, or there are loose or rattling parts.
The inner pot is deformed.
There are other problems or abnormalities.
Immediately disconnect the power plug from the outlet and contact the place of purchase for inspection and repair.
Warning
Who should use the rice cooker

Do not allow children to use the rice cooker unsupervised. Keep out of reach of infants.
Unsupervised use by children or infants may result in burns, electric shock, or injury.

This rice cooker is not intended for use by persons with physical difficulties or lack of adequate knowledge of its proper use.
A person with sufficient knowledge should always be present to confirm the appropriate use of the rice cooker. Inappropriate use may result in burns, electric shock, or injury.
Using the rice cooker

Do not use the rice cooker in any ways not specifically covered in this instruction manual (and the supplied "COOKBOOK").
Doing so may enable steam or the contents of the rice cooker to spray out, resulting in burns or other injury. Examples of procedures that should not be performed:
Heating ingredients or seasoning inside of plastic bags, etc.
Using a cooking sheet or other utensil to cover food in the rice cooker
Power supply

Use only 120 V AC power.
Use of any other power source may result in fire or electric shock.

Use an independent outlet rated for 15 A or higher.
Connecting other instruments to the same outlet may cause the branch socket to overheat, resulting in fire.
Power cord and plug

Do not use a damaged power cord. Also, be careful not to damage the power cord yourself.
Do not modify, forcibly bend, pull, twist, or bundle the cord. Do not expose it to heat. Do not rest anything heavy on the power cord or sandwich it between any objects.) Doing so may result in fire or electric shock.

Clean the power plug if it is dirty.
Failure to do so may result in fire.

Insert the power plug fully into the outlet.
Failure to do so may result in electric shock, short-circuiting, smoke, or fire.

Do not use the rice cooker if there is any damage to the power cord or plug, or if the plug cannot be securely inserted into the outlet.
Doing so may result in electric shock, short-circuiting, or fire.

Do not connect or disconnect the power plug with wet hands.
Doing so may result in electric shock or injury.

Do not expose the power plug to steam.
Doing so may result in electric shock or fire. When using the rice cooker on a sliding tabletop, position the cooker so that the power plug is not exposed to the emitted steam.
Warning
Handling the rice cooker

Do not immerse the rice cooker in or splash it with water.
Doing so may result in short-circuiting or electric shock.

Do not insert pins, needles, or other metal objects, etc., into gaps between parts.
Doing so may result in electric shock or in injury due to malfunction.
Starting to cook

Do not use the cooking plate without the inner pot.
Doing so may result in fire, smoke, or burns.
During and after cooking

Never open the lid during cooking.1 Doing so may result in burns.

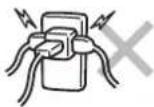
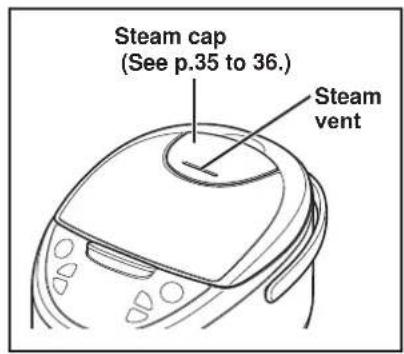
Do not place your face or hands near the steam cap or steam vent.
Doing so may result in burns. Be especially careful to keep out of reach of infants and children.
Caution
General safety precautions

Handle the rice cooker with care.
Dropping the rice cooker or exposing it to a strong impact may result in injury or in malfunction of the unit itself.

Only use the cooking plate supplied with this rice cooker.
Using another cooking plate may result in fire or burns.
Using the rice cooker

This rice cooker is a general household appliance.
It may, however, also be used in applications such as:
- staff kitchen areas in shops, offices, and other working environments;
farm houses; - for guests in hotels, motels, and other accommodation-type environments.
Environment for use

Do not use the rice cooker on unstable surfaces or heat sensitive tables or mats.
Doing so may result in fire or damage to the table or mat.

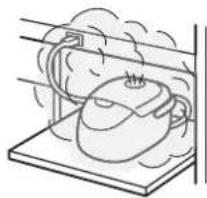
Do not use the rice cooker near walls or furniture.
Steam and heat may cause damage, discoloration and/or deformation. Use the rice cooker at least 11.81 inches (30 cm) away from walls or furniture. When using the rice cooker in a hide-away-type of shelf or counter, be careful not to allow the steam to remain trapped inside the enclosed area.
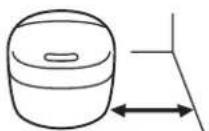
At least 11.81
inches (30~cm)
Caution

Do not use the rice cooker near a heat source or where it may be splashed with water.
Doing so may result in electric shock, short-circuiting, fire, or deformation or malfunction of the rice cooker.
Power cord and plug

Be sure to hold the power plug when disconnecting the cord from an outlet.
Failure to do so may cause an electric shock or short-circuiting, resulting in fire.


Do not plug multiple appliances into a single outlet.
Doing so may result in fire.
SHORT CORD INSTRUCTIONS
- A short power-supply cord is provided to reduce the risks resulting from becoming entangled in or tripping over a longer cord.
- Longer extension cords are available and may be used if care is exercised in their use.
- If a longer extension cord is used:
a. The marked electrical rating of the extension cord should be at least as great as the electrical rating of the appliance.
b. The longer cord should be arranged so that it will not drape over the counter top or tabletop where it can be pulled by children or tripped over unintentionally.
Handling the rice cooker

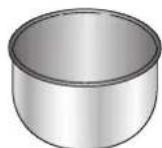
Only use the inner pot made exclusively for this rice cooker. Using any other pot may result in overheating or malfunction.

Do not cook with the inner pot empty. Doing so may result in overheating or malfunction.

Be careful of the escaping steam when opening the lid. Exposure to steam may result in burns.

Disconnect the power plug from the outlet when the rice cooker is not in use.
Failure to do so may result in injury or burns, or in electric shock or a short-circuit-induced fire due to degradation of the insulation.

Do not touch the open/lock button while carrying the rice cooker. Doing so may cause the lid to open, resulting in injury or burns.
During and after cooking

Do not touch hot parts during or immediately after cooking. Doing so may result in burns.

Do not handle the inner pot with your bare hands when the rice cooker is or has recently been in operation; use oven mitts to pick up the pot. Touching the hot pot may result in burns.

-Inner pot

Do not move the rice cooker during cooking.
Doing so may result in burns or enable the contents to boil over.
Caution
Cleaning the rice cooker

Wait until the rice cooker has cooled down before cleaning it.
Failure to do so may result in burns.

Do not wash the entire rice cooker.
Do not wash the entire rice cooker or pour water into the rice cooker or its bottom section. Doing so may result in short-circuiting or electric shock.
Cautions towards enabling the long-term use of this rice cooker
- Remove burned rice and any other remaining grains of rice.
Failure to do so may cause steam to leak out or the contents to boil over, resulting in a malfunction of the unit or simply in improperly cooked rice.
- Do not cover the rice cooker with a cloth or other object during cooking.
Doing so may cause the rice cooker or the lid to become deformed or discolored.
-
The holes on the rice cooker are designed to maintain its functions and performance. In extremely rare cases, dust or even insects may enter these holes and cause a malfunction. To prevent this, a commercially available insect-prevention sheet, etc., is recommended. If a malfunction does occur due to this problem, it will not be covered by warranty. Contact the place of purchase.
-
The inner pot's fluorocarbon resin coating may wear and peel with extended use. This material is harmless to humans and this situation presents no hindrance to actual cooking or to the rice cooker's heat insulating capability.
If you would like, or if the inner pot becomes deformed or corroded, a new one may be purchased. Contact the place of purchase.
- Strictly observe the following to keep the fluorocarbon resin coating from blistering or peeling:
- Do not place the inner pot over a gas fire, or use it on an electromagnetic cooker or in a microwave oven, etc.
Use the Keep Warm function for white rice (rinse-free rice) only; do not use for seasoned rice, etc. - Do not use vinegar inside the inner pot.
- Use only the supplied spatula or a wooden spatula.
- Do not use hard utensils such as metal ladles, spoons, or whisks.
- Do not place a basket inside the inner pot.
- Do not place tableware and other hard utensils or objects inside the inner pot.
- Do not clean the inner pot with hard materials such as metal spatulas or nylon scouring sponges.
- Do not use a dishwasher/dryer to clean the inner pot.
- Be careful not to scratch the inner pot when washing rice.
If the inner pot becomes deformed, contact the place of purchase.
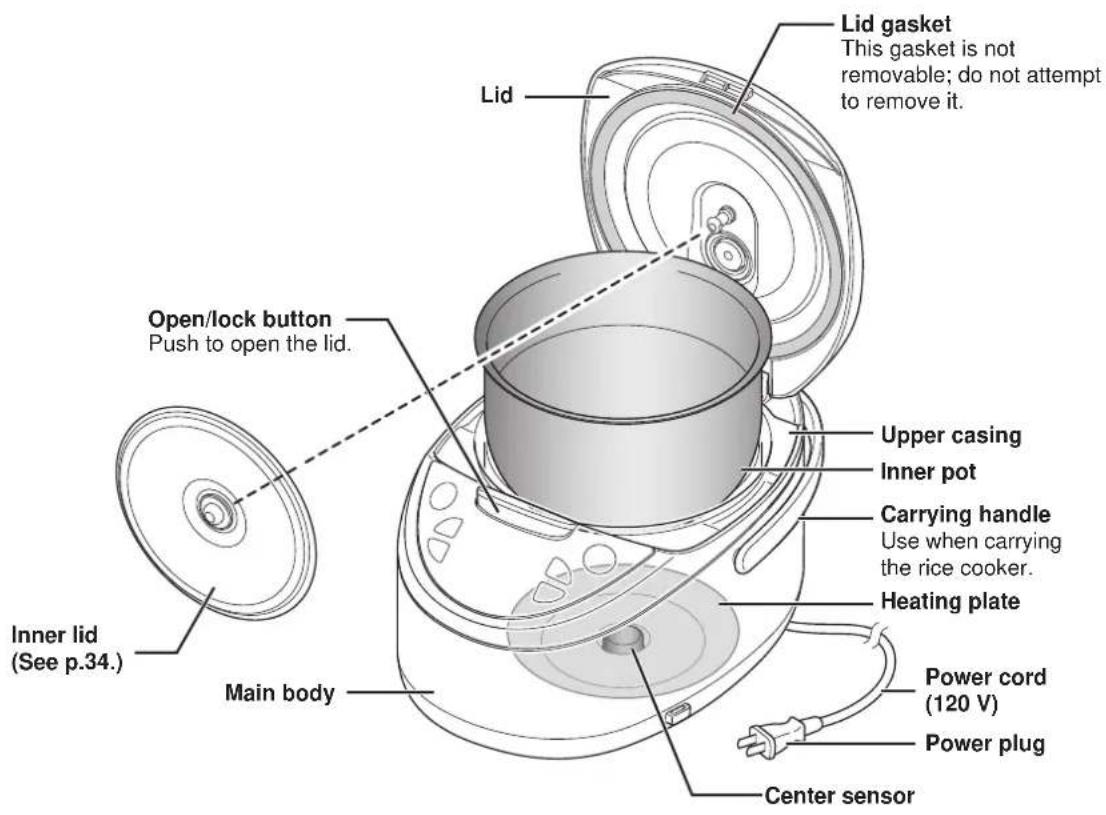
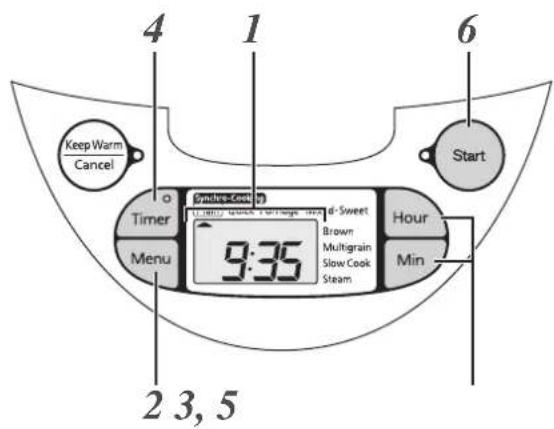
2 Names and Functions of Component Parts
English
Operation panel

The reliefs (O) on the [Start] and [Keep Warm/Cancel] keys are to aid persons with a visual impairment.
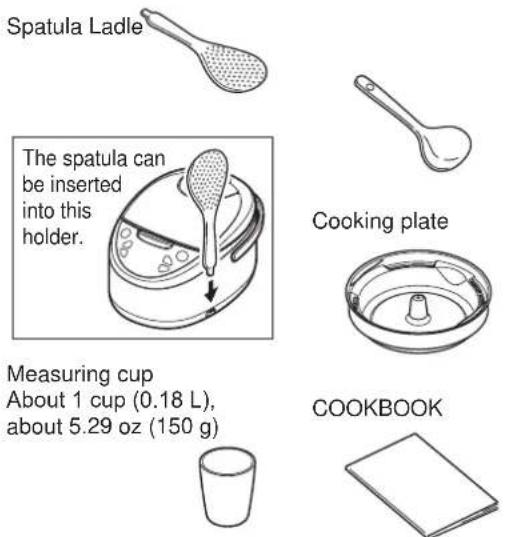
Checking the accessories
■ Sounds emitted by the rice cooker
The following sounds coming from the rice cooker during cooking, steaming, or when the Keep Warm function is on is normal and does not indicate a problem:
- A clicking sound (This is the sound of the microcomputer controller.)
- A scraping sound (This is the sound of metal contracting and rubbing together due to heat.)
- A sound like boiling water (Only during cooking or steaming.)
Checking the present time
The time is displayed in a 24-hour format. It should be adjusted if the correct time is not displayed. (See p.44.)
The lithium battery
The rice cooker has a built-in lithium battery that stores the present time and the preset timer settings even with the power plug disconnected.
This lithium battery has a four-to-five-year life expectancy with the power plug disconnected.
- If the lithium battery runs out, "0:00" will blink on the display when the power cord is plugged back in. Normal cooking is still possible, but the present time, preset timer settings, and elapsed Keep Warm time will no longer be stored in memory when the power plug is disconnected.
Note
- Do not attempt to replace the lithium battery yourself.
To replace the battery, contact the place of purchase.
12 *1 "During cooking" means while cooking rice as well as other types of cooking.
Menu options and features
| Menu | Timer function availability | Feature |
| Plain/Synchro-Cooking | 1 | Select when cooking white rice. Also select when using the cooking plate to cook rice and side dishes together. |
| Quick N/A Select when quickly cooking white rice. | ||
| Porridge Select when making porridge. | ||
| Mixed • Sweet N/A Select when cooking seasoned rice or steamed glutinous rice. | ||
| Brown Select when cooking brown rice and/or multi-grain rice. | ||
| Multigrain | Select when cooking multi-grain rice like barley, foxtail millet, barnyard millet, black rice or red rice together with white rice. | |
*1 Do not use the Timer function when cooking with the cooking plate. See p.45 for cooking capacities.
Tips on making delicious rice

Read p.16 to 17 for preparations before cooking rice, and p.18 to 22 for how to cook rice.
Select high quality rice and store it in a cool location.
Choose freshly polished, glossy rice with a uniform grain size. Store in a cool, dark, well-ventilated place.
Carefully measure the rice with the supplied measuring cup.
One cup equals about 0.18 L. Use the supplied measuring cup for rinse-free rice as well.

Wash the rice quickly.
Stir the rice around with your hand in a generous amount of water, pour out the water, and repeat until the water remains clear.
When cooking germinated brown rice, whole rice or semi-polished rice, select the "Multigrain" menu.
Cooking rinse-free rice
- Add the rinse-free rice and water, and then stir well from the bottom so that every individual grain of rice becomes immersed in the water. (Merely adding water to the rice will prevent it from soaking in the water and may result in improperly cooked rice.
If the added water turns white, we recommend you wash the rice thoroughly by replacing the water once or twice. (The water turning white is due to the starch in the rice and not its bran; however, cooking it with the starch left in the water may result in burned rice, the contents boiling over, or improperly cooked rice.)
Adding other ingredients to the rice
The total amount of ingredients should be no more than 2.5 oz (70 g) per cup of rice. Stir in any seasoning well and then add the extra ingredients on top of the rice. If other ingredients are to be added to the rice, be sure to use no more than the acceptable maximum amount (refer to the table below).
| Type of rice or menu | 1.0 L (5.5-cup) type | 1.8 L (10-cup) type |
| Porridge • Hard | 0.5 cups or less 1.5 | cups or less |
| Mixed 3 cups or less 6 cups or less | ||
| Sweet 3 cups or less 5 cups or less | ||
| Brown 3 cups or less 5 cups or less | ||
- Add water prior to adding the ingredients.
Adding water after the ingredients will result in the cooked rice being too firm.
Add water according to the type of rice and your personal preference.
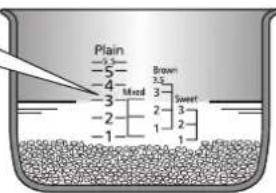
Amount of water to add
| Type of rice or menu | Corresponding scale (Use the corresponding scale on the inner pot as a guide and add water according to your personal preference.) |
| Plain/Synchro-Cooking Quick Multigrain | "Plain" scale |
| Porridge | Hard porridge: "Porridge • Hard" scaleSoft porridge: "Porridge • Soft" scale |
| Mixed "Mixed" scale | |
| Sweet (a mixture of glutinous and non-glutinous rice) | Between the "Plain" and "Sweet" scales |
| Sweet (glutinous rice) | "Sweet" scale |
| Brown "Brown" scale | |
If you choose to use more or less water than the recommended amount, do not deviate from that amount by any more than 1/3 of one line.
- When cooking rinse-free rice, use the "Plain" scale as a reference but add a little extra water (until it just covers the corresponding line).
- When making with rinse-free rice, use the "Porridge • Hard" scale as a reference for hard porridge and the "Porridge • Soft" scale for soft porridge.
- When cooking germinated brown rice, whole rice or semi-polished rice, use the "Plain" scale as a reference.
If the amount of water to add is specified on a package of germinated brown rice or multi-grain rice, follow those directions and add water according to your personal preference.
Cooking brown rice and/or multi-grain rice mixed in with white rice
- If the rice to be cooked includes more brown rice and/or multi-grain rice than white rice, use the "Brown" menu.
If there is an equal amount of brown rice and white rice, or there is more white rice than brown rice, use the "Plain" menu. (The brown rice should be soaked separately for 1 to 2 hours before cooking.)
If there is an equal amount of multi-grain rice and white rice, or there is more white rice than multi-grain rice, use the "Multigrain" menu. (The multi-grain rice should be soaked separately for 1 to 2 hours before cooking.)
Cooking steamed glutinous rice
Wash the rice, and then level it out so that all of the rice is under water.
Cooking grains together with white rice
The amount of multi-grain rice should equal less than 20% of the volume of the white rice. The maximum acceptable amount for the combination of white rice and grains is 5.5 cups with the 1.0 L type and 10 cups with the 1.8 L type.
- The grains should be placed on top of the white rice. Mixing them together may result in improperly cooked food.
Cooking grains together with brown rice
Always use the "Brown" menu.
The maximum acceptable amount for the combination of brown rice and grains is 3.5 cups with the 1.0L type and 6 cups with the 1.8 L type.
Cooking long-grain rice
- When cooking long-grain rice, select the "Quick" menu.
To cook seasoned long-grain rice, select the "Mixed • Sweet" menu.
Selecting any other menu may result in the contents boiling over or in improperly cooked food.
3 Before Cooking Rice
1 Measure the rice.
Always use the measuring cup supplied with the rice cooker.
A level filling of rice in the supplied measuring cup equals about 0.18 L.

Fill the measuring cup as shown below.
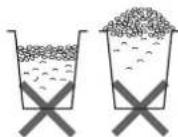
Correct measurement
Incorrect measurement

Note
Always use the specified volume of rice (see "Specifications" on p.45). Otherwise the rice may not cook properly. If other ingredients are to be added to the rice, see p.14.
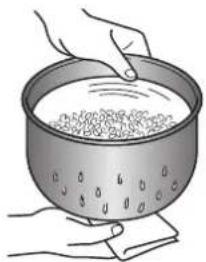
2 Wash the rice. (This can be done using the inner pot.)

Note
- Do not use hot water (over 95^ [35^] ) to wash the rice or when adding water. It may prevent the rice from cooking properly.
Adjust the water level.
Place the inner pot on a level surface and adjust the water level to the appropriate line of the corresponding scale on the inside of the pot.

- The water level should be selected according to the type of rice and the selected cooking menu, but can be fine-adjusted to your personal preference. (See the guidelines on p.14.)
When cooking 3 cups of white rice, adjust the water level to line "3" on the "Plain" scale.
4 Wipe off any water and rice, etc.

Caution
- Be sure to remove any rice or other material adhering to and around the heating plate, center sensor, upper casing, and the open/lock button. (See p.33.)
Adhering material can prevent the lid from closing, allow steam to leak out during cooking, or enable the lid to open and the contents to spray out, resulting in burns or other injury.
5 Place the inner pot in the rice cooker.
(1) Be sure to set the pot properly (not set at an angle).
(2) Close the lid.
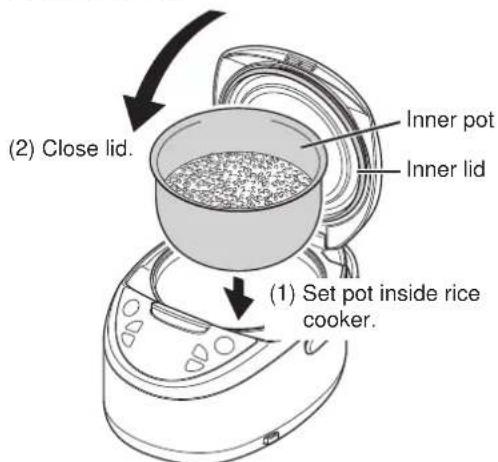
Note
- Make sure the inner pot is set securely into the rice cooker.

6 Connect the power plug to an outlet.

Power plug
The power will come on and the menu cursor will blink.
Note
- If the Keep Warm lamp is on, press the [Keep Warm/Cancel] key to turn off the lamp.

4 How to Cook Rice
1 Press the [Menu] key to select the desired menu.
Each time the [Menu] key is
pressed, the selected menu will
change in the order shown below.
The menu cursor will blink while the menu is being selected.
![Tiger JAXT18U - Press the [Menu] key to select the desired menu. - 1](/content/2026/02/403918/images/dee5f0be16b3386dcdeff0e6817177d48e0dbae13216e6ca171e6ce9d167ac49.jpg)
![Tiger JAXT18U - Press the [Menu] key to select the desired menu. - 2](/content/2026/02/403918/images/ca94c10a5151ea412c227239fad8fe801a87b0621fa5aa4c818119725b764cf5.jpg)
- It is not necessary to press the [Menu] key if the desired menu is already selected.
2 If you selected the "Porridge" menu, use the [Hour] and [Min] keys to set the desired cooking time.
Each time the [Hour] key is pressed, the set time will increase by 5 minutes. Each time the [Min] key is pressed, that time will decrease by 5 minutes.
The cooking time can be set to any 5-minute increment between 40 and 90 minutes.
![Tiger JAXT18U - If you selected the "Porridge" menu, use the [Hour] and [Min] keys to set the desired cooking time. - 1](/content/2026/02/403918/images/b03c81b4e2207d586e821b3510d07de8a8e749ee5dddcd90d3b2eef3b558ca0f.jpg)
The default setting is for 60 minutes. Adjust as desired.
Press the [Start] key.
The Start lamp will turn on. If you selected the "Plain" menu, a one-short, one-long beep alarm will sound. Otherwise, only a one-beep alarm will sound.
![Tiger JAXT18U - Press the [Start] key. - 1](/content/2026/02/403918/images/4d424befa76129846ab185c5171d6dc6a74343f876bab1ac2b80ff010469bc87.jpg)
![Tiger JAXT18U - Press the [Start] key. - 2](/content/2026/02/403918/images/d276261cbc75d91833d66b108299b53ed102cd0df9a5776c262814f587889b48.jpg)
Cooking will start.
Appropriate amounts
See p.14 to 15 for the appropriate amounts of grains and ingredients.
Cooking time guidelines
| Type of riceUnit size | Plain/Synchro-Cooking | Quick Mixed | Sweet Brown Multigrain | |
| 1.0 L (5.5-cup) type | 44 to 59 min. 25 to 45 | min. 39 to 60 min. 67 to 79 min. 42 to 58 | min. | |
| 1.8 L (10-cup) type | 50 to 63 min. 26 to 50 | min. 42 to 65 min. 67 to 80 min. 45 to 60 | min. |
-
The above times indicate the amount of time to the end of steaming after cooking is completed when the rice is not soaked prior to pressing the [Start] key. (Voltage: 120 V, Room temperature: 73.4^ [23°C], Water temperature: 73.4^ [23°C], Amount of water: normal level)
-
Cooking times will differ somewhat depending upon the amount being cooked, the type of rice, the type and quantity of ingredients, the room temperature, the water temperature, the amount of water, electrical voltage, and whether the Timer function is used or not, etc.
5 Once the Rice Is Done Cooking
Once the final steaming process begins, the remaining time will be displayed.
The time until steaming is completed will be shown on the display in 1-minute increments.
- Steaming times will vary depending upon the selected menu.
Once the rice is fully cooked, the Keep Warm function will automatically engage (the Start lamp will turn off).
The Keep Warm lamp will turn on and an alarm (8 beeps) will sound.
- If you added ingredients under the "Porridge" menu, or a longer cooking time is required, etc., you can set the desired additional cooking time. Simply press the [Hour] and [Min] keys once the Keep Warm lamp turns on, and then press the [Start] key. The cooking time can be extended up to 15 minutes in increments of 1 minute, a maximum of 3 times.
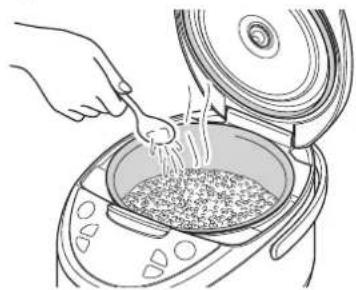
- Stir the rice well before reheating.
1 Stir and loosen the cooked rice. Be sure to stir and loosen the rice as soon as cooking is complete. Always wear a kitchen mitten, etc., to hold the pot while stirring.

Note
- Be sure to wipe off any hot water that collects on the upper casing or that runs onto the outside of the rice cooker when you open the lid immediately after cooking or while the Keep Warm function is on.
When you are done using the rice cooker...
1 Press the [Keep Warm/Cancel] key to turn off the Keep Warm function. The Keep Warm lamp will turn off.
2 Disconnect the power plug from the outlet. (See p.11.)
3 Clean the rice cooker. (See p.32 to 37.)
6 Setting the Timer
Using the Timer function (Timer 1 / Timer 2)
You can preset the time that you want cooking to be actually completed.
- Select either "Timer 1" or "Timer 2" and set the desired completion time. The start of cooking will be automatically adjusted so that the operation is completed at the preset time.
Each timer can be set to different times. e.g. "Timer 1" for breakfast and "Timer 2" for dinner. - The preset timer settings will be stored in memory.

- Example setting: If "Timer 1" is set to 13:30, cooking will be completed at 13:30.
1 Check the present time.
See p.44 for the procedure to set the present time.
2 Press the [Menu] key to select the desired menu.
The menu cursor will blink while the menu is being selected.
![Tiger JAXT18U - Press the [Menu] key to select the desired menu. - 1](/content/2026/02/403918/images/cf8252ca39c6557ff57877adeb80d701fddb71c43fc1925d0cac7c4db097855d.jpg)
![Tiger JAXT18U - Press the [Menu] key to select the desired menu. - 2](/content/2026/02/403918/images/fe03fe0eb10c7c09eed5ec61094da4de9b81c1b460f3e4b68e055033c4651359.jpg)
- Confirm that the Keep Warm lamp is off.
![Tiger JAXT18U - Press the [Menu] key to select the desired menu. - 3](/content/2026/02/403918/images/a52561d57ee4ded420fe44ef41e3a967daea03ad4ff1e37774aa2803073775b6.jpg)
- It is not necessary to press the [Menu] key if the desired menu is already selected.
3 If you selected the "Porridge" menu, use the [Hour] and [Min] keys to set the desired cooking time.
Each time the [Hour] key is pressed, the set time will increase by 5 minutes. Each time the [Min] key is pressed, that time will decrease by 5 minutes.
The cooking time can be set to any 5-minute increment between 40 and 90 minutes.
![Tiger JAXT18U - If you selected the "Porridge" menu, use the [Hour] and [Min] keys to set the desired cooking time. - 1](/content/2026/02/403918/images/983089fe5aefc95e40dd84c0728194d5660a35eb060e8624aa62bcdef50fdfc3.jpg)
Increases by 5 min.
Decreases by 5 min.
The default setting is for 60 minutes. Adjust as desired.
4 Press the [Timer] key to select either "Timer 1" or "Timer 2".
![Tiger JAXT18U - Press the [Timer] key to select either "Timer 1" or "Timer 2". - 1](/content/2026/02/403918/images/6373bebe90d55c428daab17a8c097ac3d83e82c713abe38b12273788ed4c131e.jpg)
The selected setting will switch back and forth between "Timer 1" and "Timer 2" each time the [Timer] key is pressed. Both the Timer lamp and the displayed "Timer 1" or "Timer 2" will blink.
![Tiger JAXT18U - Press the [Timer] key to select either "Timer 1" or "Timer 2". - 2](/content/2026/02/403918/images/57aeb33d49537621bc66a3319488519e713c5977e5cb61940459c854bcad4737.jpg)
- The previously preset time will be displayed. It is not necessary to set the timer again if the desired completion time is already displayed.
Note
The Timer function is not available in the following cases.
- When the "Quick", "Mixed - Sweet", "Slow Cook", or "Steam" menu is selected
- When the preset time is less than that indicated in the following table
| Menu Minimum preset time |
| Plain 1 h 10 min |
| Porridge Cooking time + 2 min |
| Brown 1 h 30 min |
| Multigrain 1 h 10 min |
- When "0:00" is blinking on the display
- If the Keep Warm lamp is on, press the [Keep Warm/Cancel] key to turn off the lamp. (The Timer function is not available while the Keep Warm lamp is on.)
- If you do not operate the rice cooker within about 30 seconds after pressing the [Timer] key, an alarm (3 beeps) will sound.
- If the [Timer] or [Start] key is pressed while the rice cooker is in a state where the Timer function is not available, an alarm (3 beeps) will sound.
- Do not use the Timer function when cooking rice and side dishes concurrently.
Use the [Hour] and [Min] keys to set the desired completion time.
![Tiger JAXT18U - Use the [Hour] and [Min] keys to set the desired completion time. - 1](/content/2026/02/403918/images/14fbff501e8bfa3a9a44f102678b201fee6e4fbc570b63bb2b31ed01f065b5e8.jpg)
Press the [Hour] key to change the set time in 1-hour increments. Press the [Min] key to change that time in 10-minute increments. Hold down the corresponding key to change the time more rapidly.
![Tiger JAXT18U - Use the [Hour] and [Min] keys to set the desired completion time. - 2](/content/2026/02/403918/images/a352475a541c59e1d64ea22e53066165229a0ff743add3ffc409808eb93500c5.jpg)
The time is displayed in a 24-hour format.
Note
- Do not set the timer to more than 12 hours, as it may result in spoiled rice.
6 Press the [Start] key. The Timer lamp will turn on at the Timer function is set.
![Tiger JAXT18U - Press the [Start] key. The Timer lamp will turn on at the Timer function is set. - 1](/content/2026/02/403918/images/c91431931a6aae5d17966c495c87312ea1327947ef900c8b7b9fb36bee20634b.jpg)
If you selected the "Plain" menu, a one-short, one-long beep alarm will sound. Otherwise, only a one-beep alarm will sound.
![Tiger JAXT18U - Press the [Start] key. The Timer lamp will turn on at the Timer function is set. - 2](/content/2026/02/403918/images/96c132936bfffdd44901c28f98d0005396b9a413f064a332205a75a0369a4087.jpg)
- If you make a mistake or otherwise want to reset the timer, press the [Keep Warm/Cancel] key and repeat the procedure from step 2 on p.21.
7
Keeping the Rice Warm
The Keep Warm function will especially maintain the shiny, delicious taste of white rice.
The Keep Warm function will automatically engage when cooking is completed.
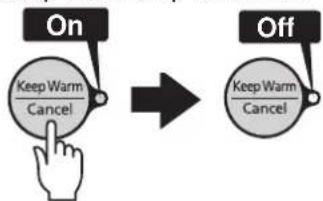
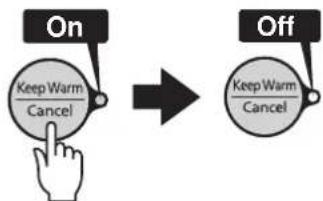
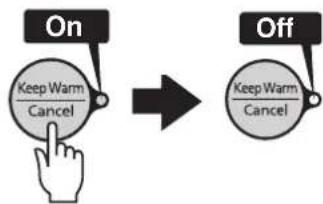
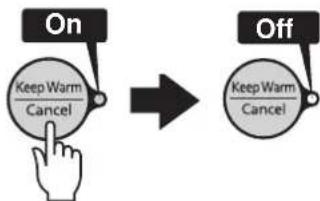
Turning off the Keep Warm function
Press the [Keep Warm/Cancel] key.
The Keep Warm lamp will turn off.
![Tiger JAXT18U - Press the [Keep Warm/Cancel] key. - 1](/content/2026/02/403918/images/5e124faf885088e69af97c66a15616f366e88778b7e1c4ba563909e1cae9b3bc.jpg)
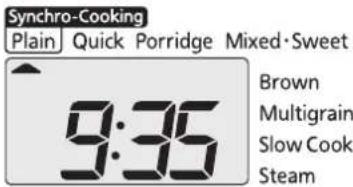
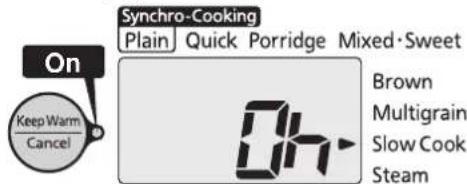
Synchro-Cooking
[Plain] Quick Porridge Mixed-Sweet

Brown
Multigrain
Slow Cook
Steam
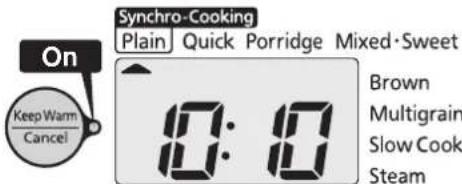
- Restarting the Keep Warm function
Confirm that the Keep Warm lamp is off and press the [Keep Warm/ Cancel] key.
The Keep Warm lamp will turn on.
![Tiger JAXT18U - Confirm that the Keep Warm lamp is off and press the [Keep Warm/ Cancel] key. - 1](/content/2026/02/403918/images/2c80d58afd20b146efff0117aa89cccc184b30f4b7316b3724c32aec97171991.jpg)
- Keeping a small amount of rice warm
Gather the rice at the center of the inner pot; serve as soon as possible.
■ Elapsed Keep Warm time display
Hold down the [Hour] key to display the elapsed Keep Warm time. The elapsed time will be displayed in 1-hour increments up to 24 hours ("24h"). If more than 12 hours has elapsed, the time on the display will blink up to 24 hours. Once 24 hours has elapsed, "24" will blink on the display.
Note
- Avoid the following, as they may result in unusual odors, dryness, discoloration, and spoiling of the rice, or corrosion of the inner pot.
Using the Keep Warm function with cold rice - Adding cold rice to rice that is being kept warm
Leaving a spatula in the inner pot while the Keep Warm function is on
Using the Keep Warm function with the power plug disconnected
Using the Keep Warm function for longer than 12 hours - Keeping less than the minimum required amount of rice warm (See "Specifications" on p.45.)
Using the Keep Warm function for anything other than white rice (including rinse-free rice) - When using the "Porridge" menu, the porridge can become pasty if kept warm for too long; serve as soon as possible.
- Be sure to remove any grains of rice that adhere to the brim of the inner pot as well as to any gaskets. Failure to do so can result in dryness, discoloration, odors, and stickiness of the rice being cooked.
- Serve cooked rice as soon as possible in cold climates and high temperature environments.
- Do not leave the cooking plate or food cooked using the cooking plate inside the rice cooker while the Keep Warm function is on.
8
Reheating Cooked Rice
For piping hot rice, reheat the rice that is being kept warm before serving it.
Note
- Rice will not be fully heated if more than half of the inner pot is full.
The rice will end up dry if reheated under any of the following conditions.
The rice is still hot, such as immediately after cooking. - There is less than the minimum required amount of rice (1 cup with the 1.0L type, 2 cups with the 1.8L type).
The rice is reheated 3 times or more.
1 Stir and loosen the rice that was being kept warm.
2 Add 1 to 2 tablespoons of water evenly over the rice.

- Adding water will prevent the rice from drying out and result in plumper rice.
3 Make sure that the Keep Warm lamp is on.

- Reheating is not available if the Keep Warm lamp is not on. If the lamp is not on, press the [Keep Warm/Cancel] key. (See p.23.)
4
Press the [Start] key.
The Start lamp will blink and reheating will start. The remaining time will be displayed and an alarm (3 long beeps) will sound when the operation is completed.
![Tiger JAXT18U - Press the [Start] key. - 1](/content/2026/02/403918/images/d66e9a2b634c8410f2204cd41edf310857969cd0559e7f3ebe4d4da67c48632e.jpg)
![Tiger JAXT18U - Press the [Start] key. - 2](/content/2026/02/403918/images/acc2983b563b1d239c138a6cea5b4d997594257d0d33b9e89e9838eafbbc0924.jpg)
- To stop reheating, press the [Keep Warm/Cancel] key.
- Reheating is not available if the rice is too cold (under about 131^ [55^] ). In this case, a repeated beeping alarm will sound.
5
Stir and loosen the reheated rice well, and even it out in the inner pot.
9
Cooking Rice and Side Dishes Together ("Synchro-Cooking" Menu)
You can use the cooking plate to cook side dishes described in the supplied "COOKBOOK" at the same time as you cook rice. You can also add water to the inner pot and cook side dishes without making rice.
Refer to the supplied "COOKBOOK" for directions.
Note
- Do not make dishes other than those described in the supplied "COOKBOOK".
- Do not cook with a greater volume of ingredients than that indicated in the supplied "COOKBOOK". Doing so may cause the contents to boil over or result in improperly cooked food.
- Be careful of the following points when using the cooking plate.
- When cooking dishes with a strong odor, the odor may adhere to the pan.
- When cooking ingredients with a strong color, that color may be transferred to the cooking plate through the broth, etc.
- Do not use sharp instruments like kitchen knives, table knives, or forks inside the cooking plate.
- Do not use the Timer function when cooking rice and side dishes concurrently.
Prepare the ingredients and place them in the cooking plate.
Stacking ingredients on top of each other may result in the contents boiling over or in improperly cooked food. Spread ingredients over the whole of the cooking plate.
2 Make the necessary preparations for cooking rice. (See p.16.)
Note
Refer to the following table for the acceptable amounts of food that can be cooked concurrently with rice. Do not cook more than the acceptable maximum or less than the minimum required amounts. Doing so may cause the contents to boil over or result in improperly cooked food.
| 1.0 L type 1.8 L type | |
| Maximum Minimum Maximum Minimum | |
| 2 cups 1 cup 4 cups 2 cups | |
3 Place the cooking plate inside the inner pot and close the lid.
Note
Always place the cooking plate inside the inner pot.
- Make sure that the cooking plate is level (not set at an angle).
4 Connect the power plug to an outlet.
Note
- If the Keep Warm lamp is on, press the [Keep Warm/Cancel] key to turn off the lamp.
Use the [Menu] key to select the "Plain/ Synchro-Cooking" menu.
![Tiger JAXT18U - Use the [Menu] key to select the "Plain/ Synchro-Cooking" menu. - 1](/content/2026/02/403918/images/ea59e650745ec9cafaa0e43a3c25bb40debc64d4d4218e9b5c2f3f164bce8b28.jpg)
The menu cursor will blink while the menu is being selected.
![Tiger JAXT18U - Use the [Menu] key to select the "Plain/ Synchro-Cooking" menu. - 2](/content/2026/02/403918/images/4a83563f0f48321bc9368a7d98a0acdb034980f065c535cabb7c6f03e0c4620a.jpg)
Always select the "Plain/Synchro-Cooking" menu when cooking concurrently.
6 Press the [Start] key.
The Start lamp will turn on and concurrent cooking will start.
![Tiger JAXT18U - Press the [Start] key. - 1](/content/2026/02/403918/images/599115c51ca4c962f302deae52aa9a93988a25148ae10b3a5bcd268b48d90f85.jpg)
7 Once cooking is completed, an alarm (8 beeps) will sound (the Start lamp will turn off).
The Keep Warm lamp will turn on.
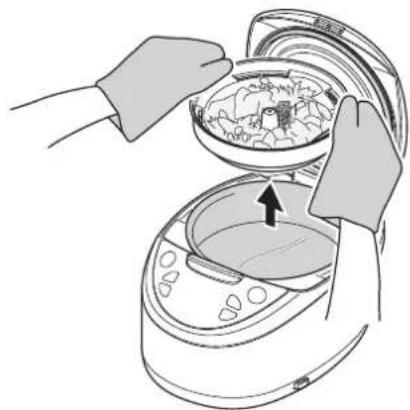
8 Remove the cooking plate and stir and loosen the rice.
Note
- Do not leave the cooking plate in the rice cooker while the Keep Warm function is on.
- Be careful when removing the cooking plate after cooking, as it will be hot.
- Do not tilt the cooking plate while removing it. The broth, etc., may spill out and result in burns.
- Do not return the cooking plate to the inner pot after removing it.
Doing so may result in the rice spoiling or not being kept warm. - When cooking with ingredients that release a lot of liquid, oils or fats when heated, or that expand during heating, such as eggs and the like, some of the broth may overflow down into the rice.
Cooking without making rice
See "Steaming Food ("Steam" Menu)" (p.29 to 31).
Note
- Set the cooking time to between 20 and 30 minutes, according to the type of food being cooked.
When you are done using the rice cooker...
1 Press the [Keep Warm/Cancel] key to turn off the Keep Warm function. The Keep Warm lamp will turn off.
2 Disconnect the power plug from the outlet. (See p.11.)
3 Clean the rice cooker. (See p.32 to 37.)
10 Slow Cooking ("Slow Cook" Menu)
Refer to the supplied "COOKBOOK" for directions.
With this menu, food is first brought to near boiling, the heat is then lowered to about 197^ (92^) and the food left to simmer. The temperature is then lowered even further to about 186^ (86^) and simmering is continued. By gradually lowering the heating temperature in this way, flavors are enhanced and the liquids do not boil down even when heated for a long period of time.
Note
- Caution should be exercised when making dishes other than those described in the supplied "COOKBOOK", as they may boil over.
- Stir well before cooking to prevent seasonings from settling at the bottom of the inner pot.
- When simmering foods in broth, cool the broth before cooking.
- When thickening with starch, add the starch at the end of cooking.
- Since fish-paste products like "chikuwa" tube-shaped fish paste and "kamaboko" fish paste cake will swell when heated, the amount being used should be adjusted with that in mind.
Prepare the ingredients.
2 Add ingredients to the inner pot and close the lid.
Note
- Use the "Plain" scale on the inside of the inner pot as a reference. Using more than the maximum acceptable amount (see the table below) can prevent proper boiling or cause the contents to boil over. Be careful also not to use less than the minimum required amount either, as that can also cause the contents to boil over.
| "Plain" scale |
| 1.0 L type 1.8 L type |
| Maximum Minimum Maximum Minimum |
| 5.5 or below 2 or above 8 or below 3 or above |
3 Connect the power plug to an outlet.
Note
- If the Keep Warm lamp is on, press the [Keep Warm/Cancel] key to turn off the lamp.
Use the [Menu] key to select the "Slow Cook" menu.
![Tiger JAXT18U - Use the [Menu] key to select the "Slow Cook" menu. - 1](/content/2026/02/403918/images/c9f0999c6fc9a1fa7e6c6830217b817320911d520144836a728792f3b8987049.jpg)
The menu cursor will blink while the menu is being selected.
![Tiger JAXT18U - Use the [Menu] key to select the "Slow Cook" menu. - 2](/content/2026/02/403918/images/d8ddb8565eaf206289fa4031fbc352e81b659d296daec6d8dfcdea84b4b13a7d.jpg)
Use the [Hour] and [Min] keys to set the desired cooking time.
![Tiger JAXT18U - Use the [Hour] and [Min] keys to set the desired cooking time. - 1](/content/2026/02/403918/images/5458eff2e712fa929844f0f87b0e1987a0a65fe3e8d37ec89bc94996c6c6432e.jpg)
Each time the [Hour] key is pressed, the set time will increase by 5 minutes. Each time the [Min] key is pressed, that time will decrease by 5 minutes.
The cooking time can be set to any 5-minute increment between 5 and 180 minutes.
![Tiger JAXT18U - Use the [Hour] and [Min] keys to set the desired cooking time. - 2](/content/2026/02/403918/images/58343acb4e1bbc883f0903f10d7b8abe4c9e7aacabfadef1f2210aac108e504a.jpg)
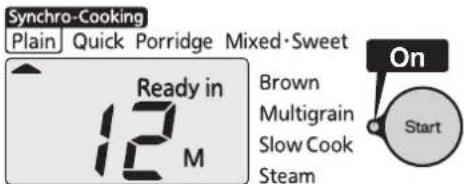
6 Press the [Start] key.
The Start lamp will turn on and cooking will start.
"Ready in" will appear on the display.
![Tiger JAXT18U - Press the [Start] key. - 1](/content/2026/02/403918/images/bd1f912cb5e938eeae35ee430f76b30aa9b1d2740f20cabd80cd37810be8fc41.jpg)
![Tiger JAXT18U - Press the [Start] key. - 2](/content/2026/02/403918/images/7d74d04025b50eac00165aa51079ef61c89d9590cef118c4ae6eba6fd4a2e545.jpg)
Note
- Do not open the lid during cooking.
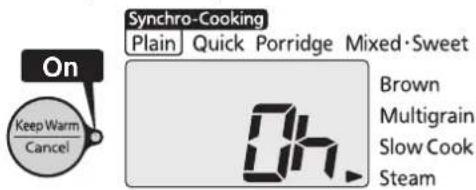
7 Once cooking is completed, an alarm (8 beeps) will sound (the Start lamp will turn off).
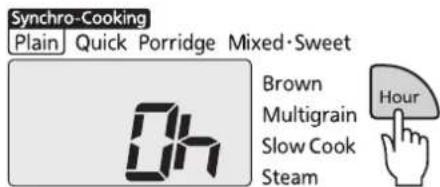
The Keep Warm lamp will turn on and "0h" will be displayed.
To simmer the food further, use the [Hour] and [Min] keys to set the additional simmering time and then press the [Start] key. The simmering time can be extended up to 30 minutes, a maximum of 3 times.
Note
-
If a longer cooking time is required, do not press the [Keep Warm/Cancel] key before extending that time. Doing so will cause the Keep Warm lamp to go out and additional cooking will not be possible. If you mistakenly pressed the [Keep Warm/Cancel] key, perform the following procedure.
-
Remove the inner pot and set it on a wet towel or cloth.
- Leave the rice cooker lid open and cool down the unit and the inner pot for about 10 minutes.
-
Place the inner pot back inside the rice cooker.
-
Repeat the procedure from step 4 on p.27.
-
If you want food that is being kept warm to be piping hot before serving it, press the [Start] key when the Keep Warm lamp is on in order to reheat that food. The remaining reheating time will be displayed and an alarm (3 long beeps) will sound when the operation is completed. After reheating, the Keep Warm lamp will turn on and the elapsed Keep Warm time will be displayed.
Once cooking is completed...
1 Press the [Keep Warm/Cancel] key to turn off the Keep Warm function. The Keep Warm lamp will turn off.
2 Remove any odors. (See p.37.)
Note
- If the [Keep Warm/Cancel] key is not pressed when cooking is completed, the Keep Warm function will automatically engage and the elapsed Keep Warm time will be displayed in hourly increments from the first hour ("1h") up to 6 hours ("6h") after that. After 6 hours has elapsed, "6" will blink on the display.
- Do not use the Keep Warm function continuously for more than 6 hours as some foods will lose their taste.
11
Steaming Food ("Steam" Menu)
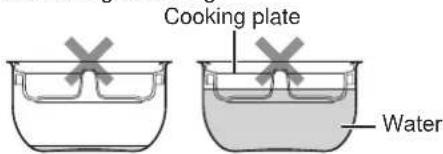
1 Add water to the inner pot and place the cooking plate inside.
Refer to the following guideline on the amount of water to add.
- 1.0 L (5.5-cup) type: 3-1/2 cups (630 mL [21 oz])
- 1.8 L (10-cup) type: 4-1/2 cups (810 mL [28 oz])
Use the supplied measuring cup to add water.
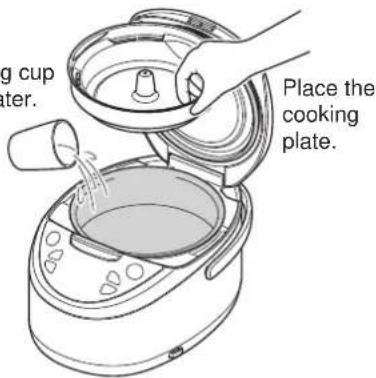
Note
- Be sure to put an appropriate amount of water in the inner pot. Do not allow the inner pot to run out of water or the cooking plate to become immersed in water during steaming.
2 Add ingredients to the cooking plate and close the lid.
3 Connect the power plug to an outlet.
Note
- If the Keep Warm lamp is on, press the [Keep Warm/Cancel] key to turn off the lamp.
4 Press the [Menu] key to select the "Steam" menu.
The menu cursor will blink while the menu is being selected.
![Tiger JAXT18U - Press the [Menu] key to select the "Steam" menu. - 1](/content/2026/02/403918/images/0b9498b0cc99bf1fa4904f6b7ca422ba7431a614e0d98e88ffe23aefb1e98092.jpg)
English
![Tiger JAXT18U - Press the [Menu] key to select the "Steam" menu. - 2](/content/2026/02/403918/images/53c0d03a08dbf50774d98546100cd18d024a95d993cf5eca3564cb9c03146107.jpg)
5 Press the [Hour] and [Min] keys to set the desired steaming time.
![Tiger JAXT18U - Press the [Hour] and [Min] keys to set the desired steaming time. - 1](/content/2026/02/403918/images/1c434b3015ff47f45013fc47d8f684c56994d118a91a4366185efa5e7e1311bd.jpg)
Each time the [Hour] key is pressed, the set time will increase by 5 minutes. Each time the [Min] key is p that time will decrease by 5 minutes
The steaming time can be set to any 5-minute increment between 5 and 60 minutes.
![Tiger JAXT18U - Press the [Hour] and [Min] keys to set the desired steaming time. - 2](/content/2026/02/403918/images/b1a495e86b08604dd0973753e624f0cc4c4b057417475132ead0816dec818548.jpg)
6 Press the [Start] key.
The Start lamp will turn on and steaming will start. "Ready in" will appear on the display.
![Tiger JAXT18U - Press the [Start] key. - 1](/content/2026/02/403918/images/10e975c696d9267f6f1af3ae97e0cfbd0c8406915a5d23850ff30702f8a8defc.jpg)
![Tiger JAXT18U - Press the [Start] key. - 2](/content/2026/02/403918/images/e418c3349c6ddab162040160233e6c646a97d0b5ea61f2d19d3fbef49ca280a6.jpg)
Note
- Do not open the lid during steaming. Doing so may prevent the food from steaming properly.
7 Once steaming is completed, an alarm (8 beeps) will sound (the Start lamp will turn off).
The Keep Warm lamp will turn on.
To steam the food further, use the [Hour] and [Min] keys to set the additional steaming time and then press the [Start] key. The steaming time can be extended up to 15 minutes, a maximum of 3 times.
Caution
- Be careful not to get burned by the escaping steam when opening the lid.
Note
-
When extending the steaming time, be sure to add water to prevent dry-boiling.
-
If a longer steaming time is required, do not press the [Keep Warm/Cancel] key before extending that time. Doing so will cause the Keep Warm lamp to go out and additional steaming will not be possible. If you mistakenly pressed the [Keep Warm/Cancel] key, perform the following procedure.
-
Remove the inner pot and set it on a wet towel or cloth.
- Leave the rice cooker lid open and cool down the unit and the inner pot for about 10 minutes.
- Place the inner pot back inside the rice cooker.
- Repeat the procedure from step 4 on p.29.
8 Remove the cooking plate.
- Be careful when removing the cooking plate after cooking, as it will be hot.
- Serve as soon as steaming is completed. If not removed from the rice cooker right away, the food will become wet and soggy.
- Do not tilt the cooking plate while removing it. The broth, etc., may spill out and result in burns.
Once steaming is completed...
1 Press the [Keep Warm/Cancel] key to turn off the Keep Warm function. The Keep Warm lamp will turn off.
2 Disconnect the power plug from the outlet. (See p.11.)
3 Clean the rice cooker. (See p.32 to 37.)
Guidelines for steaming times
| Ingredients Amount Approx. time Hints for steaming | |||
| Chicken | 1 fillet(1/2 to 3/4 lbs [200 to 300 g]) | 20 to 30 min | Make several small cuts in the chicken. |
| White fish | 2 to 3 fillets(5.0 to 7.0 oz [150 to 200 g]) | 20 to 25 min | Fillet to a thickness of 3/4 inches (2 cm) or less.Always wrap in aluminum foil. |
| Shrimp | 6 to 10(1/4 to 1/2 lbs [100 to 200 g]) | 15 to 20 min Steam | in shells. |
| Carrots | 1 to 2(7.0 to 11.0 oz [200 to 300 g]) | 30 to 40 min Cut intobite-sized pieces. | |
| Potatoes | Medium size, 2 to 3(9.0 to 11.0 oz [250 to 300 g]) | 30 to 40 min Cut intobite-sized pieces. | |
| Sweet potatoes | Medium size, 1(7.0 to 11.0 oz [200 to 300 g]) | 30 to 40 min Cut intobite-sized pieces. | |
| Meat dumplings(warming) | 8 to 15 20 to 25 min Space evenly in pan | ||
- Do not fill the cooking plate for the 1.0 L (5.5-cup) type any higher than 1-1/3 inches (3.4 cm), or 1-1/2 inches (3.7 cm) with the 1.8 L (10-cup) type. Doing so may result in the food touching the lid and becoming wet and soggy.
- The steaming times above are only a guideline and the required time will differ depending upon the temperature, quality, and quantity of the ingredients.
If steaming is still not complete, you can steam for an additional period of time based on how well the food is cooked. - Normally, there will not be enough water for additional steaming. Add water to prevent the inner pot from running dry.
If you steam meat and fish, etc., for too long, they will become hard. If food does not steam sufficiently at shorter times, cut into thinner slices.
Always wrap fish, etc., in aluminum foil for steaming. Failure to do so may result in the contents of the cooking plate boiling over.
12 Cleaning and Maintenance
Perform cleaning and maintenance procedures as described on the following p.32 to 37.
Any other servicing should be performed by an authorized service representative.
Clean all parts by hand. Do not use a dishwasher/dryer.
To maintain cleanliness, always clean the rice cooker on the same day it is used. Also clean the rice cooker at regular intervals as well.
The rice cooker should also be cleaned on the day that it is used in order to remove any odors that remain from cooking. (See p.37.)
Note
- Be sure to disconnect the power plug and allow the rice cooker, inner pot, inner lid, and steam cap to cool down before cleaning.
- When cleaning the rice cooker with a detergent, use only standard kitchen detergent (for tableware and kitchen utensils).
Clean with a soft sponge and cloth. - Rinse the parts thoroughly since detergent remaining on them may result in deterioration and discoloration of part's materials such as resin.
Parts to wash after every use
Inner pot

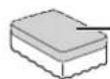
Cooking plate

Measuring cup

Spatula

Ladle

Steam cap (See p.35 to 36.)

Inner lid
Clean with a soft sponge and with tap or lukewarm water.
2 Wipe off water with a dry cloth and completely dry all parts.
Note
- Do not clean the inner pot with the abrasive side of a heavy-duty scrub sponge. Doing so may damage the fluorocarbon resin coating.
Do not use the abrasive side of a heavy-duty scrub sponge.
- Do not wash dishes, etc., inside the inner pot. Also, do not place the inner pot upside down on top of dishes, etc., to dry. Doing so may damage the fluorocarbon resin coating or cause it to peel.


Parts to wash when dirty

Inside and outside the rice cooker
Wet a towel or cloth, wring out excess water, and wipe.
Power cord
Wipe with a dry cloth.
Heating plate, center sensor
Remove burned rice and any other adhering grains of rice. If adhering objects are hard to remove, use commercially available sandpaper (around #320), then wet a towel or cloth, wring out excess water, and wipe.
Around the upper casing and open/lock button and on the lid gasket
Remove any adhering grains of rice, etc.
Note
- Do not allow water to get inside the rice cooker unit.
- Do not immerse the power cord in or splash it with water. Doing so may result in short-circuiting or electric shock.
- Do not pull on the lid gasket.
Power cord and plug

Wipe with a dry cloth.
Note
- Always keep the inner pot and lid clean to prevent corrosion and odors.
- Do not clean the rice cooker or its parts with thinner, cleanser, bleach, disposable cloth, metal spatulas, nylon scouring sponges or the like.
Always clean each part separately.
- Do not immerse the steam cap, measuring cup, spatula or ladle in hot water. Doing so may cause them to become deformed.
- Do not use a dishwasher/dryer to clean the rice cooker or its parts. Doing so may cause them to become deformed.
- Always wash the steam cap after cooking with grains (amaranths, etc.). The vent on the steam cap may clog and cause problems, like preventing the lid from opening, resulting in improperly cooked food.
Removing and attaching the inner lid
Pull the inner lid towards you to remove it.
To reattach, align the inner lid gasket with the shaft on the main lid.
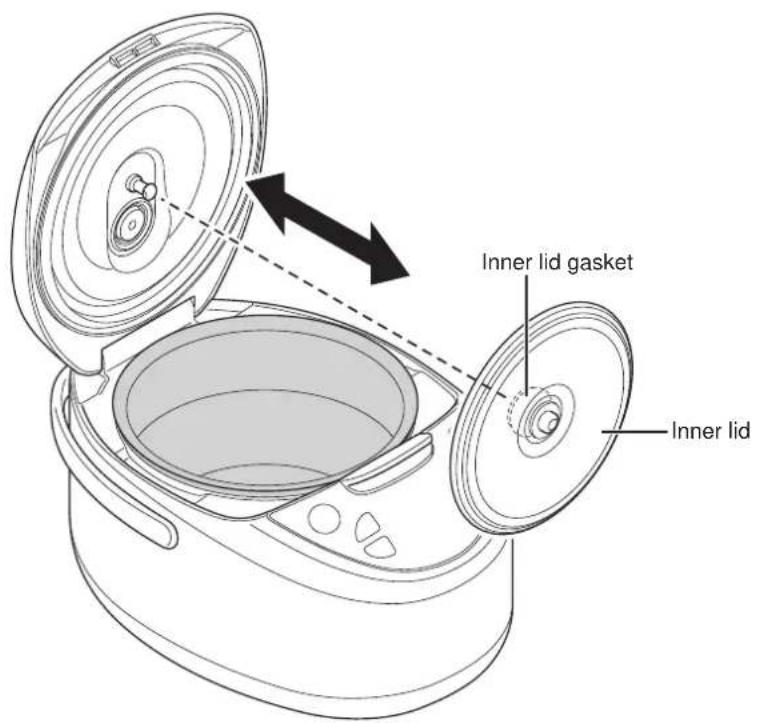
- Attaching the inner lid gasket
If the inner lid gasket is loose, press it firmly back into place.

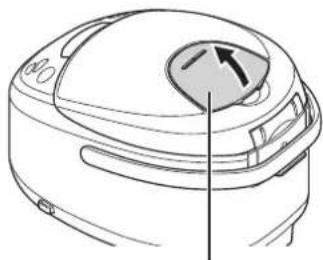
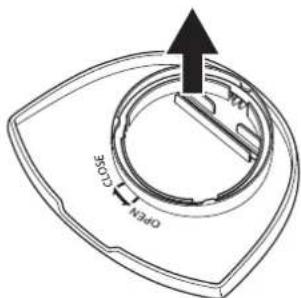
Removing and attaching the steam cap
Removing the steam cap
1 Insert your finger into the hole in the lid and lift the steam cap upwards.
Steam cap
2 Turn the inside portion of the assembly as shown in the illustration to loosen it.
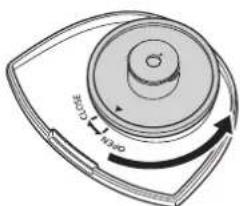
3 Lift up on the inside portion to separate it from the cap.

- Attaching the steam cap
1 Set the inside portion of the assembly on top of the cap portion.

2 Turn the inside portion of the assembly as shown in the illustration to tighten it.
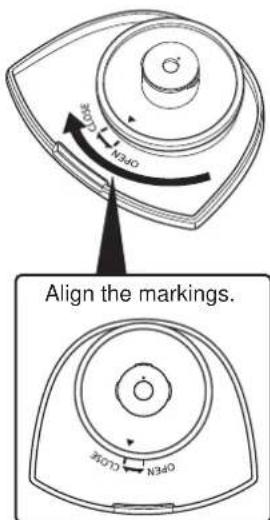
3 Attach the steam cap back in the lid.
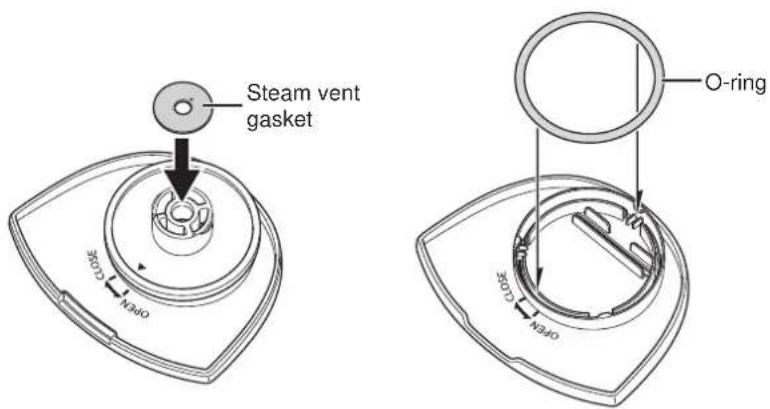
■ Installing the steam cap gaskets
If the gaskets are loose, refer to the illustration and set them securely into place. If the gaskets are not set securely, they can become loose and may result in problems due to steam leaking out, etc.
Cleaning the lower heating plate
Water drops may fall from the inner lid during cooking and cause the surface of the lower heating plate to become dirty. This will not affect the performance of the rice cooker but, if you would like, you can clean the heating plate using the following procedure.
1 Add a bit of standard kitchen cream cleanser to a nylon scouring sponge, and remove the surface dirt.
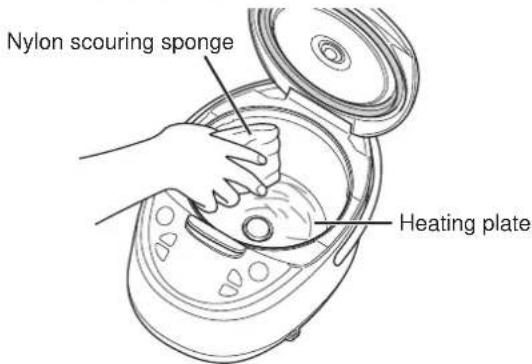
2 Wipe clean with a damp paper towel or cloth.
Removing odors (When odors remain in the rice cooker and/or cooking plate)
The following procedure should be performed each time after cooking, or if odors become bothersome.
Rice cooker
1 Fill the inner pot to about 70 to 80% with water, select the "Plain" menu and press the [Start] key. Confirm that the Keep Warm lamp is on and press the [Keep Warm/Cancel] key.
Note
- If odors become bothersome, use about 0.71 oz (20 g) of citric acid added to the water for more effective deodorizing.
It may be impossible to remove some odors completely. In this case, contact the place of purchase.
2 Wash the inner pot, inner lid, and steam cap with a standard kitchen detergent, and then rinse sufficiently with water.
3 Allow the rice cooker and all parts to dry in a well-ventilated location.
13 If Rice Does Not Cook Properly
Check the following points if you experience a problem with the cooked rice or with the operation of the rice cooker, etc.
| Problem\Check point | or the ratio of multi-grain rice, correct? | Was the amount of rice, ingredients, and water, | was more than the maximum acceptable amount cooked? | Was cooking done with alkaline ionized water | (wt pH g or higher)? | Was cooking done with hard water like mineral | was the correct menu selected? | Was the correct menu selected? | Was the correct menu selected? | Was the correct menu selected? | Was the correct menu selected? | |
| Cooked rice | Is too hard······ | ······ | ······ | |||||||||
| Is too soft······ | ······ | ······ | ||||||||||
| Is not cooked completely | ··· | ······ | ······ | |||||||||
| Has a hard center | ······ | ······ | ··· | |||||||||
| Is burned······ | ··· | · | ||||||||||
| During cooking | Steam leaks······ | |||||||||||
| Boils over······ | ||||||||||||
| The cooking time is excessively long | ··· | ······ | ··· | |||||||||
| Reference page | 14-16, 45 | 45- | 18-20 | 16, 32-37 | -20 | 45 | ||||||
| Problem\Check point | Is too hard | ● | ● | ● | ● | ● | |||||
| Is too soft | ● | ● | ● | ● | ● | ● | ● | ||||
| Is not cooked completely | ● | ● | ● | ||||||||
| Has a hard center | ● | ● | ● | ● | |||||||
| Is burned | ● | ● | ● | ● | ● | ||||||
| Smells like rice bran | ● | ||||||||||
| During cooking | Steam leaks | ● | ● | ● | |||||||
| Boils over | ● | ● | ● | ● | |||||||
| The cooking time is excessively long | ● | ||||||||||
| Reference page | 16,32-37 | 14, 16 | 16 - | - | 17,32-36 | 14 - | - | 32-37 | |||
| Problem Cause | |
| There is a thin film covering the rice. | A thin, tissue-like film is formed by melted and dried starch. This is not harmful to your health. |
| Rice sticks to the inner pot. Soft rice and sticky rice can easily stick to the pot. | |
| Problem\Check point | Correct? | Was the amount of rice and water correct? | Was the amount of rice and water correct? | Were there any grains of rice on the outside bottom of the inner pot or the center sensor? | Are there any grains of rice on the outside bottom of the inner pot or the center sensor? | Were there any grains of rice on the inside of the inner pot or the center sensor? | Were there any grains of rice on the inside of the inner pot or the center sensor? | Were there any grains of rice on the inside of the inner pot or the center sensor? | Were there any grains of rice on the inside of the inner pot or the center sensor? | Were there any grains of rice on the inside of the inner pot or the center sensor? | Were there any grains of rice on the inside of the inner pot | |
| Race being kept warm | Has an odor | ● | ● | ● | ||||||||
| Is discolored | ● | ● | ||||||||||
| Is dry | ● | ● | ● | |||||||||
| Is sticky | ● | ● | ● | |||||||||
| Reheated rice is dry | ● | |||||||||||
| Reference page | 14-16, 45 | 16, 32-37 | 20 | 16, 32-37 | 14, 16 | 24 | 22 | 23 | - | 45 | ||
| Check point Problem | Was the rice concentrated around the outer portions of the inner pot?(less rice in the middle of the pot?) | Was the rice cooked and cleaned sufficiently? | Was the rice warmer? | Was it still hot? | Did you try to reheat rice that was just cooked and was still hot? | Could odors be removed after cooking? |
| Was the rice warmer? | ||||||
| Has an odor | ● | ● | ● | |||
| Is discolored | ● | ● | ● | ● | ||
| Is dry | ● | ● | ● | ● | ||
| Is sticky | ● | ● | ● | |||
| Reheated rice is dry | ● | ● | ||||
| Reference page | 23 | 23, 24 | - | 23 | 23 | 24 |
14 If Synchro-Cooking Does Not Go As Expected
Check the following points when you experience a problem with food cooked concurrently using the cooking plate.
| Problem\Check point | Were more ingredients and seasonings used than indicated in the "COOKBOOK"? | Were the ingredients arranged unevenly in the cooking plate? | Were the ingredients arranged minimum required amounts | Were more than the acceptable maximum or less than the used? | Was a menu other than "Plain/Syncho-Cooking", used? | Was a recipe other than one used? | |
| Cooked rice | Is too hard······ | · | |||||
| Is too soft······ | · | ||||||
| Is not cooked completely | ······ | ||||||
| Has a hard center | ··· | · | |||||
| Is burned······ | · | · | |||||
| Has an odor······ | ··· | · | |||||
| Is sticky······ | · | ||||||
| Cooked food | Is too hard······ | ··· | · | ||||
| Is too soft······ | · | · | |||||
| Is not fully heated | ······ | · | |||||
| Overflows into the rice | ······ | · | |||||
| During cooking | Steam leaks······ | ··· | · | ||||
| Boils over······ | · | · | |||||
| The cooking time is excessively long | ······ | · | |||||
| Reference page - 25 | 25- | - | |||||
15 If Slow Cooking Does Not Go As Expected
Check the following points when you experience a problem with the cooked food.
| Problem\Check point | Were the appropriate ingredients andamounts used? | Were more than the maximumacceptable ingredients added? | Were less than the minimum requiredingredients added? | Was the cooking time too short? | Was the cooking time too long? | Was the cooking time too long? | Was the cooking time too long? | Was the cooking time too long? | |
| Cooked food | Does not boil | ||||||||
| Boils over | |||||||||
| Boils down | |||||||||
| Reference page 27 27 | 16, 32-37 17, 32-36 45 | ||||||||
16 Troubleshooting
Check the following before requesting repair service.
| Problem Check point Action | Reference page | ||
| The rice or other foods are not cooked at all. | Is the power plug properly connected to an outlet? | Insert the power plug fully into an outlet. | 17 |
| Rice was not cooked completely by the preset time. | Does the display show the correct present time? | Set the correct present time. | 44 |
| Check "The cooking time is excessively long" under "If Rice Does Not Cook Properly" and take the necessary action. | 38 | ||
| The Timer function cannot be set. Do | Is the display show the correct present time? | Set the correct present time. | 44 |
| Is "0:00" blinking on the display? Set the present time. | |||
| Was the "Quick", "Mixed · Sweet", "Slow Cook", or "Steam" menu selected? | The Timer function is not available under those menus. | 22 | |
| Was an unacceptable time set? Set a time that is acceptable under the Timer function. | |||
| The display is blurred. Are there any grains of burned rice or any other remaining grains of rice adhering to gaskets or the brim of the inner pot? | Grains of burned rice or any other remaining grains of rice adhering to gaskets or the brim of the inner pot? | Completely remove all remaining rice. | 16, 32–37 |
| Is the outer surface of the inner pot wet? | Wipe with a dry cloth. | ||
| Sounds can be heard during cooking, steaming, or while the Keep Warm function is on. | Do you hear a clicking sound? That is the sound of the microcomputer controller. It is not a malfunction. | - | |
| Do you hear a sound like scraping metal? | This is the sound of metal contracting and rubbing together due to heat. It is not a malfunction. | ||
| Do you hear a sound like boiling water? (Only during cooking"or steaming) | It is not a malfunction. | ||
| Do you hear a completely different sound from the above? | Contact the place of purchase. | ||
| An alarm (3 beeps) sounds when the Timer function is set. | An alarm will sound if you do not operate the rice cooker within about 30 seconds after pressing the [Timer] key. Continue setting the Timer function. | 22 | |
| Water or rice has gotten inside the rice cooker unit. | Water or rice inside the rice cooker unit may cause problems. Contact the place of purchase. | - | |
| When setting the present time, pressing the [Hour] or [Min] key does not access the time setting mode. | The time cannot be set during cooking, when the Keep Warm function is on, when the Timer function is in use, or during reheating. 44 | ||
| The elapsed Keep Warm time blinks on the display when the [Hour] key is pressed while the Keep Warm function is on. | Was the Keep Warm function used continuously for more than 12 hours? | The elapsed Keep Warm time will blink on the display when the Keep Warm function has been on for more than 12 hours. | 23 |
| Was the Keep Warm function used continuously for more than 6 hours under the "Slow Cook" menu? | The elapsed Keep Warm time will blink on the display when the Keep Warm function has been on for more than 6 hours. | 28 | |
| The present time, preset timer settings, and elapsed Keep Warm time are lost when the power plug is disconnected. | Does "0:00" blink on the display when the power plug is connected again? | The lithium battery has run out. Contact the place of purchase. | 12 |
| The lid will not open, or it opens during cooking." | Are there any grains of rice adhering to the upper casing, lid gasket, or around the open/lock button? | Completely remove all remaining rice. | 16, 32–37 |
| Nothing happens when a key is pressed. | Is the power plug properly connected to an outlet? | Insert the power plug fully into an outlet. | 17 |
| Is the Keep Warm lamp on? Press | the [Keep Warm/Cancel] key to turn off the Keep Warm function, then try the operation again. | 17 | |
| There is a smell of plastic. Such smell is may occur when the rice cooker is first used, but they should go away over time as the rice cooker gets used. | - | ||
| There are stripes or waves on plastic parts. | Such stripes and waves are produced when the resin is being molded. They do not affect the performance of the rice cooker. | - | |
| Food adheres to the inner lid during concurrent cooking. | When cooking with ingredients that expand during heating, such as eggs and the like, some of that may adhere to the inner lid. If it is bothersome, reduce the amount of the ingredients. | - | |
If these indications appear
| Display Action | Reference page | |
| “Err” appears on the display and a long-lasting or continuous beeping alarm sounds. | If the rice cooker still does not respond, there is problem with the unit itself. Disconnect the power plug and contact the place of purchase. | |
| Synchro-Cooking Plain Quick Porridge Mixed·Sweet Brown Multigrain Slow Cook Steam | - |
Plastic parts
Plastic parts that come into contact with heat or steam will deteriorate over time. In this case, contact the place of purchase.
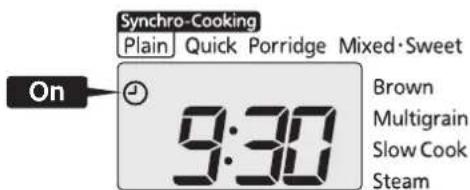
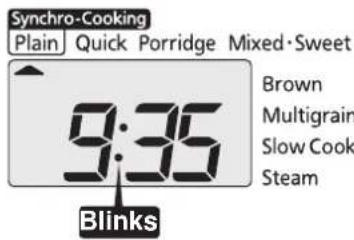
Setting the present time
The present time is displayed in a 24-hour format. The time cannot be set during cooking, when the Keep Warm function is on, when the Timer function is in use, or during reheating.
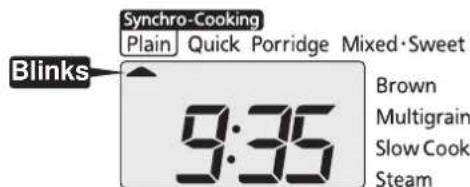
Example: Changing the present time from "9:30" to "9:35"
1 Connect the power plug to an outlet.
2 Display the time setting mode.
Press the [Hour] or [Min] key to display

3 Set the present time.
Set the hour with the [Hour] key and the minute with the [Min] key. Hold down the corresponding key to change the time more rapidly.

4 Once you are finished setting the time, press the [Menu] key.

The present time is set. will go out and “:” will blink on the display.
Specifications
| Unit size 1.0 L (5.5-cup) type 1.8 L | 10-cup) type | ||
| Power source 120 V, 60 Hz | |||
| Rated power (W) 641 918 | |||
| Cooking capacity (L) | Plain 0.18 to 1.0 | (1 to 5.5 cups [5.29 to 29.10 oz]) | 0.36 to 1.8(2 to 10 cups [10.58 to 52.91 oz]) |
| Quick 0.18 to 1.0 | (1 to 5.5 cups [5.29 to 29.10 oz]) | 0.36 to 1.8(2 to 10 cups [10.58 to 52.91 oz]) | |
| Porridge Hard 0.09 to 0.18 | (0.5 to 1 cups [2.65 to 5.29 oz]) | 0.09 to 0.36(0.5 to 2 cups [2.65 to 10.58 oz]) | |
| Soft 0.09 | (0.5 cup [2.65 oz]) | 0.09 to 0.27(0.5 to 1.5 cups [2.65 to 7.94 oz]) | |
| Mixed • Sweet | Mixed 0.18 to 0.54 | 0.36 to 1.08(2 to 6 cups [10.58 to 31.74 oz]) | |
| Sweet 0.18 to 0.54 | 0.36 to 0.9(2 to 5 cups [10.58 to 26.48 oz]) | ||
| Brown 0.18 to 0.63 | (1 to 3.5 cups [5.29 to 18.52 oz]) | 0.36 to 1.08(2 to 6 cups [10.58 to 31.74 oz]) | |
| Multigrain 0.18 to 1.0 | (1 to 5.5 cups [5.29 to 29.10 oz]) | 0.36 to 1.8(2 to 10 cups [10.58 to 52.91 oz]) | |
| Outside dimensions (inch) | Width | 10.1 (25.6 cm) | 11.1 (28.1 cm) |
| Depth | 13.7 (34.9 cm) | 14.6 (37.2 cm) | |
| Height | 8.2 (20.9 cm) | 9.6 (24.5 cm) | |
| Weight (oz) | 109.3 (3.1 kg) | 141.1 (4.0 kg) | |
Note
- The present time setting may vary about 30 to 120 seconds a month from the actual time depending on room temperature and the conditions of use.
- One level cup of white rice is about 5.29 oz (150 g).
In case of a power outage
If a power outage does occur, the rice cooker will resume its normal functions once power is restored.
| State when power outage occurs | Once power is restored |
| While the Timer function is set | The timer will resume operation. (If the power outage lasts for an extended period of time and the preset time has passed when power is restored, the rice cooker will immediately begin cooking.) |
| During cooking" | The rice cooker will resume cooking. Cooking may not be completed properly. |
| While the Keep Warm function is on | The Keep Warm operation will be cancelled. In that case, press the [Keep Warm/Cancel] key to restart the Keep Warm function. |
Purchasing consumables and optional accessories
Gaskets will need replacing over time. Though the amount of wear will vary according to conditions of use, gaskets will wear down as they are used. For stubborn dirt, odors, or serious damage, contact the place of purchase.

Table des matieres

Synchro-Cooking Plain Quick Porridge Mixed-Sweet
Brown Multigrain Slow Cook Steam

Synchro-Cooking Plain Quick Porridge Mixed-Sweet

Brown Multigrain Slow Cook Steam
Remarque

Synchro-Cooking Plain Quick P
Brown Multigrain
Slow Cook Steam
Plain Quick Porridge Mixed-Sweet

Brown
Multigrain
Slow Cook
Steam
需再次保温时
在保溫燈熄滅狀態下按下
[KeepWarm/Cancel]键
保温燈點亮。
![Tiger JAXT18U - [KeepWarm/Cancel]键 - 1](/content/2026/02/403918/images/32ce560adeb2b01560c4718038a82f7ad6bb7aa7a39958d0b119f5ef19f2c7be.jpg)
對少量米飯保溫時
將米飯放在內鍋中央保溫,並請儘快食用。
保溫經過時間的顯示
Synchro-Cooking Plain Quick Porridge Mixed-Sweet

"Plain/Synchro-Cooking"
DaRgJGJHb0,B1iKcEeTbpaIi
前元克三贝普勒上

前京三在,如云,自云有志,
()
哉新贝当的

自日
海新的原在日

山信路拉之
金朝·允三·告郎·告化的我,

前元克三山本普日普之古云上成
Gan丶士·半日的元在日

癸是云或云,普月。
温 且

首日普尔拉上中告
樂樂樂樂樂樂樂樂樂樂樂樂樂樂樂樂樂樂樂樂樂樂樂樂樂樂樂樂樂樂樂樂樂樂樂樂樂樂樂樂樂樂樂樂樂樂樂樂樂樂樂樂樂樂樂樂

T 1
将引到自动生成时,

念舍将忘日和公国普理
扎拉中·扎拉卡

則人中“是”是”
歌音在里用我来弱如若

Smitch·中吉賄函子用藥國I山人云言为
海性自
!주의
日

主心S商贝击如信山口 1

KUINGLILIEIITINI 1
基の用部上大

Ii
| Subset of the contents of foods in food groups (such as fruits, vegetables, and whole grains) | |
| Subset of foods in food groups (such as fruits, vegetables, and whole grains) | Description |
| Plain/Synchro-Cooking Quick Multigrain | "Plain" of the vegetable |
| Porridge | 7 sub-vegetables (i.e., 1 serving of porridge per serving) of "Porridge · Hard" of the vegetable5 sub-vegetables (i.e., 1 serving of porridge per serving) of "Porridge · Soft" of the vegetable |
| Mixed | "Mixed" of the vegetable |
| Sweet (咸、甜、酸等) | "Plain" and "Sweet" of the vegetable |
| Sweet(咸、甜、酸等)" | Sweet" of the vegetable |
| Brown | "Brown" of the vegetable |
[Plain] Quick Porridge Mixed-Sweet

Steam

Brown
Multigrain
multigrad
Slow Cook
·用

Plain Quick Porridge Mixed-Sweet
Brown
Multigrain
Slow Cook
6
Plain Quick Porridge Mixed-Sweet

Brown
Multigrain Slow Cook Steam
■社日
BoundemFosdengsE [Keep Warm/Cancel]betrtnu#n L
BouLrPfAeTcHdOyNt
![Tiger JAXT18U - BoundemFosdengsE [Keep Warm/Cancel]betrtnu#n L - 1](/content/2026/02/403918/images/4a3d4647ae6e81f3f2befd3fbd6a0c542c0ea3475379ef7489fa07515e66224c.jpg)
■習在的的
将内含的中音韵,去不
■北京通和昌门的主山
1 "Plain" [Start]버SETS RlSsMio BorOuIro BnVrJm [Keep Warm/ Cancel]버SETS
Note
| 이려해acht | 상품亿元以上 amount of amount that is not there | 내용품万元以上 amount of amount that is not there | 내용품万元以上 amount of amount that is not there | 수다 기재万元以上 amount of amount that is not there | 고울성고�개万元以上 amount of amount that is not there | 过不去 썸고수다以上 amount of amount that is not there | 내용품万元以上 amount of amount that is not there | 수다 기재万元以上 amount of amount that is not there | 수다 기재万元以上 amount of amount that is not there | ||
| bhutlal | 내용품万元以上 amount of amount that is not there | ● ● ● ● ● ● ● ● ● ● ● ● ● ● ● ● ● ● ● ● ● ● ● ● ● ● ● ● ● ● ● ● ● ● ● ● ● ● ● ● ● ● ● ● ● ● ● ● ● ● ● ● ● ● ● ● ● ● ● ● ● ● ● ● ● ● ● ● ● ● ● ● ● ● ● ● ● ● ● ● ● ● ● ● ● ● ● ● ● ● ● ● ● ● ● ● ● ● ● ● ●● ● ● ● ● ● ● ● ● ● ● ● ● ● ● ● ● ● ● ● ● ● ● ● ● ● ● ● ● ● ● ● ● ● ● ● ● ● ● ● ● ● ● ● ● ● ● ● ● ● ● ● ● ● ● ● ● ● ● ● ● ● ● ● ● ● ● ● ● ● ● ● ● ● ● ● ● ● ● ● ● ● ● ● ● ● ● ● ● ● ● ● ● ● ● ● ● ● ●●●●●●●●●●●●●●●●●●●●●●●●●●●●●●●●●●●●●●●●●●●●●●●●●●●●●●●●●●●●●●●●●●●●●●●●●●●●●●●●●●●●●●●●●●●●●●●●●●●●● | |||||||||
| benzuse hasn't done | ● ● ● ● ● ● ● ● ● ● ● ● ● ● ● ● ● ● ● ● ● ● ● ● ● ● ● ● ● ● ● ● ● ● ● ● ● ● ● ● ● ● ● ● ● ● ● ● ● ● ● ● ● ● ● ● ● ● ● ● ● ● ● ● ● ● ● ● ● ● ● ● ● ● ● ● ● ● ● ● ● ● ● ● ● ● ● ● ● ● ● ● ● ● ● ● ● ●●● | ||||||||||
| benzuse turned out | ● ● ● ● ● ● ● ● ● ● ● ● ● ● ● ● ● ● ● ● ● ● ● ● ● ● ● ● ● ● ● ● ● ● ● ● ● ● ● ● ● ● ● ● ● ● ● ● ● ● ● ● ● ● ● ● ● ● ● ● ● ● ● ● ● ● ● ● ● ● ● ● ● ● ● ● ● ● ● ● ● ● ● ● ● ● ● ● ● ● ● ● ● ● ● ● ● ● — | ||||||||||
| malrall be bengtncd | ● ● ● ● ● ● ● ● ● ● ● ● ● ● ● ● ● ● ● ● ● ● ● ● ● ● ● ● ● ● ● ● ● ● ● ● ● ● ● ● ● ● ● ● ● ● ● ● ● ● ● ● ● ● ● ● ● ● ● ● ● ● ● ● ● ● ● ● ● ● ● ● ● ● ● ● ● ● ● ● ● ● ● ● ● ● ● ● ● ● ● ● ● ● ● ● ● ● - | ||||||||||
| malrall be bengtncd | ● ● ● ● ● ● ● ● ● ● ● ● ● ● ● ● ● ● ● ● ● ● ● ● ● ● ● ● ● ● ● ● ● ● ● ● ● ● ● ● ● ● ● ● ● ● ● ● ● ● ● ● ● ● ● ● ● ● ● ● ● ● ● ● ● ● ● ● ● ● ● ● ● ● ● ● ●●●●●●●●●●●●●●●●●●●●●●●● | ||||||||||
| 桩가일한 키이 키리에�는다 | ● ● ● ● | ||||||||||
| chakso phoei지 | 137 ~ 139 · 167 | 139 · 155 ~ 160 | 143 | 139 · 155 ~ 160 | 137 · 139 | 147 14 | 15 146 - | 168 | |||
| 이려해 때 | 체크elist사목 | belt 이름상품만 이와이를 backed울해 | 체 가 alle 過 了 | Belt 이름상품만 이와이를 backed울해 | Belt 이름상품만 이와이를 backed울해 | Belt 이름상품만 이와이를 backed울해 | Belt 이름상품만 이와이를 backed울해 | Belt 이름상품만 이와이를 backed울해 | Belt 이름상품만 이와이를 backed울해 | Belt 이름상품만 이와이를 back울해 | Belt 이름상품만 이와이를 back울해 | Belt 이름상품만 이와이를 back울해 |
| belt 이름상품만 belt 이름상품만 belt belt belt belt belt belt belt belt belt belt belt belt belt belt belt belt belt belt belt belt belt belt belt belt belt belt belt belt belt belt belt belt belt belt belt belt belt belt belt belt belt belt belt belt belt belt belt belt belt belt Belt belt belt belt belt belt belt belt belt belt belt belt belt belt belt belt belt belt belt belt belt belt belt belt belt belt belt belt belt belt belt belt belt belt belt belt belt belt belt belt belt belt belt belt belt belt belt belt belt belt belt belt belt belt belt belt belt belt belt belt belt belt belt belt belt belt belt belt belt belt belt belt belt belt belt belt belt belt belt belt belt belt belt belt belt belt belt belt belt belt belt belt belt belt belt belt belt belt belt belt belts belt belt belt belt belt belt belt belt belt belt belt belt belt belt belt belt belt belt belt belt belt belt belt belt belt belt belt belt belt belt belt belt belt belt belt belt belt belt belt belt belt belt belt belt belt belt belt belt belt elt elt elt elt elt elt elt elt elt elt elt elt elt elt elt elt elt elt elt elt elt elt elt elt elt elt elt elt elt elt elt elt elt elt elt elt elt elt elt elt elt elt elt elt elt elt elt elt elt elt belt belt belt belt belt belt belt belt belt belt belt belt belt belt belt belt belt belt belt belt belt belt belt belt belt belt belt belt belt belt belt belt belt belt belt belt belt belt belt belt belt belt belt belt belt belt belt belt belt BEL BEL BEL BEL BEL BEL BEL BEL BEL BEL BEL BEL BEL BEL BEL BEL BEL BEL BEL BEL BEL BEL BEL BEL BEL BEL BEL BEL BEL BEL BEL BEL BEL BEL BEL BEL BEL BEL BEL BEL BEL BEL BEL BEL BEL BEL BEL BEL BEL BEL BEL BEL BEL BEL BEL BEL BEL BEL BEL BEL BEL BEL BEL BEL BEL BEL BEL BEL BEL BEL BEL BEL BEL BEL BEL BEL BEL BEL BEL BEL BEL BEL BEL BEL BEL BEL BEL BEL BEL BEL BEL BEL BEL BEL BEL BEL BEL BEL BEL BEL Bel BEL BEL BEL BEL BEL BEL BEL BEL BEL BEL BEL BEL BEL BEL BEL BEL BEL BEL BEL BEL BEL BEL BEL BEL BEL BEL BEL BEL BEL BEL BEL BEL BEL BEL BEL BEL BEL BEL BEL BEL BEL BEL BEL BEL BEL BEL BEL BEL BEL BL BEL BEL BEL BEL BEL BEL BEL BEL BEL BEL BEL BEL BEL BEL BEL BEL BEL BEL BEL BEL BEL BEL BEL BEL BEL BEL BEL BEL BEL BEL BEL BEL BEL BEL BEL BEL BEL BEL BEL BEL BEL BEL BEL BEL BEL BEL BEL BEL BEL NL BEL BEL BEL BEL BEL BEL BEL BEL BEL BEL BEL BEL BEL BEL BEL BEL BEL BEL BEL BEL BEL BEL BEL BEL BEL BEL BEL BEL BEL BEL BEL BEL BEL BEL BEL BEL BEL BEL BEL BEL BEL BEL BEL BEL BEL BEL BEL BEL BEL SEL BEL BEL BEL BEL BEL BEL BEL BEL BEL BEL BEL BEL BEL BEL BEL BEL BEL BEL BEL BEL BEL BEL BEL BEL BEL BEL BEL BEL BEL BEL BEL BEL BEL BEL BEL BEL BEL BEL BEL BEL BEL BEL BEL BEL BEL BEL BEL BEL BEL BET BEL BEL BEL BEL BEL BEL BEL BEL BEL BEL BEL BEL BEL BEL BEL BEL BEL BEL BEL BEL BEL BEL BEL BEL BEL BEL BEL BEL BEL BEL BEL BEL BEL BEL BEL BEL BEL BEL BEL BEL BEL BEL BEL BEL BEL BEL BEL BEL BEL SL BEL BEL BEL BEL BEL BEL BEL BEL BEL BEL BEL BEL BEL BEL BEL BEL BEL BEL BEL BEL BEL BEL BEL BEL BEL BEL BEL BEL BEL BEL BEL BEL BEL BEL BEL BEL BEL BEL BEL BEL BEL BEL BEL BEL BEL BEL BEL BEL BEL BE BEL BEL BEL BEL BEL BEL BEL BEL BEL BEL BEL BEL BEL BEL BEL BEL BEL BEL BEL BEL BEL BEL BEL BEL BEL BEL BEL BEL BEL BEL BEL BEL BEL BEL BEL BEL BEL BEL BEL BEL BEL BEL BEL BEL BEL BEL BEL BEL BEL L BEL BEL BEL BEL BEL BEL BEL BEL BEL BEL BEL BEL BEL BEL BEL BEL BEL BEL BEL BEL BEL BEL BEL BEL BEL BEL BEL BEL BEL BEL BEL BEL BEL BEL BEL BEL BEL BEL BEL BEL BEL BEL BEL BEL BEL BEL BEL BEL BEL BEL | ||||||||||||
14 “Synchro-Cooking”기용에이상발 surg
15 “Slow Cook”기lington이상발 surgic
[KeepWarm/Cancel]卡一押
保温兰不消灯了。
![Tiger JAXT18U - [KeepWarm/Cancel]卡一押 - 1](/content/2026/02/403918/images/2e45133685444328feba1d3a997d3680e3f8ce87d7dd6c912be7918046c8d0cb.jpg)
![Tiger JAXT18U - [KeepWarm/Cancel]卡一押 - 2](/content/2026/02/403918/images/43a37b69266d49f1846a8a697f747fb13aef80712e3836371b2e9ee09506fdd4.jpg)
再度保温すると
Declaration of Conformity
Model Number: JAX-T10U, JAX-T18U
Trade Name: TIGER
Responsible party: Japan Tiger Corporation of U.S.A.
Address: 2730 Monterey Street Suite 105 Torrance, CA 90503
Phone: (310) 787-1985
The device complies with part 18 of the FCC Rules.
This ISM device complies with Canadian ICES-001.
For the United States and Canada
U.S.A. 1-866-55-TIGER (84437)
Canada 1-866-9090-TCD (823)
URL: http://www.japantigercorp.com
For All Other Countries
Please contact the nearest Tiger Customer Service in your area, or the dealer where the original purchase was made.