GTE 280 - Freezer BAUKNECHT - Free user manual and instructions
Find the device manual for free GTE 280 BAUKNECHT in PDF.
Frequently Asked Questions - GTE 280 BAUKNECHT
User questions about GTE 280 BAUKNECHT
0 question about this device. Answer the ones you know or ask your own.
Ask a new question about this device
Download the instructions for your Freezer in PDF format for free! Find your manual GTE 280 - BAUKNECHT and take your electronic device back in hand. On this page are published all the documents necessary for the use of your device. GTE 280 by BAUKNECHT.
USER MANUAL GTE 280 BAUKNECHT
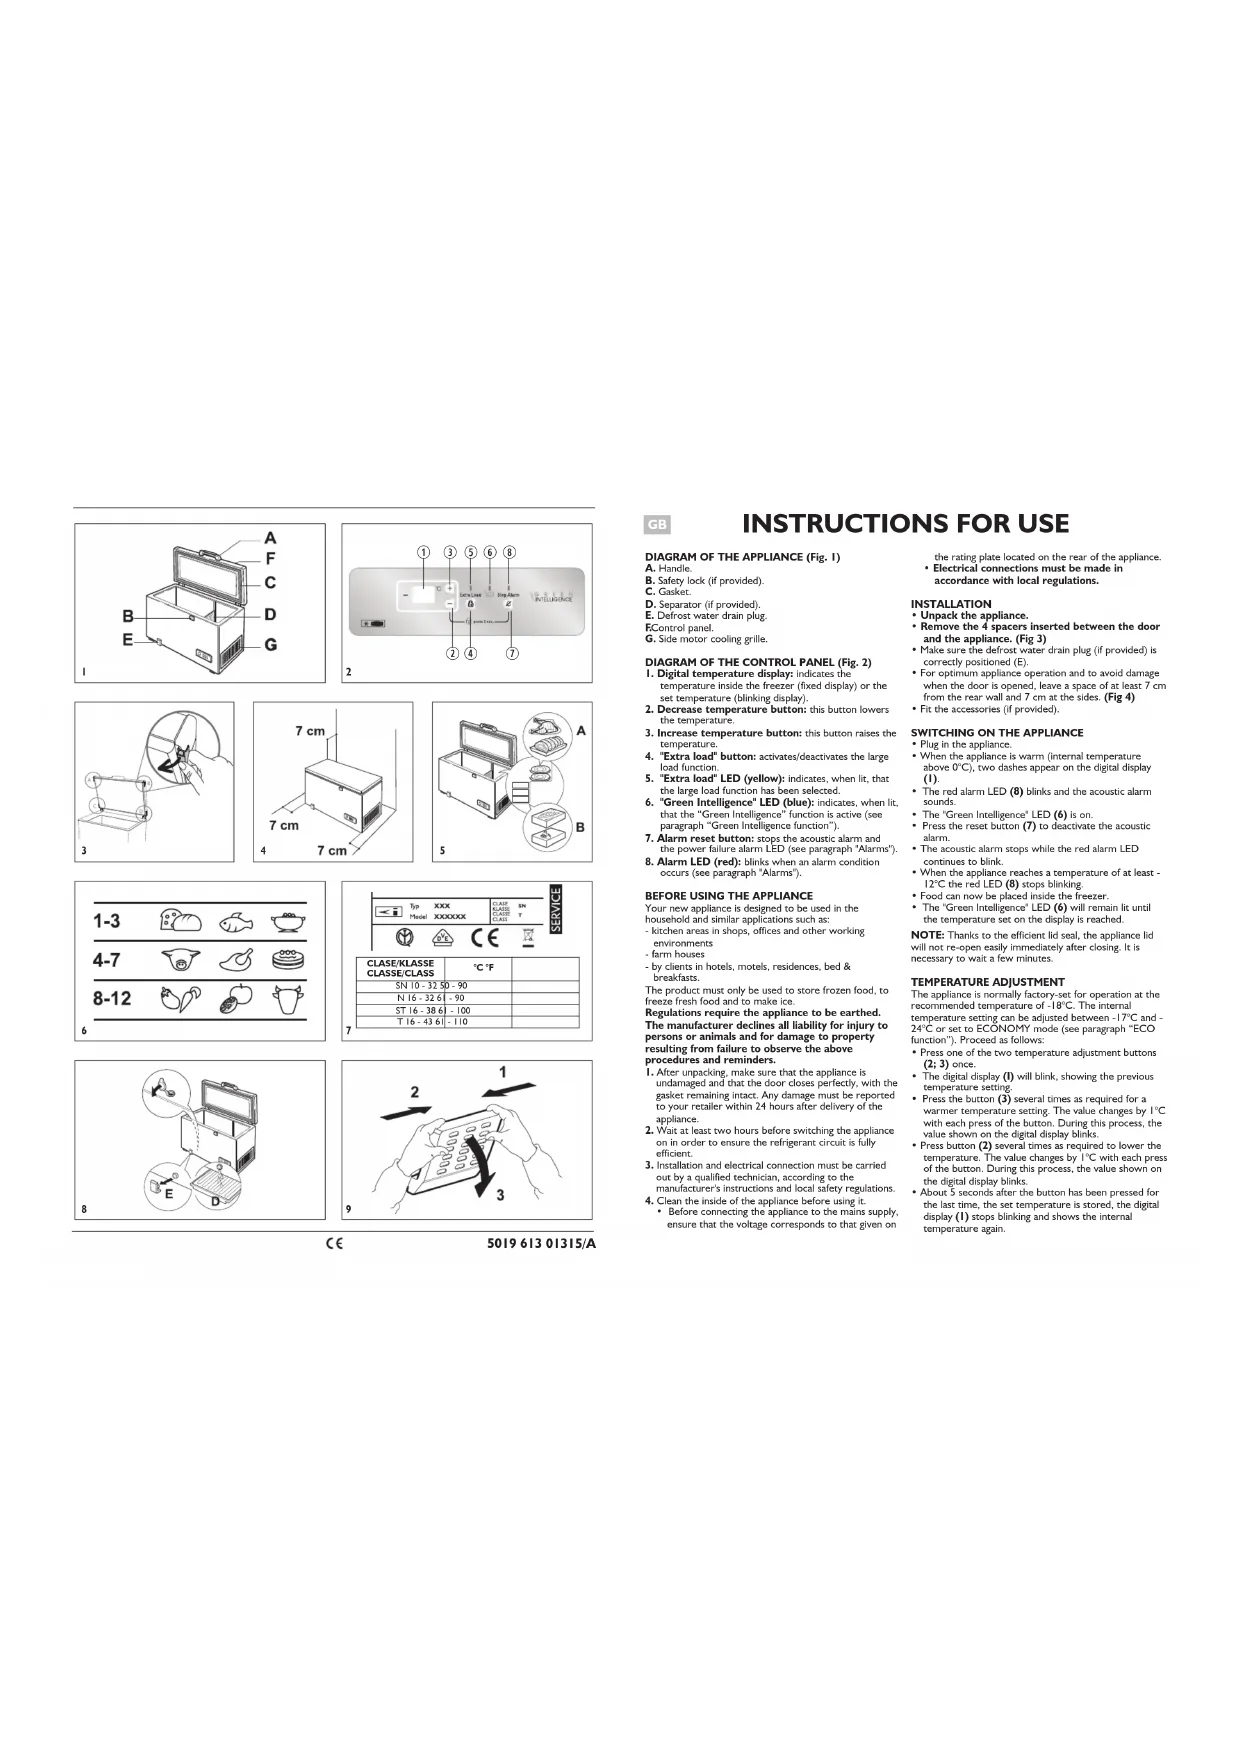
DIAGRAM OF THE APPLIANCE (Fig.1)
B. Safety lock (if provided)
C. Gasket
D. Separator (if provided)
E. Defrostr water drain plug
ECore panel
G. Side motor cooling grille
DIAGRAM OF THE CONTROL PANEL (Fig. 2)
- Digital temperature display: indicates the temperature inside the freezer (fixed display) or the set temperature (blinking display).
- Decrease temperature button: this button lowers the temperature.
- Increase temperature button: this button raises the temperature.
- "Extra load" button: activators/deactivates the large load function.
- "Extra load" LED (yellow): indicates, when it, that the large load function has been selected.
- "Green Intelligence" LED (blue): indicates, when in that the "Green Intelligence" function is active (see paragraph "Green Intelligence function").
- Alarm reset button: stops the acoustic alarm and the power failure alarm LED (see paragraph 'Alarms').
- Alarm LED (red): blinks when an alarm condition occurs (see paragraph 'Alarms').
BEFORE USING THE APPLIANCE
Your new appliance is designed to be used in the household and similar applications such as:
- kitchen areas in shops, offices and other working environments
- farm houses
- by clients in hotels, motels, residences, bed & breakfasts
The product must only be used to store frozen food, to freeze fresh food and to make ice.
Regulations require the appliance to be earthed. The manufacturer declines all liability for injury to persons or animals and for damage to property resulting from failure to observe the above procedures and reminders.
1. After unpacking, make sure that the appliance is undamaged and that the door closes perfectly, with the gasket remaining intact. Any damage must be reported to your retailer within 24 hours after delivery of the appliance.
2. Wait at least two hours before switching the appliance on in order to ensure the refrigerant circuit is fully efficient.
3. Installation and electrical connection must be carried out by a qualified technician, according to the
manufacturer's instructions and local safety regulations. 4. Clean the inside of the appliance before using it.
- Before connecting the appliance to the mains supply, ensure that the voltage corresponds to that given on
the rating plate located on the rear of the appliance. Electrical connections must be made in accordance with local regulations.
INSTALLATION
- Unpack the appliance.
- Remove the 4 spacers inserted between the door and the appliance. (Fig 3)
Make sure the defrost water drain plug (if provided) is correctly positioned (E). - For optimum appliance operation and to avoid damage when the door is opened, leave a space of at least 7cm
from the rear wall and 7cm at the sides. (Fig 4) Fit the accessories (if provided).
SWITCHING ON THE APPLIANCE
Plug in the appliance.
- When the appliance is warm (internal temperature above 0^ ), two dashes appear on the digital display (1).
- The red alarm LED (8) blinks and the acoustic alarm sounds.
The "Green Intelligence" LED (6) is on.
Press the reset button (7) to deactivate the acoustic alarm.
- The acoustic alarm stops while the red alarm LED continues to blink.
- When the appliance reaches a temperature of at least -12^ the red LED (8) stops blinking.
Food can now be placed inside the freezer.
- The "Green Intelligence" LED (6) will remain lit until the temperature set on the display is reached.
NOTE: Thanks to the efficient lid seal, the appliance lid will not re-open easily immediately after closing. It is necessary to wait a few minutes.
TEMPERATURE ADJUSTMENT
The appliance is normally factory-set for operation at the recommended temperature of -18^ . The internal
temperature setting can be adjusted between -17^ and -24^ or set to ECONOMY mode (see paragraph "ECO function"). Proceed as follows:
- Press one of the two temperature adjustment buttons (2; 3) once.
- The digital display (I) will blink, showing the previous temperature setting.
- Press the button (3) several times as required for a warmer temperature setting. The value changes by 1^ with each press of the button. During this process, the value shown on the digital display blinks.
- Press button (2) several times as required to lower the temperature. The value changes by 1^ with each press of the button. During this process, the value shown on the digital display blinks.
-
About 5 seconds after the button has been pressed for the last time, the set temperature is stored, the digital display (1) stops blinking and shows the internal temperature again.
-
To check the appliance temperature setting at any time, press one of the temperature adjustment buttons once. The set value will blink for 5 seconds, after which the internal temperature of the freezer will be displayed again.
NOTE: in the event of a power failure, settings remain memorised. The time required for the temperature inside the freezer to reach the set value can vary according to the weather conditions and the temperature setting; in any case temperature variations are displayed with some delay.
ECO function
ECONOMY mode is recommended when the appliance is only partly loaded, below the level of the "e" on the separator. To set the ECO function:
- Press one of the temperature adjustment buttons (2; 3).
- The digital display (1) will blink, showing the previous temperature setting.
- Press the button (3) several times as required to increase the temperature until the value EC appears on the digital display.
NOTE: if the large load freeze function is activated when the appliance is in ECO mode, the ECO mode is automatically deactivated for the entire duration of the function.
GREEN INTELLIGENCE FUNCTION
The Green Intelligence function is automatically activated in the following cases:
Lid opening
- The function activates when lid opening causes the internal temperature to increase to values that do not ensure safe storage of food and remains active until optimal storage conditions have been restored.
Loading food to be frozen
- The function activates when fresh food is placed in the freezer and remains active until optimal freezing conditions are reached so as to ensure the best freezing quality with the lowest power consumption.
NOTE: the duration of the Green Intelligence function is calculated according to the amount of food loaded in the freezer, the amount of food already inside the freezer and the outside temperature. Therefore significant duration variations are quite normal.
Control panel lock
- This function prevents anyone from inadvertently changing settings.
- Once this function has been selected, even if a button is pressed the corresponding function is not activated.
To lock the control panel, press buttons (2) and (7) together for about 3 seconds until the display shows the symbol before showing the set temperature again. - To unlock the control panel, follow the same procedure: when the symbol disappears, the control panel lock is deactivated.
ALARMS
- Temperature alarm
Signals that the internal temperature is above -12^ . The acoustic alarm sounds and the red LED (8) flashes. To deactivate the acoustic alarm, press the button (7). The LED (8) will continue to flash until the temperature falls below -12^ .
Note: in these circumstances the Green Intelligence LED is activated automatically until normal storage conditions are restored.
Prolonged power failure alarm
Indicates that the internal temperature has risen above -8^ following a power failure.
The acoustic alarm sounds, the red LED (8) blinks and the digital display (1) flashes, showing the highest temperature reached during the power failure. Press the button (7); the digital display shows the current internal temperature again.
Note: in these cases the Green Intelligence LED is activated automatically.
- Sensor alarm
Indicates a temperature sensor fault. The acoustic alarm sounds, the red LED (8) blinks and the digital display shows "5F". In these circumstances, contact the After-Sales Service.
NOTE: the temperature alarm may also be activated after loading fresh food or prolonged door opening; in any case, this does not affect the perfect preservation of already frozen food. A power failure, on the other hand, may compromise the preservation of frozen food, in which case make sure to check the food to avoid any risk.
FREEZING FOOD
Preparing fresh food for freezing
- Wrap and seal the fresh food in: aluminium foil, cling film, plastic bags, polyethylene containers with lids,
Food must be balanced and of good quality in order to be safe, healthy and - Fresh fruit and vegetables should preferably be frozen as soon as they are picked to maintain the full original nutritional value, consistency, colour and flavour.
- Always leave hot food to cool before placing it inside the appliance.
Freezing fresh food
- Place foods to be frozen in direct contact with the walls of the appliance (Fig 5): A) - foods to be frozen. B) - foods already frozen
- Avoid placing foods to be frozen in direct contact with food already frozen.
- For best and fastest freezing, food should be split into small portions; this will also be useful when the frozen items are to be used.
- If the amount of food placed in the freezer is less than 10 - 12kg , appliance operation will be automatically controlled by the "Green Intelligence" function (see section "Green Intelligence Function") and the user is
not required to perform any procedure.
- To freeze larger amounts, exploiting the maximum freezing capacity of the appliance as specified on the data plate, it is necessary to activate the large load freeze function 24 hours before loading the food to be frozen.
- To activate the large load freeze function, press the button (4). The yellow LED (5) lights up.
After placing the fresh food in the freezer, it is advisable to keep the lid of the appliance closed for 24 hours. Food will be fully frozen after this period of time. - To deactivate the large load freeze function, press the button (4); if this procedure is not carried out, the appliance will automatically deactivate the function approx. 48 hours after activation.
FOOD STORAGE
Refer to the table on the appliance.
Classification of frozen foods Load and classify the frozen foods; it is advisable to indicate the storage date on the packs, to ensure consumption before the expiry dates listed in months in fig. 6 for each type of food.
Advice for storing frozen food
When buying frozen food, make sure that: The packaging is intact (food in damaged containers may have deteriorated). If a package is swollen or has damp patches, the product may not have been stored in optimum conditions and therefore undergone partial defrosting.
- When shopping, leave frozen food purchases until last and carry them in a thermally insulated bag.
- On arriving home, immediately place the frozen food in the appliance.
- Avoid or minimise temperature variations. Observe the expiry date on the packaging.
- Always follow the storage instructions on frozen food packages.
Note:
Eat fully or partially defrosted foods immediately. Do not refreeze unless the food is cooked after it has thawed. Once cooked, the food can be refrozen.
- In case of a prolonged power failure: Do not open the appliance door, except to place ice packs (if provided) over the frozen foods on the right and left side of the appliance. This will slow down the rise in temperature.
PRECAUTIONS AND SUGGESTIONS
- During installation, make sure the appliance does not damage the power cable.
- Do not store glass containers with liquids inside the product as they may break.
-
Do not eat ice cubes or ice lollies immediately after taking them out of the appliance as they may cause cold burns.
Before carrying out any maintenance or cleaning, always unplug the appliance or disconnect the power supply. -
Do not install the appliance in places exposed to direct sunlight or near heat sources in order to avoid increasing power consumption.
- Do not put aerosol spray cans or recipients containing propellants or flammable substances in the appliance.
- Do not store or use gasoline or other flammable liquids and gases in the vicinity of this or any other domestic appliance. The fumes can create a fire hazard or explosion.
Install the appliance in a perfectly horizontal position, on a floor strong enough to take its weight and in an area suitable for its size and use. - Install the appliance in a dry, well-ventilated place. The appliance is set for operation at specific ambient temperature ranges, according to the climatic class indicated on the data plate located at the rear of the product (Fig. 7). The appliance may not work properly if it is left for a long time at a temperature outside the specified range.
- It is advisable to leave the appliance connected if left empty even for short periods.
- Be careful not to damage the floors when you move the appliance (e.g. parquet). To facilitate product handling, it is advisable to empty it beforehand, if possible.
Note: The appliance must be handled and installed by two or more persons.
- Do not use mechanical devices or any means other than those recommended and/or supplied by the manufacturer to speed up the defrosting process.
- Do not use electrical appliances inside the product, unless such appliances are specifically recommended by the manufacturer.
- The bulb used inside the appliance is specifically designed for domestic appliances and is not suitable for general room lighting within the home (EC Regulation 244/2009).
- This appliance must not be used by children under 8 years of age, or by people with limited physical, sensory or mental abilities or without experience and knowledge of it, unless instructed in its use by those responsible for their safety.
- Do not allow children to play or hide inside the product: risk of becoming trapped inside and suffocating.
- Power cable modification or replacement must only be carried out by qualified personnel or After-sales Service.
- Do not use extension leads or adapters.
- Electrical disconnection must be possible either by unplugging the appliance or by means of a double-pole switch located upline from the socket.
- Ensure that the voltage indicated on the appliance data plate corresponds to the domestic supply voltage.
- Do not ingest the contents (non-toxic) of the ice packs (if provided).
- Restrict the number of times you open the door.
- This appliance features "skin condenser"
technology: the condensing unit is integrated into the walls of the freezer. For this reason the side and front walls of the product may become hot while the product is running. This is entirely normal and also reduces the risk of condensation forming in particularly critical environmental conditions (see paragraph "Troubleshooting guide").
APPLIANCE DEFROSTING
The appliance should be defrosted when the thickness of ice on the walls reaches 5-6 mm.
- Disconnect the appliance from the power supply.
- Remove food from the appliance and put it in a very cool place or a thermally insulated bag.
- Leave the appliance door open.
- Remove the internal defrost water drain plug (depending on model) (Fig. 8).
- Remove the external defrost water drain plug (depending on model) and reposition it as shown in figure 8.
- Use the separator (depending on model) inside the product as a recipient for any remaining water, (D) as shown in fig. 8. If there is no separator, use a shallow container.
- Defrosting can be sped up by using a spatula to detach the frost from the appliance walls.
- Remove the frost from the bottom of the appliance.
- In order to avoid permanent damage to the appliance interior, do not use pointed or sharp metal instruments to remove the ice.
- Do not use abrasive products or heat up the interior artificially.
- Dry the inside of the appliance thoroughly.
- Refit the plug after defrosting.
CLEANING AND MAINTENANCE
- Remove the frost from the upper edges (see Troubleshooting Guide).
- Clean the inside after defrosting, using a sponge dampened with warm water and/or mild detergent.
- Clean the side vent (if provided).
Unplug the appliance before carrying out maintenance operations. Do not use abrasive products, scourers or stain-removers (e.g. acetone, trichloroethylene) to clean the appliance. To obtain the best results from your appliance, carry out cleaning and maintenance at least once a year.
CHANGING THE LID LIGHT BULB (if provided)
- Disconnect the appliance from the mains power supply
- Remove the diffuser by following the sequence of steps shown in the figure.
- Unscrew the light bulb and replace it with an identical bulb of the same wattage and voltage.
- Refit the diffuser and plug in the appliance.
Disconnect the appliance from the mains power supply. Remove the diffuser by following the sequence of steps shown in the figure.
Unscrew the light bulb and replace it with an identical bulb of the same wattage and voltage. Refit the diffuser and plug in the appliance.
TROUBLESHOOTING GUIDE
I. The red LED blinks.
Is there a power failure?
Is defrosting in progress?
Has food to be frozen been placed inside recently?
Is there a power failure?
Is defrosting in progress?
Has food to be frozen been placed inside recently?
Is the appliance lid closed properly?
Is the appliance placed near a heat source?
- Are the ventilation grille and condenser clean?
2. Appliance is excessively noisy.
Is the appliance perfectly horizontal?
- Is the appliance in contact with other furniture or
objects that may cause vibrations?
- Has the packaging been removed from under the appliance?
Note: Gurgling noises from the refrigerating circuit after the compressor cuts out are perfectly normal.
3. The acoustic alarm is activated.
- See the section 'User instructions', par. 'ALARMS'. 4. The display is off, the inside light does not switch on and the compressor is not running (appliance warm).
Check for a power failure.
- Check that the power plug is correctly inserted in
the mains socket.
- Unplug the appliance and make sure the power
- The display is OFF, the inside light switches on and the compressor runs continuously.
Contact After-sales Service.
- When a button is pressed, the corresponding function is not activated.
Make sure the control panel lock function is not
activated (see section 'CONTROL PANEL LOCK').
7. The compressor runs continuously.
- Have hot foods been put in the appliance?
Has the appliance lid been left open for a long time? - Is the appliance placed in a very warm room or near heat sources?
Has the rapid freeze button been pressed
inadvertently? (the green LEDs blink alternately) 8. Too much ice on the upper edge.
- Are the defrost water drainage plugs correctly positioned?
Is the appliance lid properly closed?
Is the appliance lid seal damaged or warped? (See
is the appicnate no seal damaged or warped. (see section "instillation")
- Have the 4 years been removed (see section
"Installation")
-
Formation of condensate on the external walls of the appliance.
It is normal for condensation to form under certain atmospheric conditions (humidity above 85% ) or if the appliance is located in a damp or poorly ventilated room. The performance of the appliance -
The layer of ice on the internal walls of the appliance is not uniform.
This phenomenon is quite normal.
SAFEGUARDING THE ENVIRONMENT
1. Packing
The packing material is 100% recyclable and bears the recycling symbol. For disposal, cornply with the local regulations. Keep the packing materials (plastic bags, polystyrene parts, etc.) out of the reach of children, as they are a potential source of danger.
PROTECCIO DEL MEDI AMBIENT
1. Embalatge
El material d'emballage es 100% recicable i porte el simbolo de reciclage. Para la seva eliminacion, seguiu los normatives locals. Guardeu el materials del embalage (bosses de plastico, peces de poliestre, etc.) fora de la abast dei infants, ja que poden ser perillosos.
TROUBLESHOOTING GUIDE
I. The red LED blinks.
2. Scrapping/Disposal
The appliance is manufactured using recyclable material. This appliance is marked in compliance with European Directive 2002/96/EC on Waste Electrical and Electronic Equipment (WEEE). By ensuring the correct disposal of this appliance, you can help prevent potentially negative consequences for the environment and the health of persons.
The symbol of the appliance, or on the accompanying documents, indicates that this appliance should not be treated as domestic waste but must be taken to a special collection centre for the recycling of electrical and electronic equipment.
When scraping the appliance, make it unusable by cutting off the power cable and removing the doors and shelves so that children cannot easily climb inside and become trapped.
Scrap the appliance in compliance with local regulations on waste disposal, taking it to a special collection centre; do not leave the appliance unattended even for a few days, since it is a potential source of danger for children. For further information on the treatment, recovery and recycling of this product, contact your competent local office, the household waste collection service or the shop where you purchased the appliance.
Information:
This appliance does not contain CFCs. The refrigerant circuit contains R134a (HFC) or R600a (HC) (see the rating plate inside the appliance).
Appliances with Isobutane (R600s): isobutane is a natural gas without environmental impact, but is flammable. Therefore, make sure the refrigerant circuit pipes are not damaged.
This product may contain Fluorinated Greenhouse Gases covered by the Kyoto Protocol; the refrigerant gas is inside a hermetically sealed system.
Refrigerant gas: R134a has a Global Warming Potential of (GWP) 1300.
Declaration of conformity C
This appliance has been designed for preserving food and is manufactured in compliance with Regulation (CE) No.1935/2004.
- This appliance has been designed, manufactured and marketed in compliance with:
- safety objectives of the "Low Voltage" Directive 2006/95/CE (which replaces 73/23/CEE and 14/20/CE)
the protection requirements of Directive "EMC" 2004/108/EC.
Electrical safety of the appliance can only be guaranteed if it is correctly connected to an approved earthing system.
AFTER-SALES SERVICE
Before contacting Alter-Sales Service:
- See if you can solve the problem yourself.
- Switch the appliance on again to see if the problem has been solved. If it has not, disconnect the appliance from the power supply and wait for about an hour before switching on again.
- If the problem persists after this course of action, contact After-Sales Service.
Specify:
the nature of the fault,
the model,
- the service number (the number after the word SERVICE on the rating plate on the rear of the appliance)
- your full address,
- your telephone number and area code.
D
GEBRAUCHSANWEISUNG
GERÄTESCHEMA (Abb. I)
PRECAUCIONS I CONSELLS
Directive "EMC' 2004/108/CE
OVERSIGT OVER APPARATET (fig.1)
A. Handtag
B. Sikkerhedslas (afhaengigt af model).
C. Taettingslste.
D. Rumopdeler (afhaengirt af model).
E. Prop. til afrimpingsvanders udlebskana!
Betieninnspanel
G.Motorventilationsrist pa siden.
OVERSIGT OVER BETJENINGSPANELET (fig. 2)
- Temperaturdisplay: Angverter temperaturen i fryseren (fast visning) aller den indstilleste temperatur (blinkende visning).
- Knap til indstilling af lavere temperatur: När der trykkes pa knappen, bliver den indstillede temperatur koldere.
- Knap til indstilling af hjore temperatur: Nar der trykkes pa knappen, bilver den indstillede temperatur varmcre.
- Knappen "Extra load": När der trykkes på knappen, aktiveres/deaktiveres Funktionen til indifrnsning af store mängender.
- Kontrolllampre for "Extra load" (gul): När kontrollampen er tendt, angiver den, at functioren til indfrysning af store maengder er aktiveret.
- Kontrollpane for aktiver auf "Green Intelligence" (blä): När kontrollpam er taend, angiver den, at Funktionen "Green Intelligence" er aktiv (se asfntift "Funktionsen Green Intelligence").
- Knappen Stop alarm: Deaktiverer lydsignalfunktionen og kontrollampen for stromafrydige (se afniertet 'Almerre').
- Kontrollampe for alarm (red): När den bänkner, anglover den anlarmstituation (se asfniettet "Alarmer")
FOR PRODUKTET TAGES I BRUG
RENGIØRING OG YEDLIKEHOLD
SKIFTE AV LYSPAEREN I DOREN (NOEN
MODELLER)
2. Apparatet lager for mye story.
AYBIMING AY APPARATET
SKJEMA OVER APPARATET (Fig.1)
A. Handtak
B. Silkerhetslukking (noen modeller).
C. Pakning
D. Skillevegg (noen modeller).
E. Propp dreneringsrar for smeltevann.
F.Betjeningspanel.
G. Ventilasjonsrist for motor.
SKJEMA OVER BETJENINGSPANELET (Fig. 2)
- Digital temperaturindikator: viser temperaturen i fryseren (kontinuierig) aller den valgte temperaturen (blinkenende).
- Tast for innstilling av kaldere temperatur: narn
trykper pa casten, velges en kaldere temperatur. - Tast for innelling av vermere temperatur:纳税 mantrykker pa taston veliges en vermere temperatur.
- Tast for "Extra load": ved à trykke på dette aktiveres/deaktiveres funksiøn for innfrysing av store matmengder.
- Indicator for "Extra load" (gul): nár den lyser viser det at funskjorden inimfysing av store matmengder er aktivert.
- Indikator für aktiverung avg "Green Intelligence" (blä): när den lyser visser det fiquksonen "Green Intelligence" er aktivert (se avschnittet "Funksonen Green intelligence")
- Tast for utkobling av alarm: brukes til a koble ut lydsignalet og alarmindikasjonen ved strombrudd (se asvinsitet "Alarmer").
- Alarmlamp (rod): blinker hijs det opstär en krintisk situation (se assvitmet "Alarmer").
FOR APPARATET TAS I BRUK
IGANGSETTING AV APPARATET
- Sett stopslet i stikkontalsten.
- Digitalk indicatorfelt (I). när apparatet er varmt (og temperaturen i apparatet er over 0^ ), vises to streker i mitten.
Den rode alarmampen (8) blinker og et alarmsignal vil heres.
Indikatoren for "Green Intelligence" (6) lysen
Trykk pa resetknappen (7) for a koble ut alarmsignalet. - Det akustiske alarmsgnalet avbrytes, mens den rode alarmampellen fortsetter blinke.
-
När apparentet har nädd en temperatur på minst -12 °C, vill den rede alarmampen (8) slute à blinke.
N&kan macvarene legges inn i fryseren. -
Indikatoren for "Green Intelligence" (6) vill fortsette à lys innti temperacron som er innsitt à playdiserté r madd.
MERK: Pä grunn av undertryld i apparate, er det ilke mulg à pèn dāren igen rett ester at man har lukket den. Man mä vente noen minutner.
JUSTERE TEMPERATURE
Vanvigis et temperature forhandssinstift p-18 ^ C fra fabrikien. Man kan velge en annen temperature (mellom - 17 Cog-24 ^ C og p-an oKONOMISK mate (se avsinitt eKO-Kininstilling') veg a giare folgefle.
Tryk éng paç àn de do tastone für instilling av temperaturen (2, 3).
Indikatorfelt (I) blinker og viser den instilte temperanere.
- Trykk're ganger pa tasten (3) for a stille inn er varmene temperacur. Ved hvert tryckp k pasten endres verdien med 1^ . Under denne operasonjen blinker verdien pa indikacorfeltet.
Trykflere ganger pa tasten (2) for a velge en kaldere temperatur. Ved hert ytrkk pa tasten endres verdien med 1^ . Under denne operasjonen blinker verdien pa indikatorfelitet.
Ca.5 sekunder etter siste trykk pa knappen vil den valgtce
Lagga in matvaror for infrysning
INNAN APPARATEN ANVÄNDS
BeBaBaeBeTe 10 dev uunpaqdo koukpo puktoo.
BeBaBaeBeTe 10 to 100 to 100 to 100 to 100 to 100 to 100 to 100 to 100 to 100 to 100 to 100 to 100 to 100 to 100 to 100 to 100 to 100 to 100 to 100 to 100 to 1
Afoa anouvboe to npolov, sEyEe tv
KATOtaoTou NAEKTIPKO KAWIOU TPOPOSOIOJ. 5 HOBV civai oBnO, To eOWeRko fwo ACVAEJI KA O ouMneTei AIEoupyei diapKw.
Eukouwovotne ta mu taha texkivn omohtno y
Takrto, d vdoitro kactoupye de
evyepnoiota.
Béfaaibelte dt n 1eaiouy KAEiδiuaotao nkiKpOoiyic De evat evpeoyonmiv (Bk. kéfAaO = KAEIΔOMA IIAKTHPOAOIOTY.).
- O oumuereohe aeitoupyei diapkuc
Exov ToneetBel Gacta tropma oTo npolov: H nptoTau npolovTo mapeive avoknti yia meyako xpoikia bidaqma?
To npoiov plokeTae xapo e noA
Bepuopaia kovrae myn 0epuotnd;
- EverpyonBnke n Aertoupyia Toxelao KaraliuEna; Iot
8.YneoBoikoc oxnuatouc npoy ngpok
TordBtbnKavOaTc ta Taneo tv Kauaoia oanayosvapov apn anp.
To 100 piojno 100 eaeonr k,
napaopowet; (Bλ. kepaiao *Ekyataotan
ApaieBnKav o4 anotateo; (BA.KeafalaoEvkatoa)
-
Xinyuatao6c aumunwukawewuvubpatuwotraeoueepkdoiuyuaotao npoivvotae
-
Elva iuauokoyko va aynaiartikovai uupmkiayevoiu
- upatul omb opiaeve kkuatoukoyke ouvivkce
- (uvapda dva taou 85%) h edy to pioviy kexi
Tepneptnelge xeno he yogagk goyemokh
eepnog, nnoa qnt to yoyoxq autc
nepaaicuiepon ng anioogone y noioyto
- Toptuia myo aTo oEumetika Toxuata Tou npovotoc EV sivai ooiopiofo
To qavuveauo npme va eepetra oioyko.
SVMYBOAEI FIA THN NPOSTAZIA TOY NEPIBAAANTOZ 1. Zoukeuagala
To uko ooukeuaedai 1v100% auukakkaikko K eivaiu anuueo me to ouboalao kauokkaan. Ta tia ddo8e To oukouoltei tou TkoKau KavovkuOa. To uko ooukeuaedai mktkto aooakos, ta Teyta fksu Ka. n. pnta vio ta biptaiu poka i do ta maia efocov Omaetale mabv entia kuvovu.
2.Anokogoh/Adiaceo H uokoukexExei kataKeuaTeI e avakukKaQauu KluK. Autn uokoukexEeu oJauqauen de ouapooqauen me Tny Eupaiokai Odyia 200268/EK, Waste Electrical and Electronic Equipment (WEEE-Axyopotra HaKTpOka K HAKTpavikO EtAmaQ) BaSaojueveo ot autn uokoukex AmokoiTce Me GaoToPto, Oaukepepe Tny npAmpTnv duuvtivkov apvntkiav emmndawy to nepaBcay Kny Tny UVC.
因
To oujolao nnnn nnoukuc, n oty eyya aou n nn ouofoov oukocu onutn ouokuc ne ne pene vaetaepiote woukaok apcipaa ola nne i
napabeo 10e oEvbEVEyO ovne IepuaLoyoo yi Tny avokkiaam kIekpKvki KI aekpovkoiv oukeukew.
KATA nAnokoi, ENBcPteTj Tn Keukw agxpyen,
KOBVtavu KaKaioo Tupeaiu, OApovgTu Tn npoei Ka TpaK ETo 0e Tu Nuy Anpae KivVouo CkyAokoiu Tnv 0e ToepeKtu Tn.
TNY anokoi cke AOKoAVG ToTu ToKIOU KAVoVo
vi Tn DBeon ToNn apDopauu KAI npAdobite OTe
Eoka ONeia PekuLyoo, Xyoio Tu v OYfHvete
OaakOt ot Yla lyoe Ndo, KAOO anotKei estra
KIVouvo Tu RA tua, Ti neOpoeTe Naoopoeip
OeTKo Tu nE MEEcyOvo, Avoktni KAvokluOau
auto Tn Ouekuho, EIKovovote Me to Apoio
Yapolo ToKoTo 0o autoBoIOIO, TU uptege
peuLAAoyoo oikakov atopupatov n To katottna
omou apoyote Tn oukeun.
πλnpoΦopig:
AUTN CUKKENH DE MPPEXI CFC TO qukTIKO KUKAUGPA MPPEXI H134 (HC) H600CA, BAETE ETKACA apOuO uTPOU OTOEUPKIO TNGCUKKUN
Fi Tio duoukeu me Iaououto (1600a) To kououto evi Eua Kuoqie aepo quo imetangue yao to nepuoo, oai civoi eaokeToKAT EeKtoei Ciovai 1000000000000000000000000000000000000000000000000000000000000000000000000000000000000000000
Bepnepnepnepnepnepnepnepnepnepnepnepnepnepnepnepnepnepnepnepnepnepnepnepnepnepnepnepnepnepnepnepnepnepnepnepnepnepnepnepnepnepnepnepnepnepnepnepnepnepnepnp
△nawon wupu6pwhong C
Autn oukeun npocipetai va m ouvtnon npoiovtav batpoan ka kataokudai ot oupooamtey o tey kawoyuq (EK Ap. 19352004).
- Autn n ouokun oxeodotnke. kataokeudotnke K
2008/95/EE (mo avrikobirr) my 73/23/OK kai
enbveed Tponnoiio
- ta amarjnaia npotaolra Ta Odylae EMC 2004/108/EK.
HnAeKpnk aaoAeia Tpo uokcua eaoaaizctai oovov Gtiv civoi ootv ouoeyoeioc nce taeeauatikr k
ΣEPBIZ
Piv amkoovnoe Tg To Eepic
1.Eaeyetvavvovauvaovaeaaeipetevoovoo nT BpOe.
2.Avaie tata nai tounkuey va yia tegauabweite av envapouveo nay dupeoxy. Av aotroanea eiva apavntko, aodyve tata nai tounkue kien evanovauyaevete to xepiaipeta mea oia pia.
3. AV to oBajma napayel EMKOWOWYNEA ME To XeBIO. MetoBIO'
Toy Tuno TaBaaene.
to yovteao
TOW APUBIO SEPCIO (a) aipubio noo BOLKETAI JETA TNI LECN SERVICE, MVA OTN EKTU PUNIPOU NO BOLKETAI OTO sgratepko tno quoknei.
TnV TnPn 8aBuvon aoc.
ov TnAeawviko caa apiBko kal tov KwDikk KaHcna.
SERVICE 00000000000

LIMPEZA E MANUTENCAO
GUIDA RICERCA GUASTI
I. La spi rossa lampeggia.