GT730 - Browser CONRAD - Free user manual and instructions
Find the device manual for free GT730 CONRAD in PDF.
Frequently Asked Questions - GT730 CONRAD
User questions about GT730 CONRAD
0 question about this device. Answer the ones you know or ask your own.
Ask a new question about this device
Download the instructions for your Browser in PDF format for free! Find your manual GT730 - CONRAD and take your electronic device back in hand. On this page are published all the documents necessary for the use of your device. GT730 by CONRAD.
USER MANUAL GT730 CONRAD
This software update is available for download in our online catalogue at http://www.conrad.de.
Just enter the item number in the search field.
The software update can then be found under the "Dokumente und Downloads" tab.
Thank you for your kind attention.
Your CONRAD team
This note is published by Conrad Electronic SE, Klaus-Conrad-Straße 1, D-92240 Hirschau/Germany. All rights including translation reserved. Reproduction by any method, e.g. photocopy, microfilming, or the capture in electronic data processing systems require the prior written approval by the editor. Reprinting, also in part, is prohibited. The note reflects the current technical specifications at time of print. We reserve the right to change the technical or physical specifications. © Copyright 2012 by Conrad Electronic SE. V1_0412_02-SB

REMARQUE IMPORTANTE BELANG
ENINFORMATIE
www.conrad.com
GPS Logger
N^o de commande 37 27 38 GT-750 Bluetooth GPS Logger N^o de commande 37 28 60 GT-750 Bluetooth GPS Logger SET N^o de commande 37 36 86 GT-730 Enregistreur de données GPS
Version 04/12
GPS Logger
Bestelnr. 37 27 38 GT-750 Bluetooth GPS Logger
Bestelnr. 37 28 60 GT-750 Bluetooth GPS Logger SET
Bestelnr. 37 36 86 GT-730 GPS geveenslogger
Versie 04/12
Chere cliente, cher client,
www.conrad.business.at
GPS Log Setting" (b)
Unit and Coordination (a)
"Display Language" (e)
"Delete Selected Object"
- Introduction 31
- Scope of Delivery 32
- Intended Use 32
- Symbols 33
- Features and functions 33
- Safety instructions 34
- The product at a glance 36
- Commissioning, fitting the rechargeable batteries 36
- Charging 36
a) Car charger 36
b) Mini-USB to USB cable 37
- Switch on the product 37
- Connect product to Bluetooth device 37
-
Connect the product to the computer 38
-
'GPS Photo Tagger' program 39
a) Program installation 39
b) Activate program 39
c) Configure product 40
d) Configure program 41
e) Display routes 43
f) Edit route. 45
g) Route view 47
h) Edit route. 47
i) Load photos/media 48
j) Photo list. 49
k) Media list. 49
I) Photos and GPS data 49
m) Changing the photo capture time. 50
n) Google Earth view. 50
o) Export route as KMZ file 50
Page
p) Export route as HTML file 51
q) Export route 51
r) Speed/altitude view. 51
s) Store/load projects 52
-
Maintenance and care 53
-
Disposal 53
- Technical data 54
17.Declaration of Conformity (DOC) 54
1. Introduction
Dear Customer,
Thank you for purchasing this product.
The product meets the requirements of the current European and national guidelines. To maintain this status and to ensure safe operation, you as the user must observe these operating instructions!

Please read the operating instructions completely and observe the safety and operating notices before using the product.
All company names and product names are trademarks of their respective owners. All rights reserved.
In case of any technical inquiries, contact or consult:
Germany: Tel. no.: +49 9604 / 40 88 80
Fax. no.: +49 9604 / 40 88 48
e-mail: tkb@conrad.de
Mon. to Thur. 8.00am to 4.30pm
Fri. 8.00am to 2.00pm
2. Scope of Delivery
- Bluetooth GPS Logger
- Car charger
- Mini-USB to USB cable
- Software CD
- Rechargeable battery
- Operating Instructions
3. Intended Use
The Bluetooth GPS Logger receives the current position data via GPS. These data, including date and time, are stored and can be transmitted to other Bluetooth devices by Bluetooth.
The capture intervals for the waypoints can be set. The journey route can then be assigned using the photo program supplied. The stored data can be exported and displayed in 3D maps, e.g. Google Maps.
The supplied system components must not become damp or wet.
The GPS Logger is powered by the LI-ION rechargeable battery supplied (3.7 V, 1000 mAh). This battery is charged using the mini-USB to USB cable supplied. This cable can either be connected to a spare USB port or to the supplied car charger.
All safety instructions and notes on operation in these Operating Instructions must be observed at all times. These instructions not only protect the device but also and in particular your health.
This product complies with the applicable national and European specifications. All company names and product names are trademarks of their respective owners. All rights reserved.
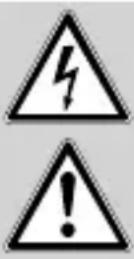
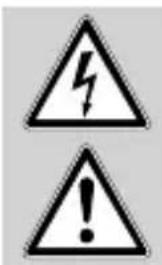
4. Symbols
Hazard warnings and signs are clearly marked in the Operating Instructions. The following symbols are used:
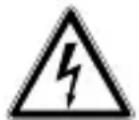
The symbol with lightning inside the triangle is used to indicate a health hazard, e.g. by electric shock

The symbol with the exclamation mark inside the triangle indicates particular hazards during handling, operation or control.

This symbol denotes information provided to improve understanding of the procedures.
5. Features and functions
- The product uses Bluetooth 2.0 and is compatible with products that support the Bluetooth 'Serial Port Profi le' (PPS)
- The product supports A-GPS (Assisted Global Positioning System)
- You can store up to 25,6000 waypoints
The guarantee/warranty will be void if damage occurs due to failing to comply with the Operating Instructions! We will not assume any responsibility for consequential damage!
Nor do we assume liability for property damage or physical injury caused by improper use or failure to observe the safety instructions. In such cases the warranty/guarantee is void.
General safety instructions
- All safety instructions and notes on operation in these Operating Instructions must be observed at all times. These instructions not only protect the product but also and in particular your health. Please read through the Operating Instructions carefully before using the product. Keep them in a safe place for future reference.
- If you have any doubts about the correct operation or the safety of the product, please consult a specialist.
- Maintenance, adjustments and repairs may only be carried out by a qualified specialist or a specialised repair shop.
- Do not use this product in hospitals or medical institutions. The product does only emit relatively weak radio signals. These radio signals could, however, lead to malfunctions in life-supporting systems.
- The product is not a toy and should be kept out of the reach of children. Particular care must therefore be exercised if children are around.
- Do not leave any packaging material unattended. It may become a dangerous toy for children.
- On industrial sites the accident prevention regulations of the association of the industrial workers' society for electrical equipment and utilities must be followed.
- If you sell or pass on the product to a third party, always include these Directions for Use.
- Observe also the safety instructions in the individual sections of these Operating Instructions.
Product-specific safety Instructions
- The supplied system components must not be exposed to extreme temperatures, direct sunlight, intense vibration or heavy mechanical stress.
- Never switch on the product immediately after it has been taken from a cold room to a warm one. The condensation water produced as a result could destroy the product. Allow the appliance to reach room temperature before switching it on. Wait until the condensation water has evaporated.
- The supplied system components must not become damp or wet.
- Handle the product with care. It can be damaged by impact, blows or when dropped even from a low height.
- For reasons of safety and approval (CE), the product must not be opened, converted and/or modified without authorisation.
- If you have questions which remained unanswered in these operating instructions, please contact our technical advisory service.
Rechargeable batteries
- Keep rechargeable batteries out of the reach of children.
- Please observe correct polarity (plus/+ and minus/-) when inserting the batteries.
- Do not leave rechargeable batteries lying around. Pets or small children might swallow them. If swallowed, consult a doctor immediately.
- Leaky or damaged rechargeable batteries may cause caustic burns if they come into contact with skin. Therefore, you should use suitable protective gloves.
- Do not short-circuit or dismantle the rechargeable battery and do not throw it into the fire. There is a danger of explosion!
- If not used for longer periods (e.g. storage), remove the inserted rechargeable batteries. If rechargeable batteries are too old, they may leak and damage the product and this will invalidate the guarantee/warranty!
- Read the chapter on Disposal about the environmentally friendly disposal of batteries.
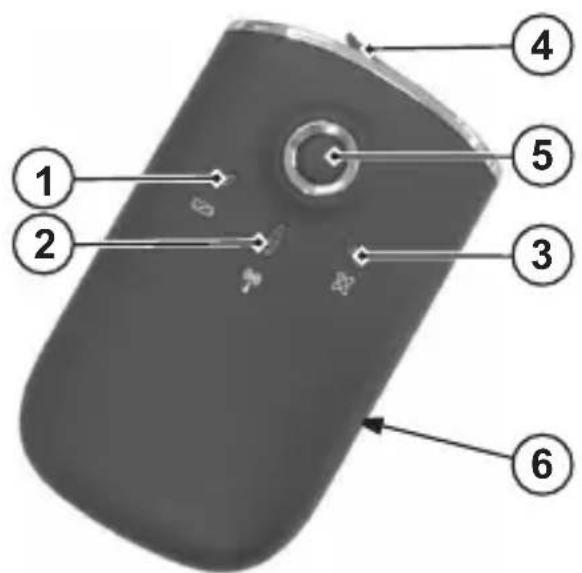
7. The product at a glance
- Rechargeable battery status LED
- Bluetooth status LED
- GPS status LED
- Connection for charger cable (mini-USB socket)
- 'ON/OFF' button
- Rechargeable battery compartment cover
8. Commissioning, fitting the rechargeable batteries
- Pull the rechargeable battery compartment cover (6) backwards and off the product.
- Insert the supplied rechargeable battery into the product, observing the correct polarity.
- Slide the rechargeable battery compartment cover (6) back on, until it engages.
9. Charging
If the rechargeable battery status LED lights up yellow, the battery needs recharging.
a) Car charger
- Attach the product to the supplied car charger via the charger cable connection (4).
- Plug the car charger into the cigarette lighter socket.
- Switch on the vehicle ignition to supply the device with power.
- The rechargeable battery status LED lights up red during the charging process.
b) Mini-USB to USB cable
- Attach the product to the supplied mini-USB socket (small socket) via the charger cable connection (4).
- Connect the mini-USB to USB cable to the jack on your computer or an equivalent port.
- Switch on the computer to supply the device with power.
- The rechargeable battery status LED lights up red during the charging process.
10. Switch on the product
- Press and hold the 'ON/OFF' button (5) for approx. two seconds to switch on the product.
- The Bluetooth status-LED (2) fl ashes slowly (1 second ON, 3 seconds OFF).
- As soon as the product has received GPS position data, they are saved at regular intervals as waypoints along with the current date and time. During each saving process, the GPS status LED flashes briefly.

The parameters for saving the GPS position data can be modified in the 'GPS Photo Tagger' program.
11. Connect product to Bluetooth device
Connecting this product to other Bluetooth devices allows the GPS position data to be transmitted to these devices.
- Switch on the product.
- Switch on the Bluetooth device (e.g. PDA/PC/mobile phone).
- Allow the Bluetooth device to search for Bluetooth accessories.
- When prompted to enter a password on the Bluetooth device, enter the password '0000'.
- As soon as the Bluetooth connection is established, the GPS position data are transmitted from the product to the other Bluetooth device at regular intervals. During each transmission process, the Bluetooth LED flashes briefly y.

Establishing the connection to other Bluetooth devices can differ from device to device. Always observe the instructions for the Bluetooth device to which you want to connect this product.
GPS reception
GPS reception is highly dependent on atmospheric conditions.
Reception problems can occur in the following situations:
- GPS signals are blocked within tunnels.
- Covers suppress the GPS reception signal.
GPS signals are blocked within buildings. - In side buildings (high-rise buildings in particular), the GPS signal is lower and interference can occur.
- In forests or when passing through densely vegetated areas, the GPS signal can be lower and interference can occur.
The following factors can also impair signal quality or interfere with the reception signal:
Sun blinds inside a vehicle
- Walls, reinforced concrete ceilings
- Coated/metallised insulated glass
- Proximity to metallic & conductive objects
- Broadband interferences, e.g. in residential areas (DECT telephones, mobiles, radio-controlled headphones, radio-controlled speakers, radio-controlled weather stations, baby phones etc.)
- Proximity to electric motors, transformers, power supply units
- proximity to badly shielded or openly operated computers or other electric devices.

When switching on the product for the first time or if you have transported it over more than 500km when switched off, we recommend that you position it in the open air (within your field of vision) in order to guarantee proper reception and correct position determination.
12. Connect the product to the computer
- Insert the narrow part of the mini-USB cable into the charger connection (mini-USB socket) (4) on the product.
- Connect the large side of the mini-USB cable to your computer.
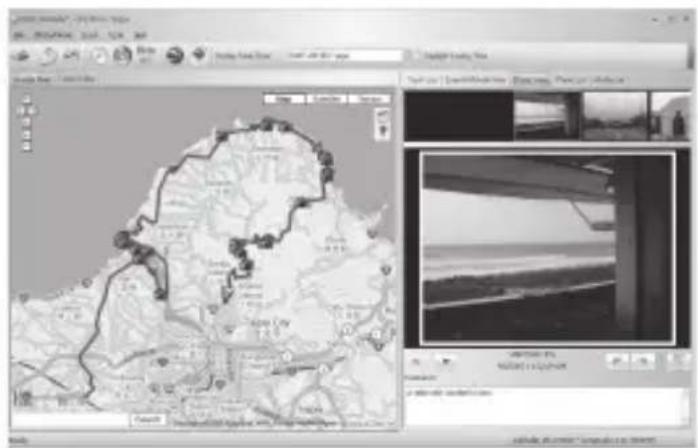
13. 'GPS Photo Tagger' program
The 'GPS Photo Tagger' program enables you to evaluate and display the GPS position data stored by the product. Another function is the automatic assignment of photos to the waypoints using the date and time.
You can also use the program to configure the product and its features.
a) Program installation
- Place the installation CD supplied into the correct drive in your computer.
- If it fails to start automatically, look for the installation file in the menu tree and follow the instructions that appear on the screen.

To use all functions of the program, you must have a working Internet connection.
b) Activate program
Following installation, you must activate the program once before you can use the product with this program.
- Make sure you have connected the product to the computer and switched it on.
- Start the program.
The program window will open. - Select the menu item 'File/Read Device log...' or press the button on the toolbar.
- A window appears into which you have to enter the activation code.

The activation code for the program is located on the cover of the Installation CD.
- Once the entry has been confirmed, the program is activated and can be used.
c) Confi gure product
- Select the menu option 'File/Config GPS...' or press the button on the toolbar.
- The connection to the product will appear in a status window.
- You will then see a window into which you can enter settings.

To transfer the settings you have entered to the product, click on the 'Apply' button.
Connection settings (a)
- 'Auto Scan GPS Module'
The settings for the connection via the USB port (baudrate etc.) are determined automatically. This setting is recommended.
- 'Manual Setting'
You can enter the settings for the USB connection manually. This setting is recommended only for experienced user.
- 'Connect...'
Connect the computer to the product (only if the connection setting changes).
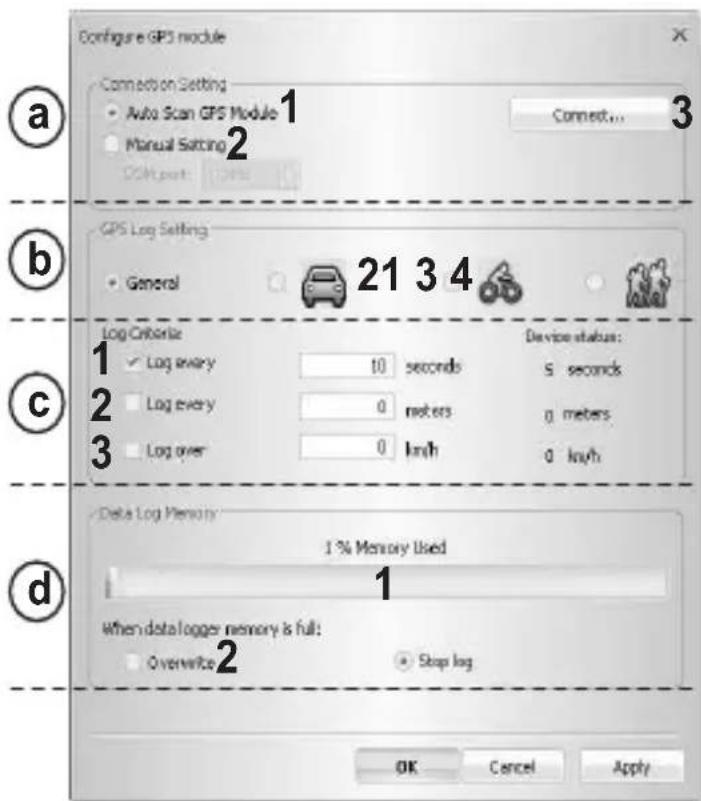
'GPS Log Setting' (b)
The product regularly saves the GPS position along with the current date and time. You can define the intervals at which the position data is saved via the time, distance and speed parameters. You can confi gure up to four operating modes.
Modes of operation:
- General
- Vehicle
- Bicycle
- Hiking

The parameters of only one operating mode are transferred to the product at any one time. Select the correct operating mode for the planned route and transfer to the product before setting out.
'Log criteria' (c)
The current GPS position is stored in the product as a waypoint only when certain parameters are achieved:
- By time:
If the value is set to three seconds, for instance, the product will save the current GPS position every three seconds at the earliest. - By distance:
If the value is set to ten meters, for instance, the product will save the current GPS position every ten meters at the earliest.
- By speed:
If the value is set to 20km / h , for example, the product will start saving the current GPS position from a speed of 20km / h .

The product will capture the current GPS position only when all set conditions are satisfi ed.
Here you see the product's current storage capacity and you can set the behaviour on reaching the maximum storage volume.
- Status:
The bars indicate the product's current memory status. - 'Overwrite':
When the storage volume is reached, the oldest waypoints are overwritten. - 'Stop log':
When the storage volume is reached, no further waypoints are saved.
d) Confi gure program
Select the menu option 'Tools/Options...' or press the button on the toolbar.
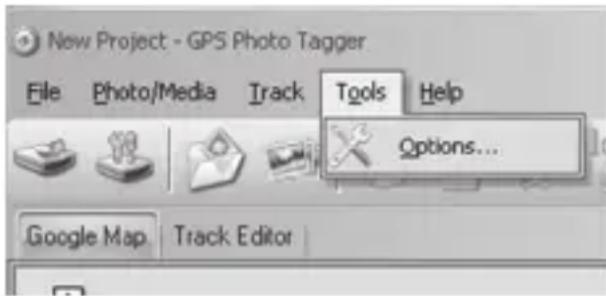
You will then see a window into which you can enter the following settings:
'Unit and Coordination' (a)
-
'Distance unit: Metric'
Kilometres and/or meters are used for the display. -
'Distance unit: Imperial': Miles and/or feet are used for the display.
-
Lat/Long: Degrees, Minutes, Seconds: The latitude and longitude are displayed in degrees, minutes and seconds.
-
Lat/Long: Degrees: The latitude and longitude are displayed in decimal degrees.
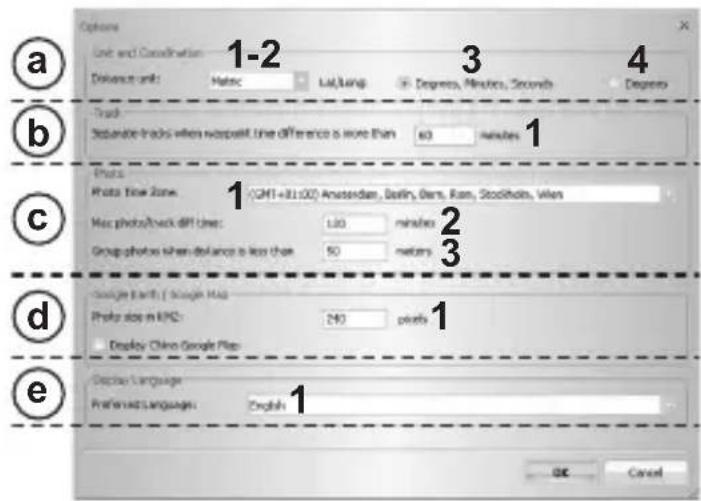
'Track' (b)
- Here, define the time in minutes that is to apply as a separating point for various routes.
'Photo'(c)
- 'Photo time zone'
Set the time zones that correspond to the time zone settings of the camera that was used to take the photos assigned to the waypoints. - 'Max Photo/track diff time'
Enter the maximum difference between the capture time and the storage time of the waypoint at which the photo is assigned to the waypoint. - 'Group photos when distance is less than' If the distance between two photos is less than the set value, both photos for a position marking are assigned.
Here you can make settings for exporting to Google Earth and Google Maps via a KMZ file.

KMZ files allow several files to be condensed. The contents are compressed to accelerate the download operation, for example. This file format if used by Google Earth, for example, for importing routes.
-
'Photo size in KMZ'
-
The display quality of the photos is reduced for exporting to KMZ. You can set the display quality here.
'Display Language' (e)
Here you can set the language for the menus, buttons and messages in the program.
e) Display routes
- Make sure you have connected the product to the computer and switched it on.
- Start the program.
- Select the menu option 'File/Config GPS...' or press the button on the toolbar.
- The product will read and analyse the stored data.
- The status will appear in a status window.
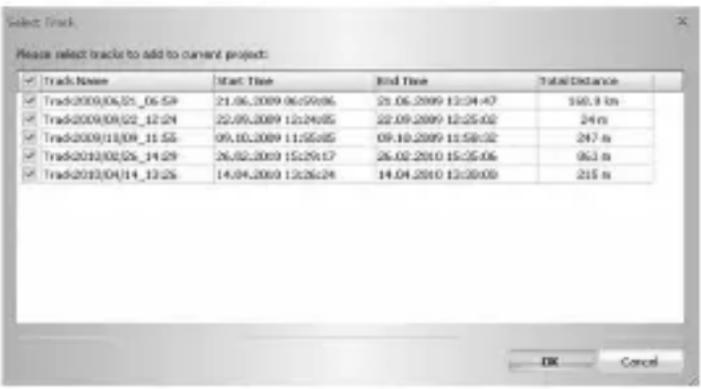
Select route
- Select a route from the list.
- Confirm the selection and the route will be displayed in map view.
Map navigation
You can move the map using the symbols in the left-hand corner (top):
Move map upwards
Move map to left
个Move map to right
Move map downwards
+ Enlarge map view (mouse wheel up).
- Reduce map view (mouse wheel down)
You can select the display type using the symbols in the right-hand corner (top):
Map
Display as street map
Satellites
Display of satellite images
Terrain
Combined (street map and satellite images)
Search
To search for a city or a street, enter the relevant term into the input fi eld and confirm these entries.
Scale:
You will see the current scale in 'ft' (feet) and in 'km' (kilometres).
f) Edit route
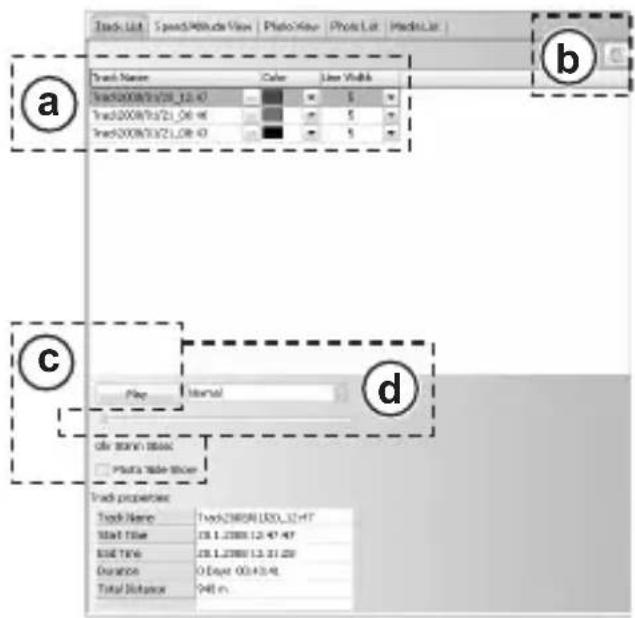
Edit display (a)
The stored routes are stored in the right half of the window in the 'Track List' tab.
You can change the name and alter the colour and the line width of the route using sub-menus.
Delete route (b)
- Mark out the route you require.
Press the button - Following confirmation, the route will be deleted.
Animation (c)
Press the button
- The route will be displayed in the map in an animated sequence.
- Activating 'Photo Slide Show' will display the corresponding photos during the animated sequence.
Select the speed you want from the drop-down menu.
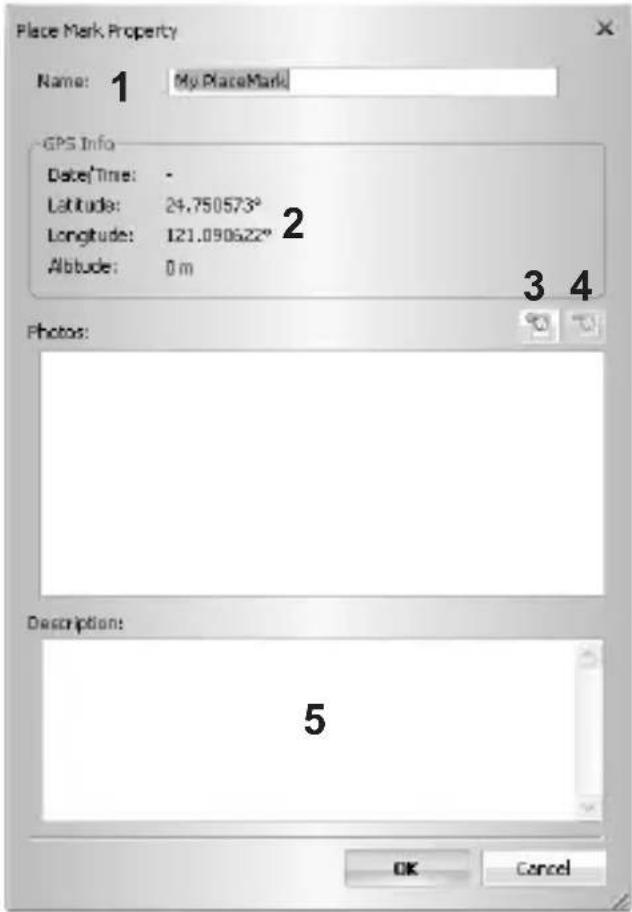
Add position markings
To store position markings on the map, proceed as follows:
- Press the symbol in map view.
- Now click at the position on the map at which a new position marking is to be added.
You will then see a window into which you can enter the following settings:
- 'Name':
Assign an appropriate name.
- 'GPS Info':
Data for precise coordination of the position marking.
- Add images:
You can assign photos to your position marking:
Press the button
- Select an appropriate photo and confirm your selection.
The photos will now be displayed.
- Remove photos:
- Select the relevant photo.
Press the button - The photo will be removed from the list and the corresponding position marking.
5.Description:
Here, you will see (if stored), the description of the selected photo.
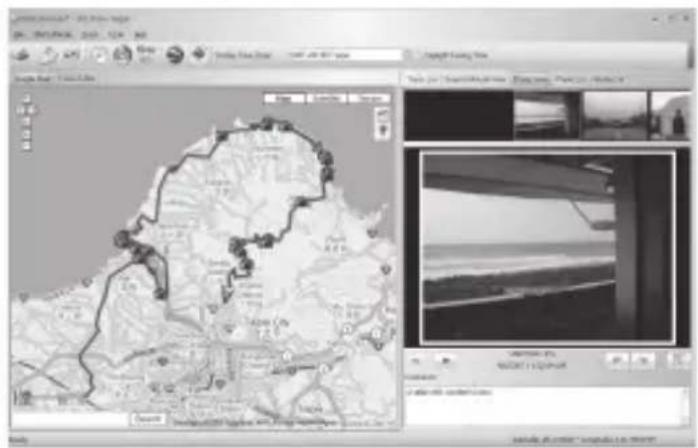
g) Route view
Map and images
The added photos are displayed in the right half of the window in the 'Photo View' tab.
You can add a comment to any photo.
The program automatically links the photos to the corresponding waypoints.
Position markings are created as placeholders for photos.
h) Edit route
'Track Editor' tab
- Open the 'Track Editor' tab.
The route will appear in the display without map. - You use the + and - symbols to zoom in and out.
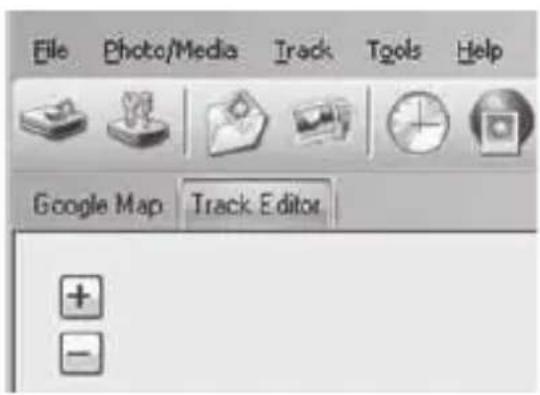
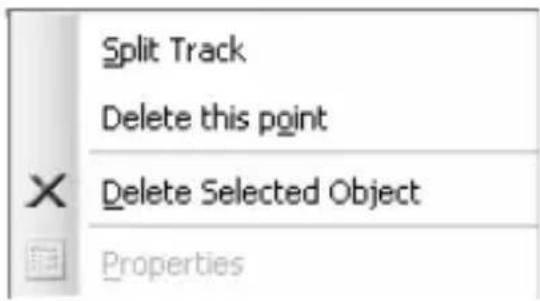
Mark the waypoint you want and right-click.
'Split Track' menu item
This command splits one route into two separate ones.
'Delete this point'
You can use this command to delete a waypoint.
'Delete Selected Object'
You can use this command to delete all marked items.
Cancel
Press the button to cancel an action.
Repeat
Press the button to restore the last action.
Mark several paths
Press the button and drag a window over the relevant path.
Delete marked paths
Press the button to delete the marked paths.
i) Load photos/media
You can add all photos in a file folder or individual photos to the photo list.
Proceed as follows to add photos from a folder:
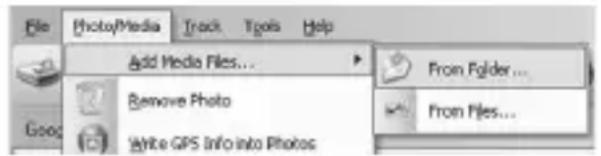
- Select the menu item 'Photo/Media/Add Media Files.../From Folder...' or press the button in the menu overview.
- Select the folder from which you want to add photos.
- Confirm the entry.
- All photos from this folder are now saved in the photo list.
Proceed as follows to add individual photos from a folder:
- Select the menu item 'Photo/Media/Add Media Files.../From Files...' or press the in the menu overview.

button
- Select the image you want to add from the folder.
- Confirm the entry.
- The image will be added to the list of photos.
Repeat this step to load media/videos.
These data will then be added to the media list.
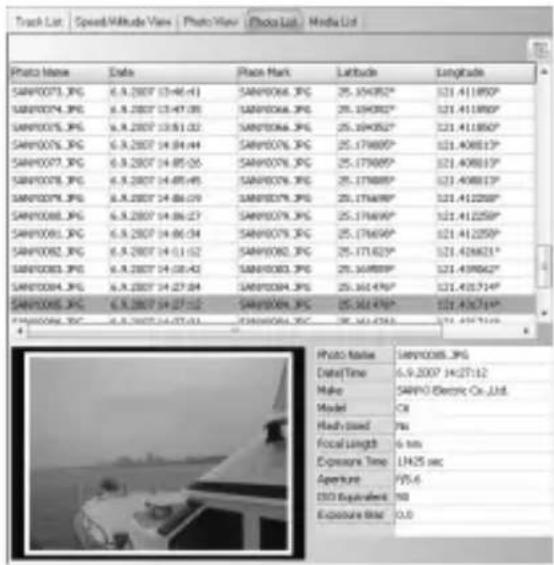
j) Photo list
The photos previously stored in the photo list are displayed in the right half of the window in the 'Photo List' tab.

You can also mark several photos ('Ctrl' or 'Shift' key).
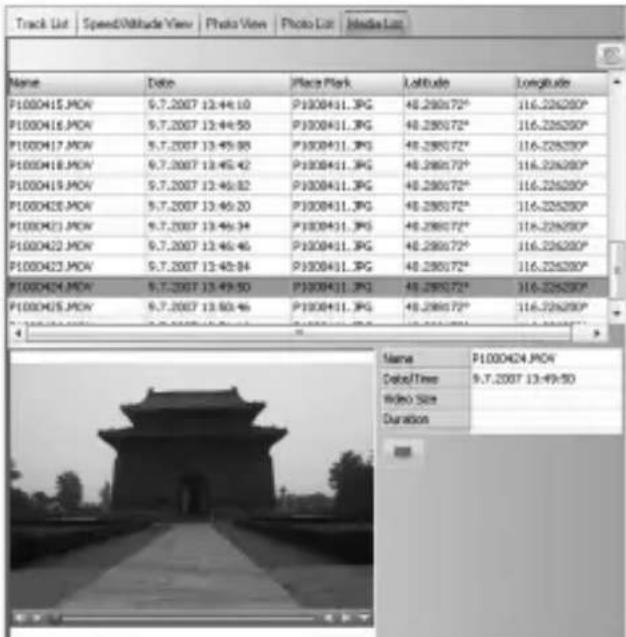
k) Media list
The media previously stored in the media list are displayed in the right half of the window in the 'Media List' tab.

You can also mark several photos ('Ctrl' or 'Shift' key).
I) Photos and GPS data
Assign GPS data to the photos
The GPS information (latitude, longitude and height) of the waypoints can be stored in file information for the assigned photos.
- Select the menu option 'Photo Media/Write GPS Info into Photos' or press the on the toolbar.
The corresponding data are added to the file information for the photos.
m) Changing the photo capture time
The photos are assigned to the waypoints via the capture time for the photos and the storage time for the waypoint. The time setting on the camera may not match the GPS time (storage time for the waypoints). In this case, you can correct the photo capture times:
Select the menu option 'Photo Media/Shift Photo/Media time' or press the toolbar.

button on the
You will then see a window into which you can enter the following settings:
- Enter the relevant time correction.
- Select the photos for which you wish to make changes.
- Confirm the entry.
The photo capture times are changed accordingly. The assignment of photos to the waypoints is then updated.
n) Google Earth view
Proceed as follows to display your route in Google Earth:
- Press the button on the toolbar.
- The route and the photos will be displayed in Google Earth.

This function is available only if Google Earth is installed on your computer.
o) Export route as KMZ file
KMZ files allow several files to be condensed. The contents are compressed to accelerate the download operation, for example. This file format if used by Google Earth, for example, for importing routes.
You can store the route as a KMZ file so it can be displayed in Google Earth.
- Press the button on the toolbar.
- Select an appropriate storage location and confirm the entry.
p) Export route as HTML file
You can store the route as an HTML file.
- Press the button on the toolbar.
- You will now see a preview.
Press Save to confirm. - Select an appropriate storage location and confirm the entry.
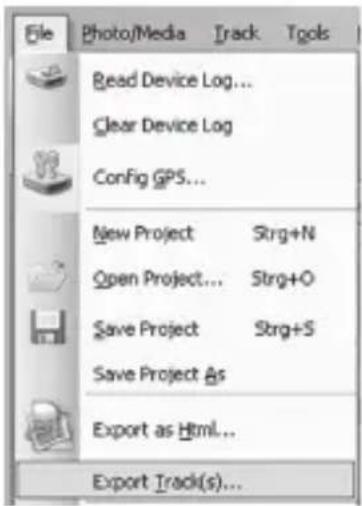
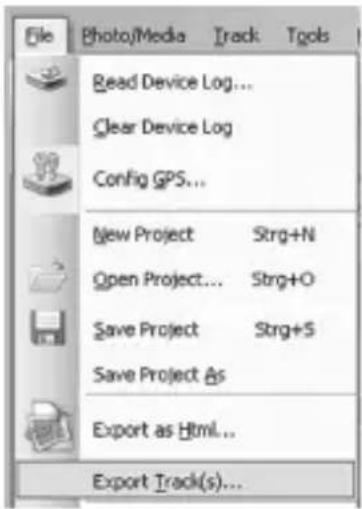
q) Export route
You can also export the route data in formats 'GPX', 'NMEA', 'KML' or 'CSV'.
- Select 'File/Export Track(s)...' from the menu bar.
- Select the route you want to export.
- Select an appropriate storage location and confirm the entry.
r) Speed/altitude view
You can display the speed and altitude of the waypoints concerned in the form of a diagram.
The information on the speed and altitude of the individual waypoints is displayed in the right half of the window in the 'Speed/Altitude View'.
- Select a route.
- You use the + and - symbols to zoom in and out.
- You will see waypoints with linked photos as red squares.
Move the mouse pointer to a red square and the corresponding photos will be displayed.
s) Store/load projects
A route and its assigned photos is stored as a project.
Store project
- Select the 'File/Save Project (H) menu item.

If you are storing a project for the first time, you will be prompted to enter a storage location.
- Select an appropriate storage location and confirm the entry.
Load project
- Select the 'File/Save Project ( )' menu item.
- Select an appropriate folder and confirm the entry.
14. Maintenance and care
The product does not require any maintenance. You should never open it or take it apart.
Clean the product only with a clean, soft, dry cloth. Never use aggressive cleaning agents or chemical solutions as the surface of the housing could be damaged.
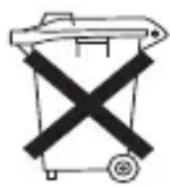
15. Disposal

Never dispose of devices bearing the symbol opposite in the household waste. You are obliged to dispose of these used electrical and electronic devices separately.
Ask your local authority about the facilities for controlled disposal. Separate disposal passes used devices for recycling or other forms of reuse. This helps prevent harmful substances from infi ltrating the environment.
Batteries and rechargeable batteries
The end user is legally obliged (Battery Regulation) to return used batteries and rechargeable batteries.
Disposal in the domestic waste is prohibited!
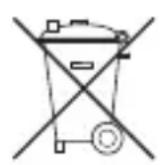
Batteries/rechargeable batteries containing hazardous substances are marked with the icons opposite to indicate that disposal in domestic waste is forbidden. The icons for the respective heavy metal are: Cd=cadmium, Hg=mercury, Pb=lead (the designation is stamped on the battery/rechargeable battery e.g. under the rubbish can symbols depicted at the left).
You can return used batteries/rechargeable batteries free of charge at the off-ficial collection points of your community, in our stores, or wherever batteries/rechargeable batteries are sold!
In doing so, you fulfil your statutory obligations and help protect the environment.
16. Technical data
Voltage supply
Rechargeable battery .7V/DC (1000 mAh, LI-ION)
Car charger 12-24V/DC
Working temperature range -20°C to +60°C
Dimensions approx. 74× 44× 22mm
Weight approx. 60 g
17. Declaration of Conformity (DOC)
We, Conrad Electronic, Klaus-Conrad-Straße 1, D-92240 Hirschau, hereby declare that this device adheres to the fundamental requirements and the other relevant regulations of Directive 1999/5/EC.

The Declaration of Conformity for this device can be found at www.conrad.com
Page
Chere cliente, cher client,
d) Confi gurer le programme
,Unit and Coordination” (a)
- "Distance unit: Metric".
- Lat/Long: Degrees, Minutes, Seconds":
- "Lat/Long: Degrees":
- "Max Photo/track diff time"
- "Group photos when distance is less than"
1. Photo size in KMZ
"Display Language" (e)
",Delete Selected Object"
Copyright 2010 by Conrad Electronic SE.

Legal Notice
These operating instructions are a publication by Conrad Electronic SE, Klaus-Conrad-Str. 1, D-92240 Hirschau (www.conrad.com).
All rights including translation reserved. Reproduction by any method, e.g. photocopy, microfilming, or the capture in electronic data processing systems require the prior written approval by the editor. Reprinting, also in part, is prohibited.
These operating instructions represent the technical status at the time of printing. Changes in technology and equipment reserved.
Copyright 2010 by Conrad Electronic SE.

Information legales
Copyright 2010 by Conrad Electronic SE.

Colofon
Copyright 2010 by Conrad Electronic SE.