HeatSeal Sprint H925 - Laminating machine GBC - Free user manual and instructions
Find the device manual for free HeatSeal Sprint H925 GBC in PDF.
Frequently Asked Questions - HeatSeal Sprint H925 GBC
User questions about HeatSeal Sprint H925 GBC
0 question about this device. Answer the ones you know or ask your own.
Ask a new question about this device
Download the instructions for your Laminating machine in PDF format for free! Find your manual HeatSeal Sprint H925 - GBC and take your electronic device back in hand. On this page are published all the documents necessary for the use of your device. HeatSeal Sprint H925 by GBC.
USER MANUAL HeatSeal Sprint H925 GBC
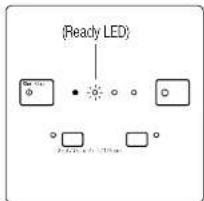
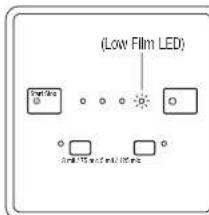
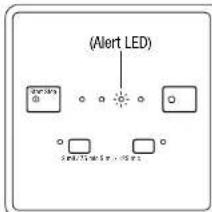
LED "Alert" (Alerta)
Q) Low Film (LED)
Voyant de faible
de pellicule (DEL)
LED "Low Film" (Poca)
pelicula remanente)
Rj Stop Button
Bouton d'arret
Boton de Paro
S) Film Select Buttons
Touches de selection de
pellicule
Important Safety Instructions Important S:
YOUR SAFETY AS WELL AS THE SAFETY OF OTHERS IS IMPORTANT TO GBC. IN THIS INSTRUCTION MANUAL AND ON THE PRODUCT ARE IMPORTANT SAFETY MESSAGES: READ THESE MESSAGES CAREFULLY.
The SAFETY ALERT SYMBOL PRECEDES EACH SAFETYMESSAGE IN THIS INSTRUCTION MANUAL.
ON THE PRODUCT YOU WILL FIND IMPORTANT SAFETY MESSAGES. READ THESE MESSAGES AND INSTRUCTIONS CAREFULLY. SAVE THESE INSTRUCTIONS FOR LATER USL.
THE FOLLOWING Warnings ARE FOUND ON THIS PRODUCT.

WARNING
Electrical shock hazard
Do not open No user
servable parts since
Dade company by will
spones personnel
m = 311 ;
This safety message means that you could be seriously hurt or killed if you open the product and expose yourself to hazardous voltage.
Do not touch heat shoes until they have cooled.

CAUTION
SHARP BLADE
Keep hand and
fingers away.
This safety message means that you could cut yourself if you are not careful.

WARNING: THE SAFETY ALERT SYMBOL PRECEDES EACH
SAFETYMESSAGEINTHISINSTRUCTIONMANUALTHIS
SYMBOL INDICATES A POTENTIAL PERSONAL SAFETY HAZARD THAT COULD INVEST YOU OR OTHERS.

WARNING:DO NOT ATTEMPT TO SERVICE OR REPAIR
THE LAMINATOR.

WARNING:DO NOT CONNECT THE LAMINATOR TO AN
ELECTRICAL SUPPLY OR ATTEMPT TO OPERATE THE
LAMINATOR UNIY OHTHE HAS COMPLETLY READ THESE
INSTRUCTIONS: MAINTAIN THESE INSTRUCTIONS CONVENIENT LOCATION FOR FUTURE REFERENCE.
rds

WARNING: FOR YOUR PROTECTION, DO NOT CONNECT THE LAMINATOR TO ELECTRICAL POWER OR ATTEMPT TO OPERATE UNTIL YOU READ THESE INSTRUCTIONS COMpletely. KEEP OPERATING INSTRUCTIONS IN A CONJ东南LOCATION FOR FUTURE REFERENCE. TO GUARD AGAINST INJURY, THE FOLLOWING BASIC SAFE PRECAUTIONS MUST BE OBSERVED IN THE SET-UP AND USE OF THE LAMINATOR.
General Safeguards
- Use this laminator only for its intended purposes as according to the specifications outlined in the operating instructions.
- Keep hands, long hair, loose clothing and articles such as necklaces, scarves, and hats on the front of the pull robbers to avoid entrapment and entrapment.
- Avoid contact with the heat shoes during operation or shortly after the liminisher has been turned off. The heat shoes can reach the surface of the shoe and cause it to break down.
- Keep hands and fingers away from the path of the sharp film cutter blade located at the film exit.
- Place the laminator on a stable cart, stand or table capable of supporting at least 110 lbs/50 kg. An unstable surface may cause the laminator to fall resulting in serious bodily injury. Avoid quick dislodging the laminator from the floor surfaces when moving the laminator on a cart or stand.
- Do not defeat or remove electrical and mechanical safety equipment such as interlocks, shields and guards.
- Do not insert objects unsuitable for lamination
- Do not expose laminator to liquids.
Electrical Safeguards
- This laminator must be connected to a supply voltage corresponding to the electrical rating as indicated on the serial plate located at the bottom of the cylinder.
- Unplug the laminator before moving it, or when it is not in use for an extended period of time.
- Do not operate the laminator with a damaged power supply cord or plug.
- Do not overload electrical outlets as this can result in fire or shock.
- Do not alter the attachment plug. This plug is configured for the power supply.
The unit is intended for indoor use only.
A CAUTION: The receptacle must be located near the equipment and easily accessible. Do not use an extension cord.
- Disconnect the attachment plug from the receptacle to which it is connected and keep the power supply cord in your possession while moving the laminator.
- Do not operate the laminator with a damaged power supply cord or attachment plug, upon occurrence of a malfunction, or after laminator has been damaged. Contact an authorized 6BC service representative for assistance.

HeatSeal® Sprint™ H925 - Safety
Service
Perform only the routine maintenance procedures referred to in these instructions.

Do not attempt to service or repair the laminator.
implug the unit and contact an authorized GBC service representative for any required repairs if one or more of the following has occurred:
The power supply card or attachment plug is damaged.
Liquid has been spilled into the laminator.
- The liminator is malfunctioning after being misfranchled.
- The liminator does not operate as described in these are

WARNING: THIS IS NOT A TOY - DO NOT ALLOW CHILDREN TO OPERATE THIS LAMINATOR!
Installation
- Shipping damage should be brought to the immediate attention of the delivering carrier.
- Place the laminator on a stable flat surface capable of supporting 110 ft/s 50kg . The surface should be at least 30^ high to assure comfortable positioning during operation. All four rubber foot should be on the supporting surface.
- Connect power cord to an appropriate power source. Avoid connecting other equipment to the same branch circuit to which the laminator is connected as this may cause nuisance tripping of the circuit breaker or brown fuses.
Position laminator to allow documents to exit freely.
- If laminating letter/A4 size documents, open exit tray to fully extended position. When laminating any media that is longer than letter/A4 in the landscape orientation—the exit tray MUST be folded back into the machine. Failure to do so will result in a jam caused by the finished media not having enough room to clear the rollers once laminated.
Install this laminator where the ambient temperature is at least 72^1^22^
Caring for the H925 Laminator
The only maintenance required by the operator is to periodically clean the heat shoes. This should only be done when changing film rolls, please see page 7 steps 1,2, & 3. The following procedure will help keep the heat shoes free of adhesive that has been deposited along the edge of the laminating film.
Preheat the laminator using the heat button.
Clean the top and bottom heat shoes with a soft cloth.
Follow the procedure on page 7, steps 4.5.6 and 7.

CAUTION: THE FOLLOWING PROCEDURE IS PERFORMED WHILE THE LAMINATOR IS HOT. USE EXTRE CAUTION.
NOTE: Do not use metal scouring pads to clean the heat shoes!

WARNING: Do not apply cleaning fluids or solvents to the rollers.
WARNING: Do not laminate glider and/or metallic items. Damage to the rollers may result.

WARNING: Do not attempt to laminate adhesives marked 'Flammable'.

HeatSeal® Sprint™ H925 - Setup
Laminator comes pre-loaded with 3 mil/75 mic film, approximately 30ft/9m.
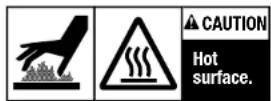
STEP1 In back of machine, turn on power. Power light LED in front control panel lights up.
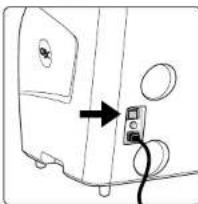
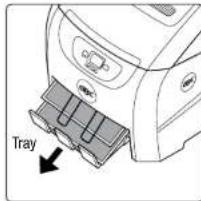
STEP3 Insert and secure feed tray into position.
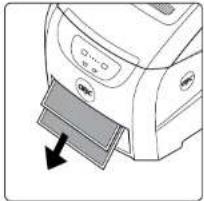
STEP2 Open exit tray to fully extended position for normal operation. For longer paper or banners close tray.
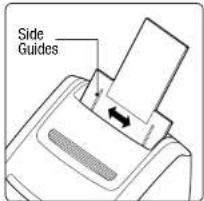
STEP 4 Adjust side guides to fit document(s).

HeatSeal® Sprint™ H925 - Operation
For optimal laminator performance, see "Tips" page 15.
STEP1
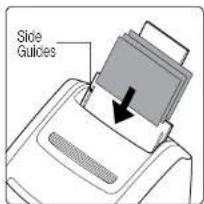
Adjust side guides and place document(s) in feeder.

STEP4
Machine ready, lamination in process.

STEP2
Press start and lamination will begin after warm up. (See page 13 for additional information).
STEP5
Laminated document(s) will stack in exit tray. Lamination will stop when job is complete*
STEP3
Ready LED will flash during process warmup. At the beginning of each job, first output will be film only as film aligns to edge of document.
*First output will be film only as film aligns to leading edge of document.

HeatSeal Sprint H925 - Load Film

If possible, always load film before running completely out.
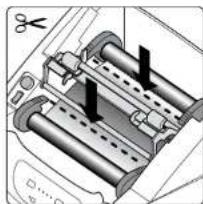
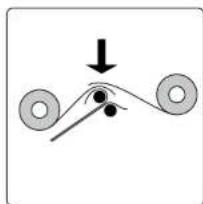
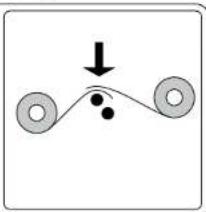
STEP1
Cut laminating film as indicated in diagram at left. If film is not present see next page.
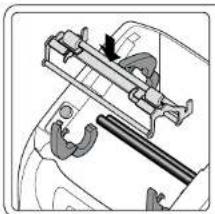
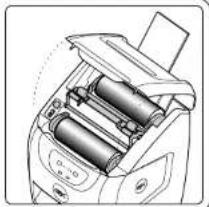
STEP5
Insert and lock idler bar assembly, then close 4 EZload levers.
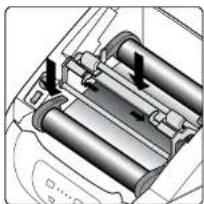
STEP2
Open all 4 EZoLoad levers and remove film.
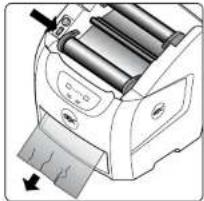
STEP6
Press feed switch (forward) and hold until wrinkle-free lamination. Close top.
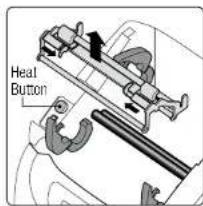
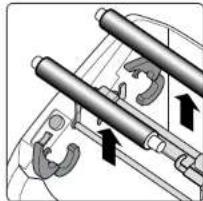
STEP3
Remove idler bar assembly, then press "Heat" button. Ready LED will flash during warmup.
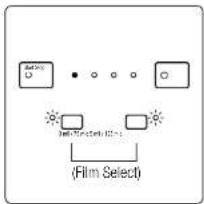
STEP7
Select film thickness.
STEP4
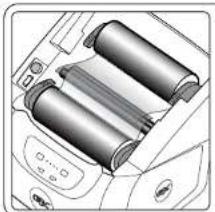
Insert new film, overlap film on heat shoe. Note: Match colors of film core ends to EZload levers.

HeatSeal® Sprint™ H925 - Load Film from Empty


Use instructions below to load new film if completely empty.
STEP1
First, complete steps 2, 3 and 4 from "Load Film" page 7. Close 4 EZload levers.
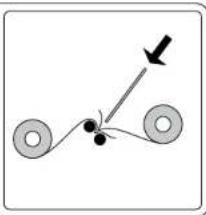
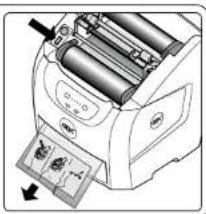
STEP2
Press Feed switch (forward) and insert the threading card (supplied with EZload film) as shown. Insert card with slight force through film rollers.
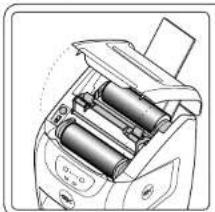
STEP3
Insert idler bar assembly, Continue pressing feed switch and wait for clear, wrinkle-free lamination.

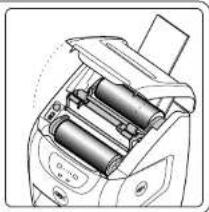
STEP4
Close top cover, select film thickness.

HeatSeal® Sprint™ H925 - Alert Indicators

Do not take machine apart - No user servicable parts.

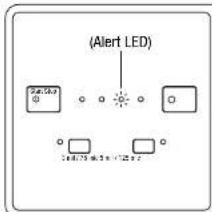
LOW FILM ALERT
TOP COVER ALERT
Top cover is open. Close the cover and resume lamination.
Open top cover and load new film rolls. Refer to "Load Film", pg. 7 and 8.

HeatSeal Sprint H925 - Error Indicators

Do not take machine apart - no user servicable parts.

FEEDJAMERROR
Remove document(s) and any debris from feed tray. Fan documents and adjust size guides. Turn main power button, located on the back of machine, off and on again. Press "Start" to resume*.
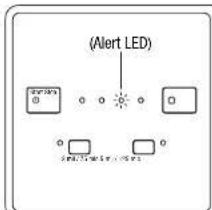
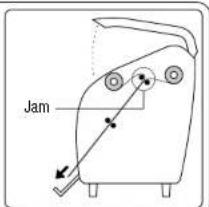
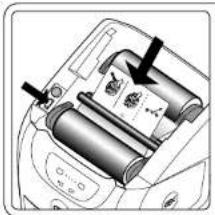
JAM ERROR
A) Open covers
B)Locate film jam
C) Press heat button
Use feed switch (forward/reverse) to clear jam. It may be necessary to cut and remove film. (Take care not to damage rollers when cutting film).
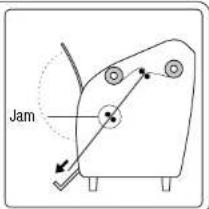
if cutting is required, use feed switch (forward / reverse) to re-feed film through machine.
- For additional information to optimize performance see page 15.

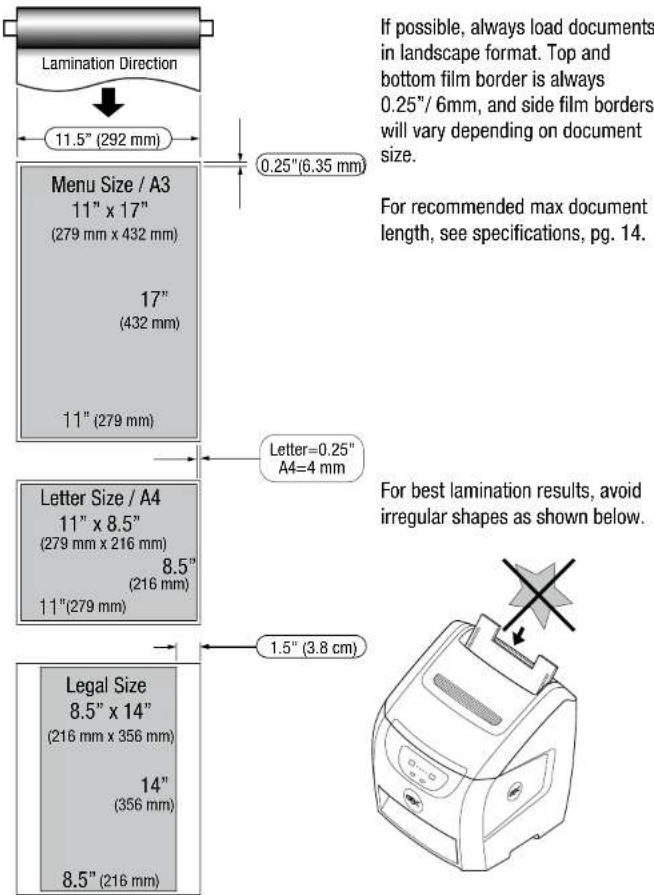
HeatSeal® Sprint™ H925 - Loading and Document Orientation
GBC
HeatSeal® Sprint™ H925 - Troubleshooting
| SYMPTOMS POSSIBLE | CAUSE CORRECTIVE ACTION | |
| No power. Switch does not illuminate when in ON position. | Power cord is not plugged into live power outlet | Plug into live outlet |
| Circuit breaker has tripped | Reset circuit breaker at rear of machine | |
| Machine does not respond after pressing standby button | Cover is open Close cover | |
| No paper in feeder Insert paper | ||
| Idler bar assembly not latched | Latch idler bar levers | |
| Main power switched off Turn on power | ||
| Low film Load new film | ||
| Faint lines across the document | Incorrect film setting Select correct film setting | |
| Ambient temperature is below 72°F/22°C | Operate at ambient temperatures at or above 72°F/22°C | |
| Low line voltage Ensure correct voltage is available | ||
| Cloudy lamination. Wavy lamination. Unsatisfactory adhesion to media. | Incorrect film settings, insufficient heat | Verify and select correct setting |
| Feeder does not feed document | Media not compatible with feeder | Try different media |
| Print output not compatible with feeder | Try different printer | |
| Paper is not fully inserted into feeder | Fully insert paper into feeder | |
| Sever paper curl Ensure paper is flat | ||
| Finished document is skewed | Paper side guides are not adjusted squarely | Adjust paper side guides to paper size |
| Media is too smooth or slick | Feed one at a time or change media type | |
| Feeder picks multiple documents (add to existing) | Paper curl is excessive Ensure paper is flat | |
| Static electricity on media, or media is stuck together | Fan paper and replace in feeder | |
| EZload levers not closed Wrinkles in document Close EZload lev |
GBC
HeatSeal Sprint H925 - Specifications
- Warm-up time Note: If machine is warm, the warm up times are reduced. Standby mode is activated after 30 minutes of non-use. To resume, press "Start" button.
| 3 mil / 75 mic | Max 2 minutes from cold |
| 5 mil / 125 mic | Max 2 minutes from cold |
2. Speed
A) The machine throughput speed is 31" (787.4mm) per minute
B) Equivalent to 4 Letter or A4 documents per minute
C) 25 Letter or A4 sheets take approximately 7 minutes
- Paper sizes and weights
| Max paper weight | 80 lbs cover - 216 gsm |
| Min paper weight | 20 lbs - 75 gsm |
| Max paper width | 12" film, 11.6" - 295 mm11.5" film, 11" - 279 mm |
| Min paper width | 6" - 152 mm |
| Max paper length | 48" - 1219 mm |
- Border sizes
| A4 paper (side border) | 12" - 305 mm wide film | 0.15" - 4 mm |
| A4 paper (top & bottom border) | 12" - 305 mm wide film | 0.25" - 6 mm |
| Letter paper (side border) | 11.5" - 292 mm wide film | 0.25" - 6 mm |
| Letter paper (top & bottom border) | 11.5" - 292 mm wide film | 0.25" - 6 mm |
- Film thickness
| 3 mil / 75 mic | Flexible |
| 5 mil / 125 mic | Semi Rigid |
6. Feeder capacity
A) Maximum of 25 sheets at 20 lbs - 75 gsm
7. Machine weight
A) In box 85 lbs - 38.6 kg
B) Out of box 70 lbs - 32 kg
8. Dimensions (with exit tray open)
19" Wide x 31" High x 27" Deep
(483 mm Wide x 787 mm High x 686 mm Deep)
9. Electrical Specifications
A) 120v @ 60Hz, 7.5A
B)230v, @ 50Hz, 4A
C) 100v, @ 50Hz/60Hz, 8.5A

HeatSeal® Sprint™ H925 - Lamination Tips for Optimum Performance
Selection of media/paper requirements
The following is a guide to selecting the proper paper for this unit to perform at an optimum level.
Before laminating important or unique documents always run a test document through the laminator using a similar media. If you find that your printed media is not compatible with the H925, try a different media and/or a different print engine.
Size & finish/weight
Size: The minimum width that can be fed through the H925 is 6^ or 152mm . Standard paper sizes that will automatically feed into the laminator are as follows: (leading edge into machine is indicated in bold)
| Type | Size | Type | Size |
| Letter | 11" x 8.5" | Government letter | 10.5" x 8.5" |
| Legal | 8.5" x 14" | A4 | 297 x 210 mm |
| Menu | 11" x 17" | A5 | 210 x 148 mm |
| Half-letter 8.5" x 5.5" | B5 250 x 176 mm | ||
| Executive 10.5" x 7.25" | F4 210 x 330 mm | ||
| Government legal 8.5" x 13 | |||
Finish/weight: As stated above, even standard media can change from time to time due to circumstances that cannot be controlled by GBC. It is always recommended that the user experiment with the media prior to loading a full run into the feed tray. The media range that will optimize performance of the feeder when slack loading is as follows*:
| Media | Minimum Weight | Maximum Weight |
| Standard copy/bond paper | 20lb / 75gsm | 53lb / 203gsm |
| Cover stock | 28lb / 75gsm | 80lb / 216gsm |
| Index stock | 42lb / 75gsm | 110lb / 203gsm |
| Porous photo paper 20lb / 75gsm Up to 50lb / 200gsm | ||
- Certain finishes (levels of gloss), weights and ink compositions may require the user to feed single sheets into the laminator rather than stack loading.
Media such as double sided printed output, designer papers, card stocks, cover stocks, high gloss photo papers, glossy photo cards and others with specialized coatings should be fed into the laminator one sheet at a time to avoid mis-feeding or jamming the feeder mechanism.

HeatSeal Sprint H925 - Lamination Tips for Optimum Performance
Loading
| Before loading prints, fan sheets on all four sides. This creates a small layer of air between the sheets that will help the feeder mechanism by eliminating any blocking that may have occurred while the sheets were drying or while in storage. |
| To maximize the film usage for letter/A4 stock, it is best to load the prints into the feeder tray with landscape orientation. For legal/A3 stock, the media must be loaded with portrait orientation. |
| If your document is severely curled, or warped, it may pose a feeding problems for the H925 feeder. To minimize this potential issue you can try to eliminate the curl by rolling the media stack in reverse prior to loading the document. You may also try loading the document upside down or backwards. |
| When loading a stack of prints, it is best to square off the bottom edge of the stack by lightly tapping the entire stack on a flat surface. Loading the feeder tray with the bottom of the stack squared will help eliminate mis-feeds. |
| Ensure the paper side guides on the document feed tray are properly spaced to rest against the edges of the paper without compressing the stack. If paper side guides are not against the media, sheets can skew during lamination. |
| Once media is loaded into the feeder tray, the lamination run must conclude before adding more prints. DO NOT add more pages to the feed tray while lamination job is in process. |
| The film rolls will laminate more total pages per refill if the maximum width is utilized when loading media into the feed tray. |
Exit tray
IMPORTANT: When laminating any media that is longer than letter/A4 in the landscape orientation, the exit tray MUST be folded back into the machine. Failure to do so will result in a jam caused by the finished media not having enough room to clear the rollers once laminated.
The exit tray was designed to only stack letter/A4 and smaller media in the landscape orientation. Capacity of this tray varies based on overall thickness of media and film mil used. GBC recommends emptying the exit tray frequently.

HeatSeal® Sprint™ H925 - Lamination Tips for Optimum Performance
Minimizing potential heat lines on media
Depending on the ambient temperature, media type and film thickness the HeatSeal Sprint H925 may produce a heat line on the initial 3 to 5 sheets of output. Follow the below recommendation to minimize the likelihood of experiencing heat lines:
Recommended morning start-up routine:
| Turn the main power switch to the “ON” position. |
| Load two or three sheets of plain paper into the feed tray. |
| Press the start button. |
| Allow the machine to run the start-up sheets and stabilize its temperature for at least 5 minutes. |
| Test one single sheet of your special media. |
| If required, repeat steps 4 and 5 again until the heat line is no longer visible. |
Additional tips:
| Film thickness can make a difference and 1.7 mil film may produce more of a heat line than 3 mil or 5 mil films. |
| Media and inks can make a difference and darker images or glossy papers may produce more of a heat line than other medias. |
| If your machine has not been used for several hours, it may be "cold" again and the morning start-up routine is recommended to be repeated. |
| For best results, do not operate this machine in an environment with an ambient temperature less than 72°F/22°C.Operating at a lower than normal room temperature, prevents the nip rollers from reaching the proper laminating temperature, resulting in faint heat lines across the finished sheet. |

HeatSeal® Sprint™ H925 - Lamination Tips for Optimum Performance
Successful lamination tips:
| Prior to use, media should be allowed to acclimate at least 48 hours in the environment in which it will be used. Optimum storage and operating environment is between \( {70}^{ \circ } - {80}^{ \circ }\mathrm{F} \) with \( {50}\% \) relative humidity. |
| Allow ink on printed media to properly dry prior to lamination. |
| DO NOT load any type of media that is creased, folded or not square into the feeder as this may cause the unit to jam. |
| Always ensure that the media has the straightest possible path into the laminator. If laminating a longer length of media, it is not recommended that the media is draped over the back of the feeder tray, as this may cause the feeder to not pick the sheets properly. |
| Upon completion of a lamination run, do not leave unlaminated media in the feeder tray. Media should be removed and stored in a way that it is stacked flat and in the proper environmental conditions. |
IMPORTANT: When laminating media that has been 3 hole punched, load that media in with the holes down into the machine first. Failure to do so will result in mis-cut sheets due to the sensor picking up a hole as the end of the page.
The composition and quality of any type of media/paper can change at any time. GBC cannot specify nor guarantee the performance of any specific brand, type or manufacturer of media/paper. Even standard media can change from time to time due to circumstances that cannot be controlled by GBC.
Limited One (1) Year Warranty
ACCO Brands USA LLC, 300 Tower Parkway, Lincolnshire, IL 60069 (in Canada, ACCO Brands Canada Inc., 5 Precidio Court, Brampton, ON L65-SB7; and in Mexico, ACCO Mexicana, S.A. de C.V. Av. Circuito Industrial Norte #6 Parque Industrial Lerma 52000, Lerma Edo. de Mexico) (each, respectively, "ACCO Brands") warrants to the original purchaser that this ACCO Brands product is free from defects in workmanship and material under normal use and service for 1 year limited warranty after purchase.
ACCO Brands' obligation under this warranty is limited to replacement or repair, at ACCO Brands' option, of any warranted part found defective by ACCO Brands without charge for material or labor. Any replacement, at ACCO Brands' option, may be the same product or a substantially similar product that may contain remanufactured or refurbished parts. This warranty shall be void in the following circumstances:
(i) if the product has been misused,
(ii) if the product has been damaged by negligence or accident, or
(iii) If the product has been altered by anyone other than ACCO Brands or ACCO Brands' authorized agents.
For warranty execution, please call 1-800-541-0094 in the USA/1-800-268-3447 in Canada/1-800-759-6825 in Mexico or go to www.gbc.com.
TO THE EXTENT ALLOWED BY APPLICABLE LAW, THIS WARRANTY IS IN LIEU OF ALL OTHER EXPRESSED WARRANTYES. REPRESENTATIONS OR PROMISES INCONSISTENT WITH OR IN ADDITION TO THIS WARRANTY ARE UNAUTHORIZED AND SHALL NOT BE BINDING ON ACCO BRANDS. TO THE EXTENT PERMITTED BY APPLICABLE LAWS, ANY IMPLIED WARRANTY (IF APPLICABLE) ARE LIMITED IN DURATION TO THE DURATION OF THIS WARRANTY. SOME STATES AND JURISDICTIONS DO NOT ALLOW LIMITATIONS ON HOW LONG AN IMPLIED WARRANTY LASTS, SO THE ABOVE LIMITATION MAY NOT APPLY TO YOU. TO THE EXTENT PERMITTED BY APPLICABLE LAW, IN NO EVENT SHALL ACCO BRANDS BE LIABLE FOR ANY SPECIAL, INCIDENTAL, PUNITIVE, EXEMPLARY, CONSEQUENTIAL OR SIMILAR DAMAGES, WHETHER OR NOT FORSEEABLE. SOME STATES AND JURISDICTIONS DO NOT ALLOW THE EXCLUSION OR LIMITATION OF SPECIAL, INCIDENTAL, PUNITIVE, EXEMPLARY, CONSEQUENTIAL, OR SIMILAR DAMAGES, SO THE ABOVE EXCLUSION OR LIMITATION MAY NOT APPLY TO YOU.
To the extent permitted by law, this warranty is not transferable and will automatically terminate if the original product purchaser sells or otherwise disposes of the product.
This warranty gives you specific legal rights. Other rights, which vary from jurisdiction to jurisdiction, may exist. In addition some jurisdictions do not allow (i) the exclusion of certain warranties, (ii) limitations on how long an implied warranty lasts and/or (iii) the exclusion or limitation of certain types of costs and/or damages, so the above limitations may not apply.
Service
ACCO Brands USA
300 Tower Park
Lincolnshire, IL 6
(800)541-0094
ACCO Brands Canada
5 Pracidio Court
Brampton, ON L6S-687
(800)263-1063
ACCO Mexicana
Mepluno #43, Colonia Nuva Industrial Vallejo
Delegation Gustavo A. Madero, CP 077/00
Mexico, DF. (55) 1500-5578
Purchase information
Register this product online at: www.gbc.com.
The model and serial numbers are recorded on the bottom of the machine.
Serial number:
Model number:
Purchase date:
Purchased from:
FCCCLASSBNOTICE
Note: This equipment has been tested and found to comply with the limits for a Class B digital device, pursuant to part 15 of the FCC Rules. These limits are designed to provide reasonable protection against harmful interference in a residential installation. This equipment generates, uses and can radiate radio frequency energy and, if not installed and used in accordance with the instructions, may cause harmful interference to radio communications. However, there is no guarantee that interference will not occur in a particular installation. If this equipment does cause harmful interference to radio or television reception, which can be determined by turning the equipment off and on, the user is encouraged to try to correct the interference by one or more of the following measures:
Reorient or relocate the receiving antenna.
Increase the separation between the equipment and receiver.
- Connect the equipment into an outlet on a circuit different from that to which the receiver is connected.
Consult the dealer or an experienced radio/TV technician for help.
CANADA CLASS B NOTICE
This Class B digital apparatus complies with Canadian ICES-003
MODIFICATIONS
Any modifications made to this device may void the authority granted to the user by the FCC and/or by Industry Canada to operate this equipment.
Made in China.
GBC and HeatSeal are registered trademarks of
General Binding Corporation.
ACCO is a registered trademark of ACCO Brands.
Copyright © 2010 ACCO Brands. All rights reserved.
Issue 2 July 2010

LES MISES EN GARDES SUVANTES FIGURENT SUR CE PRODUIT.

Attention, aces chaudes.

This warranty gives you specific legal rights. Other rights, which vary from jurisdiction to jurisdiction, may exist. In addition some jurisdictions do not allow (i) the exclusion of certain warranties, (ii) limitations on how long an implied warranty lasts and/or (iii) the exclusion or limitation of certain types of costs and/or damages, so the above limitations may not apply.
Entretien
ACCO Brands USA
300 Tower Parkway.
Lincolnshire, IL 60069-3640
(800)541-0094
ACCO Brands Canada
5 Precidio Court
Brampton, ON L6S-6B7
(800)263-1063
ACCO Mexicana
Nepluno #13, Colonia Nueva Industrial Vallejo
Delapacion Gustavo A. Madero, CP 07700
Mixico.DF.65)1500-5578