
A 8250 C - Laminating machine OLYMPIA - Free user manual and instructions
Find the device manual for free A 8250 C OLYMPIA in PDF.
| Product type | Laminating machine |
| Brand | Olympia |
| Model | A 8250 C |
| Max laminating format | DIN A3 (330 mm width) |
| Pouch thickness | 80 to 250 µm |
| Max document thickness | 0.8 mm |
| Laminating speed | 0.8 m/min |
| Power supply | 220-240 V, 50 Hz |
| Power consumption | 5.5 A |
| Dimensions (L x W x H) | 541 x 213 x 139 mm |
| Weight | Approx. 6.7 kg |
| Warm-up time | Approx. 4 to 6 minutes |
| Laminating system | 4 hot rollers (Hot-Roller) |
| Number of rollers | 4 transport rollers |
| LED indicators | Power (red), Ready (green) |
| Thickness adjustment | Via up/down buttons (80 to 250 µm) |
| Reverse function | Yes, REV button |
| Automatic shut-off in case of overheating | Yes |
| Warranty | 24 months |
| Maintenance | Clean rollers with folded paper; clean casing with mild soap |
| Safety | Circuit breaker; do not use cold laminating pouches |
Frequently Asked Questions - A 8250 C OLYMPIA
User questions about A 8250 C OLYMPIA
0 question about this device. Answer the ones you know or ask your own.
Ask a new question about this device
Download the instructions for your Laminating machine in PDF format for free! Find your manual A 8250 C - OLYMPIA and take your electronic device back in hand. On this page are published all the documents necessary for the use of your device. A 8250 C by OLYMPIA.
USER MANUAL A 8250 C OLYMPIA
natural_image
White and black electric air conditioner with ventilation slots (no visible text or symbols)Exemption From Liability 14
Intended Use....15
Features 15
Operating Elements 16
Operation 17
Clearing Foil Jams 18
Cleaning and Servicing....18
Troubleshooting....19
Disposal 19
Guarantee....20
Français FR BE CH
Please observe the following information to ensure reliable operation of the laminator:
1 Read this manual thoroughly and observe the instructions and information in it when operating the device.
2 Keep the operating instruction manual available for future reference.
3 The device may only be operated indoors in dry rooms which are well ventilated.
4 The device must be set down on a level surface and may only be used when horizontal.
5 Ensure that the On/Off switch is in the "OFF" position before connecting the laminator to the mains power supply.
6 The mains power socket and power connection on the device must be freely accessible for reasons of safety, namely to enable the power supply to be disconnected quickly in an emergency!
7 Prevent damage to the power plug and power cable. Never twist or kink the power cable nor set it down on hot surfaces. Do not operate the unit if the power cable or power plug is damaged.
8 Switch the device off immediately if a strong smell comes from it.
9 Switch the device off when it is not being used.
10 Disconnect the power plug when the device is not in use.
11 Never take hold of the power plug with damp hands.
12 Keep loose clothing, ties, jewellery, long hair and other loose objects away from the insertion slot. Risk of injury!
13 Children must not be allowed in the vicinity of the device when it is ready to operate.
14 Ensure no pets can get near the device.
15 Do not use the device in the vicinity of hot surfaces or in damp environments and protect it from direct sunlight and dusty conditions.
16 Always use the lamination foil pockets recommended for the device (refer to "Features"). Using foil pockets which are too large could lead to the unit jamming.
17 Do not use foil pockets intended for cold lamination for hot lamination. This could damage the device, foil pockets and document.
18 Never cut foil pockets to size. The resulting cut edges could cause the foil pockets to jam.
19 Never use foil pockets which are soiled. Clean them beforehand, if necessary, using a soft, slightly damp cloth.
20 Metallic objects cannot be laminated.
21 Do not laminate heat sensitive materials, such as thermal paper, in the device.
22 Lamination of moist documents produces poor results.
23 Maintain a pause of at least 15 seconds between each lamination process.
24 Never operate the device longer than 2 hours at a time. Then allow the device to cool down for at least 30 minutes.
25 Only transport the device when it has cooled down.
26 Never touch hot parts of the device. Risk of burns! Handle the foil pockets just laminated with due care and attention. They are very hot!
27 Always switch the device off and then disconnect the power plug before cleaning the device. Never use any solvents or aggressive cleaning agents.
Important Information
If very soft material (such as serviettes) or very small size material is to be laminated, we recommend inserting a folded sheet of paper in the foil pocket too, to prevent the possibility of the document being laminated from jamming. The folded edge of the sheet must be inserted into the laminator first.
ID cards and documents could lose their validity if they are laminated because the official status of the document can no longer be validated.
If you transfer the laminator to others, always hand over this operating manual with it.
Exemption From Liability
We cannot guarantee that the information which relates to the technical properties of the product or to the product itself contained in this document is correct. The product and, where applicable, its accessories, described in this document are subject to constant improvement and further development. For this reason, we reserve the right to modify components, accessories, technical specifications and related documentation of the product described herein at any time without notice.
Intended Use
This laminator can be used for the hot lamination of foil pockets with a thickness between 80 and 250 m and a maximum size of A3. It can be used to laminate photos, cards, documents, paper etc. with a max. thickness of 0.8 mm and a weight between 70 and 80 g/m ^2 .
Any other use is considered unintended use.
Unauthorised modifications or reconstructions are not permitted.
Features
Protection and refinement of your documents.
Laminate photos, documents, graphics etc. up to A3 size.
The unit operates using 4 heating rollers, has a quick warm-up phase and laminates without a carrier.
- 2 LED lamps indicate the operating status.
• Automatic switch-off in the event of overheating
• High quality heating system prevents smudging and blistering
• Warm-up phase of 4 - 6 minutes - Cool down phase to room temperature, approx. 30 minutes.
- Foil thickness, minimum 80 µm and maximal 250 µm.
Laminating system: Hot roller technology,
4 transport rollers
Maximum laminating width: 330 mm
Maximum lamination thickness: 0.8 mm
Laminating speed: 0.8 m/min
Power supply: 220 - 240 Volt / 50 Hz
Power consumption: 5.5 A
Dimensions (L x W x H): 541 x 213 x 139 mm
Weight: Approx. 6.7 kg
Operating Elements
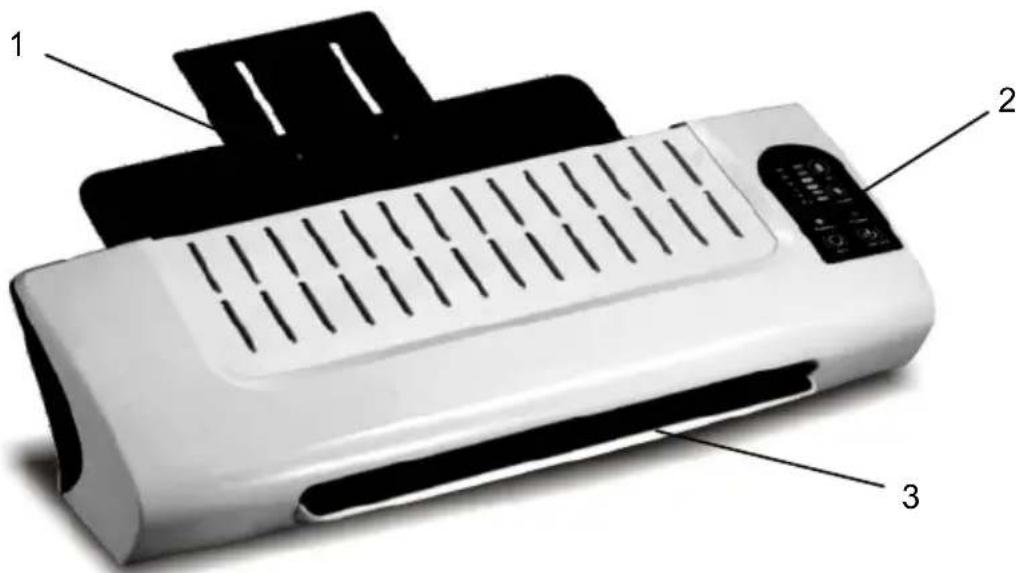
text_image
1 2 31 Foil pocket discharge 2 Operating panel
3 Insertion slot
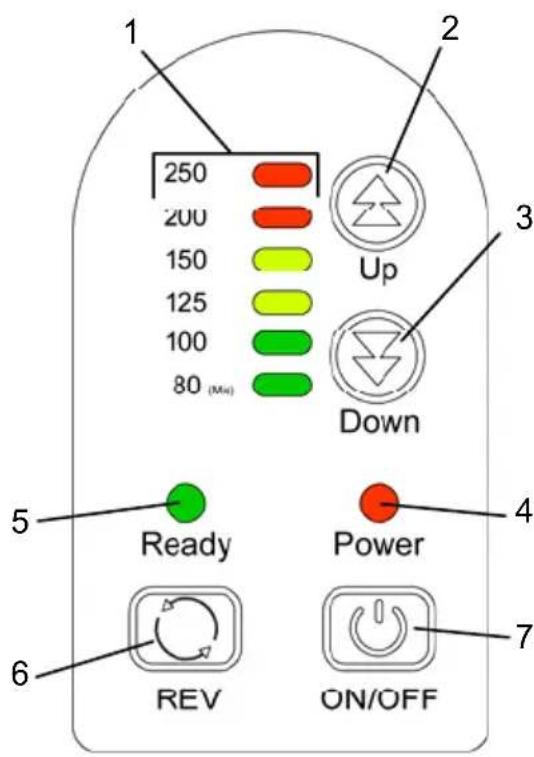
text_image
1 250 200 150 125 100 80 (Mx) Up Down 3 5 Ready Power 6 REV ON/OFF 4 71 LED for foil pocket thickness
2 Up button
3 Down button
4 Red LED: Device is switched on.
5 Green LED: Device is ready to operate.
6 Reverse running button
7 On/Off switch
Operation
- Connect the power cable to an easily accessible, standard electrical socket.

Attention: Check that the voltage specifications of the machine correspond to that of your power supply network (220 - 240 V / 50 Hz).
- Switch on the power switch at the rear of the device and then switch on the On/Off button (ON/OFF) on the operating panel.
- The drive motor for the transport rollers starts up, the red LED (Power) lights up and the warm-up phase begins.
- The correct operating temperature is reached after about 4 - 6 minutes and the green LED (Ready) lights up.
- Set the thickness of the laminating pocket using the Up and Down buttons, if it needs to be altered.

Note: Only use laminating pockets of at least 80 m and maximally 250 m.
- Insert the document to be laminated in the foil pocket so that there is a margin of approx. 3 - 5 mm to the edge of the foil on all sides.

Attention: Only use hot laminating foils.
- Insert the foil pocket containing the document in the laminator's insertion slot. Insert the ready closed side of the foil in first. The foil pocket, with the document inside, is automatically drawn in and sealed.

Note: To prevent the foil pocket from creasing, never feed the open side of the laminating pocket first in the insertion slot of the laminator.

Attention: The foil is very hot and soft when ejected following lamination. Therefore, handle the laminated product with extreme care.

Note: To flatten the laminated product, place a book or similar heavy, flat object, on it.

Note: If the device is used continuously, the blue LED may light up occasionally to indicate reheating. This does not affect the quality of the lamination process.
Clearing Foil Jams
This laminator is equipped with a REV button which activates reverse running in order to quickly clear foil pockets which have become jammed.
- If the foil pocket jams, press the REV button.
- The jammed foil pocket is released and is fed back out of the insertion slot.
- It will probably be necessary to then clean the unit several times as described in the Section "Cleaning and Servicing".
- If foil jams occur repeatedly or jammed foil cannot be removed from the laminator, please contact our hotline (refer to Guarantee).
Cleaning and Servicing
Deposits and residual adhesive on the transport rollers can influence the results of the laminating process. Therefore, the transport rollers must be cleaned regularly after use:
To do this, insert a folded piece of paper in the insertion slot. Residual adhesive is removed and taken up by the paper when ejected. Repeat the process several times.
Disconnect the power plug before starting to clean the unit with a damp cloth. If necessary, the housing can be cleaned using a cloth moistened with clean water with a little mild soap applied. Never use any solvents or aggressive cleaning agents.
Troubleshooting
| Fault | Corrective |
| Red LED (Power) does not light upDevice does not respond | Check that the power switch on the rear side of the device has been switched on. Also check that the On/Off switch on the operating panel has been switched on.If the fault cannot be cleared, contact our hotline. |
| Foil jam | Check the foil pockets being used are the correct size.Only use foil pockets of the size specified.Ensure that the foil pocket is straight when inserted in the device.To clear the fault, follow the instructions in the Section "Clearing Foil Jams". |
| Laminated foil is not completely transparent | Laminate the same foil again to improve the lamination result. |

Conformity of the equipment to the EU directives is confirmed by the CE symbol.
Disposal

The adjacent symbol indicates that when the product has come to the end of its service life, the end user is responsible for disposing of it at a collection point or recycling depot authorised by the local authorities. The symbol is only applicable for states within the EEA. EEA = European Economic Area, which comprises the EU member states plus Norway, Island and Liechtenstein.
Guarantee
It is essential to retain this guarantee!
Dear Customer,
We are pleased that you have chosen the A 8250 C laminator from Olympia. Should a technical problem arise with regard to the equipment, please observe the following points:
- The period of guarantee for the equipment is 24 months.
- It is essential to keep the purchase receipt and original packing.
- The first line of action if a problem occurs is to contact our hotline.
0180 5 007514 (0,14 € / minute)
Our expert personnel can frequently provide help over the phone.
- However, if the problem cannot be solved via telephone, please sent the equipment to the following address in its original packing:
Servicecenter Hattingen
Repairs under the terms of guarantee can only be completed when the purchase receipt is enclosed.
We are sorry for any inconvenience.
Chère cliente, Cher client,
Olympia Business Systems
Vertriebs GmbH
GB The manufacturer hereby declares that the equipment complies with the stipulations defined in the following guidelines and standards:
text_image
H. Byyi EHeinz Prygoda, Managing Director