FOLKLIG - Cooker IKEA - Free user manual and instructions
Find the device manual for free FOLKLIG IKEA in PDF.
Frequently Asked Questions - FOLKLIG IKEA
Download the instructions for your Cooker in PDF format for free! Find your manual FOLKLIG - IKEA and take your electronic device back in hand. On this page are published all the documents necessary for the use of your device. FOLKLIG by IKEA.
USER MANUAL FOLKLIG IKEA
ITENGLISH 4 DEUTSCH 16 FRANÇAIS 32 ITALIANO 54ENGLISH 4 Your safety and that of others is paramount. This manual and the appliance itself provide important safety warnings, to be read and observed at all times. This is the safety alert symbol, pertaining to safety, which alerts users to potential hazards to themselves and others. All safety messages are preceded by the safety alert symbol and the following terms: DANGER Indicates a hazardous situation which, if not avoided, will result in serious injury. WARNING Indicates a hazardous situation which, if not avoided, could result in serious injury. All safety warnings give specic details of the potential risk present and indicate how to reduce risk of injury, damage and electric shock resulting from improper use of the appliance. Please observe the following instructions: - The appliance must be disconnected from the power supply before carrying out any installation work. - Installation and maintenance must be carried out by a qualied technician, in compliance with the manufacturer’s instructions and local safety regulations. Do not repair or replace any part of the appliance unless specically stated in the user manual. - Regulations require that the appliance is earthed. - The power cable must be long enough for connecting the appliance, once tted in its housing, to the power supply. - For installation to comply with current safety regulations, an all-pole disconnect switch with minimum contact gap of 3 mm must be utilized. - Do not use multiple plug adapters or extension leads. - Do not pull the power cable to disconnect it from the electrical supply. - The electrical components must not be accessible to the user after installation. - The appliance is designed solely for household use for cooking food. No other type of use is permitted (e.g. heating rooms). The Manufacturer declines all responsibility for inappropriate use or incorrect setting of the controls. - The appliance and its accessible parts become hot during use. Care should be taken to avoid touching heating elements. Children less than 8 years of age shall be kept away unless continuously supervised. This appliance can be used by children aged from 8 years and above and persons with reduced physical, sensory or mental capabilities or lack of experience and knowledge if they have been given supervision or instruction concerning use of the appliance in a safe way and understand the hazards involved. They shall not play with the appliance. Cleaning and user maintenance shall not be made by children supervision. Safety information 4 Product description 5 Daily use 6 Maintenance and cleaning 9 What to do if 10 Technical Data 11 Electrical connection 12 Environmental concerns 13 IKEA GUARANTEE 14 Safety Information Table of contentsENGLISH 5 - The accessible parts of the appliance may become very hot during use. Keep children away from the appliance and supervise them to ensure that they do not play with it. - During and after use, do not touch the heating elements of the appliance. Do not allow the appliance to come into contact with cloths or other ammable materials until all the components have cooled sufciently. - Do not place ammable material on or near the appliance. - Overheated oils and fats catch re easily. Never leave the appliance unattended when cooking with fat and oil. - Metallic objects such as knives, forks, spoons and lids should not be placed on the hob surface since they can get hot. - A separator panel (not supplied) must be installed in the space under the appliance at a distance at least 20mm. If an Ikea separator is used, follow the instructions given in the panel reference material. No separator is needed if an oven is installed underneath. - If you don’t install the oven underneath, you must use the separator and between the separator and the cabinet you must install the drawer. - If the surface is cracked, switch off the appliance to avoid the possibility of electric shock. - The appliance is not intended to be operated by means of an external timer or separate remote control system. - Do not use steam cleaners. - Unattended cooking on a hob with fat or oil can be dangerous and may result in re. NEVER try to extinguish a re with water, but switch off the appliance and then cover ame e.g. with a lid or a re blanket. Danger of re: do not store items on the cooking surfaces. - After use, switch off the hob element by its control and do not rely on the pan detector. Product description
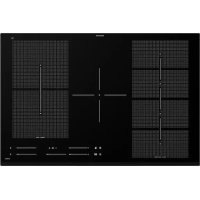
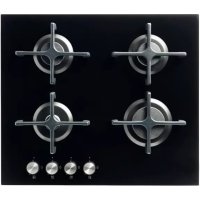
Induction cooking zone
Cooking zone controls and corresponding display
Timer/Child lock/Power Management Control panel
2ENGLISH 6 Switching the hob ON/OFF To switch the hob on, press the button for approx. 2 seconds until the cooking zone displays light up. To switch off, press the same button until the displays switch off. All the cooking zones are deactivated. If the hob has been in use, the residual heat indicator “H” remains lit until the cooking zones have cooled down. If within 10 seconds of switching on, no function is selected, the hob switches off automatically. Before use Important: The induction cooking zones will not switch on if pots and pans are not of the correct dimensions. Only use pots bearing the symbol “INDUCTION SYSTEM”. Before switching the hob on, position the pot on the desired cooking zone. Existing pots and pans: Use a magnet to check whether pots or pans are suitable for use on the induction hob: pots are unsuitable if they cannot be magnetically detected.
1. Ensure pots have a smooth bottom,
otherwise they may scratch the hob’s glass ceramic surface. Check dishes.
2. Do not use empty pots on the hob. This
could result in damage to both the glass ceramic surface and the bottom of the pots.
3. Never place hot pots or pans on the
hob’s control panel. This could result in damage. Switching on and adjusting cooking zones Power indicator display Selected cooking zone indication Cooking zone positioning Once the hob is switched on and the pan is positioned on the chosen cooking zone, select the zone using the corresponding button: the display shows level 0. With the Slider it is possible to select the required power level, from min. 0 to max. 9, or booster “P”. To increase the power level, slide your nger on the slider from left to right several times; to decrease it, slide in the opposite direction. Alternatively the “+” and “-” quick access buttons can be used. Each cooking zone has various power levels, adjustable with the +/- buttons, going from “1”: min. power, to “9”: max. power. Some cooking zones have a fast boil function (Booster), shown on the display with the letter “P”. Fast boil function (Booster) This function, only present on some cooking zones, makes it possible to exploit the hob’s maximum power (for example to bring water to the boil very quickly). To activate the function, press the “+” button until “P” appears on the display. After 5 minutes’ use of the booster function, the appliance automatically sets the zone to level 9. Demo Mode This hob is equipped with a demo mode which allows you to interact with the control panel without activating the corresponding cooking zones. The activation and deactivation procedure must be carried out within 60 seconds of the appliance being connected to the power Daily useENGLISH 7 supply in the home. To activate the demo mode, hold the two external cooking zone selection buttons at the same time for at least 5 seconds: “dE” appears on the central display. You can now explore the control panel functions. To deactivate Demo mode, repeat the procedure, remembering rst of all to disconnect the hob from the mains and then reconnect it, carrying out the procedure within 60 seconds of connection. Activation/deactivation of the acoustic signal After switching on the hob, keep the “+” button and outermost selection button on the right (“control panel lock”) pressed at the same time for at least 3 seconds Deactivation of cooking zones Select the cooking zone you wish to switch off. Press the corresponding button (a dot lights up at the bottom right of the power level indicator). Press the key “-” to set the level to “0”. To switch off instantly, hold the zone selection button for 3 seconds. The cooking zone switches off and the residual heat indicator “H” lights up. Control panel lock This function locks the controls to prevent accidental switching on of the hob. To activate the control panel lock function, hold button C for 3 seconds. The control panel is locked except for the deactivation function. To deactivate the control panel lock, repeat the activation procedure. The luminous dot goes off and the hob is active again. The presence of water, liquid spilled from pots or any objects resting on the button below the symbol can accidentally activate or deactivate the control panel lock function. Slider The timer can be used to set cooking time for a maximum of 99 minutes (1 hour and 39 minutes) for all cooking zones. Select the cooking zone to be used with the timer (an illuminated dot appears to the bottom right hand side of the heat setting indicator on the display), press the button with the clock symbol then set the desired cooking time using the buttons “+” and “-” of the timer function (see gure). After a few seconds, the timer begins the countdown (an illuminated dot is visible next to the zone for which the timer has been activated). Once the set time has elapsed, an acoustic signal sounds and the cooking zone switches off automatically. To deactivate the timer, press the “-” button until the display shows “0:0”. To set the timer for another zone, repeat the points above. The timer display always shows the timer for the selected zone or the shortest timer. To change or switch off the timer, press the zone selection button for the timer in question. Control panel warnings Residual heat indicator. The hob is tted with a residual heat indicator for each cooking zone. These indicators alert the user when cooking zones are still hot. If the display shows H, the cooking zone is still hot. If the residual heat indicator of a given cooking zone is lit, that zone can be used, for example, to keep a dish warm or to melt butter. When the cooking zone cools down, the display goes off.ENGLISH 8 Incorrect or missing pot indicator. If you are using a pot that is not suitable, not correctly positioned or not of the correct dimensions for your induction hob, the message “no pot” will appear in the display (see gure). If no pot is detected within 60 seconds, the hob switches off. Power management Thanks to the “Power management” function, the user can set the maximum power the hob can reach, as required. This setting is possible at any time and is maintained until the next change. By setting the required maximum power, the hob automatically adjusts distribution in the various cooking zones, ensuring that this limit is never exceeded; with the advantage of also being able to manage all the zones simultaneously, but without overload problems. 4 maximum power levels are available and showed on display: 2.5 – 4.0 – 6.0 – 7.2 kW (7.2 kW is considered as max power of cooktop) At the time of purchase, the hob is set to maximum power After plugging the appliance into the electrical socket, in the rst 60 seconds it is possible to set the required power level by running the following points: Step Control panel Display 1 Press for approximately 3 seconds + button The display shows 2 Press the Power Management (button C) to conrm the previous step The display shows last level set previously 3 Press - + button to set the chosen level amongst the different options available The display shows the set level. 4 Press the Power Management (button C) to conrm the previous step The display shows the set level which ashes for approximately 2 seconds; after which the hob emits an acoustic signal and then turns itself off; it is now ready for useENGLISH 9 In case of an error when setting the power, the symbol appears in the middle and an acoustic signal sounds for about 5 seconds. In this case repeat the conguration procedure from the beginning. If the error occurs again, contact the After- Sales Service. During normal use, if the user tries to increase the maximum available power level when reached, the level of the zone in use ashes twice and an acoustic signal sounds. To obtain a higher power in that zone, it is necessary to manually decrease the power level of one or more already active cooking zones. Recommended pot bottom widths Ø Zone Ø Pot 210 mm 150 - 210 mm 180 mm 120 - 180 mm 145 mm 100 - 145 mm Clean the hob after each use in order to avoid damaging the surface and to prevent the formation of baked-on deposits which are difcult to remove. Before cleaning, make sure the cooking zones are switched off and that the residual heat indicator (“H”) is not displayed. Steam cleaner is not to be used! Periodically check for dust under the appliance, near the cooling air inlet or the outlet openings. This could hinder the ventilation and cooling of the electronic module and decrease the effectiveness of the hob. To clean the hob, proceed as follows:
1. use a soft clean cloth, absorbent kitchen
wipes or a proprietary cleaner for glass ceramic hobs. Do not use abrasive sponges and/or metal scouring pads.
2. Food spills should be cleaned off before
they bake onto the glass ceramic surface. Sugar and foods with a high sugar content damage the glass ceramic surface and must be immediately removed using a scraper for glass. Caution! Glass scrapers have a very sharp blade and must be handled with care.
3. Remove any stubborn food residues with
a scraper or proprietary detergents.
4. Salt, sugar and sand can scratch the
glass ceramic hob: clean up any such spills on the hob immediately. Maintenance and cleaningENGLISH 10 Error code Problem Possible cause Solution The hob switches off and after 10 seconds emits an acoustic signal every 3 seconds Continuous pressure on control panel area Water or utensils on control panel Clean the control panel C81, C82 The control panel switches off because of excessively high temperatures The internal temperature of electronic parts is too high Wait for the hob to cool down before using it again C83 The control panel indicates the error code hob off because of an issue on electronic circuit Cooktop has been supplied with over voltage Cooktop may be still used but call the After-Sales Service C85 Hob is not able to give power to the pot Pot is not suitable to the induction hob Use another induction pot F02 or F04 or C84 The connection voltage is wrong or issue to the power supply The sensor detects a discrepancy between the appliance voltage and that of the mains supply Disconnect the hob from the mains and check the electrical connection F42 or F43 The connection voltage is wrong The sensor detects a discrepancy between the appliance voltage and that of the mains supply Disconnect the hob from the mains and check the electrical connection F01, F05, F06, F07, F10, F12, F25, F33, F34, F36, F37, F46, F47, F48, F49, F58, F61, F62, F63, F72, F74, F77 Call the After-Sales Service and specify the error code What to do if ...ENGLISH 11 Technical data Dimensions Width (mm) 580 Height (mm) 58 Depth (mm) 510 Voltage (V) See Installation and electrical connection The technical information are situated in the rating plate on the bottom side of the appliance. Before calling the After-Sales Service:
1. Check “Troubleshooting guide” to see if
you can eliminate the problem yourself
2. Turn the hob on again to check if correct
operation has been restored.
3. If the problem persists, contact the After-
sales Service. Give the following information:
- service number (i.e. the number after the word SERVICE on the dataplate under the hob and on the warranty certicate);
- your telephone number. If any repairs are required, contact an authorised service centre, indicated in the warranty. In the unlikely event that an operation or repair is carried out by an unauthorised technician, always request certication of the work carried out and insist on the use of original spare parts. Failure to comply with these instructions may compromise the safety and quality of the product.ENGLISH 12 Electrical connection WARNING. Disconnect the appliance from the power supply. - Installation must be carried out by qualied personnel who know the current safety and installation regulations. - The manufacturer declines all liability for injury to persons or animals and for damage to property resulting from failure to observe the regulations provided in this chapter. - The power cable must be long enough to allow the hob to be removed from the worktop. - Make sure the voltage specied on the dataplate located on the bottom of the appliance is the same as that of the home.
1. Remove the terminal cover (A) by
unscrewing the screw and insert the cover into the hinge (B) of the terminal.
2. Plug the power cord into the clamp and
connect the wires to the terminal block as shown in the wiring diagram located near the terminal.
3. Secure the power cable with the cable
4. Close the cover (C) and screw on the
terminal with the screw removed. For each connection to the network, the hob automatically checks for a few seconds.
= E (yellow-green) N1 = N (blue) N2 = N (blue) L1 = R (black) L2 = S (brown) Connection to main power blue/greyblack/brownyellow/greenENGLISH 13 Disposal of packaging materials The packaging material is entirely recyclable and marked with the recycling symbol ( ). Do not dispose of the various packaging materials carelessly, but do so responsibly and in full compliance with local authority regulations governing waste disposal. Scrapping This appliance is marked in compliance with European Directive 2002/96/EC on Waste Electrical and Electronic Equipment (WEEE). By ensuring that this appliance is scrapped suitably, you can help prevent potentially damaging consequences for the environment and health. The symbol on the appliance or accompanying documentation indicates that this product should not be disposed of as unsorted municipal waste but must be taken to a collection point for the treatment of WEEE. Energy saving For optimum results, observe the following advice: - Use pots and pans whose bottom diameter is equal to that of the cooking zone. - Only use at-bottomed pots and pans. - If possible, keep pot lids on when cooking. - Make sure you place the pot or pan in the centre of the cooking zone outlined on the hob. Declaration of Conformity - This appliance has been designed, constructed and marketed in compliance with the safety requirements of “Low Voltage” Directive 2006/95/EC (replacing 73/23/EEC as amended) and protection requirements of “EMC” Directive 2004/108/EC.
- THIS APPLIANCE MEETS THE
STANDARD EN 60350-2. Environmental concernsENGLISH 14 IKEA GUARANTEE How long is the IKEA guarantee valid? This guarantee is valid for ve (5) years from the original date of purchase of your appliance at IKEA, unless the appliance is named LAGAN in which case two (2) years of guarantee apply. The original sales receipt, is required as proof of purchase. If service work is carried out under guarantee, this will not extend the guarantee period for the appliance. Which appliances are not covered by the IKEA ve (5) years guarantee? The range of appliances named LAGAN and all appliances purchased in IKEA before 1st of August 2007. Who will execute the service? IKEA service provider will provide the service through its own service operations or authorized service partner network. What does this guarantee cover? The guarantee covers faults of the appliance, which have been caused by faulty construction or material faults from the date of purchase from IKEA. This guarantee applies to domestic use only. The exceptions are specied under the headline “What is not covered under this guarantee?” Within the guarantee period, the costs to remedy the fault e.g. repairs, parts, labour and travel will be covered, provided that the appliance is accessible for repair without special expenditure. On these conditions the EU guidelines (Nr. 99/44/ EG) and the respective local regulations are applicable. Replaced parts become the property of IKEA. What will IKEA do to correct the problem? IKEA appointed Service Provider will examine the product and decide, at its sole discretion, if it is covered under this guarantee. If considered covered, IKEA Service Provider or its authorized service partner through its own service operations, will then, at its sole discretion, either repair the defective product or replace it with the same or a comparable product. What is not covered under this guarantee?
- Normal wear and tear.
- Deliberate or negligent damage, damage caused by failure to observe operating instructions, incorrect installation or by connection to the wrong voltage, damage caused by chemical or electrochemical reaction, rust, corrosion or water damage including but not limited to damage caused by excessive lime in the water supply, damage caused by abnormal environmental conditions.
- Consumable parts including batteries and lamps.
- Non-functional and decorative parts which do not affect normal use of the appliance, including any scratches and possible color differences.
- Accidental damage caused by foreign objects or substances and cleaning or unblocking of lters, drainage systems or soap drawers.
- Damage to the following parts: ceramic glass, accessories, crockery and cutlery baskets, feed and drainage pipes, seals, lamps and lamp covers, screens, knobs, casings and parts of casings. Unless such damages can be proved to have been caused by production faults.
- Cases where no fault could be found during a technician’s visit.
- Repairs not carried out by our appointed service providers and/or an authorized service contractual partner or where non- original parts have been used.
- Repairs caused by installation which is faulty or not according to specication.
- The use of the appliance in a non-domestic environment i.e. professional use.
- Transportation damages. If a customer transports the product to his home orENGLISH 15 another address, IKEA is not liable for any damage that may occur during transport. However, if IKEA delivers the product to the customer’s delivery address, then damage to the product that occurs during this delivery will be covered by IKEA.
- Cost for carrying out the initial installation of the IKEA appliance. However, if an IKEA appointed Service Provider or its authorized service partner repairs or replaces the appliance under the terms of this guarantee, the appointed Service Provider or its authorized service partner will reinstall the repaired appliance or install the replacement, if necessary. These restrictions do not apply to fault-free work carried out by a qualied specialist using our original parts in order to adapt the appliance to the technical safety specications of another EU country. How country law applies The IKEA guarantee gives you specic legal rights, which cover or exceed all the local legal demands. However these conditions do not limit in any way consumer rights described in the local legislation. Area of validity For appliances which are purchased in one EU country and taken to another EU country, the services will be provided in the framework of the guarantee conditions normal in the new country. An obligation to carry out services in the framework of the guarantee exists only if the appliance complies and is installed in accordance with: - the technical specications of the country in which the guarantee claim is made; - the Assembly Instructions and User Manual Safety Information. The dedicated AFTER SALES for IKEA appliances Please don’t hesitate to contact IKEA appointed After Sales Service Provider to:
- make a service request under this guarantee;
- ask for clarications on installation of the IKEA appliance in the dedicated IKEA kitchen furniture;
REMPLACEMENT OU REMBOURSEMENT
Rate: Local rate Opening hours: Monday - Friday 9.00 - 21.004000 107 73027 © Inter IKEA Systems B.V. 2015 AA-1158382-3