
LIVSGNISTA - Cooker IKEA - Free user manual and instructions
Find the device manual for free LIVSGNISTA IKEA in PDF.

| Product type | Built-in gas hob |
| Brand | IKEA |
| Model | LIVSGNISTA |
| Number of burners | 4 (1 rapid, 2 semi-rapid, 1 auxiliary) |
| Dimensions (W x H x D) | 590 x 44 x 510 mm |
| Weight (estimated) | Approximately 12 kg |
| Electrical supply | 220-240 V ~, 50/60 Hz |
| Gas supply | Natural gas (G20/G25) or LPG (G30/G31), adaptable via injectors |
| Total power | 8 kW |
| Ignition | Integrated electronic with safety thermocouple |
| Safety | Automatic gas shut-off in case of flame extinction (thermocouple) |
| Materials | Tempered glass, stainless steel, enamel |
| Grids | Removable, cast iron or steel (depending on version) |
| Cleaning | Glass and enamel surfaces: hot water and neutral detergent. No abrasive products or dishwasher for burners |
| Installation | Built into worktop (thickness 20-60 mm), gas connection by professional |
| Warranty | 5 years (contractual IKEA) |
| Spare parts | Injectors, knobs, thermocouples, ignition spark plugs available via IKEA after-sales service |
| Repairability | Repair possible by certified technician; specified original parts |
Frequently Asked Questions - LIVSGNISTA IKEA
User questions about LIVSGNISTA IKEA
0 question about this device. Answer the ones you know or ask your own.
Ask a new question about this device
Download the instructions for your Cooker in PDF format for free! Find your manual LIVSGNISTA - IKEA and take your electronic device back in hand. On this page are published all the documents necessary for the use of your device. LIVSGNISTA by IKEA.
USER MANUAL LIVSGNISTA IKEA
Helpful hints and tips 8
Maintenance and cleaning 8
What to do if ... 9
Injector table 10
Technical data 11
Installation
Environmental concerns 16
IKEA GUARANTEE
11
Safety Information
Your safety and the safety of others are very important.
This manual and the appliance itself provide important safety messages, to be read and observed at all times.
This is the safety alert symbol, pertaining to safety, which alerts users to potential hazards to themselves and others.
All safety messages will follow the safety alert symbol and either the terms:
DANGER Indicates a hazardous situation which, if not avoided, will cause serious injury.
WARNING Indicates a hazardous situation which, if not avoided, could cause serious injury.
All Safety messages will tell you what the potential hazard is, tell you how to reduce the chance of injury, and tell you what can happen if the instructions are not followed.
The appliance must be disconnected from the power
supply before carrying out any installation work.
Installation and maintenance must be carried out by a qualified technician, in compliance with the manufacturer's instructions and local safety regulations to the relevant gas standard. Only use original spare parts. Do not repair or replace any part of the appliance unless specifically stated in the user manual.
WARNING If the information in this manual is not followed exactly, a fire or explosion may result causing property damage or injury.
- Do not store or use gasoline or other flammable vapors and liquids in the vicinity of this appliance.
What to do if you smell gas:
- Do not try to light any appliance.
- Do not touch any electrical switch.
- Do not use any phone in your building.
- Immediately call your gas
supplier from a neighbor's phone. Follow the gas supplier's instructions.
- If you cannot reach your gas supplier, call the fire department.
- Installation and service must be performed by a qualified installer, service agency or the gas supplier.
- Use appliance in well ventilated rooms only.
- The electrical and gas connections must comply with local regulations.
- When the hob is installed, provide a multi-pole circuit breaker with a contact separation of at least 3 mm, that provides full disconnection.
- Regulations require that the appliance is grounded.
- The power cable must be long enough for connecting the appliance, once fitted in its housing, to the power supply
- Use only flexible or rigid metal hose for gas connection.
- If necessary, the electrical power cable must be replaced exclusively with a power cable having identical characteristics to the original supplied by manufacturer (type H05V2V2-F 90°C or H05RR-F). This operation must be performed by a qualified
electrician.
- The manufacturer cannot be held responsible for any injury to persons or animals or damage to property arising from failure to comply with these requirements.
- Do not use multiple plug adapters or extension cords.
- Do not pull the power cable to disconnect it from the electrical supply.
- The electrical components must not be accessible to the user after installation.
- Do not touch the appliance with any wet part of the body and do not operate it when barefoot.
- This hob (class 3) is designed solely for private household use for cooking food. Do not use this appliance as a space heater to heat or warm the room. Doing so may result in carbon monoxide poisoning and overheating of the hob.
- The Manufacturer declines all responsibility for inappropriate use or incorrect setting of the controls.
- The appliance and its accessible parts become hot during use. Care should be taken to avoid touching heating elements. Children less than 8 years of age shall be kept away unless continuously
supervised. This appliance can be used by children aged from 8 years and above and persons with reduced physical, sensory or mental capabilities or lack of experience and knowledge if they have been given supervision or instruction concerning use of the appliance in a safe way and understand the hazards involved. They shall not play with the appliance.
- The use of a gas appliance produces heat and humidity in the room. Make sure the room is well-ventilated, or install an extractor hood with exhaust duct.
- Domestic animals should be kept away from the appliance.
- In case of prolonged use, additional ventilation may be necessary (by opening a window or increasing the hood extraction speed).
- After use, make sure the knobs are in off position and close the main gas supply cock or the gas cylinder valve.
- Overheated oils and fats catch fire easily. Always remain vigilant when cooking foods rich in fat, oil or alcohol (e.g. rum, cognac, wine).
- Unattended cooking on a hob with fat or oil can be dangerous and may result in
fire. NEVER try to extinguish a fire with water, but switch off the appliance and then cover flame e.g. with a lid or a fire blanket.
Danger of fire: do not store items on the cooking surfaces.
- Keep the packaging materials out of the reach of children.
- Before cleaning or maintenance wait for hob to cool down.
- CAUTION: "In case of hotplate glass breakage:
- shut immediately off all burners and any electrical heating element and isolate the appliance from the power supply
- do not touch the appliance surface,
- do not use the appliance".
- These instructions are valid only for those countries whose symbol is shown on the rating plate (under cooktop).
- This product is not intended to be installed and operated outdoors.
Save these instructions
Product description
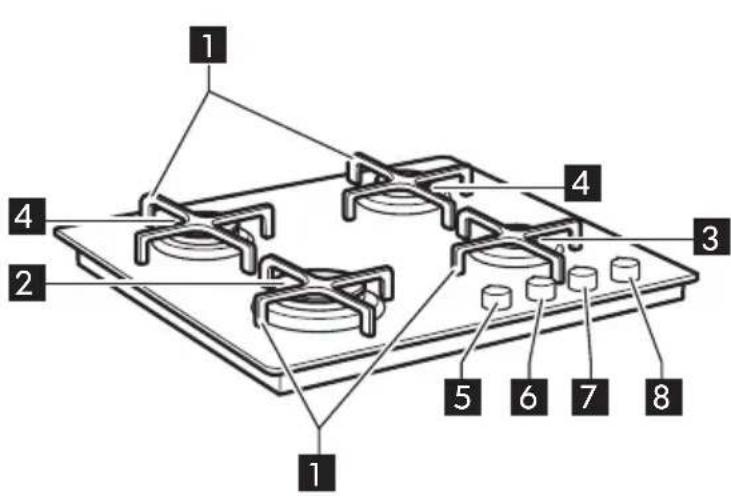
| Symbols | |
| Solid disc | Tap closed |
| Large flame | Maximum flame |
| Small flame | Minimum flame |
1 Removable grates
2 Rapid burner
3 Auxiliary burner
4 Semi-rapid burners
5 Front left rapid burner control knob
6 Rear left semi-rapid burner control knob
7 Rear right semi-rapid burner control knob
8 Front right auxiliary burner control knob

Daily use
Important: When the hob area is hot do not spill liquids to avoid glass damages.
Do not let the burner flame extend beyond the edge of the pan.
Important: when the hob is in use, the entire hob area may become hot.
- To ignite one of the burners, turn the relative knob anti-clockwise to the maximum flame setting.
- Press the knob against the control panel to ignite the burner.
- After the burner has ignited, keep the knob pressed for about 5-10 seconds to allow proper device operation.
This burner safety device shuts off the gas supply to the burner if the flame goes out accidentally (because of sudden draught, an
interruption in the gas delivery, boiling over of liquids, etc.).
- The knob must not be pressed for more than 15 sec. If, after that time has elapsed, the burner does not remain lit, wait at least one minute before trying to light it again.
NOTE: should particular local conditions of the delivered gas make the ignition of burner difficult, it is advisable to repeat the operation with the knob turned to small flame setting. The burner might go out when the knob is released. This means that the safety device has not warmed up enough. In this case, repeat the operations described above.
Helpful hints and tips
This hob has burners of different diameters. For better burner performance, please stick to the following rules:
- Use pots and pans with bottoms the same width as that of the burners or slightly larger (see table on the right).
- Only use flat-bottomed pots and pans.
- Use the correct amount of water for cooking foods and keep the pot covered.
- Make sure pots on the grates do not
protrude beyond the edge of the hob.
IMPORTANT: improper use of the grids can result in damage to the hob: do not position the grids upside down or slide them across the hob. Do not use:
- Cast iron griddles, ollar stones, terracotta pots and pans.
- Heat diffusers such as metal mesh, or any other types.
- Two burners simultaneously for one receptacle (e.g. fish kettle).
| Burner Pot Ø | |
| Rapid from 24 to 26 cm | |
| Semi-rapid from 16 to 22 cm | |
| Auxiliary from 8 to 14 cm |
Maintenance and cleaning

Disconnect power before servicing.
- All the enamelled and glass parts should be cleaned with warm water and neutral solution.
- Stainless steel surfaces may be stained by calcareous water or aggressive detergents if left in contact for too long. Any food spills (water, sauce, coffee, etc.) should be wiped away before they dry.
- Clean with warm water and neutral detergent, and then dry with a soft cloth or chamos. Remove baked-on dirt with specific cleaners for stainless steel surfaces.
NOTE: Clean glass and enamelled parts only with soft cloth or sponge.
- Do not use abrasive or corrosive products, chlorine-based cleaners or pan scourers.
- Do not use steam cleaning appliances.
-
Do not use flammable products.
-
Do not leave acid or alkaline substances, such as vinegar, mustard, salt, sugar or lemon juice on the hob.
CLEANING THE HOB PARTS
- Grids, burner caps and burners can be removed to be cleaned. Do not wash them in the dishwasher.
- Clean them by hand with warm water and non-abrasive detergent, removing any food residues and checking that none of the burner openings is clogged.
Rinse and dry - Refit burners and burner caps correctly in the respective housings.
- When replacing the grids, make sure that the panstand area is aligned with the burner.
- Models equipped with electrical ignition plugs and safety device require thorough cleaning of the plug end in order to ensure correct operation.
ENGLISH 9
Check these items frequently, and if necessary, clean them with a damp cloth. Any baked-on food should be removed with a toothpick or needle.
NOTE: to avoid damaging the electric ignition device, do not use it when the burners are not in their housing.
What to do if ...
| Problem Possible cause Solution | ||
| The electric ignition does not work | There is no electrical supply | Check the unit is plugged in and the electrical supply is switched on. |
| The burner fails to ignite The gas | tap could be closed | Check that the gas tap is open |
| The gas ring burns unevenly | burner crown may be occluded by food residues | Clean the burner crown according to cleaning instructions to make sure that the burner crown is clear of food residues. |
Before calling the After-Sales Service:
- Check "Troubleshooting guide" to see if you can eliminate the problem yourself
- Turn the hob on again to check if correct operation has been restored.
- If the problem persists, contact the After-sales Service.
Give the following information:
type of fault;
- hob model;
- service number (i.e. the number after the word SERVICE on the dataplate under the hob and on the warranty certificate);
SERVICE
0000 000 00000
- your full address;
- your telephone number.
If any repairs are required, contact an authorised service centre, indicated in the warranty.
Failure to comply with these instructions may compromise the safety and quality of the product.
Injector table
Category II2E+3+
| Type of gas used | Type of burner | Injector marking | Nominal heating capacity kW | Nominal consum- pition | Reduced heat capacity kW | Gas pressure (mbar) | |||
| BE FR min. | nom. | max. | |||||||
| NATURAL GAS (Methane) G20 | rapid semi-rapid semi-rapid auxiliary | 125 A 104 B 104 B 78 A | 3,00 2,00 2,00 1,00 | 286 l/h 190 l/h 190 l/h 95 l/h | 0,80 0,45 0,45 0,40 | 0,60 0,35 0,35 0,30 | 17 | 20 25 | |
| NATURAL GAS (Methane) G25 | rapid semi-rapid semi-rapid auxiliary | 125 A 104 B 104 B 78 A | 3,00 2,00 2,00 1,00 | 332 l/h 221 l/h 221 l/h 111 l/h | 0,60 0,35 0,35 0,30 | 20 | 25 30 | ||
| LIQUEFIED PETROLEUM GAS (Butane) G30 | rapid semi-rapid semi-rapid auxiliary | 85 A 69 69 50 | 3,00 2,00 2,00 1,00 | 218 g/h 145 g/h 145 g/h 73 g/h | 0,60 0,35 0,35 0,30 | 20 | 28 30 | 35 | |
| LIQUEFIED PETROLEUM GAS (Propane) G31 | rapid semi-rapid semi-rapid auxiliary | 85 A 69 69 50 | 3,00 2,00 2,00 1,00 | 214 g/h 143 g/h 143 g/h 71 g/h | 0,60 0,35 0,35 0,30 | 25 | 37 45 | ||
| Type of gas used | 4 burners 60 cm | Nominal heating capacity kW | Total nominal consumption | Air necessary (m3) for combustion 1 m3 of gas |
| G20 20 mbar | 1R - 2 SR (2kW) - 1 AUX | 8,00 761 l/h | 9,52 | |
| G25 25 mbar | 1R - 2 SR (2kW) - 1 AUX | 8,00 | 885 l/h | 8,187 |
| G30 28-30 mbar | 1R - 2 SR (2kW) - 1 AUX | 8,00 | 581 g/h | 30,94 |
| G31 37 mbar | 1R - 2 SR (2kW) - 1 AUX | 8,00 | 571 g/h | 23,80 |
Technical data
| Dimensions | |
| Width (mm) 590 | |
| Height (mm) 44 | |
| Length (mm) 510 | |
| Voltage (V) 220-240 V ~ |
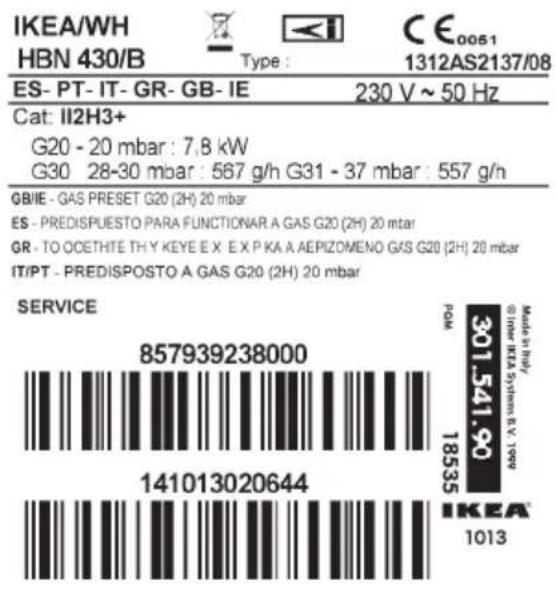
The technical information are situated in the rating plate on the bottom side of the appliance.

Installation

Use protective gloves for handling, preparing and installing the product.
After unpacking the hob, make sure that it has not been damaged during transport. In the event of problems, contact the dealer or your nearest After-sales Service.
Technical information for the installer
- This product can be embedded in a worktop 20 to 60mm thick.
- If there is no oven beneath the hob, insert a separator panel that has a surface at least equal to the opening in the work surface. This panel must be positioned at a maximum distance of 150mm below the upper surface of the work surface but, in no case less than 20 mm from the bottom of the hob.
- Before installation, make sure that:
-
the local gas delivery conditions (nature and pressure) are compatible with the settings of the hob (see the rating plate and injector table);
-
the outer surfaces of the furniture or appliances adjacent to the hob are heat resistant according to local regulations;
- This appliance is not connected to a fume exhaust device. It shall be installed in accordance with current installation regulations. Particular attention shall be given to the relevant requirement regarding ventilation.
- Combustion products are discharged outdoors through specific hoods or wall and/or window mounted electrical fans.
Gas connection

This operation must be performed by a qualified technician.
The gas supply system must comply with local regulations to the relevant gas standard.
- You can find specific local regulations for some countries in the paragraph
- "Reference to Local Regulations". If no information concerning your Country is
ENGLISH 12
given, please ask details to a qualified technician.
- The connection of the hob to the gas pipe network or gas cylinder must be made by means of a rigid copper or steel pipe with fittings complying with local regulations, or by means of a continuous-surface stainless steel hose complying with local regulations. The maximum length of the hose is 2 linear metres.
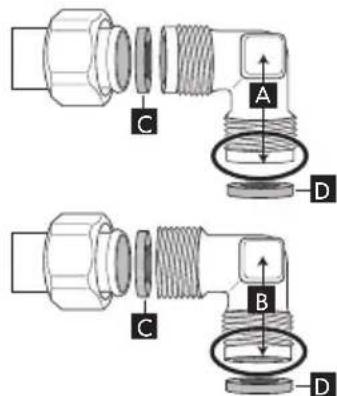
- Connect elbow (A) or (B) supplied with to the hob inlet main pipe and interpose the washer (C) supplied, in compliance with EN 549.
- Use elbow (A) for France and elbow (B) for all other destinations.
-IMPORTANT: if a stainless steel hose is used, it must be installed so as not to touch any mobile part of the furniture. It must pass through an area where there are no obstructions and where it is
possible to inspect it on all its length.
- After connection to the gas supply, check for leaks with soapy water. Light up the burners and turn the knobs from max position to minimum position to check flame stability
Electrical connection
WARNING
- This operation must be performed by a qualified technician.
- The electrical connections must comply with local regulations.
- The earthing of this appliance is compulsory by law.

- Do not use an extension cord.
-IMPORTANT: the data relevant to the voltage and power absorption are indicated on the rating plate.
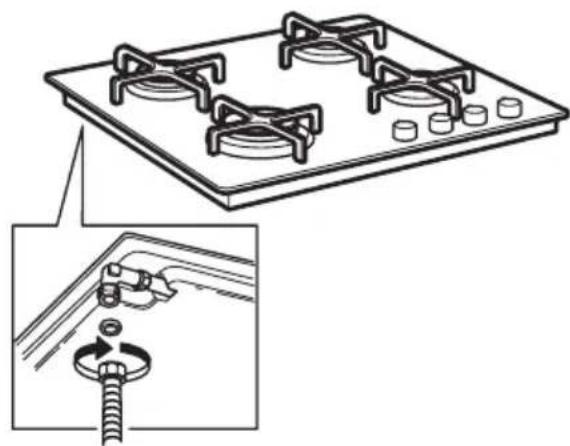
Assembly
Use protective gloves for cleaning the product perimeter surface, then apply the supplied gasket to the hob.
After having cleaned the perimeter surface, apply the supplied gasket to the hob. Position the hob in the worktop opening made respecting the dimensions indicated in the Instruction.
NOTE: the power supply cable must be long enough to permit its upward extraction.
To secure the hob, use the brackets provided with it. Fit the brackets into the relevant bores shown by the arrow and fasten them by means of their screws in accordance with the thickness of the worktop.
Make sure that the outlet is near the product to install. So, if the cable that came with the product is not long enough, you will need to
ENGLISH 13
replace it with another one having the same features but with the right length.
Adjustment to different type of gas
WARNING
- This operation must be performed by a qualified technician.
If the appliance is intended to operate with a different gas from the gas type stated on the rating plate and information label on the top of the hob, change the injectors.
Remove the information label and keep it with the instructions booklet.
Use pressure regulators suitable for the gas pressure indicated in the Instruction.
- The gas injectors must be changed by After Sales Service or a qualified technician.
- Injectors not supplied with the appliance must be ordered from After Sales Service.
- Adjust the minimum setting of the taps.
NOTE: when liquid petroleum gas is used (G30/G31), the minimum gas setting screw must be tightened as far as it will go.
IMPORTANT: should you experience difficulty in turning the burners knobs, please contact the After Sales Service for the replacement of the burner tap if found to be faulty.
IMPORTANT: when gas cylinder is adopted, the gas cylinder or gas container must be properly settled (vertical orientation).
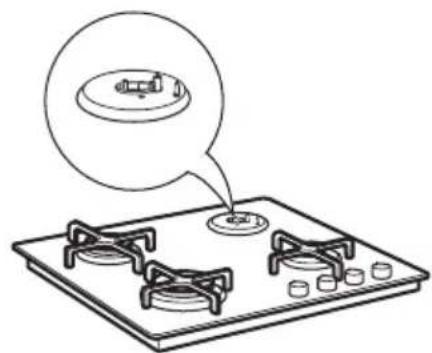
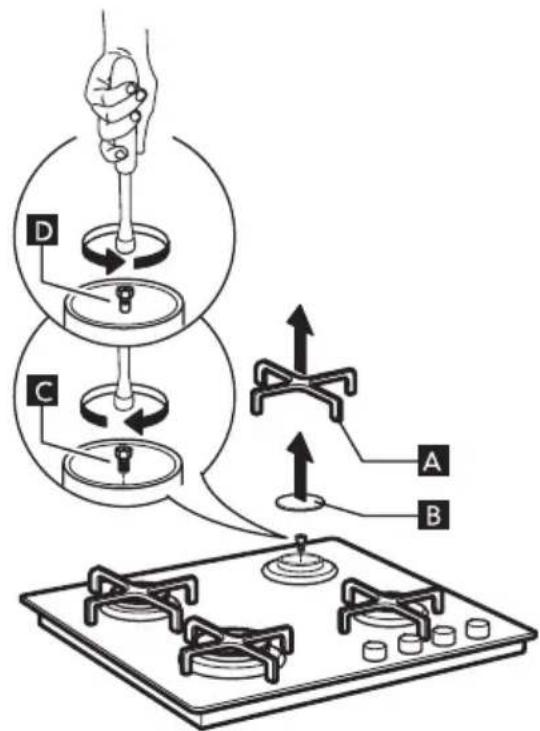
Replacing the injectors (see paragraph "injector table")
- Remove grids (A).
- Extract burners (B).
- Using a socket spanner of the appropriate size unscrew the injector (C), unscrew the injector to be replaced.
- Replace it with the injector suitable for the new type of gas.
- Re-assemble the injector in (D).
Before installing the hob, remember to affix the gas calibration plate supplied with
the injectors in such a way that it covers the existing information relating to gas calibration.
Replacement of the gas injector
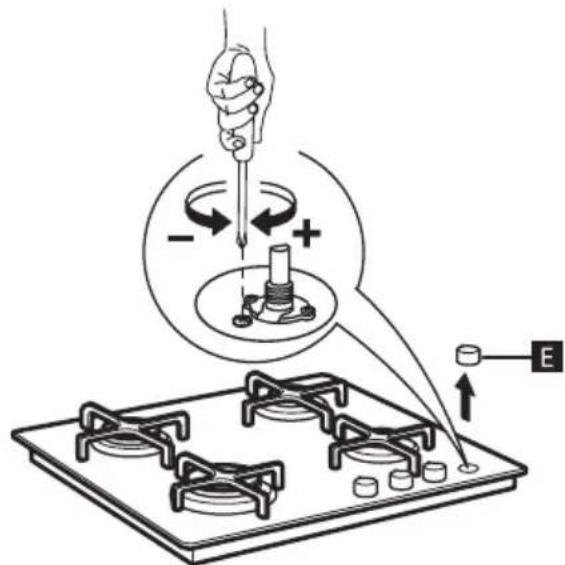
Adjusting minimum gas setting of taps
To ensure that the minimum setting is correctly adjusted, remove the knob (E) and proceed as follows:
- tighten screw to reduce the flame height (-);
- loosen screw to increase the flame height (+).
The adjustment must be performed with the tap in minimum gas setting position (small flame).
- The primary air of the burners does not need to be adjusted.
- At this stage, light up the burners and turn the knobs from max position to minimum position to check flame stability.
Upon completion of adjustment, reseal the work surface using sealing wax or an equivalent material.
The installation and maintenance of the appliance must be carried out by a qualified skilled technician in accordance with the regulations in force, and in particular:
- Decree of 2 August 1977
Technical and Safety Rules applicable to fuel gas and liquefied hydrocarbon installations located within residential buildings and outbuildings.
-StandardDTUP45-204
Gas installations (formerly DTU no. 61-1 - Gas installations April 1982 + supplement no. 1 of July 1984).
- Departmental Health Regulations
For appliances connected to the mains electricity supply.
-Standard NF C 15-100
Low-voltage electrical installations - Standards.
The appliance is supplied with a 1/2 ” threaded conical end to be connected to the gas supply (according to ISO regulations ISO 7/1 RP 1/2).
The connection must be effected in accordance with standard NBN D 51-003 using rigid piping or in accordance with specifications sheet A.R.G.B./03 using flexible tubing.
The appliance must be installed complete with an AGB-approved stop valve.
ENGLISH 15
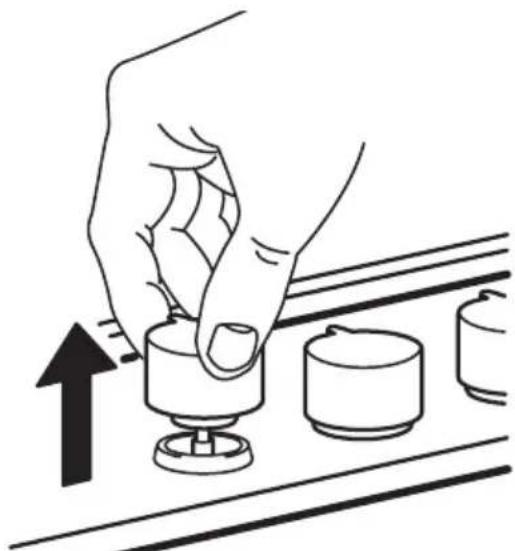
KNOBS REPLACEMENT
- Be sure that your hob is switched-off! All knobs must be in closed position.
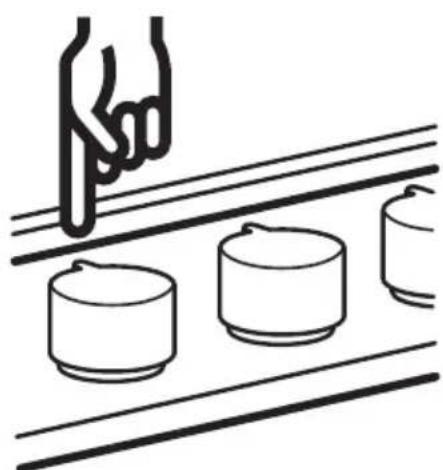
- Pull upwards each knob of the cooktop and store together after removal.
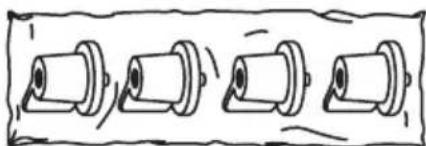
- Take the kit with new knobs, which is located in upper part of packaging and remove the new knobs from the plastic bag.
- Push each of knob on the valve shaft until you feel the end of sliding (sparking may occur).
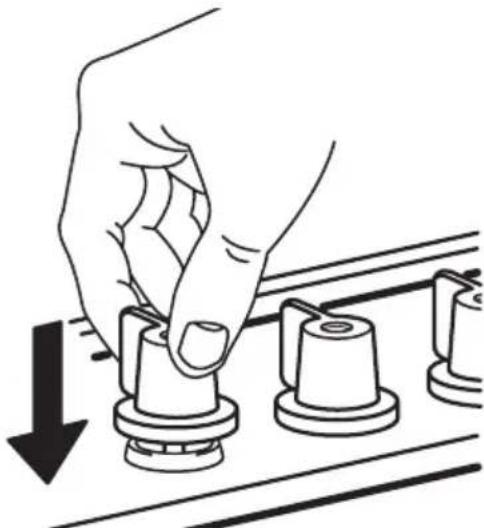
- Make sure that all the knobs are in the right position.
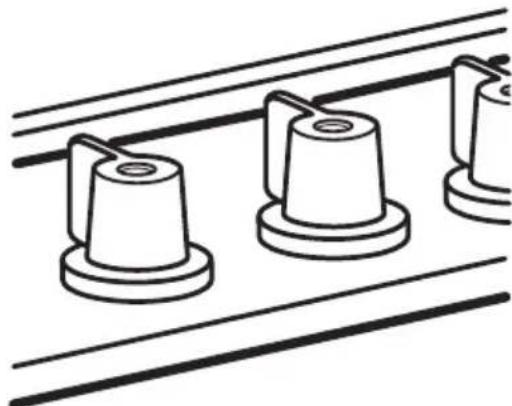
- Verify correct installation by switching each burner separately.
Environmental concerns
Packing
- The packing materials are 100% recyclable and marked with the recycling symbol (
Products
This appliance is marked in compliance with European Directive 2002/96/EC on Waste Electrical and Electronic Equipment (WEEE). By ensuring that this appliance is correctly scrapped, the user can help prevent potentially harmful consequences for the environment and the health of people.

The symbol on the product or accompanying documentation indicates that this product should not be treated as domestic waste but must be taken to a suitable centre for collection and recycling of electrical and electronic equipment. Disposal must be carried out in compliance with local regulations on waste disposal. For further information on the treatment, recovery and recycling of this product, contact your competent local office, the household waste collection service or the shop where you purchased the appliance.
Declaration of Conform
- This cooking hob has been designed, constructed and put on the market in conformity with:
- safety requirements of "Gas" Directive 2009/142/EEC;
- safety objectives of "Low Voltage" Directive 2006/95/EC (which replaces 73/23/EEC as amended).
- protection requirements of "EMC" Directive 2004/108/EEC;
- This cooking hob (Class 3) has been designed only for cooking food. Any other use (such as heating a room) is improper and dangerous.
IKEA GUARANTEE
How long is the IKEA guarantee valid?
This guarantee is valid for five (5) years from the original date of purchase of your appliance at IKEA, unless the appliance is named LAGAN in which case two (2) years of guarantee apply. The original sales receipt, is required as proof of purchase. If service work is carried out under guarantee, this will not extend the guarantee period for the appliance.
Which appliances are not covered by the IKEA five (5) years guarantee?
The range of appliances named LAGAN and all appliances purchased in IKEA before 1st of August 2007.
Who will execute the service?
IKEA service provider will provide the service through its own service operations or authorized service partner network.
What does this guarantee cover?
The guarantee covers faults of the appliance, which have been caused by faulty construction or material faults from the date of purchase from IKEA. This guarantee applies to domestic use only. The exceptions are specified under the headline "What is not covered under this guarantee?" Within the guarantee period, the costs to remedy the fault e.g. repairs, parts, labour and travel will be covered, provided that the appliance is accessible for repair without special expenditure. On these conditions the EU guidelines (Nr. 99/44/EG) and the respective local regulations are applicable. Replaced parts become the property of IKEA.
What will IKEA do to correct the problem?
IKEA appointed Service Provider will examine the product and decide, at its sole discretion, if it is covered under this guarantee. If considered covered, IKEA Service Provider or its authorized service partner through its own service operations, will then, at its sole discretion, either repair the defective product
or replace it with the same or a comparable product.
What is not covered under this guarantee?
Normal wear and tear.
- Deliberate or negligent damage, damage caused by failure to observe operating instructions, incorrect installation or by connection to the wrong voltage, damage caused by chemical or electrochemical reaction, rust, corrosion or water damage including but not limited to damage caused by excessive lime in the water supply, damage caused by abnormal environmental conditions.
- Consumable parts including batteries and lamps.
- Non-functional and decorative parts which do not affect normal use of the appliance, including any scratches and possible color differences.
- Accidental damage caused by foreign objects or substances and cleaning or unblocking of filters, drainage systems or soap drawers.
- Damage to the following parts: ceramic glass, accessories, crockery and cutlery baskets, feed and drainage pipes, seals, lamps and lamp covers, screens, knobs, casings and parts of casings. Unless such damages can be proved to have been caused by production faults.
- Cases where no fault could be found during a technician's visit.
- Repairs not carried out by our appointed service providers and/or an authorized service contractual partner or where nonoriginal parts have been used.
- Repairs caused by installation which is faulty or not according to specification.
- The use of the appliance in a non-domestic environment i.e. professional use.
- Transportation damages. If a customer transports the product to his home or
another address, IKEA is not liable for any damage that may occur during transport. However, if IKEA delivers the product to the customer's delivery address, then damage to the product that occurs during this delivery will be covered by IKEA.
- Cost for carrying out the initial installation of the IKEA appliance.
However, if an IKEA appointed Service Provider or its authorized service partner repairs or replaces the appliance under the terms of this guarantee, the appointed Service Provider or its authorized service partner will reinstall the repaired appliance or install the replacement, if necessary.
These restrictions do not apply to fault-free work carried out by a qualified specialist using our original parts in order to adapt the appliance to the technical safety specifications of another EU country.
How country law applies
The IKEA guarantee gives you specific legal rights, which cover or exceed all the local legal demands. However these conditions do not limit in any way consumer rights described in the local legislation.
Area of validity
For appliances which are purchased in one EU country and taken to another EU country, the services will be provided in the framework of the guarantee conditions normal in the new country.
An obligation to carry out services in the framework of the guarantee exists only if the appliance complies and is installed in accordance with:
- the technical specifications of the country in which the guarantee claim is made;
- the Assembly Instructions and User Manual Safety Information.
The dedicated AFTER SALES for IKEA appliances
Please don't hesitate to contact IKEA
appointed After Sales Service Provider to:
make a service request under this guarantee;
- ask for clarifications on installation of the IKEA appliance in the dedicated IKEA kitchen furniture;
- ask for clarification on functions of IKEA appliances.
To ensure that we provide you with the best assistance, please read carefully the Assembly Instructions and/or the User Manual before contacting us.
How to reach us if you need our service

Please refer to the last page of this manual for the full list of IKEA appointed After Sales Service Provider and relative national phone numbers.
In order to provide you a quicker service, we recommend to use the specific phone numbers listed on this manual. Always refer to the numbers listed in the booklet of the specific appliance you need an assistance for. Please also always refer to the IKEA article number (8 digit code) and 12 digit service number placed on the rating plate of your appliance.
SAVE THE SALES RECEIPT!
It is your proof of purchase and required for the guarantee to apply. The sales receipt also reports the IKEA name and article number (8 digit code) for each of the appliances you have purchased.
Do you need extra help?
For any additional questions not related to After Sales of your appliances please contact your nearest IKEA store call centre. We recommend you read the appliance documentation carefully before contacting us.
Table des matieres
Installations electriquesasse tension - Standards.
BE RAPPELS SUR LES NORMES DE SECURITE EN VIGUEUR DANS LE PAYS D'INSTALLATION
REEMPLACEMENT DES BOUTONS
GARANTIE IKEA (FRANCE)
CONTRAT DE GARANTIE ET DE SERVICE APRES-VENTE IKEA
Opening hours: Monday - Friday 8.00 - 20.00
ROMANIA
Numar de telegram: 021 2044888
Tarif: Tarif local
Orar: Luni - Vineri 8.00 - 20.00
POCCN
TeneboHHbH HOMep: 84957059426
CTOUMOCTb 3BOHka: MeCTHAR CTOMOCTb 3BOHKA
Bpempa60tbI: NoHeeBnK - PTHNu 9.00 - 21.00
(MockOBCKOe BpeMa)
Opening hours: Monday - Friday 9.00 - 21.00
FAC-SIMILE
GB In case of missing Service Slicer, please report Model and Serial numbers for future Service references, which can be found on the Rating Plate in the product. - DE Falls der Serviceaufkleber fehl, geben Sieitte zur Erleichtung kunftiger Servicearbeiten Modell und Seriennummern an. Dese Daten befunden sich auf dem Typenschild im Gerat. - FR En l'absence d'autocollant de service, veillez inscrie le modele et le numero de série de l'appareil figurant sur la plaque signaletique, afin de pouvoir les communier au SAV en cas de probleme eventuel. - NL Als de Servicesticker ontbreekt, vermeld dan het productnummer (85-) en serienummer bij eventuel contact met de klantenservice in de toekomst. Deze kut u vinden op het typeplaatje in het product. - ES En el caso de que no se encuentre la tarjeta de service, indique le modele y los numeros de series, que peuvent enccntrare en la placae de caracteristicas del producto, parautures referencias de service. - PT Se perder o autocolante "Service", comunique o numero do Modelo e de Serie para refeciona futura en caso de assistencia. O neros encomram-se na placal sinaletica do produto. - IT In caso non sa presente I'adesivo del Servizio Assistenzo, comunicare il modulo e il numero di serie indicati sulla targhetta matricola del prodotto come futuro riferimento per I'assistenza. GR Tepimwnou tou aeinei toaokolno toeepic, avapepete to povtekoai aeiipakopc oepic ta onoiia 0a peite otny avaywpiotik nivakibdo npoiov. - SE Om Service-etiketten fattas, bor du anteckna modell- och serienummer for framtida behov - dessa finner du pa tyskylten i produkten. - NO Dersom serviceetikten mangler, noter deg modell- og serienummer for fretdig referanse. Du finner dem pa typeplaten i produktet. - DK Hvis servicemarkaten mangler, skal model- og serienummer opyses, nar Service kontaktes. Numre re angivet pa produits typeplade. - FI Jos huolotarraa ei ole, ilmoita hultoa varten malli- ja sarjanumero, jotka loytyvat tuoteen arvokilvesta. - CZ V priade, ze servisni stitek chyi, uved'te prosim pro prisi potrebu servisu ma sariove cislo, kterne najdete na ykonovem stitku vyrobku. - SK Ak chya baservsna nalepka, v priade servisnej potreby nahlaste prosim ma vyrobné cislo spotrebica zo servisneho stitku, ktory sa nachadza na vrobku. PL Jesli brakuje nakejki serwisowey, w celu utawienia serwisowania urzqdzenia w pryszlosci prosze podac model oraz numer seryjny, ktoe moza znalez na tablicce zanamionowej. - EST Hoolduskleebise puudumise korral palume teatada hooldusfimale toote model je sereianumber, mis on leitavad toote andmeplaadilt. - LV Gadjumá, ja trukst apkalposanas uzline, dariet zinamus modalu un serijas numerus, kas atrodami izstradajuma technisko datu plaksnié, lai nikotne tos varetu ozmanot apkalposanaikai atsauci. LT Nesant serviso lipduco, serviso specialists nurodkyite modelio ir serijos numerius, kurios rasite prietao gamklinje plekstelje. - HU Amennyiben hianyizk a szervizmatrica, kerjuk, adja meg a jovobeni szervizhivatkozasokhoz a modellszamot es a sorozatszamot, amelyek a termeken az odattablan talalhatok. RU B cnyae otcyctbrn haeknekn nocpeanauaohoro 6cbnybaHnna (co cnoBOM Service) cnayet yka3ab MoeNB N cepinnbHn homep, nonb3yembe B daNbHeHn me ncpaBKn npI Tex6cbnyBAHn B cepBCHOM ceHTpe. 3TN DaHnble npBBeHb Na nacnpTHO TabnueKhe n3DnEHN. - KZ Erep K13met Krcptety KonncbpMaCbo BOnMAcke, Keeneke TeBtmet Krcptety XMybCTapbIn OPbHATy KaKET BoEAnAra, rHMHS TexnHKanBik aknapat TaTAAcbIHAN Tabyea 60bAtBIn Inri xJHe CepnBbN HApBnB. BG B cnyaH na nnncBaAs CTKeP CnHOpMaunra 3a cepBn3HO 6cbNyBaHne MOna NocOHTe Moena N cepinHn Homep 3a 6bDeunn CnpABKn 3a cepBn3HO 6cbNyBaHne, KOHTO ue Hamephte Ha TabEnkata C OChOBHnde DAHN. - RO Daca abtbildul cu informati li pentru service lipseste, va rugam sa comunici at modelul si numerele de series, ca referinte pentru service pe viitor; acestea se gasesc pe placuta cu datele tehnice de pe produs. - MA En I'absence d'autocollant de service, veillez inscribe le modele et le numero de série de I'appareil figurant sur la plaque signaletique, afin de pouvoir les communier au SAV en cas de probleme eventuel.
- Safety Information
- Product description
- Daily use
- Helpful hints and tips
- Maintenance and cleaning
- CLEANING THE HOB PARTS
- ENGLISH 9
- What to do if ...
- Before calling the After-Sales Service:
- Injector table
- Technical data
- Installation
- Technical information for the installer
- Gas connection
- ENGLISH 12
- Electrical connection
- WARNING
- Assembly
- ENGLISH 13
- Adjustment to different type of gas
- Replacing the injectors (see paragraph "injector table")
- Adjusting minimum gas setting of taps
- - Decree of 2 August 1977
- -StandardDTUP45-204
- - Departmental Health Regulations
- -Standard NF C 15-100
- ENGLISH 15
- KNOBS REPLACEMENT
- Environmental concerns
- Packing
- Products
- Declaration of Conform
- IKEA GUARANTEE
- How long is the IKEA guarantee valid?
- Which appliances are not covered by the IKEA five (5) years guarantee?
- Who will execute the service?
- What does this guarantee cover?
- What will IKEA do to correct the problem?
- What is not covered under this guarantee?
- How country law applies
- Area of validity
- The dedicated AFTER SALES for IKEA appliances
- How to reach us if you need our service
- SAVE THE SALES RECEIPT!
- Do you need extra help?
- Table des matieres
- BE RAPPELS SUR LES NORMES DE SECURITE EN VIGUEUR DANS LE PAYS D'INSTALLATION
- REEMPLACEMENT DES BOUTONS
- GARANTIE IKEA (FRANCE)
- CONTRAT DE GARANTIE ET DE SERVICE APRES-VENTE IKEA
- ROMANIA
- POCCN
- FAC-SIMILE
Brand : IKEA
Model : LIVSGNISTA
Category : Cooker