
PGC 56SLF - Cooker PROLINE - Free user manual and instructions
Find the device manual for free PGC 56SLF PROLINE in PDF.
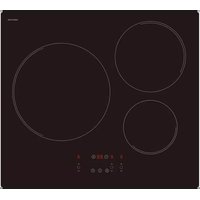
| Product type | Gas cooker |
| Brand | Proline |
| Model | PGC 56SLF |
| Dimensions (W x D x H) | 56 x 60 x 85 cm (approx.) |
| Power supply | 230 V, 50 Hz |
| Compatible gas type | Natural gas (G20/G25) and butane/propane (G30/G31) |
| Number of burners | 4 burners: 1 rapid, 2 semi-rapid, 1 auxiliary |
| Rapid burner power | 3.0 kW (butane/propane gas) / 2.75 kW (natural gas) |
| Auxiliary burner power | 1.0 kW |
| Semi-rapid burner power | 1.75 kW |
| Oven | Gas oven with thermostat, setting from 155 to 250 °C |
| Grill | Gas grill burner with protection |
| Rotisserie | Electric rotation for rotisserie |
| Oven power | 2.8 kW |
| Grill power | 2.0 kW |
| Ignition | Manual (match) or electric (piezo) depending on model |
| Safety | Thermocouple on burners and oven, gas shut-off in case of extinction |
| Lid | Glass lid protecting the hob |
| Oven lighting | Bulb 25 W, type E14, resistant to 300 °C |
| Accessories included | Grid, drip tray, rotisserie, grill protective cover |
| Cleaning | Clean with soft cloth and soapy water; avoid abrasive products |
| Gas connection | Flexible hose (butane/propane) or TFEM pipe (natural gas), max 1.5 m |
| Electrical connection | Grounded socket, do not use extension cord |
| Repairability | Original spare parts recommended, intervention by approved after-sales service |
Frequently Asked Questions - PGC 56SLF PROLINE
User questions about PGC 56SLF PROLINE
0 question about this device. Answer the ones you know or ask your own.
Ask a new question about this device
Download the instructions for your Cooker in PDF format for free! Find your manual PGC 56SLF - PROLINE and take your electronic device back in hand. On this page are published all the documents necessary for the use of your device. PGC 56SLF by PROLINE.
USER MANUAL PGC 56SLF PROLINE
1.Part : PRESENTATION AND SIZES OF PRODUCT
2.Part:WARNINGS
3.Part : INSTALLATION AND PREPARATIONS FOR USE
3.1 Environment where the apparatus will be installed
3.2 Installation
3.3 Adjustment of feet
3.4 Gas Installation
3.5 Gas Connection
3.6 Changing the gas inlet
3.7 General warnings and measures
3.8 Gas conversions
4.Part : USE OF YOUR OVEN
4.1 Useobthbookers containing gas
4.2 Explanation of the fault detection device (FFD)
4.2.1 Use of the Oven
4.3 Accessories
5.Part : CLEANING AND MAINTENANCE
5.1 Cleaning
5.2 Maintenance
6.Part : SERVICE AND TRANSPORT
6.1 Before contacting service
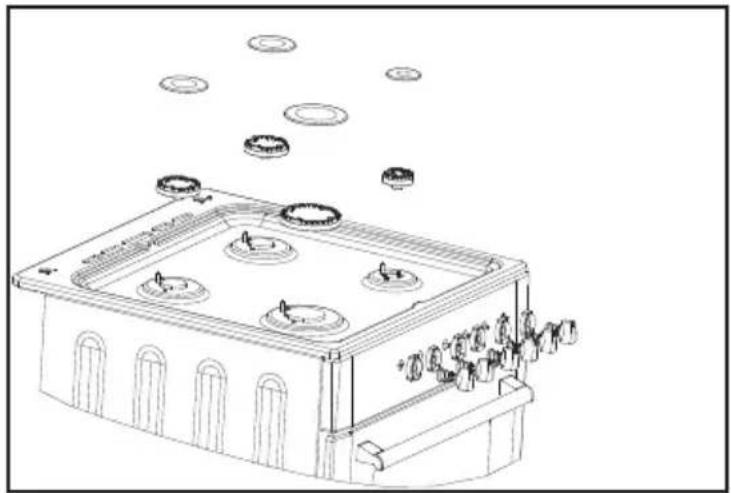
PART 1: PRESENTATION AND SIZES OF PRODUCT
1.1 PRESENTATION :

Part of List:
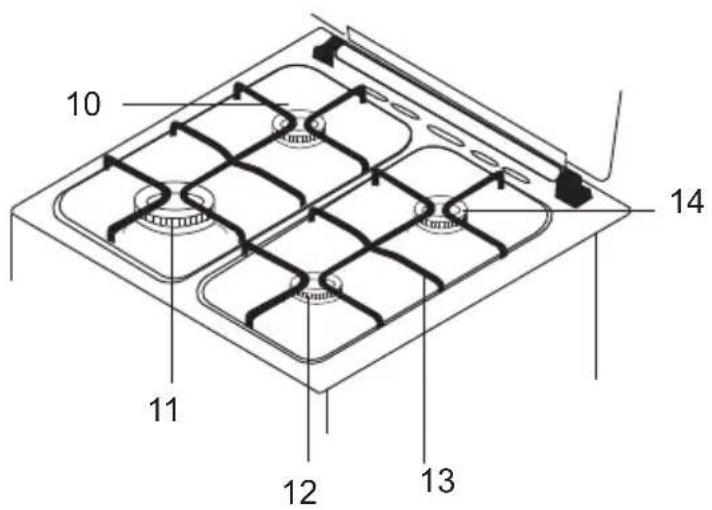
1-Cooktop Cover
2-Cooktop
3- Control Panel
4-Oven Door Handle
5-Drawer Cover
6- Supply leg
7-Oven Door
8-Oven Tray
9-Wire Grid
10-Semi-Rapid Burner
11-Rapid Burner
12-Auxillary Burner
13-Hob Grids
14-Semi-Rapid Burner
| MODEL | SIZE(cm) |
| PGC56M-FWSV PGC56SL-F | 50*50*5 60*5 50*90 |
Part 2:WARNINGS
TAKE ALL IMPORTANT SECURITY MEASURES AND READ THE MANUAL COMPLETELY BEFORE USING THE APPARATUS
This appliance is intended for domestic use only, any other use may invalidate the warranty and might be dangerous.
Check if there is any damage after you unpacked the apparatus. If there is any defect, do not use the apparatus and immediately contact to the store where you bought the apparatus. As the materials used for package (nylon, stapler, strafoam...etc) may cause harmful effects to children, they should be collected and removed immediately.
The apparatus must be set up by an engineer on the gas register. The producer is not responsible for any damage that might be caused by defective placement, and set up byauthathospepsenebnel.
Before connecting your apparatus to the gas network, carefully check whether it is appropriate for the features stated on the packaging and rating plate on the apparatus. (Gas type and pressure).
If you are not going to use the apparatus for a prolonged time, turn off the main gas tap.
Some parts stay hot for a long time, it is required to wait for it to cool before touching parts that are exposed to the heat.
Do not keep flammable materials close to the apparatus.
Make sure electrical cables of other electrical devices operating near the apparatus, do not touch hot parts.
Make sure the control is set to "0", when the apparatus is not in use.
The use of a gas cooking appliance results in the production of heat and moisture in the room in which it is installed. Ensure that the kitchen is well ventilated: keep natural ventilation holes open or install a mechanical ventilation device (mechanical extractor hood). Prolonged intensive use of the appliance may call for additional ventilation, for example opening of a window or more effective ventilation, for example increasing the level of mechanical ventilation where present.
IF A GLASS LID IS FITTED CAUTION: Glass lids may shatter when heated. Turn off all the burners before shutting the lid. Do not shut lid when burner alight.
Keep children away from the cooker when it is in use.
Only use spare parts recommended by the manufacturer and only call an authorised service agent if service is required.
Part 3: INSTALLATION AND PREPARATION FOR USE
Read this manual before you use the apparatus for the first time, make sure that the installation is carried out to local laws by an installation engineer registered on the gas safe register. Failure to do this will render the guarantee Void.
3.1 ENVIRONMENT WHERE YOUR APPARATUS WILL BE INSTALLED
Your oven must be set up and used in a place where it will always have ventilation. While operating, this appliance needs 2m^3/h air per kw input. There must be a natural ventilation enough to provide the gas to be used in the environment. The average air flow must directly come in through the air holes on the walls or windows and doors that open directly to the outside.
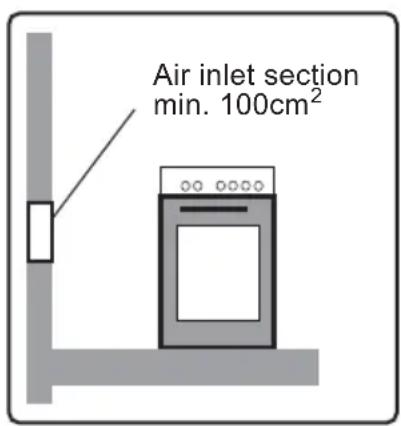

Figure 1 Figure 2
The ventilation must have at least a cross section of 100cm^2 that is effective for air transition (One or more air vents can be opened.) (Figure1-2) This hole (or holes) must be opened both from the inside and from the outside as they must never be clogged and preferably must be placed close to the bottom and at opposite side of the fumes of the burned gases that are imitted. If it is not possible to open these ventilations in the place where the apparatus is set up, the required air can also be obtained through a mechanical extractor device, the installation location must not be in a bedroom.
Venting of the Burned Gases
Cooking apparatus that operates with gas, throw the burned gas wastes out directly to the outside or through a mechanical extraction device or open windows and doors or if this is not possible it is required to set an electric fan onto the window or wall that is vented to the outside. This electric fan must have the capacity to change the air of the kitchen environment 3-5 times of its own volume of air per hour (Figure 3-4) Please see FIG 5 for the minimum dimensions surrounding the apparatus.
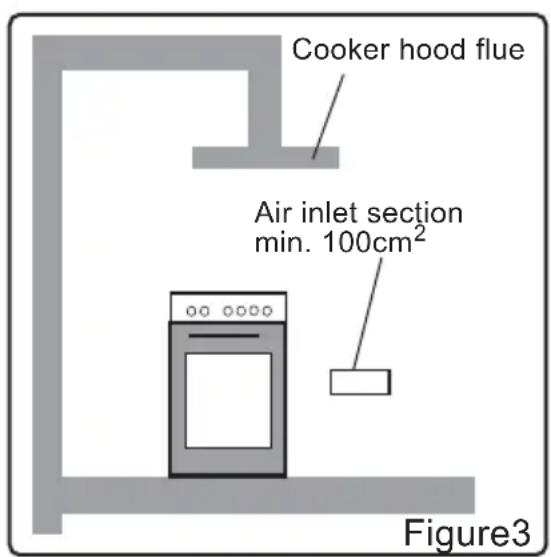
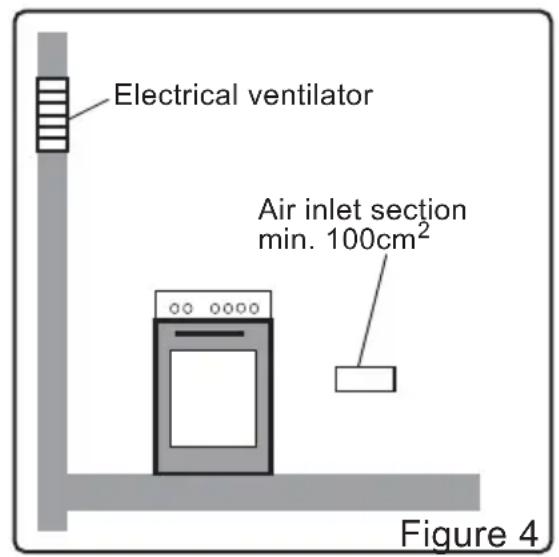
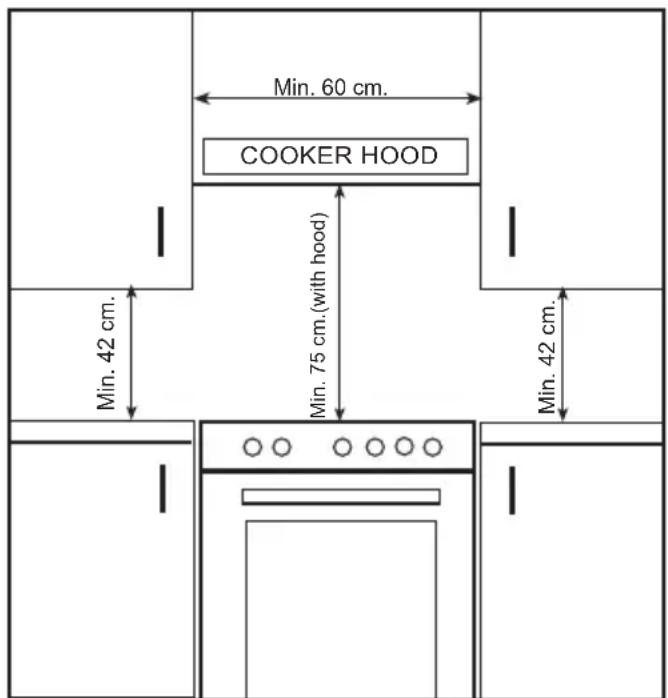
Figure 5
3.2 INSTALLATION
Take notice of the advice given below when installing this apparatus. It can be placed close to
other furniture on condition that in the area where the oven is set up furiture's height must not exceed the height of the cooker panel. Do not place the applienbe near a frigerator,theranel. Must be no flammable or inflammable materials such as curtain, waterproof cloth,...etc. that will burn quickly, near the place where the apparatus is to be installed. It is required there must be least 2cm space between the back cover of the oven and the wall for circulation. The furniture close to oven must be manufactured resistant to heat more than 50~^ C above room temperature. If the kitchen furiture is higher than the oven burners, the furniture must be at least 11cm away from the oven's side. The minimum heights from the oven's pan and wall cupboards and cooker hoods with fan over the oven are about 4000 psi. The cooker should ensure airflow through the downspool of 75 cm above the cooker hob.(Figure 5)
3.3 ADJUSTMENT OF FEET
Your oven stands on 4 adjustable feet. The feet are adjusted as required to make the oven stable before using the oven. You can make this adjustment by turning the feet clockwise if required. This is possible, but raise the apparatus maximum 15mm away from the feet. When the feet are adjusted appropriately, the oven should be levered and stable, do not move the oven by moving it.
This appliance is supplied for use on natural gas only and cannot be used on any other gas without modification.
This appliance is manufactured for conversion to LPG, if the injectors are not supplied, they can be purchased from after sales service.
It is a legal requirement that all gas appliances are installed and serviced by a competent person in accordance with the current additions of the following standards and regulations or those regulations appropriate to the geographical region in which they are to be installed.
Gas safety (Installation and use)
Regulations
Building regulations British standards
Regulations for electrical installation
Installation and service of any gas appliance must be carried out by a suitable qualified person competent on the type of appliance being installed or serviced and holding a valid certificate of competence for the work being carried out.
Currently the proof of competence is the accredited certification system (ACS) or S/NVQ that has been aligned to the ACS.
It is also a requirement that all businesses or self employed installers are members of a class of person approved by the health and safety executive.
Currently the only body with such approval is the gas safe register (UK).
3.5 GAS CONNECTION
The installation of the gas appliance to natural gas or LPG gas must be carried out by a gas qualified and registered installer.
Installers shall take due account of the provisions of the relevant codes of practice for the region the appliance is being installed.
NOTE:
Flexible hoses can be used where the sited ambient temperature of the hose does not exceed 70^OC . These hoses must be manufactured in accordance with BS 669 part 1 and be of the correct construction for the type of gas being used.
Gas hoses designed for natural gas must not be used for supplying LPG gas (LPG gas hoses can be identified by either a red band or stripes on the rubber outer coating of the hose).
The hose should not be crushed or trapped or be in contact with sharp or abrasive edges.
Using a suitable leak detection solution (E.G. Rocol) check each gas connection one at a time by brushing the solution over the connection.
The presence of bubbles will indicate a leak. If there is a leak, tighten the fitting then recheck for leaks.
NOTE: (Cookers UK only)
It is recommended that the gas connection to the Cooker is installed with a flexible connecting tube made to BS5386.
IMPORTANT
Do not use a naked flame to test for leaks.
3.6 CHANGING THE GAS INLET
For all types of gas D type connection in United Kingdom and Ireland, the flexible gas hose should neither pass behind nor be in contact with objects that may cause combustion.
The gas feeding manifold protruding from the back of the Industriebuchspit is visibly visibly; any means of connection (nut, hose etc.) must be placed with attention to avoid any contact with parts that will heat up.
During the gas connection process, the pipe of the appliance should be kept stationary, while the connected part (mechanical, LPG or NG nut) is fixed.
Always use the seals supplied in the spare set between the connections "91A"92 for flexible hose connection.
For connection of methane type gases (NG) Use B type connection in Spain, Italy, Portugal, Greece, France and Algeria for use with flexible hose connection.
Use C type connection in Letonia and Luxemburg for mechanical connection
This connection may also be optionally used in some areas in France, Algeria, Spain, Portugal and Italy
Use C type connection in Germany and Belgium with an additional ISO7/ISO228 adapter and Netherlands with an additional Besca adapter, supplied in the spare set.
An example of usage is shown in FIG1.
For all types of gas D type connection in United Kingdom and Ireland, the flexible gas hose should neither pass behind nor be in contact with objects that may cause combustion.
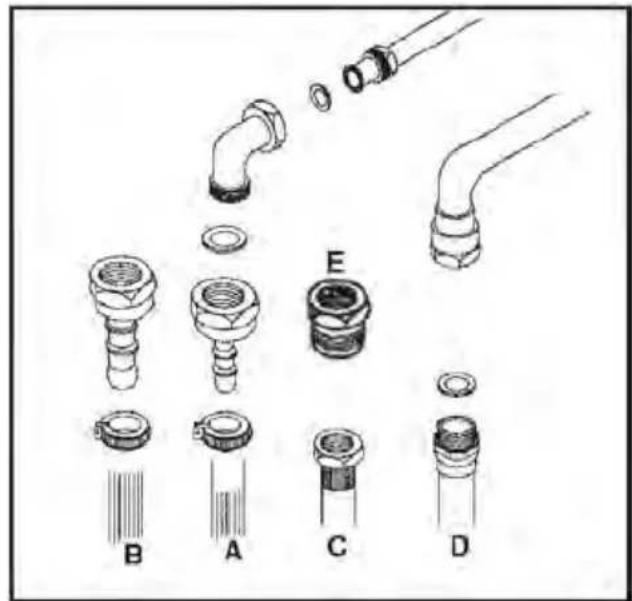
FIG1
French regulations state that the gas supply pipe shall be changed every 5 years for your safety. The installer shall check the flexible hose for cracks cuts or any other damage before installation. LPG gas supply pipes can be recognised by the Blue or Red stripe down the casing of the pipe.
CAUTION
No parts of the hose must touch any place that has heat more than 50^ . The lenght of hose must not exceed 1.5m.
The hose must not be ruptured, be tightened or be folded.
WARNING
Do not use a naked flame such as a lighted match to search for a gas leak.
The metal top may get hot after using the hob burners.
Turn off all the burners before shutting the lid.
This appliance must be used for its intended purpose only, this is for the domestic cooking of foodstuffs. Any other form of usage is to be considered as inappropriate and therefore dangerous.
The manufacturer declines all responsibility in the event of damage or injury caused by improper or incorrect use of the appliance.
3.7 GENERAL WARNINGS AND MEASURES
The maintenance and repair works must be made by a technician on the gas safe register. Accessible surfaces get hot use handles and knobs at all times.
WARNING:
hot surfaces. Keep children away. Do not leave the cooker while cooking with solid or liquid oils. There may ignite due to extreme heating. Never pour water to the flames occurring from oil. Cover the saucepan or frypan with its cover in order to choke the flame and turn the cooker off.
The oven control must be adjusted for cooking in your oven.
Otherwise the oven does not operate.
when the door or drawer of oven is open do not leave anything on it. You may unbalance your apparatus or break the cover.
Do not put heavy things or flammable, burnable goods (nylon, plastic bag,paper,cloth...etc) into the lower drawer.
Protect your apparatus against atmospheric effects. Do not expose the product to direct sunlight or rain.
If the control knobs become stiff to operate, they may need lubrication, this must be carried out by a qualified gas engineer.
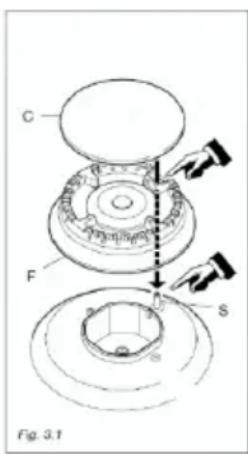
3.8 GAS CONVERSIONS
Caution : The following procedures must be undertaken by authorised service personnel.
Changing Injectors :
The gas burners adapt to different types of gas, by replacing the corresponding injectors.
For this purpose, following steps should be performed.
Cut off the feeding gas flow and disconnect from the gas supply.
Remove the cap and the adapter.
Unscrew the injectors.
Replace the injector with the ones corresponding to the type of gas that is going to be used, according to the information chart. on Page 15.
Changing Injectors to use LPG
In order to change the oven gas burner injector:
Remove the oven burners by unscrewing the assembly screw located at then the foremost tip of the burner.
Remove the existing injector pfametherirjictorjcdehahdereplacewiththeitwe new injector separately.
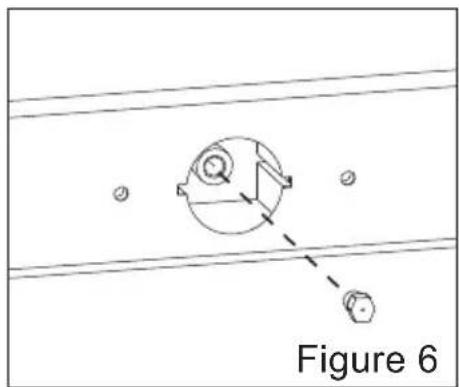
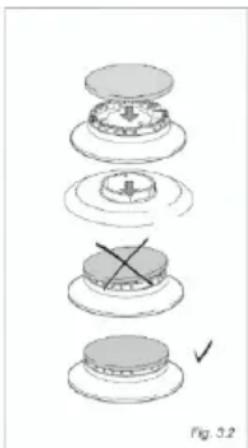
Adjusting The Reduced Flame Position :
The control panel should be removed in order to reach the adjusting screw safely.
For reduced flame position the by pass screw must be loosened in transformation from LPG to NG. In transformation from NG to LPG, the same screw must be tightened to make open that gas feed is open.
Ignite the burners and leave them on minimumusettigifora few minutes.
Remove the knobs the screw are acesible won't when the knob are removed. With the help of a small screwdriver tighten or loosen the by pass screw 90^ , which makes the flame of the burner come down to the minimum (Figure 6).
When the flame has a length of at least 4mm , the gas is well distributed. Make sure that the flame does not die out when passing from the maximum position to the minimum position.
Part 4: USE OF YOUR OVEN
4.1 USE OF THE HOB
Carefully read all instructions before using the appliance for the first time. The signs on the control knobs, shows which burners they control. Use a lighter or match to ignite gas burner.
DO NOT use over or under sized pans or pans that do not have flat bases.
WARNING The use of under-sized pans causes flames to rise up the sides of the pans causing the handles to get very hot.
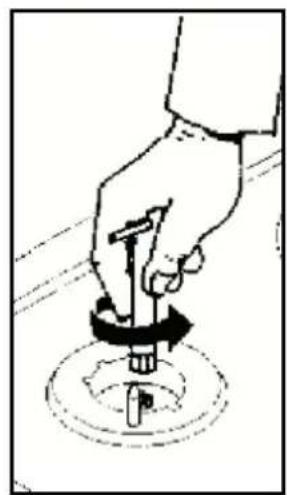
BURNER IGNITION
Press and hold the required control knob towards the oven, turn it to maximum and approach the burner with a naked flame source. The burner will ignite, hold the control knob in for 15 seconds before releasing it. The burner should remain lit, if it does not turn the control knob to off and open a door or window. Wait at least 1 minute before attempting to re ignite the burner.
Flame Failure Device (FFD)
The Flame failure device will cut off the gas supply to the burner should the flame be extinguished.
After the flame has been extinguished, the burner can be immediately re ignited. If the flame has been extinguished by liquids or food boiling over, clean the burner parts before re-ignition.
To re-ignite the burner, turn the control fully anti-clockwise, then follow instructions above for re-ignition.
WARNING:
If the burner has not re-ignited within 90 seconds, turn off the burner control and open a door to vent the room for 3 minutes before attempting to re-ignite the burner.
way.
4.2 USE OF OVEN PART - GAS COOKERS
4.2.1 Oven Burner 4.2 USE OF OVEN
4.2.1 Oven Burner
| POSITION | TEMPERATURE |
| MAX. | 250°C |
| 7 | 230°C |
| . | 220°C |
| 5 | 210°C |
| . | 200°C |
| 3 | 190°C |
| . | 180°C |
| 1 | 170°C |
| MIN. | 155°C |
CAUTION :
- If the burner has not lit after 15 seconds, stop operating the device, and open the compartment door and/or wait at least 1 minute before attempting a further ignition of the burner.
- In the event of the burner flames being accidentally extinguished, turn off the burner control and do not attempt to re-ignite the burner at least one minute.
4.3 Accessories
Pay attention to the information given by the manufacturer's size and the diagram used, place the dish onto the wire shelf, centrally in the middle. The following information must also be followed for enameled dishes:
If the food does not cover the oven trajectory completely, if the food is taken from the deep freezer on the trayds being used for collection of food's juices, duffing radaking uits mays butkicobome formed because of high heat during cooking or roasting.
This is a normal physical event that occurs during heat transfer.
This is a normal physical event that occurs during heat transfer.
Do not leave this tray or dish in cold environment straight away after cooking in glasss tray or dish.
Part 5: CLEANING AND MAINTENANCE
5.1 CLEANING
Make sure that all control switches are off and your apparatus cooled before cleaning your oven. Check if the cleaners you use are recommended by the manufacturer before using the cleaning materials on your oven. As they may damage the surfaces, do not use caustic creams, abrasive cleaning powders, wire wool or hard tools. In case liquid overflow burns onto the oven surface, the enamel may be damaged. Immediately clean any spilled liquids.
Cleaning of Inside and outside of your oven
Make sure the oven is turned fully off and has cooled to room temperature. The inside of the oven is cleaned when the oven is warm. Wipe the oven with a soft cloth in soapy water after each use. Then wipe it with a wet cloth once more and then dry it. It may be required to use a liquid cleaning material from time to time. Do not clean with dry and powder cleansers.
Cleaning the gas burners
Wipe and clean the back panel with a soapy cloth. Wash the burner parts in soapy water and rinse them.
5.2 MAINTENANCE
Periodically check the gas supply pipe for damage or cracks, if any defect is noticed, contact your local gas qualified installer to have the supply pipe changed. We recommend you do this once each year.
For France:
The gas supply pipe must be changed every 5 years for your safety. This must be carried out by a qualified installer.
Part 6: SERVICE AND TRANSPORT
6.1 BEFORE CONTACTING SERVICE
Cooking (If lower-upper part does not cook equally);
Change the shelf locations, cooking period and heat values according to the manual. If you are still having problems then contact an authorised service agent.
Table 4
IMPORTANT DISPOSAL INSTRUCTIONS
As a responsible retailer we care about the environment.
As such we urge you to follow the correct disposal procedure for your product and packaging materials.
This will help conserve natural recourses and ensure that it is recycled in a manner that protects health and the environment.
You must dispose of this product and its packaging according to local laws and regulations. Because this product contains electronic components, the product and its accessories must be disposed of separately from household waste when the product reaches its end of life. Contact your local authority to learn about disposal and recycling. The product and its packaging should be taken to your local collection point for recycling. Some collection points accept products free of charge.
If something doesn't seem to work
If there is something about your appliance which you do not understand and you live in the UK you can phone our help line during normal office hours on: 0844 8009595
Calls are charged at standard rates.
We apologise for any inconvenience caused by minor inconsistencies in these instructions, which may occur as a result of product improvement and development.
PROLINE
MANUAL DE USUARIO
DE COCINA
INDEPENDIENTE
DE GAS
PGC56W-F
PGC56SL-F
Estimado cliente,
DEEL 2 : WAARSCHUWING
NEEM ALLE BELANDIJKRIJKE VEILIGHEIDSMAATREGELEN EN LEES DE HANDLEIDING VOLLEDIG DOOR VOOR U HET APPARAAT BEGINT TE GEBRUIKEN
3.1 OMGEVING WAAR UW APPARAAT GEINSTALLEERD WORDT
Schoonmaken in uw oven
| MODELE | DIMENSIONS (cm) |
| PGK65F | 50*50*85/50*50*90 |
| PGC68F | 50*50*85/50*50*90 |


- PART 1: PRESENTATION AND SIZES OF PRODUCT
- PRESENTATION :
- Part of List:
- Part 2:WARNINGS
- TAKE ALL IMPORTANT SECURITY MEASURES AND READ THE MANUAL COMPLETELY BEFORE USING THE APPARATUS
- Part 3: INSTALLATION AND PREPARATION FOR USE
- ENVIRONMENT WHERE YOUR APPARATUS WILL BE INSTALLED
- Venting of the Burned Gases
- INSTALLATION
- ADJUSTMENT OF FEET
- GAS CONNECTION
- NOTE:
- CHANGING THE GAS INLET
- CAUTION
- WARNING
- GENERAL WARNINGS AND MEASURES
- WARNING:
- GAS CONVERSIONS
- Changing Injectors :
- Changing Injectors to use LPG
- Adjusting The Reduced Flame Position :
- Part 4: USE OF YOUR OVEN
- USE OF THE HOB
- BURNER IGNITION
- Flame Failure Device (FFD)
- USE OF OVEN PART - GAS COOKERS
- Oven Burner 4.2 USE OF OVEN
- Oven Burner
- CAUTION :
- Accessories
- Part 5: CLEANING AND MAINTENANCE
- CLEANING
- Cleaning of Inside and outside of your oven
- Cleaning the gas burners
- MAINTENANCE
- Part 6: SERVICE AND TRANSPORT
- BEFORE CONTACTING SERVICE
- IMPORTANT DISPOSAL INSTRUCTIONS
- As a responsible retailer we care about the environment.
- If something doesn't seem to work
- PROLINE
- MANUAL DE USUARIO
- DE COCINA
- INDEPENDIENTE
- DE GAS
- DEEL 2 : WAARSCHUWING
- NEEM ALLE BELANDIJKRIJKE VEILIGHEIDSMAATREGELEN EN LEES DE HANDLEIDING VOLLEDIG DOOR VOOR U HET APPARAAT BEGINT TE GEBRUIKEN
- OMGEVING WAAR UW APPARAAT GEINSTALLEERD WORDT
- Schoonmaken in uw oven
Brand : PROLINE
Model : PGC 56SLF
Category : Cooker