
PEH 460 SS-E - Cooker PROLINE - Free user manual and instructions
Find the device manual for free PEH 460 SS-E PROLINE in PDF.


| Product Type | Built-in Electric Hob |
| Brand | Proline |
| Model | PEH 460 SS-E |
| Number of Cooking Zones | 4 (2 standard, 2 rapid) |
| Control Type | Rotary knobs (6 positions) |
| Surface Material | Stainless steel and enamel |
| Power Supply | 230V ~ 2N~, 50Hz |
| Power Rating | Approx. 4.6 kW |
| Circuit Breaker Requirement | 20A, delayed functioning type with contact opening of at least 3 mm |
| Installation Type | Built-in, cut-out |
| Cut-out Dimensions | Approx. 590 x 520 mm (refer to manual for exact) |
| Approximate Product Dimensions | 600 x 520 x 50 mm |
| Safety Features | On/Off indicator light, residual heat warning, requires proper earthing |
| Cleaning Instructions | Mild soapy water, soft sponge; avoid abrasive powders |
| Warranty | Not specified, standard domestic use |
| Energy Efficiency | Not rated |
Frequently Asked Questions - PEH 460 SS-E PROLINE
User questions about PEH 460 SS-E PROLINE
0 question about this device. Answer the ones you know or ask your own.
Ask a new question about this device
Download the instructions for your Cooker in PDF format for free! Find your manual PEH 460 SS-E - PROLINE and take your electronic device back in hand. On this page are published all the documents necessary for the use of your device. PEH 460 SS-E by PROLINE.
USER MANUAL PEH 460 SS-E PROLINE
OPERATING AND INSTALLATIONINSTRUCTIONS OFBUILT-IN ELECTRIC HOB
PEH460SS
natural_image
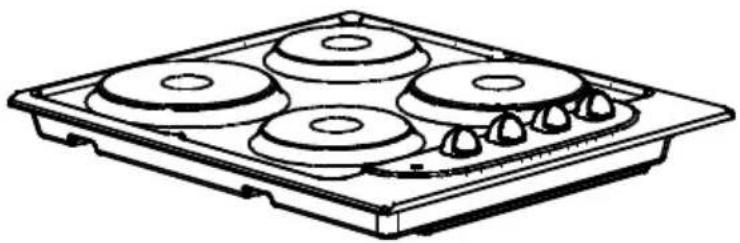
Line drawing of a four-tier electric stove with cooling fans and heat sinks (no text or symbols)
CONTENTS
- DESCRIPTION OF THE HOB
- SAFETY INSTRUCTIONS
- INSTALLATION
- USAGE
- MAINTENANCE & CARE
Dear Customer,
Thank you for purchasing a Proline Cooking recommendations in these instructions are others. They will also provide a means by which by your appliance.
g Hob. The safety precautions and for your own safety and that of to make full use of the features offered
Please keep this booklet in a safe place. It may be useful in future, either to yourself or to others in the event that doubts should arise relating to its operation.
This appliance must be used only for its intended purpose, that is for the domestic cooking of foodstuffs. Any other form of usage is to be considered as inappropriate and therefore dangerous.
The manufacturer declines all responsibility in the event of damage caused by improper or incorrect use of the appliance.
CE Declaration of conformity
- This cooking hob has been designed to be used only for cooking. Any other use (such as heating a room) is improper and dangerous.
- This cooking hob has been designed, constructed, and marketed in compliance with:
- Safety requirements of the "Low voltage" Directive 2006/95/EC;
- Safety requirements of the "EMC" Directive 89/336/EC;
- Requirements of the Directive 93/68/EC.

1
DESCRIPTION OF THE HOB
BEFORE USING FOR THE FIRST TIME
Read the instructions carefully before installing and using the appliance.
After unpacking the appliance, make sure it is not damaged. In case of doubt, do not use appliance and contract your supplier or a qualified engineer. Remove all packaging and do not leave the packing material( plastic bags, polystyrene, bands etc.) in easy reach of children as they may cause serious injury. The packaging materials are recyclable. The appliance should be installed and all the electrical connections made by a qualified engineer in compliance with local regulations in force and following the manufacturers instructions. Do not attempt to modify the technical properties of the appliance, it may become dangerous to use .
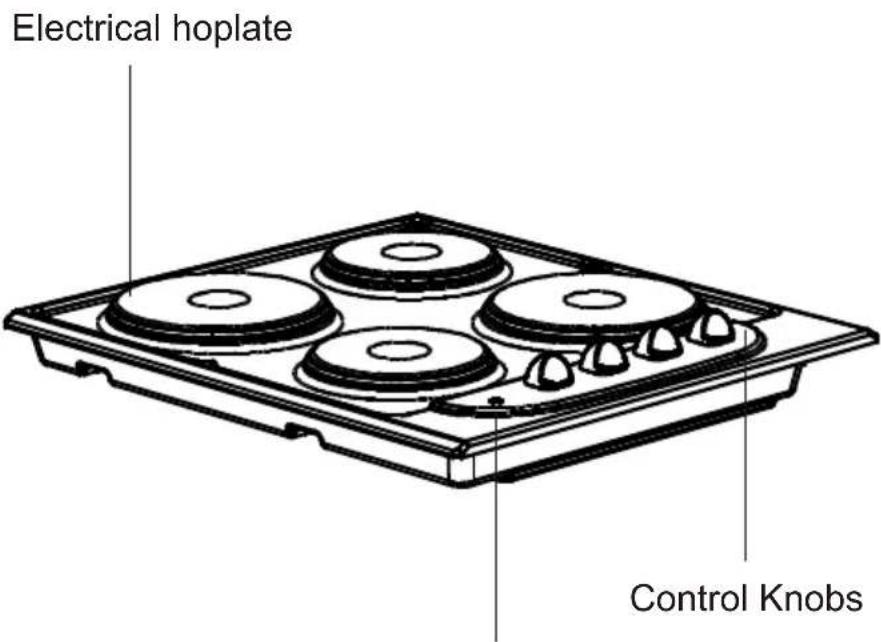
On/Off Light For Electrical Hotplate
Note: Appearance of your hob maybe different than the model shown above due to production changes.
2
SAFETY INSTRUCTIONS
Please comply with these instructions. If you do not, any damage resulting from improper, incorrect or negligent use or improper connection or installation is not covered by the warranty.
- This appliance should be used only for normal domestic use any other use may invalidate the warranty and might be dangerous.
- This appliance must only be used for the purpose of heating or cooking food, any other use, for example heating rooms, working surface or storage surface, is dangerous.
- Additions or modifications to the appliance are not permitted.
- Do not place or store flammable liquids, highly inflammable materials or fusible objects on or near the appliance.
- Children must be kept away from the appliance.
- The appliance may only be installed and connected by an authorised and qualified installer.
- The electrical safety of this hob is guaranteed only if it is connected to a properly earthed system, which complies with the electrical safety standards.
- Built-in appliances may only be used after they have been installed in suitable built-in units and work surfaces that meet the standards.
- Do not put pressure on the power supply cable while fitting the hob.
- Power supply cable length should not exceed 2m for isolation safety.
- Repairs to the appliance must only be carried out by authorised service personnel.
- Cables from electrical appliances must not or hot cookware.
- Never leave the appliance hob unattent can rapidly catch fire if overheated.
- Be careful when using small household elements.
- Do not use the cooking zones with empty cookware or without cookware.
Downloaded from www.vandenborre.be touch the hot surface of the appliance led when cooking with fat or oil. They appliances, such as irons, near the bookware or without cookware.
- Make sure all the controls are in the off position when not in use.
- For cleaning, the appliance must be switched off and cooled down.
- For safety reasons, the cleaning of the appliance with steam jet or high-pressure cleaning equipment is not permitted.
- Use only stable flat-based pans.
WARNING
- When correctly installed, your product meets all safety requirements laid down for this type of product category. However special care should be taken around the underneath of the appliance as this area is not designed or intended to be touched and may contain sharp or rough edges, that may cause injury.
- Fire Risk! Do not leave inflammable materials on the Hob top.
- Make sure that electrical cords connecting other appliances in the proximity cannot come in to contact with the Hob top.
- Do not scratch the hob with sharp objects. Don't use the hob as a work surface.
-
Before disposing of an unwanted appliance, it is recommended that it is made inoperative and that all potentially hazardous parts are made harmless.
-
Important: This appliance has been designed for domestic use only. The appliance is NOT suitable for use within a semi-commercial, commercial or communal environment.
- If the supply cord is damaged, it must be replaced by the manufacturer, its service agent or similarly qualified person in order to avoid an electrical hazard.
3
INSTALLATION
The electrical connection of this hob authorised service personnel or a quali the instructions in this guide and in regulations.
should be carired out by an fed electrician, according to compliance with the current
- Prior to installation, ensure that the local distribution conditions and the adjustment of the appliance are compatible.
- The laws, ordinances, directives and standards in force in the country of use are to be followed (safety regulations, proper recycling in accordance with the regulations, etc.).
Locating your built-in hob
After removing the packaging material from the appliance and its accessories, ensure that the hob damaged. If you suspect any damage do not use the appliance and contact the store where you purchased this hob.
- This built-in hob is to be inserted into a cut out of a worktop. It will be electrically connected with the switch box below counter level, especially provided for this purpose.
Installation and operation - in conformity with these instructions - according to the Appliances Safety Law and The Applicable Regulations in force in the area the hob is to be installed.
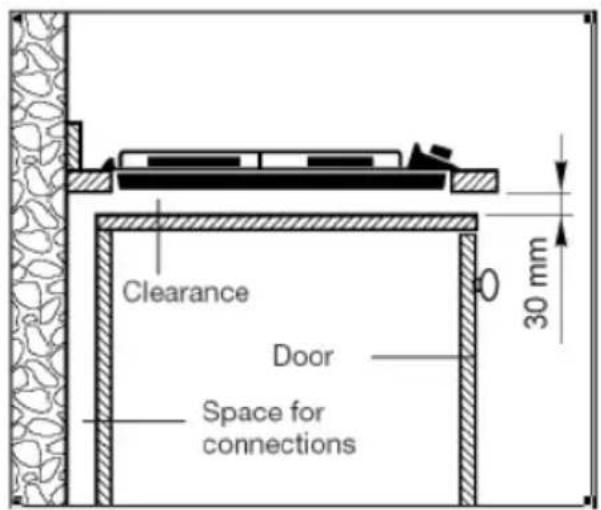
Cut an opening with the dimensions shown in the picture below.
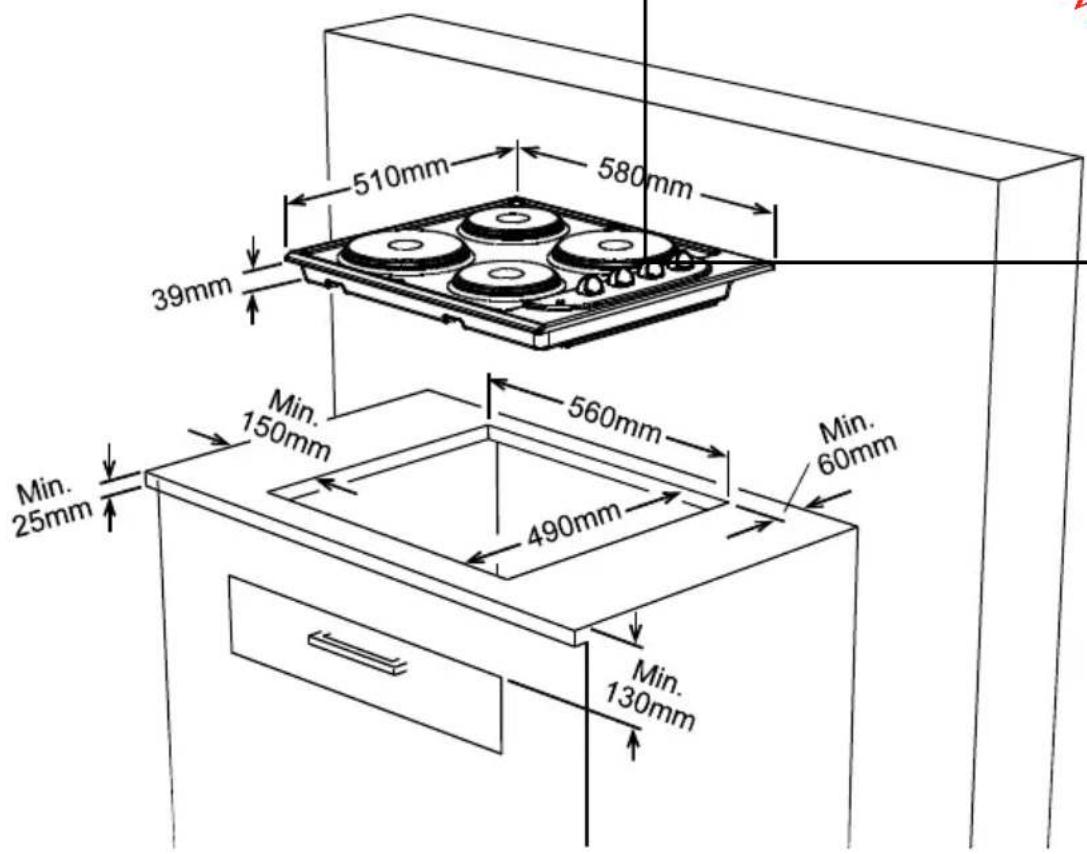
The Hob is supplied with is special seal in order to avoid any liquid ingress in the work top. Cut out and opening in the top of your kitchen unit that corresponds to the measurements given in the picture. Apply the self adhesive seal to all edges of the opening and carefully fit the hob into the opening and such a way that the knobs will be on the right hand side. Secure by tightening the clamps as in the picture.
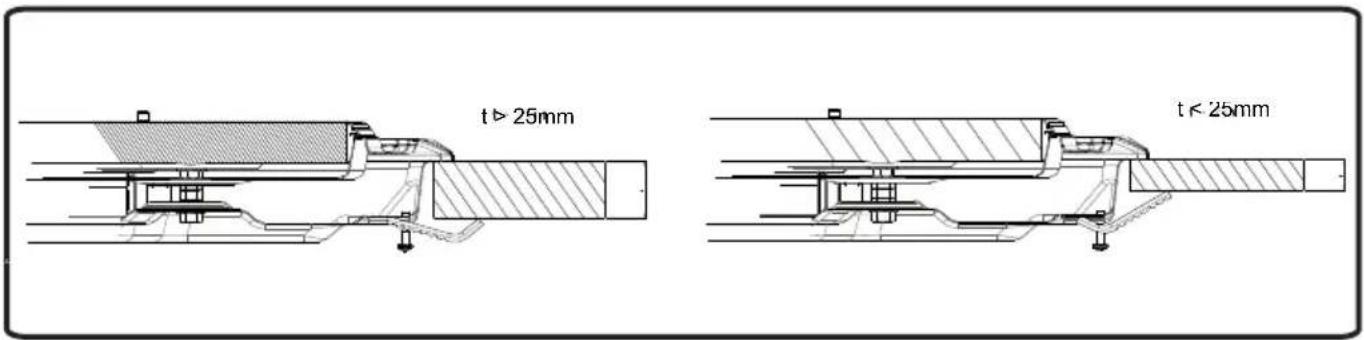
The thickness of the top of your kitchen unit must be between the dimensions given in the picture below. For a thickness of less than the given dimension “2 mm” thick wooden spacers can be inserted between the bracket and undersurface. If the thickness of the top is greater than given “5 mm” slots can be cut in the under surface of the furniture to house the bracket.
4
ELECTRICAL CONNECTION OF YOUR HOB
Before proceeding with the electrical connection verify that:
- The current carrying capacity of the system and the socket is adequate for the maximum power rating of the hob.
- The voltage indicated on the rating label is the same as the supply voltage.
- Do not use for connection any reductions, adapters or shunts because they may cause overheating.
- Electrical connection of a built-in hob to an electric source is done with a cable situated on the bottom of the built-in hob. Electrical installation of the residence and the electric current socket must be earthed and conform with safety regulations. The manufacturer declines responsibility should the appliance be installed without the above mentioned conditions.
- The appliance is provided for fixed connection to the power supply.
- The connection of the appliance to an electrical source must be done by an qualified technician (Connecting diagram given below).
- A circuit breaker with a contact opening of at least 3 mm, rated 20A and delayed functioning type must be installed inside the supply circuit.
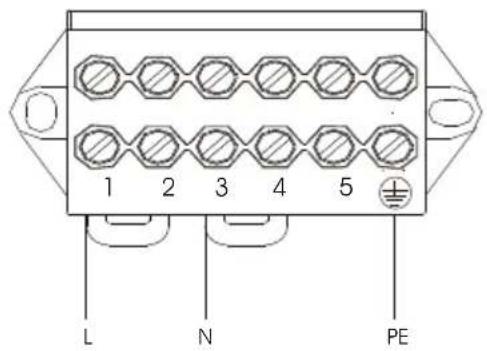
230V\~
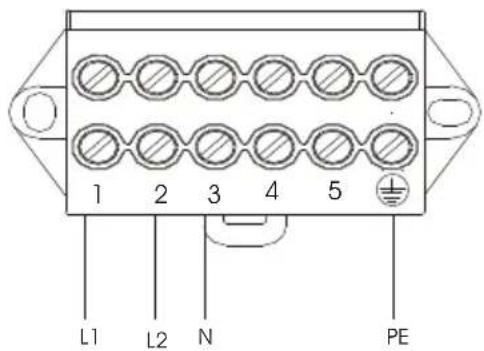
230V, 2N\~
5
USAGE
Usage of Your Hotplates
There are 2 Types hotplates exist
- Standart hotplate
- Rapid hotplate (which are distinguished by
These hotplates are controlled by a 6 position
By switching the control knob to one of these. Below each button, there is a small diagram t with that button. A signal light located on the control panel shows if any of the hotplates are in use.
their red mark)
switch.
positions the hotplates can be operating. that shows which hotplate is controlled
HOTPLATES - FUNCTIONS
| 0 off position |
| 1 To melt bitter etc. and to warm smal quantities of liquid |
| 2 To warm bigger quantities of liquid.To prepare creams and sauces |
| 3 To defrost food for cooking |
| 4 To cook delicate meat and fish |
| 5 To roast meat and steak |
| 6 To boil big quantities of liquid for frying |
WARNING
When the operating for the first time or whenever the hotplate has not been used for prolonged of time it is necessary to eliminate any humidity which may have accumulated around the electrical elements of the plate by operating the hotplate on its lowest setting for about 20 minutes.
- Use only flat pans and with a sufficiently thick base.
- Never use pans with a smaller diameter than of the hotplate.
- Ensure that the base of the pan is dry before placing it on the hotplate. While the hotplate is in operation it is important to ensure that the pan is centred correctly above the hotplate.
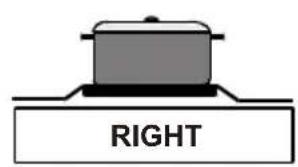
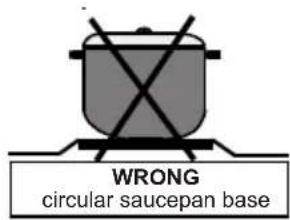
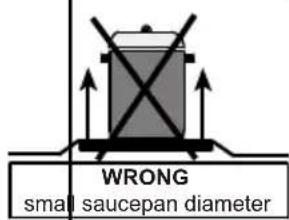
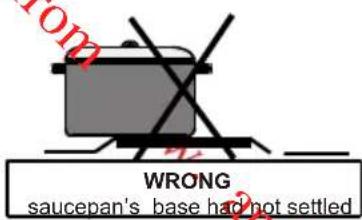
- Never operate the hob without pans on the hotplates.
- The temperature of accessible parts may be high when the appliance is operating. So it is imperative to keep children and animals out of the reach of the hotplate during and after the operation.
- If you note a crack on the hotplate it must be immediately switched off and replaced.
- To ensure long life, the hotplate must be thoroughly cleaned with appropriate cleaning products. To avoid rustiness and to keep them new it is recommended to rub the hotplates lightly with tissue with a small amount of oil. Do not use a steam cleaner.
- After use, the hotplates remain very hot for a prolonged of time, do not touch them and to not place any object on top of the hotplate.
The appliance is operated by using control knobs shown in the picture below.

The cooker is designed for operating at 6 heat levels:
1 Keeping warm position
2-3 Heating position at low heat
4-5-6 Cooking and boiling position
6
MAINTENANCE & CARE
Before cleaning switch the appliance off and allow to fully cool down.
Enamelled parts:
In order to keep to hob looking new, it is necessary to clean it frequently with mildly warm soapy water and then dry with a soft tissue. Do wash the hob while hot and never use abrasive powders or abrasive cleaning materials. Do not leave vinegar, coffee, milk, salt, water, lemon or tomato juice to remain in contact with enamelled parts for long periods of time. As they will become difficult to remove.
Stainless steel:
Stainless steel parts must be cleaned frequently with mildly warm soapy water and a soft sponge and then dry with a soft cloth. Do not use abrasive powders or abrasive cleaning materials. Do not leave vinegar coffee, milk, salt, water, lemon or tomato juice to remain in contact with stainless steel parts for long periods of time. As they will become difficult to remove.

Disposal
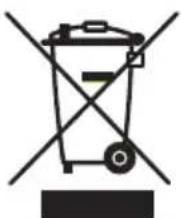
natural_image
Symbol of a trash bin with crossed lines indicating no waste or discharge (no text or labels)Waste electrical and electronic products must not be disposed of with household waste. Please refer to the retailer from whom you purchased this item for disposal instructions.
If something doesn't seem to work
If there is something about your appliance which you do not understand and you live in the UK you can phone our help line during normal office hours on: 0113 2793520
Calls are charged and standard rates.
We apologise for any inconvenience caused by minor inconsistencies in these instructions, which may occur as a result of product improvement and development.
Kesa Electricals© UK: EC1N 6TE. Kesa U.K HU1 3AU 23/08/07
52027955 02/12 R002
- CONTENTS
- Dear Customer,
- CE Declaration of conformity
- DESCRIPTION OF THE HOB
- BEFORE USING FOR THE FIRST TIME
- 2
- SAFETY INSTRUCTIONS
- WARNING
- 3
- INSTALLATION
- Locating your built-in hob
- ELECTRICAL CONNECTION OF YOUR HOB
- 5
- USAGE
- Usage of Your Hotplates
- MAINTENANCE & CARE
- Enamelled parts:
- Stainless steel:
- Disposal
- If something doesn't seem to work
- Calls are charged and standard rates.
Brand : PROLINE
Model : PEH 460 SS-E
Category : Cooker