FS 913 P - Oven FRANKE - Free user manual and instructions
Find the device manual for free FS 913 P FRANKE in PDF.
Frequently Asked Questions - FS 913 P FRANKE
User questions about FS 913 P FRANKE
0 question about this device. Answer the ones you know or ask your own.
Ask a new question about this device
Download the instructions for your Oven in PDF format for free! Find your manual FS 913 P - FRANKE and take your electronic device back in hand. On this page are published all the documents necessary for the use of your device. FS 913 P by FRANKE.
USER MANUAL FS 913 P FRANKE
natural_image
Line drawing of a double door mounted on a wall, showing structural lines and mounting brackets (no text or symbols)FS 913 M FS 913 P
EN User manual Multifunction Oven Touch
Proper installation and placement 6
Proper use 6
Maintenance and cleaning 6
Repair 7
Taking out of service 7
Information for energy saving 7
Overview 8
Oven 8
Control panel 9
Menu icons on display 10
Switching on the first time 12
Configuring the display 12
Operation 13
Cooking in manual mode 13
Cooking in automatic mode 13
Cooking in eco cooking mode 14
Cooking in wellness mode 15
Scheduling an end time for cooking 15
Setting the timer 15
Meat Probe use 16
Connection 16
Manual cooking programs 17
Cooking table 19
Cooking tested 21
Complete Menu Programs 22
Complete Meat Menu 22
Complete Meat Menu - low energy 24
Complete Fish Menu 25
Complete Fish Menu - low energy 27
Complete menu 4 Pizzas and Bread 29
Complete menu 4 Pizzas and Bread - low energy 29
Menu Wellness 29
Cleaning and care 30
General recommendations 30
Using the auto clean function 30
Cleaning the oven chamber 30
Cleaning the oven door 30
Removing the oven door 31
Mounting the oven door 31
Cleaning the glass panels of the oven door 31
Cleaning the side frames and telescopic guides 32
Replacing the oven lamp 33
Maintenance and repair 34
Disposal 34
Customer service 34
Technical data 35
INTRODUCTION
Dear customer,
Thank you for choosing Frames by Franke.
Before using the oven, please carefully read the instructions and advice contained in this manual. This will enable you to make best use of the oven and ensure many years of trouble-free operation.
Keep this user manual for further reference.
Frames by Franke is a next generation oven, developed to turn domestic and professional cooking around. Our proven Dynamic Cooking Technology (DCT) has been upgraded with a touchscreen HD display that allows you to program, schedule, and control every cooking process with a simple touch.
With Frames by Franke the choice is in your hands:
You can decide to cook “old-style” helped by the ultimate technological upgrades provided by the oven, or you can enjoy saved recipes and complete menus which will make your everyday life easier, faster and healthier.
These are the options you can choose from:
MANUAL – Cooking in manual mode and setting the system, temperature and duration as desired.
AUTO – Cooking in automatic mode and enjoying a great variety of recipes and complete menus ready to go.
ECO COOKING – Cooking in automatic or ecologic mode and enjoying a great variety of recipes and complete menus perfect for your health.
An aesthetic and technological upgrade that perfectly combines design and performance. Frames by Franke is a piece of elegance suitable for every kitchen that guarantees outstanding reliability thanks to the quality of materials and attention to detail, typical of every Franke product.
ABOUT THIS MANUAL
This user manual applies to several models of the device. Thus it may be possible that some of the described features and functions are not available on your specific model.
Franke reserves the right to make modifications to the product without prior notice. All information is correct at time of issuance.
▶ Carefully read the user manual before using the device.
▶ Keep the user manual.
▶ Use the device described in this user manual only according to the intended use.
INTENDED USE
The oven was developed exclusively for non-professional, domestic use in the household.
Symbol Meaning

Warning symbol. Warning against risks of injury.
▶ Actions in safety and warning notes to avoid injury or damage.
▶ Action step. Specifies an action to be done.
■ Result. Result of one or more action steps.
√ Precondition that has to be fulfilled before performing the following action.
The oven is designed to offer professional performance in the household. It is a highly versatile appliance enabling safe and easy selection of different cooking methods.
SAFETY INFORMATION
Read the user manual and the safety information carefully before using the oven.
▷ Keep the manual for future reference.
The manufacturer can not be made liable for possible damage which may occur due to incorrect installation and incorrect, improper or unreasonable use of the device.
The electrical safety of the oven is guaranteed only when it is connected to an earthing system in compliance with the valid regulations.
To ensure safe and efficient operation of this electrical device:
▶ Only contact authorised service centres.
Do not modify any features of the device.

This appliance is not intended for use rsons (including children) with reduced cal, sensory or mental capabilities, k of experience and knowledge, s they have been given supervision or ction concerning use of the appliance person responsible for their safety.
Children should be supervised to ensure that they do not play with the appliance.
This device is not a toy.
▷ Keep children away from the device and the packaging material.
Do not leave children near the device unattended.
Do not let children play with the device.
Do not allow children to touch the device or its controls during and immediately after using it.
Proper installation and placement
If the oven is to be permanently connected to the power supply:
▷ Ensure that the device is installed only by the customer service, an electrician or trained personnel with the appropriate knowledge/education.
▷ Ensure that the device is installed in a way that allows to disconnect it from the power supply, with a contact opening distance that ensures complete disconnection in category III overvoltage conditions.
▷ Ensure that the device is connected directly to the mains socket.
- Ensure that no adapters, no multi-sockets and no extension cables are used to connect the device.
▷ Ensure that the device is not exposed to atmospheric agents (rain, sun).
Proper use
▷ Only use the device to prepare and cook food.
▷ Use oven gloves when placing containers in the oven or when taking containers out of the oven.
▷ Observe the manuals of the cooking devices that are used with the oven when using the device.
Do not place power cables of other electric appliances on hot parts of the oven.
Do not use the oven chamber to store any objects.
Do not use flammable liquids near the oven.
▶ Only use the temperature probe recommended for this oven.
Risk of overheating and malfunction of the oven due to blocked ventilation!
▷ Never cover the inside walls of the oven with aluminium foil, especially the lower part of the oven chamber.
Do not block the ventilation of the fan or the cooling openings above the oven door.
The appliance shall not be installed behind a decorative door in order to avoid overheating.
Damage to the enamel in the oven due to wrong handling of pots or containers!
During cooking, never place pots or containers directly on the floor of the oven chamber.
Place pots and containers only on the racks or enamel trays provided in the oven chamber, on one of the five shelves available.
Risk of burns!
During use the appliance becomes hot. Care should be taken to avoid touching heating elements inside the oven.
WARNING: Accessible parts may become hot during use. Young children should be kept away.
Risk of burns!
The end of the door handle may be hotter due to hot air being vented.
▷ When opening or closing the door, always hold the door handle in the middle.
▶ Always make sure that the control knobs are in the off position when the oven is not in use.
Risk of electric shock due to damaged device!
▷ Do not switch on a damaged device.
▷ Switch off the fuse in the fuse box.
▷ Contact the customer service.
Risk of electric shock!
Do not touch the device with wet parts of your body.
▷ Do not use the device when barefoot.
Do not pull on the device or power cable to unplug it from the socket.
WARNING: Ensure that the appliance is switched off before replacing the lamp to avoid the possibility of electric shock.
Maintenance and cleaning
Before maintenance or cleaning:
▷ Disconnect the device from the power supply, e.g., switch off the fuse in the fuse box.
The oven uses a special enamel which is easy to keep clean. However, Franke recommends to clean it frequently in order to avoid baking on grime and previous cooking residues.
Do not use harsh abrasive cleaners or sharp metal scrapers to clean the oven door glass since they can scratch the surface, which may result in shattering of the glass.
Do not use steam cleaners or direct jets of water.

Risk of electric shock due to entering !!
The device contains electrical components.
▶ Make sure that no liquid enters the interior of the device.
Do not use pressurised steam to clean the device.
Do not use a wet cloth to clean the operating elements.
Repair
Do not allow anyone except qualified personnel to install or repair the appliance.
- Contact a service centre authorised by the manufacturer or qualified personnel in the following cases:
- Immediately after unpacking, in the event of doubts regarding the integrity of the device
- During installation (according to the manufacturer's instructions)
- Doubts regarding the correct operation of the device
- Malfunction or poor operation
- Replacing the power socket if incompatible with the power plug of the device
- If the supply cord is damaged, it must be replaced by the manufacturer, its service agent or similarly qualified persons in order to avoid a hazard.
Taking out of service
▷ If the oven is no longer to be used, call the service centre or qualified personnel to disconnect it from the power supply.
INFORMATION FOR ENERGY SAVING
The operating modes GENTLE HEAT and HOT AIR consume less energy than the other cooking functions available.
▷ Avoid frequent door opening.
▷ Preheat as rapidly as possible.
▷ Preheat the oven chamber only if the baking results depend on this operation.
▷ If a recipe for a gratin uses residual heat for longer than 30 minutes, turn the appliance off 5–10 minutes before the end of cooking.
OVERVIEW
Oven

text_image
Technical diagram showing two views of a kitchen appliance with numbered components and labeled parts.1 Control panel
2 Front door handle
3 Front door glass
4 Lighting
5 Runners for racks and enamel trays
6 Cooling fan (rear side)
Cooling fan
In order to reduce the temperature at the door, the control panel and the sides, your Franke oven is equipped with a cooling fan which is automatically activated when the oven gets hot. When the cooling fan is on, air is vented out of the oven between the front panel and oven door. The speed of the air being expelled was optimised to create no disturbance in the kitchen and to keep the noise to a minimum.
To protect kitchen units, the cooling fan continues to run after cooking until the oven has cooled down sufficiently.
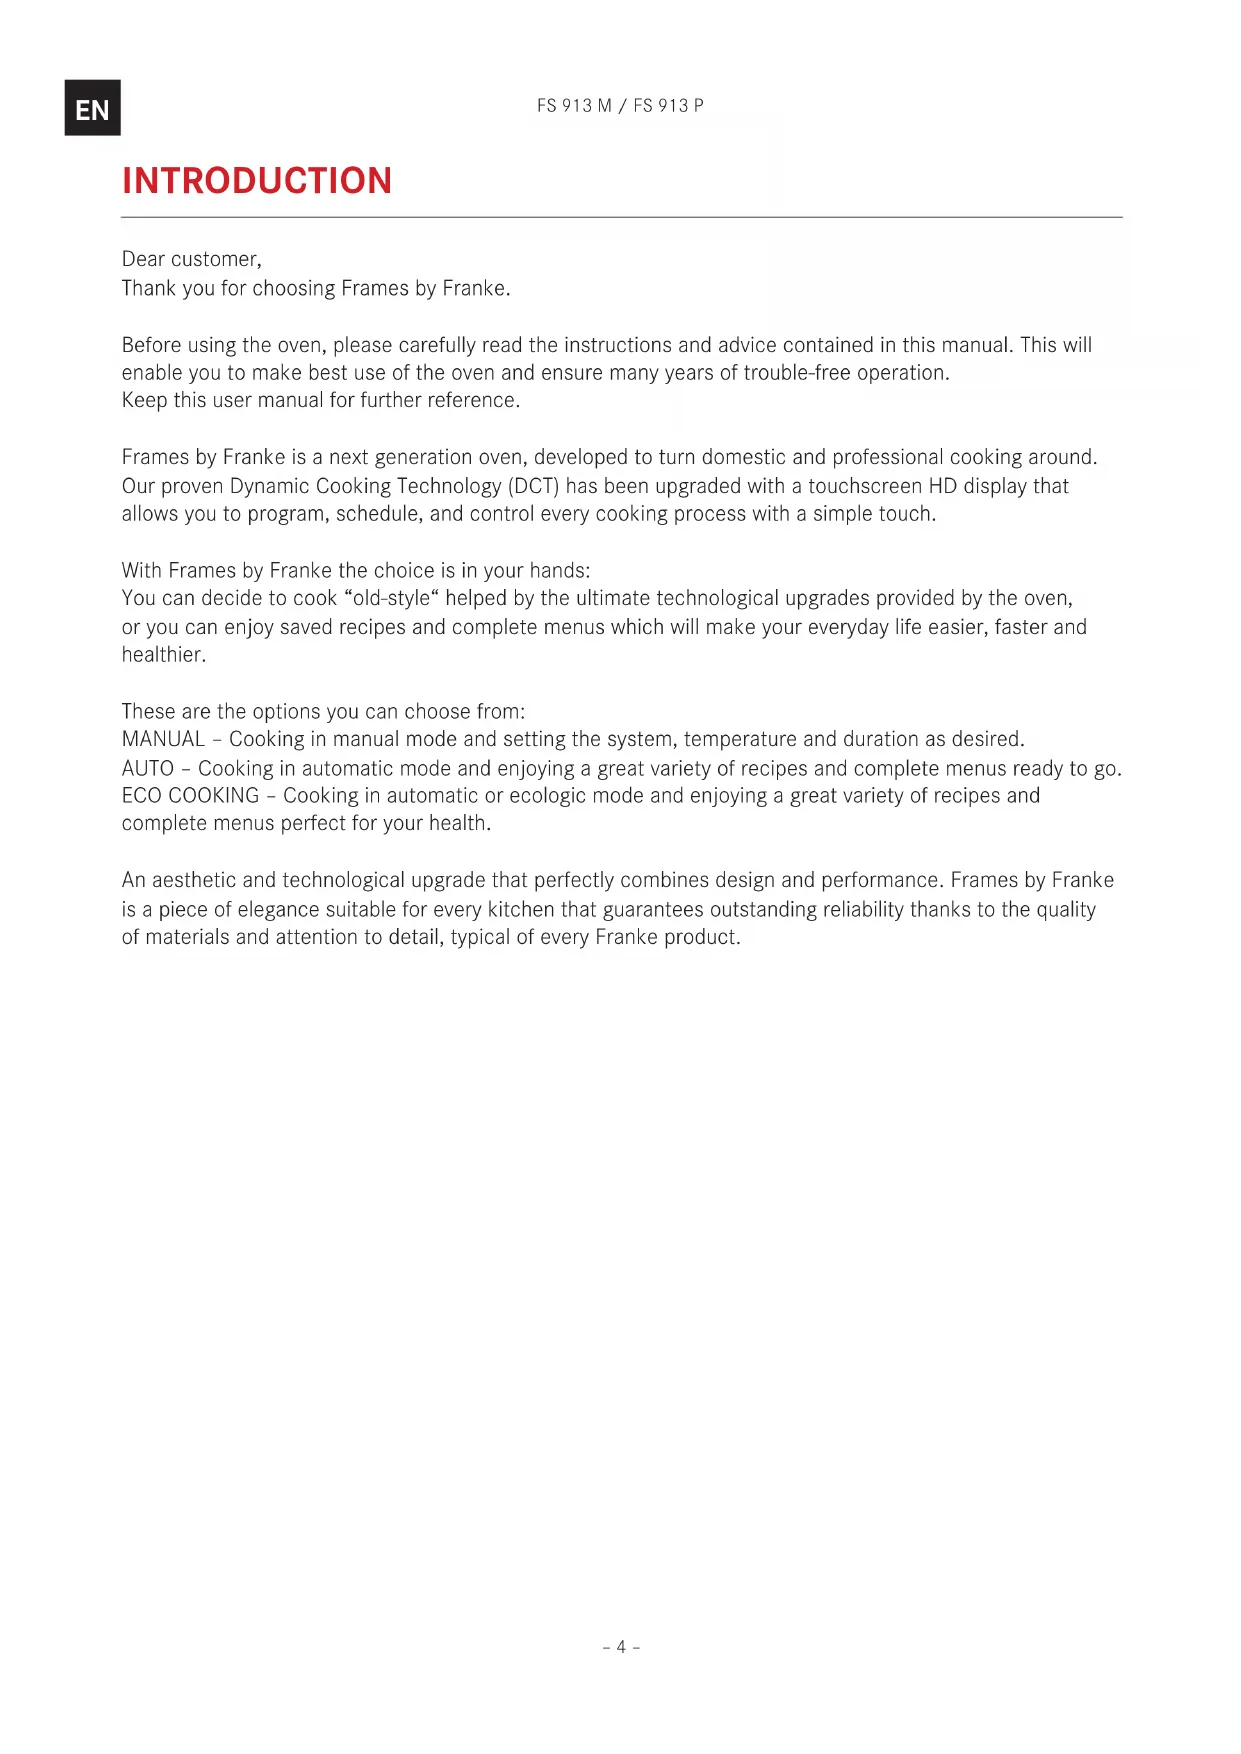
Runners for racks and enamel trays
text_image
⑥ ⑤ ④ ③ ② ① ⑥ ⑤ ④ ③ ② ①Used for correctly positioning the racks and enamel trays in 6 predetermined positions (depending on model; 1 to 6 starting from the bottom). The cooking table (page 19) indicates the best position for each type of cooking.
Accessories Description
natural_image
Plain gray square with a subtle gradient and faint vertical lines, no text or symbols present.
natural_image
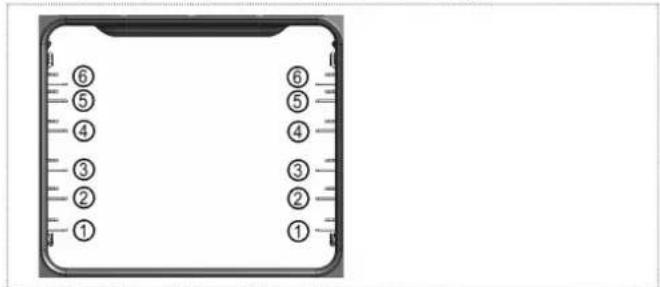
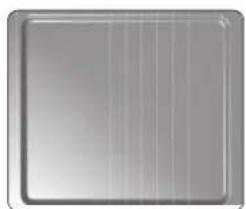
Plain gray square with subtle horizontal striations, no text or symbols visibleEnamel Baking/Roasting Tray
Normally used for collecting juices from grilled food or for cooking food directly on the enamel tray.
Enamel trays must be removed from the oven when they are not used. The enamel trays are made from „AA“ food-grade enamelled steel.
natural_image
Pure diagram of a rectangular frame with horizontal lines inside, no text or symbols present.Rack
Used for supporting pans, pastry moulds and any containers other than the enamel trays provided, or for cooking meat and fish mainly with the grill and turbo grill functions, toasting bread, etc. Food should not come into direct contact with the rack.
Control panel
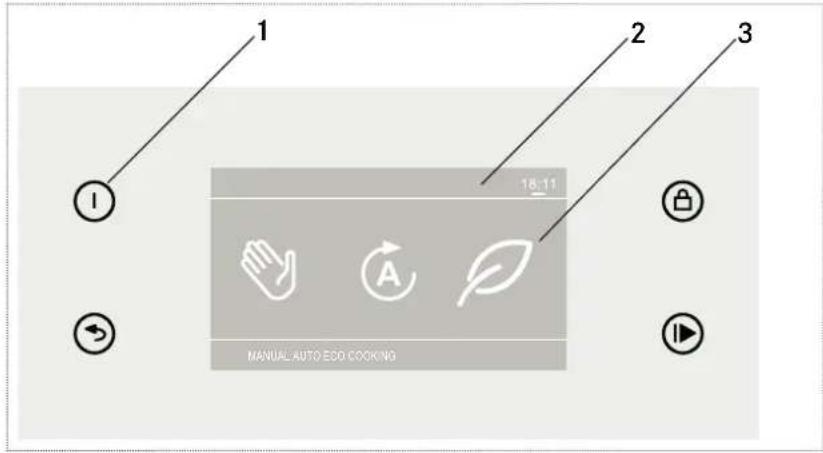
text_image
1 2 3 18-11 MANUAL AUTO ECO COOKING1 Key
2 Display
3 Menu icons
Key Key name Function

On/Off Start / stop the oven:
▶ Press briefly.
Shut down the oven:
▶ Press for a while.

Safety/Lock Start a safety procedure to avoid accidental interruptions of your cooking program. Activate child lock:
▶ Press briefly.
Unlock the procedure / child lock:
▶ Press and hold for 2 seconds.

Return Return to previous menu.

Confirm/Run Validate your operations and confirm the program:
▶ Press briefly.
Interrupt the program:
▶ Press and choose between

Menu icons on display
Main view
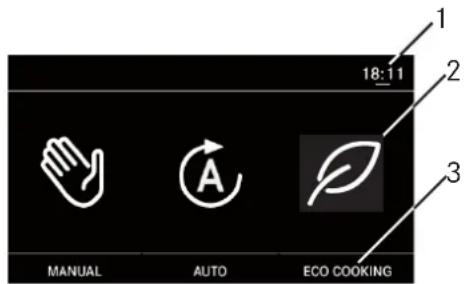
text_image
18:11 1 2 3 MANUAL AUTO ECO COOKING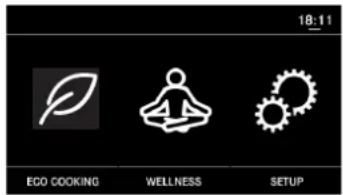
text_image
18:11 ECO COOKING WELLNESS SETUP1 Actual time
2 Menu icon
3 Menu name
Menu icon Menu name Function


MANUAL
Cooking in manual mode
AUTO
Cooking in automatic mode
ECO COOKING
In this menu the following programs are provided:
Recipes Eco and Complete menu Eco
Cooking with reduced power consumption to use the domestic power supply available in the most ecological way. The recipes in this menu are the same as in the AUTO mode, but with a lower power consumption for cooking.
- In the RECIPES program you can cook on only one level.
- In the COMPLETE MENU program you can cook on four levels.
WELLNESS
In this menu the following program is provided: Wellness
Cooking of meat, fish and vegetable dishes in a completely natural and low-fat way. This program requires prolonged cooking at a low temperature inside the food (around 100^ C) without the addition of oil or other fats. This allows you to retain the original nutritional value of the food (minerals, vitamins, etc.) and to enhance its natural flavours.
- In the WELLNESS program you can cook on only one level.
SETUP
In this menu you can configure the display, e.g., time, language, brightness and contrast.
RECIPES
In this menu you can choose from different recipe categories, e.g., pasta, vegetables, meat, fish, cakes, bread or pizza.
COMPLETE MENU
In this menu you can choose from different programs for complete menus, e.g., meat menu, fish menu, 4 pizzas, bread in 4 trays.
MANUAL mode view
text_image
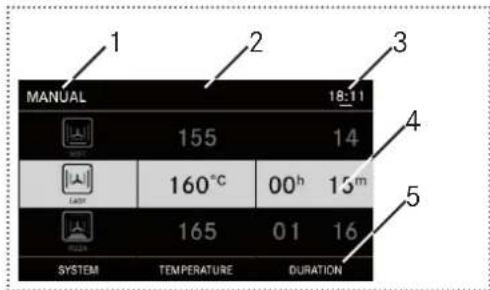
1 MANUAL 18:11 155 14 160°C 00h 15m 165 01 16 SYSTEM TEMPERATURE DURATION 3 4 51 Menu name
2 Menu bar
3 Actual time
4 Sections with program settings (grey: active setting)
5 Section name
RECIPES, COMPLETE MENU, WELLNESS view
text_image
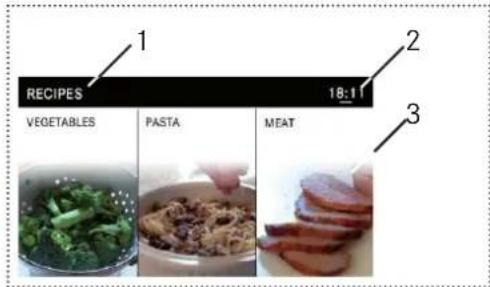
1 RECIPIES 18:11 VEGETABLES PASTA MEAT1 Menu name
2 Actual time
3 Recipe or complete menu with example picture and name In ECO COOKING mode the view is the same, but the menu name shows ECO at the end.
Sub menu view
This sub menu appears when touching in any view on the upper menu bar.
text_image
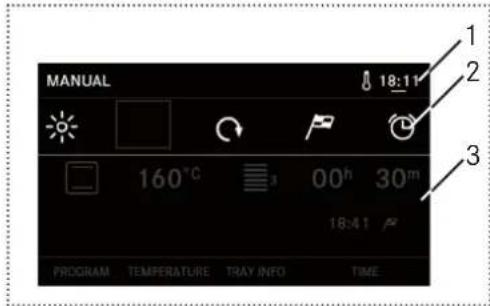
MANUAL 18:11 160°C 00h 30m 18:41 PROGRAM TEMPERATURE TRAY INFO TIME1 Actual Time. The ampoule icon appears when the oven is in function, is heating up or is programmed.
2 Function icons
3 Display of cooking program parameters
Icon Icon name Function

Light off Switch the internal lighting on/off

Reset timer Reset the cooking time and duration after the cooking has started

Set end time Set an end time for cooking

Timer Set an alarm time
If you did program the duration of cooking with a starting delay, the display shows the total cooking time and the end time when the cooking will be finished.
SWITCHING ON THE FIRST TIME
When using the oven for the first time:
▶ Open the front door and ensure that the oven is empty. Remove all accessories and close the oven door.
▶ Ensure that the room is well aired, e.g., open the doors and windows.
▶ Press ⏻ to start the oven.
After starting, clock time is displayed, touch it, then the main view appears.
▶ Press

▶ In the FUNCTION section select the program MULTICOOKING.
▶ In the TEMPERATURE section, select the maximum temperature (270°C).
▶ In the DURATION section, select 00^h 40^m .
▶ Operate the oven while empty at maximum temperature with the door completely closed.
The odour detectable during this operation results from the evaporation of substances used to protect the oven during the time between manufacture and actual installation.
After the 40 minutes, the oven stops automatically and will be ready for use after cooling down the oven.
CONFIGURING THE DISPLAY
This chapter explains how to set up your display features according to your preferences.
Starting the configuration
▶ Press
■ The SETUP menu with different options appears.
Configuring the time
▶ Press TIME.
▶ Choose hours, minutes and seconds by scrolling through the list.
Configuring the language
▶ Press LANGUAGE.
▶ Choose your language by scrolling through the list.
Configuring the display brightness
▶ Press DISPLAY BRIGHTNESS.
▶ Set the brightness of the control panel by selecting one of the segments of the bar.
Configuring the volume of the alarm tone
▶ Press SOUND.
▶ Set the volume by selecting one of the segments of the bar.
Configuring the clock display type
▶ Press CLOCK DISPLAY TYPE.
▶ Select your favourite skin: analogue clock or digital clock.
Switching the display off
The display can switch off automatically when the oven is switched off. If this option is activated, the clock is not visible.
▶ Press DISPLAY OFF.
Finishing the configuration
▶ To confirm each configuration, press ⏻
■ It returns to the previous page. Your settings will be saved.
OPERATION
For best use of your Franke oven, consult the cooking table.
Cooking in manual mode
In manual mode you are cooking by setting a program, the temperature and duration according to your preferences.
▶ Press
■ The menu MANUAL with different sections appears:
| Section Description | |
| FUNCTION | Select from different programs (see chapter Manual Cooking Programs) |
| TEMPERATURE | Select the required temperature from min. 50°C up to max. 270°C (in program GENTLE HEAT: 230°C) |
| DURATION | Select the duration in hours and minutes |
In each section: Select the program, temperature and duration.
▶ Place the prepared food in the oven chamber and close the oven door.
▶ Press to confirm.
▶ Choose to activate or not the pre heating.
■ If you choose YES, the oven will activate all the heating elements to reach the required temperature in the shortest time as possible.
■ If you choose NO, the oven will maintain the cooking profile of the selected function according to the cycle set.
It is possible to choose the rapid pre-heating only with the following functions: 🐘, 🐘, 🐘


■ The cooking program starts.
To stop the program:
▶ Press and press . √
Cooking in automatic mode
In automatic mode there are many recipes and complete menus perfect for your health and wellness.
▶ Press Ⓐ
The menu AUTO with its submenus appears:
- RECIPES
In this menu you can choose from different recipe categories, e.g., pasta, vegetables, meat, fish, cakes, bread or pizza.
- COMPLETE MENUS
In this menu you can choose from different programs for complete menus, e.g., meat menu, fish menu, 4 pizzas, bread in 4 trays.
Example for a recipe program
▶ Press
▶ Press PASTA, then press CANNELLONI.
■ The summary of the recipe appears:
| Section Description | |
| INFO | Automatic set-up of temperature, program and display of the optimal position for the tray |
| TIME | Automatic set-up of cooking duration |
▶ Press to confirm.
▶ Place the prepared food in the oven chamber and close the oven door.
▶ Press to confirm.
■ The cooking program starts.
To stop the program:
▶ Press and press . √
The details of the recipes (ingredients and preparation) are available on our web site:
- http://recipes.franke.com
Example for a complete menu program
▶ Press
▶ Press MEAT.
■ The summary of the complete menu appears:
Section Description
| PROGRAM | Automatic set-up of the cooking program |
| TEMPERATURE | Automatic set-up of the temperature |
| TRAY INFO | Automatic display of the optimal position for the tray |
| TIME | Automatic set-up of the cooking duration |

▶ Press 🏠 to confirm.
▶ Place the prepared food in the oven chamber and close the oven door.
▶ Press 🏠 to confirm.
■ The cooking program starts.
▶ To stop the program, press 🏠 and press . √
The details of the recipes (ingredients and preparation) are available on our web site:
- http://recipes.franke.com
Cooking in eco cooking mode
In eco cooking mode you are enjoying an eco-friendly way of cooking with numerous recipes and complete menus.
In this menu the recipes are the same as in the
AUTO mode, but with a lower power consumption for cooking.
▶ Press
The menu ECO COOKING with its submenus appears:
- ECO RECIPES
In this menu you can choose from different recipe categories, e.g., pasta, vegetables, meat, fish, cakes, bread or pizza.
- COMPLETE ECO MENUS
In this menu you can choose from different programs for complete menus, e.g., meat menu, fish menu, 4 pizzas, bread in 4 trays.
Example for an eco recipe program
▶ Press
▶ Press PASTA, then press CANNELLONI.
■ The summary of the recipe appears:
Section Description
| INFO | Automatic set-up of temperature, program and display of the optimal position for the tray |
| TIME | Automatic set up-of the cooking duration |
▶ Press 🏠 to confirm.
▶ Place the prepared food in the oven chamber and close the oven door.
▶ Press 📄 to confirm.
■ The cooking program starts.
To stop the program:
▶ Press land press . √
The details of the recipes (ingredients and preparation) are available on our web site:
- http://recipes.franke.com
Example for a complete eco menu program
▶ Press
▶ Press MEAT.
■ The summary of the complete menu appears:
Section Description
| PROGRAM | Automatic set-up of the cooking program |
| TEMPERATURE | Automatic set-up of the temperature |
| TRAY INFO | Automatic display of the optimal position for the tray |
| TIME | Automatic set-up of the cooking duration |
▶ Press to confirm.
▶ Place the prepared food in the oven chamber and close the oven door.
▶ Press ⑪ confirm.
■ The cooking program starts.
▶ To stop the program, press and press . √
The details of the recipes (ingredients and preparation) are available on our web site:
- http://recipes.franke.com
Cooking in wellness mode
In wellness mode you can choose from different recipe options like lamb, pork, sheep, poultry, fish, veal and vegetables.
Example for a wellness menu program
This program enables the cooking of meat, fish and vegetable dishes in a completely natural and low-fat way. It requires prolonged cooking at a low temperature inside the food (around 100^ C) without the addition of oil or other fats. This allows you to retain the original nutritional goodness of the food (minerals, vitamins, etc.) and to enhance its natural flavours.
▶ Press
▶ Press VEGETABLES.
■ The summary of the complete menu appears:
Section Description
| PROGRAM | Automatic set-up of the cooking program |
| TEMPERATURE | Automatic set-up of the temperature |
| TRAY INFO | Automatic display of the optimal position for the tray |
| TIME | Automatic set-up of the cooking duration |
▶ Press 🏠️ confirm.
▶ Place the prepared food in the oven chamber and close the oven door.
▶ Press 📇 to confirm.
■ The cooking program starts.
▶ To stop the program, press 📋 and press . √
The details of the recipes (ingredients and preparation) are available on our web site: - http://recipes.franke.com
Scheduling an end time for cooking
In automatic cooking mode
▶ Press Ⓐ
■ The menu AUTO with different sections appears.
▶ Press
▶ Press PASTA, then press CANNELLONI.
▶ Press the area on the top of the display where the time is displayed (e.g. 18:11)
■ The sub menu view appears.
text_image
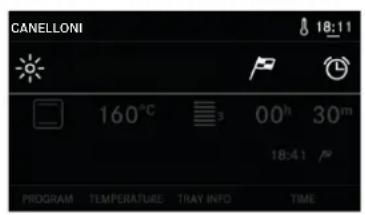
CAMELLONI 18:11 160°C 00h 30m 18:41 ° PROGRAM TEMPERATURE TRAY INFO TIME▶ Press
▶ Choose hours and minutes by scrolling through the vertical menu.
▶ Confirm with ⏻
▶ Place the prepared food in the oven chamber and close the oven door.
▶ Press Ito confirm.
■ The oven is now in standby mode.
The oven calculates the start time based on the chosen cooking time or cooking program and the preset end time. Cooking will start at the calculated start time. It is possible to set an end time for cooking only in the section RECIPES of AUTO, ECO COOKING and WELLNESS.
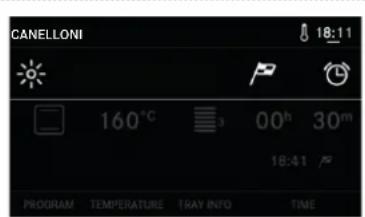
Setting the timer
The timer can be used in all cooking modes, it is independent from any function.
▶ Press the area on the top of the display where the time is displayed (e.g. 18:11)
■ The sub menu view appears.
text_image
CANELONI 18:11 160°C 00h 30m 18:41 PROGRAM TEMPERATURE TRAY INFO TIME▶ Press
▶ Choose hours and minutes by scrolling through the vertical menu.
▶ Press again the area on the top of the display where the time is displayed (e.g. 18:11)
▶ Press √ confirm.
■ The timer runs in the background.
When finished, you hear a sound.
MEAT PROBE USE
The meat probe supplied with your Franke oven allows you to cook meat and be sure that the cooking process will be interrupted at the right moment, i.e. when the measured core temperature of the meat corresponds to the ideal cooking. In this way it will no longer be necessary to set cooking times and repeatedly check the meat.
The meat probe cannot be activated in cooking modes ☐, ☐ (GRILL, FAN GRILL) or in any pre-set cooking recipes.

Caution!
▷ Please use only the meat probe provided together with the oven by Franke; in case of damage or to buy a new one, please contact Franke Service.
▷ Check and remove the probe before the switch on the oven, if you are not intended to use or for grill mode. Risk of damage.
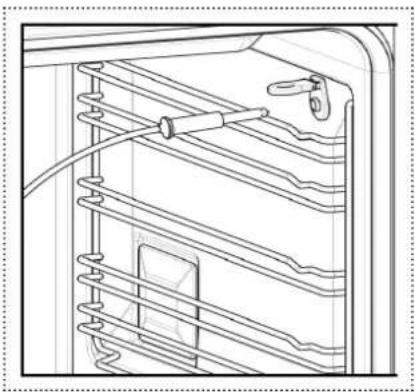
Connection
It is advisable to connect the probe jack before starting cooking and with the oven cold, in order to avoid burns.
▶ Make sure the jack is fitted properly in the connector, to ensure stability and a correct meat temperature reading.
It is advisable to connect the probe jack before starting cooking and with the oven cold, in order to avoid burns. ▶ Make sure the jack is fitted properly in the connector, to ensure stability and a correct meat temperature reading.
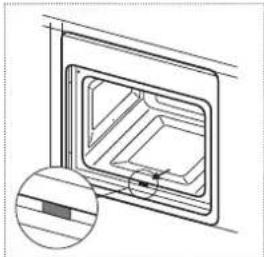
The probe connection point is shown in the figure.
natural_image
Line drawing of a refrigerator interior with coiled shelves and a handle (no text or symbols)▶ After connecting the probe, insert the tip in the meat and switch the oven on.
For a correct temperature reading, the probe must be inserted so that the tip is as close as possible to the centre of the meat.
▶ Select the cooking mode and temperature.
■ The icon 📄 all light up, indicating correct connection of the probe.
■ If the end of cooking message END appears immediately, it means that the jack is not fully inserted. Insert it properly.
The oven temperature selected must be suitable for the even cooking required (a temperature that is too high could burn the outside of the meat). Cooking is interrupted in any case when the meat probe detects the reaching of 65 °C inside the meat, regardless of the selected oven temperature. In fact, at this pre-set temperature the meat is cooked to medium. If a different type of cooking (rare or well-done) is required, this pre-set value can modified as follows:
▶ Press the area on the top of the display and select the symbol 📁 and confirm with . √
▶ Within 15 seconds scroll the values to increase or decrease the temperature. It is possible to select between 35 °C and 95 °C.
MANUAL COOKING PROGRAMS
| Program Description | |
 | HOT AIRThis DCT cooking function with less power (1500 Watts) is generally suited for a wide variety of dishes. Cooking times are elongated but heat distribution is optimal which guarantees excellent results at a low power consumption. |
 | TOP & BOTTOM HEATThis traditional function is ideal for all dishes, for baking bread and cakes and for cooking roasts and lamb. |
 | FAN ASSISTEDThis traditional function is used for flans, savoury pies, desserts and roasts of for cooking on two shelves. |
 | PIZZAThe heating elements are combined to create highly concentrated heat in the lower part of the oven. This function is ideal for cooking pizza which requires heating from below on a single shelf. Cooking is quick and perfect results are guaranteed (for preheating use RAPID HEATING and then switch on Pizza mode). |
 | RAPID HEATINGThis very powerful function exploits the DCT booster effect. High temperatures are reached in a short time. This function is suitable for traditional cooking of large pieces of meat (e.g., leg of lamb, roast suckling pig, pork/veal leg, oven-baked ham). |
 | MULTI COOKINGThis function uses all of the oven's heating elements (DCT and traditional). Unlike the COMPLETE MENU-function, this function creates heat predominantly in the lower part of the oven, which is ideal for cooking on 4 shelves (bread, 4 pizzas, savoury pies). |
 | COMPLETE MENUThe combination of DCT technology and traditional heating elements creates gradual heat distribution predominantly towards the upper shelf, which is ideal for cooking large quantities of food on 2-3 shelves. |
 | EASY BAKINGThis is the ideal function for novice cooks. The combination of DCT technology and traditional heating elements creates a balanced heat distribution, which allows a great variety of food to be cooked with limited instantaneous power absorption. |
 | GENTLE HEATThe temperature is adjustable between 50 and 230°C for cooking at low power (1000 Watts). Cooking times are longer which allows a very delicate and uniform cooking (e.g., cooking type “wellness”). This function is suitable for preheating the oven before inserting the prepared food. |
 | LOW TEMPERATUREThe low temperature function is ideal to cook food at low temperatures for a longer time, in order to preserve tenderness and organoleptic properties.You can cook meat, fish and vegetables, keeping the original flavor and nutritional values. |
Program Description

ENERGY SAVING
This function reduces the power consumption of the oven during cooking. This function is not suitable for all types of food. Recommended for soft heart cakes and with room temperature oven.

BBQ
Traditional grill and upper heating elements are assisted by the DCT. Heat is generated only in the upper part of the oven, radiating uniformly over the surface of the food. This function is suitable for tender or small pieces of meat and hamburger.

GRILL
This function uses the top grill only and is ideal for toasting bread and for browning meat or fish.

FAN GRILL
The heat is generated by the grill and distributed by the rear fan. Ideal for cooking large pieces of meat and poultry.

DEFROSTING
The set temperature is 25^ with the inside cooling fan switched on. This function is suitable for defrosting food slowly or to cool the oven down after cooking.

DOUGH RESTING
The set temperature is 30^ with the inside cooling fan switched off. This creates the ideal conditions for dough to rise.

PLATE WARMING
The set temperature is between 55^ C and 85^ C. This function is suitable for warming cooked but cold food or for keeping plates or food warm without affecting the cooking.

AUTO CLEAN
This function is only available on ovens with pyrolitic cleaning function, like FS913P. The oven heats up to 450^ Celsius and is automatically cleaned.
COOKING TABLE
The instructions in the cooking table are the result of cooking tests carried out by a team of professional chefs. They are given only as a guide and can be changed according to personal tastes.
Top & Bottom Heat, Fan Assisted, Grill and Fan Grill are standard cooking functions, you can refer to manual cooking programs for suggested dish for daily usage, you can use your knowledge for temperature, levels, time management.
| Function selected | Type of food or recipe Weight (kg) | Shelf position (level) | Preheating time (min.) | Temperature (°C) | Duration (minutes) | |
| GENTLE HEAT | Scallops | 0.5 | 3 or 4 | 8 | 170 | 17-20 |
| Vegetable pies 1 3 or 4 8 175 17-20 | ||||||
| Baked pasta dishes | 1.8 | 2 or 3 | 9.5 | 195 | 38-40 | |
| Cannelloni | 1.3 | 2 or 3 | 10 | 195 | 40-45 | |
| Roast beef | 1.3 | 2 or 3 | 10 | 195 | 70-74 | |
| Fish en papillote | 0.4 | 4 or 5 | 8 | 200 | 48-55 | |
| Biscuits | 0.8 | 2 or 3 | 8 | 165 | 40-45 | |
| Apple pie | 1.6 | 2 or 3 | 10 | 180 | 65-70 | |
| HOT AIR | Pizza by the slice | 1.3 | 4 or 3 | 7 | 200 | 40-45 |
| Baked vegetables | 1 | 2 or 3 | 8 | 190 | 20-25 | |
| Stuffed pancakes | 1.3 | 3 or 4 | 8 | 200 | 30-35 | |
| Hamburgers | 180 g | 3 or 4 | 8 | 180 | 10-12 | |
| Roast pork | 1.3 | 2 or 3 | 12 | 200 | 85-95 | |
| Bass | 0.8 | 3 or 4 | 8 | 200 | 38-48 | |
| Salt-crusted fish | 0.8 | 2 or 3 | 6 | 190 | 40-43 | |
| Tarts | 1.3 | 3 or 4 | 8.5 | 180 | 60-65 | |
| PIZZA | Bread | 1 | 2 or 3 | 8 | 180 | 25-30 |
| Thin-crust pizza | 0.2 | 2 or 3 | 8 | 190 | 8-15 | |
| Focaccia pizza | 1.3 | 2 or 3 | 10 | 185 | 20-23 | |
| Focaccia | 1.3 | 2 or 3 | 8 | 185 | 18-23 | |
| Toasted garlic bread | 0.4 | 4 or 5 | 10 | 190 | 9-13 | |
| EASY BAKING | Cannelloni | 1.3 | 2 or 3 | 10 | 195 | 35-45 |
| Baked Parmigiana dishes | 1.3 | 3 or 4 | 8.5 | 190 | 30-37 | |
| Meat & veg pie | 1.8 | 2 or 3 | 10 | 180 | 50-65 | |
| Vegetables au gratin | 1.2 | 2 or 3 or 4 | 7.5 | 195 | 20-23 | |
| Baked potatoes | 1.5 | 2 or 3 | 8 | 190 | 40-46 | |
| Gilt-head bream | 0.8 | 2 or 3 | 10 | 180 | 30-37 | |
| Rabbit (pieces) | 1.1 | 2 or 3 | 8 | 175 | 65-80 | |
| Loaf cake | 0.9 | 2 or 3 | 10 | 175 | 50-65 | |
| Function selected | Type of food or recipe | Weight (kg) | Shelf position (level) | Preheating time (min.) | Temperature (°C) | Duration (minutes) |
| COMPLETE MENU | Cheese pies | 0.8 | 2 or 3 | 6.5 | 180 | 23-28 |
| Vegetable pies | 1.5 | 2 or 3 | 8 | 190 | 35-40 | |
| Tomatoes au gratin | 9 pcs | 2 or 3 | 7.5 | 200 | 20-22 | |
| Roast veal | 1.3 | 1 or 2 or 3 | 8.5 | 190 | 105-115 | |
| Chicken | 0.4 | 2 or 3 | 7.5 | 200 | 28-35 | |
| Cod | 1.5 | 2 or 3 | 7.5 | 190 | 28-38 | |
| Monkfish | 0.7 | 2 or 3 | 8 | 190 | 23-28 | |
| Cream puffs | 0.9 | 2 or 3 | 6 | 200 | 13-18 | |
| MULTI COOKING | Large rustic cob loaf | 1.5 | 3 or 4 | 8 | 210 | 38-48 |
| Vegetable flan | 0.8 | 2 or 3 or 4 | 7.5 | 180 | 15-22 | |
| Baked pasta dishes | 1.3 | 2 or 3 | 9.5 | 190 | 32-40 | |
| Pilaf rice | 1 | 2 or 3 | 10 | 190 | 15-22 | |
| Swordfish | 0.8 | 2 or 3 | 8 | 200 | 30-35 | |
| Chicken pieces | 1 | 2 or 3 | 7.5 | 175 | 40-45 | |
| Croissants | 12 pcs | 3 or 4 | 6 | 180 | 15-20 | |
| Puff pastry | 0.8 | 2 or 3 or 4 | 6.5 | 165 | 18-22 | |
| RAPID HEATING | Courgettes au gratin | 1.4 | 1 or 2 or 3 | 6 | 190 | 15-19 |
| Tortellini au gratin | 1 | 2 or 3 | 5.5 | 175 | 17-23 | |
| Potato dumplings | 1.5 | 1 or 2 | 5 | 180 | 15-25 | |
| Meat kebabs | 1 | 1 or 2 or 3 | 8.5 | 190 | 22-28 | |
| Chicken wings | 1 | 2 or 3 | 7.5 | 175 | 18-23 | |
| Sausages | 15 pcs | 2 or 3 | 5.5 | 180 | 13-15 | |
| Chocolate Bonet dessert | 9 pcs | 2 or 3 | 3 | 210 | 7-9 | |
| Muffins | 9 pcs | 1 or 2 | 4.5 | 190 | 15-22 | |
| BBQ | Omelette | 1.8 | 2 or 3 | 4 | 190 | 22-45 |
| Fish pie | 1.8 | 2 or 3 or 4 | 5.5 | 185 | 30-32 | |
| Goat skewers | 1 | 2 or 3 | 6 | 200 | 8-15 | |
| Pork ribs | 1.8 | 1 or 2 | 8 | 195 | 32-42 | |
| Hamburgers | 180 g | 1 or 2 or 3 | 3 | 195 | 6-8 | |
| Trout | 0.8 | 1 or 2 or 3 | 6.5 | 200 | 37-42 | |
| Sweet stuffed pancakes | 12 pcs | 1 or 2 | 5.5 | 190 | 7-15 | |
| Mini croissants | 12 pcs | 1 or 2 | 4 | 185 | 15-17 | |
COOKING TESTED
- In accordance with the Standard EN / IEC 60350 These tables have been created for the controlling authorities in order to facilitate the examination and testing of the various devices.
How to read the cooking table
The table suggests the ideal function to use for a particular food cooked on one or more shelves simultaneously.
The cooking times refer to the introduction of the food in the oven, excluding preheating (if required). Temperatures and cooking times are approximate values and depend on the quality of food and the type of accessory.
Initially use the recommended values and, if the cooking result is not as expected, increase or decrease the time. We recommend using the supplied accessories, enamel trays and trays made of dark metal. Follow the selection table which lists the supplied items to be placed on different shelves.
The indicated levels refer to the shelves without sliding guides (please remove).
Cooking different foods at the same time
Using the recommended ventilated functions, it is possible to cook on different shelves simultaneously. When cooking on a single shelf you can also use the static function.
| Recipe Function Pre- | heating | Level (from bottom to top) | Temperature (°C) | Time (min.) | Accessories / Notes | |
| Shortbread TOP/BOTTOM HEAT | ✓ | 4 160 22–26 | Level 4: enamel baking tray | |||
| EASY BAKING | ✓ | 1–3 | 150 | 32–38 Level 1: enamel roasting trayLevel 3: enamel baking tray | ||
| Small cakes TOP/BOTTOM HEAT | ✓ | 3 | 170 | 33–38 | Level 3: enamel roasting tray | |
| EASY BAKING | ✓ | 3 | 150 | 24–28 Level 4: enamel roasting trayLevel 3: enamel roasting tray | ||
| FAN ASSISTED | ✓ | 3–5 | 140 | 28–35 Level 3: enamel baking trayLevel 5: enamel roasting tray | ||
| Spongecake made without added fat | TOP/BOTTOM HEAT | ✓ | 2 | 170 | 43–48 | Level 2: baking tin on rack |
| EASY BAKING | ✓ | 2 | 170 | 28–32 | Level 2: baking tin on rack | |
| Apple pie | TOP/BOTTOM HEAT | ✓ | 1 190 60–70 | Level 1: baking tin on rack | ||
| MULTICOOKING | ✓ | 1 | 180 | 50–55 | Level 1: baking tin on rack | |
| Two apple pies | MULTICOOKING | ✓ | 1 | 180 | 50–55 | Level 1: 2 baking tins on rack |
| Leavened cakes | TOP/BOTTOM HEAT | ✓ | 2 | 165 | 25–30 | Level 2: baking tin on rack |
| EASY BAKING | ✓ | 2 | 165 | 28–35 | Level 2: baking tin on rack | |
| Grill cooking | If cooking foods directly on the rack, place the enamel tray on the shelf below.This will collect cooking residues and keep the oven clean. | |||||
| Toasted sandwich | GRILL | ✓(5 min.) | 5 Level 4 2–3 | Level 5: rack | Keep the door closed for the entire cooking time. | |
| Burgers | BBQ | no | 4 | 200 | 20 | Level 4: rackLevel 3: enamel baking/roasting trayTurn food after 10 min. |
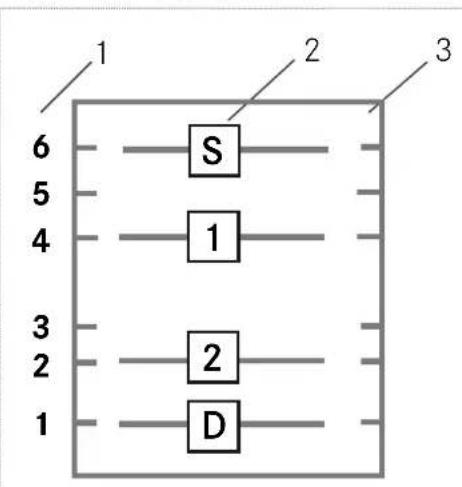
COMPLETE MENU PROGRAMS
flowchart
graph TD
    A["1"] --> B["S"]
    C["2"] --> D["1"]
    E["3"] --> F["2"]
    G["4"] --> H["D"]
    I["5"] --> J["1"]
    K["6"] --> L["2"]
    M["7"] --> N["1"]
1 Runners
2 Shelf position
3 Oven chamber
Example:
S Starter
1 1st Course
2 2nd Course
D Dessert
Information about weight and position: on website: http://recipes.franke.com
Complete Meat Menu
Meat Menu 1
| Food Recipes Shelf | position | Total cooking time | Weight (recipe) | Franke accessory to be used | |
| Starter | SAVOURY GRUYERE PROFITEROLES | 6 28 min | n20 300 g | Enamel baking tray | |
| 1st course | BEEF CANELONI | 4 | 41 min | 1100 g | Baking tin on grill |
| Dessert | CHOCOLATE CHILLI CAKE | 1 | 51 min | 800 g | Baking tin on enamel roasting tray |
| 2nd course | STUFFED GUINEA FOWL | 2 | 98 min | 1450 g | Baking tin on grill |
Meat Menu 2
| Food Recipes | Shelf | position | Total cooking time | Weight (recipe) | Franke accessory to be used |
| Starter | STUFFED COURGETTES | 6 | 18 min | n16 700 g | Enamel baking tray |
| Dessert | APPLE PIE | 1 | 34 min | 800 g | Baking tin on enamel roasting tray |
| 1st course | LASAGNE WITH PESTO | 4 | 44 min | 1600 g | Baking tin on grill |
| 2nd course | CHICKEN MEATLOAF WITH PEAS & ASPARAGUS | 2 | 54 min | 1100 g | Baking tin on grill |
Meat Menu 3
| Food | Recipes | Shelf position | Total cooking time | Weight (recipe) | Franke accessory to be used |
| Starter | FENNEL GRATIN | 6 | 22 min | 800 g | Baking tin on grill |
| 1st course | GNOCCHI | 4 | 29 min | 650 g | Baking tin on grill |
| Dessert | PLUM TART | 1 | 51 min | 580 g | Baking tin on enamel roasting tray |
| 2nd course | WILD BOAR IN SAUCE | 3 | 55 min | 900 g | Enamel baking tray |
Meat Menu 4
| Food Recipes Shelf | position | Total cooking time | Weight (recipe) | Franke accessory to be used | |
| Starter | SPINACH FLAN | 6 | 19 min | 800 g | Baking tin on grill |
| 1st course | PATE WITH POLENTA & VEGETABLES | 4 | 25 min | 1200 g | Baking tin on grill |
| 2nd course | TURKEY STUFFED WITH ASPARAGUS | 3 | 29 min | 870 g | Enamel baking tray |
| Dessert | SWEET FOCACCIA | 1 | 32 min | 1100 g | Baking tin on enamel roasting tray |
Meat Menu 5
| Food Recipes | Shelf | position | Total cooking time | Weight (recipe) | Franke accessory to be used |
| Starter | STUFFED COURGETTE FLOWERS | 6 | 17 min | 600 g | Baking tin on grill |
| 1st course | PAPPARDELLE PASTA WITH COURGETTES | 4 | 23 min | 1100 g | Baking tin on grill |
| 2nd course | ROAST VEAL | 3 | 28 min | 900 g | Enamel baking tray |
| Dessert | RICOTTA CINNAMON PUDDING | 1 | 41 min | 850 g | Baking tin on enamel roasting tray |
Meat Menu 6
| Food | Recipes | Shelf position | Total cooking time | Weight (recipe) | Franke accessory to be used |
| Starter | POTATO BASKETS | 6 | 23 min | 800 g | Enamel baking tray |
| 1st course | STUFFED PASTA | 4 | 38 min | 1100 g | Baking tin on grill |
| Dessert | CHESTNUT CAKE | 1 | 38 min | 900 g | Baking tin on grill |
| 2nd course | LEG OF LAMB | 3 | 78 min | 800 g | Enamel roasting tray |
Meat Menu 7
| Food Recipes | Shelf | position | Total cooking time | Weight (recipe) | Franke accessory to be used | |
| Starter | STUFFED PEPPERS | 6 | 25 min | 600 g | Baking tin on grill | |
| 1st course | EGG NOODLES WITH HAM & CHEESE | 4 | 34 min | 1300 g | Baking tin on grill | |
| Dessert | GERMAN CAKE | 1 | 54 min | 850 g | Baking tin on enamel roasting tray | |
| 2nd course | CHICKEN WITH RAISINS | 3 | 79 min | 1450 g | Enamel baking tray | |
Meat Menu 8
| Food Recipes | Shelf | Total cooking time | Weight (recipe) | Franke accessory to be used | |
| position | |||||
| Starter | OLIVE TOFU DUMPLINGS | 6 | 28 min | 850 g | Enamel baking tray |
| 1st course | MEAT FILLED PASTA | 4 | 35 min | 1100 g | Baking tin on grill |
| 2nd course | ROAST VEAL | 2 | 38 min | 900 g | Baking tin on grill |
| Dessert | MARBLE CAKE | 1 | 65 min | 1326 g | Baking tin on enamel roasting tray |
Complete Meat Menu - low energy
Meat Menu 1 - low energy
| Food Recipes Shelf | position | Total cooking time | Weight (recipe) | Franke accessory to be used | |
| Starter | SAVOURY GRUYERE PROFITEROLES | 6 | 45 min | n20 300 g | Enamel baking tray |
| 1st course | BEEF CANELONI | 4 | 58 min | 1100 g | Baking tin on grill |
| Dessert | CHOCOLATE CHILLI CAKE | 1 | 65 min | 800 g | Baking tin on enamel roasting tray |
| 2nd course | STUFFED GUINEA FOWL | 2 | 98 min | 1450 g | Baking tin on grill |
Meat Menu 2 - low energy
| Food Recipes | Shelf | Total cooking time | Weight (recipe) | Franke accessory to be used | |
| position | |||||
| Starter | STUFFED COURGETTES | 6 | 45 min | n16 700 g | Enamel baking tray |
| Dessert | APPLE PIE | 1 | 56 min | 800 g | Baking tin on enamel roasting tray |
| 1st course | LASAGNE WITH PESTO | 4 | 70 min | 1600 g | Baking tin on grill |
| 2nd course | CHICKEN MEATLOAF WITH PEAS & ASPARAGUS | 2 | 82 min | 1100 g | Baking tin on grill |
Meat Menu 3 - low energy
| Food Recipes | Shelf | Total cooking time | Weight (recipe) | Franke accessory to be used | |
| position | |||||
| Starter | FENNEL GRATIN | 6 | 45 min | 800 g | Baking tin on grill |
| 1st course | GNOCCHI | 4 | 45 min | 650 g | Baking tin on grill |
| Dessert | PLUM TART | 1 | 60 min | 580 g | Baking tin on enamel roasting tray |
| 2nd course | WILD BOAR IN SAUCE | 3 | 74 min | 900 g | Enamel baking tray |
Meat Menu 4 - low energy
| Food Recipes | Shelf | position | Total cooking time | Weight (recipe) | Franke accessory to be used | |
| Starter | SPINACH FLAN | 6 | 38 min | 800 g | Baking tin on grill | |
| 1st course | PATE WITH POLENTA & VEGETABLES | 4 | 52 min | 1200 g | Baking tin on grill | |
| 2nd course | TURKEY STUFFED WITH ASPARAGUS | 3 | 56 min | 870 g | Enamel baking tray | |
| Dessert | SWEET FOCACCIA | 1 | 56 min | 1100 g | Baking tin on enamel roasting tray | |
Meat Menu 5 - low energy
| Food Recipes | Shelf | position | Total cooking time | Weight (recipe) | Franke accessory to be used |
| Starter | STUFFED COURGETTE FLOWERS | 6 | 43 min | 600 g | Enamel baking tray |
| 1st course | PAPPARDELLE PASTA WITH COURGETTES | 4 | 48 min | 1100 g | Baking tin on grill |
| 2nd course | ROAST VEAL | 3 | 56 min | 900 g | Baking tin on grill |
| Dessert | RICOTTA CINNAMON PUDDING | 1 | 58 min | 850 g | Baking tin on enamel roasting tray |
Meat Menu 6 - low energy
| Food Recipes Shelf | position | Total cooking time | Weight (recipe) | Franke accessory to be used | |
| Dessert | CHESTNUT CAKE | 1 | 42 min | 900 g | Baking tin on enamel roasting tray |
| Starter | POTATO BASKETS | 6 | 49 min | 800 g | Enamel baking tray |
| 1st course | STUFFED PASTA | 4 | 60 min | 1100 g | Baking tin on grill |
| 2nd course | LEG OF LAMB 3 96 min 800 g Baking tin on grill | ||||
Meat Menu 7 - low energy
| Food Recipes | Shelf | position | Total cooking time | Weight (recipe) | Franke accessory to be used | |
| Starter | STUFFED PEPPERS | 6 | 52 min | 600 g | Enamel baking tray | |
| 1st course | EGG NOODLES WITH HAM & CHEESE | 4 | 65 min | 1300 g | Baking tin on grill | |
| Dessert | GERMAN CAKE | 1 | 65 min | 850 g | Baking tin on enamel roasting tray | |
| 2nd course | CHICKEN WITH RAISINS | 3 | 86 min | 1450 g | Baking tin on grill | |
Meat Menu 8 - low energy
| Food Recipes | Shelf | position | Total cooking time | Weight (recipe) | Franke accessory to be used |
| Starter | OLIVE TOFU DUMPLINGS | 6 | 56 min | 850 g | Enamel baking tray |
| 1st course | MEAT FILLED PASTA | 4 | 58 min | 1100 g | Baking tin on grill |
| 2nd course | ROAST VEAL | 2 | 58 min | 900 g | Baking tin on enamel roasting tray |
| Dessert | MARBLE CAKE | 1 | 65 min | 1326 g | Baking tin on grill |
Complete Fish Menu
Fish Menu 1
| Food Recipes Shelf | position | Total cooking time | Weight (recipe) | Franke accessory to be used | |
| Starter | SWORDFISH SKEWERS | 6 | 22 min | 600 g | Enamel baking tray |
| 1st course | PASTA WITH RADICCHIO & PRAWNS | 4 | 27 min | 1200 g | Baking tin on grill |
| Dessert | PEAR TART | 1 | 44 min | 950 g | Baking tin on grill |
| 2nd course | SEA BASS IN FOIL | 2 | 50 min | 800 g | Baking tin on grill |
Fish Menu 2
| Food Recipes | Shelf | position | Total cooking time | Weight (recipe) | Franke accessory to be used | |
| Starter | SALMON TART | 6 | 35 min | 1200 g | Enamel baking tray | |
| 1st course | FISH PIE | 4 | 41 min | 1200 g | Baking tin on grill | |
| Dessert | TORTA MARGHERITA | 1 | 45 min | 890 g | Baking tin on enamel roasting tray | |
| 2nd course | GILTHEAD BREAM IN FOIL | 2 | 45 min | 800 g | Baking tin on grill | |
Fish Menu 3
| Food Recipes Shelf | position | Total cooking time | Weight (recipe) | Franke accessory to be used | |
| Starter | STUFFED ANCHOVIES | 6 | 25 min | 400 g | Enamel baking tray |
| 2nd course | ROLLS OF SOLE | 2 | 32 min | 600 g | Baking tin on grill |
| 1st course | TIMBALE OF VERMICELLI | 4 | 46 min | 1300 g | Baking tin on grill |
| Dessert | YOGHURT CAKE 1 46 min 680 g Baking tin on enamel roasting tray | ||||
Fish Menu 4
| Food Recipes Shelf | position | Total cooking time | Weight (recipe) | Franke accessory to be used | |
| Starter | COD WITH ARTICHOKES | 6 | 24 min | 900 g | Enamel baking tray |
| Dessert | HONEY CAKE | 1 | 30 min | 800 g | Baking tin on enamel roasting tray |
| 1st course | SPAGHETTI BAKED IN PAPER | 4 | 34 min | 1200 g | Baking tin on grill |
| 2nd course | BREAM WITH CAPERS | 3 | 45 min | 800 g | Baking tin on grill |
Fish Menu 5
| Food Recipes | Shelf | position | Total cooking time | Weight (recipe) | Franke accessory to be used | |
| Dessert | PINEAPPLE TART | 1 | 22 min | 300 g | Baking tin on enamel roasting tray | |
| Starter | FRIED ARTICHOKES | 6 | 29 min | 500 g | Baking tin on grill | |
| 1st course | RISOTTO WITH SCAMPI & MUSHROOMS | 4 | 32 min | 1100 g | Baking tin on grill | |
| 2nd dishes | CALAMARI WITH PEAS | 3 | 40 min | 900 g | Enamel baking tray | |
Fish Menu 6
| Food Recipes | Shelf | position | Total cooking time | Weight (recipe) | Franke accessory to be used | |
| Starter | SALT COD BALLS | 6 | 21 min | 600 g | Enamel baking tray | |
| 1st course | LASAGNE WITH SEAFOOD & PEAS | 4 | 38 min | 1300 g | Baking tin on grill | |
| 2nd course | JOHN DORY | 3 | 42 min | 1100 g | Baking tin on grill | |
| Dessert | LEMON CAKE | 1 | 48 min | 800 g | Baking tin on enamel roasting tray | |
Fish Menu 7
| Food Recipes Shelf | position | Total cooking time | Weight (recipe) | Franke accessory to be used | |
| Starter | GROUSE | 6 | 14 min | 400 g | Enamel baking tray |
| 2nd course | STUFFED SALMON | 3 | 22 min | 800 g | Baking tin on grill |
| Dessert | CITRUS FRUIT TART | 1 | 36 min | 700 g | Baking tin on enamel roasting tray |
| 1st course | RICE, POTATOES & MUSSELS | 4 | 42 min | 1400 g | Baking tin on grill |
Fish Menu 8
| Food Recipes Shelf | position | Total cooking time | Weight (recipe) | Franke accessory to be used | |
| Starter | SCALLOPS WITH LEEKS | 6 | 24 min | 550 g | Baking tin on grill |
| 1st course | SEAFOOD TAGLIATELLE | 4 | 28 min | 750 g | Baking tin on grill |
| 2nd course | SCORPIONFISH IN SAUCE | 2 | 34 min | 700 g per 2 p.z | Enamel baking tray |
| Dessert | LEMON TART 1 34 min 600 g Baking tin on enamel roasting tray | ||||
Complete Fish Menu - low energy
Fish Menu 1 - low energy
| Food Recipes | Shelf | Total cooking time | Weight (recipe) | Franke accessory to be used | |
| position | |||||
| Starter | SWORDFISH SKEWERS | 6 | 42 min | 600 g | Enamel baking tray |
| 1st course | PASTA WITH RADICCHIO & PRAWNS | 4 | 50 min | 1200 g | Baking tin on grill |
| Dessert | PEAR TART | 1 | 52 min | 950 g | Baking tin on enamel roasting tray |
| 2nd course | SEA BASS IN FOIL | 2 | 65 min | 800 g | Baking tin on grill |
Fish Menu 2 - low energy
| Food Recipes | Shelf | position | Total cooking time | Weight (recipe) | Franke accessory to be used | |
| Dessert | TORTA MARGHERITA | 1 | 50 min | 890 g | Baking tin on enamel roasting tray | |
| Starter | SALMON TART | 6 | 53 min | 1200 g | Enamel baking tray | |
| 1st course | FISH PIE | 4 | 57 min | 1200 g | Baking tin on grill | |
| 2nd course | GILTHEAD BREAM IN FOIL | 2 | 59 min | 800 g | Baking tin on grill | |
Fish Menu 3 - low energy
| Food Recipes | Shelf | position | Total cooking time | Weight (recipe) | Franke accessory to be used | |
| Starter | STUFFED ANCHOVIES | 6 | 48 min | 400 g | Enamel baking tray | |
| 2nd course | ROLLS OF SOLE | 2 | 48 min | 600 g | Baking tin on grill | |
| Dessert | YOGHURT CAKE | 1 | 54 min | 680 g | Baking tin on enamel roasting tray | |
| 1st course | TIMBALE OF VERMICELLI | 4 | 57 min | 1300 g | Baking tin on grill | |
Fish Menu 4 - low energy
| Food | Recipes | Shelf position | Total cooking time | Weight (recipe) | Franke accessory to be used |
| Starter | COD WITH ARTICHOKES | 6 | 45 min | 900 g | Enamel baking tray |
| Dessert | HONEY CAKE | 1 | 48 min | 800 g | Baking tin on enamel roasting tray |
| 1st course | SPAGHETTI BAKED IN PAPER | 4 | 59 min | 1200 g | Baking tin on grill |
| 2nd course | BREAM WITH CAPERS | 3 | 62 min | 800 g | Baking tin on grill |
Fish Menu 5 - low energy
| Food Recipes Shelf | position | Total cooking time | Weight (recipe) | Franke accessory to be used | |
| Dessert Starter | PINEAPPLE TART | 1 | 32 min | 300 g | Baking tin on enamel roasting tray |
| Starter | FRIED ARTICHOKES 6 48 min 500 g Baking tin on grill | ||||
| 1st course | RISOTTO WITH SCAMPI & MUSHROOMS | 4 54 min | 1100 g Baking tin on grill | ||
| 2nd course | CALAMARI WITH PEAS | 3 | 62 min | 900 g | Enamel baking tray |
Fish Menu 6 - low energy
| Food Recipes Shelf | position | Total cooking time | Weight (recipe) | Franke accessory to be used | |
| Starter | SALT COD BALLS | 6 | 39 min | 600 g | Enamel baking tray |
| 1st course | LASAGNE WITH SEAFOOD & PEAS | 4 | 54 min | 1300 g | Baking tin on grill |
| 2nd course Dessert | JOHN DORY | 3 | 54 min | 1100 g | Baking tin on grill |
| Dessert | LEMON CAKE | 1 54 min | 800 g Baking tin on enamel roasting tray | ||
Fish Menu 7 - low energy
| Food Recipes Shelf | position | Total cooking time | Weight (recipe) | Franke accessory to be used | |
| Starter | GROUSE | 6 | 32 min | 400 g | Enamel baking tray |
| 2nd course | STUFFED SALMON | 3 | 35 min | 800 g | Baking tin on grill |
| Dessert | CITRUS FRUIT TART | 1 | 53 min | 700 g | Baking tin on enamel roasting tray |
| 1st course | RICE, POTATOES & MUSSELS | 4 | 58 min | 1400 g | Baking tin on grill |
Fish Menu 8 - low energy
| Food | Recipes | Shelf position | Total cooking time | Weight (recipe) | Franke accessory to be used |
| Starter | SCALLOPS WITH LEEKS | 6 | 45 min | 550 g | Enamel baking tray |
| 1st course | SEAFOOD TAGLIATELLE | 4 | 50 min | 750 g | Baking tin on grill |
| Dessert | LEMON TART | 1 | 50 min | 600 g | Baking tin on enamel roasting tray |
| 2nd course | SCORPIONFISH IN SAUCE | 2 | 59 min | 700 g per 2 p.z | Baking tin on grill |
Complete menu 4 Pizzas and Bread
Menu 4 Pizzas
| Food Recipes Shelf | position | Total cooking time | Weight (recipe) | Franke accessory to be used | |
| 1 | PIZZA MARGHERITA | 6 | 28 min | 400 g | Enamel baking tray |
| 2 | PIZZA WITH BACON AND OLIVES | 4 | 28 min | 400 g | on grill |
| 3 | PIZZA WITH TUNA AND ONIONS | 2 | 28 min | 400 g | on grill |
| 4 | PIZZA WITH VEGETABLES 1 25 min 400 g Enamel roasting tray | ||||
Menu Bread
| Food Recipes Shelf | position | Total cooking time | Weight (recipe) | Franke accessory to be used | |
| 1 | BREAD / PIZZA | 6 | 25 min | 500 g | Enamel baking tray |
| 2 | BREAD / PIZZA | 4 | 27 min | 500 g | on grill |
| 3 | BREAD / PIZZA | 2 | 27 min | 500 g | on grill |
| 4 | BREAD / PIZZA | 1 | 27 min | 500 g | Enamel roasting tray |
Complete menu 4 Pizzas and Bread - low energy
Menu 4 Pizzas
| Food Recipes | Shelf position | Total cooking time | Weight (recipe) | Franke accessory to be used | |
| 1 | PIZZA WITH BLACK OLIVES 6 38 min | 400 g Enamel baking tray | |||
| 2 | PIZZA WITH HAM AND MUSHROOMS | 1 | 38 min | 400 g | Enamel roasting tray |
| 3 | PIZZA WITH VEGETABLES | 2 | 38 min | 400 g | on grill |
| 4 | PIZZA WITH TUNA AND ONIONS | 4 | 38 min | 400 g | on grill |
Menu Bread
| Food Recipes | Shelf position | Total cooking time | Weight (recipe) | Franke accessory to be used | |
| 1 | BREAD / PIZZA | 1 | 49 min | 500 g | Enamel roasting tray |
| 2 | BREAD / PIZZA | 2 | 49 min | 500 g | on grill |
| 3 | BREAD / PIZZA | 4 | 53 min | 500 g | on grill |
| 4 | BREAD / PIZZA | 6 | 55 min | 500 g | Enamel baking tray |
Menu Wellness
| Food Recipes | Shelf position | Total cooking time | Weight (recipe) | Franke accessory to be used | |
| 1 | LAMB/PORK/SHEEP | 3 | 194 min | 1550 g | Enamel baking tray |
| 3 | FISH | 3 | 92 min | 1100 g | Enamel baking tray |
| 2 | POULTRY | 3 | 138 min | 600 g | Enamel baking tray |
| 4 | VEAL | 3 | 195 min | 1100 g | Enamel baking tray |
| 5 | VEGETABLES | 3 | 75 min | 900 g | Enamel baking tray |
CLEANING AND CARE
Before performing any cleaning and care:
Read the general safety information about cleaning in the chapter "safety information".
▷ Turn the oven off.
- Depending on how the oven is installed: Unplug the oven or disconnect the power at the main electrical system switch, e.g., switch off the fuse of the oven in the fuse box.
General recommendations
Stains on the base of the oven from various cooking products (sauces, sugar, proteins and fat) are always caused by spills and splashes. Splashes occur during cooking and are usually the result of cooking at too high temperatures. Spills occur when using cooking dishes which are too small, or due to an incorrect estimate of increases in volume during cooking. These problems can be avoided by using deep cooking receptacles or by using the enamel trays supplied with the oven.
The stainless steel and enamelled parts of the oven will remain as good as new if cleaned regularly with water or special detergents.
▷ Ensure that the oven is cold before you start cleaning.
Do not use steam cleaners or direct jets of water.
Do not use coarse abrasive materials or sharp metal scrapers to clean the glass parts of the oven door. They could scratch the surface and cause the glass to shatter.
▷ Never use scouring pads, steel wool, muriatic acid or other products which could scratch or mark the surface.
▷ Only use hot water and non-abrasive detergents when cleaning the enamelled surfaces and the oven chamber.
▷ Use a branded glass cleaner for the glass.
Using the auto clean function
This function is only available on ovens with pyrolitic cleaning function, like FS913P.
The AUTO CLEAN function turns oven cleaning into a quick, easy and instant procedure. The temperature reached in the cooking compartment (450°C) carbonizes all food and fat residue. During this process, some particles of residue may glow; this is a normal phenomenon due to instantaneous combustion.
If the AUTO CLEAN function is activated, the oven door is locked after the first two minutes cycles and cannot be opened. The padlock icon lights up.
The obscuring of the LCD display during the pyrolitic cleaning process is a precautionary display protection feature caused by the high temperatures in use.
We recommend to start the cleaning cycle always with room temperature oven.
Before cleaning
Accessories left in the oven may hinder the correct circulation of heat on all the walls or may be damaged due to the high temperatures.
Remove all accessories (enamel trays, racks, runners, telescopic guides).
Do not leave anything inside the oven.
▷ Remove food residues using a moist sponge.
▷ Never use detergents or any other specific cleaning product.
Do not obstruct the circulation of air in the area in front of the oven.
Do not leave anything on the door handle.
The surfaces may become very hot during pyrolytic cleaning process.
▷ Keep children away.
▶ Clean the internal glass panel with a mixture of water and soap.
▶ Start the AUTO CLEAN function at the display.
After cleaning
▶ Clean the internal glass panel with a glass cleaner.
▶ Dry all parts of the oven thoroughly after cleaning.
Cleaning the oven chamber
It is easier to remove any stains while the oven is still warm and while the stains are still new.
▷ Ensure the oven is cool to the touch, to avoid burns.
▶ Clean the enamelled surfaces and the oven chamber with hot water and non-abrasive detergents.
▶ Dry all parts of the oven thoroughly after cleaning.
Cleaning the oven door
▷ Ensure that the oven is cold before you start cleaning.
To facilitate oven cleaning, the oven door can be removed (see chapter „Removing the oven door“).
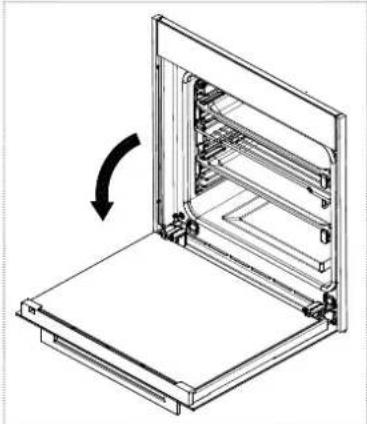
Removing the oven door
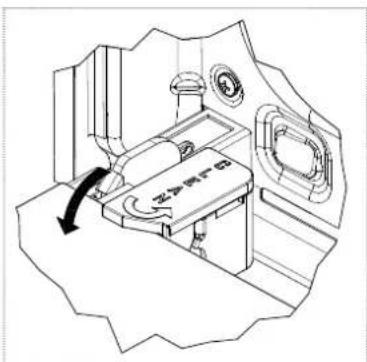
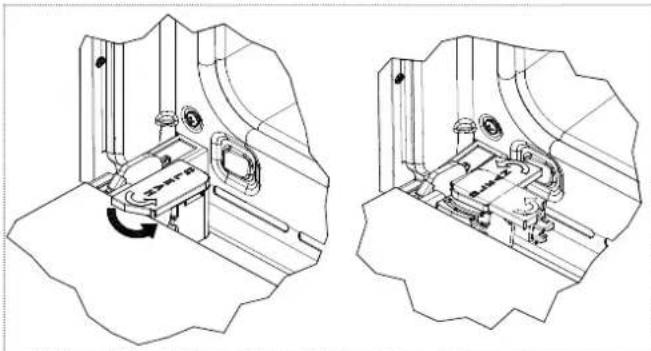
▶ Open the oven door completely.
natural_image
Isometric line drawing of a mechanical device with a curved arrow indicating rotation (no text or symbols)The hinges are equipped with two moveable locks.
▶ To release the hinge lift the lock and hold the door at the sides near the hinges.
▶ Turn the two block hooks down.
text_image
Technical diagram of a mechanical device with labeled components and an arrow indicating rotation or assembly.▶ Ensure that the block hooks are turned down completely.
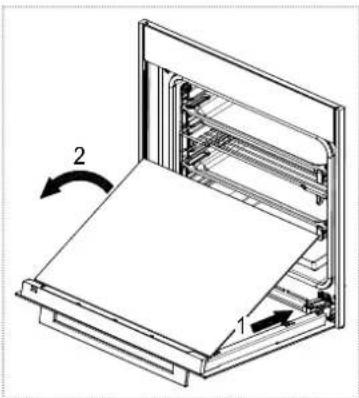
▶ Close the door halfway.
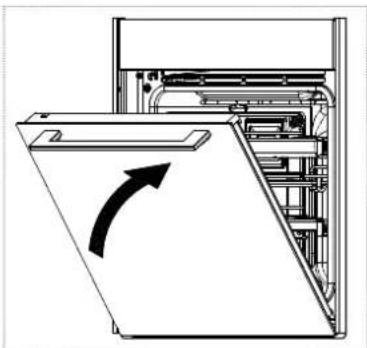
natural_image
Diagram of an open computer case with a directional arrow indicating rotation (no text or symbols present)▶ Pull the door outwards.
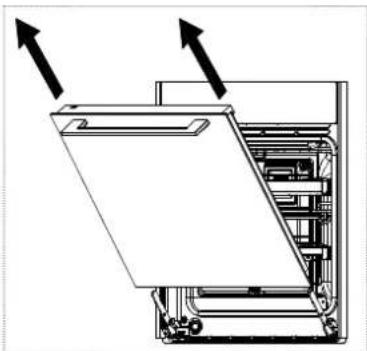
natural_image
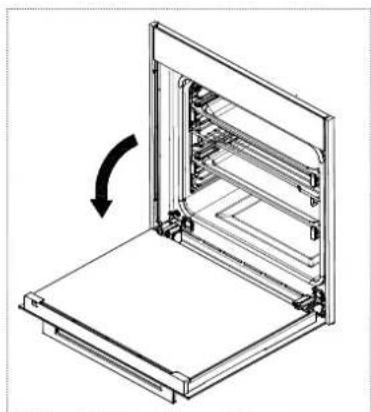
Diagram of a computer monitor with an open panel and directional arrows indicating orientation (no text or symbols)Mounting the oven door
After cleaning, the oven door has to be mounted again.
▶ Slide the hinges into their grooves.
▶ Turn the two block hooks (used as hinge attachments) upwards.
CAUTION! Damage to the oven due to wrong handling!
▷ Never try closing the door when one or both blocks are partially or completely open.
▶ Close the oven door.
Cleaning the glass panels of the oven door
The oven door and the glass panels can be removed to enable thorough cleaning of the glass panel.
The oven door has 3 glass panels, 4 glass panels for pyro model FS 913 P (intermediate glass panel):
- internal glass panel (near the cavity)
- intermediate glass panel (inside the oven door)
- external glass panel
The internal glass panel and the intermediate glass panel can be removed for cleaning purposes.
The inside of the external glass panel can be cleaned when the internal and the intermediate glass panel are removed.
Removing and cleaning the internal glass panel from the oven door
▷ Ensure that the oven is cold before you start cleaning.
▶ Open the oven door completely.
natural_image
Technical line drawing of a 3D cabinet or rack unit with an arrow indicating rotation (no text or symbols present)▶ Turn the two black blocks (with the word CLEAN, at the bottom of the door) for 180^ so that they fit into the seats in the oven structure.
natural_image
Technical line drawing of a mechanical assembly with two views (top and side), showing internal components and motion indicators (no text or symbols)- Make sure to turn the black blocks completely.
■ The blocks click into their position.
CAUTION! Damage to the oven due to wrong handling!
If the blocks are not turned completely, removing the glass panel will cause the oven door to close immediately.
▷ Never try closing the door when one or both blocks have partially or completely freed the glass panel.
▶ Carefully push the internal glass panel (1) towards the oven. Then lift the internal glass panel (2).
■ The two black blocks will prevent the door from closing.
natural_image
Technical line drawing of a mechanical assembly with labeled components (no text or symbols)▶ Clean the internal glass panel.
Removing and cleaning the intermediate glass panel of the oven door
After removing the internal glass panel, the intermediate glass panel can be removed.
▶ Carefully lift the intermediate glass panel out of the rubbers on both sides.
▶ Clean the intermediate glass panel.
Removing and cleaning the upper trims for glass panels
For more thorough cleaning, the upper trims on the oven door can be removed. The upper trims are fixed with two screws, one in the upper right, one in the upper left corner on the inside of the oven door. It is only possible to remove the upper trims when the internal glass is removed.
▶ Unscrew the fixing screws in the upper right and left corner of the oven door.
▶ Remove the upper trim.
▶ Clean the upper trim.
Mounting the glass panels
The correct position of the mounted glass panels is indicated by the wording TEMPERED GLASS which must be perfectly legible.
▶ If unmounted, put the upper glass trim back in place.
▶ If unmounted, put the intermediate glass panel back in place within the rubbers.
▶ Put the internal glass panel back in place.
▶ Turn the two glass retaining blocks back to their original position.
▶ Close the oven door.
Cleaning the side frames and telescopic guides
To clean the side frames and telescopic guides thoroughly they can be removed from the oven.
Remove the telescopic guides
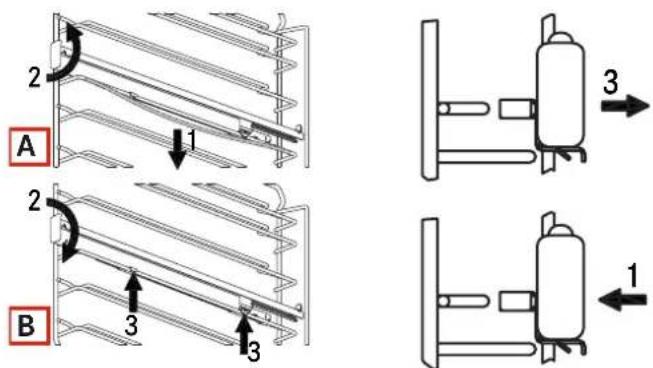
text_image
2 1 A 2 3 B 3 1Image A
▶ With the telescopic guide in closed position press down firmly (1) to the middle of the wire rack where the bottom side of the guide hooks.
▶ Turn the guide in a anticlockwise direction (2) and remove it from the grid floor (3).
Image B
▶ With the telescopic guide in open position, move forward the wire rack (1).
▶ Turn the guide in a clockwise direction (2) and hook it on the bottom shelf (3) pressing towards of the two hooks until you hear a click.
▶ Lift the telescopic guide (3) while pulling out (2) towards the other side of the oven.
▶ Remove the telescopic guides.
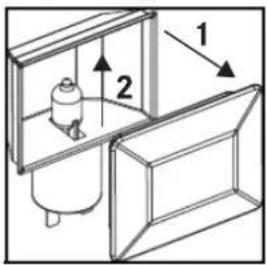
Remove the side frames

text_image
1 2 3▶ Bend the crosspiece which is engaged in the fixing bush downwards and remove it from the groove.
▶ Push the side frame upwards and remove it from the two upper hooks.
Cleaning
▶ Clean the side frames and the telescopic guides.
▶ After cleaning, keep the side frame tilted and insert the side frames into the two respective guides on the top.
▶ Bend the crosspiece which is engaged in the fixing bush upwards and insert it in the groove.
▶ Insert the telescopic guides.
Replacing the oven lamp
text_image
Technical diagram showing a mechanical assembly with labeled components and directional arrowsFranke ovens are equipped with two rectangular lamps. The replacement lamp must meet the following technical specifications:
- Temperature resistance: 300°C
- Voltage: 220-240 V, 50/60 Hz
- Power: 40 W
- Connection: G9
CAUTION! Damage to the lamp due to wrong handling!
▷ Avoid touching the lamps with bare hands.
▷ Use a cloth or a sheet of kitchen paper.
WARNING! Possibility of electric shock!
▷ Ensure that the oven is switched off before replacing the lamp.
WARNING! Electric shock due to wrong handling!
▷ Switch the oven off.
- Depending on how the oven is installed: Unplug the oven or disconnect the power at the main electrical system switch, e.g., switch off the fuse of the oven in the fuse box.
▶ Remove the glass cover by carefully prying it off with a flat-blade screwdriver.
▶ Remove the lamp from its holder.
▶ Replace the lamp.
▶ Reattach the glass cover.
MAINTENANCE AND REPAIR
▷ Make sure that maintenance on electrical components is carried out only by the manufacturer or the customer service.
▷ Make sure that damaged cables are changed only by the manufacturer or the customer service.
▶ When contacting the customer service, please provide the following information:
- type of fault
- appliance model (Art.)
- serial number (S.N.)
This information is given on the data plate.
Software version
This option contains technical information useful for the customer service in case of an intervention on the electronic control.
▶ Press

■ The SETUP menu with different options appears.
▶ Press SOFTWARE VERSION.
■ The software information appears.
Demo
The option can only be activated by service technicians.
The option allows to navigate the display functions without activating the heating elements. It is useful in situations such as fairs or product presentations.
DISPOSAL

The symbol on the product or on the packaging indicates that the device must not be disposed of in the domestic waste.
By disposing of the device in a proper way you help to avoid harmful consequences to environment and health.
Further information about recycling the device is available from the competent authority, the local refuse disposal service or the vendor of the device.
▷ Dispose of the device, which is to be discarded, via a specialised waste collection point for electronic and electrical devices.
In accordance with the Directive 2012/19/EU, regarding the reduction of the hazardous substances used in electrical and electronic appliances, and waste disposal.
The barred dustbin symbol on the appliance indicates that at the end of its working life the product must not be disposed of as household waste.
Consequently, when the appliance has reached the end of its working life the user must take it to a suitable recycling centre for electronic and electrotechnical waste, or return it to the dealer when purchasing a new appliance of equivalent type.
Proper separate waste collection of the scrapped appliance for subsequent recycling, treatment and environmentally-friendly disposal helps prevent a potentially negative impact on the environment and health and facilitates recycling of the materials used in appliance construction.
CUSTOMER SERVICE
▶ Refer to the contact address for your country on the back page or on our website:
- www.franke.com
TECHNICAL DATA
Product identification
Type: OE-9D
Model: FS 913 M / FS 913 P
▶ Refer to the data plate placed on the product.
natural_image
Technical line drawing of a door frame with internal shelves and a close-up inset showing a component detail (no text or symbols)The energy efficiency class (according to 2009 / 60350-50304 / EN) is determined by operating modes: Energy Saving and Statics.
To calculate the volume, if present, remove the inner side of the guide wire (according to regulations 2009 / 60350-50304 / EN).
Appliance operation is safe with and without tray guides.
Parameter Value
| Working dimensions of the oven (mm) | 480 x 370 x 405(W x H x D) |
| Power supply voltage and frequency | 220-240 V, 50/60 Hz |
Total power and fuse rating 2900 W, 16 A
Power and heating element values
| Radial motor 27 ... 40 W | |
| Light bulb 40 W (2x) | |
| Tangential fan 15 ... 35 W | |
| Roof 520 W / 124 V | |
| Floor 1250 W | |
| Grill 2100 W | |
| DCT heating elements | 2650 W |
| Parameter | Symbol | Value | Unit of measure |
| Model identification | FS-CR | 913-982 DCT | |
| Oven type | built-in | ||
| Appliance weight | M | 41 | kg |
| Number of cavities | 1 | ||
| Heat source of each cavity | electric | ||
| Volume of each cavity | V | 74 | l |
| Energy consumption required to heat a standard load in a cavity of an electric oven during a cycle in convection mode for each cavity | EC electric cavity | 1.12 | kWh/cycle |
| Energy consumption required to heat a standard load in a cavity of an electric oven during a cycle in forced air circulation mode for each cavity | EC electric cavity | 0.53 | kWh/cycle |
| Energy efficiency ratio for each cavity | EEI cavity | 61 | |
| Model identification FS 913 P DCT | |||
| Oven type built-in | |||
| Appliance weight M 43 kg | |||
| Number of cavities 1 | |||
| Heat source of each cavity electric | |||
| Volume of each cavity | V | 74 | l |
| Energy consumption required to heat a standard load in a cavity of an electric oven during a cycle in convection mode for each cavity | EC electric cavity | 1.12 | kWh/cycle |
| Energy consumption required to heat a standard load in a cavity of an electric oven during a cycle in forced air circulation mode for each cavity | EC electric cavity | 0.70 | kWh/cycle |
| Energy efficiency ratio for each cavity | EEI cavity | 81 | |
| The manufacturer provides continuously product enhancements. For this reason, the text and the illustrations in this manual may be changed without notice. Further information on technical data is available on: - www.franke.com |
INHALTSVERZEICHNIS
Einleitung 40
text_image
Technical diagram showing two views of an oven with labeled components, including a control panel and internal air duct.natural_image
Gray square button with vertical lines, no text or symbols visible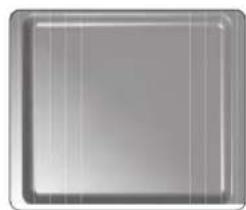
natural_image
Plain gray square with no text, symbols, or markingsBack-/Bratblech aus Emaille
natural_image
Pure diagram of a rectangular frame with horizontal lines inside, no text or symbols present.Rost
natural_image
Line drawing of a refrigerator interior with coiled shelves and a handle (no text or symbols)MANUELLE GARPROGRAMME
natural_image
Technical line drawing of a mechanical assembly with an arrow indicating rotation (no text or symbols present)natural_image
Technical line drawing of a mechanical device with a curved arrow indicating rotation (no text or symbols)natural_image
Diagram of a mechanical device showing internal components and an arrow indicating rotation (no text or symbols present)natural_image
Diagram of a refrigerator interior showing internal components and directional arrows (no text or symbols)Ofentür einbauen
natural_image
Technical line drawing of a mechanical assembly with an arrow indicating rotation (no text or symbols present)natural_image
Technical line drawing of a mechanical assembly with two views (top and side), showing internal components and no visible text or symbols.natural_image
Technical line drawing of a mechanical device with two labeled components (1 and 2), showing internal structure without any text or symbols.text_image
Technical diagram showing a mechanical assembly with labeled components 1 and 2, likely illustrating a gear or valve mechanism.natural_image
Technical line drawing of a door frame with an inset showing a small rectangular component (no text or symbols)text_image
Technical diagram of an oven with labeled components including control panel, door, and heaternatural_image
Plain gray square with a subtle gradient and faint vertical lines, no text or symbols present.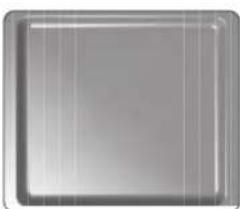
natural_image
Plain gray square with subtle shading and horizontal lines, no text or symbols present.natural_image
Pure diagram of a rectangular frame with horizontal lines inside, no text or symbols present.Grilles
PREMIÈRE MISE SOUS TENSION
natural_image
Line drawing of a refrigerator interior with coiled shelves and a handle (no text or symbols)Programme Description

CHALEUR TOURNANTE
VENTILATION ASSISTÉE
Programme Description

BASSE TEMPÉRATURE
natural_image
Technical line drawing of a mechanical assembly with an arrow indicating rotation (no text or symbols present)text_image
Technical diagram showing a mechanical assembly with labeled components and an arrow indicating rotation or movement.natural_image
Diagram of a device interior showing a curved arrow indicating rotation or movement (no text or symbols present)natural_image
Technical line drawing of a mechanical assembly with two arrows indicating direction (no text or symbols present)natural_image
Technical line drawing of a mechanical assembly with an arrow indicating rotation (no text or symbols present)natural_image
Technical line drawing of two mechanical assembly views showing internal components and motion indicators (no text or symbols)natural_image
Technical line drawing of a mechanical assembly with labeled components (no text or symbols)text_image
Technical diagram showing a mechanical assembly with labeled components and directional arrowsnatural_image
Technical line drawing of a door frame with internal structure and a magnified inset showing a component detail (no text or symbols)Koken in wellness modus 125
text_image
Technical diagram showing labeled components of a kitchen appliance, including front and side views with numbered parts.natural_image
Plain gray square button with no text or symbols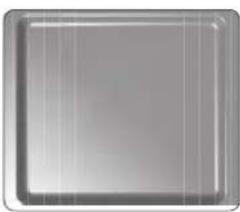
natural_image
Plain gray square object with no visible text, symbols, or markingsnatural_image
Pure diagram of a rectangular frame with horizontal lines inside, no text or symbols presentRek
EERSTE KEER INSCHAKELEN
Koken in wellness modus
natural_image
Line drawing of a refrigerator interior with coiled shelves and a handle (no text or symbols)natural_image
Diagram of a computer monitor with an open screen and directional arrow indicating rotation (no text or symbols present)▶ Trek de deur buitenwaarts.

natural_image
Technical line drawing of a mechanical device with two arrows indicating assembly or movement (no text or symbols present)natural_image
Technical line drawing of a mechanical assembly with an arrow indicating rotation (no text or symbols present)natural_image
Technical line drawing of a mechanical device with a rotating arrow indicating motion (no text or symbols)Ovendeur bevestigen
natural_image
Isometric line drawing of a mechanical or architectural component with an arrow indicating rotation (no text or symbols present)natural_image
Technical line drawing of a mechanical assembly with two views (top and side), showing internal components and motion indicators (no text or symbols)natural_image
Technical line drawing of a mechanical device with labeled components and directional arrows (no text or symbols)text_image
Technical diagram showing a mechanical assembly with labeled components and dimension indicatorsnatural_image
Technical line drawing of a door frame with internal shelves and a close-up inset showing a component detail (no text or symbols)text_image
Technical diagram showing two views of an appliance with numbered components, likely for assembly or maintenance instructions.natural_image
Gray square button with vertical stripes, no text or symbols visible
natural_image
Plain gray square with subtle shading and subtle vertical lines, no text or symbols present.Leccarda smaltata/Leccarda smaltata per arrosti
natural_image
Pure diagram of a rectangular frame with horizontal lines inside, no text or symbols presentGriglia
▶ Premere DISPLAY OFF.
natural_image
Line drawing of a refrigerator interior with coiled shelves and a handle (no text or symbols)natural_image
Isometric line drawing of a mechanical assembly with an arrow indicating rotation (no text or symbols)natural_image
Diagram of a computer tower with an arrow indicating rotation or movement, showing internal structure without any text or symbols.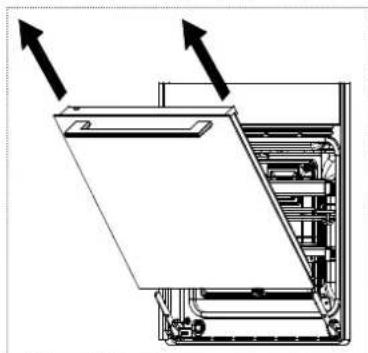
natural_image
Technical line drawing of a mechanical device with two arrows indicating assembly or movement (no text or symbols present)natural_image
Technical line drawing of a mechanical assembly with an arrow indicating rotation (no text or symbols present)natural_image
Technical line drawing of a mechanical assembly with two views (top and side), showing internal components and no text or symbols.natural_image
Diagram of a mechanical device with two labeled parts (1 and 2), showing internal structure without any text or symbols.text_image
Technical diagram showing a mechanical assembly with labeled components and directional arrowsnatural_image
Technical line drawing of a door frame with an inset showing a component detail (no text or symbols)Franke Kindred Canada Limited
Midland, ON L4R 4K9
Phone +1 866 687 7465
China
Franke (China) Kitchen Systems Co., Ltd.
Heshan, Guangdong, 529700
Hotline 400 882 9898
Czech Republic
Franke s.r.o.
190 00 Praha 9
Phone +420 281 090 411
Denmark
Franke Kitchen Systems Denmark
8520 Lystrup
Phone +45 8624 9024
Egypt
Franke Kitchen Systems Egypt S.A.E.
6th of October City
Hotline 16828
Finland
Franke Finland Oy
76850 Naarajärvi
Phone +358 15 341 11
France
Franke France S.A.S.
60230 Chambly
Phone +33 130 289 400
Germany
Franke GmbH
79713 Bad Säckingen
Phone +49 7761 52 0
Greece
Franke Hellas S.A.
19003 Markopoulo Attikis (Athens)
Phone +30 22991 500 00
Hong Kong SAR
Franke Asia Hong Kong Office
Causeway Bay
Phone +852 3184 1900
India
Franke Faber India Limited
Aurangabad - 431 136
Phone 1800 209 3484
Italy
Franke S.p.A.
37019 Peschiera del Garda
Numero Verde 800 359 359
Kazakhstan
Franke Kazakhstan Ltd.
040918 Almaty City
Phone +7 727 297 3812
Morocco
Franke Kitchen System SARL
21 000 Casablanca
Phone +212 522 674 200
Norway
Franke Kitchen Systems Norway
8520 Lystrup, Denmark
Phone +47 35 566 450
Poland
Franke Polska Sp. z o.o.
05-090 Raszyn
Phone +48 22 711 6700
Portugal
Franke Portugal S.A.
2735-531 Cacém
Phone +351 21 426 9670
Romania
Franke Romania SRL
Pantelimon 077145
Phone +40 21 350 1550
Russia
Franke Russia GmbH
199106 St. Petersburg
Phone +7 812 703 1540
Slovak Republic
Franke Slovakia s.r.o.
010 01 Žilina
Phone +421 41 733 6200
South Africa
Franke South Africa
Durban 4052
Phone +27 31 450 6300
Spain
Phone +46 912 405 00
Switzerland
United Arab Emirates
Franke LLC
Ras Al Khaimah
Phone +971 7 203 4700
United Kingdom
Franke UK Ltd.
Manchester M22 5WB
Phone +44 161 436 6280
USA
Franke Kitchen Systems LLC
Smyrna, TN 37167
Phone 800 626 5771