
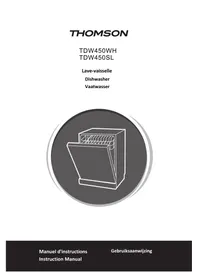
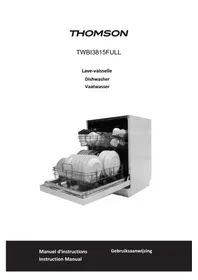
TDW 1445 SL - Dishwasher THOMSON - Free user manual and instructions
Find the device manual for free TDW 1445 SL THOMSON in PDF.
| Product type | Freestanding dishwasher |
| Brand | Thomson |
| Model | TDW 1445 SL |
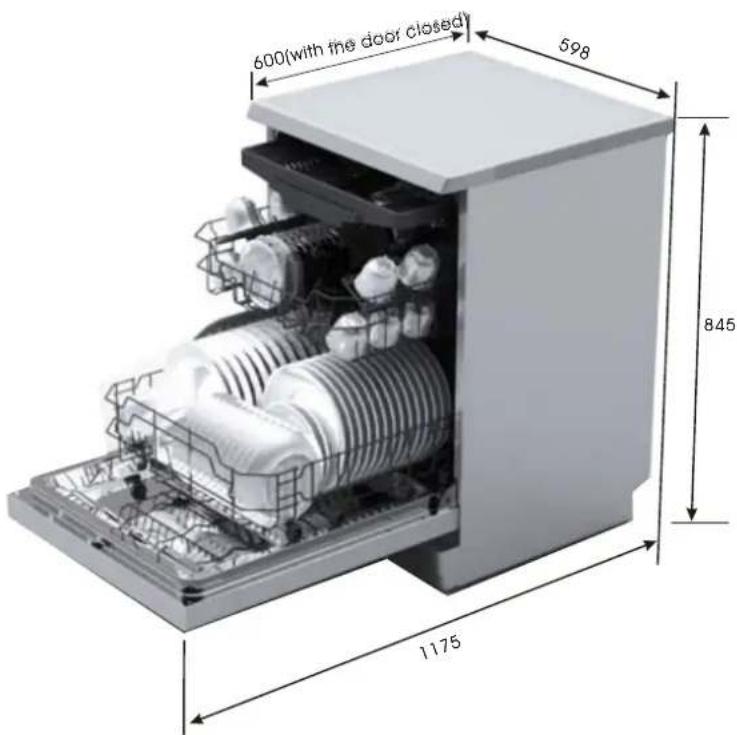
| Dimensions (H x W x D) | 84.5 x 59.8 x 60 cm |
| Capacity | 14 place settings |
| Power supply | 220-240 V ~ 50 Hz, 1760-2100 W |
| Water pressure | 0.04 to 1 MPa (0.4-10 bar) |
| Energy class | A+ |
| Annual energy consumption | 299 kWh/year |
| Annual water consumption | 3360 L/year |
| Noise level | 45 dB(A) |
| Wash programs | Intensive, Normal, Eco 50°C, Glass, 1 hour, Quick, Rinse |
| Special functions | Half load, Delay start (max 24h), Child lock |
| Water softener | Salt reservoir, adjustable (6 levels) |
| Rinse aid | Reservoir with 6 settings |
| Maintenance and cleaning | Regular cleaning of filters, spray arms, and door seals |
| Safety | Child lock, automatic stop, leak protection (code E4) |
| Spare parts and repairability | Replace power cable by manufacturer or authorized service; use original parts |
| Installation | Freestanding, requires cold water supply and drain |
| Standards | LVD 2006/95/EC, EMC 2004/108/EC, ErP 2009/125/EC |
Frequently Asked Questions - TDW 1445 SL THOMSON
User questions about TDW 1445 SL THOMSON
0 question about this device. Answer the ones you know or ask your own.
Ask a new question about this device
Download the instructions for your Dishwasher in PDF format for free! Find your manual TDW 1445 SL - THOMSON and take your electronic device back in hand. On this page are published all the documents necessary for the use of your device. TDW 1445 SL by THOMSON.
USER MANUAL TDW 1445 SL THOMSON
natural_image
Cutaway view of a white kitchen appliance showing internal components like dish, sink, and rack (no text or symbols visible)Table des matières
ATTENTION ....1
MISES EN GARDE IMPORTANTES ....3
DESCRIPTION....4
INSTALLATION ....5
MISE A NIVEAU ....5
PRESSION HYDRAULIQUE ....5
BRANCHEMENT SUR LES CANALISATIONS ....5
ALIMENTATION....6
UTILISATION....6
RECOMMANDATIONS ET MISES EN GARDE GENERALES .... 7
CHARGEMENT DU PANIER A COUVERTS 8
CHARGEMENT DES PANIERS DU HAUT ET DU BAS 9
ADOUCISSEUR D'EAU....11
DISTRIBUTEURS DE DETERGENT ET DE LIQUIDE DE RINÇAGE ....12
PROGRAMMES DE LAVAGE....14
DÉMARRAGE DU LAVE-VAISSELLE ....15
NETTOYAGE ET ENTRETIEN ....16
NETTOYAGE DU BLOC DE FILTRAGE ....17
NETTOYAGE DE LA PORTE ....17
NETTOYAGE DES BRAS D'ASPERSION ....17
PRÉCAUTIONS CONTRE LE GEL ....17
DEPANNAGE....18
FICHE TECHNIQUE ....20
ATTENTION
natural_image
Interior view of a device with exposed wiring and a grid base, labeled 11 and 12 (no text or symbols on the main subject)natural_image
Coiled white cable or wire against a plain background (no text or symbols visible)natural_image
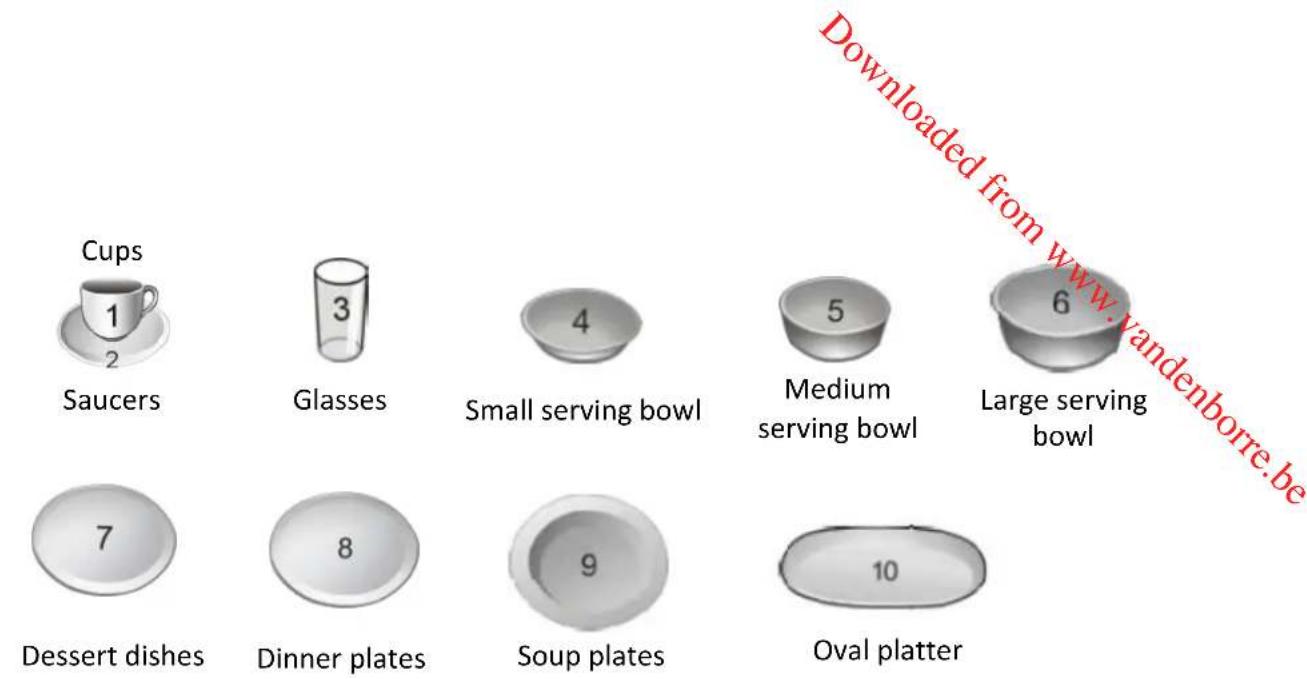
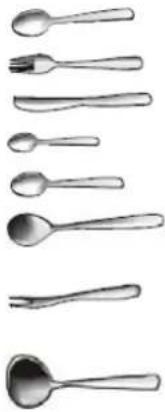
Pure electrical circuit lines without any symbolsCuillères à
soupe
Fourchettes
Couteaux
Cuillères à café
Cuillères à
dessert
Cuillères de
service
Fourchettes de
service
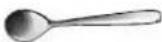
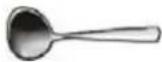
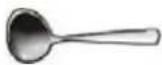
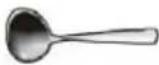
Louches


natural_image
Blue industrial machine tray with metal grid and control panel (no visible text or symbols)natural_image
Illustration of a blue industrial machine with mesh grid and directional arrows indicating flow or movement (no text or symbols)natural_image
3D rendering of a blue and gray industrial machine tray with mesh grid structure (no text or symbols visible)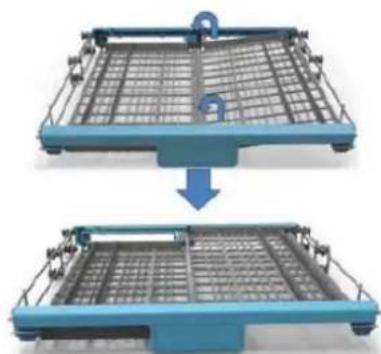
natural_image
Two blue metal shelving units with grid patterns, one showing a drop and the other a flat base (no text or symbols visible)natural_image
Two views of a blue tray with grid patterns, showing structural change (no text or symbols)natural_image
Two identical blue metal rack structures with grid patterns, one showing a downward arrow (no text or symbols)natural_image
Technical line drawing of a mechanical assembly with no visible text or symbolsnatural_image
Hand holding a grid of vertical lines with diagonal tick marks, no text or symbols visibleADOUCISSEUR D'EAU
natural_image
Illustration of a hand pouring black granules into a container with a mechanical component (no text or symbols)natural_image
Illustration of a light bulb with a magnified view of its base (no text or symbols)
natural_image
Mechanical assembly diagram showing a component with a central hub and directional arrow (no text or symbols)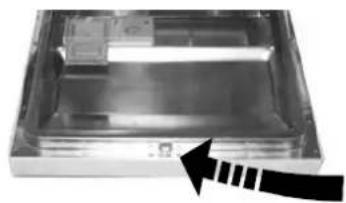
natural_image
Metallic tray with internal compartments and a black arrow pointing to a section (no text or symbols visible)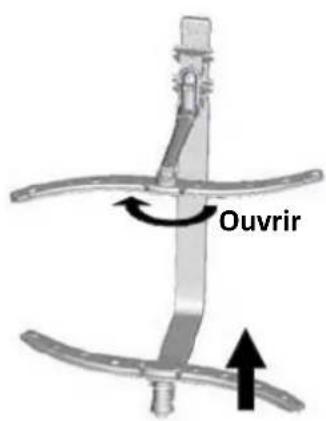
DÉPANNAGE
Darty Plc © UK: EC1N 6TE 17/03/2014
Table of Contents
WARNINGS .... 1
IMPORTANT SAFETY INSTRUCTIONS .... 3
DESCRIPTION 4
INSTALLATION INSTRUCTIONS .... 5
LEVELLING....5
WATER PRESSURE 5
CONNECTING YOUR DISHWASHER 5
POWER SUPPLY 6
OPERATION 6
GENERAL WARNINGS AND RECOMMENDATIONS 7
LOADING THE CUTLERY RACK.... 8
LOADING THE UPPER AND LOWER RACKS....9
USING THE WATER SOFTENER.... 11
USING THE RINSING AID AND DETERGENT DISPENSERS 12
WASHING PROGRAMMES....14
STARTING THE DISHWASHER 15
CLEANING AND MAINTENANCE 16
CLEANING THE FILTER UNIT.... 17
CLEANING THE DOOR....17
CLEANING THE SPRAY ARM.... 17
FROST PRECAUTIONS.... 17
TROUBLESHOOTING.... 18
TECHNICAL DATA SHEET.... 20
WARNINGS
This appliance is intended for domestic household use only and should not be used for any other purpose or in any other application, such as for non-domestic use or in a commercial environment.
This appliance can be used by children aged from 8 years and above and persons with reduced physical, sensory or mental capabilities or lack of experience and knowledge if they have been given supervision or instruction concerning use of the appliance in a safe way and understand the hazards involved. Children shall not play with the appliance. Cleaning and user maintenance shall not be made by children without supervision.
If the supply cord is damaged, it must be replaced by the manufacturer, its service agent or similarly qualified persons in order to avoid a hazard.
For the details concerning the method and frequency of cleaning, please see section “Cleaning and maintenance” on page 16 -17 .
The new hose-sets supplied with the appliance are to be used and that old hose-sets should not be reused.
The door should not be left in the open position since this could present a tripping hazard.
WARNING: Knives and other utensils with sharp points must be loaded in the basket with their points down or placed in a horizontal position.
For the details on how to load the dishwasher please see section "Loading" on page -10.8
The minimum permissible inlet water pressure is 0.04 MPa.
The maximum permissible inlet water pressure is 1 MPa.
The plug must be remained easily accessible after installation of the appliance.
IMPORTANT SAFETY INSTRUCTIONS
- The dishwasher must only be used for the washing of household dishes and cooking utensils.
- Never disconnect the appliance from the mains socket by pulling on the mains cord, always grasp the plug.
- Never touch the dishwasher when barefoot or with wet hands or feet.
- Do not open the door during a wash cycle as hot steam and water may be ejected.
- Do not overload the dishwasher; the maximum number of place settings is 14.
- If you are discarding an old appliance with a lock / latch fitted to the door, ensure that it is in a disabled condition to avoid the entrapment of children when playing.
- Do not let children climb on the dishwasher door or place any heavy object on it while it is open, as this could unbalance the appliance.
DESCRIPTION
Front view (Interior)
Back view
natural_image
Close-up of a curved white cable or wire inside a black frame, with no visible text or symbols.- Top spray arm
- Cutlery rack
- Upper rack
- Inner pipe
- Lower rack
- Salt container
-
Detergent / rinse aid dispenser
-
Cup shelf
- Lower spray arm
- Filter assembly
- Water inlet valve
- Drain hose
Control Panel

- Power ON/OFF button
- 1/2 half load function button
- Delay button
- Display
- ✿ Rinse aid indicator light
-
Ⓧ Salt indicator light
-
1/2 Half load function indicator light
- ⏻ Child lock indicator light
- Programme indicator lights
- Progr.▶▶ programme selecting button
- ▷rt/Pause button
BEFORE INSTALLING YOUR DISHWASHER
Before connecting your dishwasher to the power supply, check that the voltage stated on the rating label of your appliance corresponds to the voltage in your home.
The appliance must be grounded. The manufacturer is not responsible for damages that may occur as a result of usage without grounding.
WARNING: Disconnect electrical power before installing your dishwasher.
INSTALLATION INSTRUCTIONS
Your dishwasher can be installed in various locations in your kitchen as long as there is space and accessibility to connect your dishwasher to the water/drainage and electrical supply.
NOTE: The plug must be accessible at all times.
LEVELLING
Place the dishwasher on an even, stable surface.
It is very important that the dishwasher is perfectly levelled in order to avoid any malfunction. You can level the dishwasher by adjusting the base feet.
WATER PRESSURE
For best operating results, incoming water pressure should be between 0.04 MPa and 1MPa. Incoming water supply for the dishwasher is controlled by a ‘pressure switch’, so if the household water pressure is low, dishwasher fill time will increase or may not operate.
WARNING: Please close the hydrant after using.
CONNECTING YOUR DISHWASHER
Inlet hose (Cold water supply)

natural_image
Coiled white cable with a small black connector at the end (no text or symbols visible)The water inlet hose from the machine terminates in a 3/4" female connector. The water supply should therefore terminate in a similar male connector and should have a stopcock close by in the pipe.
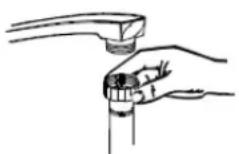
Connect the straight connector of the inlet hose to the water supply securely ensuring that the washers are securely in place at both ends of the hose.
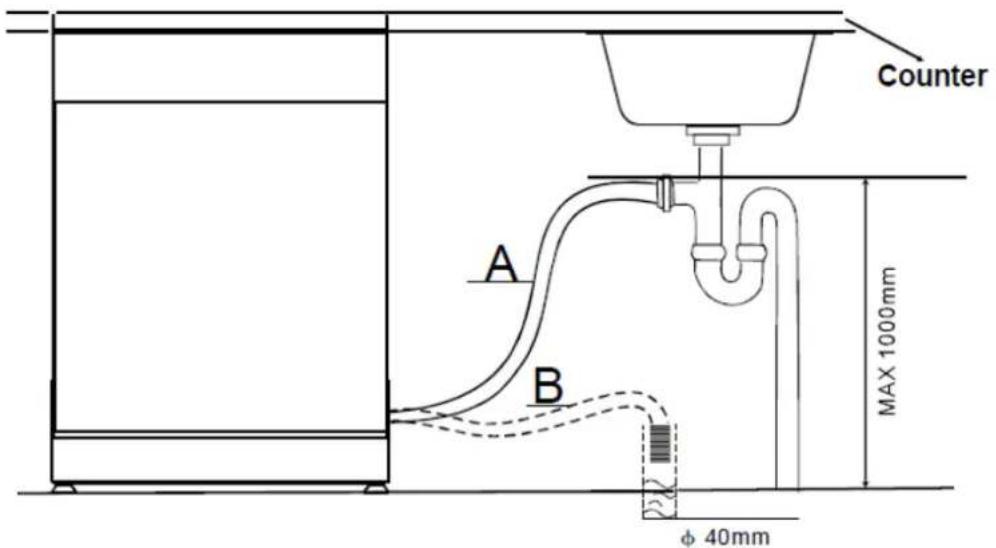
Drain hose
Insert the drain hose into a drainage pipe or standpipe.
The end of the hose should be dropped into a drainage pipe, the maximum height of which should be 1000 mm above the base of the dishwasher. The end of the hose must not be immersed in water to avoid the back flow.
To allow for an air gap around the end of the drain hose, the diameter of the standpipe should be at least 40 mm.
If leaks are detected, immediately shut the water supply and check the hose connections fully. Re-tighten the connections if necessary.
If for any reason you are unable to stop the leak yourself please seek advice from a qualified plumber.
POWER SUPPLY
IMPORTANT:
- The mains socket must be accessible at all times.
- Do not connect an extension lead to the appliance to avoid potential safety hazards.
OPERATION
Your dishwasher cleans by spraying a mixture of clean water and detergent (under pressure) against the soiled surface of dishes. The water is pumped through rotating spray arms, drained through a filter removing food and soiled particles, and pumped back through the spray arm.
Soiled water is pumped out and replaced with clean water at the end of each cycle (the number of times depends on the cycle being used).
NOTE:
- Hard Water conditions will adversely affect washability performance of your dishwasher. Hard water conditions will also contribute to “Lime” (white film substance) deposits and/or “Scaling” on the stainless steel surface of the dishwasher tub and heater element located in the sump underneath the removable filter screen.
- To minimise these conditions, it is recommended to periodically operate/rinse the inside of the dishwasher (empty) using 1 cup of white vinegar (at least once a week).
GENERAL WARNINGS AND RECOMMENDATIONS
Before using the dishwasher for the first time, it is advisable to read the following recommendations concerning dish types to be washed and their loading.
Before loading the dishes into the rack it is necessary to:
- Remove coarse food remains, e.g. bones, which may clog the filter or damage the wash pump.
- Soak any pots or pans with burnt-on food remains on the bottom then load them into the rack.
There is no need to pre-wash the dishes under running water before loading them into the rack.
Warning:
- Make sure that the dishes are securely in place so that they cannot tip over or obstruct the rotation of the spray arms during the washing cycle.
- Containers such as cups, bowls, glasses and pots should always be loaded with the opening facing downwards and with any cavities at an angle, to allow the water to drain out.
- Do not stack dishes.
- Do not place glasses too close together because they may knock against each other and break.
- Make sure that the items being washed are dishwasher-safe.
Items which are not dishwasher-safe:
- Wooden dishes and cutlery
- Handcrafted items
- Plastic dishes (except when marked dishwasher-safe)
- Dishes and objects in copper, tin, zinc or brass
• Aluminium dishes - Silverware
- Glass and crystal
- Decorated items (except when marked dishwasher-safe)
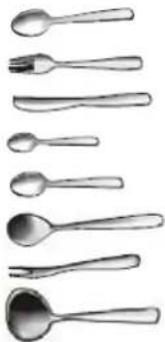
LOADING THE CUTLERY RACK
Arrange the cutlery in the rack.
The top spray arm must not be blocked by items.
Take care during loading to avoid injury from the knife blades.
natural_image
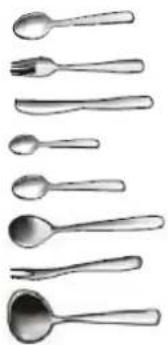
Pure electrical circuit lines without any symbolsSoup spoons
Forks
Knives
Teaspoons
Dessert spoons
Serving spoons
Serving forks
Gravy ladles
natural_image
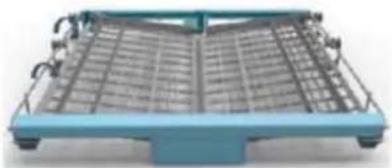
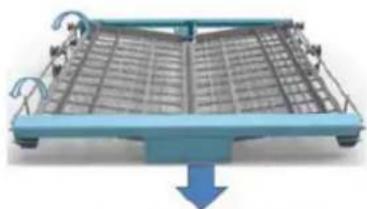
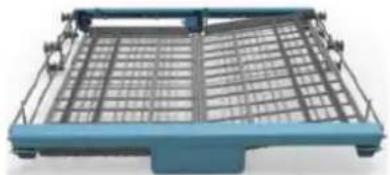
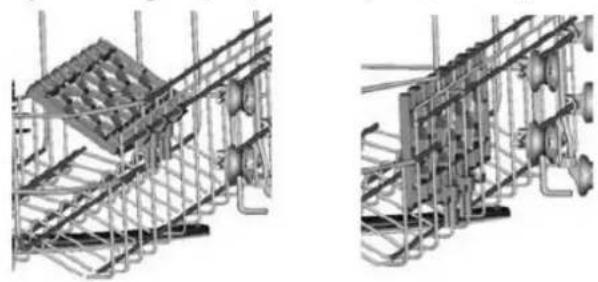
Row of eight different kitchen utensils in a row, including spoons, fork, and spoon (no text or symbols)5 Positions of cutlery rack:
natural_image
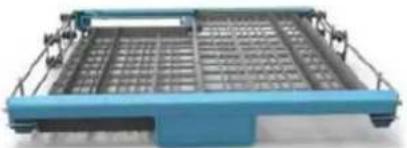
Exterior view of a blue industrial machine platform with metal grid and control panel (no visible text or symbols)Left and right parts of rack are tilted.
natural_image
Illustration of a blue metal rack with grid and curved handles, showing a downward arrow (no text or symbols)Left part is flat whilst right part is tilted.
natural_image
Front view of a blue and silver shopping cart with metal grilles (no text or symbols visible)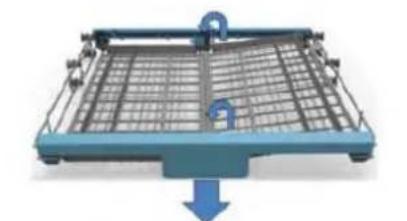
natural_image
Diagram of a blue metal rack with a downward arrow indicating compression or disassembly (no text or symbols present)Both parts of rack are flat.
natural_image
Blue industrial conveyor system with mesh grid and metal frame (no visible text or symbols)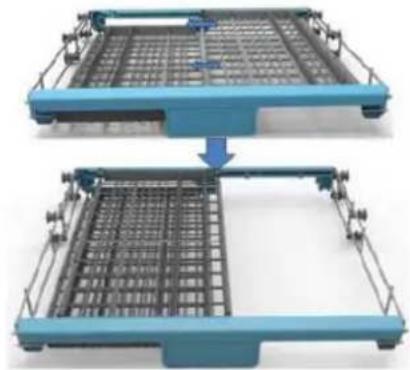
natural_image
Two views of a blue industrial machine frame with grid patterns, showing structural change (no text or symbols)Move the right part over the left part.
natural_image
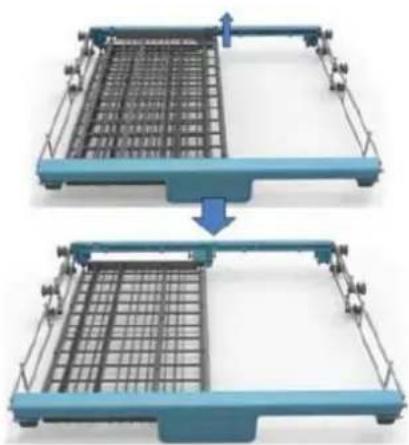
Two identical blue metal tray structures with grid patterns, one showing a downward arrow (no text or symbols)Right part of rack is removed.
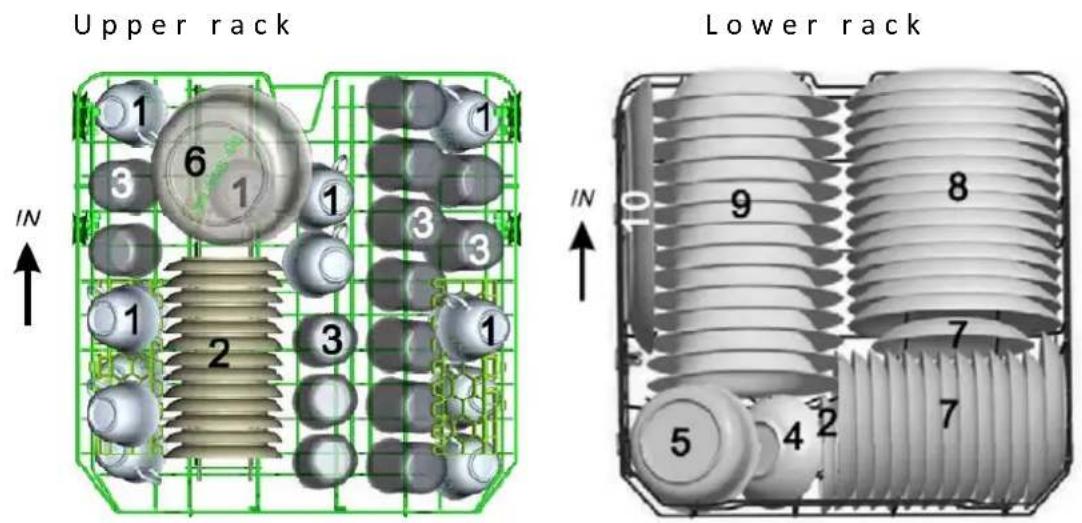
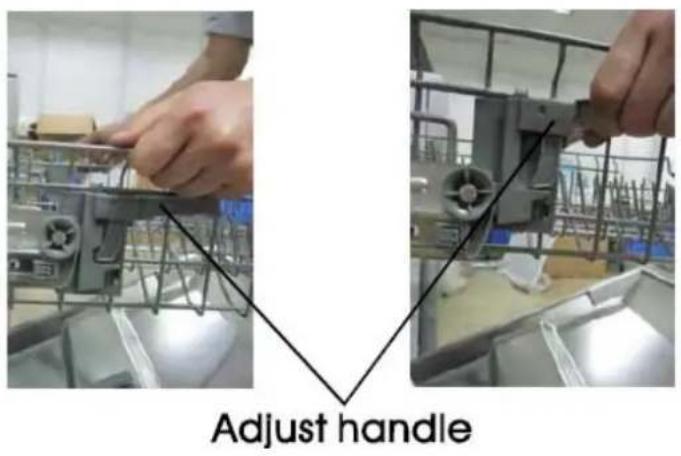
LOADING THE UPPER AND LOWER RACKS
Arrange items so that water can reach all surfaces.
Adjusting the height of the upper rack
In order to make it easier to arrange the crockery, the upper rack may be moved to a higher or lower level.
The height of the upper rack can be adjusted by adjusting the handle and then placing it to a lower or higher position.
Folding back the cup shelves of the upper rack
For better stacking of pots and pans, the cup shelves can be folded down.
natural_image
Technical line drawings of industrial piping and structural components (no text or symbols)Folding plate supports of the lower rack
To make full use of the space in the rack when large dishes are loaded, the rack has tilting plate supports which can be stowed horizontally.

natural_image
Hand holding a grid with diagonal lines, no visible text or symbolsUSING THE WATER SOFTENER
The hardness of the water varies from place to place. If hard water is used in the dishwasher, deposits will be formed on the utensils. This appliance is equipped with a water softener which uses a salt specifically designed to eliminate the minerals from the water.
CAUTION:
- Only use salt specially formulated for domestic dishwashers.
- Do not use table salt as it contains insoluble substances which may damage the water softening system.
- Fill the salt container before starting the washing programme. In this way, the excess saline solution will be immediately removed by the water; the prolonged presence of salt water inside the tank may lead to corrosion.
- If you plan to use dishwasher tablets for your washing needs, then you do not require to use salt or rinse agent.
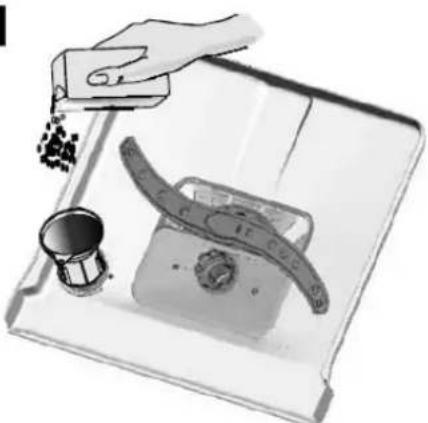
Filling with salt
1 Unscrew the cap from the salt container.
2 Place the supplied funnel so the end fits into the opening of the salt container. Load about 1.5 kg of salt into the salt container.
1
2
natural_image
Illustration of a hand pouring granular material into a control panel with a dial and bucket (no text or symbols)Screw the cap back clockwise.
NOTE: The salt container must only be refilled when the salt indicator light illuminates. Depending on how fully the salt dissolves, the salt indicator light may still be on even though the salt container is filled.
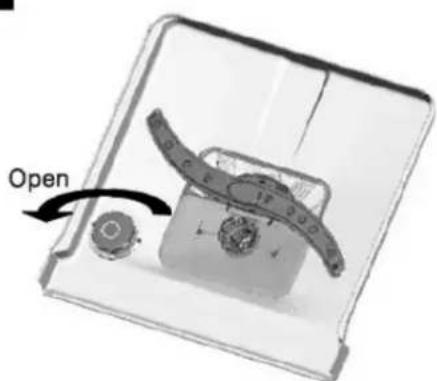
Adjusting salt consumption
- Enter the status of salt adjustment.
- Close the door, press and hold ▷|| within 60 seconds after "H4" is shown on the display.
is pressed until
- Select a certain level of salt consumption by repeatedly pressing ▷∥ .
- Salt consumption may vary according to different programmes. It is recommended to select the level by following the table below.
| Water Hardness Level | Display | Salt consumption (gram / cycle) | ||||
| °dH | °fH | °Clarke | mmol/l | |||
| 0~5 | 0~9 | 0~6 | 0~0.94 | H1 | ||
| 6~11 | 10~20 | 7~14 | 1.0~2.0 | H2 | ||
| 12~17 | 31~30 | 15~21 | 2.1~3.0 | H3 | ||
| 18~22 | 31~40 | 22~28 | 3.1~4.0 | H4 | ||
| 23~34 | 41~60 | 29~42 | 4.1~6.0 | H5 | ||
| 35~45 | 61~98 | 43~69 | 6.1~9.8 | H6 | ||
NOTE:
1^ = 1.25^ = 1.78^ = 0.178mmol / l
°dH: German degree
°fH : French degree
°Clarke: British degree
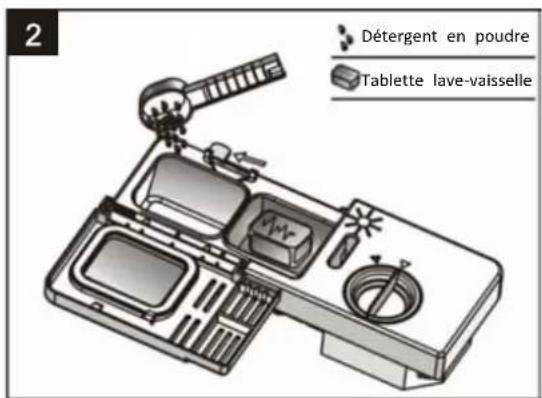
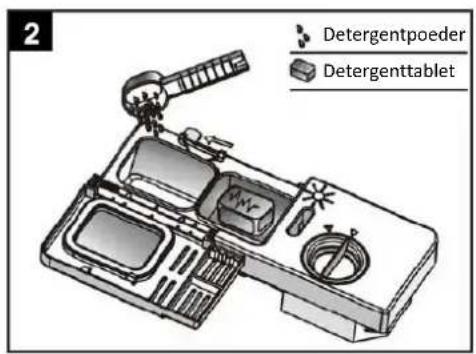
USING THE RINSE AID AND DETERGENT DISPENSERS
The rinse aid helps the dishes dry faster and prevents the formation of scale deposits and staining. It is automatically added to the water during the final rinse cycle.
The detergent and rinse aid dispensers are located on the inner part of the door: the detergent dispenser is on the left, and the rinse aid dispenser is on the right.
Adding the rinse aid
natural_image
Illustration of a device with a bulb and a magnifying glass, no visible text or symbols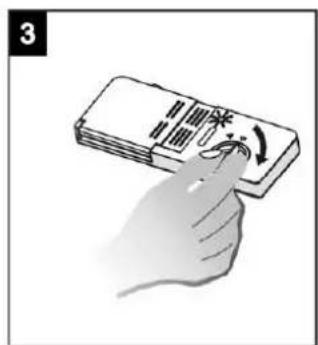
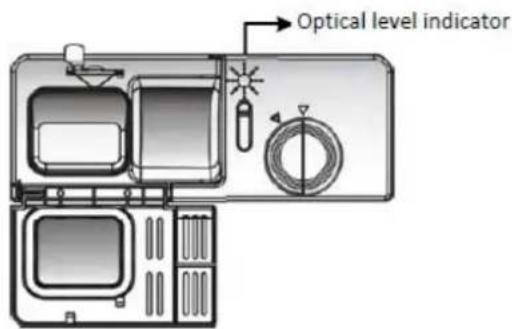
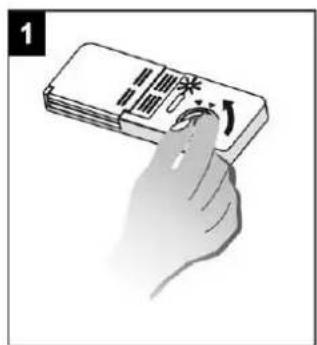
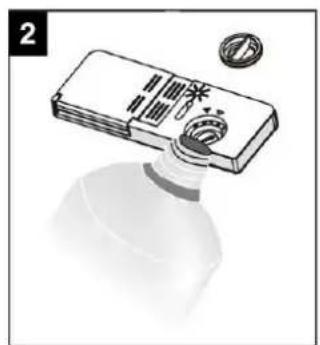
1 Rotate the dispenser cap anticlockwise and remove it.
2 Add the rinse aid until the container is full. The optical level indicator on the side of the cap should be completely dark.
3 Attach the cap and turn it clockwise.
NOTE: Refill the rinse aid when the optical level indicator becomes clear again, or when the rinse aid warning light comes on.
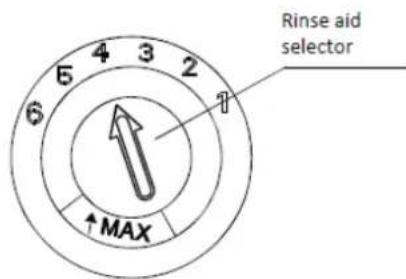
Adjusting the rinse aid dispenser setting
The factory setting for the dishwasher is 4 and you can choose between 6 settings.
The amount of rinse aid dispensed is proportional to the selector position.
- To adjust the rinse aid setting, remove the dispenser cap.
- Use a screwdriver (not supplied) to rotate the rinse aid selector to the desired position.
- Attach the cap and turn it clockwise.
NOTE: The amount of rinse aid must be increased if the washed dishes appear dull or feature circular stains. If the dishes are sticky or have white streaks, it is necessary to reduce the rinse aid setting.
Adding the detergent
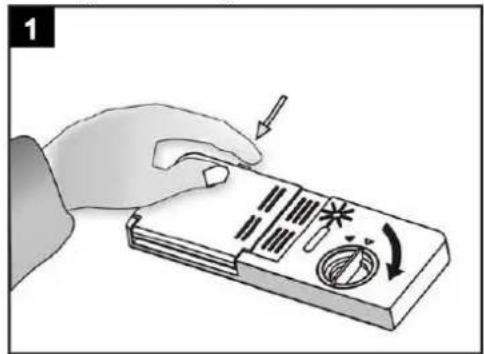
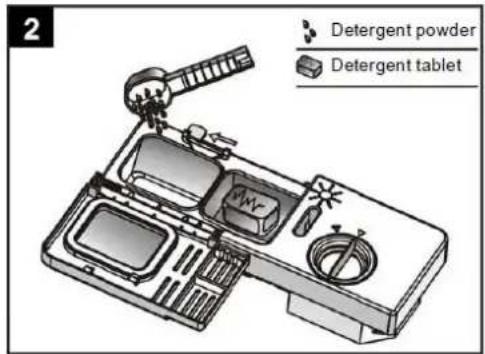
1 To open the detergent dispenser cap, gently press the release button.
2 Add the detergent and close the cap carefully.
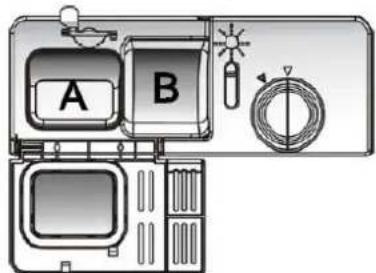
A. Detergent for main wash cycle
B. Detergent for pre-wash cycle
NOTE: Use only detergent specifically formulated for dishwashers. For optimal washing results it is important to use a good quality detergent.
WASHING PROGRAMMES
| Programme | Degree of soil | Cycle Description | Recommended quantity of detergent pre-wash / main wash | Washing time (min.) | Energy (Kwh) | Water (L) | Need rinse aid? |
 Intensive Intensive | Extremely soiled | Pre-wash (50°C) Wash (65°C) Rinse Rinse (55°C) Drying | 5/30 g (or 3 in 1) | 140 | 1.45 | 19 | |
 Normal Normal | Normal soil | Pre-wash (45°C) Wash (55°C) Rinse Rinse (65°C) Drying | 5/30 g (or 3 in 1) | 160 | 1.25 | 15 | |
| Eco 50°C Eco* | Standard programme, normal soil | Pre-wash Wash (50°C) Rinse (60°C) Drying | 5/30 g (or 3 in 1) | 170 | 1.04 | 12 | |
 Glass Glass | Lightly soiled load, such as glasses, crystal and fine china | Pre-wash Wash (40°C) Rinse Rinse (60°C) Drying | 5/30 g | 120 | 0.85 | 15 | |
 1 Hour 1 Hour | Lightly soiled loads that need no excellent drying efficiency | Pre-wash (50°C) Wash (60°C) Rinse (55°C) Drying | 5/30 g | 60 | 1 | 10 | Y |
 Rapid Rapid | Light soil | Wash (40°C) Rinse Rinse (45°C) | 30 g 40 0.6 | 11.5 | |||
 Soak Soak | To rinse crockery | Rinse | — | 8 | 0.01 | 4 |
* Testing programme in accordance with EN 50242
NOTE: The washing time may vary according to the incoming water temperature and the environmental temperature.
This programme is the test cycle. The information for comparability test in accordance with EN 50242, as follows:
- Capacity: 14 settings
- Position: Upper rack, lower position
- Rinse aid setting: 6
- The power consumption in left-on mode is 0.49 W (door open), in off-mode is 0.45 W.
STARTING THE DISHWASHER
- Turn the water tap on.
- Open the dishwasher door.
- Check the filters.
Ensure they are clean and properly positioned. See “Cleaning and maintenance” section.
-
Check that there is rinse aid and salt.
-
Load the dishes.
- Ensure that the spray arms can rotate freely.
-
Add the required amount of detergent into the dispenser according to the "Washing Programmes" chart.
-
Close the dishwasher door securely.
-
Press ☐ to switch the dishwasher on.
- The ECO programme indicator light will illuminate and the display will show the washing time.
- Select the desired washing programme by repeatedly pressing Progr. ▶▶ until the corresponding washing programme indicator light illuminates.
- Delay timer: The delay timer allows you to delay the start of a washing programme by up to 24 hours.
Repeatedly press 📄 until the desired start delay is shown on the display, e.g. H:03 for a 3-hour delay.
Once the delay timer has been set, press to activate the function.
-
If you want to perform a half load wash, press 1/2 and the half load function indicator light will illuminate.
-
The function can only be used in Intensive, Normal, Eco, Glass and 1 Hour programmes.
-
When this function is activated, the dishwasher will automatically reduce the water and energy consumption and the washing time.
-
Start the washing programme by pressing ▷II . After a few seconds, the machine will work.
-
At the end of the washing programme, the dishwasher will buzz and automatically stop.
-
Wait for about 15 minutes before you open the dishwasher door in order to avoid burns.
-
Unload the dishes.

The washing cycle will not start if the dishwasher door is left open or not properly closed.

Do not open the door when the dishwasher is working since hot water may be ejected which could cause scalding.
Adding extra crockery
- Without switching off the machine, press to pause.
- Open the door, taking care to avoid the escaping steam.
- Place the crockery inside the dishwasher.
- Close the door and press ▷∥. The cycle will start from the point at which it was interrupted.
Modifying a washing programme in progress
If a mistake was made during the washing programme selection process it is possible to change the programme.
- Press ▷∥ to pause.
- Press and hold Progr. for about 3 seconds.
- Repeatedly press Progr.▶▶ to select a new programme.
- The new programme indicator light will illuminate.
-
The washing time for the new programme will be shown on the display.
-
Press to start the programme.
Child lock function
The function allows you to lock the buttons on the control panel. Children will not be able to accidentally start the dishwasher by pressing any button.
To activate the function, press and hold 1/2 and simultaneously until the lock indicator light will illuminate.
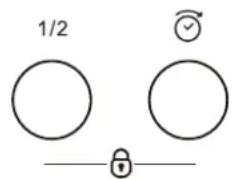
To deactivate the function, press and hold the two buttons simultaneously until the lock indicator light goes out.
CLEANING AND MAINTENANCE
Always unplug the appliance before cleaning.
Do not use chemical solvents or strong detergents as these may damage the cosmetic finish.
Clean the outer surfaces and the tank of the dishwasher with a damp cloth.
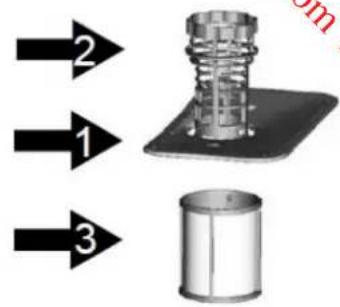
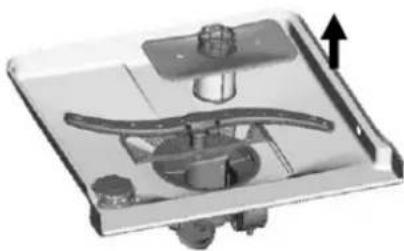
CLEANING THE FILTER UNIT
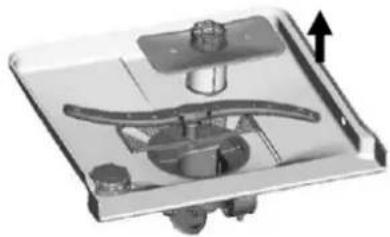
The filter unit consists of a main filter (1), central filter (2) and micro filter (3).
To disassemble the filters
Lift the filter unit up and separate them.
Rinse the filters under running water using a soft brush.
Clean the filters regularly.
CAUTION: Never operate the dishwasher without the filters.
CLEANING THE DOOR
Use a damp cloth to clean the edge around the door.
To avoid penetration of water into the door lock and electrical components, do not use a spray cleaner.
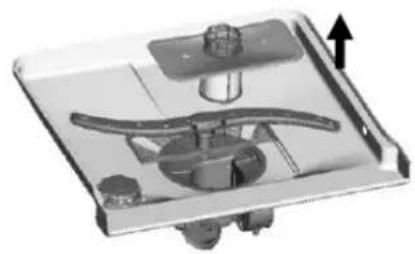
CLEANING THE SPRAY ARMS
The spray arms can be easily removed for periodic cleaning of the nozzles, to prevent possible clogging.
To remove the upper spray arm, hold and unscrew it.
To remove the lower spray arm, pull it out.
Wash the spray arms under running water and attach them back in place, checking that the rotary movement is in no way impeded.
FROST PRECAUTIONS
Avoid placing the dishwasher in a location where the temperature is below 0^ C. If this is unavoidable, empty the dishwasher, close the door, disconnect the water inlet pipe and empty it.
natural_image
Mechanical assembly diagram showing a component with a curved handle and housing, no visible text or symbols
natural_image
Exterior view of a modern office building (no signage)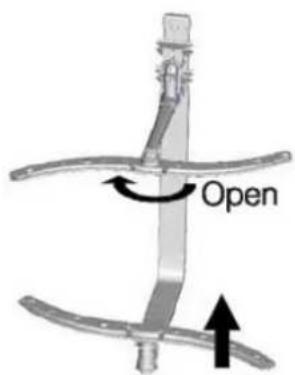
TROUBLESHOOTING
| Problem | Possible Causes | Solutions |
| Dishwasher will not start. | Fuse blown, or the circuit breaker tripped | Replace fuse or reset circuit breaker. Remove any other appliances sharing the same circuit with the dishwasher. |
| Power supply is not turned on. | Make sure the dishwasher is turned on and the door is closed securely.Make sure the power cord is properly plugged into the wall socket. | |
| The door has not been properly closed. | Close the door securely. | |
| Water not pumped from dishwasher | Kink in drain hose Check drain hose. | |
| Filter clogged Check the filter (see “Cleaning the Filter Unit”). | ||
| Kitchen sink clogged | Check kitchen sink to make sure it is draining well. If kitchen sink is not draining, you may ask for a plumber. | |
| Suds in the tub Improper or old detergent | Use only the detergent special for dishwasher to avoid suds. If this occurs, open the door and let the suds evaporate. Close the door securely then start a washing programme to drain the water out. Repeat if necessary. | |
| Stained tub interior | Detergent with colourant is used. | Make sure the detergent does not contain any colourant. |
| White film over the inside surface | Hard water minerals | To clean the interior, use a damp sponge with dishwasher detergent and wear rubber gloves. Never use any other cleaner than dishwasher detergent for the risk of foaming or suds. |
| There are rust stains on the cutlery. | The cutlery is not corrosion resistant. | |
| A programme is not running after dishwasher salt is added.Traces of salt have got into the wash cycle. | Always run the rapid washing programme.Add dishwasher salt with no crockery in the dishwasher. | |
| The dishwasher is noisy. | Dishes are rattling against each other.The spray arms are knocking against the dishes. | Refer to “Loading the Upper and Lower Racks” to rearrange the dishes. |
| The dishes are not clean. | The dishes have not been arranged properly. | Refer to “Loading the Upper and Lower Racks”. |
| The washing programme selected is too gentle. | Select the intensive programme. Refer to “Washing Programmes”. | |
| Not enough detergent has been used or it is unsuitable. | Use more detergent or change the detergent. | |
| The spray arm is clogged. | Rearrange the items so that the spray arm can rotate freely. | |
| The filters are not clean or not in the correct position. | Clean and/or position the filters correctly. | |
| Streaking and staining on the dishes | The rinse aid dispenser setting is not high enough. | Adjust the rinse aid dispenser setting. |
| The dishes are not quite dry. | Improper loading | Refer to “Loading the Upper and Lower Racks”. |
| The rinse aid has run out or too little is being used. | Increase or refill the amount of rinse aid. | |
| Wrong programme selection | Choose a programme with longer washing time. | |
Error codes
| Error codes | Meaning Possible Cause |
| E1 Longer inlet time. The water tap is not turned on, or water inlet is restricted, or water pressure is too low. | |
| E4 Overflow Some element of dishwasher is leaking. | |

If overflow occurs, turn off the main water supply before calling for service.
TECHNICAL DATA SHEET
Sheet of household dishwasher according to EU regulation 1059/2010:
| Manufacturer | Thomson |
| Type / Description | TDW 1445/ TDW 1445 SL |
| Standard place settings | 14 |
| Energy efficiency class 1 | A+ |
| Annual energy consumption 2 | 299 kWh/annum |
| Energy consumption of the standard cleaning cycle | 1.04 kWh |
| Power consumption of off-mode | 0.45 W |
| Power consumption of left-on mode | 0.49 W |
| Annual water consumption 3 | 3360 L/annum |
| Drying efficiency class 4 | A |
| Standard cleaning cycle 5 | ECO 50°C |
| Programme duration of the standard cleaning cycle | 170 min |
| Noise level | 45 dB (A)re 1 pW |
| Mounting | Free standing |
| Height | 84.5 cm |
| Width | 59.8 cm |
| Depth | 60 cm |
| Power consumption | 1760-2100 W |
| Rated voltage / frequency | 220-240V~ 50Hz |
| Water pressure (flow pressure) | 0.4-10 bar = 0.04-1.00 MPa |
NOTE:
① A+++ (highest efficiency) to D (lowest efficiency)
② Energy consumption “299” kWh per year, based on 280 standard cleaning cycles using cold water fill and the consumption of the low power modes. Actual energy consumption will depend on how the appliance is used.
3 Water consumption "3360" litres per year, based on 280 standard cleaning cycles. Actual water consumption will depend on how the appliance is used.
4 A (highest efficiency) to G (lowest efficiency)
5 This programme is suitable for cleaning normally soiled tableware and it is the most efficient programme in terms of its combined energy and water consumption for that type of tableware.
The appliance meets the European standards and the directives in the current version at delivery:
- LVD 2006/95/EC
- EMC 2004/108/EC
- ErP 2009/125/EC
The above values have been measured in accordance with standards under specified operating conditions. Results may vary greatly according to quantity and pollution of the dishes, water hardness, amount of detergent, etc.
The manual is based on the European Union's standards and rules.
Thomson is a trademark of Technicolor
We apologise for any inconvenience caused by minor inconsistencies in these instructions, which may occur as a result of product improvement and development.
Downloaded from www.vandenborre.be NL 1
Inhoudsopgave
WAARSCHUWINGEN ....1
BELANGRIJKE VEILIGHEIDSVOORZORGEN....3
BESCHRIJVING VAN HET APPARAAT 4
INSTRUCTIES VOOR DE INSTALLATIE....5
WATERPAS ZETTEN 5
WATERDRUK 5
UW VAATWASSER AANSLUITEN ....5
STROOMVOEDING....6
BEDIENING 6
ALGEMENE WAARSCHUWINGEN EN AANBEVELINGEN ....7
DE BESTEKKORF VULLEN....8
DE BOVENSTE EN ONDERSTE KORVEN VULLEN 9
WATERONTHARDER GEBRUIKEN 11
SPOEL- EN WASMIDDEL GEBRUIKEN....12
VAATPROGRAMMA'S 14
DE VAATWASSER OPSTARTEN 15
REINIGEN EN ONDERHOUD 16
DE FILTEREENHOUD REINIGEN....17
DE DEUR REINIGEN....17
DE SPROEIARMEN REINIGEN ....17
VORSTWAARSCHUWING 17
TROUBLESHOOTING 18
BESCHRIJVING VAN HET APPARAAT
natural_image
Black-and-white photo of a cable or wire device with a grid base, no visible text or symbolsnatural_image
Coiled white cable or wire against a plain background (no text or symbols visible)natural_image
Pure electrical circuit lines without any symbolssoeplepels
vorken
messen
theelepels
dessertlepels
serveerlepels
serveervorken
sauslepels
natural_image
Row of eight different kitchen utensils in a row, including spoons, fork, and spoon (no text or labels visible)natural_image
Blue industrial machine tray with metal grid and control panel (no visible text or symbols)natural_image
3D rendering of a blue industrial machine tray with grid and control panels, showing a downward arrow (no text or symbols)natural_image
Blue industrial machine frame with metal grid and mounting bracket (no visible text or symbols)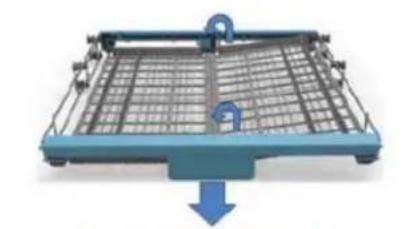
natural_image
3D illustration of a blue shopping cart with a downward arrow indicating compression or reduction (no text or symbols)natural_image
Exterior view of a blue industrial storage tray with mesh grid and metal frame (no text or symbols visible)
natural_image
Two blue metal trapezoidal trays with grid patterns, one showing a downward arrow (no text or symbols)natural_image
Two identical blue metal frame structures with grid patterns, each being lifted by a blue arrow (no text or symbols)natural_image
Two-panel photo showing hands assembling or adjusting a mechanical component in a factory setting (no visible text or symbols)Handgreep aanpassen
natural_image
Technical line drawing of a structural framework with multiple supports and pipes (no text or symbols)natural_image
Hand holding a grid of black lines with diagonal hatching, no text or symbols visibleWATERONTHARDER GEBRUIKEN
natural_image
Illustration of a hand pouring granular material into a mechanical device with a bowl (no text or symbols)natural_image
Top-down schematic of a kitchen appliance showing front, side, and interior components (no text or labels)natural_image
Illustration of a light bulb with a magnifying glass and a stack of books (no text or symbols visible)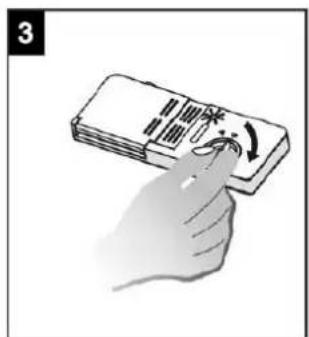
natural_image
Mechanical assembly diagram showing a component with a central hub and directional arrow (no text or symbols)
natural_image
Metallic tray with internal compartments and a black arrow pointing to a section (no text or symbols visible)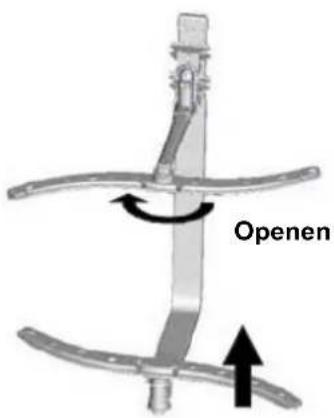
PROBLEMEN OPLOSSEN
Darty Plc © UK: EC1N 6TE 17/03/2014
ÍNDICE
ADVERTENCIAS......
natural_image
Close-up of a curved cable or wire component mounted on a dark panel, with no visible text or symbols.natural_image
Coiled white cable with a small black connector at the end (no text or symbols visible)natural_image
Line drawing of a hand holding a pipe with a handle (no text or symbols)natural_image
Diagram of a grid-based mechanical or electrical component with embedded springs and spheres, no visible text or symbols.Cuchara de sopa
Tenedor
Cuchillo
Cucharilla de café
Cuchara de postre
Cuchara para servir
Tenedor para servir
Cucharón salsero


natural_image
Exterior view of a blue industrial machine chassis with mesh grid and metal frame (no text or symbols visible)natural_image
3D rendering of a blue metal rack with a downward arrow indicating compression or reduction (no text or symbols)natural_image
3D rendering of a blue and gray metal rack with grid pattern (no text or symbols)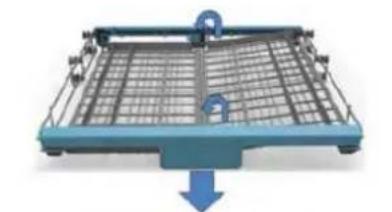
natural_image
3D diagram of a shopping cart with a blue handle and arrow indicating downward motion (no text or symbols)natural_image
Blue and gray industrial conveyor system with mesh grid and control panel (no visible text or symbols)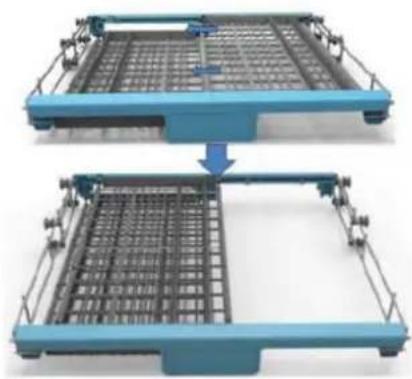
natural_image
Two identical blue metal truss systems with mesh grids, showing structural change (no text or symbols)natural_image
Two identical blue metal frame structures with grid patterns, each being rotated by a blue arrow (no text or symbols)natural_image
Technical line drawing of a mechanical assembly with no visible text or symbolsnatural_image
Hand holding a grid of vertical lines with diagonal tick marks, no text or symbols visiblenatural_image
Illustration of a hand pouring granular material into a container with a handle and a small cup (no text or symbols)natural_image
Illustration of a stylus-shaped device with a handle and circular button, no visible text or symbols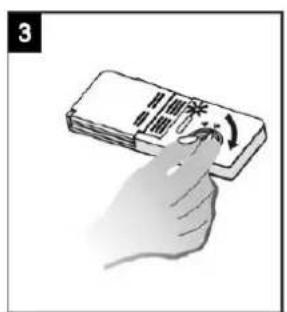
natural_image
Mechanical assembly diagram showing a component with gears and housing, no visible text or symbolsnatural_image
Exterior view of a modern office building (no signage)LIMPIEZA DEL BRAZO ASPERSOR
Darty Plc © UK: EC1N 6TE 17/03/2014
Obsah
UPOZORNĚNÍ......1
DÜLEŽITÉ BEZPEČNOSTNÍ POKYNY 3
POPIS....4
POKYNY K INSTALACI 5
VYROVNÁNÍ 5
TLAK VODY....5
PŘIPOJENÍ MYČKY 5
PŘIPOJENÍ K ELEKTRICKÉ SÍTI.... 6
OBSLUHA 6
OBECNÁ UPOZORNĚNÍ A DOPORUČENÍ ...... 7
VKLÁDÁNÍ DO PŘIHRÁDKY NA PŘÍBORY....8
VKLÁDÁNÍ DO HORNÍHO A DOLNÍHO KOŠE 9
POUŽITÍ ZMĚKČOVAČE VODY 11
POUŽITÍ LEŠTIDLA A DÁVKOVAČE MYCÍHO PROSTŘEDKU 12
PROGRAMY MYTÍ 14
SPUŠTĚNÍ MYČKY NÁDOBÍ 15
ČISTĚNÍ A ÚDRŽBA 16
ČISTĚNÍ FILTRAČNÍ JEDNOTKY 17
ČISTĚNÍ DVÍŘEK.... 17
ČISTĚNÍ OSTŘIKOVACÍCH RAMEN.... 17
OCHRANA PŘED MRAZEM 17
ŘEŠENÍ PROBLÉMŮ 18
TABULKA TECHNICKÝCH ÚDAJŮ...... 20
UPOZORNĚNÍ
natural_image
Close-up of a curved white cable or wire inside a black frame, with no visible text or symbols.natural_image
Coiled white cable with a small black connector at the end (no text or symbols visible)natural_image
Pure electrical circuit lines without any symbolsPolévkové lžíce
Vidličky
Nože
Čajové lžičky
Dezertní lžičky
Servírovací
lžíce
Servírovací
vidličky
Naběračka
natural_image
Row of eight different kitchen utensils including spoons, fork, fork, and spoon (no text or symbols)natural_image
Front view of a blue and silver metal rack with grid pattern (no text or symbols visible)natural_image
Illustration of a blue and white metal rack with a downward arrow indicating compression or reduction (no text or symbols)natural_image
3D rendering of a blue and gray metal rack with grid pattern (no text or symbols)
natural_image
Two blue metal rack units with grid patterns, one being cut down by a blue arrow (no text or symbols visible)natural_image
Two views of a blue metal rack frame with grid patterns, showing structural change (no text or symbols)natural_image
Two identical blue industrial metal frame structures with grid patterns, showing structural change (no text or symbols)natural_image
Two-panel photo showing hands assembling a mechanical device in a kitchen setting (no visible text or symbols)Nastavovací rukojeť
natural_image
Technical line drawing of industrial piping and structural elements (no text or symbols)natural_image
Hand holding a grid of black lines with diagonal marks, no text or symbols visiblePOUŽITÍ ZMĚKČOVAČE VODY
natural_image
Illustration of a hand pouring granular material into a container with a mechanical component and a small cup (no text or symbols)natural_image
Illustration of a bottle with a glass cap and a droplet, no text or symbols present

natural_image
Mechanical assembly diagram showing a component with a central hub and curved internal structure, no visible text or symbols.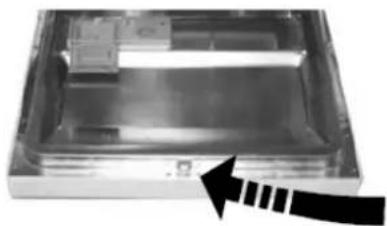
natural_image
Interior view of a rectangular electronic device with internal components and a black arrow pointing to a section (no visible text or symbols)
ŘEŠENÍ PROBLÉMŮ
Darty Plc © UK: EC1N 6TE 17/03/2014
Obsah
VAROVANIA....1
DÔLEŽITÉ BEZPEČNOSTNÉ POKYNY 3
POPIS ZARIADENIA 4
POKYNY K INŠTALÁCII 5
VYROVNANIE....5
TLAK VODY 5
PRIPOJENIE UMÝVAČKY RIADU.... 5
NAPÁJANIE 6
POUŽÍVANIE....6
VŠEOBECNÉ UPOZORNENIA A ODPORÚČANIA....7
NAPLNENIE KOŠÍKA NA PRÍBOR 8
NAPLNENIE HORNÉHO A DOLNÉHO KOŠA 9
POUŽÍVANIE ZMÄKČOVAČA VODY.... 11
POUŽÍVANIE DÁVKOVAČOV LEŠTIDLA A UMÝVACIEHO PROSTRIEDKU ...... 12
UMÝVACIE PROGRAMY 14
SPUSTENIE UMÝVAČKY 15
ČISTENIE A ÚDRŽBA 16
ČISTENIE FILTRA....17
ČISTENIE DVIEROK....17
ČISTENIE OSTREKOVACIEHO RAMENA 17
PREDCHÁDZANIE VZNIKU NÁMRAZY ....17
RIEŠENIE PROBLÉMOV 18
TECHNICKÉ ÚDAJE.... 20
VAROVANIA
DÔLEŽITÉ BEZPEČNOSTNÉ POKYNY
natural_image
Close-up of a curved cable or wire component mounted on a dark surface, with no visible text or symbols.natural_image
Coiled white cable with a small metallic connector (no text or symbols visible)natural_image
Pure electrical circuit lines without any symbolsPolievkové
lyžice
Vidličky
Nože
Čajové lyžičky
Dezertové
lyžice
Servírovacie
lyžice
Servírovacia
vidlička
Naberačky

natural_image
Blue industrial machine platform with metal grid and control panel (no visible text or symbols)natural_image
Illustration of a blue metal rack with grid pattern and a downward arrow indicating compression (no text or symbols)natural_image
Blue plastic tray with metal grid structure (no text or symbols visible)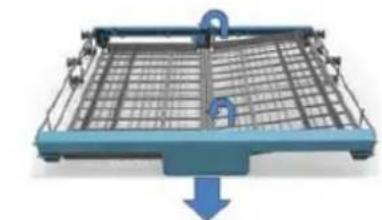
natural_image
3D diagram of a blue shopping cart with a blue arrow indicating downward motion (no text or symbols)natural_image
Blue and gray industrial conveyor system with mesh grid and railings (no visible text or symbols)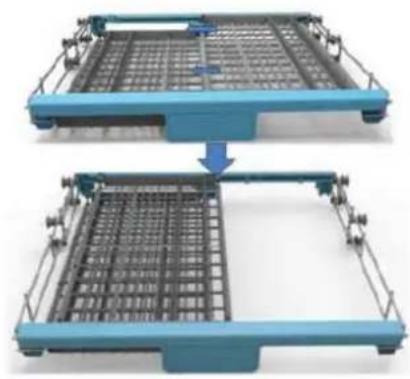
natural_image
Two blue metal tray structures with grid patterns, one showing a downward arrow indicating a process or transformation (no text or symbols present)natural_image
Two identical blue metal frame structures with grid patterns, one being rotated and the other tilted (no text or symbols)natural_image
Technical line drawing of a structural framework with grid elements and pipes (no text or symbols)natural_image
Hand holding a grid with diagonal lines, no visible text or symbolsPOUŽÍVANIE ZMÄKČOVAČA VODY
natural_image
Illustration of a hand pouring granular material into a container with a curved handle and a small bowl nearby (no text or symbols)natural_image
Illustration of a bottle with a cap and a coin, no text or symbols present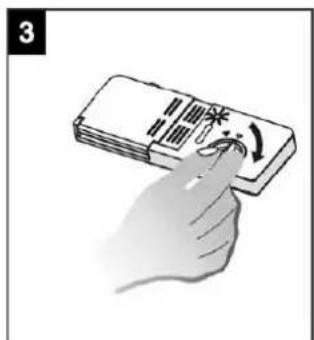
natural_image
Mechanical assembly diagram showing a component with a central shaft and housing, no visible text or symbols
natural_image
Exterior view of a rectangular electronic device casing with internal components and a black arrow pointing to a component (no visible text or symbols)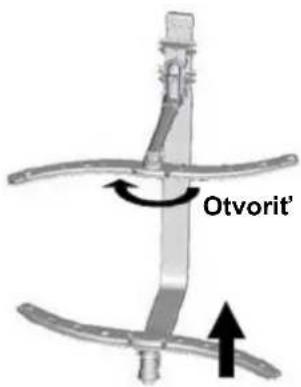
RIEŠENIE PROBLÉMOV
Darty Plc © UK: EC1N 6TE 17/03/2014

- Table des matières
- ATTENTION
- ADOUCISSEUR D'EAU
- Table of Contents
- WARNINGS
- IMPORTANT SAFETY INSTRUCTIONS
- DESCRIPTION
- Control Panel
- BEFORE INSTALLING YOUR DISHWASHER
- INSTALLATION INSTRUCTIONS
- LEVELLING
- WATER PRESSURE
- CONNECTING YOUR DISHWASHER
- POWER SUPPLY
- IMPORTANT:
- OPERATION
- NOTE:
- GENERAL WARNINGS AND RECOMMENDATIONS
- Before loading the dishes into the rack it is necessary to:
- Warning:
- Items which are not dishwasher-safe:
- LOADING THE CUTLERY RACK
- Positions of cutlery rack:
- LOADING THE UPPER AND LOWER RACKS
- Adjusting the height of the upper rack
- Folding back the cup shelves of the upper rack
- Folding plate supports of the lower rack
- USING THE WATER SOFTENER
- CAUTION:
- Filling with salt
- Adjusting salt consumption
- USING THE RINSE AID AND DETERGENT DISPENSERS
- Adding the rinse aid
- Adjusting the rinse aid dispenser setting
- Adding the detergent
- STARTING THE DISHWASHER
- Adding extra crockery
- Modifying a washing programme in progress
- Child lock function
- CLEANING AND MAINTENANCE
- CLEANING THE FILTER UNIT
- To disassemble the filters
- CLEANING THE DOOR
- CLEANING THE SPRAY ARMS
- FROST PRECAUTIONS
- TECHNICAL DATA SHEET
- Inhoudsopgave
- BESCHRIJVING VAN HET APPARAAT
- WATERONTHARDER GEBRUIKEN
- ÍNDICE
- LIMPIEZA DEL BRAZO ASPERSOR
- Obsah
- UPOZORNĚNÍ
- POUŽITÍ ZMĚKČOVAČE VODY
- VAROVANIA
- DÔLEŽITÉ BEZPEČNOSTNÉ POKYNY
- POUŽÍVANIE ZMÄKČOVAČA VODY
Brand : THOMSON
Model : TDW 1445 SL
Category : Dishwasher