Polar 9000 - Air Conditioning Eurom - Free user manual and instructions
Find the device manual for free Polar 9000 Eurom in PDF.


User questions about Polar 9000 Eurom
0 question about this device. Answer the ones you know or ask your own.
Ask a new question about this device
Download the instructions for your Air Conditioning in PDF format for free! Find your manual Polar 9000 - Eurom and take your electronic device back in hand. On this page are published all the documents necessary for the use of your device. Polar 9000 by Eurom.
USER MANUAL Polar 9000 Eurom
9. CLEAN = schoonmaken
Many thanks for choosing this EUROM equipment: you have chosen an excellent device that you will be able to enjoy for many years to come!
In order to ensure it works as efficiently as possible, we advise you to read these instructions carefully before using; the leaflet contains important safety information, recommendations etc. and will help you get the very best from your equipment!
We recommend that you keep the instruction booklet and the packaging in a safe place; the leaflet can then be used as reference material and the packaging can be used to store your equipment at the end of the season.
Finally, we hope your air conditioner / dehumidifier perfectly meets your requirements!
TECHNICAL SPECIFICATIONS
| MODEL | POLAR 7000 | POLAR 9000 |
| Cooling capacity | 7000 BTU/eur2000 Watt | 9000 BTU/eur2600 Watt |
| Max. power usage | 950 Watt | 1000 Watt |
| Reach | 50-70 m³ | 70-90 m³ |
| Energy class | A | A |
| Sleep mode | + | + |
| Air displacement max. | 320 m³ /h | 320 m³ / h |
| Connected power | 220–240V / 50Hz | 220–240V / 50Hz |
| Cooling fluid | R410A / 280 gr. | R410A / 310 gr. |
| Fan settings | 3 | 3 |
| Operating temperature | 16 - 32°C | 16 - 32°C |
| Waste pipe | Ø 125 mm x 1500 mm. | Ø 125 mm x 1500 mm. |
| Net weight | 24 kg | 24 kg. |
| Dimensions | 36 x 36 x 72 cm (lxbxh) | 36 x 36 x 72 cm (lxbxh) |
WARNING!
(ignoring these warnings may result in serious injury or death)
- This appliance can be used by children aged from 8 years and above and persons with reduced physical, sensory or mental capabilities or lack of experience and knowledge if they have been given supervision or instruction concerning use of the appliance in a safe way and understand the hazards involved. Children shall not play with the appliance. Cleaning and user maintenance shall not be made by children without supervision.
- Close supervision is necessary when the product is used near children, incapacitated persons or pets. The device is not suitable for use by persons (including children) with a physical, sensual or mental limitation or a lack of experience and knowledge, irrespective of whether they are being supervised or have been issued with instructions in relation to the use of the device by a person who is responsible for their safety. Always ensure that children cannot play with the device.
-
Only connect the device to an earthed socket! Before use, check whether the socket is not damaged and the voltage that you will be using corresponds to the specification plate on the unit. Damage caused by incorrect voltage is not covered by the guarantee!
-
The socket used and the electrical installation needs to be secured with a ground-fault circuit interrupter (max. 30 mAmp).
- Do not use the air conditioning unit in the vicinity of flammable or explosive substances or fuels. Never use any paint, cleaning sprays, anti-insect sprays or similar near the unit; this could deform the plastic or cause electrical damage.
- Do not use the unit if the electrical cable, plug or device is damaged or broken. The device, plug and/or cable must be repaired/replaced by an electrician or another suitably qualified person. Repairs by unqualified persons will result in the guarantee becoming null and void and could lead to dangerous situations!
- Do not use the air conditioning unit in a damp or wet environment and never splash water, oil or any other liquid onto the device. Do not touch the device with wet hands, or when you have bare feet.
- If the air conditioning unit is not in use or you are cleaning or carrying out maintenance on it, turn it off and remove the plug from the socket. Always turn off first and then remove the plug!
SAFETY INSTRUCTIONS
(ignoring these instructions may result in injury or damage to the device)
General
- Do not expose the body (and specifically those of children and senior citizens) to the cold air stream of the air conditioner for long periods of time. This can cause physical ailments and health issues.
- Do not touch the swivelling slats – this can cause injury or damage to the slats.
- Never block the grilles for incoming or outgoing air (not even partially). In order to prevent over-heating, never cover the device!
- Never insert fingers or objects such as pens into the device via the grilles and ensure that the ventilator does not become blocked.
- This unit is exclusively intended for household use.
- Always ensure (even during transport!) that the unit remains upright. If the unit has been lying on its side, wait 2 hours before using. This time is required in order for the compressor to function correctly.
- Ensure that the unit is always placed on a sturdy, flat and horizontal surface.
- Ensure that the unit has a free space of at least 50~cm on each side.
- Make sure that the plug and socket remain visible and accessible at all times.
- Do not place any objects in front of the air conditioning unit.
- Never leave a functioning device unsupervised, not even for a moment!
- Keep an eye on children, incapacitated persons or animals if they occupy the same room as the air conditioning unit.
- Avoid children coming into contact with the device.
- If required, only ever use original parts and accessories that are recommended and supplied by the manufacturer.
Electrical safety:
- The air conditioning unit is only suitable for indoor use.
- Only use the plug that is installed on the device in the factory and no other form of connector!
- The unit must be connected according to local, regional and national rules.
- Avoid the use of extension cables if you can. If this is unavoidable, use a cable with sufficient capacity (at least 3 × 1.5 ~mm^2 ) and do not let it cross any walking routes!
- Do not move the unit by tugging on the electric cable and never remove the plug from the socket by pulling the cable.
For maximum effect:
- Never exceed the recommended area to be cooled.
- Do not place the unit in the vicinity of a heat source or in direct sunlight.
- Close windows and doors.
- Keep curtains or hatches closed during the sunniest hours in the day
- Keep filters clean
- Modify ventilation settings once the area has reached the required condition.
DESCRIPTION
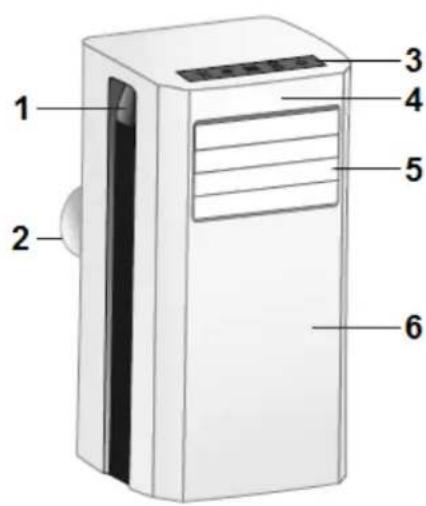
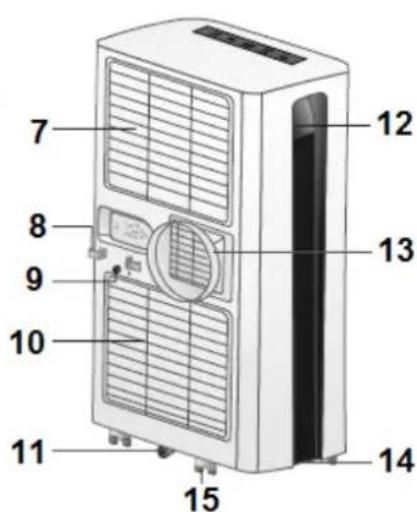
front
- handle
- hot air exhaust
- control panel
- signal receiver
- cold air outlet
- front panel
back
- top air inlet filter
- cable winding hook
- water drain
- bottom air inlet filter
- water drain (reservoir)
- handle
- hot air exhaust
- electricity cable
- castor
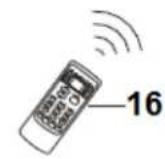
- remote contro
Accessories:
| A | |
| B | |
| C | |
| D | |
| E | |
| F |
A. Hot air exhaust hose, adapters and window beam
B. Wall connection cover
C. Wall connection
D. Bolt and nut
E. Water drain hose
F. Remote control batteries
The illustrations may slightly differ depending on your device type.
CONTROL PANEL
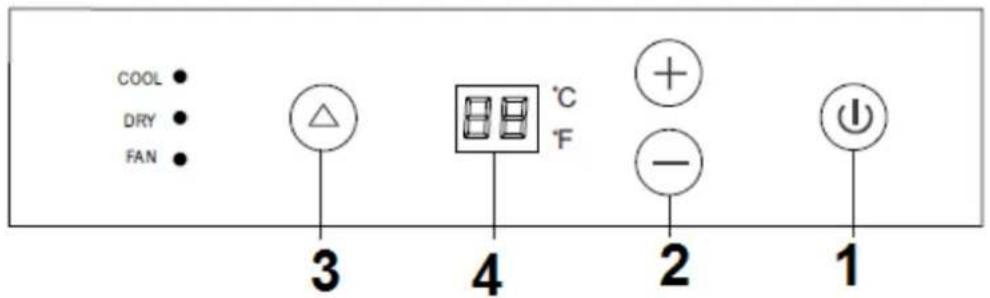
COOL - cooling indicator light
DRY - dehumidify indicator light
FAN -ventilator indicator light
1 - on/off button
2 - buttons to set the temperature higher/ lower
- mode selector button (MODE). Every time you press it the mode changes from cooling to dehumidification to automatic.
3 - temperature indicator screen
Attention:
The abovementioned modes 1, 2 & 3 work in the manner described under 'Remote control'.
- The other modes and also the speed of the ventilator can only be adjusted with the remote control, not on the control panel.
INSTALLATION
The EUROM POLAR 7000 & 9000 are mobile air conditioning/ dehumidifying units that can be moved from room to room. Install as follows:
- Remove all packaging material and ensure that the unit remains in an upright position.
- Before use, check that all accessories are present and that there is no damage to the accessories or the unit itself. Do not use a damaged unit; take it back to your supplier!
- Place the unit on a sturdy, flat, dry and horizontal base near an electrical socket and a discharge point for hot air, e.g. a window that can be opened slightly. Make sure that the unit has at least 50~cm of free space on all sides and take all safety instructions into account.
Fastening the window beam
The window beam supplied fits into most standard windows that can be opened horizontally or vertically. It may be necessary to alter special windows. The beam fits into openings of a minimum of 67.5cm and a maximum of 125cm . Fasten the correct dimension with a screw and nut. Refer to the illustration for installation.
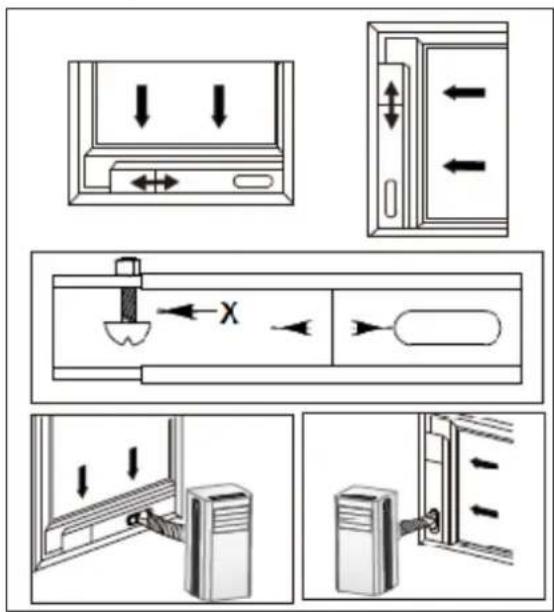
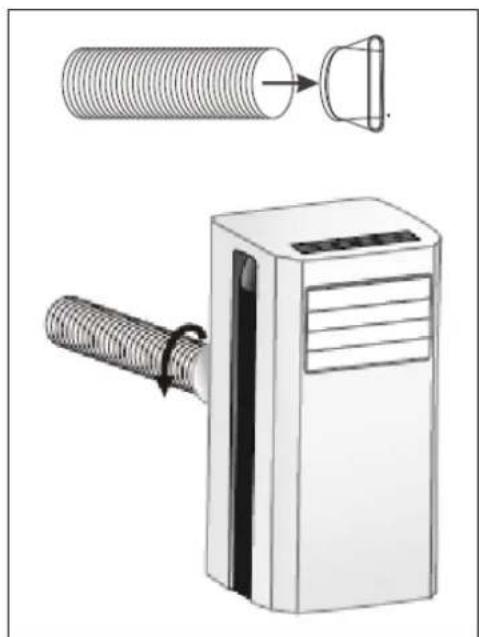
- Screw on the connector for the air conditioner on one end and the connector for the window panel on the other end of the outlet hose.
- Slide the connector for the air conditioner into the appropriate slot on the rear of the unit.
- Secure the other end of the outlet hose in the window panel opening so that it can remove hot air outside.
- You can also hang the outlet hose out of an open window; this method is less efficient however.
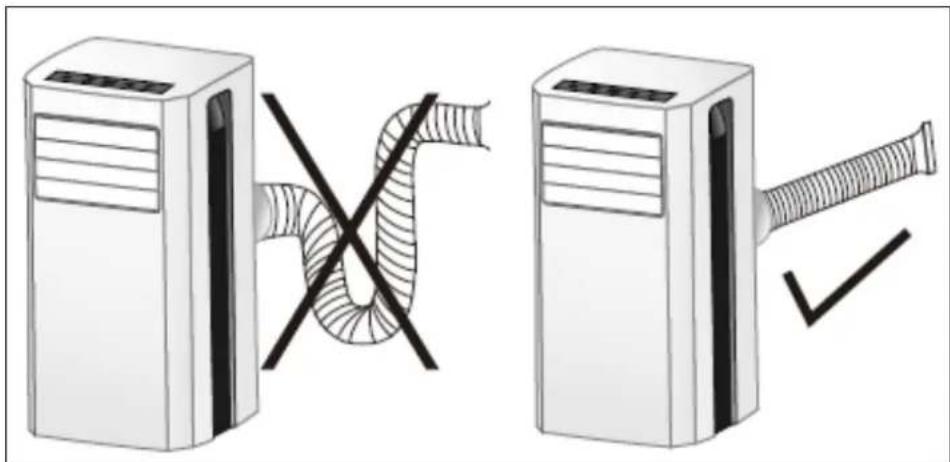
- The hose can be compressed to a minimum of 450mm and stretched to a maximum of 1500mm . Keep the length minimal.
- Avoid bends or pinches in the pipe. These will lead to a build up of damp, waste air which can cause leaks, overheating or lead to the air conditioning unit switching off.
Water outlet
During the cooling process, the device removes water from the air. This largely evaporates but any excess water is collected in the water reservoir. If the water reservoir in the device is full, the display shows "P1". In this event, switch the air conditioning unit off and remove the plug from the socket. Empty the water tank by removing the cap from the water drain (reservoir) (11) and draining the tank into a drain or receptacle. Do not forget to replace the cap again afterwards! You can then switch the air conditioning unit back on.
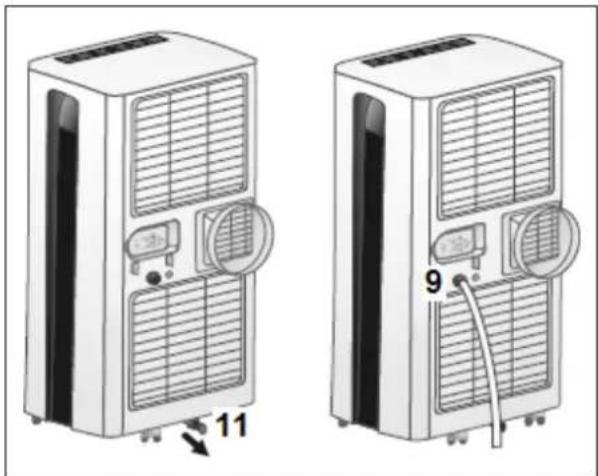
When dehumidifying, more water is removed from
the air. This is why you must connect a hose to the water drain (9) during dehumidifying and run this to a drain (at a lower point). Ensure that water does not leak along the hose and that the hose is not twisted in a way that blocks the flow of water.
Drained water is not suitable for consumption!
Only connect the device to an earthed socket! Before use, check whether the socket is not damaged and the voltage that you will be using corresponds to the specification plate on the unit. Damage caused by incorrect voltage is not covered by the guarantee! The socket used and the electrical installation needs to be secured with a ground-fault circuit interrupter (max. 30 mAmp).
The device is now ready for use.
Warning! Do not use your air conditioning unit until it has been installed according to the instructions above!
Warning! Ensure that water cannot penetrate the device!
Warning! The length of the discharge pipe corresponds to the technique that is used in this air conditioning unit. Do not replace or extend it using another pipe as this could have a negative impact on the effectiveness of the unit. The hose can be stretched but must be kept as short as possible in order to ensure optimum functioning.
Don't forget about preventing access to burglars!
OPERATION
You operate the air conditioner with the remote control as standard.
Place 2 AAA penlight batteries in the battery compartment in the back of the remote control before use.
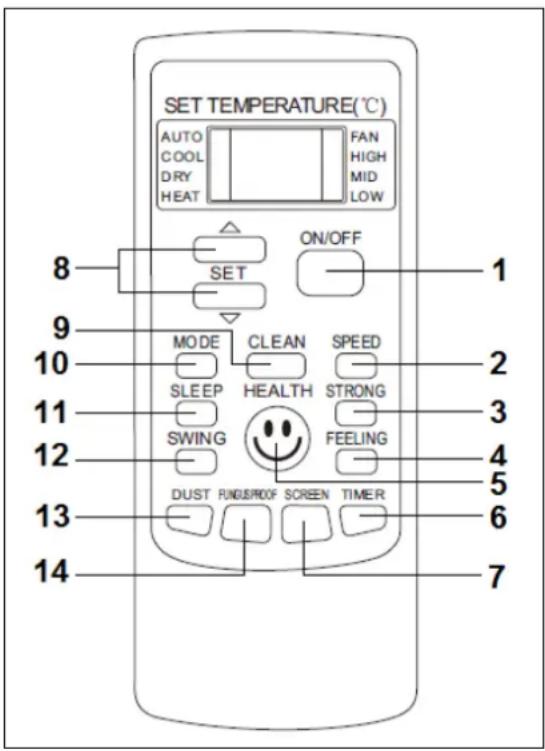
Your remote control has the following buttons:
- ON/OFF = on/off button
You start or stop the airco by pressing this button.
- SPEED = ventilator speed selection
You select a ventilator speed with this button. Every time you press the button it switches from low (Low) to mid (Mid) to high (High), and then to automatic (Auto) and then back to low.

- STRONG = strong operation
You only use this button when cooling. The ventilator is automatically switched to the 'High' setting and you cool with maximum capacity.
- FEELING = feeling
When you press this button the display shows the temperature in the room. Pressing the button again
displays the set room temperature. This button does not work when the ventilator is operating.
- HEALTH = health
When you press this button the device, depending on the ambient temperature, will select a speed automatically and thereby create a comfortable temperature for you.
- TIMER = timer
Switching on with the timer:
a. Ensure that the device is switched off. If you press the timer button, 'TIMER ON' will appear in the display, with the set time.
b. Use the and buttons to set a time at which the device will start to work automatically.
The time will increase/decrease by half an hour every time you press the button. After 10 hours the set time changes by a whole hour.
c. When the display shows the desired time, you press the TIMER button again in order to set the time.
d. You can now set the desired mode with the other buttons - cooling, ventilator speed, temperature, oscillation, etc.
Switching of with the timer:
a. When the device is operating, press the 'TIMER' button. The display shows 'TIMER OFF' with the set time.
b. Use the and buttons to set a time at which the device will switch itself off. Every time you press the button the set time will decrease/increase by half an hour. After 10 the set time changes by a whole hour.
c. When the display shows the desired time, you press the TIMER button again in order to set the time.
7. SCREEN = SCREEN
Use this button to switch the display on and off.
8. \& = higher & lower
Use these buttons to set the desired temperature at a value between 16^ and 32^ . The display shows the set time.
9. CLEAN = clean
This button does not work on your device.
10. MODE = mode
Use this button to select a mode - every time you press the button the device switches from AUTO (automatic) > COOL (cooling) > DRY (dehumidification) > HEAT (not in use on this device) > FAN (ventilate) > AUTO, etc.
11. SLEEP = sleep
a. When you press the SLEEP button the display lighting switches off. With 'cooling' the device will allow the set temperature to increase by one Degree after one hour, and by a second Degree after another hour.
b. In the sleep mode the air conditioner will operate for a maximum of 7 hours and then switch off automatically.
c. Pressing the MODE or ON/OFF button will switch the sleep mode off again.
12. SWING = swing
When you press this button the horizontal slats will swivel up and down automatically. If you press this button again the swivelling will stop and the device will blow cool air in the desired direction.
13. DUST
This button does not work on your device.
14. FUNGUSPROOF
This button does not work on your device
The modes that you have set will be indicated on the display.
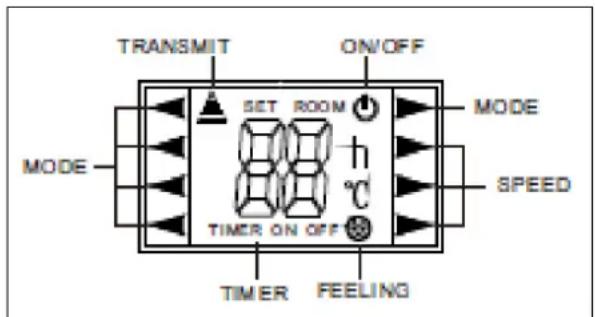
After pressing a button it can take several seconds to a minute before the device reacts. This is normal and occurs because the device must first run through internal processes before it executes the mode.
After switching off you must wait for 4 minutes before you may (and can) switch the device on again.
Automatic operation
- Switch the air conditioner on with the ON/OFF button - the display shows the modes.
- Set the MODE button to 'AUTO'
- Set the desired ventilator speed with the SPEED button
The air conditioner now starts to work. Pressing the ON/OFF button again switches the air conditioner off again.
Cooling
- Switch the airco on with the ON/OFF button - the display shows the modes.
- Set the MODE button to 'COOL'.
- Use the \& buttons to set the desired temperature (between 16^ and 32^ .)
- Use the SPEED button to set the desired ventilator speed.
The air conditioner now starts to operate. Pressing the ON/OFF button again switches the air conditioner off again.
Ventilation
- Switch the airco on with the ON/OFF button - the display shows the modes.
- Set the MODE button the 'FAN' mode.
- Set the desired ventilator speed with the SPEED button.
The airco starts to operate. Pressing the ON/OFF button again switches the air conditioner off again.
Dehumidification
- Ensure that the water drain hose is correctly attached, see page 18.
- Switch the airco on with the ON/OFF button - the display shows the modes.
- Set the MODE button to the 'DRY' mode.
- Use the \& buttons to set the desired temperature (between 16^ and 32^ .)
- Use the SPEED button to set the desired ventilator speed.
The air conditioner now starts to operate. Pressing the ON/OFF button again switches the air conditioner off again.
ATTENTION!
After switching off, wait until the slats of the air outlet are closed before you remove the plug from the socket.
- During operation, always point the remote control at the airco receiver.
- The distance between the remote control and device may be a maximum of 8 metres.
- Ensure that the connection between the remote control and the device is not blocked by obstacles.
- Handle the remote control with care - do not drop or throw it.
- Ensure that the remote control does not become hot due to strong sunlight or other heat sources.
Take the batteries out of the remote control when you foresee that you will not be using it for a long time. - If you no longer hear a reception signal and no response is shown on the display, the batteries must be replaced.
- There are various buttons on the remote control for modes that are not used in your air conditioner. Do not try to use these modes. This will disorientate your device.
Safety
The Polar 7000 c.q. Polar 9000 is fitted with an overheating safeguard that switches the unit off if it overheats. If this should occur, you must remove the plug from the socket and leave the equipment to cool for at least 30 minutes. Remove the cause of overheating - has the device been (partially) covered? Is it too close to a wall or another obstacle, preventing it sucking in or dispensing sufficient air?
You can then use the device normally again but keep an eye on it for the first 30 minutes to ensure there are no further problems. If the device is showing signs of problems or the overheating recurs, even though there is no obvious assignable cause, ask your supplier or a recognised electrician to check/repair the unit.
CLEANING AND MAINTENANCE
Note! Before cleaning or carrying out maintenance work on the air conditioning unit, always switch off and remove the plug from the socket! Regular cleaning is vital in order to keep the unit in good working order!
Cleaning the housing
Use a soft, damp cloth to wipe the housing.
Never use aggressive cleaning products, petrol, detergent, chemically-impregnated cloths or other cleaning solutions. These could damage the housing. Never spray the unit and ensure that water never penetrates the device! Dry the unit with a soft cloth.
Cleaning the filters
- Clean the filters once every two weeks; a unit with dirty filters will never work properly.
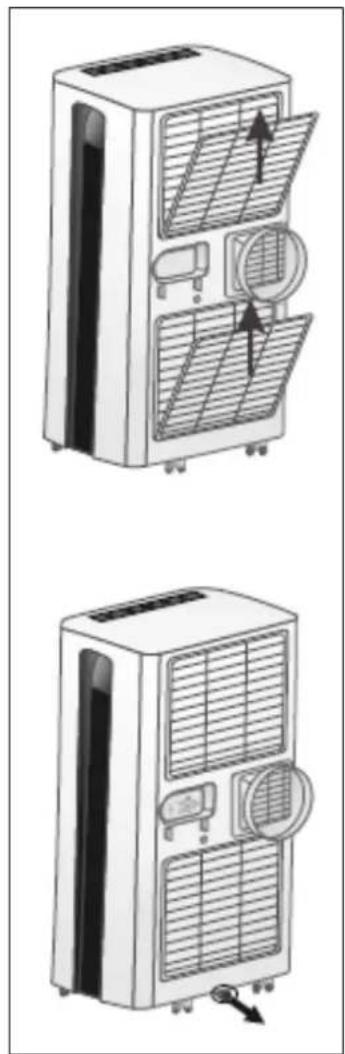
- Take both filters out of the device by pulling the flaps forward to open them and then lifting the filters out of the fastener, see illustration.
- Use a vacuum cleaner or gently beat the filter to remove loose dust and dirt.
- Rinse the filter with tepid water (not hotter than 40^ ) with a mild, neutral cleaning product.
- Let the filters dry thoroughly in the shade before replacing in the unit.
Take care! Never use the air conditioning unit without the filters!
End of season cleaning
If the device is to be stored for a long period, you must take the following measures!
- Remove the condensed water. Run the unit for a few hours on fan function so that the unit is completely dry inside.
Then switch the air conditioning unit off, remove the plug from the socket and:
- clean the filters and reposition them or replace with new ones;
- unscrew the waste pipe from the device in order to prevent damage;
- pack the air conditioning unit in its original packaging or in a plastic bag and place in a dry place for storage. Place a heavy object on the unit.
TROUBLESHOOTING
The unit does not start if I press the ON/OFF button
Is the plug in the socket?
Is the earth leakage circuit breaker engaged? No power? Fuses in good order?
- Is the set timer time probably not elapsed? Delete the setting.
- Four minutes have not yet elapsed after switching off. Wait for several more minutes.
Is the water tank full? Empty it.
- The room temperature is lower than the set temperature; amend the set temperature.
The unit doesn't seem to be very effective
- Is the set temperature lower than the ambient temperature?
- Is there direct sunlight? Shut the curtains.
- Are windows or doors open? Shut them.
- Are there too many people in the room? They produce heat!
Is the space too big? - Is there an object in the room that is generating (a great deal of) heat? Switch it off or remove it.
Is the filter dusty or covered in dirt? Clean it. - Is the air inlet or outlet (hose) blocked? Make sure there is free air flow.
The unit is making a noise or vibrates
Is the surface underneath the machine sturdy and even?
The unit switches itself off
- The overheating safeguard may have switched the unit off. See 'Safety'.
An ERROR code appears on the display
- E1: problems with the sensor ambient temperature. Refer to your supplier for repairs. In an emergency situation, the device can continue to cool or ventilate however, keep an eye on it as it will not automatically shut down! Automatic function and dehumidifier are not working.
- E3: automatic defrosting of the humidifier is not working. Refer to your supplier for repairs. In an emergency situation, you may continue to cool or dehumidify however, you must switch off the device for 5 minutes once every 30 minutes, in order to allow it to defrost.
- P1: the water tank is full, see: Water ooutlet, page 18.
REMOVAL
In the EU this symbol indicates that this product may be disposed of as ordinary household waste. Old equipment contains valuable materials, suitable for recycling. These materials should be made suitable for reuse in order to prevent any adverse effects to health and the environment caused by unregulated waste collection. Therefore, please make sure that you bring old equipment to a designated collection point. Alternatively, contact the original supplier, who can
make sure that as many of the components as possible can be recycled.
Your device contains the coolant R410A, in a closed circuit. This coolant does not damage the ozone layer but is a greenhouse gas that contributes to global warming when it is released into the atmosphere according to the Kyoto protocol. This is why only appropriately qualified technicians are allowed to fill or empty the coolant.
CE Conformity statement
Eurom bv., Genemuiden-NL hereby declares that the mobile air conditioner/dehumidifier, brand EUROM, type PAC7.1 c.q. PAC9 meets the LVD guideline 2014/35/EU and the EMC guideline 2014/30/EU and complies with the following norms:
EN 60335-1:2012
EN 55014-1:2006/+A1:2009/+A2:2011
EN 60335-2-40:2003+A11:2004+A12:2005
EN 55014-2:2015
+A1:2006+A2 :2009+A13:2012
EN 61000-3-2:2014
EN 62233:2008
EN 61000-3-3:2013
Genemuiden, 27-10-2016
W.J. Bakker, Alg. Dir.