
WayOut - Air Conditioning Eurom - Free user manual and instructions
Find the device manual for free WayOut Eurom in PDF.
| Brand | Eurom |
| Model | WayOut |
| Product type | Transfer device for portable air conditioner |
| Main use | Discharge of hot air from a mobile air conditioner via a mailbox |
| Air conditioner compatibility | Mobile air conditioners up to 14,000 BTU / 4,100 W |
| Required hose diameter | 150 mm |
| Maximum slot opening | 5 mm |
| Hose fixing type | Click or rotation system |
| Material | Plastic |
| Weight | Approximately 0.5 kg |
| Power supply | None (mechanical device) |
| Main function | Transfer hot air while allowing mailbox use |
| Safety features | Air outlet must not be obstructed; slot partially blocked by mail to be removed |
| Maintenance and cleaning | Clean before storage; store in a cool, dry, dust-free place |
| Included accessories | Main part, transfer device, adjustment screws, handle, mounting screws |
| Warranty | 24 months |
| Country of manufacture | Netherlands |
| Assembly instructions | Adapt according to mailbox type (inner or outer flap) |
| Hose compatibility | Hose with or without collar |
| Screw type | Philips screwdriver for fixing |
Frequently Asked Questions - WayOut Eurom
User questions about WayOut Eurom
0 question about this device. Answer the ones you know or ask your own.
Ask a new question about this device
Download the instructions for your Air Conditioning in PDF format for free! Find your manual WayOut - Eurom and take your electronic device back in hand. On this page are published all the documents necessary for the use of your device. WayOut by Eurom.
USER MANUAL WayOut Eurom
natural_image
Close-up of a white industrial pipe fitting with ribbed end and mounting bracket (no text or symbols visible)Afbeelding 1

LET OP
Afbeelding 2
Afbeelding 3
Afbeelding 4
Afbeelding 5

Afbeelding 6
Installatie

LET OP
Afbeelding 7
Draaisysteem
Afbeelding 8
Werking
Afbeelding 9
Verwijdering

Thank you for choosing this EUROM device. You have purchased a quality device that you will enjoy for many years. Using this device with respect and care will reduce the risk of personal injury or material damage.

CAUTION
It is important to read and understand this instruction manual before installing and using the device.
Introduction
This manual describes the correct and safe use of this device. Keep this manual for future reference. The manual is an essential part of the device and must be given to the new owner upon resale or exchange. This manual has been compiled with the utmost care. Nevertheless, we reserve the right to improve and adjust this manual at any time. The images used may differ.
The following symbol and term are used in this manual to alert the reader on safety issues and important information:

CAUTION
Indicates a hazardous situation which, if the safety instructions are not followed, can lead to light and/or moderate damage to the product or to the environment.
Warranty
EUROM offers a 24-month warranty on this device from the date of purchase. The warranty does not cover wear and tear from normal use. The warranty expires if a defect is the result of unintentional or careless use of the device. The manufacturer, importer and supplier are not liable for incorrect connections.
Description
The Way-out (Figure 1) is an easy-to-use mailbox transit to which a portable air conditioning system can be installed. An air conditioning hose transports hot air through the Way-out and mailbox opening. The maximum opening of the mailbox slot (Figure 1, pos. 4) is 5 mm. A larger opening is not possible to ensure that an air conditioning system can discharge hot air in all weather conditions.
- Main body
- Adjusting screws
- Handle
- Mailbox slot
- Air outlet
- Transit
- Air conditioning hose (150 mm)
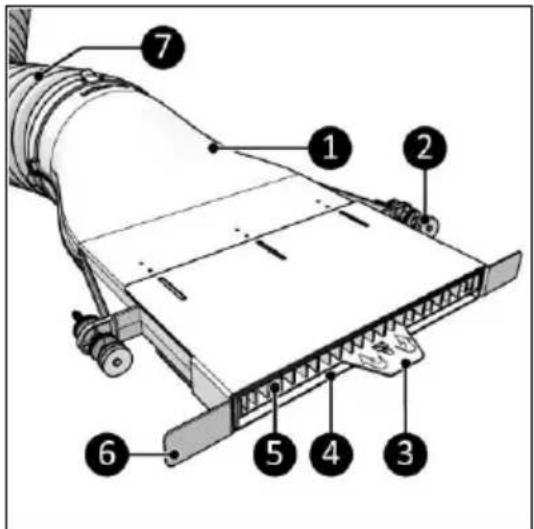
Figure 1

CAUTION
Always ensure that an unhindered flow of warm air is allowed out.
Make sure that the air outlet (Figure 1, pos. 5) is never blocked.
If the mailbox slot (Figure 1, pos. 4) is (partially) blocked by mail, remove the mail from the mailbox slot.
Transport and storage
- Clean the device before storing it.
- Transport the device in its original packaging.
• Store the device in its original packaging in a cool, dry and dust-free area.
Assembly
The device is packed in one box. Remove all packaging material and check that the device is not damaged. Do not use the device if it is damaged, but always contact your supplier. Keep the packaging for safe storage and transport.
- Open the mailbox (Figure 2, pos. 2) and insert the transit (Figure 2, pos. 1). The transit will push away the hair strips (Figure 2, pos. 3) of the mailbox to ensure there is enough space for the Way-out.
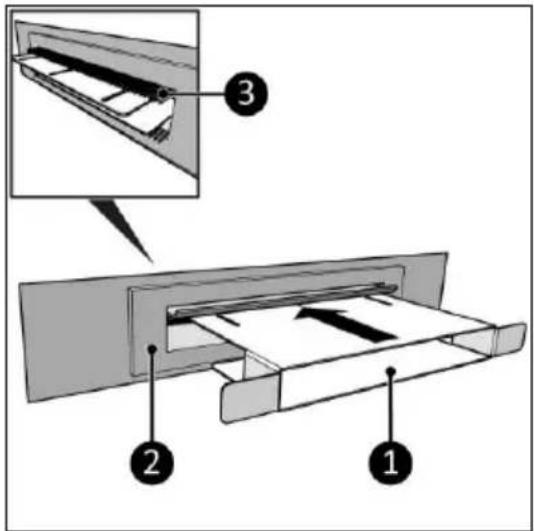
Figure 2
Mailbox flap inwards:
- Insert the main body (Figure 3, pos. 3) into the transit (Figure 3, pos. 4).
- Make sure only the handle (Figure 3, pos. 2) is sticking out from the mailbox (Figure 3, pos. 1).
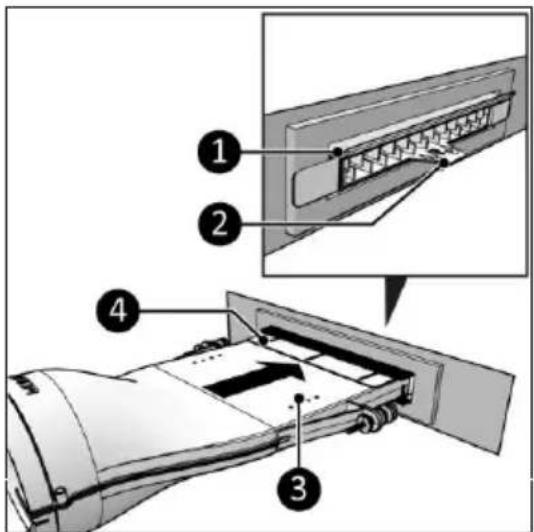
Figure 3
Mailbox flap outwards:
- Insert the main body (Figure 4, pos. 3) into the transit (Figure 4, pos. 4).
- Make sure the main body (Figure 4, pos. 3) is sticking out from the mailbox (Figure 4, pos. 2), so that the mailbox flap (Figure 4, pos. 1) stays open and rests on the main body.
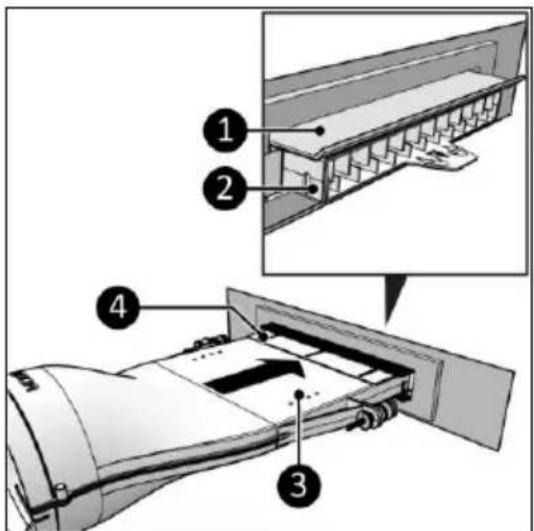
Figure 4
- Adjust and tighten both sides using the adjusting screws (Figure 5, pos. 2).
- Make sure the supports (Figure 5, pos. 1) are pressed against the inside of the door. When the mailbox flap goes inwards, make sure only the handle (Figure 3, pos. 1) sticks out from the mailbox.
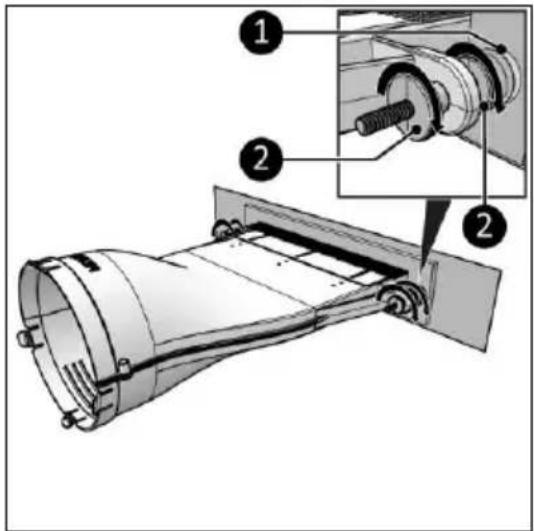
Figure 5
- Fix the main body and transit with the screws (Figure 6, pos. 2) using a Philips screwdriver (Figure 6, pos. 1).
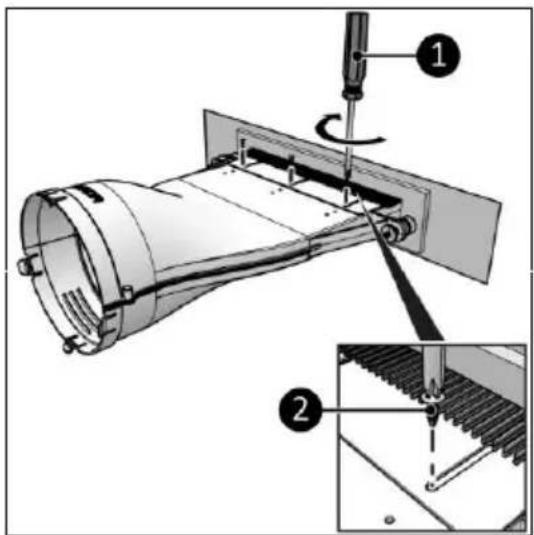
Figure 6
Installation

CAUTION
Only suitable for mobile air conditioning systems with a cooling capacity of up to 14,000 BTU / 4,100 watts.

CAUTION
Only suitable for an air conditioning hose with a diameter of 150 mm.
Two different air conditioning hoses can be installed to the Way-out:
- With a click system, for a hose with a collar (Figure 7, pos. 1).
• With a rotating system, for a hose without a collar (Figure 8, pos. 1).
Click system
- Insert the air conditioning hose (Figure 7, pos. 1) into in the main body (Figure 7, pos. 2).
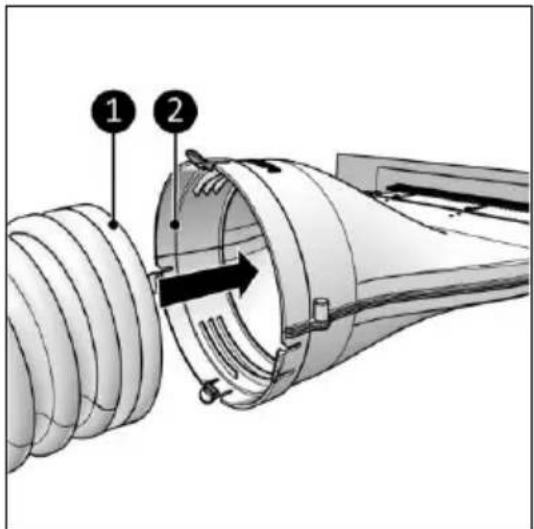
Figure 7
Rotating system
- Insert the air conditioning hose (Figure 8, pos. 1) into the main body (Figure 8, pos. 2) and tighten.
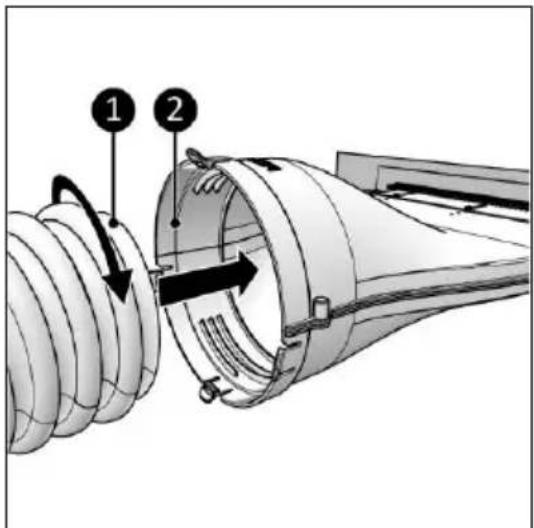
Figure 8
Operation
- Pull the handle (Figure 9, pos. 1) upwards and push a letter (max. 5 mm) through the mailbox slot (Figure 9, pos. 2).
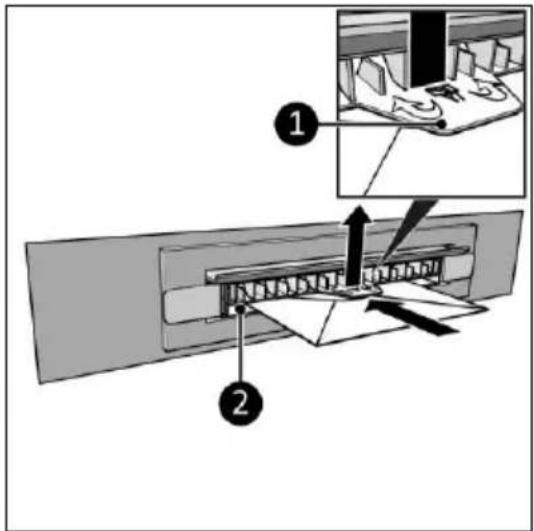
Figure 9
Disposal
At its end of life, discard the device according to the local laws and regulations, or deliver the device to your supplier.
Abbildung 1

VORSICHT
Abbildung 2
Abbildung 3
Abbildung 4
Abbildung 5
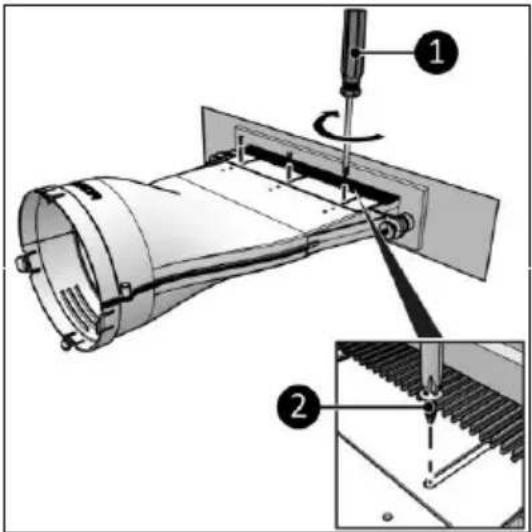
Abbildung 6
Installation

VORSICHT
Abbildung 7
Rotierendes System
Abbildung 8
Betrieb
Abbildung 9
Abfallentsorgung

Figure 1

ATTENTION
Figure 2
Figure 3
Figure 4
Figure 5
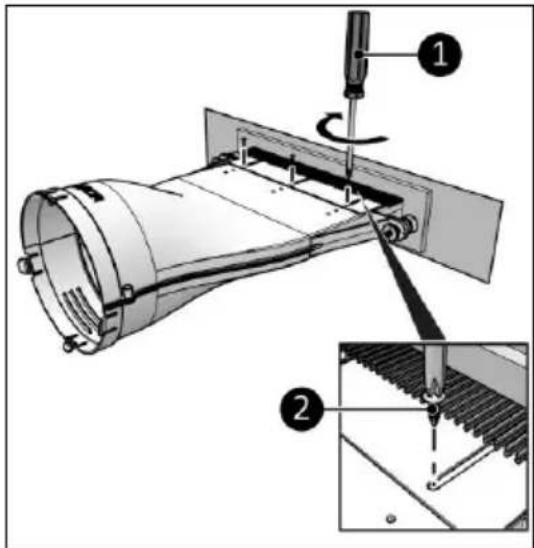
Figure 6
Installation

ATTENTION
Figure 7
Système à rotation
Figure 8
Utilisation
Figure 9
Élimination

Product code: 380965
Version: v3.0
- LET OP
- Installatie
- Draaisysteem
- Werking
- Verwijdering
- CAUTION
- Introduction
- Warranty
- Description
- Transport and storage
- Assembly
- Mailbox flap inwards:
- Mailbox flap outwards:
- Installation
- Click system
- Rotating system
- Operation
- Disposal
- VORSICHT
- Rotierendes System
- Betrieb
- Abfallentsorgung
- ATTENTION
- Système à rotation
- Utilisation
- Élimination
Brand : Eurom
Model : WayOut
Category : Air Conditioning