ADVF10 - Intercom ME - Free user manual and instructions
Find the device manual for free ADVF10 ME in PDF.
| Product Type | Wireless Intercom with DECT Extension |
| Brand | ME |
| Model | ADVF10 |
| DECT Powerbox Dimensions | 88 x 150 x 25 mm |
| DECT Indoor Station Dimensions | Approximately 150 x 90 x 30 mm (estimate) |
| DECT Powerbox Weight | Approximately 200 g (estimate) |
| DECT Indoor Station Weight | Approximately 300 g (estimate) |
| DECT Powerbox Power Supply | 15 V DC, 170 mA (from outdoor station) |
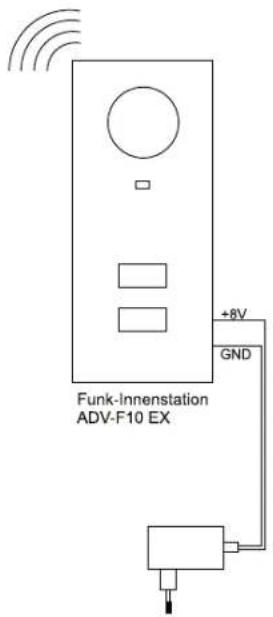
| DECT Indoor Station Power Supply | 8 V DC, 170 mA via included power adapter |
| Operating Temperature Range | -10 °C to +50 °C |
| Maximum Number of Indoor Stations | Up to 3 per DECT Powerbox |
| Wireless Range | Approximately 50 m indoors (estimate) |
| Main Features | Two-way communication, door release, melody selection, ringtone and speech volume adjustment, silent mode, alarm button (during communication) |
| Pairing | Requires long press on pairing button of Powerbox and indoor station (pre-paired at factory) |
| Cleaning and Maintenance | Unplug from mains, clean with a damp cloth and mild soap; do not use abrasive products |
| Safety Instructions | For indoor dry use only; do not expose to moisture; do not disassemble; avoid shocks |
| Warranty | 2-year limited warranty, subject to proper use and no modification |
| Supplied Parts | 1 DECT Powerbox, 1 wireless indoor station, 1 power adapter, 1 antenna, 1 mounting kit, 1 user manual |
| Repairability | Contact a specialist; do not open |
Frequently Asked Questions - ADVF10 ME
User questions about ADVF10 ME
0 question about this device. Answer the ones you know or ask your own.
Ask a new question about this device
Download the instructions for your Intercom in PDF format for free! Find your manual ADVF10 - ME and take your electronic device back in hand. On this page are published all the documents necessary for the use of your device. ADVF10 by ME.
USER MANUAL ADVF10 ME
2JAHRESBESCHRANKETGARANTIE
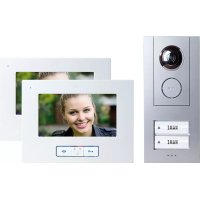
Thank you for purchasing the wireless indoor station ADV-F10, which can be used to extend an existing VISTADOOR or VISTUS intercom system by up to three wirelessly connected indoor stations. This makes it possible to install indoor stations in places in the house where a direct cable connection to the outdoor station is impossible or too complicated.
Please read these instructions carefully in order to avoid installation errors.

NOTE: In systems with several parties, one ADV-F10 is required for each party. The DECT power box is connected to the system in the same way as a 'normal' indoor station.
SCOPE OF DELIVERY
ADV-F10
1x DECT power box
1x Wireless indoor station
1x Power supply plug
1x Antenna
1x Installation materials (dowels and screws)
1x Operating instructions
ADV-F10 EX
1x Wireless indoor station
1x Power supply plug
1x Installation materials (dowels and screws)
1x Operating instructions
Antenna extension (separately available)
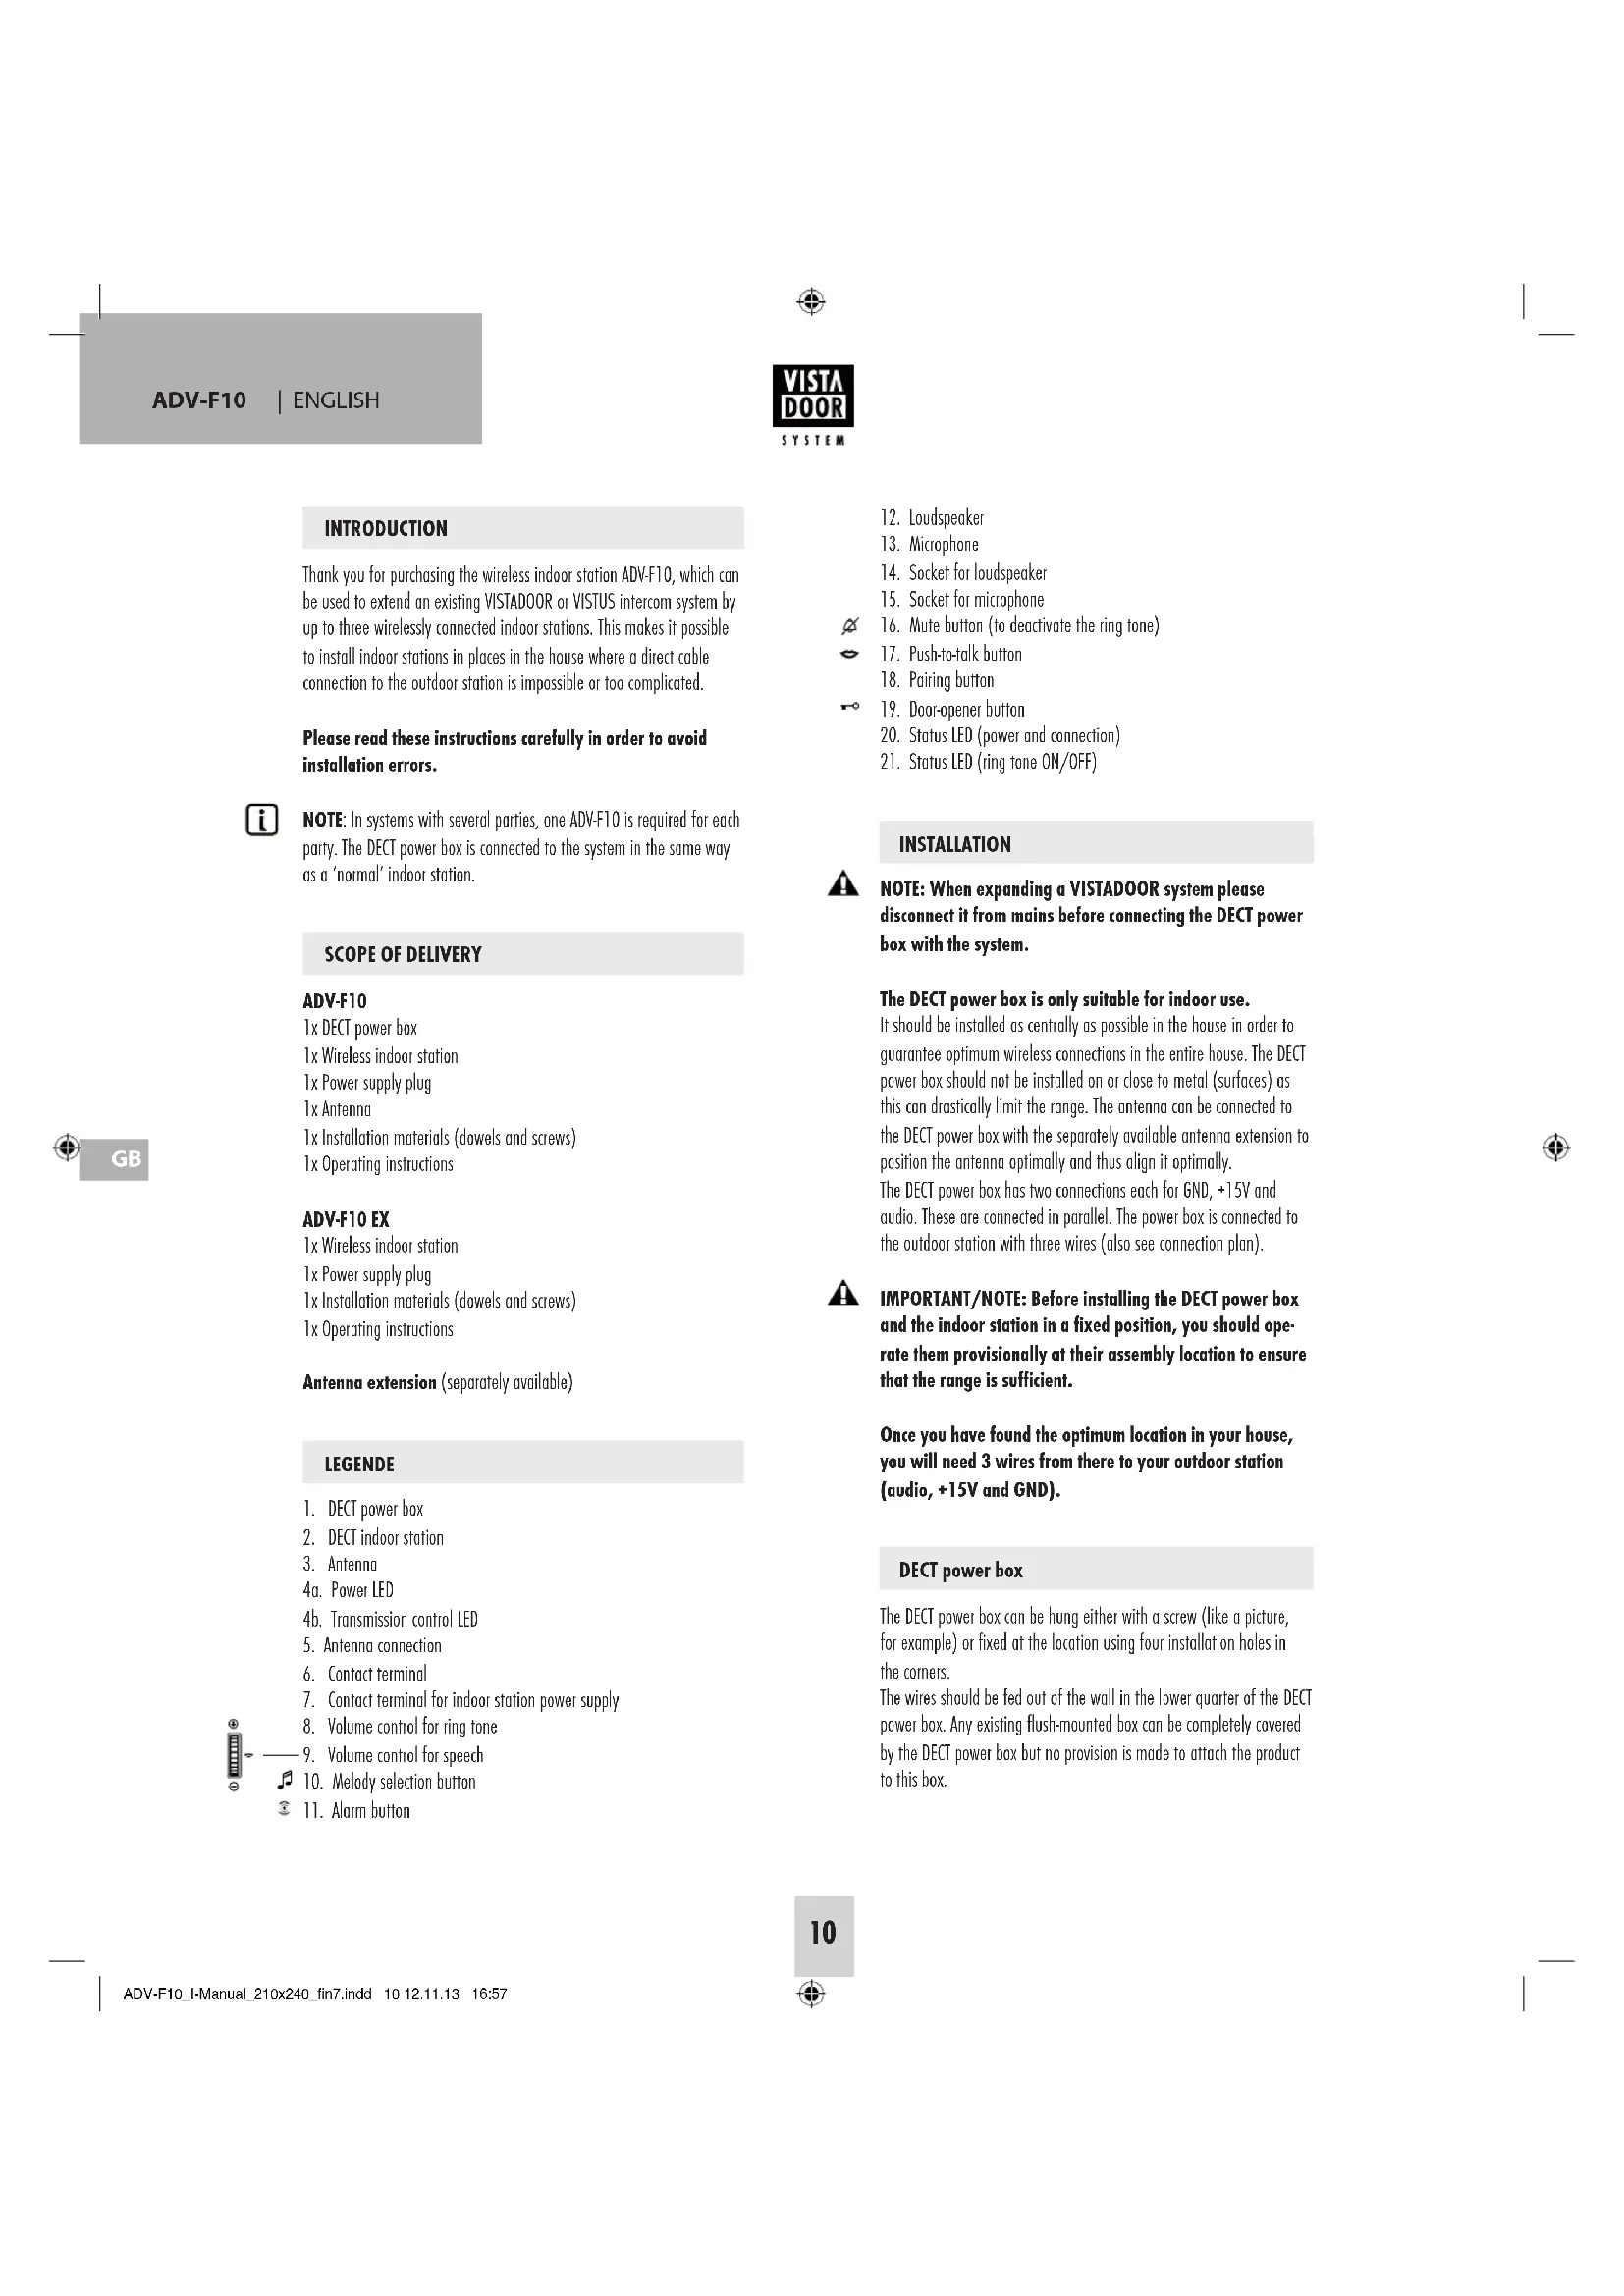
LEGENDE
- DECT power box
- DECT indoor station
- Antenna
4a. Power LED
4b. Transmission control LED - Antenna connection
- Contact terminol
- Contact terminal for indoor station power supply
- Volume control for ring tone
- Volume control for speech
-
Melody selection button
3 11. Alarm button -
Loudspeaker
- Microphone
- Socket for loudspeaker
- Socket for microphone

- Mute button (to deactivate the ring tone)
- Push-to-talk button
- Pairing button
- Door opener button
- Status LED (power and connection)
- Status LED (ring tone ON/OFF)
INSTALLATION

NOTE: When expanding a VISTADOOR system please disconnect it from mains before connecting the DECT power box with the system.
The DECT power box is only suitable for indoor use.
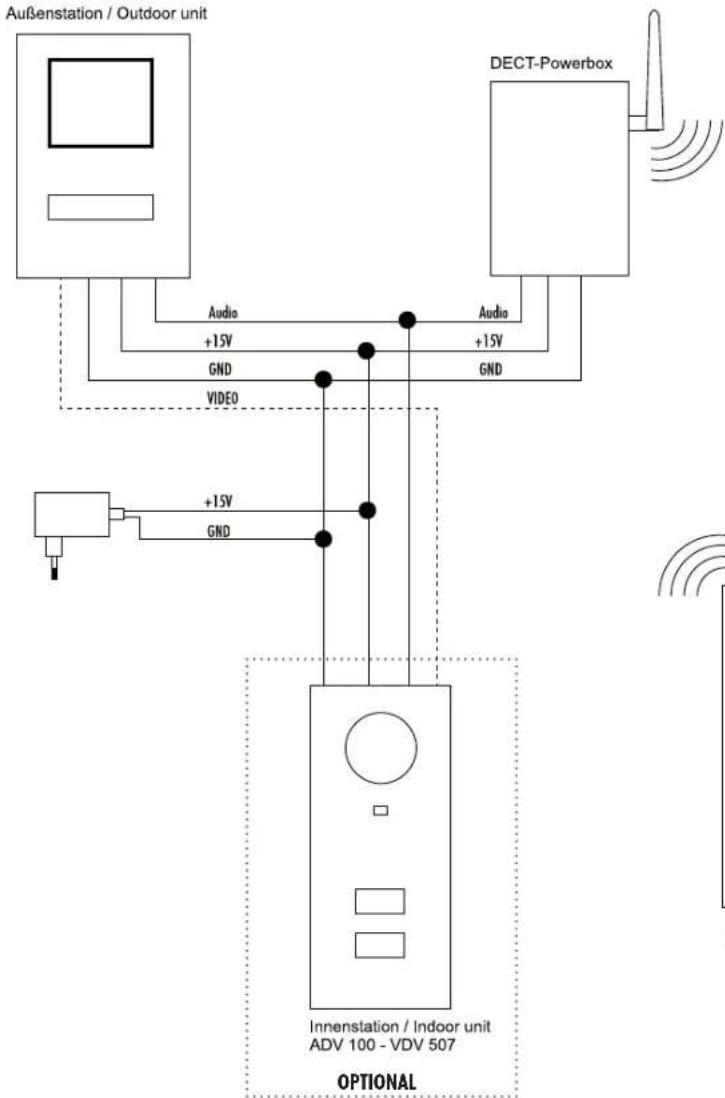
It should be installed as centrally as possible in the house in order to guarantee optimum wireless connections in the entire house. The DECT power box should not be installed on or close to metal (surfaces) as this can drastically limit the range. The antenna can be connected to the DECT power box with the separately available antenna extension to position the antenna optimally and thus align it optimally. The DECT power box has two connections each for GND, +15V and audio. These are connected in parallel. The power box is connected to the outdoor station with three wires (also see connection plan).

IMPORTANT/NOTE: Before installing the DECT power box and the indoor station in a fixed position, you should operate them provisionally at their assembly location to ensure that the range is sufficient.
Once you have found the optimum location in your house, you will need 3 wires from there to your outdoor station (audio, +15V and GND).
DECT power box
The DECT power box can be hung either with a screw (like a picture, for example) or fixed at the location using four installation holes in the corners.
The wires should be fed out of the wall in the lower quarter of the DECT power box. Any existing flush-mounted box can be completely covered by the DECT power box but no provision is made to attach the product to this box.
VISTA DOOR
SYSTEM
ENGLISH ADV-F10
- The DECT power box must be opened before installation. No tools are required as the casing is only clicked together. Simple press the tab on the bottom inwards slightly and then lift the casing lid off the box as shown in figure A1.
- Hold the back section with one hand and mark the holes with a suitable pen.
- Lay the back section to one side and drill the holes with a 6 mm drill.
- Insert the included dowels into the holes and screw the back section on.
- Connect the antenna to the power box. It has a screw connection for this purpose.

NOTE: To optimize the range, you can place the antenna at a different location using a separately available antenna extension.
DECT indoor station
The DECT indoor station is installed in fixed position using four installation holes in the corners. The power supply is fed into the casing from behind. Ensure correct polarity when connecting the power supply.
- The DECI indoor station must be opened before installation. As this casing is also only clicked together, no tools are necessary here either. Simply press the tab on the bottom inwards slightly and then lift the casing lid off the box as shown in figure B1. Take care not to rip off the wires for the loudspeaker and the microphone.
- A drilling template is included to drill the corresponding holes to attach the DECT indoor station. Then, align this at the installation location, using a spirit level if necessary, and stick it to the wall with tape.
- Drill the holes with a 6mm drill.
- Insert the included dowels into the holes and screw the back section on.
Ensure that you feed the cable for the power supply to the DECT indoor station into the casing beforehand.
OPERATION
You can connect the power once all components have been installed, first at the outdoor station and the DECT power box and then at the DECT indoor station.
The red power LED (4a) should then light up on the DECT power box. On the DECT indoor station, the status LED (20) should first flash alternately red/blue and then light permanently after a short time. The system is then ready for operation and the bell can be activated at the outdoor station.
Procedure
- Press the bell button on the outdoor station
- The blue LED (4b) on the DECT power box flashes and the indoor station(s) play(s) the set ring melody.
- Within 60 seconds, the press to talk button (17) can be pressed and a conversation held with the visitor. All other indoor stations immediately stop ringing.
- Any door opener that is connected to the outdoor station can be activated during the conversation by pressing the door opener button (19).
- To end the conversation, press the press to talk button once (17).

Note: after approximately 60 seconds, the DECT indoor station automatically switches back to standby mode.
Set the ring melody
To hear the programmed ring tone, you can simply ring from the outdoor station.
- Press the button (10) to hear the next ring tone.
- Once the tone that you wish to use is played, wait 10 seconds. The ring tone is then programmed.
Set the volume of the ring melody
- Open the indoor station by pressing the bottom tab on the casing a little and pull the front casing forwards, as shown in the illustration.
- The volume of the ring tone is set using the potentiometer (8) on the circuit board. Turn it in a clockwise direction to increase the volume and in an anti-clockwise direction to reduce the volume.

NOTE: Ensure that you do not overwind the potentiometer. It can only be turned by approx. 320^ .
Deactivating the ring tone
Use the button (16) below the loudspeaker to set the ring melody to silent, for example, so that you are not disturbed during your lunch break. The LED under the button (21) lights up red if the ring melody is deactivated.
Set the conversation volume on the indoor station
The potentiometer (9) on the side can be used to set the conversation volume to any level. Turn the wheel upwards to increase the volume and downwards to reduce it.
Alarm button
If the alarm button (11) is pressed during a conversation with the outdoor station, then an alarm will sound at the outdoor station.
This button is without function if there is no connection to the outdoor station.

Pairing / Training additional receivers
The included indoor station is already connected to the DECT power box, so it is normally not necessary to carry out these steps.
A total of 3 indoor units can be programmed to one DECT power box. Follow these steps for each indoor station in turn.
- Hold the pairing button (18) on the DECT power box down for approx. 5 seconds until the blue LED flashes.
- Hold the pairing button (18) on the DECT indoor station for approx. 5 seconds and then release it.
- The indoor unit has now been programmed.
TECHNICAL DATA
DECT power box
Supply voltage: 15 V DC
Power consumption: approx. 170mA ÷ 50mA
Temperature range: -10^ to +50^
Dimensions: 88x150x25
DECT indoor station
Supply voltage: 8 V DC
Power consumption: approx. 170mA 50mA
Temperature range: - 10^ to +50^
Dimensions: 88x200x22 mm
Frequency: 1.8GHz
Range (free field). approx. 100m

NOTES
The functionality of the unit can be affected by the influence of strong static, electrical or high frequency fields (discharging, mobile phones, radios, microwaves).
Cleaning and maintenance
Always disconnect mains powered units from the mains supply before cleaning (disconnect the plug). The unit housing can be cleaned using a soapy soft cloth. Do not use any abrasive materials or chemicals. Remove dust build-up from ventilation slits using a brush and clean up using a vacuum cleaner. Do not hold the vacuum cleaner nozzle directly against the unit.

SAFETY NOTES
The warranty will be null and void in case of damages arising from violations of these operating instructions. We are not liable for consequential damages!
We accept no liability for material damages or injuries arising from inappropriate use or violation of the safety instructions. In such cases all warranty claims are null and void!
Do not use this product in hospitals or other medical facilities. Although this device transmits only relatively weak radio signals, the signals may in such locations result in malfunctioning of systems critical to life. The same may apply to other areas.
For reasons of safety and licensing (CF), unauthorised conversion and / or modification of the product is prohibited.

Do not take the product apart!
Do not leave packaging material lying about since plastic foils and pockets and polystyrene parts etc. could be lethal toys for children.
The device is suitable only for dry interior rooms (not bathrooms and other moist places). Do not allow the device to get moist or wet.
Please consult a specialist should you have doubts regarding the method of operation, the safety, or the connections of the device.
Handle the product with care - it is sensitive to bumps, knocks or falls even from low heights.
2 YEAR LIMITED GUARANTEE
For two years after the date of purchase, the defect-free condition of the product model and its materials is guaranteed. This guarantee is only valid when the device is used as intended and is subject to regular maintenance checks. The scope of this guarantee is limited to the repair or reinstallation of any part of the device, and is only valid if no unauthorised modifications or attempted repairs have been undertaken. Customer statutory rights are not affected by this guarantee.

Please note!
No claim can be made under guarantee in the following circumstances: Operational malfunction
- Empty batteries or faulty accumulator
-
Erroneous coding/channel selection
-
Fault through other radio installation (i.e. mobile operation)
- Unauthorised modifications / actions
Mechanical damage - Moisture damage
No proof of guarantee (purchase receipt)
Claims under warranty will be invalidated in the event of damage caused by non-compliance with the operating instructions. We do not accept any responsibility for consequential damage! No liability will be accepted for material damage or personal injury caused by inappropriate operation or failure to observe the safety instructions. In such cases, the guarantee will be rendered void.

Liability limitation
The manufacturer is not liable for loss or damage of any kind including incidental or consequential damage which is the direct or indirect result of a fault to this product.
GB
These operating instruction are published by
m-e GmbH modem-electronics,
The operating instructions reflect the current technical specifications at time of print. We reserve the right to change the technical or physical specifications.
A
Abb. A
DIAGRAM A
ILLUSTRATION A
AFBEELING A
POWERBOX·POWERBOX·POWERBOX·POWERBOX
INNNENSTATION WIRELESS INDOOR STATION · STATION INTERIEURE SANS FIL DRAADLOOS BINNENSTATION
B
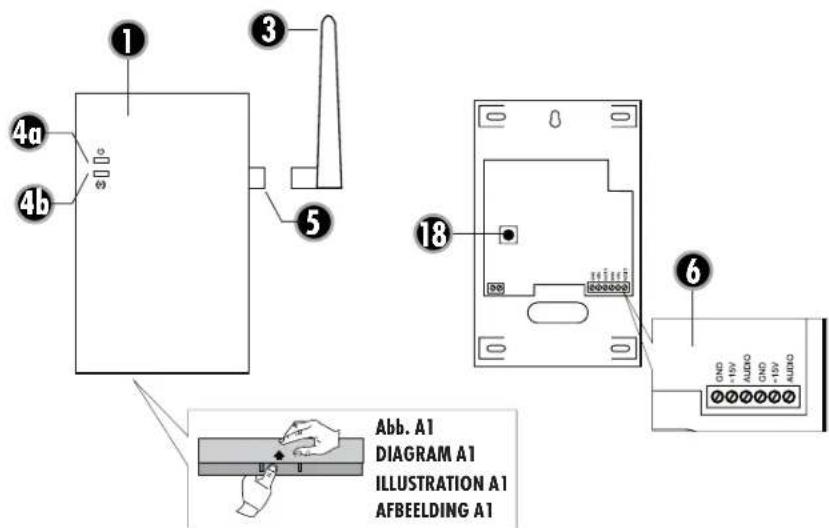
Abb. B
DIAGRAM B
ILLUSTRATION B
AFBEELING B
FR


SYSTEM
FRANÇAIS | ADF-F10

ANSCHLUSS-DIAGRAMM CONNECTION DIAGRAM SCHHEMA DE RACCORDEMENT AANSLUITSCHEMA
Abb.C
DIAGRAM C
ILLUSTRATION C
AFBEELDING C
FR
VISTA DOOR
SYSTEM
INTRODUCTION
Dimensions: 88x200x22 mm
Frequence: 1,8GHz
Portee(champ libre):env.100m
CONSIGNES
m-e GmbH modem-electronics,
An den Kolonaten 37, 26160 Bad Zwischenaln/Duitsland