
BQ6346Y - Barbecue Brixton - Free user manual and instructions
Find the device manual for free BQ6346Y Brixton in PDF.

| Product type | Gas barbecue on wheels with wooden panels |
| Brand | Brixton |
| Model | BQ6346Y |
| Fuel | L.P. (propane) gas only |
| Number of main burners | 4 |
| Side burner | 1 (included) |
| Total power | 17,72 kW/h |
| Ignition | Integrated (piezo) with push button |
| Material of cooking grills | Stainless steel |
| Material of flame tamers | Stainless steel |
| Material of chassis | Steel with wooden panels |
| Burner warranty | 2 years |
| Cooking grills warranty | 2 years |
| Valves warranty | 1 year |
| Structure and panels warranty | 1 year |
| Tank valve type | OPD (overfill protection device), UL listed |
| Use | Outdoor only |
| Cleaning | Steel brush, soapy solution, hot water |
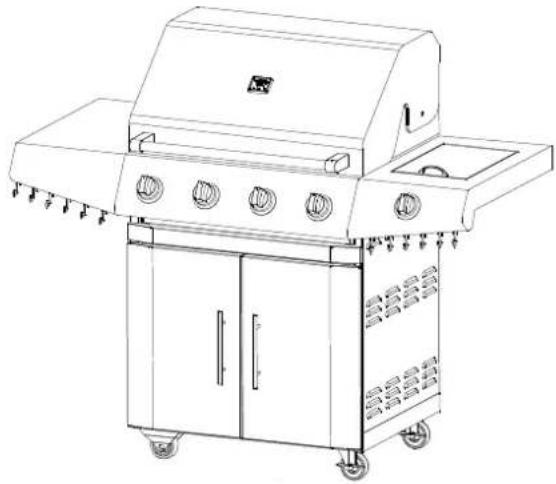
| Included accessories | Cooking grills (4), flame tamers (4), drip tray, side shelves, hooks |
Frequently Asked Questions - BQ6346Y Brixton
User questions about BQ6346Y Brixton
0 question about this device. Answer the ones you know or ask your own.
Ask a new question about this device
Download the instructions for your Barbecue in PDF format for free! Find your manual BQ6346Y - Brixton and take your electronic device back in hand. On this page are published all the documents necessary for the use of your device. BQ6346Y by Brixton.
USER MANUAL BQ6346Y Brixton
natural_image
Line drawing of a standard electric grill with mounted dish and control panel (no text or symbols)ALLEEN VOOR GEBRUIK BUITENSHUIS
ALS U VRAGEN HEEFT BIJ DE MONTAGE, HET GEBRUIK OF HET ONDERHOUD VAN DIT APPARAAT KUNT U ONS BELLEN OF EMAILEN VOOR ONDERSTEUNING.
!!! WAARSCHUWING !!!
!!! WAARSCHUWING !!!
!!! WAARSCHUWING !!!
VOOR UW VEILIGHEID
!!! WAARSCHUWING !!!
VOOR UW VEILIGHEID
text_image
Exploded view diagram of a gas stove with numbered components for identificationMODEL BQ-6346 ONDERDELENLIJST
text_image
Technical diagram of a 3D grill with labeled components and dimensionsnatural_image
Line drawing of a standard electric grill with control panel and wheels (no text or symbols)natural_image
Technical line drawing of a mechanical assembly with internal components and a close-up view of a valve (no text or labels)!!! WAARSCHUWING !!!
!!! WAARSCHUWING !!!
■ WAARSCHUWING SPINNEN EN INSECTEN
text_image
Exploded view diagram of a gas stove with numbered components for identificationMODÈLE BQ-6346 LISTE DES ÉLÉMENTS
text_image
Technical diagram of a portable air conditioner unit with labeled components and dimensionstext_image
Technical diagram of a portable electric grill with labeled components and airflow indicatorsnatural_image
Line drawing of a standard electric grill with control panel and wheels (no text or symbols)natural_image
Technical line drawing of a mechanical assembly with no visible text or symbols!!! AVERTISSEMENT !!!
Retirez tous emballages.
text_image
FORT FAIBLE IH OJ■ NETTOYAGE
NE PAS UTILISER DE DÉTERGENT ACIDE ET/OU D'ANTI-ROUILLE POUR NETTOYER LE PANNEAU DE CONTRÔLE QUI COMPORTE UNE IMPRESSION. CE TYPE DE NETTOYANT FORT PEUT ÔTER L'IMPRESSION.
■ NETTOYAGE DE LA ZONE DE CUISSON
text_image
Exploded view diagram of a portable stove with numbered components for identificationBESTANDTEILLISTE FÜR MODELL BQ-6346
text_image
Technical diagram of a commercial kitchen machine with labeled components and exploded viewSchritt 3:
text_image
Technical diagram of a portable gas stove with labeled components and internal structureSchritt 3:
natural_image
Line drawing of a portable electric grill with control panel and wheels (no text or symbols)natural_image
Technical line drawing of a mechanical assembly with gears and a valve (no text or symbols)!!! VORSICHT !!!
ANY QUESTION DURING ASSEMBLY, USE AND CARE, PLEASE CALL US OR SEND US EMAIL FOR ASSISTANCE
MESSAGE TO OUR USERS
Thank you for selecting our wooden trolley gas grill. We hope you will have great enjoyment in using our fine grill.
Do not attempt to assemble and use this grill unless you read this entire manual thoroughly. Keep it in a handy place as it has answers for questions that may occur in your future use.
Any questions please feel free to contact us, we will be glad to assist you; please refer to this model number whenever you contact us. Thank you.
IMPORTANT: ANY PROBLEM, PLEASE CONTACT US FOR ASSITANCE..
NOTE: THIS APPLIANCE IS NOT INTENDED TO INSTALL IN OR ON RECREATIONAL VEHICLES OR BOATS. THIS APPLIANCE IS FOR OUTDOOR USE ONLY. DEAR INSTALLER/ASSEMBLER: PLEASE LEAVE THIS MANUAL TO THE CONSUMER. DEAR CONSUMER: PLEASE KEEP THIS MANUAL FOR FUTURE USE.
!!! WARNING!!!!
Failure to follow all manufacturer's instructions could result in serious body injury and/or property damage.
!!! CAUTION!!!!
Some parts of this grill may have sharp edges—especially as mentioned in this manual! Wear suitable protective gloves if necessary.
IMPORTANT
The symbols and boxes shown below explain what each symbol means. Read and follow every message found in this manual.
| !!! DANGER !!! |
| DANGER: Indicates an imminently hazardous situation which will result in death or serious body injury if not followed. |
| !!! WARNING !!! |
| WARNING: Warn the possibility of serious body injury if the instructions are not followed strictly. Be sure to always read and follow all of the messages. |
| !!! CAUTION !!! |
| CAUTION: Indicates a potentially hazardous situation which may result in minor or moderate body injury if not followed. |
| !!! WARNING ! ! ! ! |
| FOR YOUR SAFETYShut off the gas to the appliance.Extinguish any open flame.Open the lid.If odor continues, immediately call your gas supplier or your fire department. |
| !!! WARNING ! ! ! ! |
| FOR YOUR SAFETYDo not store or use gasoline or other flammable vapors and liquids in the vicinity of this or any other appliance.An L.P. cylinder not connected for use shall not be stored in the vicinity of this or any other appliance. |
INSTALLATION SAFETY PRECAUTIONS
!!!WARNING!!!
Do not try to install this appliance without reading the "INSTALLATION SAFETY PRECAUTIONS" section of this manual.
- This grill is designed to use L.P. gas only. So only use grill with L.P. gas and the regulator assembly supplied by the manufacturer.
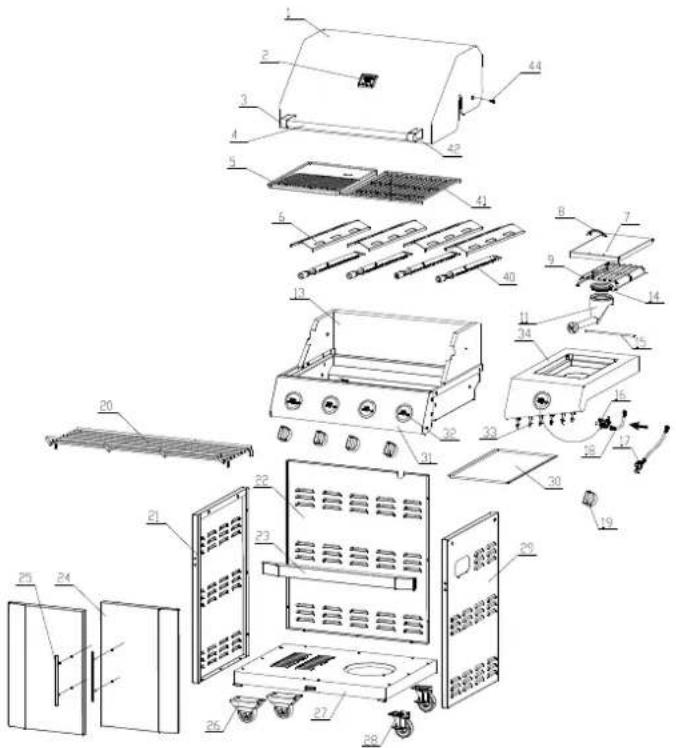
EXPLODED VIEW
text_image
Exploded view diagram of a gas stove with numbered components for identificationMODEL C6024B PARTS LIST
| REF# | DESCRIPTION | Q'T Y | REF# | DESCRIPTION Q'TY | |
| 1 | Lid Assembly 1 23 Door Bracket | 1 | |||
| 2 | Temp Gauge 1 24 Doors | 2 | |||
| 3 | Lid Handle seat(Right Left) 1 25 Door Handles | 2 | |||
| 4 | Lid Handle | 1 26 Castors | 2 | ||
| 5 | Cooking Plate | 1 27 Base | Shelf 1 | ||
| 6 | Flame Tamers 4 | 28 | Castors(Brake) | 2 | |
| 7 | Side burner Lid | 1 29 | Right Panel | 1 | |
| 8 | Handle /Side burner Lid L64 | 1 30 Grease Tray | 1 | ||
| 9 | side burner cooking grid | 1 31 Control Panel Assembly | 1 | ||
| 10 | 1 32 Valves Manifold Assembly | 1 | |||
| 11 | Side Burner 1 33 | Hooks | 12 | ||
| 12 | Left side shelf 1 34 | Right side shelf | 1 | ||
| 13 | Firebox Assembly | 1 40 Main | Burners | 4 | |
| 14 | Side Burner Lid | 1 41 | Cooking Grid | 1 | |
| 15 | Side burner brass ring 1 42 | Lid Handle seat(Left) | 1 | ||
| 16 | Side Valve 1 44 Lid rotary pin | 1 | |||
| 17 | Regulator 1 | 2 | |||
| 18 | Side Hose 1 | ||||
| 19 | Knobs | 6 | |||
| 20 | Warming Grids 1 | ||||
| 21 | Left Panel | 1 | |||
| 22 | Back Panel | 1 | |||
ASSEMBLY INSTRUCTIONS
PLEASE READ THE INSTRUCTIONS CAREFULLY AND FOLLOW STEP BY STEP.
TOOLS REQUIRED: head screwdriver, Hexagon/Wrench (not provided).
The following hardware is provided.
| Item | Description | Specification Quantity | |
| 1 | Truss head screw(With lock and flat washers) 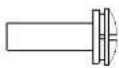 | M6*15 | 26PCS |
| 2 | Truss head screw(With lock and flat washers)  | M4*10 | 21PCS |
| 3 | |||
Step 1: Please install it as per the picture below.
(Note: The assembling ways of the left shelf and right shelf is the same)
text_image
M8*15*30PCS M4*10*15PCS M4*10 4PCS M8*15 4PCS M4*10 5PCS M4*10 6PCS M4*10 3PCS 21 22 23 24 25 26 27 28 29 M8*15 10PCSStep 2:
Please install the firebox assembly, Valves Manifold Assembly and Knobs as per the picture below.
(Note: The assembling ways of the left and right side of firebox is the same)

text_image
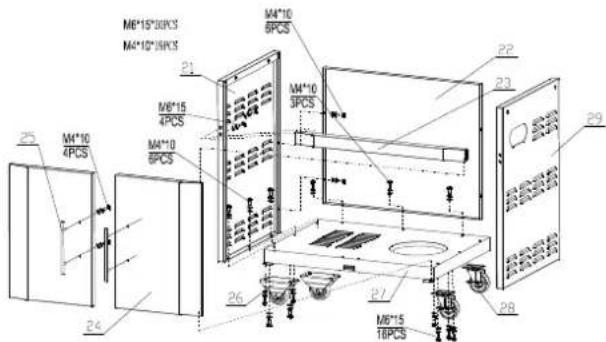
Technical diagram of a portable gas stove with labeled components and internal layoutStep 3:
Please see the picture below for installation.
text_image
Technical diagram of a 41-gas graser with labeled components and internal structureStep 3:
Please see the picture below for installation.
natural_image
Line drawing of a standard electric grill with control panel and wheels (no text or symbols)Then your gas grill is ready for use.
GAS CONNECTION
ONLY USE THE REGULATOR AND HOSE ASSEMBLY PROVIDED WITH THIS GRILL. REPLACEMENT PRESSURE REGULATORS AND HOSE ASSEMBLIES MUST BE THOSE SPECIFIED BY THE MANUFACTURER.
This is a L.P. (Liquefied Petroleum Gas) configured grill. Do not attempt to use a natural gas supply unless the grill has been reconfigured for natural gas use.
■ L.P. tank Requirements:
The L.P. tank used with your grill must meet the following requirements:
• Measurement: 12"(30.5cm) (Diameter) X 18" (45.7cm) (Tall)
• Maximum Capacity: 20lbs. (9Kg)
- Constructed and marked in accordance with the specification for L.P.-gas cylinders See L.P. tank collar for marking.
- Be arranged for vapor withdrawal.
- Has a collar to protect the tank valve.
- No dent or rust. A dented or rusty L.P. tank may be hazardous.
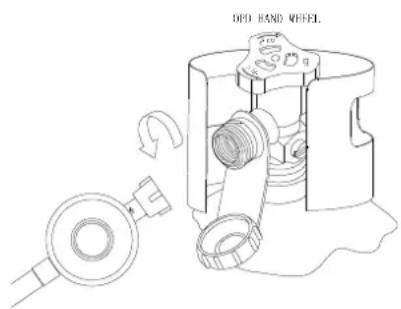
■ L.P. tank valve used must meet the following requirements:
- Have type I outlet compatible with regulator provided.
- Have safety relief valve.
- UL listed Overfill Protection Device (OPD), This OPD safety feature is identified by a unique triangular hand wheel. Only use tanks equipped with this type of valve.
For your safety:
Ensure that the black plastic grommets of the regulator provided are in place and that the hose does not come into contact with the heat shield or the grill head.
■ Connect the regulator to the L.P. tank:
VERY IMPORTANT:
THE REGULATOR SHALL INCORPORATE IN SUCH A LOCATION THAT IT WILL NOT ATTAIN A TEMPERATURE ABOVE 140☐ (60☐).
THE REGULATOR SHALL INCORPORATE A PRESSURE RELIEF VALVE OR OVERPRESSURE DEVICE.
➢ THE INLET OF THE PRESSURE REGULATOR SHALL BE FITTED TO CONNECT THE TYPE I CONNECTION OF THE TANK VALVE.
- Make sure tank valve is in its full off position (turn clockwise to stop).
- Check tank valve to assure it has proper external male threads (type I connection).
- Make sure all burner knobs are in their off position.
- Remove the protective cap from L.P. tank valve, Always use cap and strap supplied with valve.
- Inspect valve connection port and regulator assembly. Look for any damage or debris. Remove any debris. Inspect hose for damage. Never attempt to use damaged or plugged equipment. Contact your local L.P. gas dealer for repair.
- When connect regulator assembly to the valve, hand tighten nut clockwise to a positive stop. Do not use a wrench to tighten. Use of a wrench may damage quick coupling nut and result in a hazardous condition. (as the figure shown below)
- Open tank valve fully (counterclockwise). Use a soapy water solution to check all connections for leaks before attempting to light grill. If a leak is found, turn tank valve off and do not use grill until a local L.P. gas dealer can make repairs.
text_image
DFD HAND WHEEL.!!!! WARNING ! ! ! !
Never insert any foreign objects into the valve outlet. It may damage the valve and cause leak, leaking gas may result in fire, explosion, heavy body injury, or even death.
Do not connect this grill to the self-contained L.P. gas system of a motor home or camper trailer.
Do not use the grill until leak tested.
➢ Stop and call the fire department if any leak detected.
If you cannot stop a gas leak, close the L.P. tank valve IMMEDIATELY, call L.P. supplier or the fire department.
!!! DANGER!!!!
NEVER store a spare L.P. tank under or near grill or in an enclosed area.
NEVER fill the tank beyond 80% full. An overfilled spare L.P. tank is dangerous because surplus gas may leak from safety relief valve. The safety relief valve on a L.P. tank could activate to release gas and cause a fire.
The spare L.P. tank must have safety caps installed on the L.P. tank outlet.
If any gas leak found on the spare L.P. tank, immediately go away from it and call the fire department.
VERY IMPORTANT: DISCONNECTED THE TANK WHEN THIS GRILL IS NOT IN USE.
■ To disconnect L.P. gas tank:
- Turn all the knobs off.
- Turn the tank valve off fully (turn clockwise to stop).
- Detach the regulator assembly from tank valve by turning the quick coupling nut counterclockwise.
- Install the protective cap back L.P. tank valve.
LEAK TESTING
GENERAL
Although all gas connections on the grill are leak tested at the factory prior to shipment, a complete gas tightness check must be performed at the installation site due to possible mishandling in shipment, or excessive pressure unknowingly being applied to the unit. Periodically check the whole system for leaks, or immediately check if the smell of gas is detected.
BEFORE TEST
- Make sure that all packing material is removed from the grill including the burner tie-down straps.
- Do not smoke while leak testing.
- Never leak test with an open flame.
- Make a soap solution with one part liquid detergent and one part water. Prepare a spray bottle, brush, or rag to apply the solution to the connections. For the initial leak test, make sure the L.P. cylinder is full.
- Grill must be leak tested outdoors in well-ventilated area, away from ignition sources such as gas fired or electrical appliances, and flammable materials.
- Keep grill away from open flames and/or sparks while testing.
■ TO TEST
- Make sure all control knobs are in the "OFF" position.
- Make sure the regulator is connected to the L.P. tank tightly.
- Completely open L.P. tank valve by turning counter clockwise. If you hear a “POP” sound, turn gas off IMMEDIATELY, it indicates a heavy leak at the connection. Call your gas dealer or fire department.
- Check every connection from the L.P. tank up to and including the connection to the manifold pipe assembly (the pipe that goes to the burner) by brushing or spraying the soapy solution on the connections.
- If soap bubbles appear, there is a leak. Turn off L.P. tank valve IMMEDIATELY and retighten connections, Open L.P. tank valve again, and recheck.
Always close the L.P. tank valve after leak test by turning clockwise.
Only those parts recommended by the manufacturer should be used on the grill. Substitution can void the warranty. Do not use the grill until all connections have been checked and do not leak.
■ SAFETY TIPS
▶ ALWAYS CHECK FOR LEAKS AFTER EVERY L.P. TANK CHANGE
➢ ALWAYS CHECK FOR LEAKS OF EVERY CONNECTIONS BEFORE EACH USE.
USE LONG BBQ TOOL TO AVOID BURNS.
IF ANY GREASE OR HOT ITEMS FALLING FROM THE GRILL ONTO THE VALVE, REGULATOR, HOSE, ANYTHING CONVEYING THE GAS, CLOSE THE GAS IMMEDIATELY. CHECK THE CAUSE, AND REMOVE THE CAUSE. REPERFORM THE LEAK TEST BEFORE CONTINUING.
DO NOT REMOVE THE GREASE TRAY IF THE GRILL HASN'T COMPLETELY COOLED.
➢ CLOSE ALL CONTROL KNOBS AND L.P. TANK VALVE WHEN THE GRILL IS NOT IN USE.
NEVER MOVE THE GRILL WHILE IN USE OR STILL HOT.
➢ PUSH THE GRILL FORWARD, DO NOT PULL WHEN MOVING IT.
DISCONNECTED L.P. TANK IN STORAGE OR BEING TRANSPORTED MUST HAVE A SAFETY CAP INSTALLED. DO NOT STORE AN L.P. TANK IN ENCLOSED SPACES LIKE CARPORT, COVERED PATIO, PORCH, GARAGE OR OTHER BUILDINGS.
NEVER LEAVE A L.P. TANK IN A RECREATIONAL VEHICLE OR BOAT WHICH MAY BECOME OVERHEATED BY THE SUN.
➢ DO NOT STORE L.P. TANK IN OR NEAR AN AREA WHERE CHILDREN PLAY.
➢ DISCONNECTED THE TANK AND REMOVE FROM THE GRILL IF THE GRILL IS STORED INDOORS.
ANY OTHER PROBLEM, SEE "TROUBLESHOOTING" OR CONTACT US FOR ASSISTANCE.
INSTALLER FINAL CHECK LIST
☐ At least 36" clearance maintained from combustible constructions to the sides and back of this grill.
☐ There is no unprotected combustible construction over the grill.
☐ All internal packaging removed.
□ Burners are sitting properly on orifices.
□ Knobs turn freely.
☐ The regulator & hose connected to grill is provided by the manufacturer (pre-set for 11.0" water column).
☐ Unit tested and free of leaks.
☐ User informed of gas supply shut off valve location.
DEAR CONSUMER, PLEASE KEEP THIS MANUAL FOR FUTURE USE.
GRILL LIGHTING INSTRUCTIONS
■ WARNING: IMPORTANT!
■ BEFORE LIGHTING:
Finally inspect the gas supply hose before turning the gas "ON". If there is evidence of cuts, wear, or abrasion, it must be replaced before use, the replacement hose assembly shall be that specified by the manufacturer.
VERY IMPORTANT: ALWAYS INSPECT THE HOSE BEFORE EACH USE OF THIS GRILL.
- Read instructions before lighting.
- Turn all knobs to "OFF" then open the L.P. tank valve. Always keep your face and body as far from the grill as possible when lighting.
- Open lid during lighting.
- Push and turn any control knob slowly to “ ” position. , The built-in igniter will click and spark simultaneously to light the pilot and burner in sequence .Turn the control knob to OFF IMMEDIATELY if the burner does not light within 5 seconds, wait 5 minutes for gas to dispel, then repeat the lighting procedure.
Keep a spray bottle of soapy water near the gas supply valve and check the connections before each use. Do not light the grill if odor of gas is present.
■ FLAME CHARACTERISTICS:
Check for proper burner flame characteristics. Each burner is adjusted prior to shipment; however, variations in the local gas supply may take subtle necessary adjustments.
Burner flames should be blue and stable with no yellow tips, excessive noise, or lifting.. If the flame is yellow, it indicates insufficient air. If the flame is noisy and tends to lift away from the burner, it indicates too much air. NOTE: small yellow tips are ok..
OPERATION INSTRUCTIONS
!!! CAUTION!!!!
- Often clean the grill, a grease fire that may damage the grill may occur if the grill has not been cleaned frequently
- NEVER leave the grill unattended while using.
- Do not use water to extinguish the grease fire, it may cause body injury. Turn knobs off and L.P. tank off in case grease fire occurs.
- Grease fire can't be put out by closing the lid. Turn off knobs and L.P. tank IMMEDIATELY if any grease fire occurs.
!!! WARNING!!!!
For your safety use of grill:
- Keep grill area clear and free from any flammable material.
- NEVER let children operate the grill or play near the grill.
- This grill is for outdoor use ONLY. NEVER use in a enclosed area like carport, porch, covered patio, garage, or under a surface that can catch fire.
- Do not block the ventilation holes in the four sides of the grill cart, it may affect the combustion performance of the burner due to insufficient air.
- Use grill at least 36" away from any wall or surface. 120" away from objects that may spark and ignite gas i.e. live electrical appliances, pilot lights of water heaters, etc.
- Do not use this grill on or under wood balconies.
- This grill is designed to use only L.P. gas, DO NOT use lava rock, briquets, charcoal on it.
- NEVER light the burner with lid closed. Non-ignited gas accumulated inside a closed grill may cause explosions.
- Check the burner flames periodically.
- Turn off the gas supply when the grill is not in use.
• Always turn off the L.P. tank completely and detach from the grill before moving.
Total gas consumption (per hour) of BQ-6346 grill is 17.72 kW/h with all burners on “

■ USING THE GRILL:
Grilling requires high heat for searing, proper browning. Most foods are cooked at the “ ♂ ” heat setting for the entire cooking time. However, when grilling large pieces of meat or poultry, it may be necessary to turn the heat to a lower setting after the initial browning. This cooks the food through without burning the outside. Foods cooked for a long time or basted with a sugary marinade may need a lower heat setting near the end of the cooking time.
Make sure the grill has been leak tested and is properly located.
Remove any packing material.
Light the grill burners using the instructions in this manual.
Turn the control knob to “ ^* ” and preheat the grill for 15 minutes.
Notice: The grill lid is to be closed during the appliance preheat period.
Place the food on the grill and cook to the desired doneness. Adjust heat setting and The control knob may be set to any position between and .
NOTE: The grill is designed to grill efficiently without the use of lava rocks or briquettes of any kind.
NOTE: The hot grill sears the food, sealing in the juices. The longer the preheat, the faster the meat browns.
CARE & MAINTENANCE
■ MAINTENANCE
Keep the grill area clear and free from combustible materials, gasoline and other flammable vapors and liquids.
Keep the holes in the three sides of the cart clear and free from debris, thus ensure the flow of combustion and ventilation air is unobstructed.
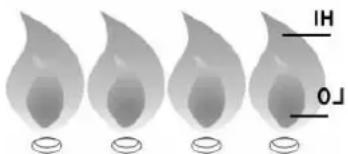
➢ Visually check burner flames as following:
- remove cooking grids and flame tamers
- light burners.
- turn knobs from High position to Low position, Check the flame status, the flame in LO position should be smaller than in HI position, as figure shown below.
• Always check flame before each use, see TROUBLESHOOTING if any abnormal status found.
text_image
HI LO■ CLEANING
DO NOT USE ACID DETERGENT AND/OR ANTIRUST TO CLEAN THE CONTROL PANEL WITH PRINTING. SUCH STRONG CLEANSER MAY CLEAN OFF THE PRINTING.
■ COOKING AREA CLEANING
The easiest way to clean the grill is to clean immediately after turning off the flame and cooking is completed. Wear a barbeque mitt to protect your hand from the heat and steam. Dip a brass bristle barbeque brush in tap
water and scrub the hot grill. Dip the brush frequently in the water. Steam, created as water contacts the hot grill, assists the cleaning process by softening any food particles. The food particles will fall and burn. Never immerse a hot parts in water.
■ GRILL BURNER CLEANING
- Be sure the tank valve and the knobs are in the "OFF" position. Make sure the grill is cool.
- Clean the exterior of the burner with a wire brush. Clear stubborn scale with a metal scraper. Clear any clogged ports with a straightened paper clip. Never use a wooden toothpick as it may break off and clog the port.
- Please note if insects or other obstructions are blocking the flow of gas through the burner, you will need to call our customer service line.
VERY IMPORTANT: The orifice of the valve must be located in the center of burner section after move and clean. Otherwise, it may cause serious body injury and property damage. Swing the burner slightly after replaced to check whether it is installed properly.
The frequency to clean the burner relies on how often you use the grill.
■ GREASE TRAY CLEANING
The grease tray should be emptied and wiped down periodically and washed in a mild detergent and warm water solution. A small amount of sand or cat litter may be placed in bottom of grease tray to absorb the grease.
TROUBLE SHOOTING
■ SPIDER AND INSECT WARNING
Spiders and insects can nest in the burners after storing, these nest can cause fires inside the tube or beneath the grill. This is very dangerous condition. So always clean the burners before use after storing.
■ WHEN TO LOOK FOR SPIDERS
Inspect the burners at least once a year or immediately in case any of the following conditions occur:
- Yellow flame with insects burning smell.
- Temperature can't rise.
- Heats unevenly.
• The burners make popping noises.
■ BEFORE CALLING FOR SERVICE
Inspect according to following trouble shooting before contact us if the grill can't work normally, sometimes it may caused by easy-solved problems and can solve by yourself. You may save the cost of a call.
TROUBLE SHOOTING
| PROBLEMS POSSIBLE CAUSE SOLUTIONS | ||
| Burner won’t light after turn and push the knobs | Pulse igniter damaged Replace. | |
| Pulse igniter wires are loose or fall off | Reconnect or replace with new Pulse igniter assembly with wires. | |
| Orifice blocked Check the orifice for blockage. | ||
| Wire is shorting | Replace with new Pulse igniter assembly with wires. | |
| Yellow or orange flame, with gas odor | Incomplete combustion Contact us for assistance | |
| Low heat with knob in high temperature " position. | Gas hose bent or kinked Smoothen it. | |
| Burner or orifice blocked. Clear. | ||
| Low gas pressure Call the gas dealer. | ||
| Grill not preheated Preheat the grill for 15 minutes. | ||
| Flare-up | Excessive meat fat Cut off fat before grilling. | |
| Over high temp. Adjust. | ||
| Grease deposit Clean. | ||
| Flame out | Over high winds | Find a less wind place. |
| Flame lifting | Over high gas pressure | Call the gas dealer. |
| Flashback | Burner port blocked | Clean. |
| Grease fire | Grease accumulated in food | Turn off knobs, gas tank valve, leave lid open, let fire burn out. Clean the grill after cool. |
GRILLING TIPS
- The doneness of meat, whether rare, medium, or well done, is affected by the thickness to a large extent.
• The cooking time is affected by the kind of meat, the size and shape of the cut, the temperature of the meat when cooking begins, and the degree of doneness desired.
- Defrost meat in the refrigerator overnight, Don't use a microwave, this always yields a juicier.
- Use a spatula instead of tongs or a fork to turn the meat, as a spatula will not puncture into the meat and let the juices come out.
• To get the juiciest meats, add seasoning or salt after the cooking is finished on each side and turn the meat only once (juices are lost when the meat is turned several times). Turn the meat just after the juices begin to bubble to the surface.
- Cut off any excess fat from the meat before grilling.
■ FOOD SAFETY
Always follow the following tips to enjoy a safe and heath outdoor grilling.
• Always use hot soapy water to wash hands, surfaces & utensils after processing raw meat.
• Always separate the raw meats from done foods to avoid cross contamination
• Always use clean utensils to handle the food.
• Always cook the meat thoroughly to kill germs. Use a thermometer to inspect the inner temp. of the meat, if necessary.
- Place the done foods and leftovers promptly into refrigerator, if eat no longer at that moment.
DO NOT LEAVE THE GRILL UNATTENDED WHILE COOKING.
PLACEMENT OF THE GRILL
Clean the grill.
Store the grill in well-ventilated dry outdoors and out of reach of children when L.P. tank is connected to the grill.
Store the grill in dry indoors ONLY after the L.P. tank is turned off and removed, the L.P. tank must store outdoors, out of the reach of children, NEVER store the tank in a building, garage or any other enclosed area.
LIMITED WARRANTY
Barbecue Gas grill
We warrant to the original consumer/purchaser of each Outdoor Gas Grill that when subject to normal residential use, it is free from defects in workmanship and materials for the periods specified below. This warranty excludes grills used in rental or commercial applications. There will be a shipping and handling charge for the delivery of the warranty part(s).
| Burners: | 2 Years |
| Stainless Steel Flame Tamer: | 2 Years |
| Cooking Grids: | 2 Years |
| Valves: | 1 Year |
| Frame, Housing, Cart, Control Panel, Igniter, and Related Parts: | 1 Year |
| All Stainless Steel Parts | 2 Years |
Our obligation under this warranty is limited to repair or replacement, at our option, of the product during the warranty period. The extent of any liability of ours under this warranty is limited to repair or replacement. This warranty does not cover normal wear of parts, damage resulting from any of the following: negligent use or misuse of the product, use on improper fuel/gas supply, use contrary to operating instructions, or alteration by any person other than our factory service center. The warranty period is not extended by such repair or replacement.
Product repair as provided under this warranty is your exclusive remedy. We shall not be liable for any incidental or consequential damages for breach of any express or implied warranty on its products. Except to the extent prohibited by applicable law, any implied warranty or merchantability or fitness for a particular purpose on this product to the duration of the above warranty. Some states do not allow the exclusion or limitation of incidental or consequential damages, or allow limitations on how long an implied warranty lasts, so the above limitations or exclusions may not apply to you. This warranty gives you specific legal rights, and you may have other rights, which vary from state to state.
\\\\\*
text_image
Exploded view diagram of a gas stove with numbered components for identificationELENCO DEI PEZZI MODELLO BQ-6346
text_image
Technical diagram of a portable kitchen machine with labeled components and internal compartmentsFase 3:
text_image
Technical diagram of a 3D grill with labeled components and internal structurenatural_image
Line drawing of a modern electric grill with control panel and wheels (no text or symbols)natural_image
Technical line drawing of a mechanical assembly with no visible text or symbols!!! AVVERTENZA!!!!
Grill Barbecue a Gas
text_image
Exploded view diagram of a portable stove with numbered components for identificationLISTA DE LAS PARTES DEL MODELO BQ-6346
text_image
Technical diagram of a portable electrical cabinet with labeled components and part numbersPaso 3:
text_image
Technical diagram of a 41-gas graser with labeled components and internal structurenatural_image
Line drawing of a standard electric grill with control panel and wheels (no text or symbols)natural_image
Technical line drawing of a mechanical assembly with gears and housing (no text or symbols)i i j ADVERTENCIA ! ! ! ! !
text_image
Exploded view diagram of a gas stove with numbered components for identificationLISTA DE PEÇAS DO MODELO BQ-6346