
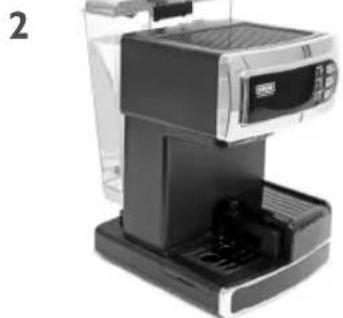
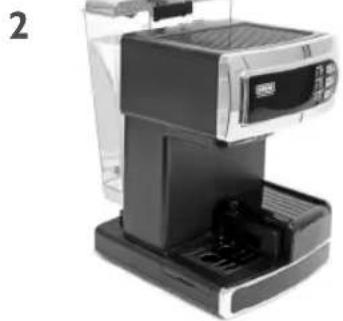
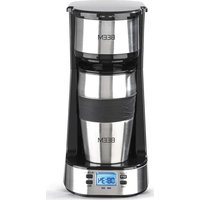
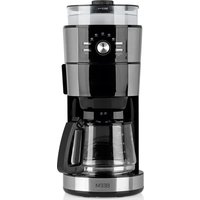
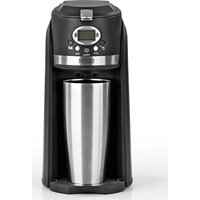
iJoy Café Ultimate - Coffee machine BEEM - Free user manual and instructions
Find the device manual for free iJoy Café Ultimate BEEM in PDF.
| Product type | Coffee and espresso machine |
| Brand | BEEM |
| Model | iJoy Café Ultimate |
| Dimensions (W x D x H) | 234 x 350 x 310 mm |
| Weight | 4.9 kg |
| Mains voltage | 220-240 V~ |
| Mains frequency | 50 Hz |
| Power | 1230-1470 W |
| Percolation pressure | 20 bar |
| Protection class | I |
| Protection rating | IP X0 |
| Water tank capacity | 1.2 L (estimated) |
| Milk jug capacity | 0.2 L (estimated) |
| Compatible coffee types | Ground coffee, E.S.E. pods, soft pods |
| Functions | Espresso, Lungo, Cappuccino, Latte Macchiato, steam function |
| Control panel | Touch with indicator lights |
| Steam wand | Articulated with milk froth regulator |
| Milk system cleaning | Automatic rinsing after use |
| Descaling | Recommended every 80 to 150 percolations depending on water hardness |
| Dishwasher-safe removable parts | Milk jug and lid (top basket) |
| Safety instructions | Do not immerse, use on a flat surface, unplug after use |
| Usage | Domestic and similar non-professional |
Frequently Asked Questions - iJoy Café Ultimate BEEM
User questions about iJoy Café Ultimate BEEM
0 question about this device. Answer the ones you know or ask your own.
Ask a new question about this device
Download the instructions for your Coffee machine in PDF format for free! Find your manual iJoy Café Ultimate - BEEM and take your electronic device back in hand. On this page are published all the documents necessary for the use of your device. iJoy Café Ultimate by BEEM.
USER MANUAL iJoy Café Ultimate BEEM
Coffee and Espresso machine
- Before using, check that your plug socket's voltage corresponds with the voltage on your device's label.
Always connect your device to a earthed plug socket. - If your device's power cable is damaged, it must be replaced by the manufacturer or customer service or another similarly qualified person to avoid any risks.
- Only use the device for its intended purpose and in a dry environment.
- Do not use the device on or in the vicinity of hot surfaces.
- Do not use any device with a damaged cable or plug or after it has malfunctioned or has fallen or been damaged in any other way. Send the device to the next authorised customer service to be checked, repaired or to have electrical or mechanical settings adjusted.
- Place the device on a flat surface or a table; do not let it hang over a table edge or counter edge.
- Make sure that the power cable does not touch any hot surfaces.
- Do not touch the device's hot surface (e.g. filter unit, hotplate, bottom of the water container).
- Do not immerse the device or power plug in water or other liquids in order to protect against electric shocks.
- Do not use the device outside or in a hot environment.
- Do not pull the cable, wrap the cable around the device or bend the cable.
- Only use fresh (potable) and cold to lukewarm drinking water.
- Be aware of steam leaving the coffee filter container to avoid burns.
Only use the device in line with the instructions.
- Do not use the device without water in the tank.
- Hot steam or hot water can drip out of the brewing head and the milk foam nozzle. Therefore only line up the milk foam nozzle with the drop pan using the operating lever. Never hold your hands, other body parts or objects that are sensitive to moisture and/or heat under the brewing head when the device is in use.
- Never remove the portafilter during the brewing process.
- Never remove the milk foam nozzle from the milk when steam is still escaping. Otherwise hot milk can spray out. Wait until the process is over before removing the container from the milk foam nozzle.
- Risk of burning; prepared coffee is hot.
- Do not clean the container with an aggressive cleaner, steel wool, or any other abrasive material.
- Always pull out the power plug from the plug socket holding the actual plug, not the cable.
- To disconnect the device, first switch the button to the "off" position, then remove the plug from the plug socket.
- Never use the device if the glass decanter (if any) is chipped. Only use the glass decanter (if any) provided with this device. Use it carefully as it is fragile.
- This device can be used by children from 8 years and by people with reduced physical, sensory or mental capabilities or a lack of experience and/or knowledge if
he/she is supervised or has been instructed about the safe use of the device and have understood the resulting dangers.
Children must not play with the device. Children must not clean or maintain the device unless they are supervised and over the age of 8.
Children younger than 8 years should be kept away from the device and the power cable.
Dear customer,
Thank you for choosing a BEEM product. Before using the device, read through the operation instructions, particularly the safety instructions. Keep the operation instructions for later use and pass them on to any future owners.

For your own safety! Read the safety instructions in the operating instructions carefully!
Table of contents
Safety Instructions 17
Delivery scope 19
Overview 20
Setup 21
Before first time use 21
Intended Use 21
Specifications 21
Using the portafilter and filter inserts 23
Preparation 25
Cleaning and care 27
Troubleshooting 31
Disposal 32

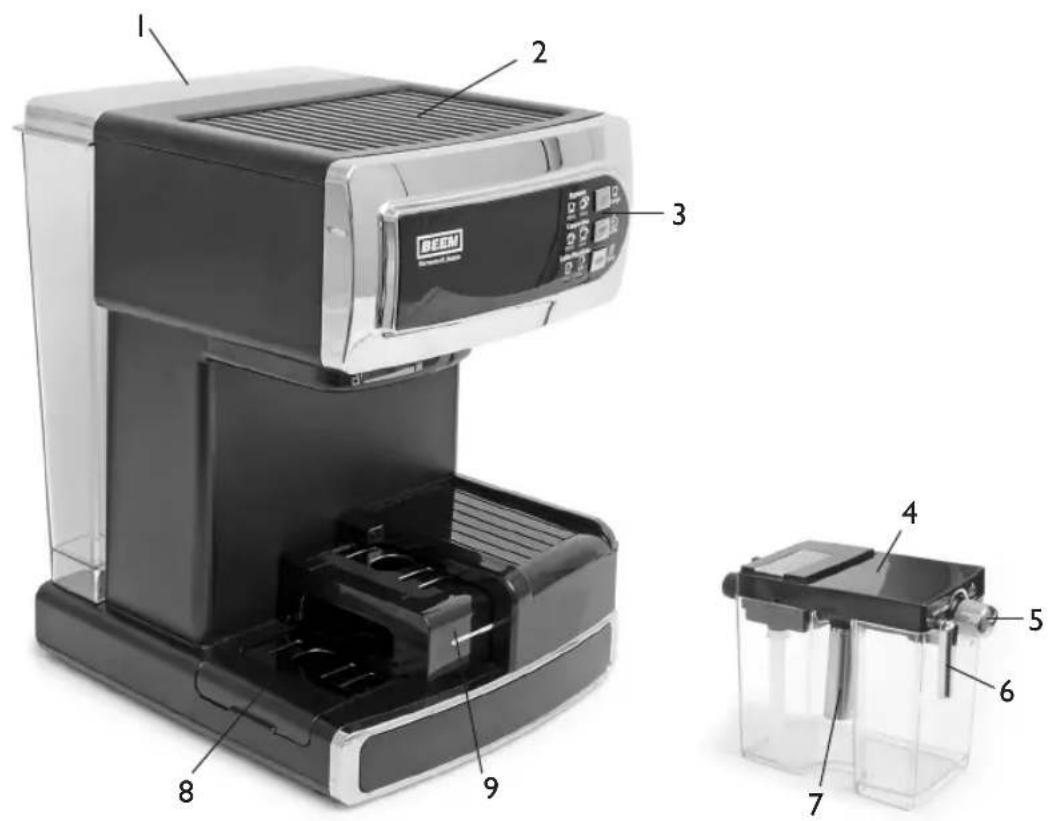
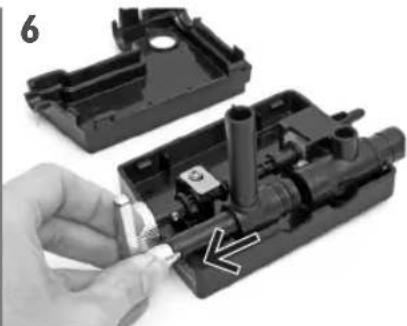
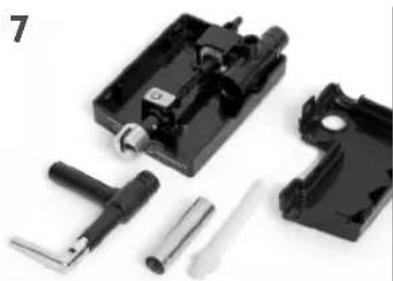
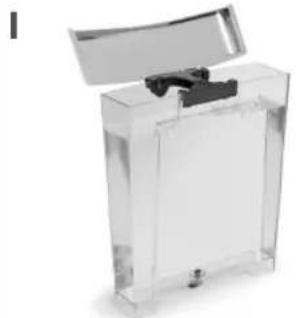
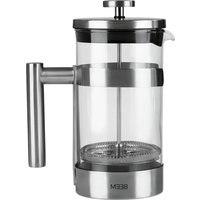
Delivery scope
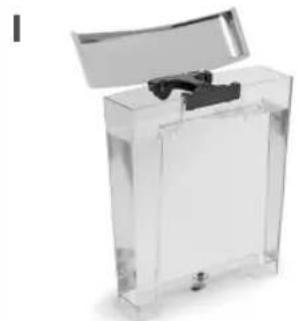
Water tank
2 Hot plate for cups
3 Control Panel
4 Milk container
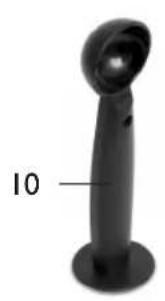
5 Steam and milk foam controller
6 Steam nozzle control lever
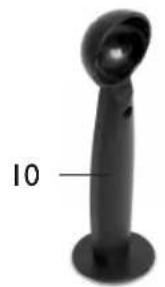
7 Steam nozzle
8 Drip pan with pot grid
9 Sliding drip pan with pot grid
10 Dose spoon
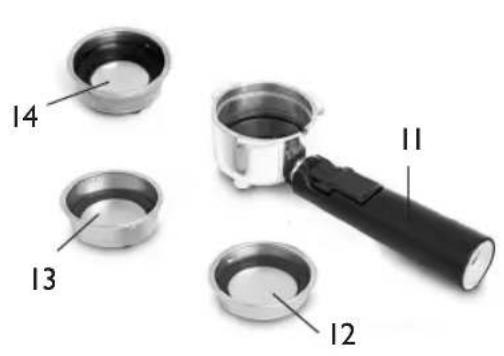
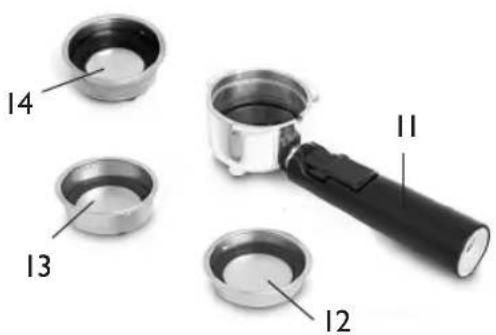
I1 Portafilter
12 Filter insert for I cup with coffee power or I pad
13 Filter insert for 2 cups with coffee power or 2 pads
14 Filter insert for E.S.E pads
Operating instructions (without images)
Overview

Set up
Before first time use
Carry out a trial run with a little bit of coffee for a perfect aroma. Throw away the coffee from the first concoction. Then clean the device as described in the "Cleaning and care" chapter.
When first using a new device, the air first needs to be displaced from the pump and the pipelines. This may cause loud pumping noises. Please prepare 3-4 drinks to fill the pipelines with water. Afterwards, the device will run quietly and reliably in the long term.
Specifications
Model i-Joy Café Ultimate
Model number ES38.001
Device (L× W× H) 234× 350× 320mm
Weight 4.9kg
Operating voltage 220-240 V~
Power frequency 50 Hz
Power 1230-1470 W
Protection class I
Protection type IP X0
Brewing pressure 20 bar
Intended Use
This device is only intended for preparing coffee and milk beverages for use in the home or similar, non-commercial applications, such as staff kitchens in shops, cafés, offices or other working environments, agricultural properties, use by guests in hotels, motels and other residential complexes, bed and breakfast guesthouses.
Any other use is unintended.
Claims of any type because of damage are invalidated by improper use.
The operator bears the risk exclusively.
filling the water tank
Fill up the water tank up to the MAX mark.
Position water tank. Do not tilt to ensure that seal is not damaged.
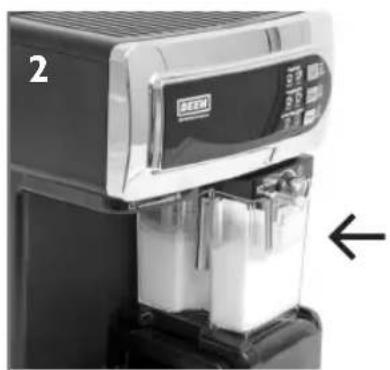
Filling up the milk container

Fill up the milk container. Note the MIN and MAX markings.

Insert milk.
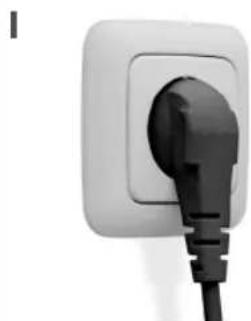
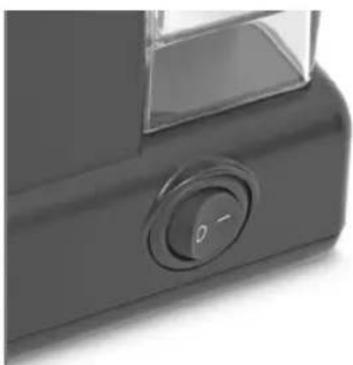
Switching on the device

Plug in the power cable. Switch on the device. Switch off the device after use.

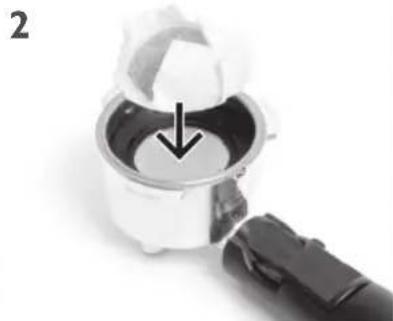
Using the portafilter and filter inserts
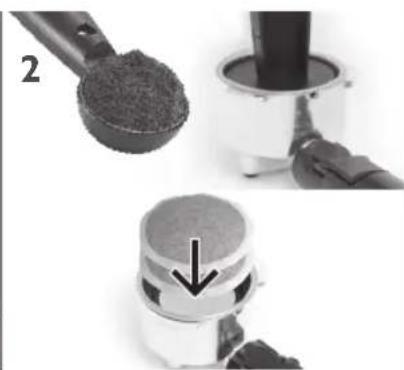
Select insert for I cup/I pad

Align insert (notch with the handle) and insert in the portafilter.
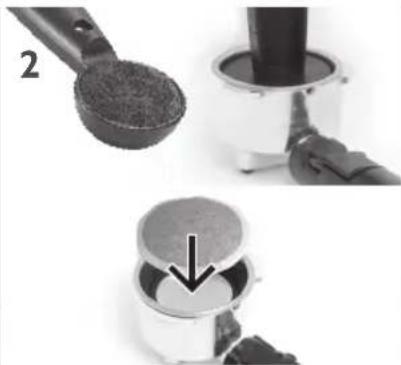
Fill with I spoon of ground coffee up to MAX and press down or insert I pad.
Select insert for 2 cups/2 pads or double espresso

Align insert (notch with the handle) and insert in the portafilter.
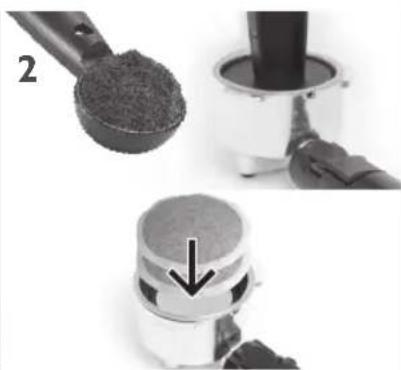
Fill with a heaped spoon of coffee up to MAX and press down or insert 2 pads.
Select insert for E.S.E. pads
Align insert (notch with the handle) and insert in the portafilter.

Lay in the E.S.E. pad, turn edges if necessary.

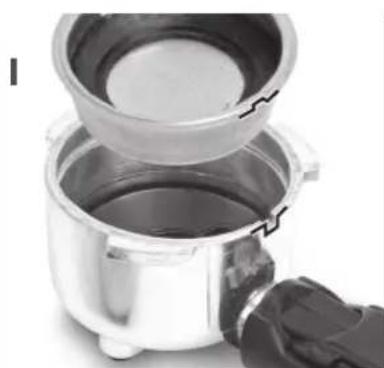
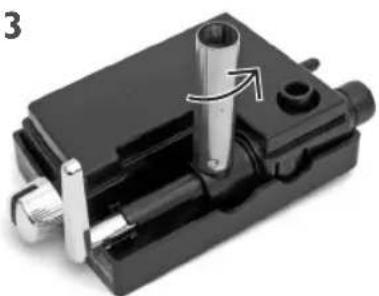
3
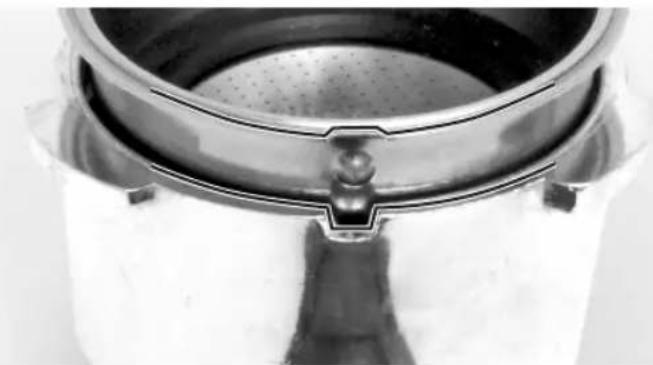
Insert portafilter with ground coffee/pad into the machine and lock in place.

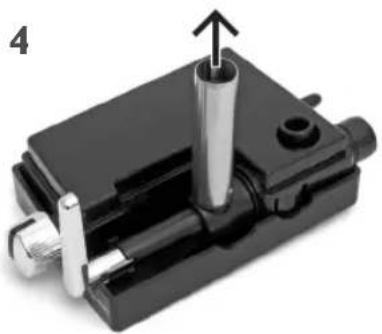
4
Place the cup under the device.
Pull out the sliding drip pan if necessary.
Preparation
Espresso
la cup

Place the cup on the pulled out sliding drip pan.
1b 2 cups
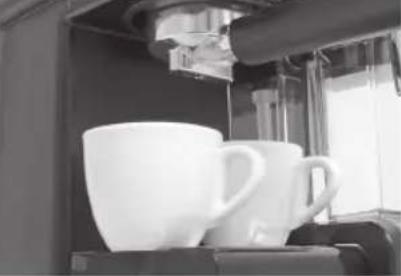
Use filter insert for 2 cups. Position cups under both discharge nozzles.
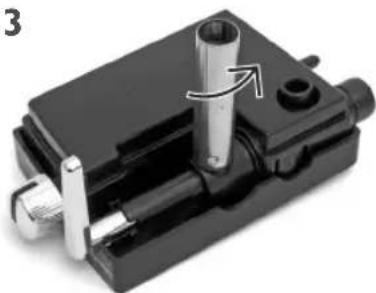
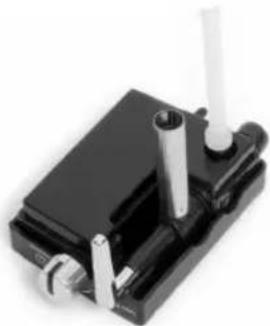
Cappuccino
1

Place the cup on the drip pan, or pull out the sliding drip pan.
2
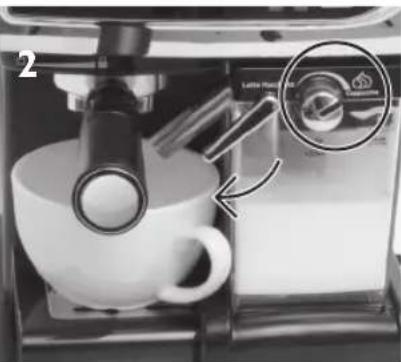
Place the milk foam control on the cappuccino. Align the steam nozzle with the cup.
Latte Macchiato
1
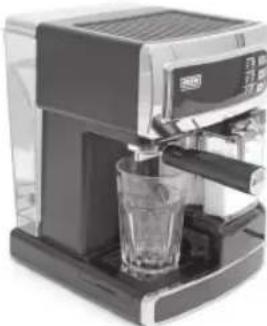
Place the glass on the drip pan, if necessary completely remove the drip pan.
2
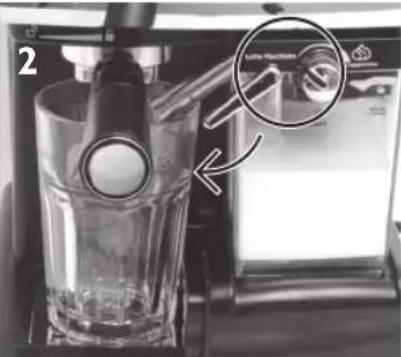
Place the milk foam control on the latte macchiato. Align the steam nozzle with the glass.
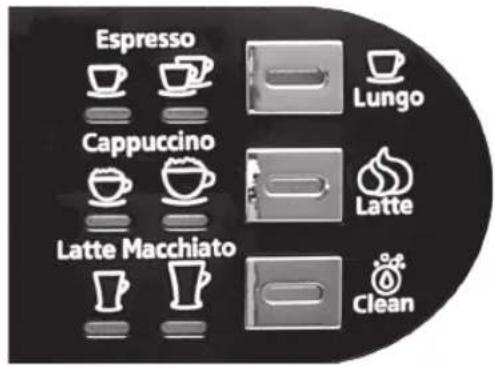
Display
Control display on the option key pulses during heating/preparation or cleaning
Control display on the option key lights up when the device is ready for use

All functions end automatically or can be ended prematurely by pressing the corresponding option key.
Latte Macchiato

Milk foam controller
Cappuccino
Important: Start the cleaning after using the milk container. See "Cleaning and care - milk container" chapter.
Cleaning and care
Emptying the portafilter


Fold the portafilter's fixing bracket upwards so that the filter insert does not fall out and bang the espresso power in the bin or remove the capsule/pad.
Inserting and removing the filter insert
Align the notch on the edge of the filter insert with the handle when inserting and removing and insert/remove the insert in the portafilter.

Careful when removing the portafilter from the device! There may be hot liquids in the portafilter or on the filter inserts which can drip.
Before commencing with cleaning work: switch off the device and let it cool.
Espresso machine, water tank, portafilter, inserts:
Clean the water tank, the portafilter and the inserts with warm rinse water and then rinse thoroughly with fresh water. The water tank, the portafilter and the inserts are not suitable for washing in a dishwasher.
Do not attach the portafilter and accessories to the device during storage in order to protect the seals.
Clean the espresso machine with a lightly moistened, lint-free cloth. Do not immerse in water.
Rinsing the espresso machine:
I. Fill the water tank with cold, clear water and insert it.
2. Insert the portafilter with an empty filter insert.
3. Place a large cup under the outlet and press the option key for Lungo for 3 seconds.
4. The device rinses the pipelines with water.
5. Repeat the process if necessary.
6. Leave all parts to dry.
Rinsing the milk container:
You can store the filled milk container in the fridge. However, ensure that the milk container and its pipelines are cleaned regularly after each transition to prevent contamination and obstructions. The milk container and the lid are suitable for cleaning in a dishwasher (top basket).
Rinsing the milk pipelines:
I. Place a large cup under the outlet.
2. Fold the milk container nozzle over the cup and set up the steam/milk foam controller (5)
3. Press the option key or 3 seconds.
4. The device rinses the pipelines with water.
5. Repeat the process if necessary.
6. Leave all parts to dry.
Thoroughly rinsing the coffee and milk ways:
If you not need the device after several transitions, clean all the coffee and milk ways thoroughly:
I. Fill the milk container and the water tank with clear water.
2. Put the milk container and the water tank in the device.
3. Place a large cup under the outlet.
4. Fold the milk container nozzle over the cup.
5. Set the steam/foam controller to latte macchiato.
6. Press the option key for a latte macchiato.
7. All pipes are rinsed with clear water.
8. Leave all parts to dry.
Cleaning and care
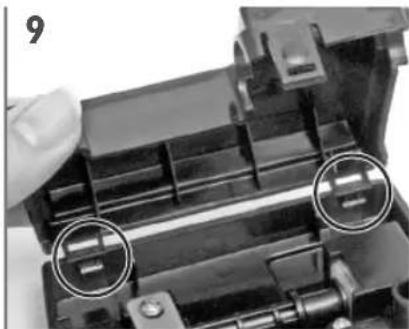
Complete clean for milk container lid
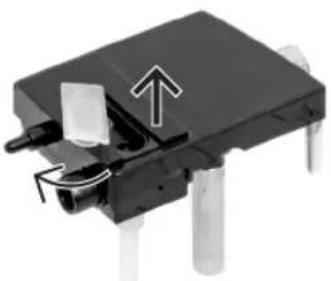
1
Upper side of the lid: open silicon cover and fold open.
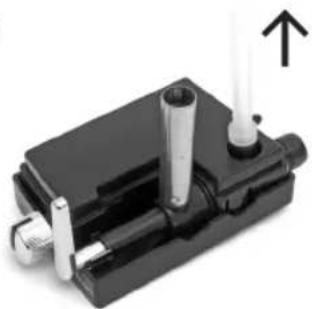
2
Turn the cover. Pull out plastic hose.
3
Turn the steam nozzle until the groove and the locking pin are on top of each other.
4
Then pull out steam nozzle.
5
Press "push" and take the cover parts a part.
6
Remove the steam nozzle control lever with a slight turn.
7
All parts are suitable for cleaning in the washing machine. Allow to dry.

8
Reassemble the parts in the reverse order.

9
Caution: place the cover correctly and press until you hear a click.
Dscaling
Over time, mineral residues from the drinking water deposit in the espresso machine. To remove them, the device must be decalcified regularly. The intervals are dependent on the water hardness and how often the device is used:
Water
Decalcification
Soft or filtered every 150 brewing processes
Hard every 80 brewing processes
Decalcifying the device:
I. Fill the water tank and the milk container up to the MAX marking with water and a mild calcification agent for automatic coffee machines.
2. Insert the portafilter with an empty filter insert.
3. Place a large cup under the outlet.
4. Press the option key for a latte macchiato.
5. Allow the calcification agent to work for 10min
6. Press the option key for a latte macchiato.
7. Rinse out the milk container and the water tank with clear water and repeat the rinsing a second time with clear water.
Storage
If it has been used for some time, clean the device before reuse.
Troubleshooting
Problem Cause Remedy
| The check lights do not light up after switching on. | Power cable not inserted. Plug in the power cable. | |
| Fuse in the power distribu-tion defect/switched off. | Replace the fuse, or switch the circuit breaker back on. | |
| Signal lamp/s defect. Inform customer service. | ||
| The fuse in the power distribu-tion is triggered | Too many devices connected to the same circuit. | Reduce number of devices in the circuit. |
| Cause of error not identifi-able. | Inform customer service. | |
| No coffee is coming out of the machine. | The water tank is empty. Fill up the water tank. | |
| Water tank incorrectly installed. | Correctly install the water tank. | |
| Water tank valve clogged up. | Clean valve, have replaced by customer service if neces-sary. | |
| Coffee comes out of the machine very slowly. | The coffee has been ground to fine. | Use a middle grind setting. |
| The coffee has been pressed together too strongly. | Do not press the coffee so strongly. | |
| Coffee runs down the out-side of the portafilter. | The portafilter is not com-pletely locked in place. | Insert the portafilter prop-erly. |
| There is ground coffee on the edge of the portafilter. | Clean the edge of the porta-filter. | |
| The portafilter seal is con-taminated. | Clean the portafilter seal. | |
| There is too much coffee in the filter. | Use less coffee. | |
Problem Cause Remedy
| The milk is not foamy or is not coming out of the milk foam nozzle. | There is not enough steam. Ensure that the water tank is filled. | |
| The steam nozzle is clogged up. | Clean the steam nozzle as per the instructions. | |
| The amount of milk in the milk tank is not enough. | Fill up the milk tank. | |
| The coffee is released to quickly. | The coffee has not been ground finely enough. | Use a middle grind setting. |
| There is not enough coffee in the filter. | Use more coffee. | |
| The coffee is too weak. You are using the small filter for two cups. | Use the large filter for two cups. | |
| The coffee has not been ground finely enough. | Use a middle grind setting. | |
| The three check lights on the control panel are blinking alternately. | The water tank is empty. Fill up the water tank. | |
| Water is leaking out of the bottom of the device. | The drip pan is full. Empty the drip pan. | |
| Valve on the water tank is leaking. | Inform customer service. | |
Disposal

The "crossed-out refuse bin" symbol demands separate disposal of electrical and electronic old devices (WEEE). Electrical and electronic devices can contain materials that are dangerous to humans and the environment. Do not dispose of this device and its packing in normal refuse. Dispose of them at a specified collection point for electrical and electronic old devices. In doing so you will be contributing to the protection of resources and of the environment. For further information please contact your retailer or your local authorities.


Instructions de service (sans illustration)
Vue d'ensemble

Characteristicas techniques
Modelo i-Joy Café Ultimate
N^ tipo ES38.001
Aparato (L × B × H) 234 × 350 × 320 ~mm
Peso 4,9 kg
PnroTOBaeHne Kofo 89
OuHcTka n yxoA 91
YcTaPaHHe HeuCnpaBHOCTe 95
YTHAN3aun 96
KOMNAEKT NOCTABKN
BakAABBOAbI
2NoDorpeBaIOUaI NaHTaAaueK
3 NaHeAb ynpabAeHn
4 KOHTeHep AAR MOAOKa
5 PeryaTOp noaun npa n BCneHbHaMn MOkA
6 PykoTka ynpabAeHnna npOBbIM clllOM
7 NapoBaHaCaAka
8 AOTOKAa c6opa BOAbc peweTKoI
9 BbIaBnXHOn AOTOK AAR c6opAp BOAbc peWTeKoN
10 Mepna Ioxka
11 ApKaTeAb HbTpa
12 Cmehhbln 0aMOnOTOro Kooe Ha I yawky nn I naKeTNK Kooe
13 Cmehhbln hA MoAOTOro KoOe Ha 2 aAaKN Hn 2 nakeTnKa KoOe
14 CmeHHbI ΦaBtpAe E.S.E.-NaKeTHKOB
PykoBOCTBO NO 3Kcnayatau (6e3 nAIOCTpaun)
O630p

POnAroToBka
Ipea nepBbIM nCIOAb30BaHHeM
AIA NOAUyehnI PpeBOxCOaHOro apomata BBIOAHHTb IPO6hBIM NcK C He6oABuM KOnueCTBOM KoFe. KoFe nepBoro PPnroTOBAAEHRA Bb6pocntb. 3aTeM OCHNTb YCTPOINCTBO, KaK ONUCAHO K TAABe ,OChNTKa N yXoA".
Pn nepbom HCNOAusbAHHH HOBOrO
yCTPOHCTBa CHaHaA Heo6XoAMMo ydaANTb
BO3dYx H3 HAcoca N Tpy6OpBODa. Pn
3TOM n3 HAcoca CbIHbI rPOMKne Wymbl.
IOkaUyInCTa, pNROTOBbTe 3-4 HAnNTKa,
HTo6bl 3aHOAHHTb Tpy6OpBOAb BOAOi.
NoCae 3TORO yCTPOHCTBO 6yDeT pa6OtaTB
6ecWUMHO I DOAFO.
TexHHueckne DaHHble
MoAeIb i-Joy Café Ultimate
Homep Tnna ES38.001
Pa3Mepbl yCTpoiCtBa ( × × ) ,MM 234x350x320
Bec,kr 4,9
Pa6ooye HapjKeHne 220-240
YacToTa ceTn 50 Tc
MoHocTB 1230-1470 BTr
Klacc 3aunTbI I
CTepeHb 3aunTbI IP XO
DaAeHHe 3aBapnBaHnra 206ap
NcnoAb3ObaHne no Ha3HaueHnIO
AaHhoe yCTpoiCTO ppeHa3NaueHO AAn
PnIroTOBaeHHa KOeHNbIX N MOAOHbIX
HaHTKOB B OMAuHEM XO3NCTBe HAn
APyHX NOo6HbIX, HeNPOMbIuAAeHHbIX
cΦepax TaKx, KaK, HApnPmEp, KyXHn
MaRa3INHO, KaΦe, OΦncOB HAn APyrHe
NOo6HbIe PON3BOAcTBeHHbIe YCAOBHn,
Ha CeAcbCKOXO3aYCTBeHHbIX PpeAPnraTnx,
IOCTOABUaMn OTeAeH, MOTEeH n B
APyrHX TINuHbIX KInbIX NOMEueHHx,
NOAYNAHCNOHax.
IVHOe HAn BbIXoAaJee 3a DaHHbIe paMKn
NCNoA3yeTcR CHTaETcR NCNoAB3OBaHHeM
He No Ha3HaueHIO.
PiPeTH3Hn AIO6Oro POda No NOBOAdy
HeNCnpaBHOCTe N PrpHne
NCNoA3OBaHHa He No Ha3HaueHIO
NCKIAOChEbl.
OTBeTCTBeHHOCtB 3a HNX HeCeT
NOA3OBaTeB.
3aopoAHeHne 6aka AAB BOAbI
3aIIOAHHTb 6ak AIA BOAbI AO OTMeTKn MAX.
YCTaHOBNTb 6aK AAR BOAbI.
Pn 3TOM He CTaBNTb
Ha pe6po, YTO6bI He
NOBpeAHTb POKAAky.
3aNoAHeHne KOHTeHepa AAM MOAoka
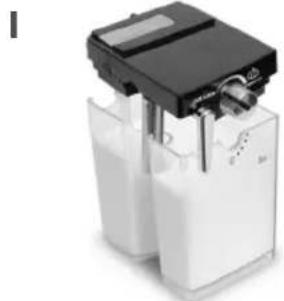
3aONAHNTe KOHTHeP AAMoAOKa. O6paauTe BHMaHne Ha OTMeTKN MIN N MAX.
YCTAHOBHTe KOHTeHep AAR MOAOKa.
Bkaioyehne yctpoiCTBa
BcTaBBTe BnAky ceTeBOrO Ka6eAA B PO3eTKy.
BkIOuHTb yCTPOIcTBO. Nocae nCNOAb3OBaHnB bIKAOHTb.
HcnoAb30BaHne AepeKaTeaI cHaBtpa I CMeHHbIX PhnAbTpOB
BbI6paTbΦnAusbTp AIA I yaekn / I naKeTuKa

BbipOBHbCMeHHbI
ΦnAbTp (BbIeMKoK
pykoTKe) n yctaHOBHTb
AepKaTeAb ΦnAbTpTa.

3acbinaTb I Aoxky MOAOTOro KoOe AO yPOBHa MAX n npnKaTb H BAOXHTb I naKeTHK KoOe.
Bb6paTbΦnAbTpAra 2
aWeK/2naKeTnKOB HAn
AAABOHNHO 3cPipecco

BbipOBHb CMeHHbI
ΦnAbTp (BbiEMKOJ K
pyKoRtKe) n yCTaHOBHTb
AepKaTeAb ΦnAbTpTa.
3acbinaTb AOKKY MOAOTORO KOe c ropKoI AO yPOBHa MAX n npKaTb Hn BAOXHTb 2 NaKeTHka KOe.
BbI6paTbΦHbTp AAnakTeNKOB E.S.E.

BbipOBHrB CMeHHbI
fNAbTp (BbiEMKOIK
pyKoRtKe) N yCTaHOBHTb
AepKaTeAb fNAbTpa.
BaoXHTb E.S.E.-NaKeTnK, npn Heo6xoAnMoCTn 3aBePhyTb Kpa.


3

YCTAHOBNTb AepKaTeA b HnAbTpa C MOAnTbIM KOe/ NaKeTHKOM KOe B MaunHy n 3a6AoKInPOBaTb.
4

Noactabntb yaiky.
Pn Heo6xoAMOCTN BblABHHTb AOTOK AAR c6opa BOAbI.
ПригOTOBаене кофe
3cnpecco
laIyaWka

IOCTaBnTb yawky Ha BblABHyTbi AOTOK AAR C6opa BOAbI.
162yaukkn
Ncnoa3OBaTb CMeHHbI HnAbTp Ha 2 yaWK. NoCTaBHTb YaWK NOD ABYM BblNYCKHbIMN OTBepCTnMn.
KanyuHnO
1

IOCTaBnTb yawky Ha AOTOK AAR c6opa BOAbI, Pn He- 06XoAMOCTH BblABHHTb AOTOK AAR c6opa BOAbI.

YCTAHOBITE peryA TOp BCNEHINBAHNMOLOKA B NOAOKeHne "KanyuHo". HappaBbTe napOByIO HacaKDy B yaIKy.
AaTTe-MaknaTo
1

IOCTaBHTcKaH Ha AO-TOK AAR c6opa BOAbI, pN HEO6XoAMOCTn CHMNTe erO COBCem.

YCTAHOBHTe peryAITOP BCNEHINBAHNA MOLOKA B NOAOKeHne" /aTTE-MaKNaTO". HAnpaBbTe npOByIO HacaKy B CTaKaH.

AHCnaei
KoHTPOAbHbI HAnKaTOp Ha KAnBnWe BbIbopa MHaerTpNpa3OrpeBe/npnroTOB- Aehnn HAN OYNCTe
. KoHTPOAbHbI INHAnKaTOp Ha KAnBnWe Bbl6opa CBeHTcra, KOrDa yCTPOINCTBO rOTOBOK pa6Ote

PeryAToP BCHeHbHaHn MoAoka
AaTTe-MakNaTo

KanyuH
BHHMaHHe! NocAe nCNOAb3OBaHnRA KOHTeHepa AAnyCTnTb OUnCTKy. Cm. rAaby "OunctKa H yXoA - KOHTeHep AAn MOtOKA".
OuHCTka n yXoA
OnopoxKHeHne ĀrpKaTeλeɪ ΦɪʌbTpɒB


OTKNHYb KHCATOp Ha pyKoTKe AepKaTeAb HnBtpa BBePx, yTO6bl CMeHHbI OHbTp He BbIIaA, N BbITpyCtB KOeHbI NOPoWok AAR 3cPiPeCCO B MycOpHoe BeApO HAN BbIHyTb KaNCyAy/naKeTNI.
YcTaHOBka n H3BaeueHne CMeHHoro fHaBtpa
BbipOBHrTb BbIeMKy Ha KpaIO AePkaTeaI aNAbTpacpyKoRTKOd yCTaHOBKn/IN3BaeueHn N yCTaHOBNTbcmHHbI aNAbTpB AepKaTeaI b IaBtpa/N3Baeu b erO n3AepKaTeaI aNAbTpap.

Co6AIOaTb octopoXHocTb npn H3BAeueHnn AePkaTeAe nAbTppa n3 yctpoiCTBa! B depKaTeAe nAbTppa Hn Ha CmEHbIX nAbTpax MOryT haoANTbcOCTaTKI RopaeJ KnADKOCTN, CTekaUJIne KaIAMN.
Ipea OunchKo: BblkAIOHTb yCTpOuCTBO N DaTb eMy OCTbITb.
3cnpecco-Maunna,6ak AALBAOdbI,AepKaTeAN 0HbTPOB H CMeHHbIe 0HbTpbl:
OuHsAHTe 6aK AAB BOAbI, AepXaTeAN FNaBTPOB IN CMeHHbIe FNaBTPbl TEALON I POMbIBOCHHO BOa, a 3aTEM TuaTeABHO ONoAOChHTe YnCToN BOaON. BAK AAB BOAbI, AepXaTeAN FNaBTPOB IN CMeHHbIe FNaBTPbl He IpeHa3HaueHbI AAn MblTbY B NOCyADOMoeHNO MaUNHe.
He yctaHaBbAaIte AepKaTeAb 0nabTPOB n npHaAeKHOCTn Ha ycTPOIcTBO, UTO6bl He NOBpeAnTb POKaAKN.
3cnpecco-MaunHy ouHuaTe BAAxHOi, 6e3BOPcBOO caAeTKoH. He norpykAtb BVdy.
Ppombibka 3cnpecco-MaunHbI:
I. 3aNoAHnTe 6ak AAR BOAbI XOAOHOH YNCTOIN BOoN I yCTaHOBnTE erO Ha MeCTO.
2. YcTaHOBnTe AeepKaTeA b cNyCTbIM CmEHbIM hAaTPOM.
3. NocTaBbTe 6oAbyu yawky NOA BbInyckHoe OTBepCTne, HaxMMTe n yApKnBaIte KaaBnuy Bb6opa 3 cekyHAbI.
4. YCTPOINCTBO INPOMOET Tpy60NPOBOAbI BOAOI.
5. Пи Heo6xoAnMoCTn NOBTOpHTe AaHHyIO npOceApy.
6. AaTe Bcem AeTaAM XopoOo npocoxHyTb.
Ppombibka KOHTeHep Aa MOAOKa:
3aNoAHHeHbI KOHTeHep AIA MOLOKa MOXHO XpaHHTb B XOAnAHBnKe. OHaKo Heo6xOAnMo CaeAHTb 3a TEM, YTO6bl KOHTeHep AIA MOLOKa IFO Tpy6OpBOAbI OuHuaHcB PeryAraPHO NocAE KaXDoRO HcNOAusbAHnA DAA PpeADTbPaueHnA 3aRpa3HeHnA n 3acopeHnA. KOHTeHep AIA MOLOKa N KpbUkA PpeDA3HaYeHbI AIA MbITbB INOCyADOMoeHOn MaHNHe (B BepxHe KOp3nHe).
PpombibKa Tpy6onpoBOAOB AAR MOAOKa:
I. NocTaBbTe 6oAusbUO yAaIKy NOA BbInyckHoe OTBepCTHe.
2. ΜΟΗΜΙΝΕ ΚΟλΟ ΚΚΤΕΝΑ ΜΟΑΚΑ ἀλ ΜαλΚΟι ΑγταΗΟΝΕ έργλΑΤΟ ΠΟΑΥΝΑ ΑΝΑ/BCπηνΗΝΑ ΜΟΑΚΑ (5) Μα
3. HaxMMTe n yApExKnBaIte KAnBnUy BbIbopa CeKyHAbI.
4. YCTPOICTBO IPOMOET Tpy6OIOPOBOAbI BOAOI.
5. Пи Heo6xOaHMoCTn NOBTOpHTe aAHHyIO npOceApy.
6. AaTe Bcem AeTaAM XopoOo npocoxHyTb.
TuaTeaBHa npombibKa KaHaAOB AAR KOoe H MOAOKa:
Ecan nocAe HeckoBkx pa3 HcnoA3ObHnryCTPOIcTBO Bam 6oAbe He HyXHo,
TtataeIbHO pOMOnTe KaHaIbI Aa KoOe N MoAOKa:
- 3aeneTe uHcTyO BOyB KOHTeHep Aa MoAOKa N 6ak AAB BOAbI.
- YcTaHOBInTe KOHTeHep Aa MoAoka N 6aK Aa BOAbI B yCTPOINCTBO.
- NocTabbTe 6oAusbkyu ChaSky NOA BbInyckHoe OTBepCTne.
- Nohmte cono KOHeHepa Aa Mooka HaaKoN.
- YctaHOBtpe peryAToP noaun npap/BCneHbAHn MOoKa B noAoXeHne "AatTe-MaKnaTo".
- HaxMMTE KaaBnuy BbIbopa AAn npHroTOBaeHHN NOpCnn AATTe-MaNaTo.
- BCE Tpy6oPBOAObI 6yAyT npombblu HCTOJ BOAOJ.
- AaTe BcEM AeTaAam XopoOo npocoxHyTb.
OuHCTka n yXoA
IOnHaO uOncTka KOHTeHepa AAn MOAOKa N KpbIuKN

BepxHra cTOpOHa KpbIuKn: OTKpbITb N OTKNHyTb CNAKOHOBYIO KpbIuKy.

2
IpeBepHyTb KpbIuKy.OTCOeAHHHTb CHANKOHOBBiH
3
IobepHyTb HaKOHeuHnK npoBoH HacaAKn TaKm 06pa3OM, yTO6bl Na3 coBnaaC BbICTyONM.

4
3aTeM OTCOeAHHHTb HAKOHHeHHK napOBoHaCaAKn.

5
HaKaTb „Push" n pa3beAnHHTb KpbIkwy Ha ABe YacTN.

6
CnTb pyKoTky ynpabAeHnnapOBn HacaKn, cAerKa NOBOPaNBa ee.

7
Bce yactn npeHa3haueHbI AAR MbITbB NocyAoMOeUHO MaunHe. DaTbXopoOIO npocoxHyTb.
8
Co6paTb yactn B o6paTHOM nopraKe.
9
BHHMaHHe! YcTaHObHTe KpbIuKy npaBnAbHo n HaXMMte Ha Hee, noka He ycAblWHTe ueauok fHKcaun.
YdaaHHeHaKnPi
CoBpemeHb3cnpecco-MaunHe cKaanHbaOTcMnHepaHbHbe OCTaTKn H3 NHTbeBOB BObl. AAnx ydaehn H3 YcTPOcTBa Heo6xoHmO peryAryPo ydaarh HaKnib. Hapady C INHTeHCNBHO BIO HCNOAb3OBAHN HHTepBaBl ydaehn HaKNIN 3aBNCr OT XecTKOCTN BObl:
BoDa YdaAeHne HaKnHn
MЯrkaj nAn ΦnAbTpoBaHHa Ype3 KaJAbie 150 uNKAOB 3aBapNBaHn JecTkaj Ype3 KaJAbie 80 uNKAOB 3abapNBaHn
YdaaHHe HaKmnn n3 yCTpoiCTBa:
I. 3aene Boay B6ak ABy BOAbi N B KOHTeHep AMy MOLOKa DO OTMeTKN MAX c O6abHeHnEM MrgKoro CpeACTBa ABy YAaleHHa KaHnN DAA BTOMaTHueCKHX KoFe-MaunH.
2. YcTaHOBnTe AePkaTeAb 0HbTpca NcyTbIM CmEHbIM 0HbTPOM.
3. NocTaBbTe 6oAusbkyu yaWky NOA BbInyckHoe OTBepCTne.
4. HaxmTe KlaBnuy Bb6opa AAn npiroTOBaeHn NOpunAaTte-MaknaTo.
5. NdoXknte 10 MNH, NOKA NOAeNCTBYET CpeACTBO AaYdaAeHHaKINH.
6. HaxmTe KlaBnuy Bb6opa AAn npiroTOBaeHnnpuHaTc-MaKaNaTo.
7. Помош Te KoHTeHep AЯ MoAOKa n 6ak AЯ BOAbI ChCToB BOAOI N NOBTOpTe npOMbIKy UcToB BOAOJ 2 pa3a.
XpaHeHne
IocAe dAnTeAbHOrO npocToa npomblb yctpoiCTBO nepea BO306HOBaeHnem 3KcNAYaTa- uH.
YcTpaHHe HeNCpPaBHOCTeI
PpO6Aema PnpuHa PeueHne

- Dear customer,
- Table of contents
- Delivery scope
- Overview
- Set up
- Before first time use
- Specifications
- Intended Use
- filling the water tank
- Filling up the milk container
- Switching on the device
- Using the portafilter and filter inserts
- Preparation
- Espresso
- Cappuccino
- Latte Macchiato
- Cleaning and care
- Rinsing the espresso machine:
- Rinsing the milk container:
- Rinsing the milk pipelines:
- Thoroughly rinsing the coffee and milk ways:
- Complete clean for milk container lid
- Dscaling
- Water
- Decalcification
- Decalcifying the device:
- Storage
- Troubleshooting
- Disposal
- Vue d'ensemble
- Characteristicas techniques
- KOMNAEKT NOCTABKN
- O630p
- POnAroToBka
- Ipea nepBbIM nCIOAb30BaHHeM
- TexHHueckne DaHHble
- NcnoAb3ObaHne no Ha3HaueHnIO
- 3aopoAHeHne 6aka AAB BOAbI
- 3aNoAHeHne KOHTeHepa AAM MOAoka
- Bkaioyehne yctpoiCTBa
- HcnoAb30BaHne AepeKaTeaI cHaBtpa I CMeHHbIX PhnAbTpOB
- ПригOTOBаене кофe
- 3cnpecco
- KanyuHnO
- AaTTe-MaknaTo
- OuHCTka n yXoA
- Ppombibka 3cnpecco-MaunHbI:
- Ppombibka KOHTeHep Aa MOAOKa:
- PpombibKa Tpy6onpoBOAOB AAR MOAOKa:
- TuaTeaBHa npombibKa KaHaAOB AAR KOoe H MOAOKa:
- YdaaHHeHaKnPi
- BoDa YdaAeHne HaKnHn
- YdaaHHe HaKmnn n3 yCTpoiCTBa:
- XpaHeHne
- YcTpaHHe HeNCpPaBHOCTeI
Brand : BEEM
Model : iJoy Café Ultimate
Category : Coffee machine