
Ventura Lite S6000 - Browser SNOOPER - Free user manual and instructions
Find the device manual for free Ventura Lite S6000 SNOOPER in PDF.

User questions about Ventura Lite S6000 SNOOPER
0 question about this device. Answer the ones you know or ask your own.
Ask a new question about this device
Download the instructions for your Browser in PDF format for free! Find your manual Ventura Lite S6000 - SNOOPER and take your electronic device back in hand. On this page are published all the documents necessary for the use of your device. Ventura Lite S6000 by SNOOPER.
USER MANUAL Ventura Lite S6000 SNOOPER
Installing the SD Card
Page 5 Charging the Internal Battery
Page 6 Powering the Ventura using the Built-in Battery
Page 7 Installing your Ventura using the Windscreen
Suction Cup bracket
Page 8 Operating Instructions
Starting Up
Easy Set Up
Screen Settings
Page 10 Volume Control
Page 11 Setting up Ventura
Page 12 Quick Start Guide to Navigation
Page 14 Quick Menu
Page 15 Using the ACSI campsite search
Using the Multi-route Function
Page 18 TMC
Page 20 System Security Code
Page 21 System Requirements and Software Installation
Page 22 Downloading the AURA TM Camera Database
Page 23 Accessories & Price List
Page 24 Vehicle Specific Professional Mounting Brackets
VENTURA QUICK START GUIDE
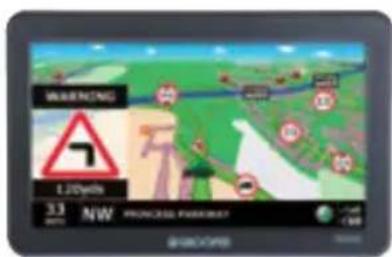
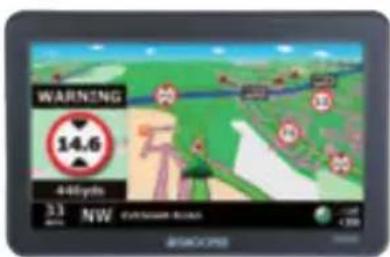
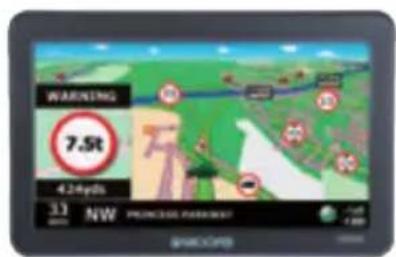
Ventura has been designed to route your vehicle safely and legally, avoiding hazards and legal restrictions such as low bridges and roads that are unsuitable for use by larger vehicles. Ventura will create safe routes for you based on the attributes of your vehicle and will alert you to any hazards if you should accidentally turn off that route for any reason. However Ventura will also alert you to hazards if it is used without a route programmed to ensure your chosen route is a safe one.
These are the hazards and restrictions Ventura will route you around and give you advanced warning of:
Restrictions

Height

Width

Length

Weight

No trailers
Warning

Steep road up ahead

Steep road down ahead

Tight bend ahead

Side winds
To utilise the AURA™ Camera database you will need to register your Ventura and perform a download. Please refer to 'Registering your Ventura', 'System Requirement' and Software Installation later in this Quick Start Guide for further information.
Start Up
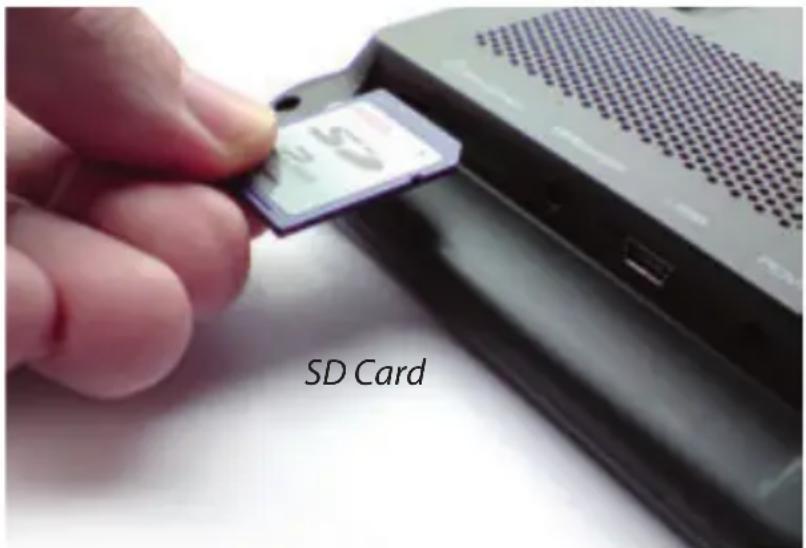
1. Installing the SD Card
Before using your Ventura, you will need to install the SD Card included with the device. The SD Card comes complete with a digital map of Western Europe and is also where the AURA™ camera database is stored if you choose to subscribe and download it.
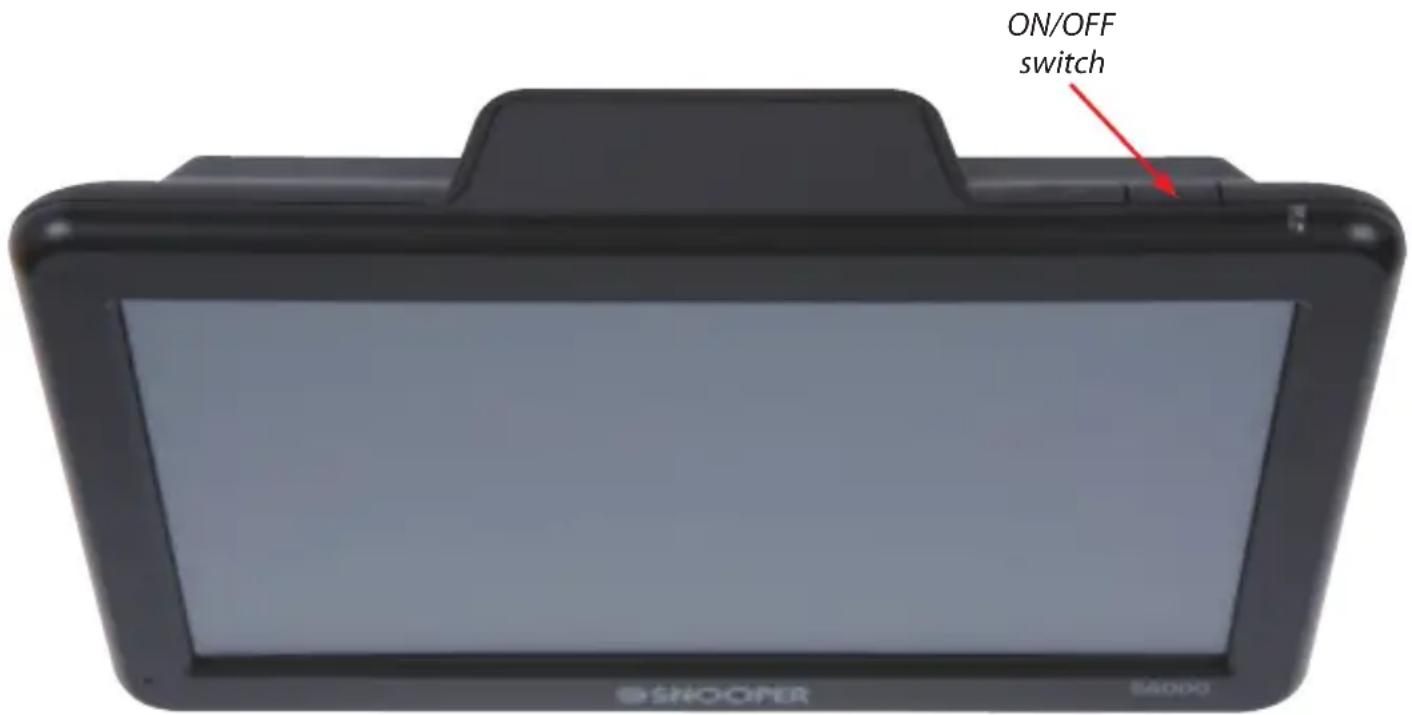
Remove the SD card from its packaging and insert it into the SD Card slot as indicated. Switch on the device by pressing and holding the standby power button located on the top right hand side of the unit for 2 seconds. As soon as the device is switched on, the Ventura will automatically synchronise with the SD Card. Once the synchronisation is completed, the SD Card will not function with any other device. Your Ventura is now ready to navigate and the camera database can be downloaded if necessary.
Please note that if the unit does not activate when you press and hold the standby power button for 2 seconds it may require charging. Refer to the section 'Charging
the internal battery' later in this guide.
4·UK
2. Charging the internal battery
Although the Ventura can be charged using the cigarette lighter in your vehicle, a complete charge is more easily achieved by using the 240V AC mains charger included. When new, the battery in your Ventura contains a nominal charge.
Connect the 240V AC mains charger as indicated in the picture on the right. Switch the battery On/Off, located on the rear of the unit, to the On position. Ventura will take approximately 3 hours to charge. Once fully charged the battery will last approximately 3 hours during normal use.
Note: The new battery's full performance is only achieved after two or three complete charges and discharges.
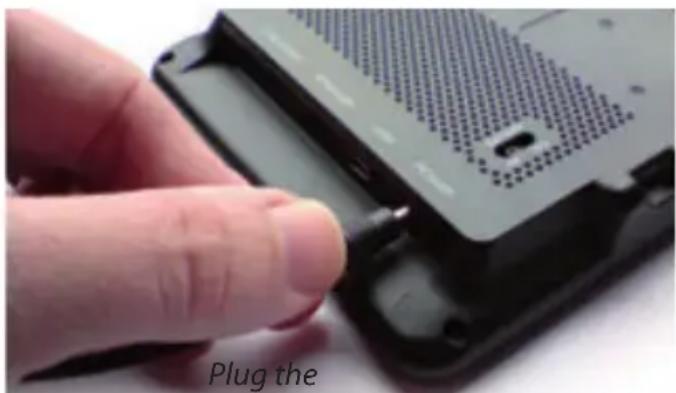
charger cable into the socket on the side of the Ventura
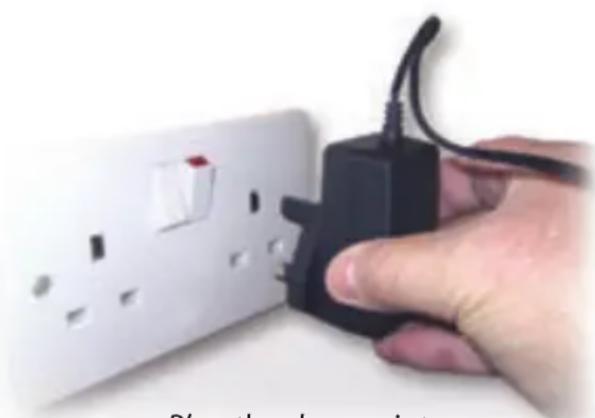
Plug the charger into a
240V AC mains socket
CAUTION
THERE IS A RISK OF EXPLOSION IF THE BATTERY IS REPLACED WITH AN UNAPPROVED TYPE. USING THE WRONG TYPE OF BATTERY MAY DAMAGE YOUR UNIT AND INVALIDATE YOUR WARRANTY. ONLY SNOOPER AUTHORISED PERSONNEL SHOULD REPLACE THE BATTERY. FURTHER INFORMATION CAN BE FOUND IN THE USER MANUAL.
3. Powering the Ventura using the built-in battery
Once the Ventura is fully charged, it is ready for use. Press and hold the standby/power switch on the top right hand side of the unit for 2 seconds to switch on the device.
WARNING PLEASE DO NOT USE OR LEAVE THE VENTURA IN Either WET OR HUMID CONDITIONS, OR IN EXTREME TEMPERATURES, AS THIS COULD PERMANENTLY DAMAGE THE UNIT AND THE BATTERY. WHEN NOT IN USE DO NOT LEAVE THE UNIT ATTACHED TO THE WINDSCREEN, ESPECIALLY WHEN THE WEATHER IS WARM, TO AVOID DAMAGE TO THE UNIT AND ALSO REDUCE THE RISK OF THEFT
WARNING THE DEVICE MAY START IF EXPOSED TO STATIC ELECTRICITY, PLEASE AVOID TOUCHING THE USB SOCKET ON THE RIGHT HAND SIDE OF THE UNIT.
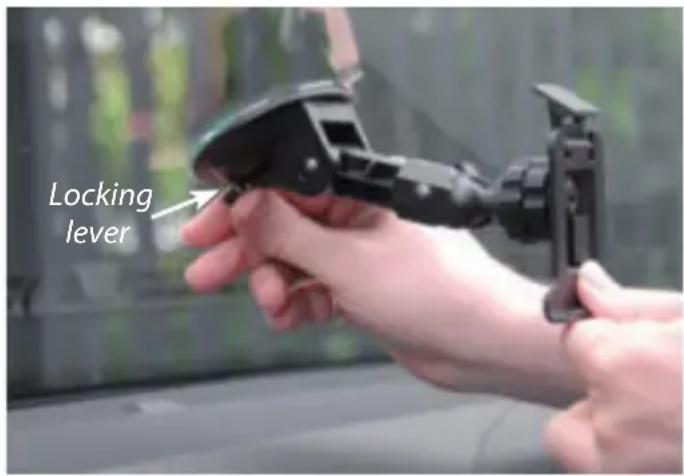
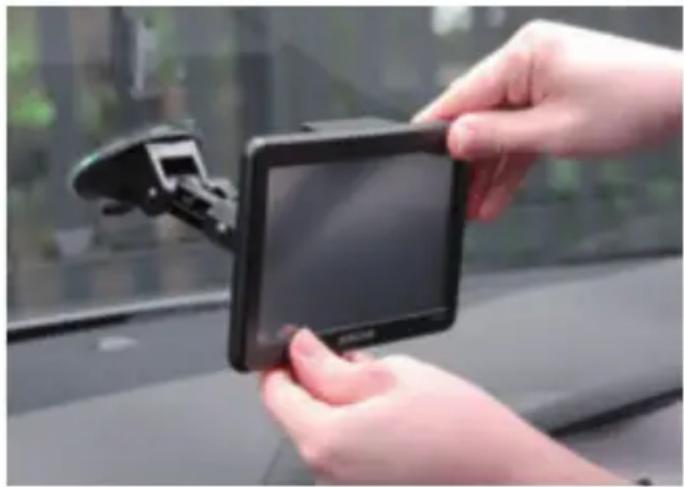
4. Installing the Ventura using the Windscreen Suction Cup bracket
You can mount your Ventura to the inside of your vehicles windscreen using the
windscreen bracket provided.
- Clean the area where you wish to position the bracket thoroughly with a good quality glass cleaner. This allows a more secure seal on the windscreen.
- Place the suction cup and bracket on the windscreen and push the locking lever towards the windscreen to secure the bracket.
- Adjust the angle of the bracket so that when the unit is attached to it you can view the display and operate the controls safely.
- Position Ventura onto the bracket, by inserting the bottom of the unit first and finally clipping the top of the bracket into the slot on the top of the unit. To remove Ventura simply unclip the unit, by pushing the top of the bracket and taking the unit from the holder.
- Ventura can be powered directly either from the internal battery if it is fully
charged or powered from the cigarette lighter socket. To use the cigarette lighter socket, plug the smaller plug on one end of the power cable into the socket marked 'Power' and plug the larger plug into the cigarette lighter socket of your vehicle.
Please Note: Only use the cigarette lighter power cable provided with Ventura. Ventura operates on 12V and using any other cigarette lighter power cable will damage your device and void the warranty.
Operating Instructions
1. Starting Up
Once you have synchronised the SD Card it is time to perform the first Start Up.
- First make sure your vehicle is parked in as open a space as possible, clear of tall trees and buildings so that the built in GPS antenna has a clear view of the sky above.
- Next, switch the unit on by pressing and holding the standby power switch on the top right hand side of the unit for 2 seconds.
- Press the'I Agree'button when available and the screen will display a section of a map.
- Ventura needs to acquire a minimum of four satellites in order to work. Once this has been achieved the Ventura will ascertain your position and this will be indicated by a green arrow icon on the on-screen map and the GPS signal strength will be shown to the bottom right hand corner of the display. Your Ventura is now ready to navigate.
As the GPS engine and antenna have never been used before, the first 'Cold' start could take anywhere from 15 – 30 minutes to establish a satellite connection. Once initialised, subsequent start ups will take less time and eventually should take only a matter of minutes.
2. Easy Set Up
Screen settings - There are a number of map views or different types of information that can be displayed on the screen at any one time:
3D 2D North


Distance to destination

Current time or vehicle speed

Estimated journey time or Estimated time of arrival

Direction and name of road

GPS Signal strength Battery status
To modify the information shown press the centre of the screen to access the menu and then press the 'Configure' button.
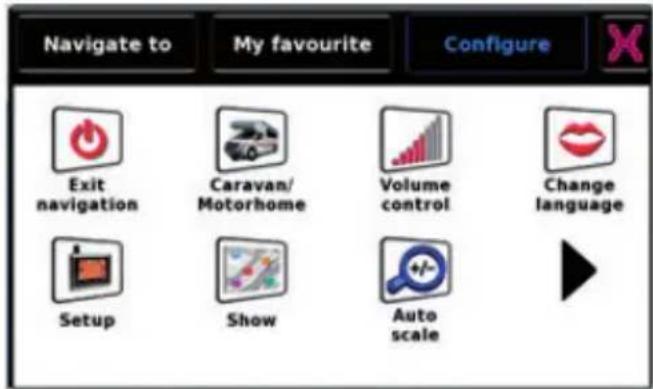
Next press the

icon where you will see the list of options
To change a setting press it with your finger and a list of the options available will be shown next to a tick box. Simply press the tick box to indicate which option you would like to choose.
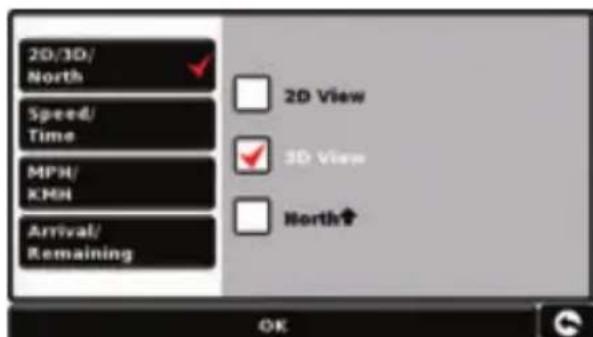
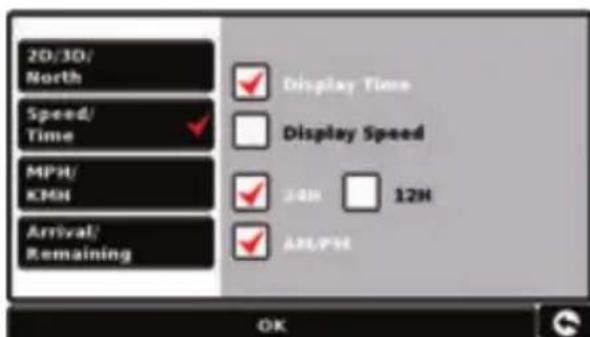
Press 'OK' at the bottom of the screen. Your chosen settings will now be saved and will appear on the screen each time you use your Ventura. If you want to switch between your Current Speed and the Atomic Clock or the Estimated Time of Arrival and the Time to Destination during your journey simply touch the LCD screen where either piece of information is displayed and the unit will display the alternative setting and vice versa. However, each time you switch on the device the original setting will be displayed.
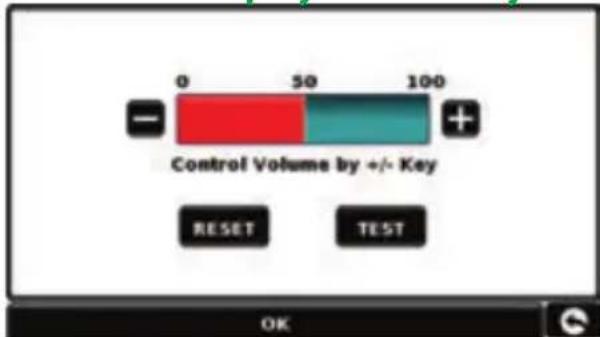
Volume Control - The volume can be adjusted within the 'Configure' Menu. To set this function press the centre of the screen to access the menu and then press the 'Configure' button. The screen will then display a number of different icons.

Press the icon. Press either the +^ button to increase the volume or the -^ button to decrease the volume. Finally select the OK' button to confirm the setting.
Note: The arrow icon in the bottom right hand corner of the display will return you
to the 'Configure' menu if pressed but will not store any changes you have made. You need to select the 'OK' button in order to save your changes.
10·UK
3. Setting up Ventura
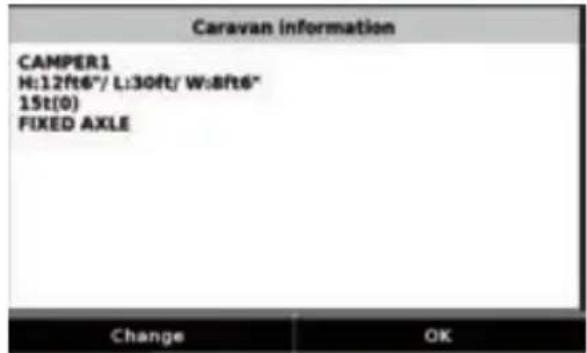
For Ventura to calculate a route suitable for your vehicle it needs to know certain information about the vehicle itself such as its height, weight and width. It is possible to save the settings of 10 different vehicles. Follow these instructions to enter your vehicles details.
Press the centre of the screen to access the menu, press 'Configure' and then press the 'Caravan/Motorhome' icon.
Name: Enter the name here.
Height: Enter the height of the vehicle here.
Length: Enter the length of the vehicle here.
Weight: Enter the weight of the vehicle here.
Width: Enter the width of the vehicle here.
Weight per axle: Enter the weight per axle of the vehicle here
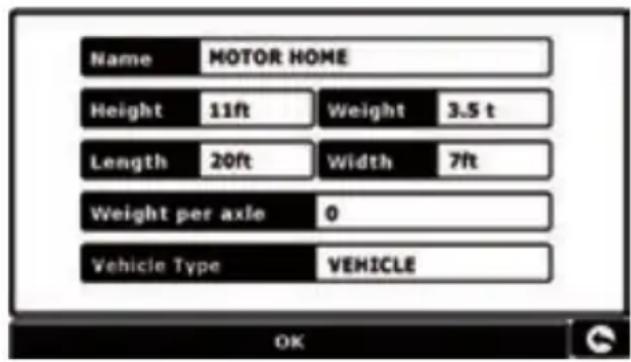
Vehicle type:
-
Fixed Axle: Standard setting for fixed axle vehicles.
-
Trailer: Specific traffic rules exist for vehicles towing caravans. For example, there are roads that are forbidden for towing vehicles. These will be avoided.
Verified and non-verified roads.
Ventura will indicate whether the road you are travelling on is verified or non-verified. In the bottom right hand corner of the screen either a green or a red will be displayed. The green indicates that you are driving in an area with Ventura coverage, the red means that you are driving on a road without detailed Ventura coverage.
ATTENTION!
Please don't forget to register your Ventura online at www.snooperne.co.uk To register you will need the serial number which can be found on the back of your Ventura.
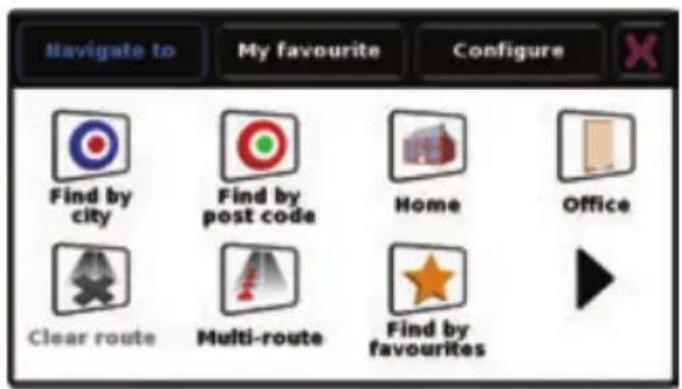
4. Quick Start Guide to Navigation using a post code
Take your Ventura outside so that the GPS receiver can locate your position. This may take between 15 - 30 minutes the first time. When satellite lock is achieved, the screen will display your current position on its map in a '3D' navigation view. Your position (and direction) is indicated by the icon.
Tip: To reduce the 'cold start' GPS time remain stationary.
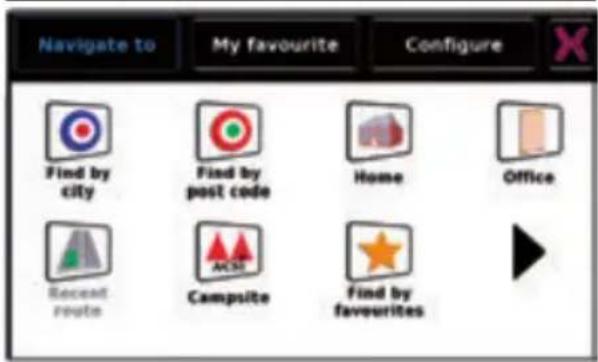
Bring up the main navigation menu by touching the centre of the display. Select
Tip: The icon always means that there are more options to see on the next screen
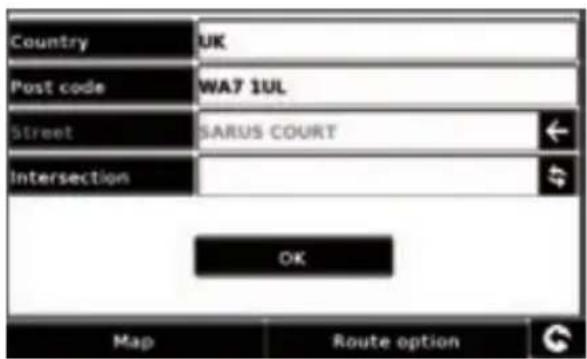
You will see a standard browser screen, used for entering postcodes. Enter the full UK postcode using the keyboard and press OK
Important: Use the key to separate the two segments of the post code.

Tip: The default route options are set to 'Quickest Route'. To change the route options please refer to the extended user guide on the software CD.
Press OK the next screen will display the default vehicle details. To change to an alternative vehicle press

not press Calculate. Ventura will calculate the fastest route from your current position to your destination.
This should only take a few seconds and a progress bar is shown on the screen.
A journey summary screen will then be displayed.
Refer to the extended user guide on the software CD for a more detailed description of these features.
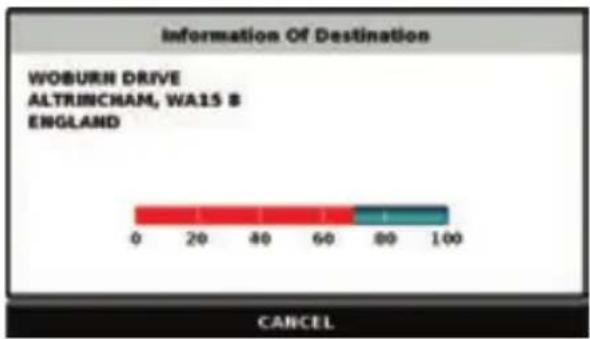

Final destination Estimated arrival time
Select
GO
Your current location
Distance to destination
Estimated journey time
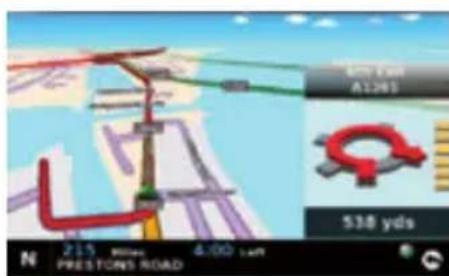
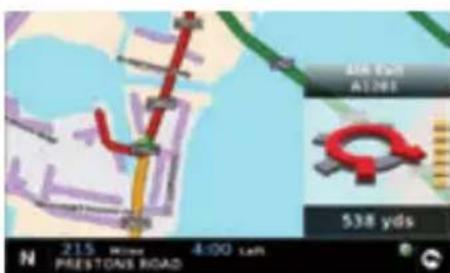
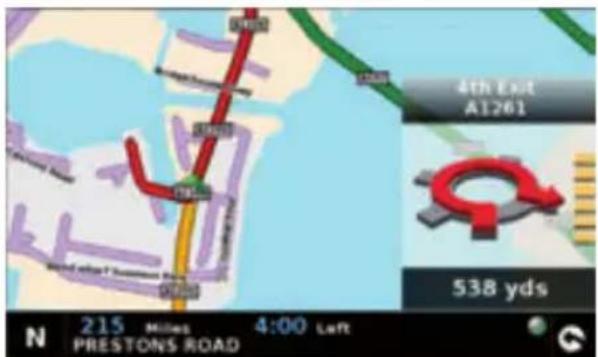
The navigation view will now be displayed, but with the route now highlighted for you. As you approach a specific turn in the calculated route, the Ventura will advise you what to do. For example, "After 200 yards, turn left", followed by "Now turn left". As you proceed along your journey, following the voice instructions, you will notice that the navigation view is updated constantly, always showing approaching roads and junctions and presenting the best route to you.
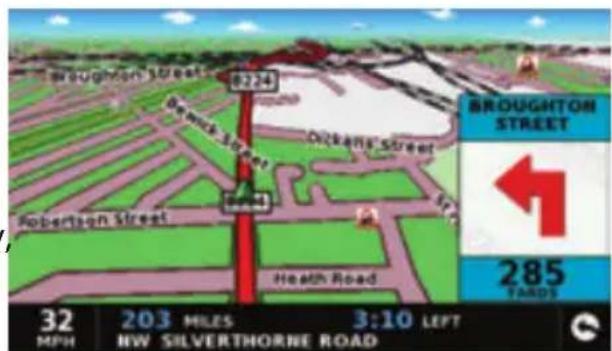
Tip: If you miss a turn or drive down a wrong road, a new fastest route will be calculated automatically, based on your new position and direction of travel, a tone will be heard to confirm re-routing. The Ventura will always give you clear instructions that will take you to your chosen destination.
5. Quick Start Guide to Navigation using 'Find By City'.
If you do not know the post code of the destination you want to drive to you can calculate a route using just the country, town or city and the road name. To do this,
press the centre of the screen to access the menu and then press the icon. Enter the country, town or city name and then enter the road name following the on-screen prompts and keyboard. Once you have found the address press the 'Calculate' button.
6. Quick Menu
If at any time you want to adjust the units' volume, screen brightness, mute an alert,
switch between day and night modes or between the 2D and 3D screen views you can do so by touching the screen at the top. This will display the Quick Menu, which will be displayed for approximately 2 seconds. Simply touch the feature you require from the information bar displayed. The Quick Menu will automatically close if no features are selected.
7. Using the ACSI campsite search
To search for a campsite suitable for your requirements press the centre of the screen to access the 'Navigate to' menu and press the 'ACSI' icon. Next select the country, region and city you would like to visit. Then press 'Select the campsite facilities required' button to select the campsite criteria you require. There are nine categories to choose from and within each a number of different options. Simply select each of the facilities you would like to have included for the campsite you want to visit. When you have selected the facilities you require press the 'OK' button to return to the first Campsite Search page. Finally press the 'Search' button and Ventura will produce a list of all the campsites that match your requirements. If you want to refine your search at any time press the 'Review facilities selected'. If there are photographs available of the campsite you can view them by pressing the 'Photo' button.
Once you have found the campsite you want to visit you can choose to navigate straight there or save the campsite to your list of Favourites.
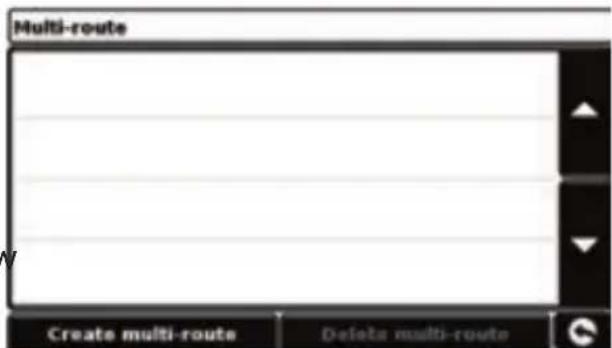
8. Using the Multi-route Function
With the Ventura you have the facility to enter more than one destination at a time (for instance if you wish to visit other locations before reaching your ultimate destination). You can store up to 16 individual destinations. The unit will process and calculate the destinations in the following order: A to B, B to C, and C to D etc. When entering the destinations you are able to review the routes and change the order of the routes before pressing 'Go

Press the centre of the screen to access the menu and press the
icon. You will
then see the 'Multi-route screen' that allows you to either create a multi-route, use or edit a previously stored multi-route or delete a multi-route.
Create a Multi-route
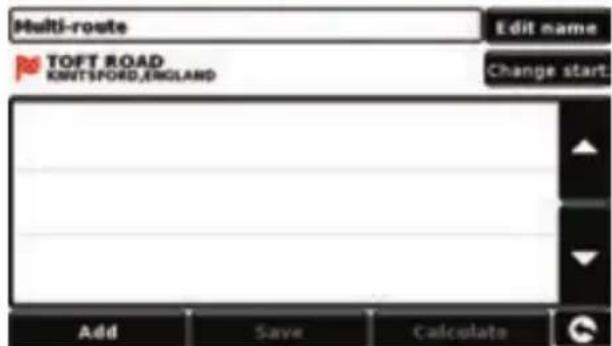
- Press 'Create multi-route' to begin. A screen is displayed where you can edit the name of the multi-route, change the start point and add your destinations.
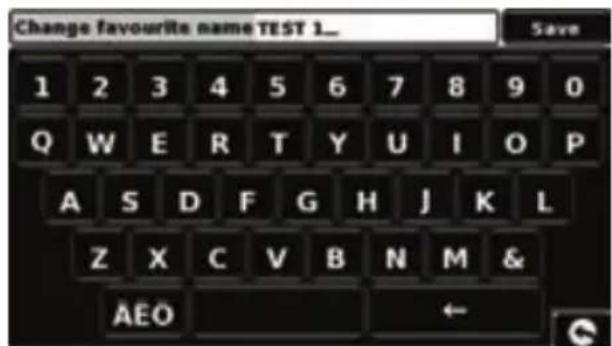
- Press 'Edit Name' to create a name for your new multi-route. Once you have created a name press the 'Save' button in the top right hand corner. (In the example on the right, we have called it 'Test 1')
- If you wish to change the start position of the multi-route, press 'Change Start' to change it. If you are happy with the start position, you can now begin to enter the data of your first destination.
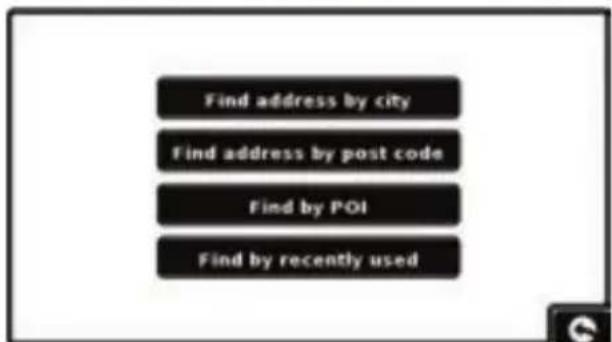
- Press 'Add' - you are provided with several options to find your destination. For this example, select 'Find address by post code'.
- Enter the postcode using the keypad that is displayed. If you make a mistake when entering the post code you can press the 'Arrow' key at the bottom of the keypad to erase the data and then re-type the information. When you have entered the correct postcode press the 'OK' button on the keypad.
IMPORTANT: You must enter a space between the two sections of the postcode.
- The Ventura will then go back to the previous screen with the Country, Postcode and Street fields completed. You can also view this destination by pressing 'Map' at the bottom of the screen. Once you have entered the data press 'Set'.
- The destination will now appear in the multi-route screen. Repeat the steps above to enter further destinations.
- Once you have entered all your destinations press 'Save'.
Editing the Multi-route
If you wish to change the order or delete any of the multi-route destinations, press one of the destinations listed and some new options will appear near the bottom of the display.
- To move the selected destination press the 'UP' or 'Down' arrow.
-
To delete the destination press the 'Bin' icon.
-
To return to the destination list press the 'Return Arrow'.
Note: These functions only apply to the destination that you have selected. To edit the other destinations in the list press the 'Return Arrow' and select the new destination. Once you have made your desired changes press 'Save'.
Using the Multi-route
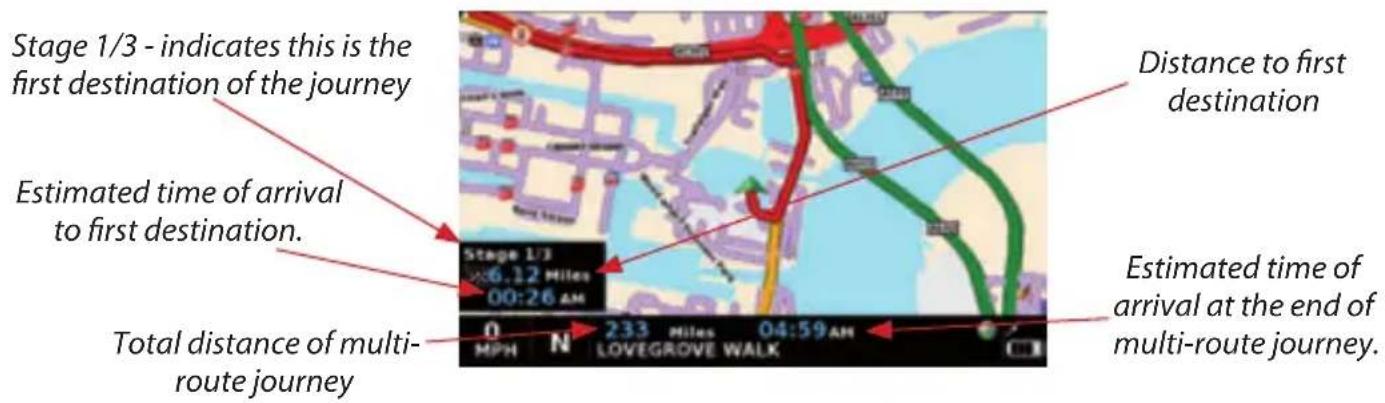
Now press 'Calculate' and the Ventura will calculate the route to each destination and provide a new summary screen with the distance to each destination along with the estimated duration of the journey to each destination from the start point.
- If you wish to view the calculated route on a map, press 'Map'.
- If you wish to start using the Multi-route, press 'Go'.
The Ventura will now display your current map position along with a small summary screen that displays the estimated journey time and distance to your first destination.
If, during the journey, you wish to cancel the current stage and begin travelling to the next stage in your multi-route journey press the summary screen and the message 'Delete current stage?' will be displayed. Press 'OK' and the unit will calculate your route to the next stage in the multi-route from your current position.
Note: If the Ventura is turned 'OFF' and then 'ON' during the multi-route journey the device will retain the current route and ask you if you wish to continue with the current destination or with the next stage of the destination or to cancel the multi-route.
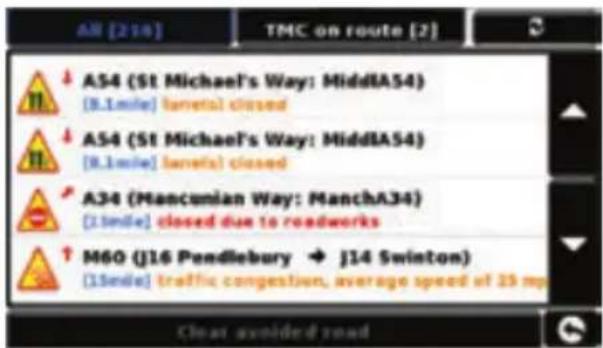
9. TMC (Traffic Message Channel)
Mounting the Antenna
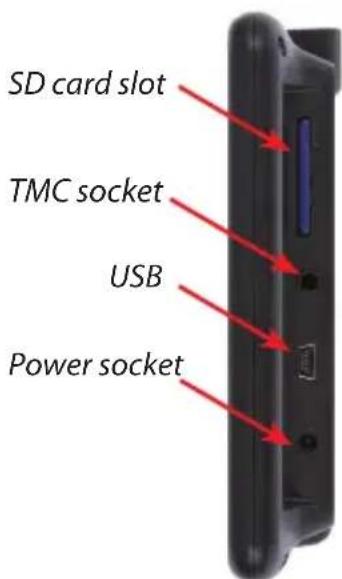
Plug the TMC antenna supplied into the TMC socket on the right hand side of the unit. Then attach it to the windscreen using the suckers provided. The antenna should be stretched out in a horizontal position either along the base or top of the windscreen depending on where you have mounted the device itself.
TMC Icon
Once the unit starts to receive any TMC alerts one of the two following icons will appear on the main screen.
This icon appears if the Ventura has received TMC information but the delay or incident is not on your route.

This icon appears if the Ventura has received TMC information and the delay or incident affects your plotted route.

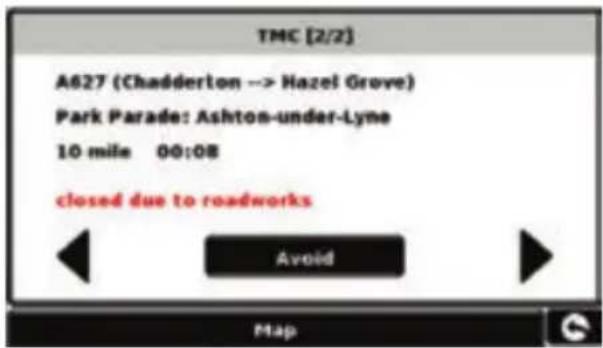
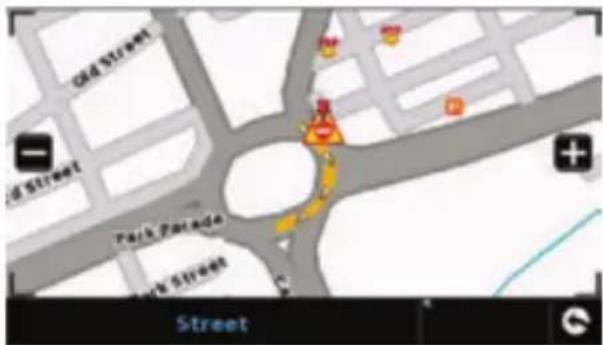
To show the TMC incident press the icon and the following screen is displayed:
Direction of event Road number Road name Type of event
Icon which will appear on map
Distance from the current location to the incident
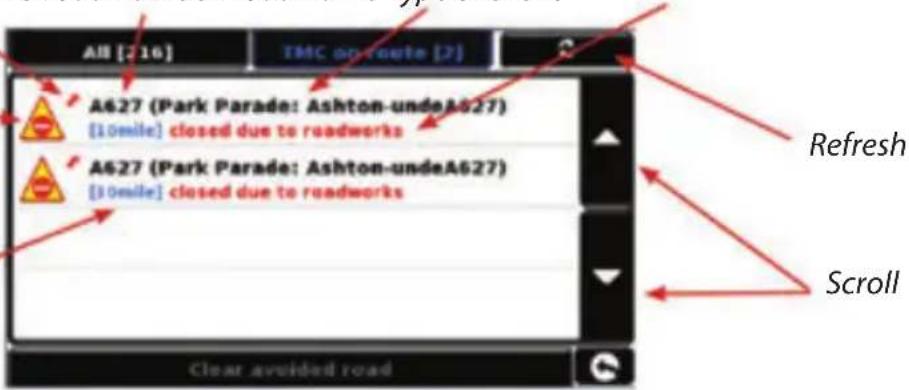
To show TMC events which are NOT on your
route press

To see a more detailed description press the TMC warning.
To avoid the incident press the Ventura will now calculate an alternative route.
To view the incident press
4^2 × 9 =
To return to to the previous screen press

If you want to return to the original route (not avoiding the incident) then press the TMC icon

and press
Clear avoided road
the Ventura will recalculate the
original route.
10. System Security Code
Ventura incorporates pin code security protection so that only users with access to the pin code can use and operate the device. To activate the security code press the centre of the screen to access the menu, press 'Configure', press the black arrow twice and then press the 'System Security Code' icon. Select 'Yes' to switch the function on. Press the 'Enter Code' button and enter the 4 digit code that you would like to use to protect your Ventura and press 'OK'. Once this setting has been activated you will need to enter this code each time you power on your Ventura or you will not be able to operate the device.
NB. It is important that you do not lose or forget this code. If you forget this code you will
need to return your Ventura so that the unit can be reset.
Configuration Security Code
It is also possible to protect the configuration settings using a security pin code. To activate the security code press the centre of the screen to access the menu, press 'Configure', press the black arrow twice and press the 'Configuration Security Code' icon. Select 'Yes' to switch the function on. Press the 'Enter Code' button and enter the 4 digit code that you would like to use to protect the configuration settings and press 'OK'. Once this setting has been activated you will need to enter this code each time you want to amend the configuration settings on your Ventura.
NB. It is important that you do not lose or forget this code. If you forget this code you will need to return your Ventura so that the unit can be reset.
Register your Ventura online to gain access to Snoopers comprehensive speed trap database. Register now at www.snooperne.co.uk
System Requirements and Software Installation
Before you can begin to download the AURA™ database onto your Ventura, you will need to install the Ventura Updater software provided on the software CD..
Minimum Hardware Requirements
The computer must have an Intel Pentium Class processor or equivalent, a minimum of 32MB of RAM, a monitor with 256 (8-bit) colours or greater, a CD ROM drive, 20MB of free disc space and a spare USB connection
Minimum Software Requirements
The software will only operate on the following Windows based operating systems: Windows 2000, Windows XP, Windows Vista, Windows 7 and, in addition, will only work with Internet Explorer 6 or Netscape Navigator 6 or above.
NOTE: The Ventura Updater software does not support Windows 95, 98, Millennium or Apple Macintosh operating systems. Windows XP (64bit) systems is not supported.
Downloading the AURA™ Camera Database
Please Note: You must register your Ventura before you can perform a download.
Please refer to the software CD for detailed installation and download instructions.
For a more detailed explanation of all the features of the Ventura, please refer to the extended user guide on the software CD.
Accessories & Price List
The following accessories are available from your local Snooper dealer. For further details please contact our sales department on 01928 579579 (Option 2).
European Mapping SD Card £149.99
Remote GPS extension antenna (5m) £34.99
In-car charger (24v/12v DC to 12v DC) adaptor £19.99
Straight hard wire lead with fuse (24v/12v to 12vDC) £19.99
Windscreen mounting bracket, excluding unit holder £24.99
USB PC Connection lead £9.99
Custom Pro Fit Bracket, including fixing plate * £19.99
Ventura to Pro Fit Bracket attachment** £7.99
1-3 Lighter socket extension 27.99
25ml anti-static LCD display cleaner & protector £2.99
240v to 12v mains charger £19.99
Snooper Ventura protective carry case £14.99
*Pro Fit brackets are a custom-made bracket that usually attaches to an air vent and are designed specifically for each make and model of vehicle. Therefore you should contact Performance Products, on 01928 579579 (Option 2), to check the availability and specification of the bracket for your vehicle.
**This attachment must be purchased to enable you to attach your Ventura to a Pro Fit bracket.
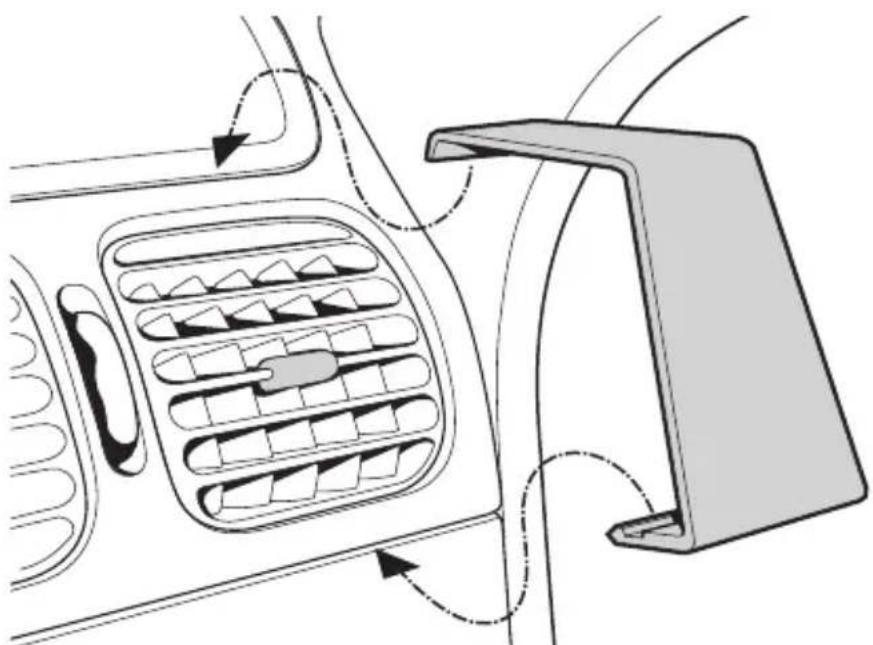
Vehicle Specific Professional Mounting Brackets
Snooper provide a range of custom fit brackets for our satellite navigation systems. These brackets have been specifically designed to individually fit your vehicle and there is a bracket available to fit most cars, trucks, coaches, buses and mobile homes on the market.
This bracket is particularly unique as you do not need to drill any holes in to your dashboard or centre console to install it. Depending on the vehicle the bracket either clips to the side of the centre console or to your vehicles air vents for a convenient trouble free installation.
Furthermore we can also now provide a 24V/12V to 12V 'hardwire' cable for your system. You can then connect Ventura directly to the vehicles electrical system providing a discreet, professional installation.
To order a bracket and hardwire cable pack please call 01928 579579 (Option 2) with the make, model and year of your vehicle or speak to your local Snooper dealer.
24·UK
KURZANLEITUNG - DE
INHALT
9. TMC (Traffic Message Channel)
Estimated journey time or Estimated time of arrival


9. TMC (Traffic Message Channel)
De antennemonteren
To view the incident press

Performance Products Ltd
Cleaver House, Sarus Court, Manor Park, Runcorn WA7 1UL UK
www.snooper.eu / europe@snooper.eu