Foldaway X1000 - Exercise bike Skandika - Free user manual and instructions
Find the device manual for free Foldaway X1000 Skandika in PDF.
| Brand | Skandika |
| Model | Foldaway X1000 |
| Category | Folding exercise bike |
| Resistance type | Magnetic brake |
| Resistance levels | 8 |
| Maximum user weight | 110 kg |
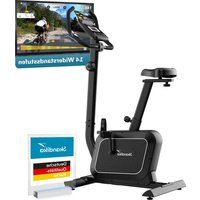
| Display | LCD with backlight (speed, distance, time, calories, odometer, pulse) |
| Computer functions | Auto scan, reset, odometer memory |
| Pulse sensors | Handlebars with manual sensors |
| Power supply | 2 AA batteries (1.5 V) not included |
| Dimensions unfolded (approx.) | 95 x 48 x 120 cm (L x W x H) |
| Dimensions folded (approx.) | 60 x 48 x 140 cm |
| Net weight (approx.) | 18 kg |
| Folding mechanism | Unfolding with safety pin |
| Transport wheels | Yes |
| Pedals | Left and right marked L/R, with straps |
| Seat adjustment | Vertical (seat post with knob) |
| Handlebar | Height adjustable |
| Materials | Steel frame, padded seat |
| Noise level | Quiet (magnetic resistance) |
| Included accessories | Allen key, flat wrench, floor mat (EVA foam), storage tray |
| Maintenance | Clean with a soft cloth, check screws and nuts regularly |
| Warranty | 24 months on manufacturing defects |
Frequently Asked Questions - Foldaway X1000 Skandika
User questions about Foldaway X1000 Skandika
0 question about this device. Answer the ones you know or ask your own.
Ask a new question about this device
Download the instructions for your Exercise bike in PDF format for free! Find your manual Foldaway X1000 - Skandika and take your electronic device back in hand. On this page are published all the documents necessary for the use of your device. Foldaway X1000 by Skandika.
USER MANUAL Foldaway X1000 Skandika
GRUN / GREEN [SF-1762]

SPECIAL EDITION JOEY KELLY
90e - 7
ASSEMBLY INSTRUCTIONS and USER GUIDE
Safety instructions 13
Parts list 14
Exploded diagram. 15
Assembly instructions 16
Computer instructions 18
Training tips 19
Guarantee conditions 21
Visit our Website for more information www.skandika.com
Scan the QR-Code with your smartphone

SAFETY INSTRUCTIONS
Important safety instructions
This exercise machine is built for optimum safety. However, certain precautions apply whenever you operate a piece of exercise equipment. Be sure to read the entire manual before you assemble or operate your machine. In particular, note the following safety precautions:
- Keep children and pets away from the machine at all times. DO NOT leave children unattended in the same room with the machine.
- Only one person at a time should use the machine.
- If you experience dizziness, nausea, chest pain or any other abnormal symptoms, STOP the workout immediately. CONSULT A PHYSICIAN.
- Position the machine on a clean, leveled surface. DO NOT use the machine near liquids or outdoors.
- Keep hands away from all moving parts.
- Always wear appropriate workout clothing when exercising. DO NOT wear robes or other clothing that could get caught by the appliance. Running or aerobic shoes are also required when using the device.
- Use the machine only for its intended purpose as described in this manual. DO NOT use attachments not recommended by the manufacturer.
- Do not place any sharp object around the machine.
- Disabled persons should not use the machine without a qualified person or physician in attendance.
Before using the machine to exercise, always do stretching exercises to properly warm up. - Never operate the machine if the machine is not functioning properly.
- The maximum weight capacity for this product is 110 KGS.
- The braking system is magnetic braking system...
WARNING: BEFORE BEGINNING ANY EXERCISE PROGRAM, CONSULT YOUR PHYSICIAN. THIS IS ESPECIALLY IMPORTANT FOR INDIVIDUALS OVER THE AGE OF 35 OR PERSONS WITH PRE-EXISTING HEALTH PROBLEMS. READ ALL INSTRUCTIONS BEFORE USING ANY FITNESS EQUIPMENT.
SAVE THESE INSTRUCTIONS IN A SAFE PLACE FOR FUTURE REFERENCE.
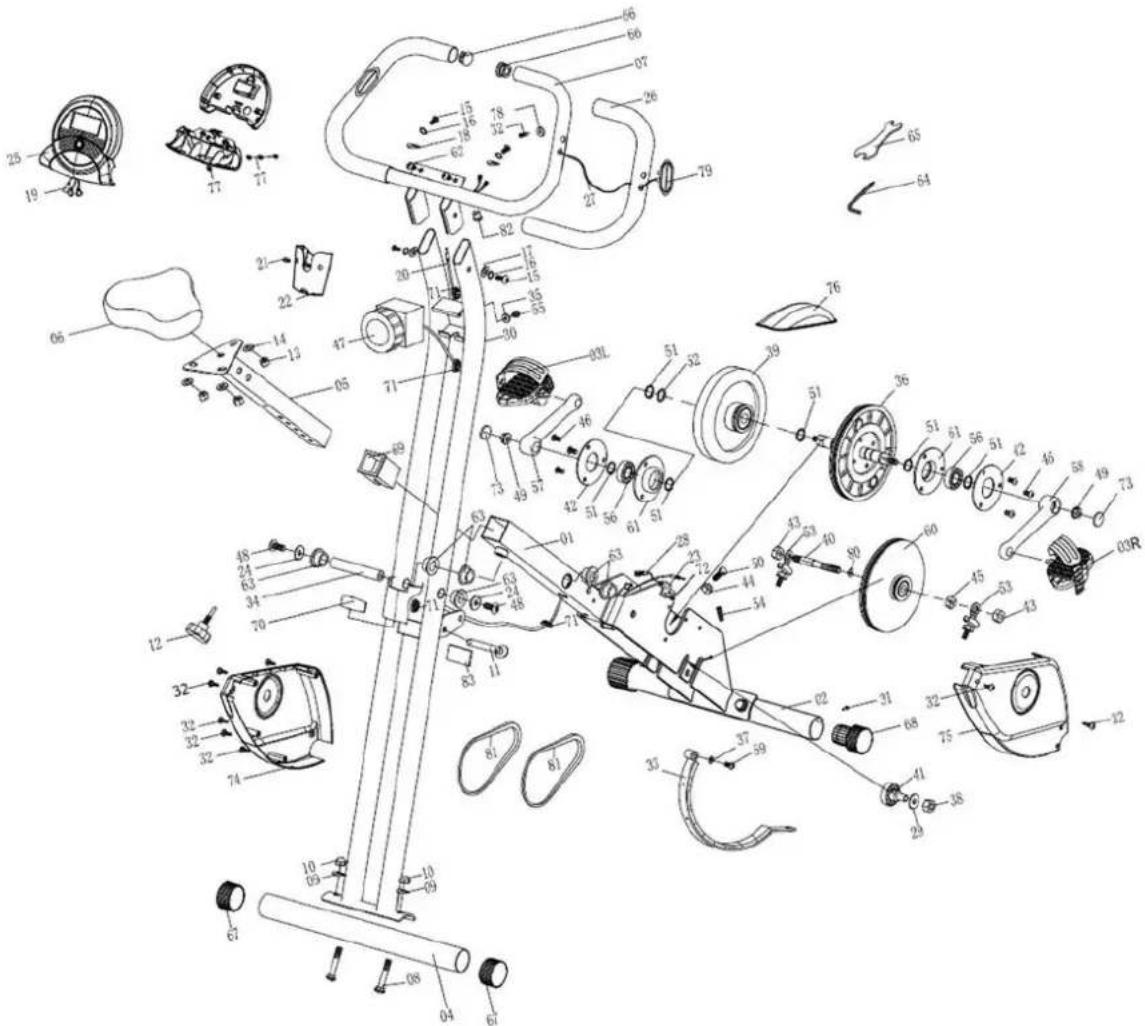
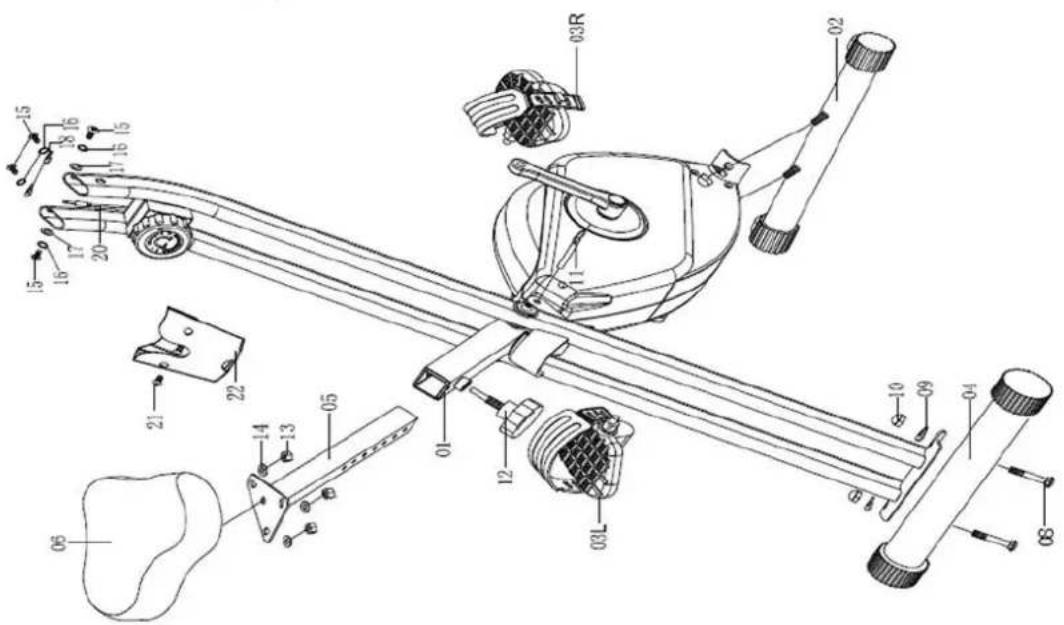
PARTS LIST
| Part No. | Description Q'ty | |
| 01 Main | frame 1 | |
| 02 Front stabilizer 1 | ||
| 03L Left | pedal 1 | |
| 03R Right | pedal 1 | |
| 04 Rear stabilizer 1 | ||
| 05 Seat | post 1 | |
| 06 Seat 1 | ||
| 07 Handlebars 1 | ||
| 08 Carriage bolt M8*60 4 | ||
| 09 Curved washer ø8.3xø22 4 | ||
| 10 Domed nut M8 4 | ||
| 11 | Safety pin | 1 |
| 12 Club knob | 1 | |
| 13 Nylon lock nut | 3 | |
| 14 Flat washer ø8.3xø17.5 | 3 | |
| 15 Allen screw M6x12 | 4 | |
| 16 Spring washer 4 | ||
| 17 Flat washer ø6.5xø13 | 2 | |
| 18 Curved washer ø6.5xø13 2 | ||
| 19 Upper sensor wire | 1 | |
| 20 Middle sensor wire | 1 | |
| 21 Screw M4x10 | 2 | |
| 22 Storage box | 1 | |
| 23 Support bracket | 1 | |
| 24 Flat washer ø8.3xø25 | 2 | |
| 25 Computer 1 | ||
| 26 Foam grip | 2 | |
| 27 Hand pulse wire | 2 | |
| 28 Lower sensor wire | 1 | |
| 29 Flat washer ø10.3xø25 | 1 | |
| 30 Rear support tube | 1 | |
| 31 Self tapping screw M4x12 | 2 | |
| 32 Self tapping screw ST4.2x20 | 10 | |
| 33 Magnetic assembly | 1 | |
| 34 Axle for main frame | 1 | |
| 35 Flat washer ø5.2xø18 | 1 | |
| 36 Belt pulley | 1 | |
| 37 Plastic washer | 1 | |
| 38 Nylon nut M10 | 1 | |
| 39 Flywheel | 1 | |
| 40 Axle for pulley | 1 | |
| 41 Idler assembly | 1 | |
| 42 Support plate | 2 | |
| 43 Hex head nut M10 | 2 | |
| 44 Hex head nut M6 | 1 |
| Part No. | Description Q'ty | |
| 45 Nut | M10 | 1 |
| 46 Screw M6*10 | 6 | |
| 47 8-level tension control | 1 | |
| 48 Allen screw M8*15 | 2 | |
| 49 Nut | M10 | 2 |
| 50 Hex head bolt M6*30 | 1 | |
| 51 C-clip | 6 | |
| 52 Waved washer 1 | ||
| 53 Adjustor assembly | 2 | |
| 54 Spring | 1 | |
| 55 Screw M5*20 | 1 | |
| 56 Bearing | 2 | |
| 57 Left crank 1 | ||
| 58 Right crank 1 | ||
| 59 Screw M5*10 | 1 | |
| 60 Belt pulley 2 | 1 | |
| 61 Bearing bracket | 2 | |
| 62 Screw M5*8 | 2 | |
| 63 Bushing | 6 | |
| 64 Allen key | 1 | |
| 65 Allen wrench | 1 | |
| 66 Round end cap | 2 | |
| 67 End cap for rear stabilizer | 2 | |
| 68 End cap for front stabilizer | 2 | |
| 69 Bushing | 1 | |
| 70 Spacer | 1 | |
| 71 Grommet | 4 | |
| 72 Screw M4*10 | 1 | |
| 73 Crank cover | 2 | |
| 74 Left chain cover | 1 | |
| 75 Right chain cover | 1 | |
| 76 Front cover 1 | ||
| 77 Self tapping screw ST2.9*8 | 4 | |
| 78 Flat washer ø4.5xø9 | 2 | |
| 79 Hand pulse sensor | 2 | |
| 80 Plastic washer | 1 | |
| 81 Belt | 2 | |
| 82 Grommet | 1 | |
| 83 EVA pad | 1 | |
EXPLODED DIAGRAM
ASSEMBLY INSTRUCTIONS
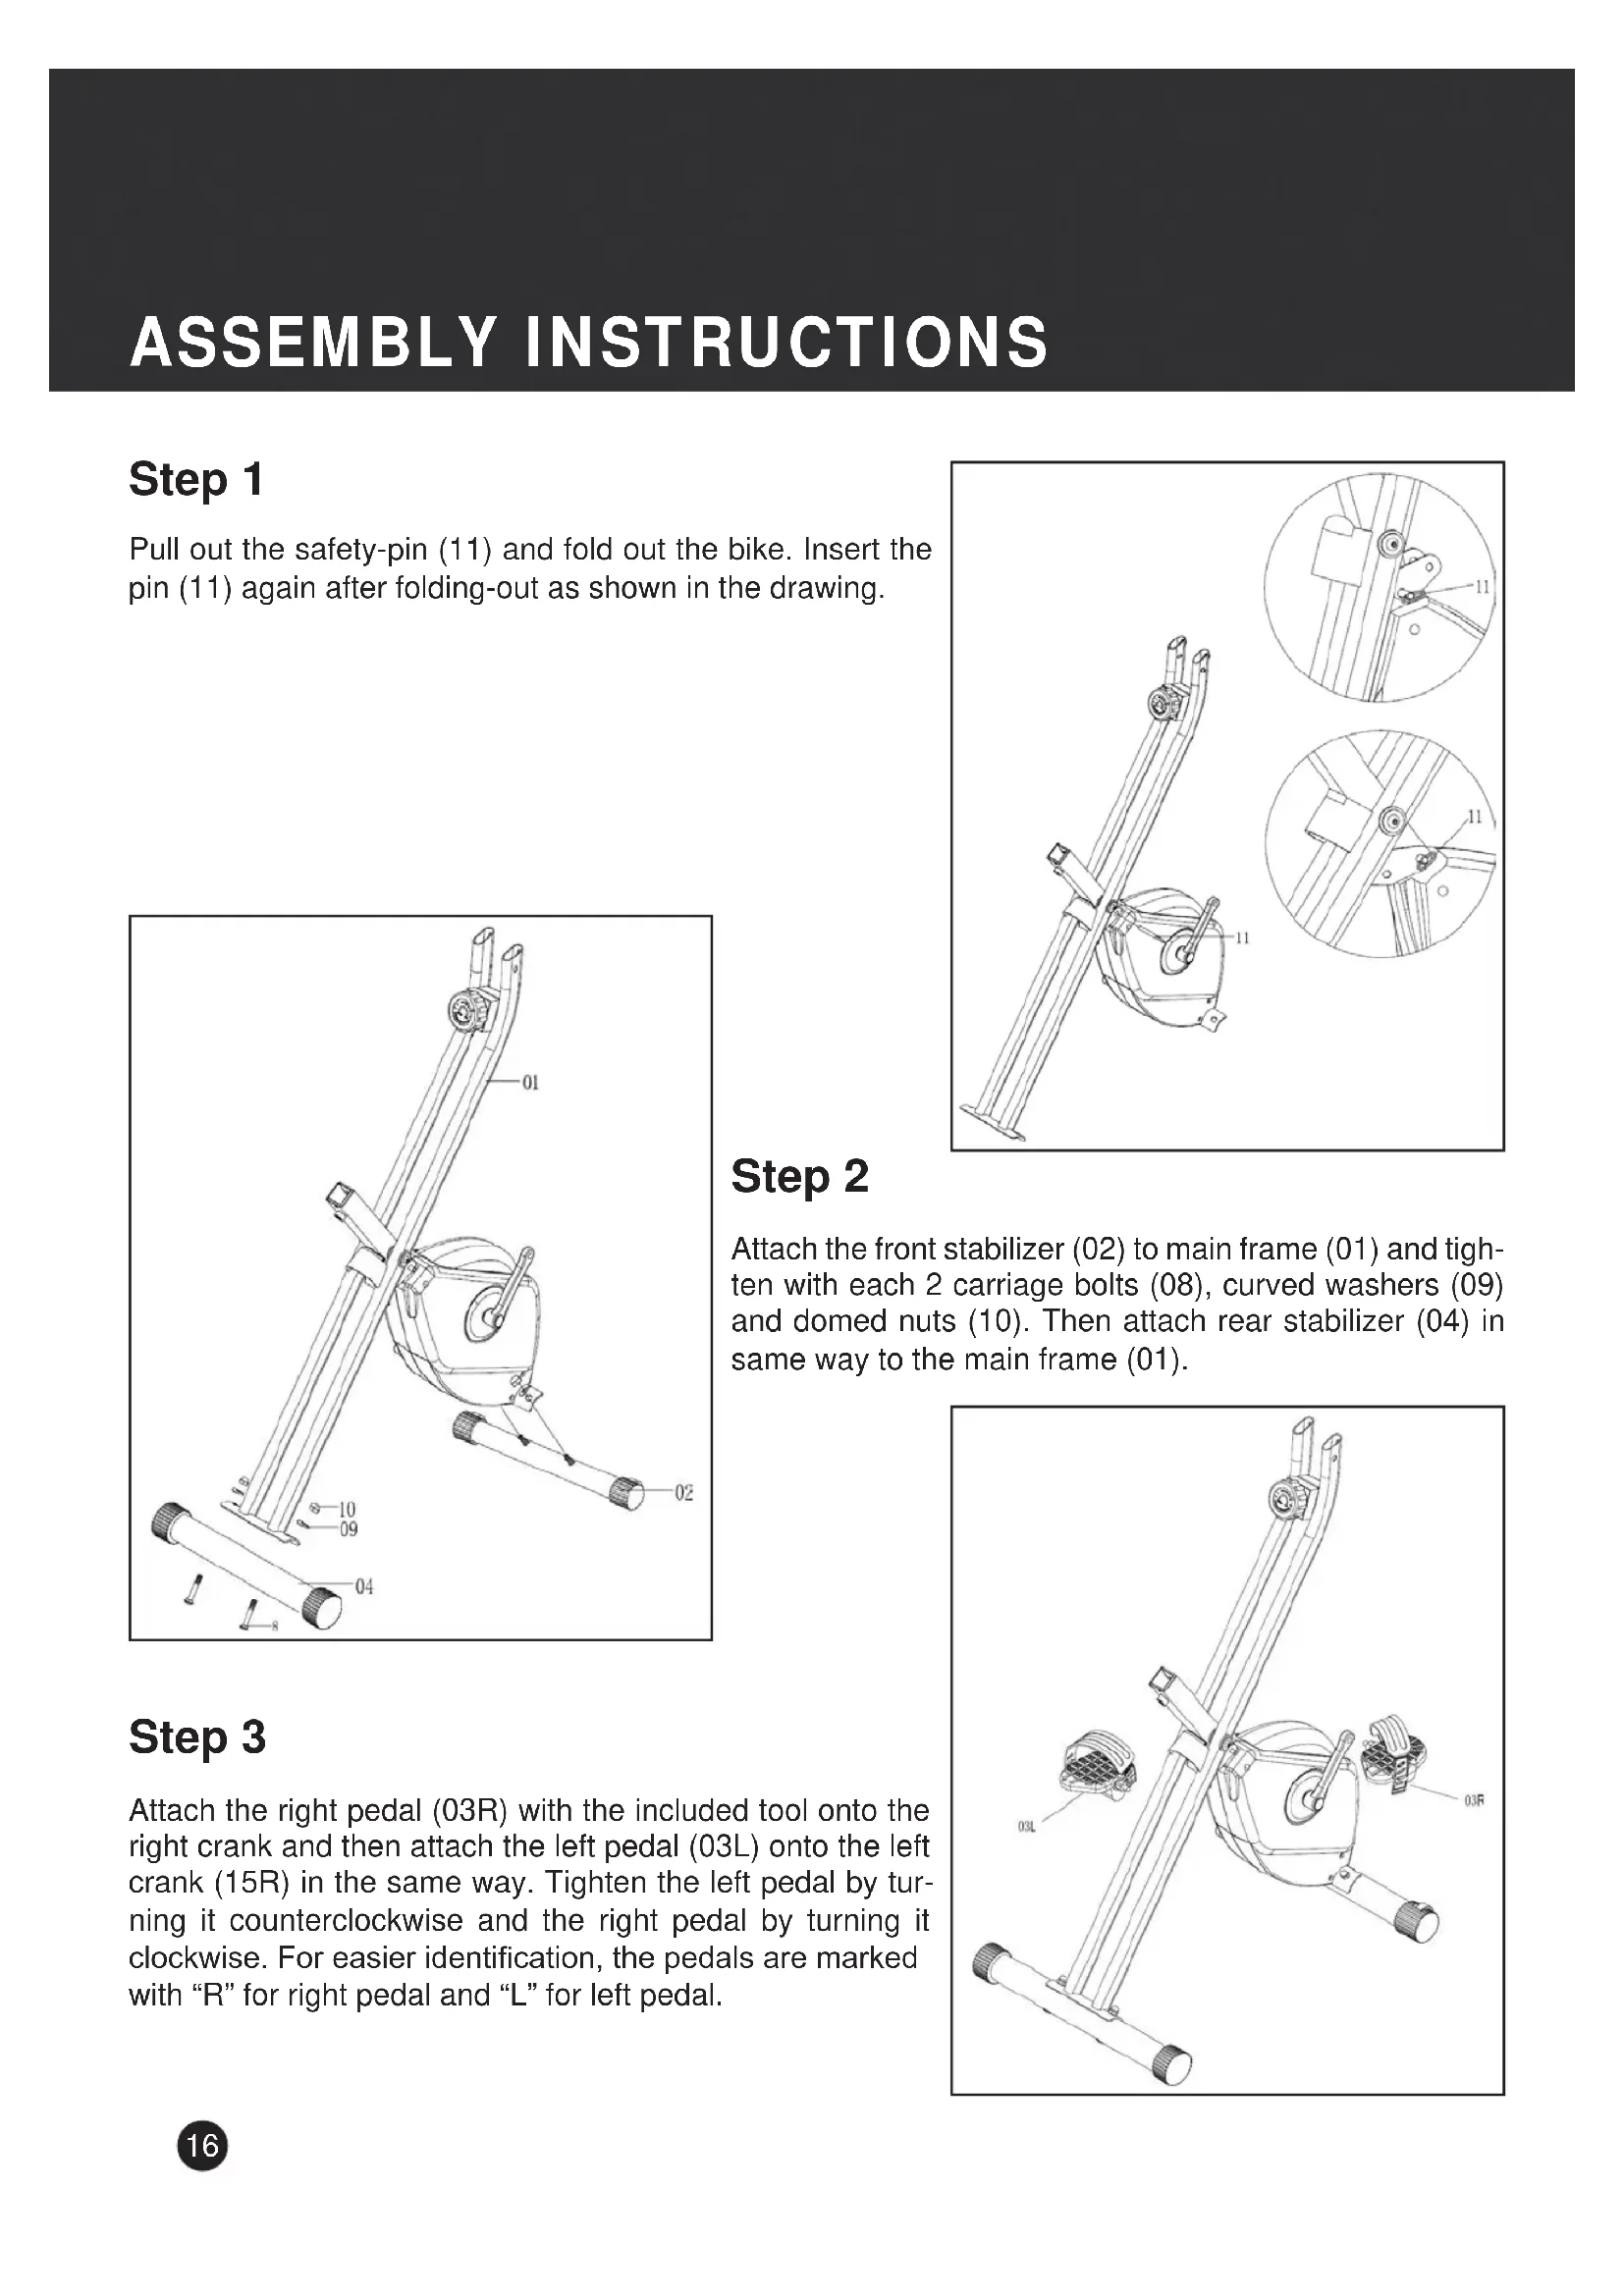
Step 1
Pull out the safety-pin (11) and fold out the bike. Insert the pin (11) again after folding-out as shown in the drawing.

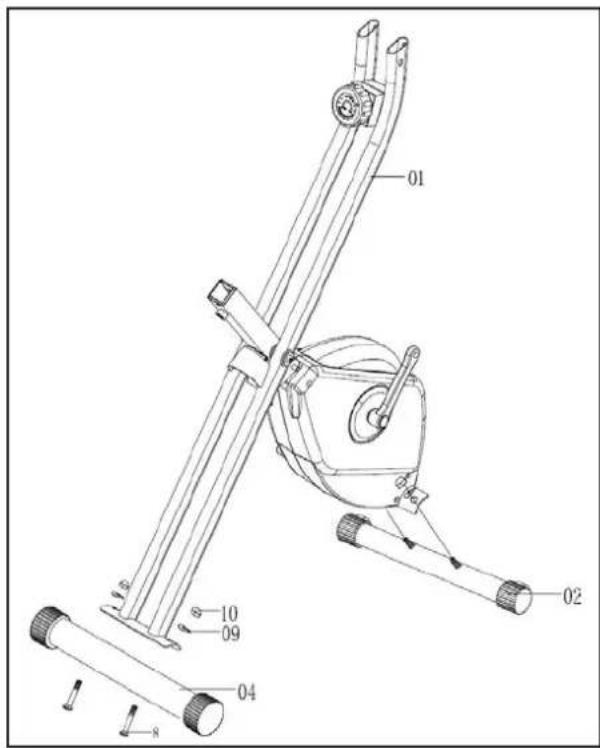
Step 2
Attach the front stabilizer (02) to main frame (01) and tighten with each 2 carriage bolts (08), curved washers (09) and domed nuts (10). Then attach rear stabilizer (04) in same way to the main frame (01).
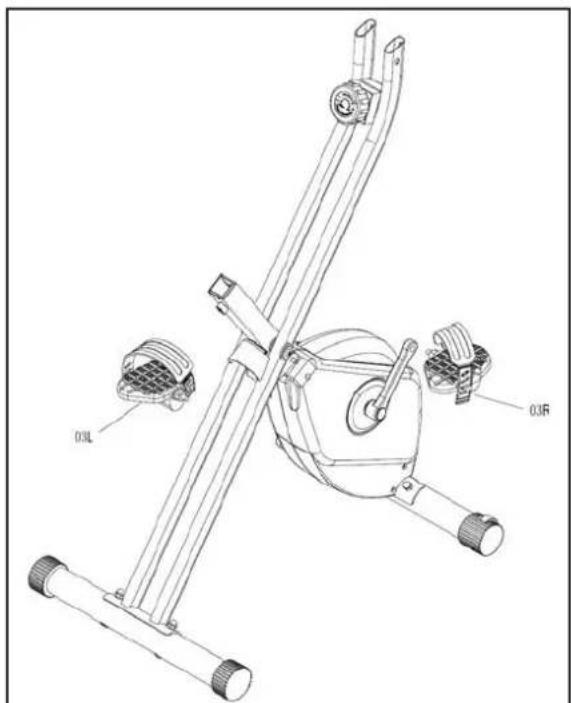
Step 3
Attach the right pedal (03R) with the included tool onto the right crank and then attach the left pedal (03L) onto the left crank (15R) in the same way. Tighten the left pedal by turning it counterclockwise and the right pedal by turning it clockwise. For easier identification, the pedals are marked with "R" for right pedal and "L" for left pedal.
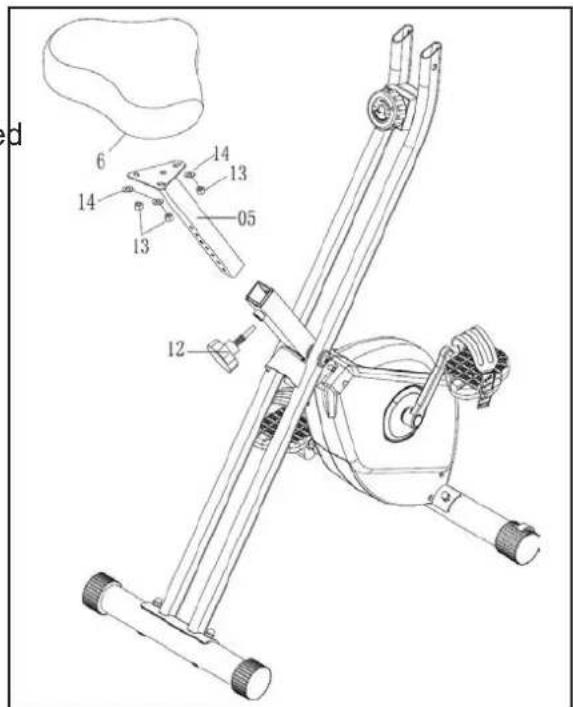
ASSEMBLY INSTRUCTIONS
Step 4
Attach the seat (06) to the seat post (05), tighten with nylon nuts (13) and flat washers (14), which are preassembled under the seat.
Attach seat post (05) to main frame with fixing knob (12).
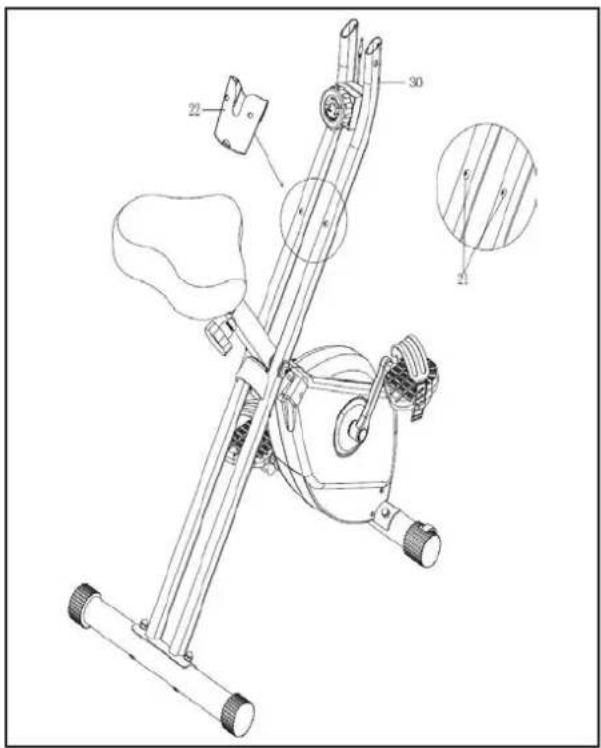
Step 5
Remove the screws (21) from the rear support tube (30). Attach the storage box (22) to the rear support tube (30) and tighten with 2 screws (21).
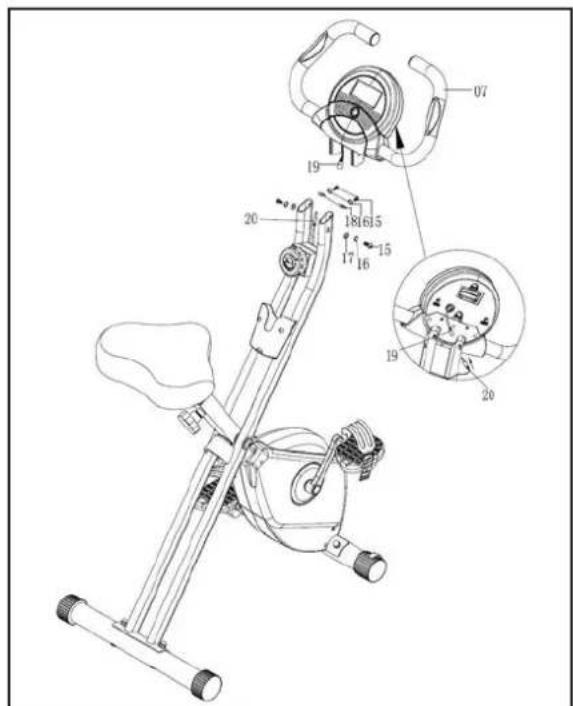
Step 6
Fix the Handlebars (07) to main frame (01), tighten with allen bolts (15), spring washers (16), flat washers (17) and curved washers (18) as shown in the drawing.
Connect the upper sensor wire (19) to the middle sensor wire (20).
Doublecheck, if all bolts and nuts are correctly tightened before using the appliance.
COMPUTER INSTRUCTIONS
Functions and Operation
Auto On / Off
As long as the wheel is in motion, the monitor is active and will show all exercise values automatically. If there is no movement for 240 seconds, the monitor will turn off automatically. The values for calories and Odometer will be memorized.
Auto Scan
Press the button until the arrow points to SCAN. The monitor will show the 6 functions SPEED, DIS, TIME, ODO, CAL and PULSE in sequence for approx. 6 seconds each.
SPEED
Displays the current and maximum speed. Speed is 0.0 up to 999.9km/h.
DISTANCE
Accumulates total distance from 0.00 up to 99.99km.
TIME
Accumulates total working time from 0:00 up to 99:59.
CALORIE
Accumulates calorie consumption during exercise. You may press the key to show the value (from 0.0 up to 999.9 kcal).
ODOMETER
Press the function button until display shows ODO, which is the total accumulated distance exercised with this device (from 0.0 to 999.9km ).
PULSE
Press the button until display shows "P". The computer will display your current heart rate in beats per minute.
RESET
Pressing the function button for more than 2 seconds will reset all values to 0 except odometer.
Note
Please note all values on this computer are approximate and they are for comparison purpose only. Do not use these values for any medical or rehabilitation purpose

Battery safety information
- Only replace with batteries of the same type, never use different types of batteries together or used batteries with new ones!
- Replace all of the batteries simultaneously!
- Clean the battery and device contacts if necessary before putting in the batteries!
- Insert the batteries correctly, observing the polarity (+/-) !
- Remove the batteries from the device if it is not going to be used for an extended period!
- Remove discharged batteries from the device immediately!
- The Computer requires two 1.5V (AA) batteries. Batteries are not included in scope of delivery.
- If the display is not clear or only partial segments appear, remove the batteries and wait for 15 seconds before re-installing them.
- The battery life is approx. 3 months under normal usage.
- When the batteries are removed, all the functional values will reset to 0.
Training tips
To achieve a considerable improvement of your physical resistance and your health, some aspects of how to find the most efficient amount of training should be followed.
You should consult your physician generally before starting any exercise to avoid health risks.
Intensity
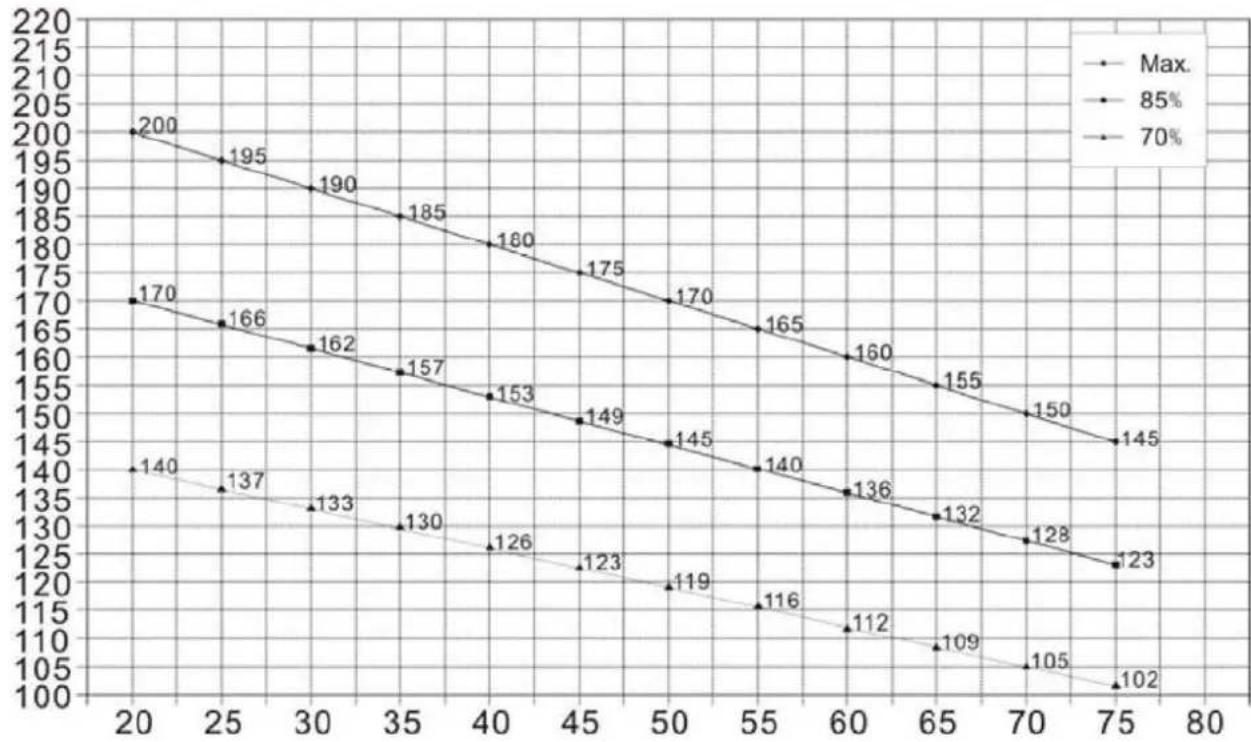
The correct intensity is important to achieve maximum results. The heart rate is an important factor in this regard and should never exceed a certain maximum, which is calculated by the formula 220 - Age. While exercising, the optimum pulse rate lies between 60% - 85% of the maximum pulse rate. For your personal training rates, please check the pulse rate reference chart.
When starting to exercise you should keep your rate at 60% of your maximum pulse rate in the first couple of weeks. With increasing improvement of fitness the pulse rate should be slowly increased to 85% of your maximum pulse rate.
Fat burning
The body starts to burn fat at approx. 60% of the maximum pulse rate. To reach an optimum fatburn rate, it is recommended to keep the pulse rate between 60% - 70% of the maximum pulse rate. The optimum training amount consists of three workouts per week, 30 minutes each.
For example:
You are 52 years of age and would like to start exercising.
Maximum pulse rate = 220 - 52(age) = 168 pulse/min
Minimum pulse rate = 168 × 0.6 = 101 pulse/min
Highest pulse rate = 168× 0.7 = 117 pulse/min
During the first weeks you should start with a pulse rate of 101, afterwards increase it to 117.
This can be done by increasing the resistance, choosing a higher frequency or longer training periods.
TRAINING TIPS
Training Organization
Warm-up: Before each exercise you should warm-up for 5-10 minutes, e.g. with some stretching exercises or training with low resistance.
Training session: During the actual training a rate of 70% - 85% of the maximum pulse rate should be chosen.
The length of your training session can be calculated with the following formula:
Daily training session: approx. 10 min. per unit
2-3 x per week: approx. 30 min. per unit
1-2 x per week: approx. 60 min. per unit
Cool down: To introduce an effective cool-down of the muscles and the metabolism, the intensity should be drastically decreased during the last 5-10 minutes. Stretching is also helpful for the prevention of muscle aches.
Success
Even after a short period of regular exercises you will notice that you constantly have to increase the resistance to reach your optimum pulse rate. The units will be continuously easier and you will feel a lot fitter during your normal day. For this achievement you should motivate yourself to exercise regularly.
Choose fixed hours for your training session and do not start training too aggressively. An old quote amongst sportsmen says: "The most difficult thing about training is to start it."
We wish you lots of fun and success with your BIKE.
Pulse Rate Reference Chart
GUARANTEE CONDITIONS
We provide guarantee for our devices according to the following conditions.
- We shall rectify the damages or defects - which are verifiably based on a manufacturing defect - in the device free of cost in accordance with the following conditions (numbers 2-5), if you have reported to us immediately after detection and within 24 months after the delivery to the end user. The guarantee does not extend to easily breakable parts like for e.g. glass or plastic. A guarantee obligation does not apply: in case of minor deviations of target quality, which are irrelevant for value and usability of the device; in case of damages due to chemical and electrochemical effects; in case of penetration of water as well as generally in case of damages due to force majeure.
- The guarantee claim is executed whereby defective parts are repaired free of charge or replaced with parts free of defects according to our discretion. We shall bear the costs for material and working time. Repairs on site cannot be demanded. The sales receipt with purchase and/or delivery date is to be submitted. Parts replaced shall become our property.
- The guarantee claim expires if repairs or interventions are carried out by people, who are not authorized by us for this purpose or if our devices are provided with additional parts or accessories, which are not adapted to our devices. Furthermore, if the device is damaged or ruined by the influence of force majeure or by environmental influences, in case of damages which are developed by incorrect handling or maintenance - especially non-observation of instruction manual - or if the device shows mechanical damages of any type. After telephonic consultation, the customer service can authorize you for repairs and/or for exchange of parts which you were sent. In this case, the guarantee claim does not obviously expire.
- Guarantee services does not cause any extension of guarantee period or does not start a new term of guarantee.
- Additional or other claims, particularly on replacement besides the damages arising on the device, shall be excluded to the extent that liability is not legally implied.
- Our guarantee conditions - which include prerequisites and scope of our guarantee conditions - do not affect the contractual guarantee obligations.
- Wear parts are not subject to the guarantee conditions.
- The guarantee claim expires in case of improper use, particularly in fitness-studios, rehabilitation centres and hotels. Even if most of our devices are qualitatively suitable for a professional use, it requires a separate joint agreement.
Packaging
Eco-friendly and recyclable materials:
- External packing made up of corrugated board
- Moulded parts made up of foamed, CFC-free polystyrene (PS)
- Foils and bags made up of polythene (PE)
- Tightening straps made up of polypropylene (PP)
Disposal

At the end of its operating life, this product should not be disposed via the normal domestic waste but should be handed over to an assembly point for recycling of electrical and electronic devices. The materials are recyclable according to their marking. You will make an important contribution for protecting our environment with the reuse, recycling or other forms of utilizing the old devices.