
CL 3 - Exercise bike Christopeit - Free user manual and instructions
Find the device manual for free CL 3 Christopeit in PDF.

User questions about CL 3 Christopeit
0 question about this device. Answer the ones you know or ask your own.
Ask a new question about this device
Download the instructions for your Exercise bike in PDF format for free! Find your manual CL 3 - Christopeit and take your electronic device back in hand. On this page are published all the documents necessary for the use of your device. CL 3 by Christopeit.
USER MANUAL CL 3 Christopeit
Assembly and exercise instructions for Order No. CL 3-1305(A)
NL
-
Summary of Parts Page 3 - 4
-
Important Recommendations and Safety Information Page 14
-
Parts List Page 15 - 16
-
Assembly Instructions With Exploded Diagrams Page 17-20 Mount, Use & Dismount
-
Computer instructions
Page 20
- Training Instructions, Warm up exercises (Warm Up)
Page 22
- Cleaning, Storage, Checks, Troubleshooting
Page 23
Dear customer,
We congratulate you on your purchase of this home training sports unit and hope that we will have a great deal of pleasure with it. Please take heed of the enclosed notes and instructions and follow them closely concerning assembly and use.
Please do not hesitate to contact us at any time if you should have any questions.
Important Recommendations and Safety Instructions
Our products are all tested and therefore represent the highest current safety standards. However, this fact does not make it unnecessary to observe the following principles strictly.
1. Assembly the machine exactly as described in the installation instructions and use only the enclosed, specific parts of the machine. Before assembling, verify the completeness of the delivery against the delivery notice and the completeness of the carton against the assembly steps in the installation and operating instructions.
2. Check the firm seating off all screws, nuts and other connections before using the machine for the first time and at regular intervals to ensure that the trainer is in a safe condition.
3. Set up the machine in a dry, level place and protect it from moisture and water. Uneven parts of the floor must be compensated by suitable measures and by the provided adjustable parts of the machine if such are installed. Ensure that no contact occurs with moisture or water.
4. Place a suitable base (e.g. rubber mat, wooden board etc.) beneath the machine if the area of the machine must be specially protected against indentations, dirt etc.
5. Before beginning training, remove all objects within a radius of 2 metres from the machine.
6. Do not use aggressive cleaning agents to clean the machine and employ only the supplied tools or suitable tools of your own to assemble the machine and for any necessary repairs. Remove drops of sweat from the machine immediately after finishing training.
7. WARNING! Systems of the heart frequency supervision can be inexact. Excessive training can lead to serious health damage or to the death. Consult a doctor before beginning a planned training programme. He can define the maximum exertion (pulse, Watts, duration of training etc.) to which you may expose yourself and can give you precise information on the correct posture during training, the targets of your training and your diet. Never train after eating large meals.
8. Only train on the machine when it is in correct working order. Use original spare parts only for any necessary repairs. WARNING! Replace the worm parts immediately and keep this equipment out of use until repaired.
9. When setting the adjustable parts, observe the correct position and the marked, maximum setting positions and ensure that the newly adjusted position is correctly secured.
10. Unless otherwise described in the instructions, the machine must only be used for training by one person at a time. The exercise time should not overtake 60 min./daily.
11. Wear training clothes and shoes which are suitable for fitness training with the machine. Your clothes must be such that they cannot catch during training due to their shape (e.g. length). Your training shoes should be appropriate for the trainer, must support your feet firmly and must have non-slip soles.
- WARNING! If you notice a feeling of dizziness, sickness, chest pain or other abnormal symptoms, stop training and consult a doctor.
- Never forget that sports machines are not toys. They must therefore only be used according to their purpose and by suitably informed and instructed persons.
- People such as children, invalids and handicapped persons should only use the machine in the presence of another person who can give aid and advice. Take suitable measures to ensure that children never use the machine without supervision.
- Ensure that the person conducting training and other people never move or hold any parts of their body into the vicinity of moving parts.
- At the end of its life span this product is not allowed to dispose over the normal household waste, but it must be given to an assembly point for the recycling of electric and electronic components. You may find the symbol on the product, on the instructions or on the packing.
The materials are reusable in accordance with their marking. With the re-use, the material utilization or the protection of our environment. Please ask the local administration for the responsible disposal place. - To protect the environment, do not dispose of the packaging materials, used batteries or parts of the machine as household waste. Put these in the appropriate collection bins or bring them to a suitable collection point.
- This machine is a speed-dependant machine, i.e. the power increases with increasing speed, and the reverse.
- The machine is equipped with 8-speed resistance adjustment. This makes it possible to reduce or increase the braking resistance and thereby the training exertion. Turning the adjusting knob for the resistance setting towards stage 1 reduces the braking resistance and thereby the training exertion. Turning the adjusting knob for the resistance setting towards stage 8 increases the braking resistance and thereby the training exertion.
- The maximum permissible load (=body weight) is specified as 100 kg. This machine has been tested and certified in compliance with EN ISO 20957-1 and EN 957-5, H,C". This item's computer corresponds to the basic demands of the EMV Directive of 2014/30EU.
- The assembly and operating instructions is part of the product. If selling or passing to another person the documentation must be provided with the product.
Parts List - Spare Parts List CL 3 Art.-Nr. 1305(A)
Technical data: Issue: 01.04.20168
- Magnetic brake system
- approx. 7 KG flywheel
- 8-manually adjustable load steps
- Hand Pulse measurement
- Saddle horizontally and vertically adjustable
- Floor level compensation
- Wheels for easier transportation
- Big LCD Computer showing speed, time, distance, distance total, approx. calories or pulse frequency
- Input of limits for time, distance, approx. calories and upper pulse limit. Announcement of higher limits
- Suitable for a height of 150-180cm
Max. body weight 100 KG
Items weight: 23kg
Exercise space approx: min. 2,5m^2
Space requirement approx. L 86, W 45, H 140 cm
Please contact us if any components are defective or missing, or if you need any spare parts or replacements in future.
Internet service- and spare parts data base: www.christopeit-service.de
This product is created only for private Home sports activity and not allowed to us in a commercial or professional area. Home Sport use class H/C
0510152025303540 5060708090100mm
| Illustration No. | Designation mm | Dimensions | Quantity illustration No. | Attached to | ET number | ||
| 1 | Main frame | 1 | 33-1305-01-WS | ||||
| 2 | Front stabilizer | 1 | 33-1305-02-WS | ||||
| 3 | Rear stabilizer | 1 | 33-1305-03-WS | ||||
| 4 | Rear end cap | 2 | 36-9906310-BT | ||||
| 5 | Carriage bolt | M8x75 | 4 | 39-10019-CR | |||
| 6 | Arc washer | 8//25 | 8 | 5+14 | 39-9966-CR | ||
| 7 | Cap nut | M8 | 4 | 5 | 39-9900-CR | ||
| 8 | Crank | 1 | 48 | 33-1302-07-SI | |||
| 9L | Pedal left | 1 | 8 | 36-9110-04-BT | |||
| 9R | Pedal right | 1 | 8 | 36-9110-05-BT | |||
| 10L | Front end cap left with transportation roller | 1 | 2 | 36-9925459-BT | |||
| 10R | Front end cap right with transportation roller | 1 | 2 | 36-9925460-BT | |||
| 11 | Sensor wire | 1 | 13 | 36-1302-07-BT | |||
| 12 | Tension cable | 1 | 25 | 36-1302-06-BT | |||
| 13 | Connection wire | 1 | 11+24 | 36-9211-07-BT | |||
| 14 | Inner hex bolt | M8x16 | 4 | 1+17 | 39-9886-CR | ||
| 15 | Saddle bushing | 1 | 1 | 36-1302-16-BT | |||
| 16 | Saddle post | 1 | 1+35 | 33-1305-04-WS | |||
| 17 | Handlebar post | 1 | 1 | 33-1305-05-WS | |||
| 18 | Tension control cover | 1 | 25 | 36-1302-10-BT | |||
| 19 | Washer | 5//10 | 1 | 20 | 39-10111-VC | ||
| 20 | Philips screw | M5x40 | 1 | 17+25 | 39-10406 | ||
| 21 | Philips screw | 4x10 | 2 | 24 | 39-10188 | ||
| 22 | Washer | 4//8 | 2 | 21 | 39-10510 | ||
| 23 | Round end cap | 2 | 27 | 36-9211-21-BT | |||
| 24 | Computer | 1 | 17 | 36-1305-33-BT | |||
| 25 | Tension controller | 1 | 12+17 | 36-1305-04-BT | |||
| 26 | Foam grip | 2 | 27 | 36-9211-22-BT | |||
| 27 | Handlebar | 1 | 17 | 33-1305-06-WS | |||
| 28 | Pulse sensor | 2 | 24+27 | 36-1302-11-BT | |||
| 29 | Handgrip screw | 1 | 1+16 | 36-1302-15-BT | |||
| 30 | Spring washer | for M8 | 10 | 5,14+31 | 39-9864-VC | ||
| 31 | Inner hex bolt | M8x30 | 2 | 17+27 | 39-9906 | ||
| 32 | Handlebar cover | 1 | 27 | 36-9110-13-BT | |||
| 33 | Saddle | 1 | 34 | 36-1305-05-BT | |||
| 34 | Horizontal saddle post | 1 | 16+33 | 33-1305-07-WS | |||
| 35 | Square end cap | 2 | 34 | 36-9211-23-BT | |||
| 36 | Fixed bracket | 1 | 34 | 33-9211-08-SI | |||
| 37 | Washer | 10//20 | 1 | 38 | 39-9989-CR | ||
| 38 | Hand grip nut | M10 | 1 | 36 | 36-9211-19-BT | ||
| Illustration No. mm illustration No. | Designation 39-Washer 8/16 5 31+33 36-9962-CR | Dimensions | Quantity | Attached to | ET number | ||
| 40 Nylon nut | M8 3 33 39-918-CR | ||||||
| 41 | Ball bearing | 30/45 | 2 | 8 | 36-9713-02-BT | ||
| 42 | Bearing holder | 2 | 8 | 36-9713-01-BT | |||
| 43 Nut | M22 | 1 8 | 36-9713-05-BT | ||||
| 44 Screw | 3x10 | 2 11 | 39-10127-SW | ||||
| 45 | Bearing cover 2 | M23 | 1 | 8 | 36-9713-06-BT | ||
| 46 | Big washer | 23/38 | 1 | 8 | 36-9713-07-BT | ||
| 47 | Belt | 1 | 48+56 | 36-1305-06-BT | |||
| 48 | Belt wheel | 1 | 8 | 36-1305-07-BT | |||
| 49 | Axle nut | M10x1 | 2 | 57 | 39-9820-SW | ||
| 50 Bolt | M6x50 | 2 | 39-10000 | ||||
| 51 | U-washer | 2 | 50 | 39-9713-59-BT | |||
| 52 Hex nut | M6 2 50 36-9861-VZ | ||||||
| 53 | Bearing cover 1 | M22 | 1 | 8 | 36-9713-03-BT | ||
| 54 | Axle nut thin | M10x1 | 2 | 57 | 39-9820 | ||
| 55 | Bearing | 6000z | 2 | 56 | 39-9998 | ||
| 56 | Flywheel | 1 | 57 | 33-1305-08-SI | |||
| 57 | Flywheel axle | 1 | 56 | 33-1305-09-SI | |||
| 58 | Crank Cover | 2 | 72 | 36-1102-04-BT | |||
| 59 Washer 22/35 1 8 36-9713-04-BT | |||||||
| 60 | Hex bolt | M6x15 | 2 | 64 | 39-10120-SW | ||
| 61 | Spring washer | for M6 | 2 | 60 | 39-9865-SW | ||
| 62 Washer 6/12 2 60 39-10013-VC | |||||||
| 63 | C-clip | C12 | 2 | 64 | 36-9111-39-BT | ||
| 64 | Magnetic board axle | 1 | 65 | 36-1122-21-BT | |||
| 65 | Magnetic board | 1 | 64 | 33-1305-10-SI | |||
| 66 | Spring | 1 | 65 | 36-9211-27-BT | |||
| 67 | Hex bolt | M5x60 | 1 | 65 | 36-1302-19-BT | ||
| 68 Hex nut | M5 2 67 39-10012 | ||||||
| 69 | Screw | 4,8x20 | 4 | 1+72 | 36-9825339-BT | ||
| 70 | Washer | 4//8 | 4 | 69 | 39-10510 | ||
| 71 | Screw | 4,2x18 | 7 | 72 | 36-9111-38-BT | ||
| 72L | Chain cover left | 1 | 1+72L | 36-1305-11-BT | |||
| 72R | Chain cover right | 1 | 1+72R | 36-1305-12-BT | |||
| 73 | Seat post cover | 1 | 16 | 36-9110-06-BT | |||
| 74 | Tool set | 1 | 16 | 36-1302-20-BT | |||
| 75 | Assembly and exercise instruction | 1 | 16 | 36-1305-10-BT | |||
Assembly Instructions
Remove all the separate parts from the packaging, lay them on the floor and check roughly that all are there on the base of the assembly steps. Please note that a number of parts have been connected directly to the main frame and preassembled. In addition, there are several other individual parts that have been attached to separate units. This will make it easier and quicker for you to assemble the equipment. Assembly time: 30 - 40 min.
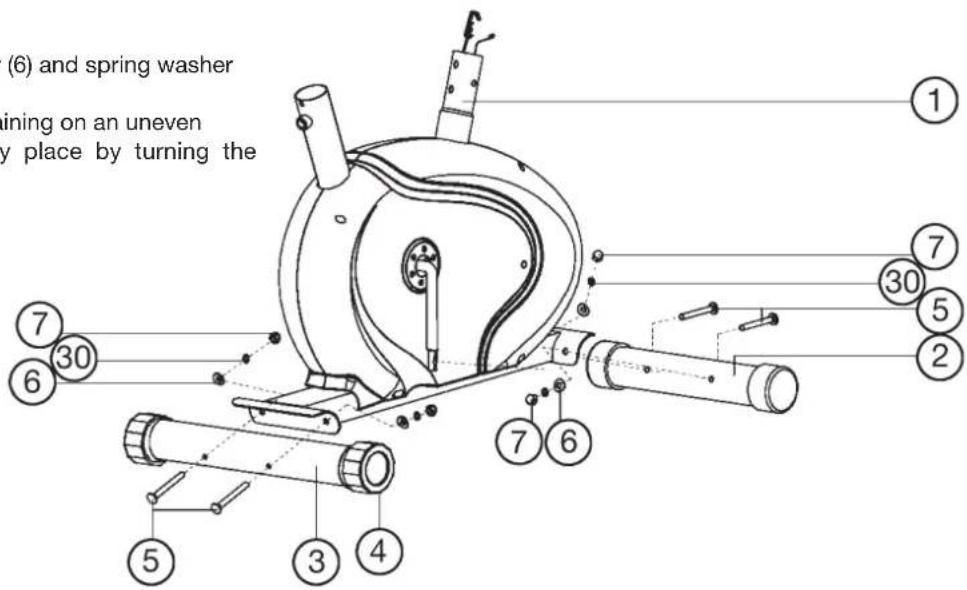
Step 1:
Install of front and rear foot (2 + 3) to the main frame (1).
- Place two screws (5), spring washers (30), washers (6) and nuts (7) accessibly beside the front and rear parts of the main frame (1).
- Insert the foot bars (2 + 3) in the holder of the main frame (1) and adjust so that the hole patterns of the holders and the foot bars (2 + 3) are aligned. The rear foot (3) has preassembled eccentric caps (4).
- Push one screw (5) through each hole.
- Fit the screw ends of (5) with one washer (6) and spring washer (30) each and fasten with a nut (7).
(Note: If the machine has positioned for training on an uneven floor, this can be compensated at any place by turning the eccentric caps (4).
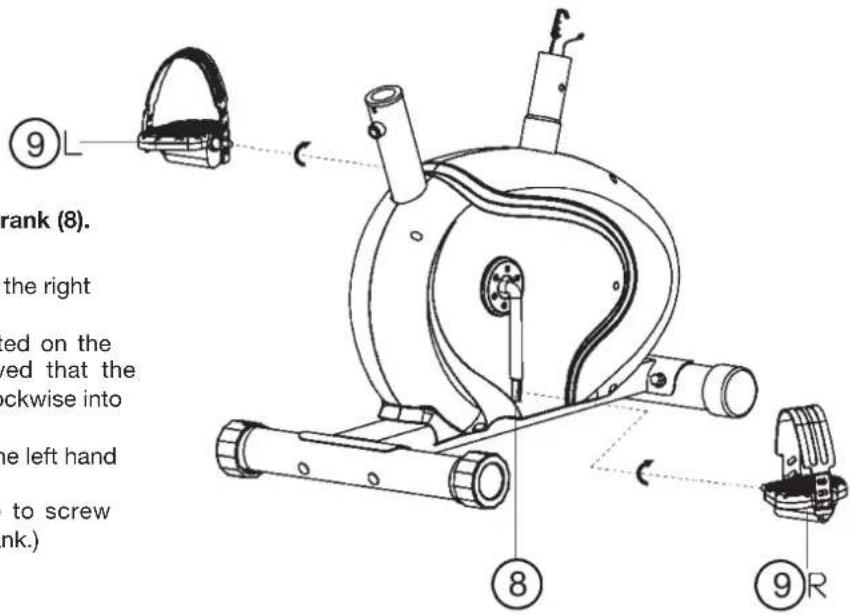
Step 2:
Installation of right and left pedal (9R + 9L) at pedal crank (8).
- The pedals are marked "R" for right and "L" for left.
- Screw the right pedal (9R) into the threaded hole on the right hand side of the pedal crank (8) and tighten firmly.
(Note: Right and left are specifies as viewed seated on the machine during training. It must also be observed that the threaded part of the right pedal must be screwed clockwise into the threaded hole of the pedal crank.)
- Screw the left pedal (9L) into the threaded hole on the left hand side of the pedal crank (8) and tighten firmly.
(Note: The threaded part of the left pedal have to screw anticlockwise into the threaded hole of the pedal crank.)
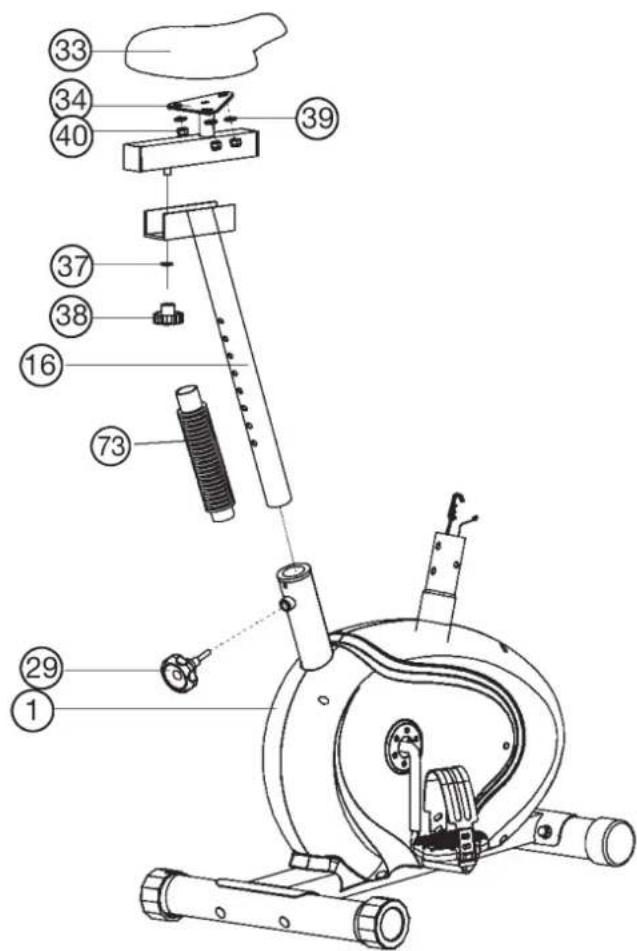
Step 3: Installation of saddle (33) and saddle support (16).
- Place the saddle (33) with the seat surface downwards.
- Place the retaining plate of the saddle slide (34) on the upwards pointing bottom of the saddle (33). The threaded pieces on the bottom of the saddle (33) must project through the corresponding holes in the retaining plate of the saddle slide (34).
- Place washers (39) on the threaded pieces, screw on nuts (40) and tighten firmly.
- Place the movable seat slide (34) into the holder of saddle support (16), set it at the desired horizontally position and tighten it by washer (37) and hand grip nut (38).
- Push the saddle support wrapping (73) onto the saddle support (16). Insert the saddle support (16) into the provided holder of the main frame (1) and secure at the desired position by screwing in the saddle support screw (29). (Note: To screw in the saddle support screw (29), the threaded hole in the main frame (1) and one of the holes in the saddle support (16) must be aligned. Furthermore, ensure that the saddle support (16) is not pulled out of the main frame beyond the marked maximum adjustment position. The setting of the saddle support can be adjust as desired later.)
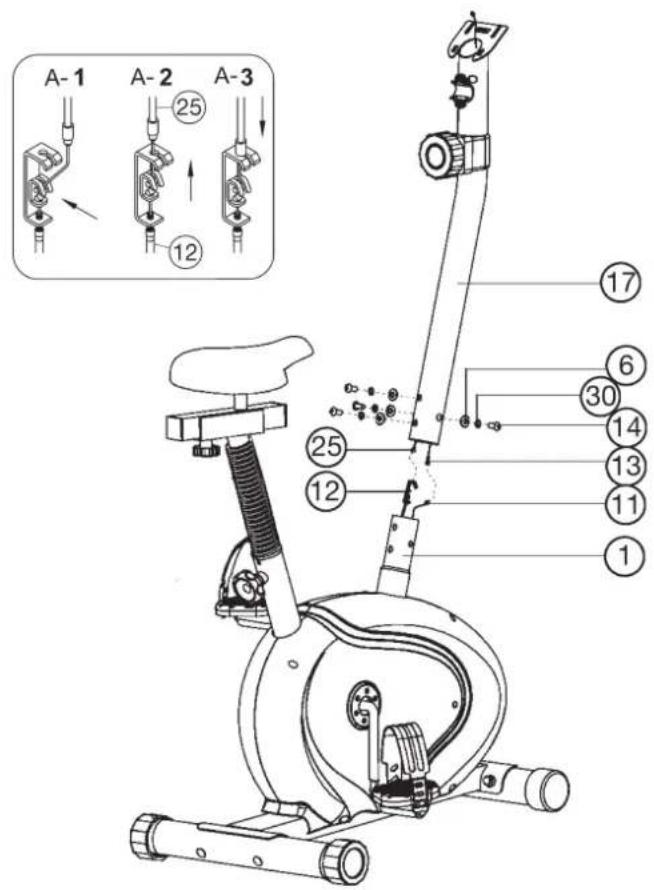
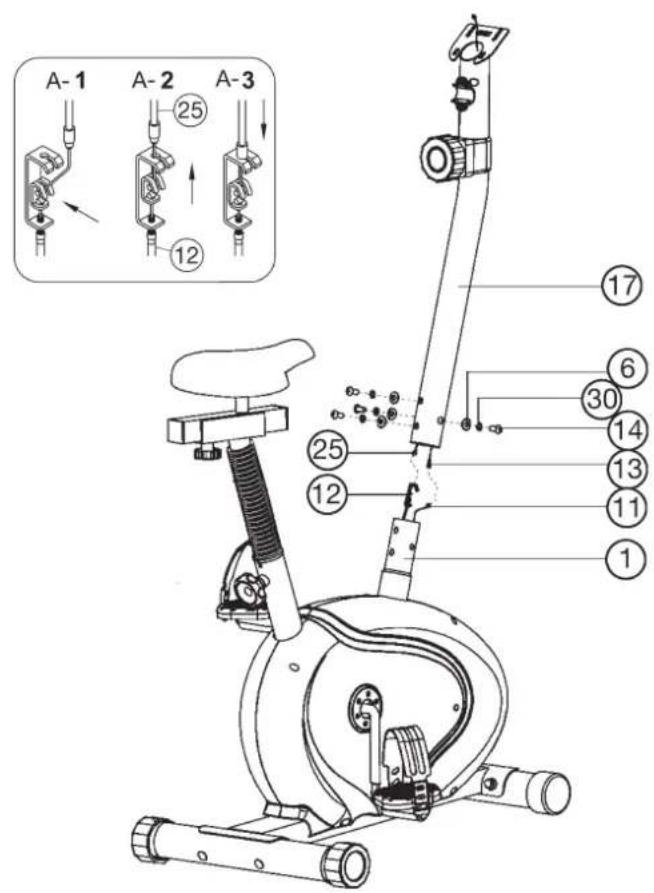
Step 4: Installation of handlebar support (17) at main frame (1).
- Place screws (14), spring washer (30) and washers (6) accessibly beside the front part of the main frame (1).
- Place the lower end of the support (17) against the main frame (1) and plug the ends of the two computer cables (11 + 13) projecting from (1) and (17) together.
(Note: The computer cable harness (13) projecting from the support (17) must not slide into the tube, as it is required for later steps of installation. When joining the tubes, ensure that the cable connection will not trapped.)
- Connect the tension cable of resistance control (25) to the bracket of lower section cable of tension (12) (See figure A1-A3). Before this step of the installation, it is advisable to adjust the resistance setting to the position, at which the cable extends furthest from the sheath. Put the lowest part of cable (19) into the small hook of lower tension cable (12) (figure A1). Pull it until the small hook get in higher position (figure A2) and then insert the cable (25) onto the bracket (12) (figure A3). When joining the tubes, ensure that the cable connection is not trapped.
- Push the handlebar support (17) onto the main frame (1) and put one washer (6) and one spring washer (30) on each screw (14). Push the screws (14) through the holes in the support (17), screw into the threaded holes of the main frame (1) and tighten firmly.
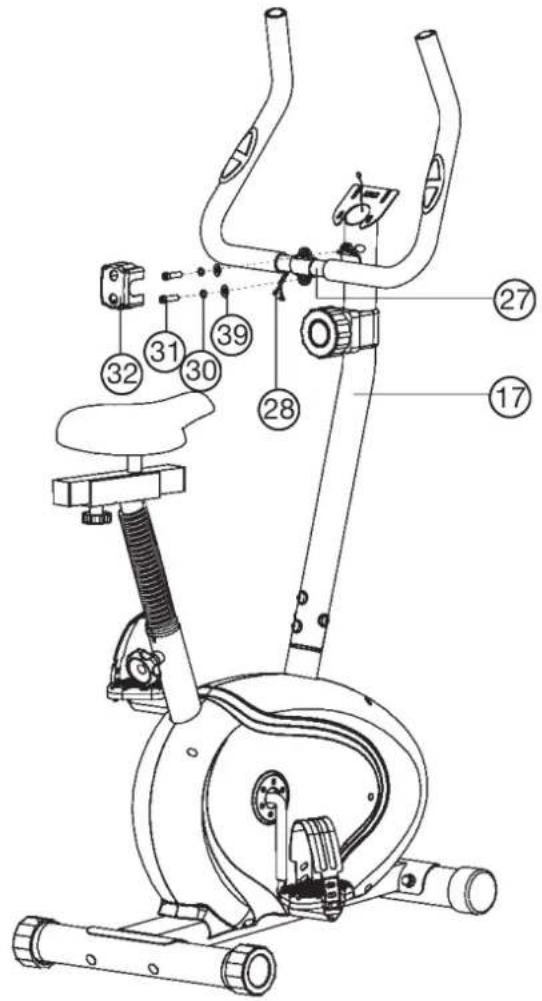
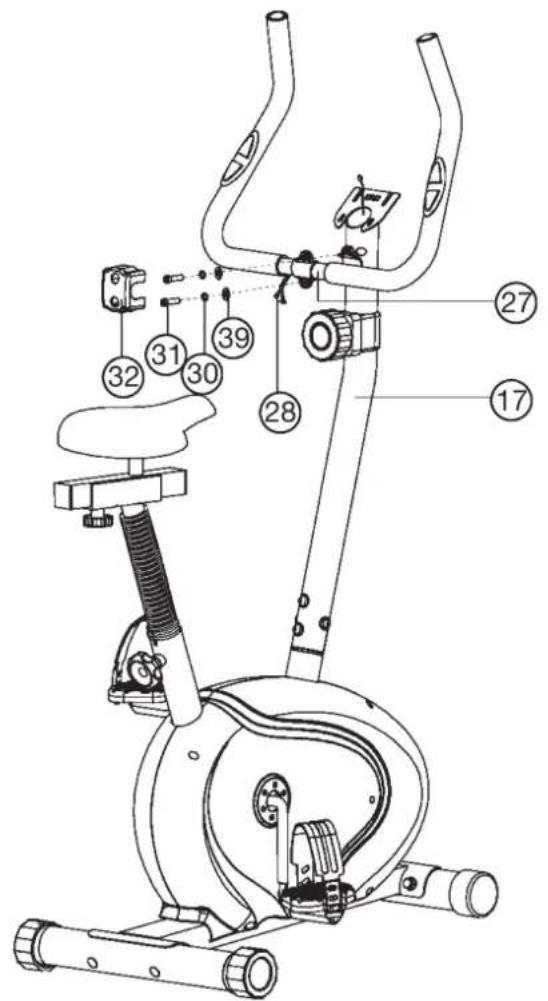
Step 5: Installation of handlebar (27) at handlebar support (17).
- Place the handlebar (27) against the handlebar support (17) and adjust so that the hole patterns in the handlebar and the handlebar support are aligned. Put one spring washer (30) and washer (39) on each screw (31).
Push the screws (31) through the holes in the support, screw into the threaded holes of the support (17) and tighten firmly. - Push the hand pulse cable (28) thought the holes into the top of handlebar support (17).
- Cover the handle bar connection with handlebar cover (32).
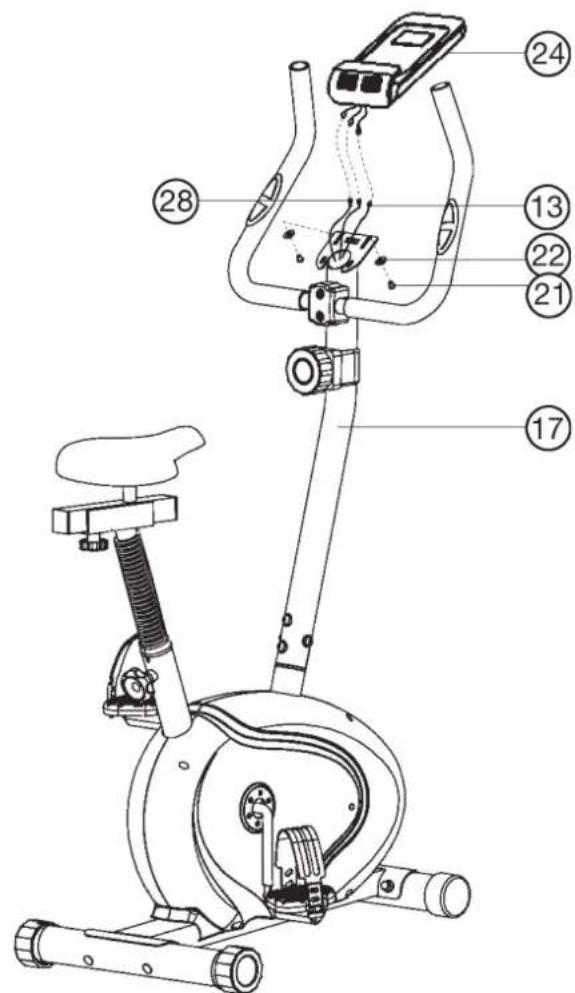
Step 6: Installation of the computer (24) at handlebar support (17).
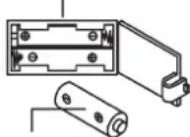
- Take the computer (24) that has been supplied out of the packaging and insert the batteries (Type "AAA"-1.5 V pencils) by watching for the right polarity on the back of the computer (24). (Batteries for the computer are not included in this item. Please buy them at your located market.)
- Guide the computer (24) to top of the upper handlebar support (17) and connect the plugs of upper connection cable (13) and pulse cables (28) with computer cables.
- Push the computer (24) with computer (8) onto the top of upper handlebar support (17) and fix it with screws (21) and washers (22).

Step 7: Checks
- Check the correct installation and function of all screwed and plug connections. Installation is thereby complete.
- When everything is in order, familiarise yourself with the machine at a low resistance setting and make your individual adjustments.
Note: Please keep the tool set and the instructions in a safe place as these may be required for repairs or spare parts orders becoming necessary later.
Mount, Use & Dismount
Transportation of Equipment:
There are two rollers equipped on the front foot. For moving, you can lift up the rear foot and drive it to where you would like to locate or store it.
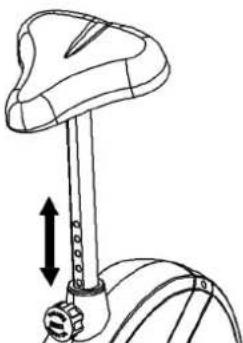
Adjustment - Seat Position
For an effective workout, the seat must be adjusted properly. While your are pedaling, your Knees should be slightly bent when the pedals are in the farthest position. In order to adjust the seat, unscrew the hand grip screw and adjust the seat to the right height, then screw in the hand grip screw and tighten it all the way.
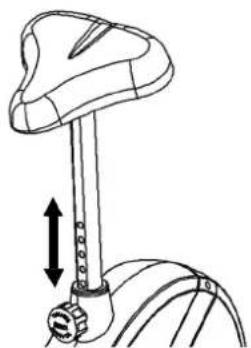
Important:
Make sure to put the hand grip screw back into place in the seat post and tighten it completely. Never exceed the maximum height of the seat. Always get off the bicycle before making any adjustment.
Mount, Use & Dismount
Mount:
a. After the seat is adjusted to properly position, insert your foot into retaining strap of pedal step on the pedal and hold the handlebar tightly.
b. Try to put whole body weight on your foot and simultaneously cross over the trainer and land your another foot on the other side.
c. Now you are in the position to start your training.
Use:
a. Keep you hands on the handlebar, and both feet are insert into retaining straps of both pedal properly.
b. Pedal your exercise bike by your both feet alternately.
c. Then you can increase the pedaling speed gradually and adjust braking resistance levels to increase the exercise intention.
Dismount:
a. Slow down the pedaling speed until it comes to rest.
b. Keep the left hand grabbing the left handlebar tightly, put your feet cross over the equipment and land on the floor, then land the other one.
This training equipment is a stationary exercise machine used to simulate without causing excessive pressure to the joints, hence decreasing the risk of impact injuries.
Exercise bike offer a non-impact cardiovascular workout that can vary from light to high intensity based on the resistance preference set by the user. It will strengthen your muscles of legs and increase cardio capacity and maintain fitness of your body also.
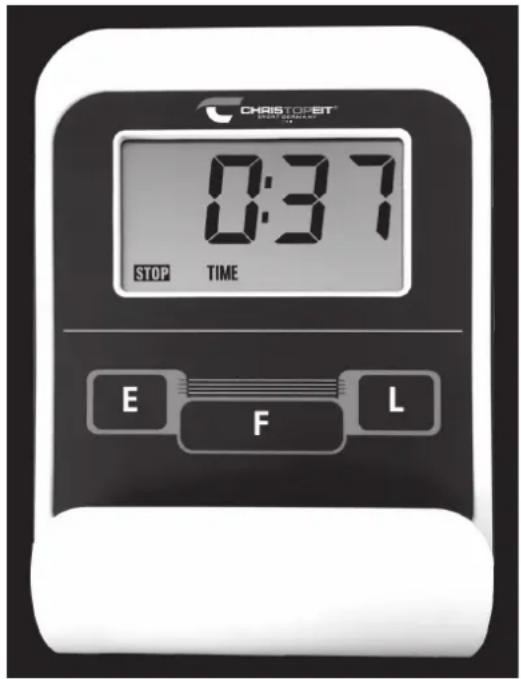
Computer instructions
The supplied computer allows the most convenient training. Every value relevant to training is displayed in a corresponding window. From the beginning of the training session, the required time, the current speed, the approximate calorie consumption, the travelled distance ad the current pulse rate are displayed. All values are counted from zero upwards. If you wish to see one value displayed constantly during training, select this with the F^ key. If you wish to see these values in constant alternation, select the "SCAN" function. The display then changes from one function to the next at intervals of approx. 6 seconds.
The computer is switched on by briefly pressing the F- key or simply by beginning training. The computer begins to register and display all values. To stop the computer, just stop training. The computer stops all measurements and retains the last attained values. The last attained values in the functions TIME, CALORIES and KM are stored and training can continue with these values when training is resumed.
The computer switches of automatically approx. 4 minutes after training is stopped. All values attained until that time are stored and are displayed again when training is resumed. It is then possible to continue training from these values or to reset all functions to zero using the L- key.
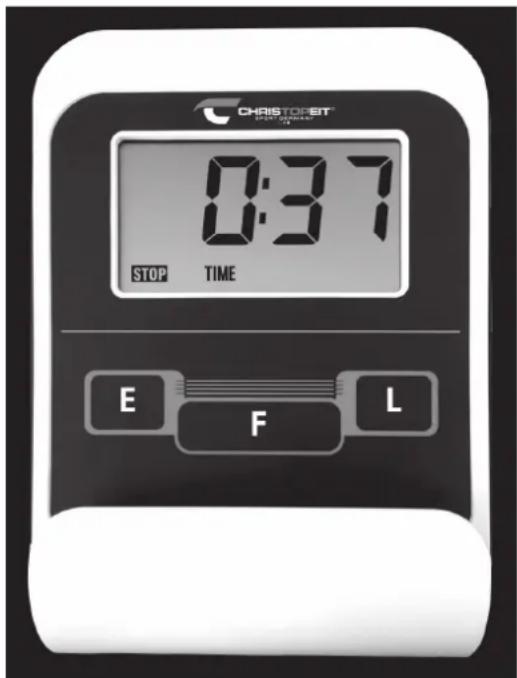
Displays:
1. "SPEED" (KM/H) display:
The current speed is displayed in kilometres per hour. It is not possible to specify a particular value using the E key. The values last attained by this function are not stored. (Limit of the display: 999.9 km/h.)
2. "TIME" (ZEIT) display:
The currently required time is displayed in minutes and seconds. It is possible to specify a particular value using the E^ key. If a particular time has been specified, the remaining time is displayed. When the specified value is attained, this is indicated by an acoustic signal. The values last attained by this function are stored. (Limit of the display: 99 minutes.)
3. DIST (KM) display:
The current status of the travelled distance is displayed. It is possible to specify a particular value using the "E" key. If a particular distance has been specified, the remaining distance is displayed. When the specified value is attained, this is indicated by an acoustic signal. The values last attained by this function are stored. (Limit of the display: 999,9 km.)
4. "CALORY" (CAL) display:
The current status of the consumed calories is displayed. It is possible to specify a particular value using the E^ key. If a particular consumption has been specified, the remaining number of calories to be consumed is displayed. When the specified value is attained, this is indicated by an acoustic signal. The values last attained by this function are stored. (Limit of the display: 999,0 calories.)
5. "PULSE" display:
The current pulse rate is displayed in beats per minute. It is possible to specify a particular value using the "E" key.
The values last attained by this function are not stored. (Limit of both displays: 40 - 240 pulse beats per minute.)
Note:
For pulse measurement, the two contact surfaces of the pulse measuring handle unit must be gripped simultaneously. The contact surfaces should be located centrally in the palms of the hands.
6. "SCAN" function:
If this function is selected, the current values of all functions are displayed successively in a constant sequence approx. every 5 seconds.
7. STOP display:
Display of Stopmode. Presets can be set.
Keys:
1. F^ key (Fuction):
Pressing this key once briefly makes it possible to change from one function to another, i.e. the respective functions can be selected for which entries can be made using the "E" key. The currently selected function is indicated in the window.
2. "E" key (Enter):
By pressing this key once, it is possible to specify values step by step in the respective functions. For this, the desired function must firstly be selected using the F^ key.
Holding the key pressed activates faster running. When training begins, the specified values are then counted down to zero.
3. ^ -key = (Delete):
When this key is pressed briefly, the values chosen with the ^ F^n key are reset to zero. If the key is held longer (approx. 3 seconds), all last attained values are deleted.

Battery compartment
AAA batteries
Replacing the batteries:
-
Open the battery compartment cover and then remove the used Batteries. (If the batteries should leak remove them under increased considering that the battery acid is not into contact with skin come and clean the battery compartment thoroughly.)
-
Insert the new batteries (type AAA) 1.5V in the correct order and taking into account the polarity in the battery compartment and close the battery cover so that it clicks into place.
- If the computer does not pick up immediately, the function should Batteries are removed for 10 seconds and re-inserted.
- The empty batteries properly in accordance with the disposal regulations disposed of and do not give residual waste.
Training instructions
You must consider the following factors in determining the amount of training effort required in order to attain tangible physical and health benefits:
1. Intensity:
The level of physical exertion in training must exceed the level of normal exertion without reaching the point of breathlessness and / or exhaustion. A suitable guideline for effective training can be taken from the pulse rate. During training this should rise to the region of between 70% to 85% of the maximum pulse rate (see the table and formular for determination and calculation of this).
During the first weeks, the pulse rate should remain at the lower end of this region, at around 70% of the maximum pulse rate. In the course of the following weeks and months, the pulse rate should be slowly raised to the upper limit of 85% of the maximum pulse rate. The better the physical condition of the person doing the exercise, the more the level of training should be increased to remain in the region of between 70% to 85% of the maximum pulse rate. This should be done by lengthening the time for the training and / or increasing the level of difficulty.
If the pulse rate is not shown on the computer display or if for safety reasons you wish to check your pulse rate, which could have been displayed wrongly due to error in use, etc., you can do the following:
a. Pulse rate measurement in the conventional way (feeling the pulse at the wrist, for example, and counting the number of beats in one minute).
b. Pulse rate measurement with a suitable specialised device (available from dealers specialising in health-related equipment).
2. Frequency
Most experts recommend a combination of health-conscious nutrition, which must be determined on the basis of your training goal, and physical training three times a week. A normal adult must train twice a week to maintain his current level of condition. At least three training sessions a week are required to improve one's condition and reduce one's weight. Of course the ideal frequency of training is five sessions a week.
3. Planning the training
Each training session should consist of three phases: the warm-up phase, the training phase, and the cool-down phase. The body temperature and oxygen intake should be raised slowly in the warm-up phase. This can be done with gymnastic exercises lasting five to ten minutes.
Then the actual training (training phase) should begin. The training exertion should be relatively low for the first few minutes and then raised over a period of 15 to 30 minutes such that the pulse rate reaches the region of between 70% to 85% of the maximum pulse rate.
In order to support the circulation after the training phase and to prevent aching or strained muscles later, it is necessary to follow the training phase with a cool-down phase. This should be consist of stretching exercises and / or light gymnastic exercises for a period of five to ten minutes.
You find further information on the subject warm-up exercises, stretch exercises or general gymnastics exercises in our download area under www.christopeit-sport.com
4. Motivation
The key to a successful program is regular training. You should set a fixed time and place for each day of training and prepare yourself mentally for the training. Only train when you are in the mood for it and always have your goal in view. With continuous training you will be able to see how you are progressing day by day and are approaching your personal training goal bit by bit.
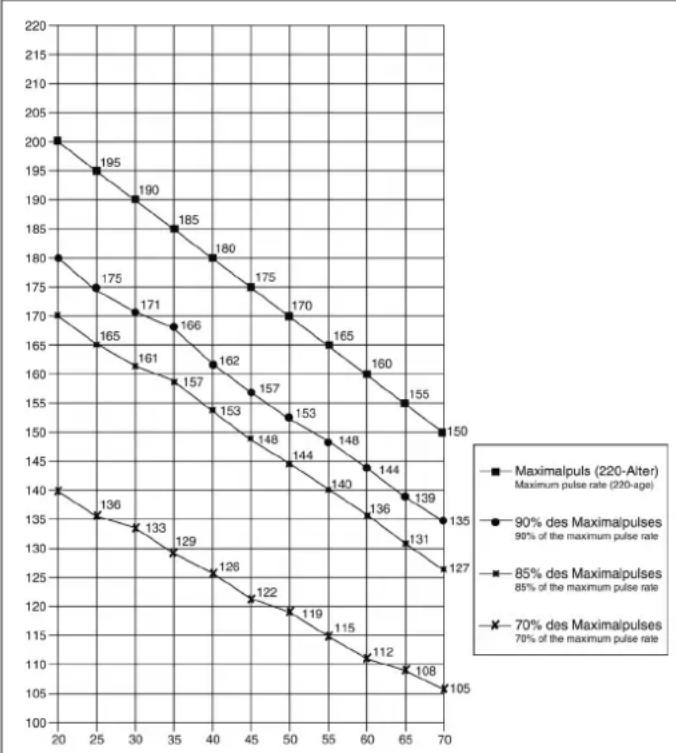
Calculation formula: Maximum pulse rate = 220 - age (220 minus your age)
90% of the maximum pulse rate = (220 - age) x 0.9
85% of the maximum pulse rate = (220 - age) x 0.85
70% of the maximum pulse rate = (220 - age) x 0.7
Warm up exercises (Warm Up)
Start your warm up by walking on the spot for at least 3 minutes and then perform the following gymnastic exercises to the body for the training phase to prepare accordingly. The exercises do not overdo it and only as far run until a slight drag felt. This position will hold a while.
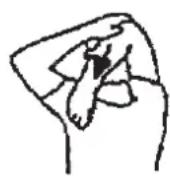
Reach with your left hand behind your head to the right shoulder and pull with the right hand slightly to the left elbow. After 20sec. switch arm.
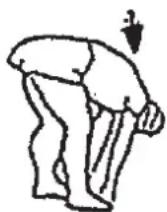
Bend forward as far forward as possible and let your legs almost stretched. Show it with your fingers in the direction of toe. 2 x 20sec.
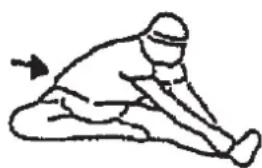
Sit down with one leg stretched out on the floor and bend forward and try to reach the foot with your hands. 2 x 20sec.
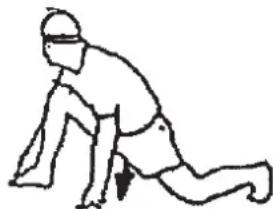
Kneel in a wide lunge forward and support yourself with your hands on the floor. Press the pelvis down. Change after 20 sec leg.
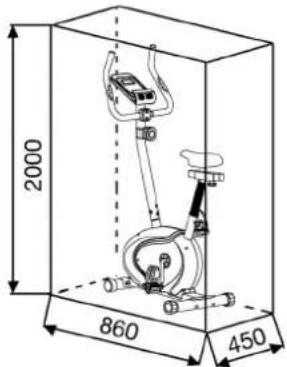
Training area in mm (for home trainer and user)
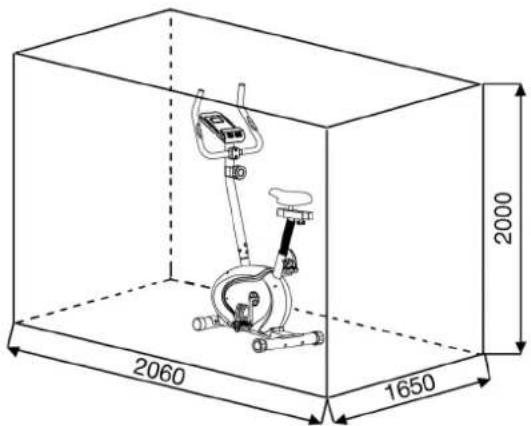
Free area in mm (Training area and security area (rotating 60cm))
Cleaning, Checks and Storage of the home bike:
1. Cleaning
Use only a less wet cloth for cleaning.
Caution: Never use benzene, thinner or other aggressive cleaning agents for surface cleaning as this damage caused.
The device is only for private home use and for use suitable indoors.
Keep the unit clean and moisture from the device.
2. Storage
Remove the batteries from the computer while intending the unit for more than 4 weeks not to use. Push the saddle slide toward the handlebar and the seat support tube as deeply as possible into the frame. Choose a dry storage in-house and put some spray oil to the pedal bearings left and right, to the thread of the handlebar bolt, and on the thread of the quick release for saddle support. Cover the bike to protect it from being discolor by any sunlight and dirty through dust.
3. Checks
We recommend every 50 hours to review the screw connections for tightness, which were prepared in the assembly. Every 100 operating hours, you should put some spray oil at the pedal bearings left and right, to the thread of the handlebar bolt and to the thread of quick release for saddle support.
Troubleshooting
If you cannot solve the problem with the following information, please contact the authorized service center.
| Problem Possible Cause Solution | ||
| Computer has no value at Display if you press any key. | No Batteries insert or batteries empty | Check the position of batte-ries at battery compartment or replace batteries. |
| Computer is not counting data and do not switch on after start cycling. | Sensor impulse missing base on not well plugged connection | Check the plug connections at computer and inside of handle-bar support. |
| Computer is not counting data and do not switch on after start cycling. | Sensor impulse missing base on not correct position of sensor. | Take off the cover and check the distance between magnet and Sensor. The magnet at turning belt wheel should have only less than < 5mm distance against the sensor position. |
| No pulse value | Pulse cable is not plugged in. | Check the separately pulse cable is well connected with computer. |
| No pulse value | Pulse sensors not well connected | Screw out the screw for pulse measurement and check if plugs are well connected and no damage at pulse cable. |
| Resistance don't change | Connection of resi-stance not well | Check the resistance connec-tion inside of handlebar support as manual mention. |

Sommaire
Chere cliente, cher client,
Warming-up oefingen (Warm Up) 42
3. Planning van de training
Warming-up oefingen (Warm Up)
Uar 3: MoHTax ceIa (33) n onopHoi Tpy6bI ceIa (16).
1.ПОJOXHTe ceIIO (33) cIeHbEm BHN3.
2.Пл actHy KpenHnAn OOnpHoi Tpy6bI ceHa (34) HANOKeHTe Ha JexKaUyIO CBepxY 3aHNOIO CTopoHY ceHa (33). DeTaN C pe3bOoHa o6paTHoN CTopoHE CEHa DOnJXHbI BbIXOuNTb Chepe3 COOTBeTCTByIOUne OTBepCTnB KpenExHOIN PnactHe Cana3OK ceHa (34).
3. Hanehbe Ha pe3b60bIe 3neMeHTbI noknaHbIe Waib (39) I raIKn (40) IN KpeKo 3aTaNHe.
4. BINOxnte caIa3Kn CeIa (34) B KpennneHHe Ha onopHOI Tpy6e ceIa (16) n 3aФHKcnpyIe IxN B XeJIaEMOM rOpI3OHTaIbHOM nONOXEHnC nOMoUbIO rpn6KOBoI raKu (38) n NOkPaIHOI shai6bl (37) Ha onopHOI Tpy6e ceIa (16).
5. Haetb MaHKeTBy onOpHOn Tpy6b Ce7na (73) Ha onOpHyTo Tpy6b Ce7na (16). BCTaBte onOpHyTo Tpy6b Ce7na (16) B COOTBeTCTBYHOeepenneHHe Ha OCHOBH Pame (1) 3aФnKcnpyTe ee B Jeknaemom NIOJoxeHN C NOMOuBb 6bICTPOdEINCTByUcero 3aTBopa (29). (BHIMaHne!ДЯ 3akpyuHBnA 6bICTPOs3AkpbBaHOeOcR 3aTBopa (29) pe3b6oBoE OTBepCTNe B OCHOBH Pame (1) H OTBepCTN B ONOpHOr Tpy6e Ce7na (16) DOJKNbCobNaTaB. TaKke npIMITE BO BHIMAHne, YTO ONOPNA Tpy6a Ce7na (16) He DOJXHa BixOOnTb 3O OCHOBH PAmbl 3a MAKImaJIbHyO IO3nIIO, 06O3NaueHHyIO Ha OCHOBH Pame. PO3nIgce CE7n MOxET 6bITb B IIO6oe BpEmr N3MeHeHa).

Uar 4: MoHTaX onOpHoi Tpy6bI pyJI (17) Ha ochOBHyIO pamy (1).
- BonTbI (14), npyXHHbIe Wai6bI (30) nIOKnIaHbIe Wai6bI (6) nOIOXHTe PAnOM C nepenHeJ yAcTBHO OCHOBHO paMbI (1).
2.ПОДBEДNTe HIXHIOU YAcTb ONOpHOr Tpy6bl (17) K OCHOBHOI pAmE (1) n coeDHHTe oBa KOHua Ka6eNei (13+11), BbIXOJaUNx N3 (1) n (17)
(BHmHaHe! BixOaIuN 30 onOpHOn Tpy6b (17) KOHeU KOMNbIOTePepHO Ka6eY (13) He doJIkeH 3anaDaTb B Tpy6y, T.K. OH Bam eJe noHaOboNTc npn nocneDyIOueM MoHTaKe. TaKKe oBaPATte BHMaHHe Ha To, YTO6bI pRn CoeINHeHH Tpy6 KOMNbIOTePheBle Ka6eY He 6blnn 3axaTb.)
3.Побдente KOncblperynipOBKn ConpoTnBHeHn(25)KkpennneHIO TPOCOBOI TgN(12)NcoeHNHTe IN DpyrCdpyrom,KaNPpeCTabNeHO Ha pcyHKax 1-3D.PerynpOBky CONpOTNBHeHnyCTAHOBITE TaK,YTObI TaRa C rONOBKO BbIXOuHa Ka MOxHO daNbwe n3 o6uINBKn.Iocne Yero 3aueHnTe rONOBKY Ha KOHcTe TANPERYNIPOBKN CONPOTNBHeHn(19)Ha KpUoK,HAXOJaUN-Ca HA KpENJIeHN TPOCOBOI TgN(12)(Pnc.1).NOTAHTE BCIO ONOPHyTOpy6C pniueHnHO rONOBKO TReN BBepx TaK,YTO6bKpOuKn B KpENJIeHN NpeMeecTHnCb HABepx(Pnc.2)NobuBkKaKpENJIeHN 3actonopunacb(Pnc.3).
4. HadehBe Ha 6oNTbI (14) no OndHn npyKHHHO WaiBe (30) n POKJaHNO WaiBe (6) n BCTaBte OnopHyTO Tpy6y (17) Ha ocHOBHyIO Tpy6y (1). BCTaBte 6oNTbI (14) B OTBepCTnN Kpenko 3aKpyTIne.
Uar 5: MoHTax pyra (27) Ha onopHyIO Tpy6y pyra(17).
- Bctabte pyb (27) B onopHyu Tpy6y pyra (17) TaKIM o6pa3oM, yto6bI OTBepCTnB pyne n B onopHou Tpy6e pyra CoBnaDann.
- Hadehhe Ta ha 6oIbI (31) no OJHO npyKHHo hwa6e (30) n OJHO nOdknaHoi wai6e (39), BCTaBte 6oJIbI (31) B OTBePcTnHa pyne, Bkpynte B pe3b6y Ha onOpHoI (17) n Kpenko 3akpynte.
- Побете Кабь Имереня Рльca (28) чepe3 OTberpctma B onopну Труб рун (17) habepx.
4.3aKpOTe coeINHeHn oOJIouKo pyKoTKn (32).
Uar 6: MoHTaX KOMNbIOTepa (24) Ha onophyIO Tpy6y (17).
- DoctaHbTe KOMNbIOTep (24) ɪs yɪnəkOBKn BCTaBbTe 6aTapeiKn (Tɪn AAA - 1,5V) B rɪeʒdHa o6paTHoɪ CTOpOHe (24). (BaTapeiKn Dɪŋ KOMNbIOTepa He npɪnɪraɪOTcR. IɒɡaʌyɪcTa, kʌŋtE B Mɑrəzɪne.)
2.ПОДБЕДИТЕКOMMbIOTep(24)КОПОРΗΝΥБЕpyla(17)иcoe-днHTeKa6eNb(13)иKa6eNbPyNbca(28)сКOMMbIOTepoM(24).
3.ПиLOXKITe KOMNbIOTep (24)КONOPHOn Tpy6e pyJn (17)И npiKpeINTE C NOMOUsbO BoTob (21)И NOknaDhIx WAn6 (22).
7: KoHTpObl
- PpOBepbTe BCE coeHHeHnHa npaBnBHOCTb c6OpKn n pOBeDnTe PpOBepky cyHKuHOHaJIbHOCTn. PpN 3TOM MOHTax CHTaETcR 3aKOHYeHHbIM.
- EcnB BCE B npraKe, npoBeinte npo6HyTO TpeHnpOBky npm ManenbKoHarpy3Ke, nocne yero HnDnBuAnbHO HAcTpoTe TpeHaxep.
3ameyane: IoxaIyIcTa, coXpaHnTe Ha6op HnCTpyMeHTOB dIra nocJeUx BO3MOKhBIX pMoHTOB INHCTpyKuIO NO MOHTaKy dJIra BO3MOKhBIX 3aKa3OB 3aNaChbIX YaCTeI
Ponb3ObaHne TpeHaepeom
TpaHcnpOpBbKa yctpoiCTBa: Ha nepeDHe HoxKe HaxOJaTcB Da TpaHCnOpTpOBoHybIX poNkA. Dnra TOrO, YTObI nepeDbHcyb TpeHaxeep Ha dpyrOe MeCTo nIN NOMeCTHTb Ha MeCtO XpAHEnH, BO3BMITECb 3a pyNb HAKNOHTE TpeHaxeep Ha nepeDHIIO HOKky TaK, YTObI TpeHaxeep MOXHO 6blIO NERKO nepeDbHcyb C NOMOuBIO TpaHCnOpTpOBoHybIX poNkOB Ha HYKHOE MecTo.
PerynnpobKa cndeHb no Bbcote:
TtO6bl noluyntb yD06Hoe nnoXeHne CnBa BO Bpemr TpeHnpOBKn.
Bicota cndeHb moKet 6bItb OTpeynpoBaHa npabNtHo. PpaBnBHa BAICOTA cndeHb torda OoctynHO npTr TpeHnpOBKe KOHeBA CAMOM HxKhem NOIOXeHn NeaBn BCE eune HEMHORO corHytBu IN He COBCem pactaHTb MoKet. TtO6bl yCTaHOBnBtpaBnBHO nIOXeHne dIra CNDeHn,OTkpyNTe BNHT 3Be3DOO6pa3HO pyKOATKn,
TtO6bl BB MORNI cDBNHytB ceNDc TpykoBcnDEHb B XKeJaEMOE
NOIOXeHne dIra CNdeHn. 3aTeM CHOBA 3aTaNITE CEINO BNHTOM CO 3Be3DOO6pa3HO pyKOATKoi
Baxho: 6eHntecb,TO BnHT 3Be3doobpa3HO pyKoTKn 3auePHeN npabInb H npikpyeh. He TAHTE 3a CnEHe 3a MAKcMaJIbHyIO nO3uHIO HpeYInpyTe NOnOKeHne NOKa BB CNDte Ha TpeHaKepe.
CauNbTbCn CnyckatbCn TpeHaxKepa: CaunTbcN Ha TpeHaxKeP:
Iocne yctahOBKn npabNbHOB BbICOTb CeIa BO3bMNTecb 3a pyNb. UcTaHOBnTE 6bnKaiSyIO neaIb B HnKHIo IO3uINIO IN BDeHbTe CTynHIO BΦHKCnpUOUI pEmeWOK Tak, YTObI OHa HaxOINlAcB H naExKHOM NOLOXKeHN Ha neaII. PepeKInbTe DpyryO Hory Ha npOTIBONIOJXHyIO CTOpOHy I CAnbTe Ha ceIIO. Ppi 3TOM KpenKO depKInTeCB DBym PyKaMI 3a pyNb. Iocne 3TORO BDeHbTe DpyryO CTynHIO BΦHKCnpUOUI pEmeWOK neaII.
Пользоваиме:
DepKntecbDyBmPykAm3a pyIbH He BCTabaIte C cedna BO BpEmr TpeHnpOBKn.CJeIeTe 3a TeM, YTo6bl CTynHn Ha neJaIax BCE BpEmr TpeHnpOBKn 6bl 3aФNKCuPOBaHbI peMeuKaMn.
CnyckaTbcra c TpeHaekepa:
Ppekpatne TpeHnpbky, KpEnKO deepKac3a pylb.CHMnTe cHaayna ONDy CTynHIO C neDann N NOCTabBte ee HadeXHom NOnOKeHN HaNOI N COINTE C cedna. CHmNTE NOTOM Dpyryo CTynHIO C neDann N NOCTabBte ee Ha NoI N coiDnTE C TpeHaxkepa.
3TOT TpeHaepe - HeoDBNkBIO DomauHIO TpeHaeep, IMTNpyUO- uE3dy HbENOCnnePe. 13-3a TpeHINPOBKn pnp IIO60I NOrOe, 6e3 BHeuHX BO3DeIECTBNI, a TaKe 6e3 DaBLeHnI npE e3eB rpynnpe yMeHbuaeTCB EpoRTHOCTb NaDeHnI INpeyTOMJeHH.
I3-3a BO3MOXHOCTN I3MEHeHn COIpOTNBHeHn, e3Ja Ha BeNoCIne de IpeIOCTABJRETOB3MOXHOCTb TpeHINPOBKn CepDeHNO-COCYDNTOcNCTeMb63Yepe3MePHo HAnpRKeHn.Ipn 3OM BO3MOXHa 60JIe NIM MeHHe INTEHCNBHnTpeHINPOBKa.Pn 3OM TpeHINpyOTc HxKHe KOHeHOCn, YkPeJIyETcA CepDeHNO-COCYDNTa CNCTema n CnOCOBCTByETc NOdEprKaHNEXOpOWe CnpTNBHOΦOpMbI.
PykoBODCTBO NO nCNoIb3OBAHnIO KOMNbIoTepa
BxoJaun B KOMTNeKT O6OpyOBoHn Chapra KaOMNbOTep O6ecneHT Bam MaKcMaIbHbI KOMpOPT Bo BPem TpeHnpOBKn. IIO6oB BaXhBi DnA TpeHnpOBOUHO npouecca nokaTeNB OTPaKaETC Ha DCINlee.
C haayanom TpeHnpOBKn Ha dinCnnee BbICBeuBaOTc HEO6xoDnMOE Bpem, pKaTnuecka CKOpocTb, npMepHbI paXoJ KAnOpN, npOJeHHoe pacCTORHHe I Nybc TpeHpyIOeROcB MOMENT CHrTHN NOKa3AHN. OTCHT BCex 3Haehn HaHnHaETcO T O cYctaHOBKO Cheta Bnepe.
KOMnbIOTep BKJIOUaETc npocTbIM HaxaTneM KHOKN, F" nI npocTo c NaHauIOM TpeHnPOBKn. KomblOTep HauHnaet OTCeT BCex NOKa3aHn I OTO6paKaTaB nx Ha dncnnee.
TTO6bIOCTaHOBNTb KOMNbIOTep, Heo6xOJIMO npocTo 3aBepuNTb TpeHIpOBky. KOMNbIOTep OCTaHaBnBaET BCE n3MepeHn I demOHCTpPyET KOHeHbIe pe3yNtBtbl.CamblcNoCleHnpe3yNtBtblФyHKmB PPEM, KALOPIM N KINOMETPAX 3aHOCTCR B NaMrtB, IN pRn BO306HOBJIeHN TpeHIpOBKn Bbl MoKeTe HaHTb C 3TxN NOka3atenei.
KOMnbIOTeP abTOMaTHueeCKn OTKNIOUaETc npIMepHO uee3 4 MNHytbi nocne OKOHaHn TpeHnpOBKn. Bce DCHTIRHyTbIe DO 3TOrO NOKaTeiN.
Jmcnnei:
1.LncnneJ,ZEIT"(Bpem):
Ioka3bIbaeT fakntueckn 3aTpaehHoe BpemB MHyTax n CekyHdx. C NMOUHO KONIKN,MOXHO npedBaPteNBHO 3aDaTB onpeDeneHHbe noka3aTeN. EcnB Bbl 3aadAn onpeDeneHoe BpemTo yka3bIbaeTCB pEmo, OCTabueeeecdo 3aHaHoro npedeJa. KaK TOnbKO yka3aHbI npden DOCTINHYT, TYT Je pa3daetcAkyctneckn cunHan.
PpOu3BOUntc3aHnCbBnAMTbNocneHnXpe3yNbTaTOB B3TOI cyHKm. (MaKcMmaJIbHaI rpaHnua nokaatae 99 MHyT.)
2. Jucnnei, KM/H" (KM b qac):
Ioka3bBaetcphaktnueckndoctnHytaeCKopoctb BKNlometpaxB.
vac.HeBo3moxHo npeBapntEnbHO 3aDaTb C NOMOuB KOHONK, "E"
onpeDeneHHb noka3aTeB.3aNcB N aMaTb NOCNEHINx pe3yJbTaTOB B
3ToI yHKUIM He npOn3BOUITcR.
(MakcmaJIbHaI rpaHua nokaTea 999,9 KM/uaC)
3. Jucnnei, KALORIEN" (Kanopun):
Yka3bIbaeTcN fakTNuecko KOnuueCTBO n3pacxOdoBaHHbx KaOpn. MoXHO npEdBapNTeBHO 3aDaTb ONpeDeHnhBIO KA3aTeB B 3ToJ ΦyHKnn C NOMoUbKO HONKn "E". EcnB Bbl 3aDann ONpeDeHnhBIO NOk3aTeB, To yka3bIbAeTc KOInueCTBO OCTabWuxCn DO 3aDaHHORO npdeNaOpn. KaTOnBko Yka3aHHb NpeDen DoCTNRHT, To Tyt Xe pa3daTcN akCyTneckn CnHaJI. 3aNNCb B NaMrtb NocJeHHx pe3yNbTaTOB B 3ToJ FyHKnn PpON3BoDnTCR.
(MakcmaIbHaI rpaHua noka3aTeJI 999,0 kaOpn)
4. Jucnnei, KM" (KunomeTpax):
Noka3bIbaeTcKoJIueCTBO npOJHbIX KINOMetPOB. MoKHO npEBApHTenbHO 3aJaTB onpeJeHHbI NOka3aTeB B 3ToI cyHKuIM C nmoUIO KNOKn + + . Ecm Bbl 3aJAMn ONpeJeHHbI NOka3aTeB, TO yKa3bIbaeTcKoJIueCTBO OCTabWnxCdo 3aJAHHOrO npPeJea KINOMetPOB. KaTOnbKO yKa3aHHbI npPeDen DoCTnHyT, To TyT Xe pa3aTeCk aKyctNuEcckn CnHAI. Ppon3BoDntC 3aNNCb B naMrtb NocneHNx pe3yIbTaTOB B 3ToI cyHKuIM.
(MakmabhaIraHua nokaTea999,9KM)
5.LncnnePULS"(NYJbc)
DEmOHCTPnpyETc qakTnueckoe COCTOHN He NylbCa BydapaX B MHyTy. C NOMOJI KHOKN, E" MOKHO ppeBapntelbHO 3aDaTB onpeDeeneHHbe nokaTeI. 3aNNb B NaMaTb NocneHnX pe3yIbTaTOB B 3ToI fynKmN He npOn3BOuNTCA.
(MakcmaIbHaI rpaHua noka3aTeIaO 40 do 220 ydaopoB B MHyTu)
BHHMaHHe:
IIN3MepeHnIyIbCa HeO6xOdImo OndHOBpeMeHHo B3rTbcR 0eIMnykamn 3a 06e KOHTaKThbIe NOBepXHOCTn Ha KOMNbHOtepe. Ppi 3tOMKOHTaKThbIe NOBepXHOCTn DOJNXHbI HAXOOnTbcR No cepEduHe BHyTpEHNeCTOPOhI naDoHei.
6.Функц,在SCAN"(ДemonctpaBnBCEX nok3aHn no oupeDn):
Ecni Bb6npaetc3a fynkun,TO B INHTepBane npMmepHO 6 ckyHIOCTOHHo CmEHJpyr dpyra, DEMOHCTpnpyIOTcN OOepeN IOCTINHyTbe NOKa3aTeEN BCex fynKu.
7. JIucnnnei, STOP" (CTON):
HnKauaCToN MoUca.Bo3MOKeH BBOd DaHHbIX
KHONK:
1.Khonka,F(FyHKnna):
KopOTKIM ODHOKpArThbIM HaxKaTnEM KJIaBnSi MOKHO nepExoDInb OT OndH ΦyHKuN K dpyro, To eCTb Bbl6npaTeC CoOTBeTcTByIOua ΦyHKuN, B KOtOpYIO C NOMOsbIO KNONKn, E" BBOJrTaXeJaEmbIe
2. Khonka, E" (BBOd daHHbIX):
Ondokpatthbim Haxktaem KHNKn Ppon3BODNTCB BBOd 3HaueHnT OIN INHOIyHKUN.ДЯ 3TOrO C NOMOUBKONKn ,F" Heo6xOJNMO npedBapntelbHo BblpaTaXeNaemyIO yHKUIO.
Bonee dntelbHbIM HaxaTneM HnHcHpyETc CKOpOCTHO pEXHM BBOda, OCTaHOBTb KOtOpBI MOxHO NOBtOpHBIM HaxaTneM.
3. Khonka „L“ (YdaneHne dAnhblx):
KopoTKM HaxaTneM 3ToH KHOKN MOxHO yCTaHOBtB BbIbpaHHb C NOMOsbIO KHOKN "NOKa3aTeNb Ha HOb. COOTBeTcByIOuN NOKa3aTeNb BBICBEHbAeTCa Ha IMcJIee.
BatapeHbI oTcK
6aTapeKeA AAA
3aMeHa 6aTapei:
- OtkpoTe KpbIuKy 6aTapeHoro OTceKa n ydaIne IcNoIb3ObaHHbI BatapeKn. (EcIn 6atapEn pa3pIINbc, ydaIne nx noJ yBeMnIacb, yHTbIBaR, YTO KNCIOTHaB 6atapeH He HaxoITCBA KONTAKTe C Koxe npxOaTn TtAteJIbHO OHCTNTE 6aTapeHbI OTcK.)
2.BCTaBtbe HOBbIe 6aTapeKn (TNN (AAA) 1.5V AA B npabHbHom npaKe n pinnHMnAB BO BHMaHne NOJIrpHOCTb B aKKyMylrTOpHOM OTCKe n noKnIOUcHe N KpbIka 6aTapeHoro OTCeka TAK, YTo6bl OHa 3aΦHKcPBOBaNaC bO cIeNcKoM.
3.Ecnn KOMnbIOTep He 06 3ToN cyHKnCneNyET
Batape ydaanraTcBteueHne 10cekyndn cHOBa BCTaBnreTc. - TnInn3nyIte pa3paKeHHbIe 6aTapeN B COOTBETCTBm C npeDncaHnMn DOnKhbIM 06pa3oM H He daIOCTaTOHbIe OTXOdbI.
HCHTPYKUNI NO TPEHHPOBKE
BbdoJXhbyyntbBaTcIeDyOuueΦaKTopbI,TO6bI ONpeDeHnTB BepHbI npametpbI TpeHPOBOK dNl DOCTNXKeHH OuyTMbIX cN3HecKnx pe3ynbTaTOB INoJIb3bldN 3doPobBa.
1.HTHeHCMBHOCTb
YpOBeHb Hn3uecknx Harpy30k npn TpeHnpOBkax Donxhen npeBbIaTb ypOBeHb HopMaIbHbIX Hn3uuecknx Harpy30K, HO Bbl He DonJXbbl 3aDbXaTcN CnIbHO nepeyTomIbCra. YDObHO mepo 3ΦeKTHBHOCTN tpeHnpOBKn Moxtet CnyKntb qactota PnIbCa. Bo BpEMr TpeHnpOBKn qactota PnIbCa Moxtet DOCTNAtb 70-85% OT MAKCMAmlbHO (CMOTPN TabnU yΦopMynrp dnn ONpeDeHEN n paCeta). B nepByIO HeDenIO qactota PnIbCa DOJIbKA OCTaBaTb HA NIXKHe OTMeTKe 3To O6NaTn, T.e. OKono 70% OT MAKCMAmlbHO. B nocNeIyUOUIne HeDenNI MeCAZb IacToTy PnIbCa cIeDyET NOCTeHEN HOPaUIMBaTb Do 85% OT MAKCMAmlbHO. JIyue Bcero dnn FhNecCKOr COCTOHN QeLOBeka, BblONIHooEro ynpaxHeHn, ecII NaCTota PnIbCa BO3pACTaET, OCTaBAChB N ppeDenAX 70-85% OT MAKCMAmlbHO. 3TO DOCTNAtcTcYBENHeHem BpeMeHN TpeHnpOBKn nn IyOBoH CNOXHOCTN.
Ecnn Tactota nynbca He noka3aHa Ha dncnnee KOMnbIotepa HIN Bby XOTne npOBepntb Yactoty nplbca, KOtopan, BO3MOXHO, NOkasaHa HeBepHO, BCNECTBne KaKoNn60 OUn6Kn. Bbl MOxTe ppeDpInHrTa CNeDuOuee: A) N3MEpntb Tactoty npbca ObuHbIM CNOOC6OM (NoCCHrTaB KOJIHeCTBO yApobos Nynbca BmHyTu Ha 3anaCTbe)
B) N3MEpntb Tactoty npbca c NMOUbIO CneuaIbHorO ycTpoJcTBa (KOtOpoe MoXHo KYNITb y npOdaBoc CneuaIaIImPOBaHOrO o6OpydoBaHnA
2. Yactota
BolbHnCTBO 3KcNepTOB peKOMeHnyIOT KOM6Hauuio 3DopOBoI duTebl, KOtOpa OCHOBaHa Ha uei BaaMx TpeHnpOBK, n Hnzneckne 3aHrttn 3 pa3a B HeJeIO. HopMaIbHbB B3pocNb YHeOBek MoXeT TpeHnpOBaTcBdAbxDb I HeJeIO dnn POnDepJxAHn Ero HopMaIbHO Nzneuchok o fOpMbI. TpeXpa3OBeI TpeHnpOBKn Heo6xOdmbl dnn yUyWeHHaBaWe Hnzneuchok o fOpMbI yMeHbSeHHa Beca. NdeaJIbHa JaCTota TpeHnpOBOK -5 pa3 B HeJeIO.

© by Top-Sports Gilles GmbH
D-42551 Velbert (Germany)
Service:
Tel.: +49 (0)2051/6067-0
