
EOR1515 LCD - Heating QLIMA - Free user manual and instructions
Find the device manual for free EOR1515 LCD QLIMA in PDF.
| Product type | Oil-filled electric convector |
| Brand | Qlima |
| Model | EOR1515 LCD |
| Dimensions (W x D x H) | 380 x 140 x 650 mm |
| Weight | 9 kg |
| Power supply | 220-240 V ~ 50 Hz, 6.5 A |
| Heating power | 1500 W (2 levels: 900 W / 1500 W) |
| Temperature range | 13 °C to 30 °C |
| Recommended heating surface | 60 m³ |
| Protection class | IP20 |
| Display | LCD screen |
| Main functions | Adjustable thermostat, timer (auto on/off), power selection, temperature display |
| Timer function | Delayed shutdown (1-24 h) and delayed startup (1-24 h) |
| Temperature display | Degrees Celsius or Fahrenheit (switchable) |
| Safety | Automatic thermal cutoff and thermal fuse |
| Installation | On swivel casters, easy assembly with wing nuts |
| Maintenance and cleaning | Clean with a soft, damp cloth. Do not use abrasive products. |
| Spare parts and repairability | Repairs exclusively by a Qlima approved service center. Use original parts. |
| Warranty | 24 months against material and manufacturing defects |
| General information | Indoor use only. Do not cover. Do not use near water. |
Frequently Asked Questions - EOR1515 LCD QLIMA
User questions about EOR1515 LCD QLIMA
0 question about this device. Answer the ones you know or ask your own.
Ask a new question about this device
Download the instructions for your Heating in PDF format for free! Find your manual EOR1515 LCD - QLIMA and take your electronic device back in hand. On this page are published all the documents necessary for the use of your device. EOR1515 LCD by QLIMA.
USER MANUAL EOR1515 LCD QLIMA
93/68/CEE Marquage CE
Congratulations with your purchase of a portable domestic heater. You have purchased a quality product, which will serve you for many years to come. This, of course, provided you use the heater correctly. Please read these Directions for Use first, to ensure maximum lifetime for your heater.
Your heater comes with a 24-month manufacturer's warranty on all defects in materials or workmanship.
We wish you a warm and comfortable time with your heater.
Yours sincerely,
PVG Holding b.v.
Customer Service Department
1 READ THE DIRECTIONS FOR USE FIRST.
2 IN CASE OF ANY DOUBT, CONTACT YOUR DEALER.
GB
22
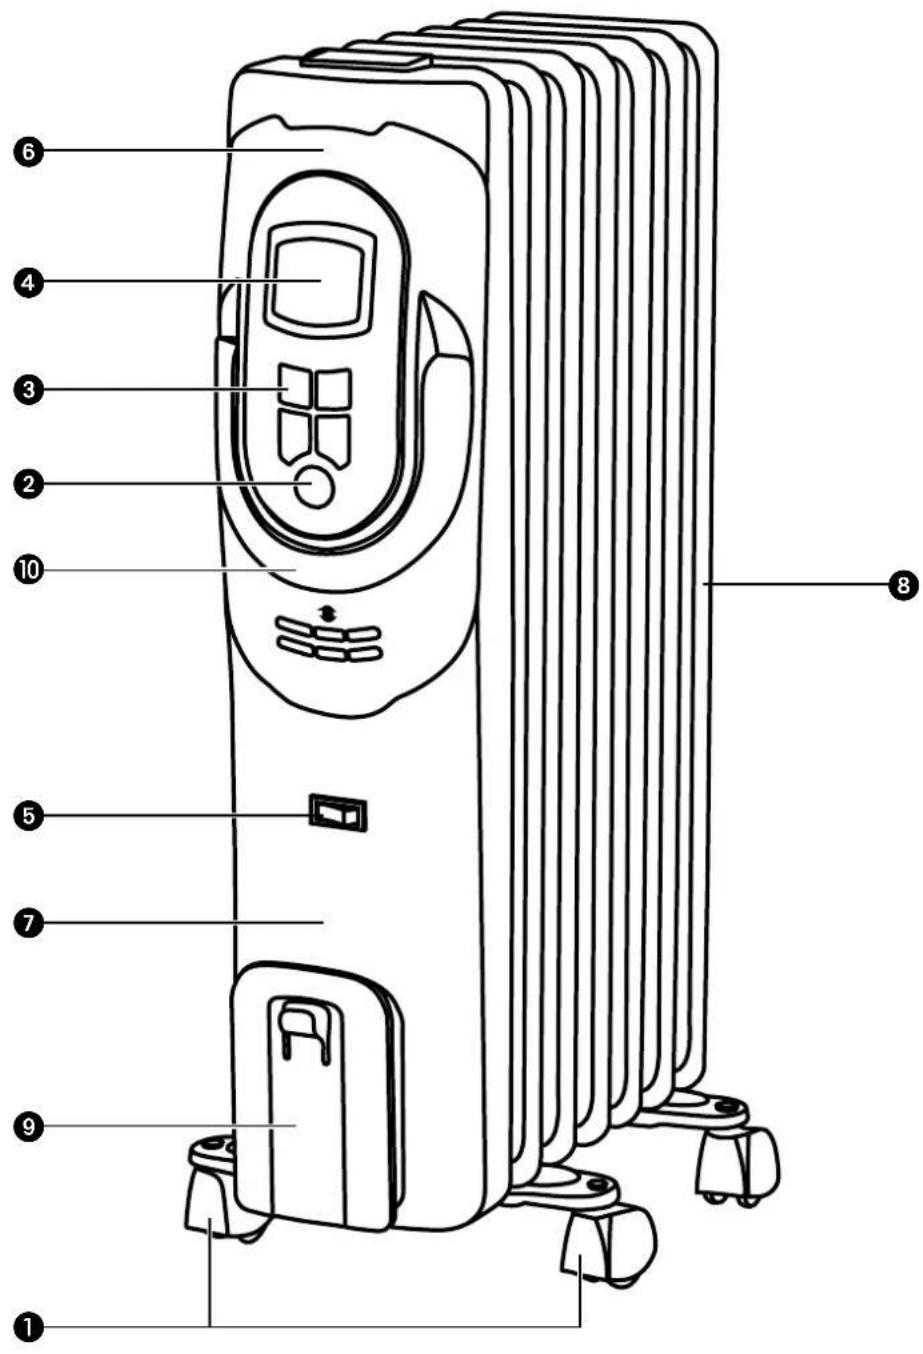


MAIN
COMPONENTS
Castor wheels (2)
2 Power button
3 Buttons
4 LCD display screen
5 Power switch
6 Control panel
7 Front cover
8 Radiator fins
Cord storage
10 Handle
10 Wing nuts (2)
12 Arc-shaped brackets (2)
Read this user manual carefully before using the appliance and keep it for future reference. Install this device only when it complies with local/ national legislation, ordinances and standards. This product is intended to be used as a mobile heater in residential houses and is only suitable for use in normal household conditions, indoors in living room, kitchen, and garage. This unit is only suitable for earthed sockets, connection voltage 220-240 V. / \~50 Hz.

GENERAL
After unpacking, check the appliance for any damages. When in doubt, do not use the appliance, but contact customer service at your local dealer's. Keep the packaging materials (plastic bags, etc.) away from children, as they may cause hazardous situations to children.
DANGER
- Do not immerse the appliance in water and do not let water run into it.
- Never open the appliance to prevent electric shock.
WARNING
- The installation must be completely in accordance with local regulations, ordinances and standards.
- Check if the voltage indicated on the type plate corresponds to the local mains voltage before you connect the appliance.
- The appliance is suitable for mains voltages ranging from 220V to 240V.
If the mains cord is damaged, you must have it
replaced by a service centre authorised by Qlima or similarly qualified persons in order to avoid a hazard.
- Always return the appliance to a service centre authorised by Qlima for examination or repair.
Repair by unqualified people could cause an extremely hazardous situation for the user. - Do not attempt to repair the appliance yourself, otherwise your guarantee becomes invalid.
- Keep the mains cord away from hot surfaces.
- This appliance is not intended for use by persons (including children) with reduced physical, sensory or mental capabilities, or lack of experience and knowledge, unless they have been given supervision or instruction concerning use of the appliance by a person responsible for their safety.
Children should be supervised to ensure that they do not play with the appliance. - The plug must be accessible at all times.
- Do not insert objects into the openings of the device.
- Do not use this heater in the immediate surroundings of a bath, a shower or a swimming pool.
- The device must not be located immediately below a socket outlet.
- In order to avoid overheating, do not cover the device.
CAUTION
- Switch off the appliance and disconnect it from the mains immediately if it produces a strange smell or an abnormal noise. Take the appliance to an authorised Qlima service centre.
- Switch off the appliance and unplug it according to the user instructions before you
move or clean it.
- Make sure the appliance and the mains cord are always out of reach of babies (at least one metre away).
- Do not use the appliance if not IPX4 protection class (see type plate) in damp places or close to water. Only IPX4 class appliances are suitable for these circumstances.
- Do not use the appliance in places where the humidity level exceeds 95% .
- Do not expose the appliance to extreme heat or cold or to direct sunlight.
- Do not use the appliance outdoors.
- Never tilt or move the appliance while it is operating.
- Do not use any extension cords or multi SOCKET adapters.
Always take the plug out of the socket when the device is not in use. - This heater is filled with a precise amount of special oil. Opening the heater and repairs to it should be carried out by a service centre authorised by Qlima. If the case of oil leakage, contact the manufacturer or an authorized service centre.
- When disposing of the stove, please respect the existing rules on oil recycling.
- This appliance can be used by children aged from 8 years and above and persons with reduced physical, sensory or mental capabilities or lack of experience and knowledge if they have been given supervision or instruction concerning use of the appliance in a safe way and understand the hazards involved.
Children shall not play with the appliance. - Cleaning and user maintenance shall not be made by children without supervision.
INSTALLING THE HEATER
-
Carefully remove your heater from the box and check the contents. In addition to the heater, you also need to have:
-
castor wheels
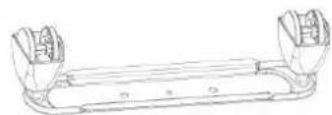
- wing nuts

- arc-shaped brackets

- these directions for use
Keep the box and the packaging materials for storage and/or transportation.
- Unpack the Castor Wheels and Arc-shaped Brackets from the product packaging.
- Turn the radiator upside-down on a scratch-free and stable surface to prevent damage to the paint finish or your floor surfacing.
- Fit the two Castor Wheels onto the radiator by placing the Arc-shaped Brackets between the outermost fins on each side of the radiator.
- Securely fasten the two Castor Wheels onto the radiator by screwing two Wing Nuts onto each Foot.
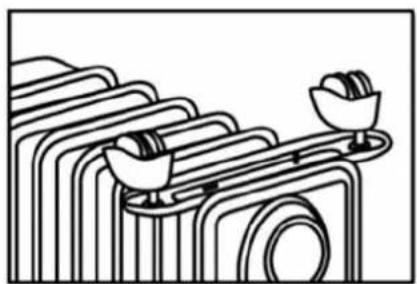
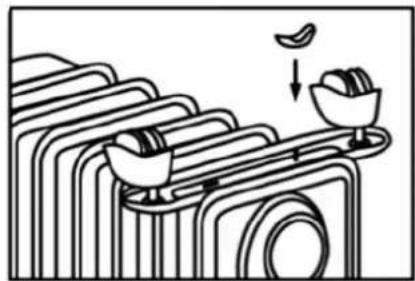
- Turn the radiator in upright position after the Castor Wheel Assembly fitted.
OPERATION

CAUTION:
Only operate the radiator in normal upright position with Castor Wheel Assemblies attached to the bottom of the unit, any other position could create a hazardous situation.
- Insert the plug in the wall outlet.
- Use the power switch 5 and press the button 2 to switch the heater on.
The heater starts operating at maximum power. The display shows . The heater will continue operating at full power until the power is switched off manually or if the room temperature exceeds 30^ .
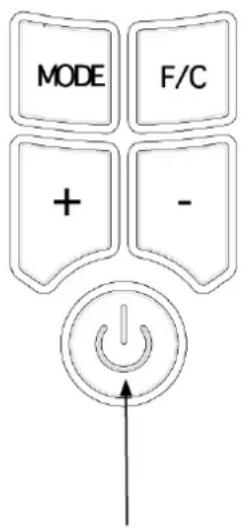
POWER
- Press the button to turn the heater into low power mode. The displays show . The heater will continue operating in low power mode until the power is switched off manually or if the room temperature exceeds 30^ .
4.Pressthe-butch2 once again to switch the heater off.
TEMPERATURE SETTING
- Press the Mode button until the temperature icon blinks. The set temperature is displayed and can be changed as the temperature icon is blinking.
- Use the + and - button to set the desired temperature, from 13 to 30^ .
- The temperature icon will stop blinking and the current room temperature will appear after the desired temperature is set.
- Once the room temperature exceeds the set temperature for over 10 seconds, the heater will stop heating and the temperature icon will blink.
- Once the room temperature drops 1^ below the set temperature, the heater will start heating again and the temperature icon on the display will stop blinking.
OVERHEAT PROTECTION
This appliance has two levels of overheat protection:
- Automatic thermal cut-off
Switches off the heater in the event of overheating or malfunction and resets once the temperature drops to a normal level
- Thermal fuse
In the event that the automatic thermal cut-off fails to operate, the heater has a further safety device. This is a non-resettable switch which will require the unit be returned to an approved service centre for replacement.
If overheating or malfunctions occur on a regular basis, return the heater to an approved service centre for examination.
TIMER SETTING
AUTO OFF

Make sure to set the desired temperature prior to setting the timer, so that the heater will shut off at the desired temperature setting.
With the Auto OFF timer setting you can decide the time that the heater should automatically switch of.
- Keep pressing the Mode button until the timer icon blinks. The Auto Off icon will also appear.
- Use the + and - buttons to set the heater operation time between 1 and 24 hours (default is 10 hours).
- The heater will automatically turn off when the set timer setting runs out.

NOTE!
When both desired temperature and timer off function have been activated, the heater will switch on and off per the set temperature setting and will stop operating once the programmed timer setting has been reached.
AUTO ON

Make sure to set the desired temperature prior to setting the timer, so that the heater will shut off at the desired temperature setting. If the desired temperature is set, this function will overrule the timer function.
With the Auto ON timer setting you can decide the time that the heater should automatically switch on.
- Keep pressing the Mode button until the timer icon and the Auto ON icon appear.
- Use the + and - buttons to set the heater start time between 1 and 24 hours (default is 1 hour).
- The heater will automatically turn on when the set time expires.

NOTE!
When both desired temperature and timer on function have been activated, the heater will switch on and off per the set temperature setting once the heater begins to operate.

In the Auto-on function the heater will turn on after the set time has elapsed. If no Auto-off time has been selected, a default timer of 10 hours will be applied to the function.
FAHRENHEIT/CELSIUS FUNCTION
This heater offers the option to read the temperature setting in either Fahrenheit or Celsius. Press F/C button to toggle between Fahrenheit and Celsius.
MAINTENANCE AND STORAGE

Allow the product to completely cool before handling or cleaning it.
Ensure the product is in the "O" OFF position and the Power Cord is unplugged from the electrical outlet before cleaning the product.
- Always ensure the product's housing is intact and completely assembled before each use.
- Do not touch hot surfaces. Always use the handle of the product. Use protective mitts or gloves to avoid serious burns or other personal injury.
- Clean the exterior surface of the product by wiping it with a soft, damp cloth.

CAUTION:
Do not allow water or other liquids to run into the interior of the product, as this could create a fire and/or electrical hazard.
- Do not use any abrasive cleaners or solvents, as product damage will occur.
- Store the product in a clean, dry place when it is not in use.
TECHNICAL SPECIFICATIONS
| Model EOR 1515 LCD | ||
| Max. heating capacity | W 1500 | |
| Heating settings 2 (Auto = 900 W / 1500 W) | ||
| Thermostatic range °C 13 - 30 | ||
| Current A 6.5 | ||
| Mains V / Hz / Ph 220-240/50/1 | ||
| Weight kg 9 | ||
| Dimensions (w x d x h) | mm 380x140x650 | |
| Room size m³ | 60 | |
| Unit protection | IP20 | |
EC DECLARATION OF CONFORMITY
The appliance has been designed, constructed and distributed in conformity with the safety regulations of EC directives.
The appliance is intended for normal domestic use and for the described purposes only.
GUARANTEE CONDITIONS
The appliance is supplied with a 24-month guarantee, commencing on the date of purchase. All material and manufacturing defects will be repaired or replaced free of charge within this period. The following rules apply:
- We expressly refuse all further damage claims, including claims for collateral damage.
- Repairs to or replacement of components within the guarantee period will not result in an extension of the guarantee.
- The guarantee is invalidated if any modifications have been made, non-genuine parts are fitted or repairs are carried out by third parties.
- Components subject to normal wear, such as filters, batteries, lamps and heating elements are not covered by the guarantee.
- The guarantee is valid only when you present the original, dated purchase invoice and if no modifications have been made.
- The guarantee is invalid for damage caused by neglect or by actions that deviate from those in this instruction booklet.
- Transportation costs and the risks involved during the transportation of the appliance or components of the appliance shall always be for the account of the purchaser
- Damage caused by not using suitable spare parts is not covered by the guarantee.

To prevent unnecessary expense, we recommend that you always first carefully consult the instructions for use. Take the appliance to your dealer for repairs if these instructions do not provide a solution.
Waste electrical products should not be disposed with household waste. Please recycle where facilities exist. Check with your local authority or retailer for recycling advice.
Egregio Signore, Gentile Signora,
| Information requirement for the electric local space heaters | ||||||
| Model identifier(s): EOR 1515 LCD | ||||||
| Item Symbol Value Unit Item Unit | ||||||
| Heat output Type of heat input, for electric storage local | space heaters only (select one) | |||||
| Nominal heat output Pnom 1,50 kW manual heat charge control, with integrated thermostat No | ||||||
| Minimum heat output (indicative) | Pmin 0 | 60 kW | manual heat charge control with room and/or outdoor temperature feedback | No | ||
| Maximum continuous heat output | Pmax,c | ,50 kW | electronic heat charge control with room and/or outdoor temperature feedback | No | ||
| Auxiliary electricity consumption fan assisted heat output | No | |||||
| At nominal heat output | elmax | 1,455 | kW | Type of heat output/room temperature control (select one) | ||
| At minimum heat output | elmin | 0,589 | kW | single stage heat output and no room temperature control | No | |
| In standby mode | eLSB | 0,002 | kW | Two or more manual stages, no room temperature control | No | |
| with mechanic thermostat room temperature control | No | |||||
| Seasonal space heating energy efficiency | ηs | 36,6% | with electronic room temperature control | Yes | ||
| electronic room temperature control plus day timer | No | |||||
| electronic room temperature control plus week timer | No | |||||
| Other control options (multiple selections possible) | ||||||
| room temperature control, with presence detection | No | |||||
| room temperature control, with open window detection | No | |||||
| with distance control option | No | |||||
| with adaptive start control | No | |||||
| with working time limitation | No | |||||
| with black bulb sensor | No | |||||
| Contact details | PVG Holding BV, P.O. Box 96, 5340 AB OSS, Kanaalstraat 12c, 5347 KM OSS, THE NETHERLANDS | |||||

Distributed in Europe by PVG Holding B.V.
Benotigen Sie weite Informationen oder treten Probleme auf, besuchen Sieitte unsere Website www.qlima.com, oder setzen sie sich mit unserem Kundendienst in Verbindung (T: +31 412 694 694).
For alle yoderligere oplysninger ell er ved eventuelle problemer med apparatet henvises til wwwqlima.com ell det lokale Kundecenter (T: +45 77 34 33 30).
Si necesita informacion o si Tiene algo problema, visite ourstra pagina Web www.qima.es, o pongase en contacto con el service客户提供 (T: +34 916 113 113).
Si you souhaitez obtenir des informations supplémentaires ou si you rencontrez un probleme, rendez-vous sur notre site Web (www.qlima.fr / www.fr.qlima.be) ou contactez notre service client (1: + 33232960747/+32(0)33263939) .
Jo hau at huoapua, liatetoja tai laiteen kanssa tulee ongelmia, tutustu verkkosivustoon osoitteessa www.qima.com tai ksy nuvoa PVG kuluttajapalvelukeskuksesta (T: +45 77 34 33 30).
If you need information or if you have a problem, please visit the our website (www.qlima.com) or contact our sales support (T: +31 412 694 694).
Per informazioni e in caso di problemi, visitate il site Web www.glima.it oppure contattate il Centro Assistenza Clienti (T. +39 0571 628 500).
Hvis du trenger informasjon, eller his du har et problem med produktet, kan du gtil nettsidene wwwqlima.com. Alternativ kan du kontakte med PVG' forbrukertjeneste (T: +45 77 34 33 30).
Alu inatme nig hebt of ul een probleme hebt, bezok dan de onze web site (ww.qlima.nl / www.qlima.be) of neem contact op met de afding sales support (T: +31 412 694 694 / +32 (0)3 326 39 39).
Se necessitar de informacoes ou se tiver problemas, visite o Web site www.qlima.es ou contacte o Centro de Assistencia (T: +34 916 113 113).
W przyypadu problemów i w celu uzyskania szczegółowych informaci odwiedź strone internetowa Qlima dostepnaj pod adresem www.qlima.com lub skontakuji sie z Centrum kontaktow Qlima (T: +48 48 613 00 70)
Om du behover service aller information aller har problem med apparaten kan du besoka www.qlima.com uller kontakta Qlima kundtjanst (T: +45 77 34 33 30).
Ce ze zelte dodatne informacije, obisiite splte no mesto podjetna na naslovu www.qlima.si ali pokiicne na telefonsko (T: +386 (0)41 674 139).


- GENERAL
- DANGER
- WARNING
- CAUTION
- INSTALLING THE HEATER
- OPERATION
- CAUTION:
- POWER
- TEMPERATURE SETTING
- OVERHEAT PROTECTION
- TIMER SETTING
- AUTO OFF
- NOTE!
- AUTO ON
- FAHRENHEIT/CELSIUS FUNCTION
- MAINTENANCE AND STORAGE
- TECHNICAL SPECIFICATIONS
- EC DECLARATION OF CONFORMITY
- GUARANTEE CONDITIONS
- Distributed in Europe by PVG Holding B.V.
Brand : QLIMA
Model : EOR1515 LCD
Category : Heating