ST100 - DJ Equipment Skytec - Free user manual and instructions
Find the device manual for free ST100 Skytec in PDF.
User questions about ST100 Skytec
0 question about this device. Answer the ones you know or ask your own.
Ask a new question about this device
Download the instructions for your DJ Equipment in PDF format for free! Find your manual ST100 - Skytec and take your electronic device back in hand. On this page are published all the documents necessary for the use of your device. ST100 by Skytec.
USER MANUAL ST100 Skytec
OSD (On Screen Display):
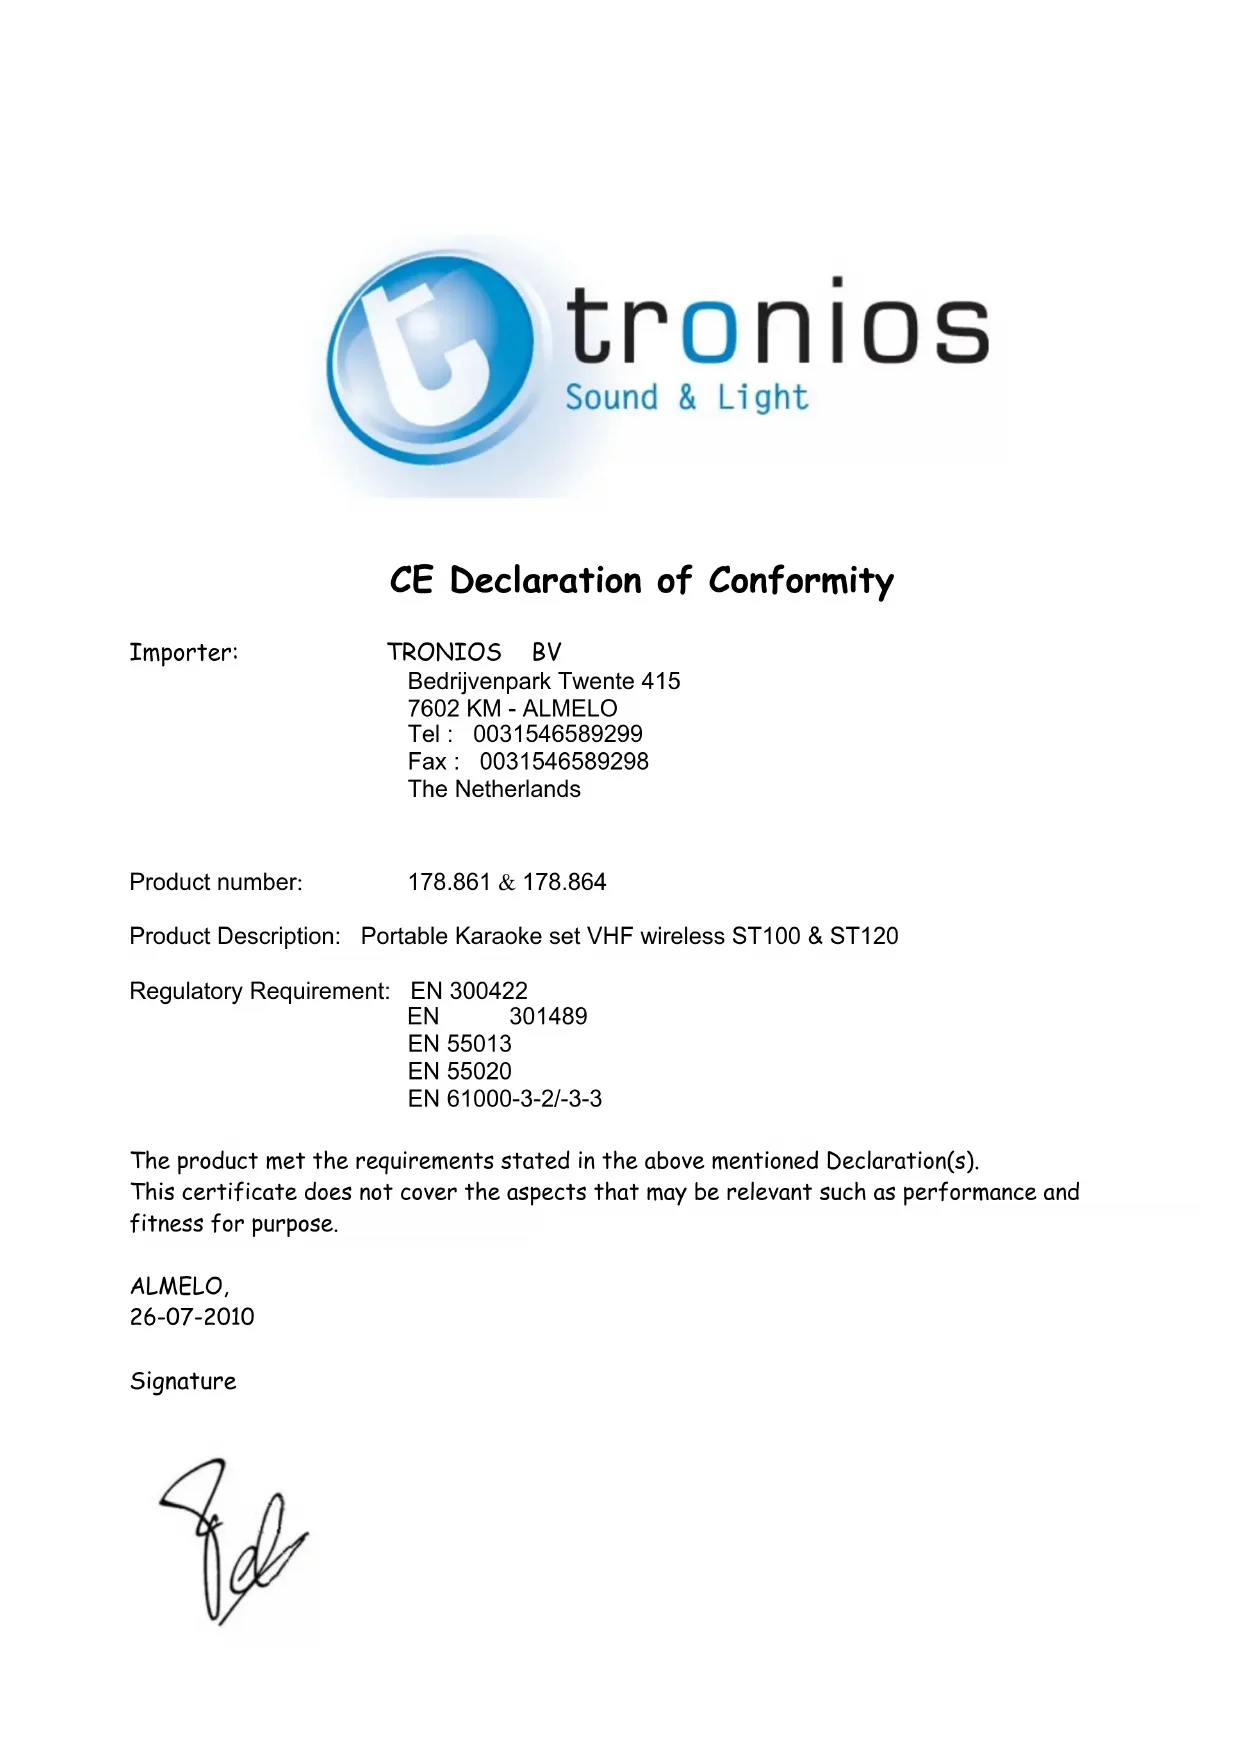
CE Declaration of Conformity
Importer:
TRONIOS BV
Regulatory Requirement: EN 300422
EN 301489
EN 55013
EN 55020
EN 61000-3-2/-3-3
The product met the requirements stated in the above mentioned Declaration(s).
This certificate does not cover the aspects that may be relevant such as performance and fitness for purpose.
ALMELO,
26-07-2010
Signature


tronios
Sound & Light
CE Declaration of Conformity
Importer:
TRONIOS BV
Product Description: Portable Karaoke set UHF wireless ST140
Regulatory Requirement: EN 301357
EN 55013
EN 55020
EN 61000-3-2/-3-3
The product met the requirements stated in the above mentioned Declaration(s).
This certificate does not cover the aspects that may be relevant such as performance and fitness for purpose.
ALMELO,
26-07-2010
Signature

CAUTION: TO REDUCE THE RISK OF ELECTRIC SHOCK, DO NOT REMOVE COVER (OR BACK). NO USER SERVICEABLE PARTS INSIDE. REFER SERVICING TO QUALIFIED SERVICE PERSONNEL.
Warning: To reduce the risk of fire or electric shock, do not expose this unit to rain or moisture.
- The lightning flash with an arrowhead symbol within an equilateral triangle, is intended to alert the user to the presence of uninsulated dangerous voltage within the product's enclosure that may be of sufficient magnitude to constitute a risk of electric shock to persons.
- The exclamation point within an equilateral triangle is intended to alert the user to the presence of important operating and maintenance (servicing) instructions in the literature accompanying the product.
- Do not place this unit on an unstable cart, stand or tripod, bracket or table. The unit may fall, causing serious injury to a child or adult and serious damage to the unit. Use only with a cart, stand, tripod, bracket or table recommended by the manufacturer or sold with the unit. Any mounting of the device on a wall or ceiling should follow the manufacturer instructions and should use a mounting accessory recommended by the manufacturer. An appliance and cart combination should be moved with care. Quick stops, excessive force and uneven surfaces may cause the appliance and cart combination to overturn.
- Read and follow all the safety and operating instructions before connecting or using this unit. Retain this notice and the owners manual for future reference.
All warnings on the unit and in its operating instructions should be adhered to. - Do not use this unit near water; for example, near a bath tub, washbowl, kitchen sink, laundry tub, in a wet basement or near a swimming pool.
- The unit should be installed so that its location or position does not interfere with its proper ventilation. For example, it should not be situated on a bed, sofa, rug or similar surface that may block the ventilation openings; or placed in a built-in installation, such as a bookcase or cabinet, that may impede the flow of air through its ventilation openings.
- The unit should be situated from heat sources such as radiators, heat registers, stoves or other devices (including amplifiers) that produce heat.
- The unit should be connected to a power supply outlet only of the voltage and frequency marked on its rear panel.
- The power supply cord should be routed so that it is not likely to be walked on or pinched, especially near the plug, convenience receptacles, or where the cord exits from the unit.
- Unplug the unit from the wall outlet before cleaning. Never use benzene, thinner or other solvents for cleaning. Use only a soft damp cloth.
- The power supply cord of the unit should be unplugged from the wall outlet when it is to be unused for a long period of time.
- Care should be taken so that objects do not fall, and liquids are not spilled into the enclosure through any openings.
- This unit should be serviced by qualified service personnel when: The power cord or the plug has been damaged; Objects have fallen, or liquid has been spilled into the unit; The unit has been exposed to rain or liquids of any kind; The unit does not appear to operate normally or exhibits a marked change in performance; The device has been dropped or the enclosure damaged.
DO NOT ATTEMPT SERVICING OF THIS UNIT YOURSELF. REFER SERVICING TO QUALIFIED SERVICE PERSONNEL
Upon completion of any servicing or repairs, request the service shops assurance that only Factory Authorized Replacement Parts with the same characteristics as the original parts have been used and that the routine safety checks have been performed to guarantee that the equipment is in safe operating condition.
REPLACEMENT WITH UNAUTHORIZED PARTS MAY RESULT IN FIRE
DESCRIPTION OF THE THREE KARAOKE SETS :
The Karaoke sets operate through a rechargeable battery or AC. The kits include an integrated amplifier, high / mid / bass speakers, EQ, Echo, AM / FM Tuner (only for 178.864), 2 wireless VHF microphones (a handheld and a bodypack headset for the 178.864 and 2 handheld microphones for the 178.861) and a remote control. The 178.864 is compatible with DVD, VCD, HDCD, DIVX, CD-R/RW. The sets are also capable of reading MP3 files via the USB port / SD slot in. Also there is an input for external power supplies.
Since the sets 178.861 and 178.864 differ little, we discuss mainly the 178,864 -ST120.
The 178,861- ST100 compared to the 178,864 ST120: No speaker output - no tuner - no bodypack headset - no dynamic microphone - no DVD, but CD compatible - a 250W amplifier.
The 178.867- ST140 is a Karaoke set with 2 UHF handheld microphones - a speaker output - no CD, but DVD-compatible - USB port / SD slot - a AM / FM tuner - no bodypack headset - dynamic microphone - a 200W amplifier and a USB REC function, to record directly to any external USB storage device.
Due to its low weight and excellent quality, these sets are ideal for use at conferences, house parties and other events. Also suitable for use by the mobile DJ.
CHARGING BATTERY
You can charge the integrated battery. While charging, the red indicator CH is on. If the indicator is off and the FUL indicator is green, charging is completed.
In case the system is not used, you should disconnect the power cord.
Let the battery charge not constantly, this would shorten the lifespan.
Do not wait until the battery is fully discharged, we recommend you to charge the battery every three months.
OPERATION (178.864)
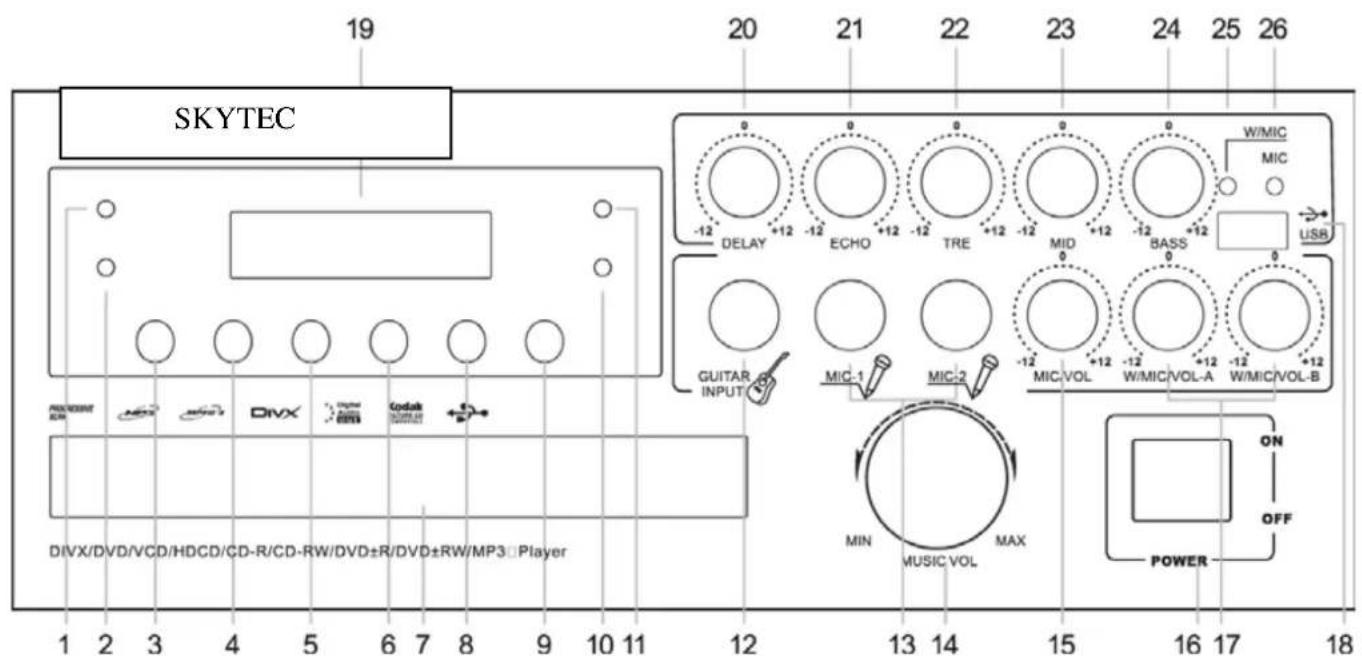
- (POWER): This indicator lights green when the device is switched on.
- (ERR): This red LED illuminates when the battery is low.
- AM / FM: Use this feature to select the mode of the radio.
- AUTO: Use this command to the radio stations automatically search.
- PREV/CH-: Allows to go to the previous track or radio station.
- NEXT / CH +: Allows to go to the next track or radio station.
- Tray.
- Play / Pause: Press this button to start or pause mode.
- OPEN / CLOSE: Opens or close the tray.
-
Charge Indicator (FUL): This indicator lights green when charging of the internal battery is completed.
-
Charge indicator (CH): This indicator lights red while charging the battery.
-
GUITAR INPUT: Connector for connecting an instrument (6.35 mm jack plug - mono).
-
Microphone inputs (MIC 1 and MIC 2): Connector for connecting microphones (6.35 mm - mono).
-
Volume control.
-
MIC / VOL: Volume control of the microphones.
-
Power switch
-
W / MIC / VOL-A and W / MIC / VOL-B): Volume controls for the wireless microphones.
-
USB port.
-
Display.
-
DELAY: This is the effect-delay control.
-
ECHO: This is the Echo effect control.
-
TRE: High frequency level control from -12 dB to +12 dB.
-
MID: Middle frequency level control from -12 dB to +12 dB.
-
BASS: Low frequency level control from -12 dB to +12 dB.
-
W / MIC: This red LED lights when a signal is received from a wireless microphone.
-
MIC: This indicator lights green when a signal from a fixed microphone is received.
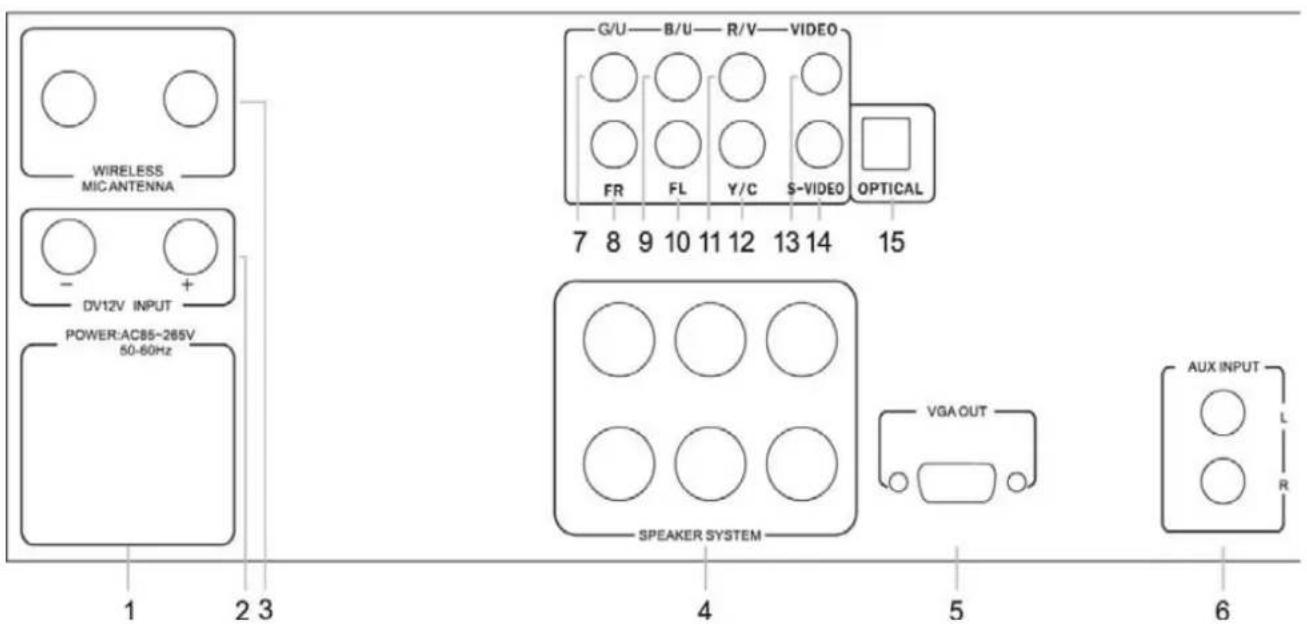
REAR PANEL (178.864)
- Mains connection.
- Connectors for external 12 volt.
- Antennas for wireless microphones.
- Connectors for external speakers.
- VGA output.
- Inputs for an external source.
- Component video output (green).
- Right output.
- Component video output (blue).
- Left output.
- Component video output (red).
- Coaxial digital output.
- Composite video output
- S-VIDEO.
- Optical output
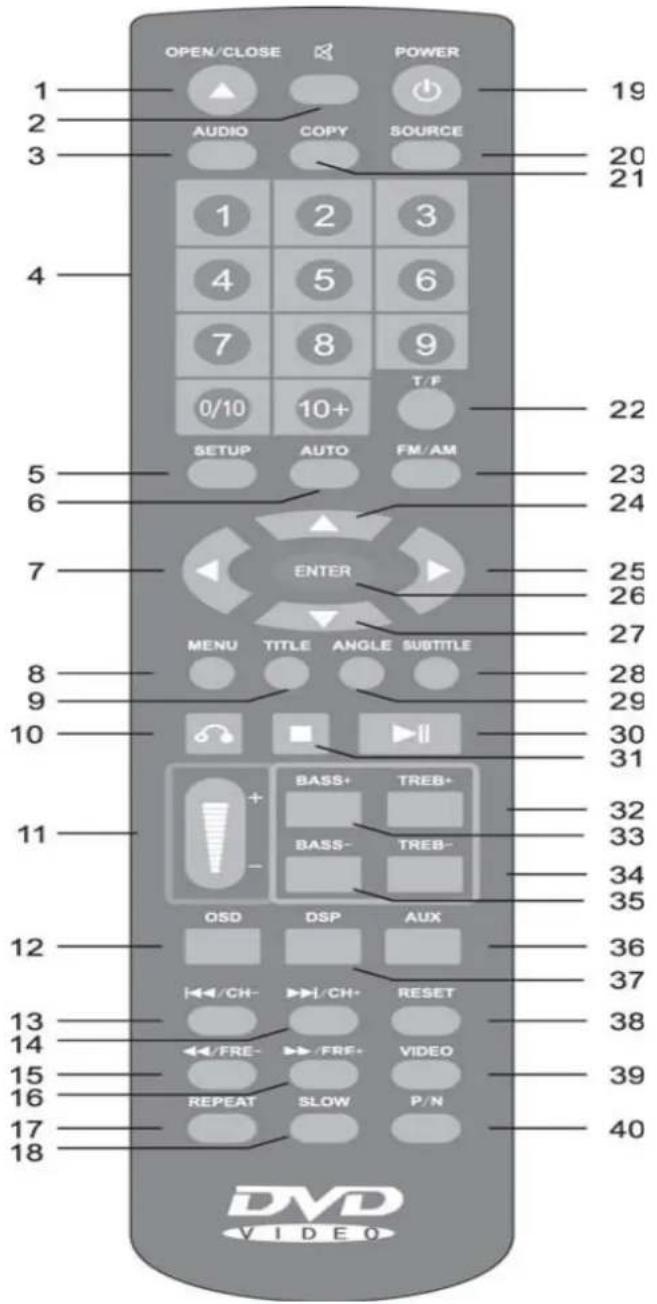
- OPEN / CLOSE: Open / close tray.
- MUTE: Turns sound off.
- AUDIO: You can select different audio reproductions.
- Keys (0-1/9 and 10): You can switch directly to a track. The buttons also serve for programming the scanner.
- SETUP: Press this button to make adjustments.
- AUTO: Use this button to automatically search for a radio station.
- Navigation key left: Move the cursor to the left.
- MENU: Press this button to display the main menu and make the desired selection.
- TITLE: Some DVDs have a important title to display in the menu.
- RETURN: To switch between two channels / tracks.
- VOL - / +: Adjusts the volume.
- On-screen display (OSD): Allows you to follow the action on screen while "running" through the menu.
- CH-): You can switch to a previous track or radio station.
- CH +): You can switch to a next track or radio station.
- Fast search backwards.
- Fast search forward.
- REPEAT: Repeating track.
- SLOW: Play back in slow motion. Press PLAY to return to normal play mode.
-
POWER: Press this key to switch the unit on or off.
-
SOURCE: Source Selection, selects the source DVD or USB port.
- COPY: Reproduce a selection.
- Search button (T / F): To search for a DVD view or a radio frequency.
- AM / FM button: To select between AM / FM mode.
- Scroll Up: Moves the cursor up.
- Navigation key right: Move the cursor to the right.
- Enter button (ENTER): Validates an action or adjustment.
27.Scroll down:Moves the cursor down. - Subtitles (SUBTITLE): Displays the subtitles.
- ANGLE (corner): Selects the angle of view (on some DVDs).
- Play / Pause: Press to start or pause.
- Stop Button: This button stops playback.
- TRE +: Increases the level of treble.
- BASS +: To increase the level of low frequencies.
- TRE-button: : Decreases the level of treble.
- Bass - : Reducing the level of low frequencies.
- To select the AUX source. Connection is at the back of the set.
- Audio Select button (DSP): Allows you to set the audio mode.
- Press the Reset button (RESET): Reset the programming.
- VIDEO: Select the desired video mode.
- P / N: Selects the video standard, PAL or NTSC.
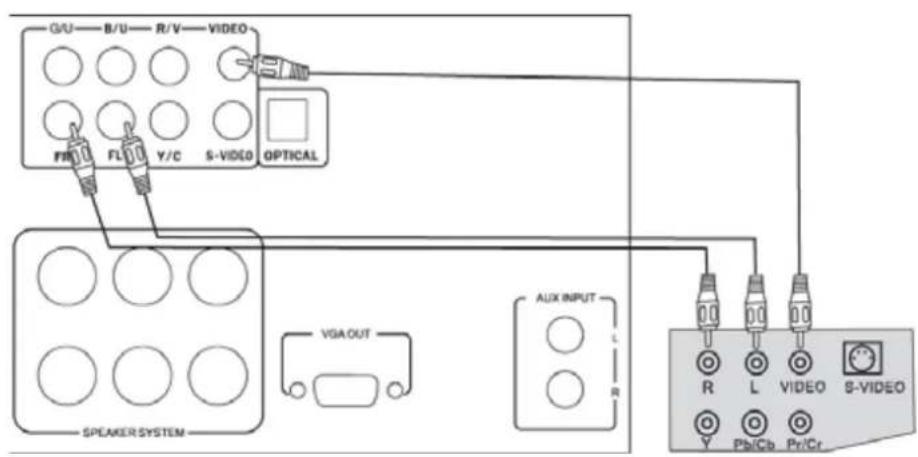
Various Connections (178.864) :
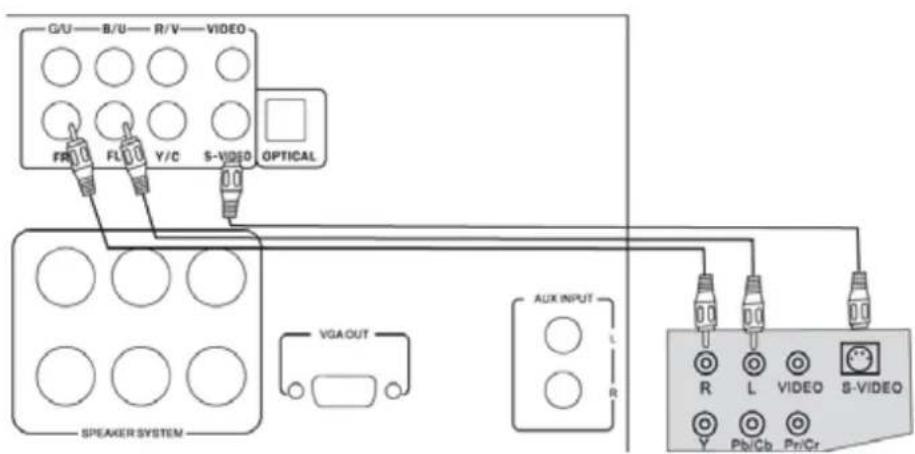
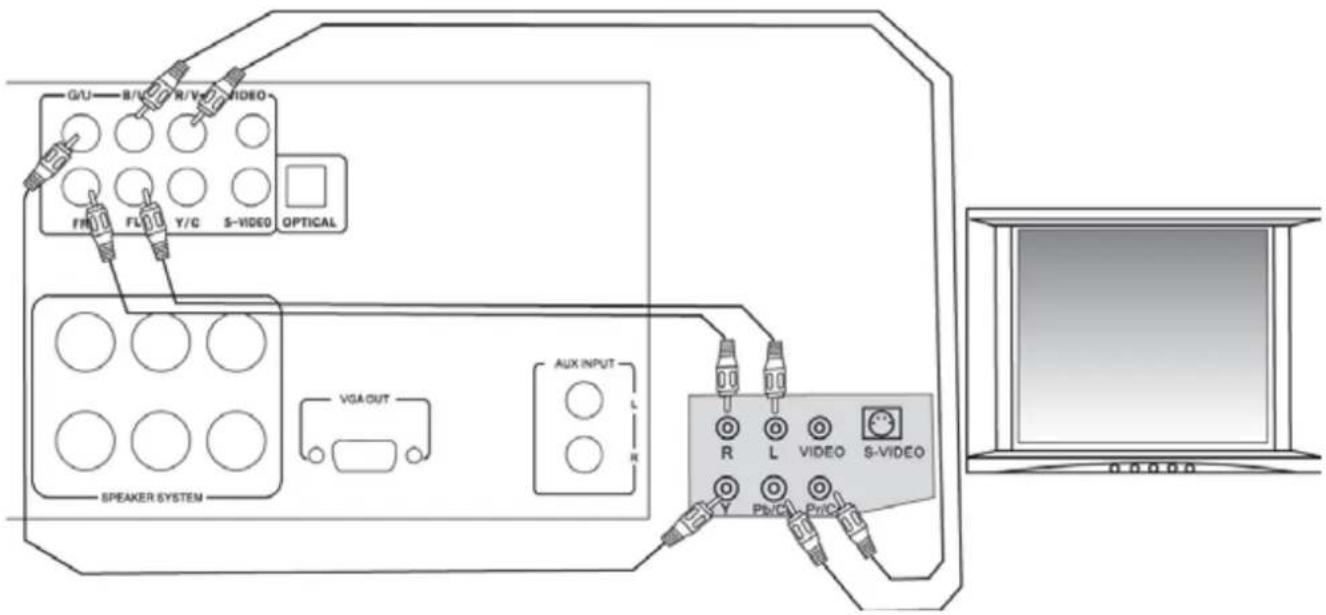
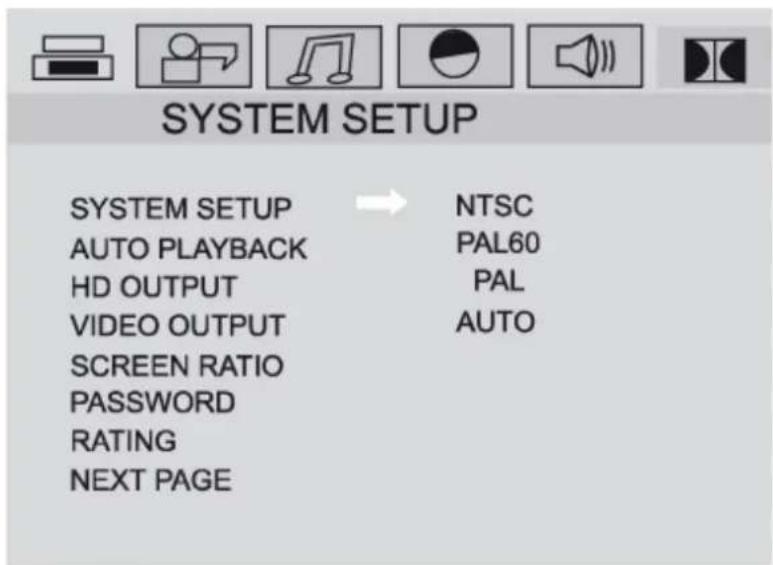
When connecting to a TV, you must configure the system. Press the SETUP button (5) of the remote control, using the arrow keys scroll through the SYSTEM SETUP menu and select NTSC, PAL60, PAL or AUTO mode. Confirm your selection by pressing the ENTER button (26) button. Press the SETUP button to exit the menu.
When connected to a digital amplifier DTS or AC-3, use output 4 to 15.
FUNCTIONS USING DVD (178.864)
We describe below the basic steps for using a DVD. Some features and views may change when using other forms of discs.
Turn on the device, press OPEN / CLOSE to open / close (button 9, on remote control button 1) the tray. If playback does not start automatically then press PLAY (8), or the play button (30) of the remote.
To pause playback, press the pause button on the remote (30). To resume playback, press PAUSE.
Press the stop button (31) of the remote control to stop playback.
Previous and next:
PREV :press the button (5) on the player or the remote control button 13 to return to the previous chapter. Press NEXT (6) on the player or the remote control button 14 to move to the next chapter.
Fast Forward or Backward:
While playing, press button 15 or 16 of the remote.
OSD (On Screen Display):
You can choose to have the title or chapter to display during playback. Press OSD (12) on the remote.
Subtitles:
Press the SUBTITLE button on the remote 28 and you can select the desired subtitle language. The number of languages depends on the set up of the DVD.
T/F search:
Press T / F (22) of the remote control to view a DVD or a radio frequency to search. In the search menu, use the scroll buttons 24 and 27 of the remote control to make your choice. Then press ENTER key 26 to confirm.
Repeat:
Press the repeat button 17 on the remote to select what should be repeated, press again to repeat the desired title. Press a third time to repeat all, and one last time to end this mode.
Menu:
Press the MENU button 8 to go to the main menu and make the desired choice.
Angle:
Some DVDs (sports, concerts, etc.) are recorded from different angles. Use ANGLE button 29 to see the scene from different angles.
Audio:
Press AUDIO-button 3 to choose between different types of audio reproductions.
JPEG reproduction
JPEG files on CD-R/RW can be played through the video output of the player.
When a disc containing JPEG files are read, a viewer automatically starts. Press STOP and you come into a photo file, use the arrow keys to scroll through the photo file.
Notes:
- JPEG files in CMYK (CMYK in French) can not be played.
- Images should not exceed 3840 × 3840 pixels.
With ZOOM button 6 an image can be enlarged. Press PLAY to exit zoom mode.
Play a MP3 disc:
MP3 is a compression method level 3 of MPEG International Standard. An MP3 disc can contain over 600 minutes music, or about 170 songs, depending on the quality of files. Playback of MP3 files through a USB port / SD slot.
SYSTEM AND ADVANCED FUNCTIONS:
This set has many advanced features. We discuss some of these features below, and invite you to scroll through the menus of the system to see all the possibilities.
GENERAL SETUP
Configuring the language:
Use this feature to select the language (configuration and display on the screen).
Select LANGUAGE SETUP, MENU LANG.
Using the arrow keys to scroll to the desired language. Confirm by pressing ENTER.
Select sub-menu OSD LANGUAGE.
Go with help of the arrow keys to the desired language. Confirm by pressing ENTER.
Setting the audio language:
Select the submenu AUDIO LANG.
Select the audio channel as the desired
language and press ENTER after your choice.
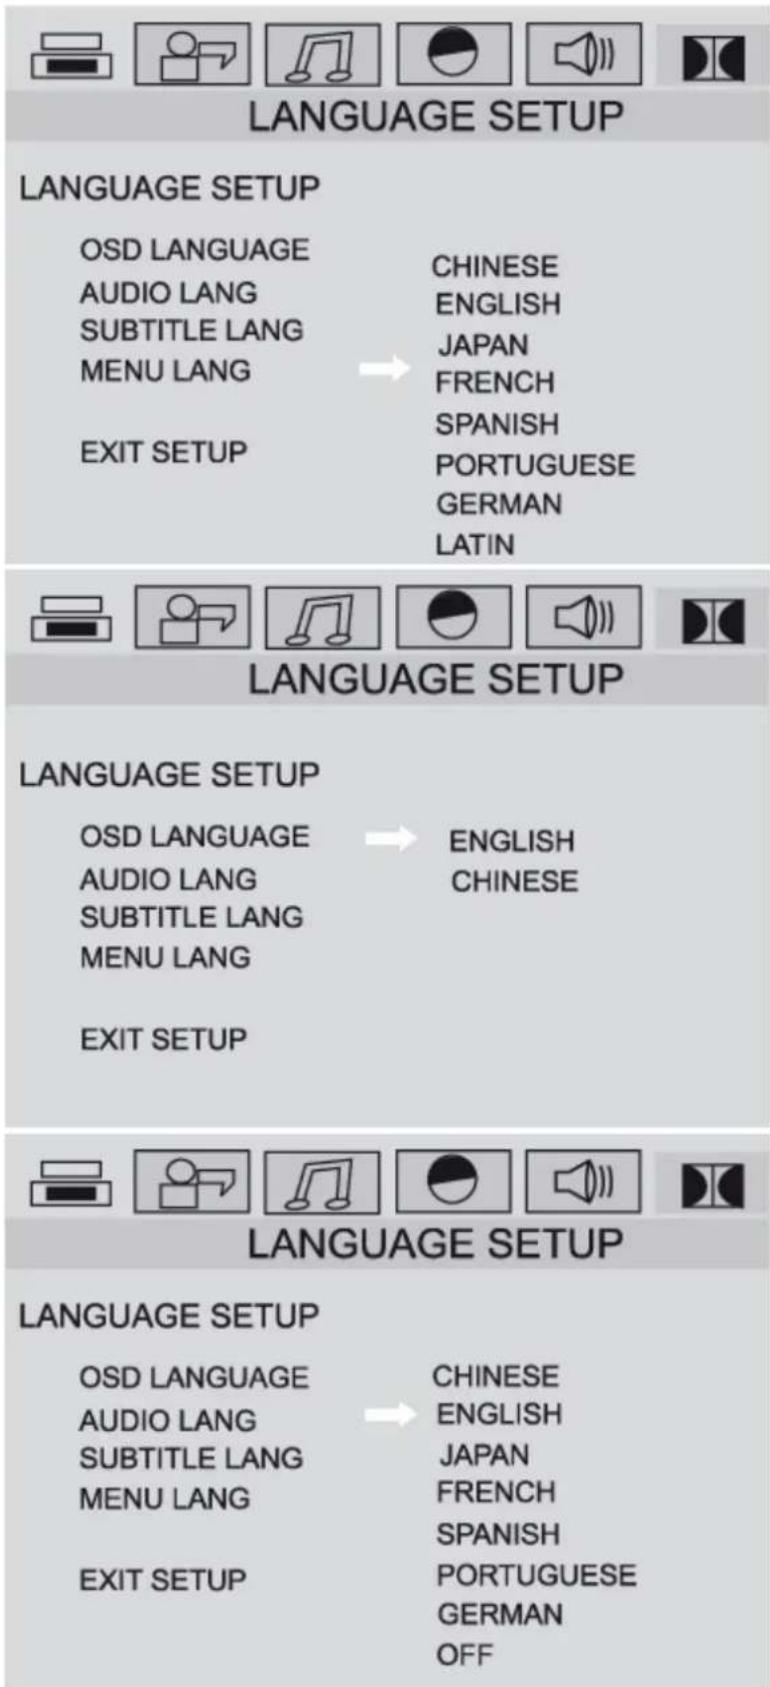
Setting the subtitle language :
Select the submenu SUBTITLE LANG.
Select the desired subtitle language and press
ENTER after your choice.

Selection of the video:
Select SYSTEM SETUP.
Select the signal mode.
You can change the system through the auto
mode to detect the signal by selecting AUTO.
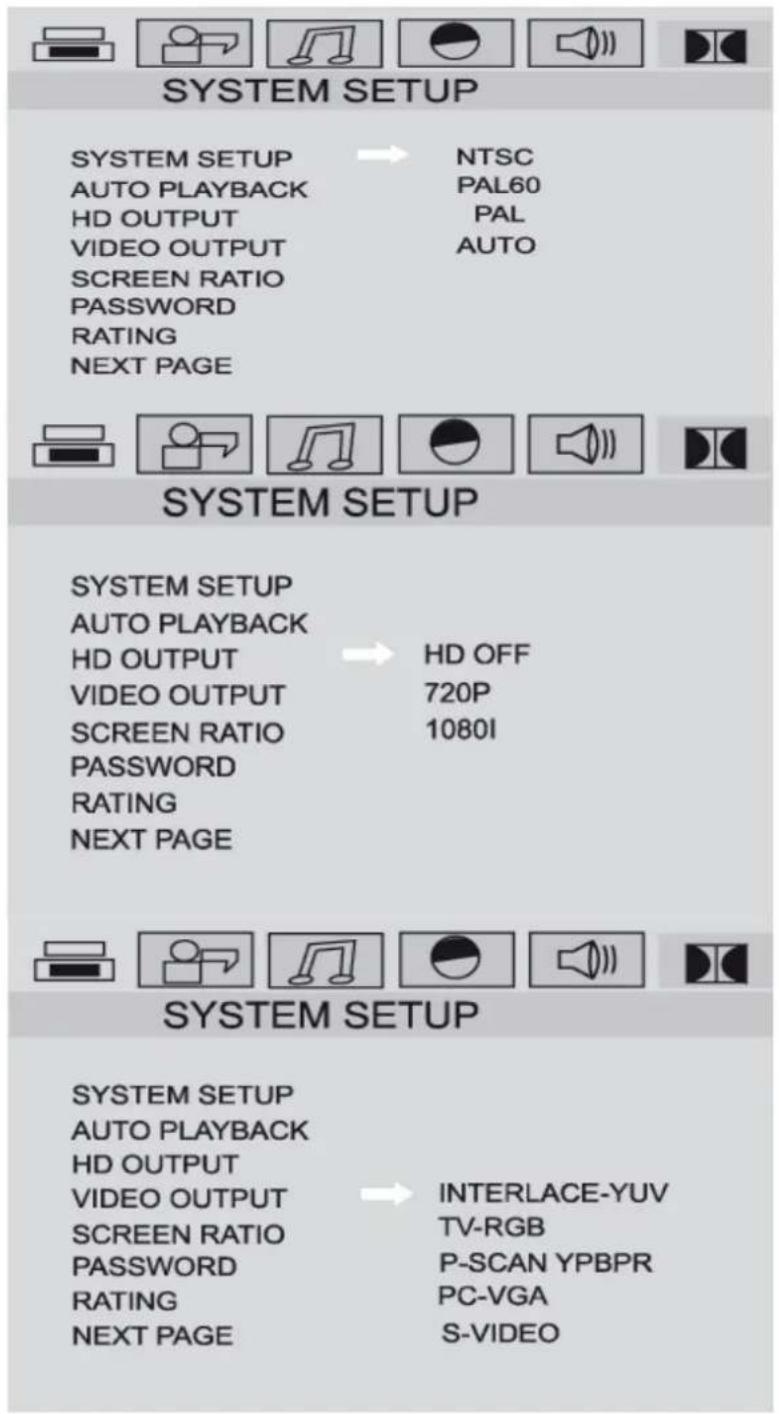
High-definition:
Choose HD output menu.
Then select the format.
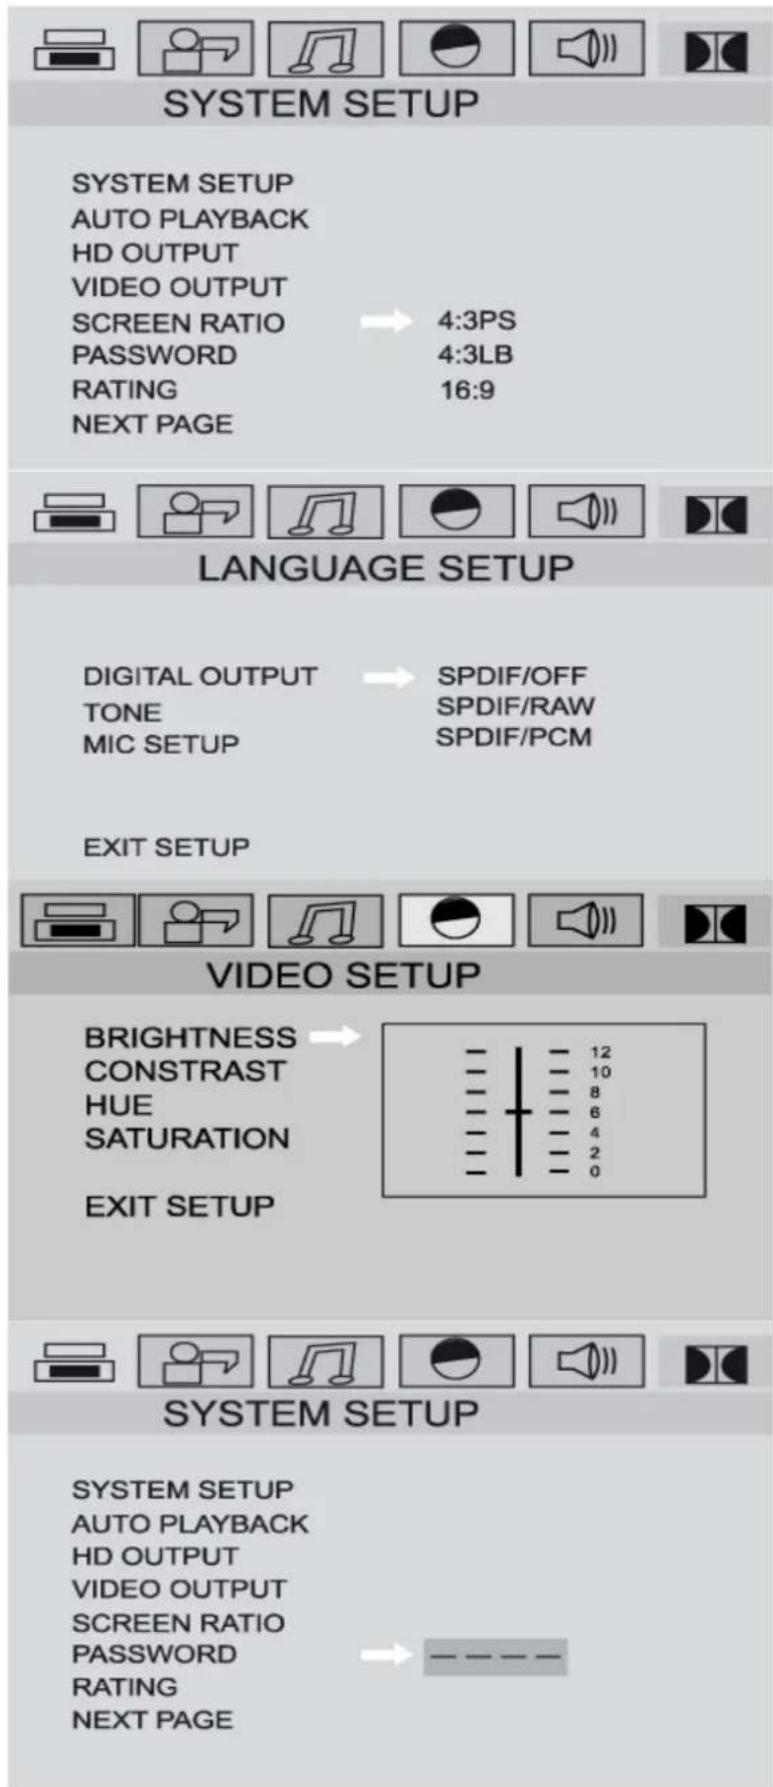
Ratio: Choose ratios. Select the desired format: 4:3 Pan & Scan, 4:3 or 16:9 for LB. The display format of the image is related to the format in which the images are stored on disk.
You can change the settings for output-mode, digital microphone and volume
Video settings:
Select VIDEO SETUP.
You can adjust brightness, contrast, hue and saturation.
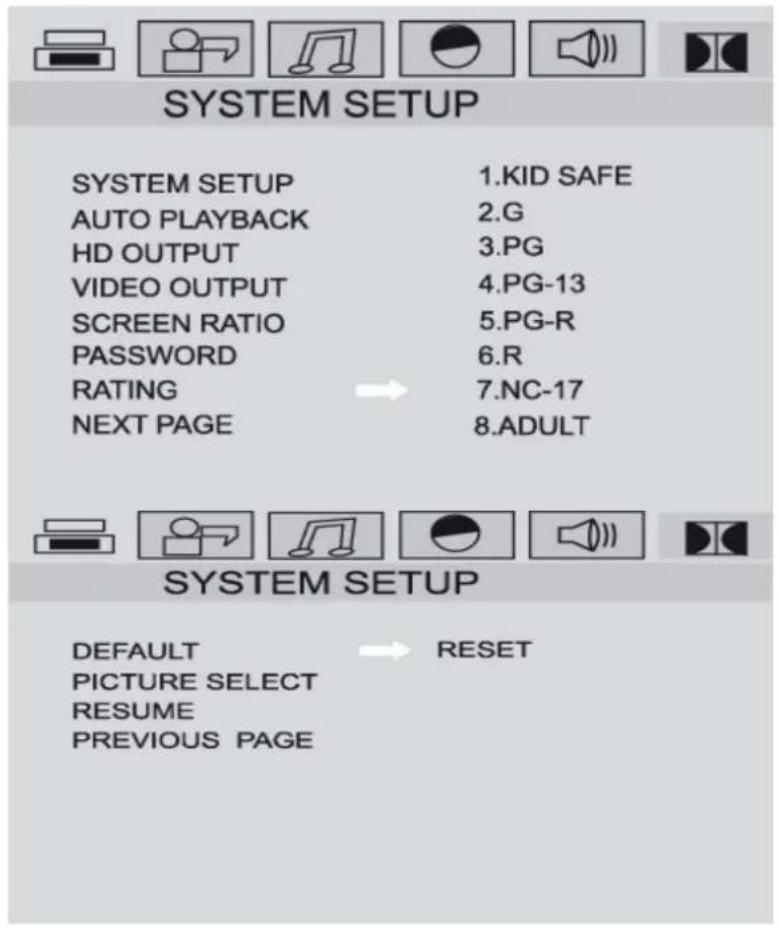
Setting a password: Setting parental control protected by a password. Start by setting a password. Note: The default password is "0000".
Limiting level of parental control:
You can prohibit certain scenes for young people.
Reset the system:
This feature allows you to restore the factory settings. Your personal settings will be lost.
Treatment and maintenance :
To ensure proper operation of your set take the following precautions:
Handle the disks so that fingerprints and dust have no influence on the reproduction.
Keep the disc in protective packaging when not in use.
Do not write on the disc with a ballpoint pen or other writing material.
When a disc becomes dirty, clean it with a cloth. Wipe the disc from the inside to the outside. Do not wipe in a circular motion.
Do not use chemicals, benzene, paint thinner, solvents or other liquids to clean the discs.
Do not place labels or stickers to discs.
Do not use any protective or anti-scratch items.
PROBLEM SOLVING :
- If a player does not work correctly as described in this manual,
Make sure the power cord is properly connected, wait 5-10 seconds, then reconnect it. - No sound or picture.
Make sure the TV is on. Check the video connection.
Check the connection of the audio cables to the TV.
Pictures may sometimes be slightly distorted. It is not a dysfunction.
Connect the player directly to the TV.
* Completely distorted picture or black and white. Connect the DVD player directly to TV.
Make sure the disk is compatible with the player.
* No or distorted audio. Adjust the volume.
Make sure your speakers are properly connected. - No audio at digital output.
Check the digital connections. Check the audio format. - Short-time image during playback.
Make sure there are no fingerprints or scratches on the disc. - No return to standby mode possible. Reset the player by the off switch. Wait for 5-10 seconds and switch on again.
* No funiton of the remote control of the player. Point the remote directly at the sensor on the front. Replace the batteries in the remote, watch the polarity (+) and -).
* The keys do not work or player is not responding.
Completely reset the player, unplug the power cord (5-10 seconds).
Use cleaning CD / DVD discs which are commercially available.
Clean the lens before using the player.. - The playback does not start when the title is selected.
Check the setting parental controls.
Enter the default password: 0000.
SPECIFICATIONS 178.864 (178.861):
| Frequency response | 60 Hz - 18 KHz (±1 dB) |
| S/N ratio | >90 dB |
| Distortion | < 0,01 % |
| Output power | 200 W / 250W for 178.861 |
| Sensitivity | 10dBuV |
| Wireless microphone | VHF 199-202 MHz |
| Tuner 178.864 | AM:515-1605 KHz, FM:88-108 MHz |
| VIDEO System | NTSC/PAL |
| Output level | 1 V |
| Mains | AC 130-220 V / 50-60 Hz |
| Battery voltage | DC 12 V |
| Power consumption | 30 W |
| Laser | CLASSE 1 |
| Support 178.864 | DVD Video, MPEG-4, Super VCD (SVCD), VCD2.0, VCD1.0, |
| DVCD, CD, HDCD, MP3, Picture-CD, | |
| JPEG, CD-R, CR-RW | |
| Connectors | Jack mic (600 Ω), Jack, USB/SDslot |
| Operating temperature | 5 °C à 35 °C |
| Remote control | Infrared |
| Batteries | 2 x 3 V DC R6P (AAA) |
WARNHINWEISE :
OSD (On Screen Display):
Tuner 178.864 AM:515-1605 KHz, FM:88-108 MHz
Video System NTSC/PAL
Ausgangspiegel 1V
Jack mic (600 Ω), Jack, USB/SDslot
Büchsen
Tuner AM:515-1605 KHz FM:88-108 MHz
Video Systeme NTSC/PAL
Alimentation 2 piles 3 V DC R6P (AAA)