USB 7329 - DJ Equipment US Blaster - Free user manual and instructions
Find the device manual for free USB 7329 US Blaster in PDF.
User questions about USB 7329 US Blaster
0 question about this device. Answer the ones you know or ask your own.
Ask a new question about this device
Download the instructions for your DJ Equipment in PDF format for free! Find your manual USB 7329 - US Blaster and take your electronic device back in hand. On this page are published all the documents necessary for the use of your device. USB 7329 by US Blaster.
USER MANUAL USB 7329 US Blaster
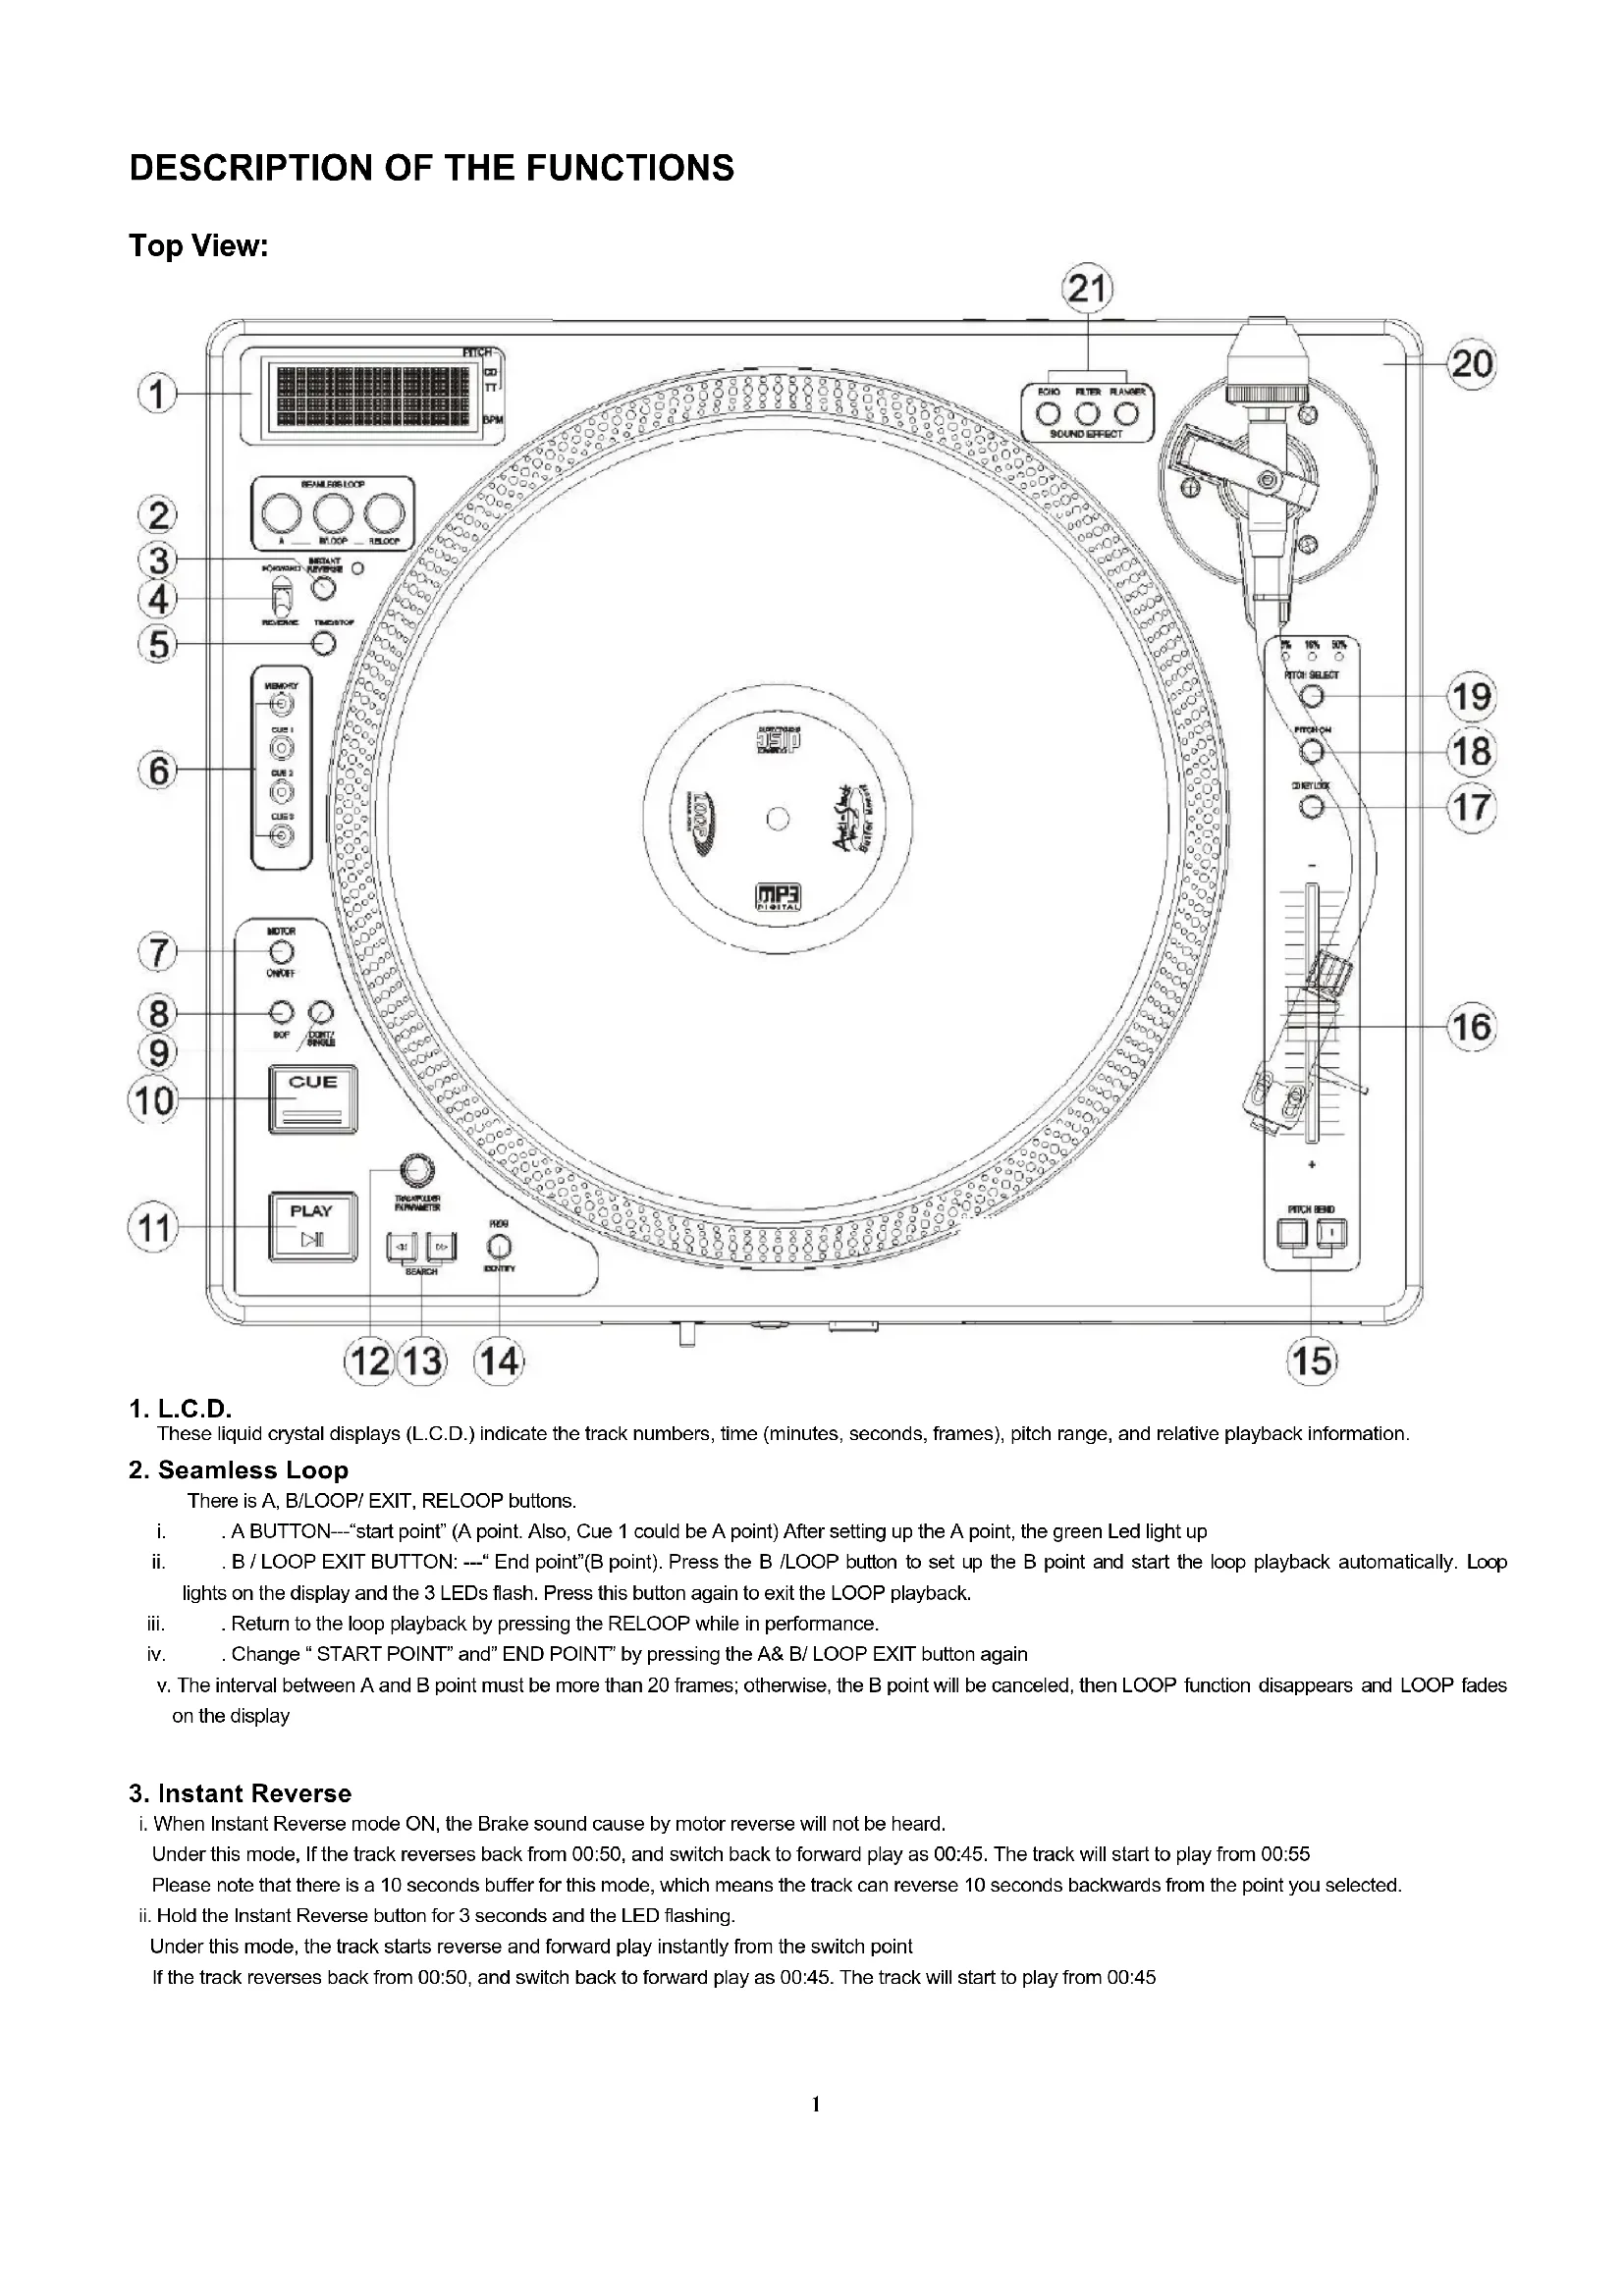
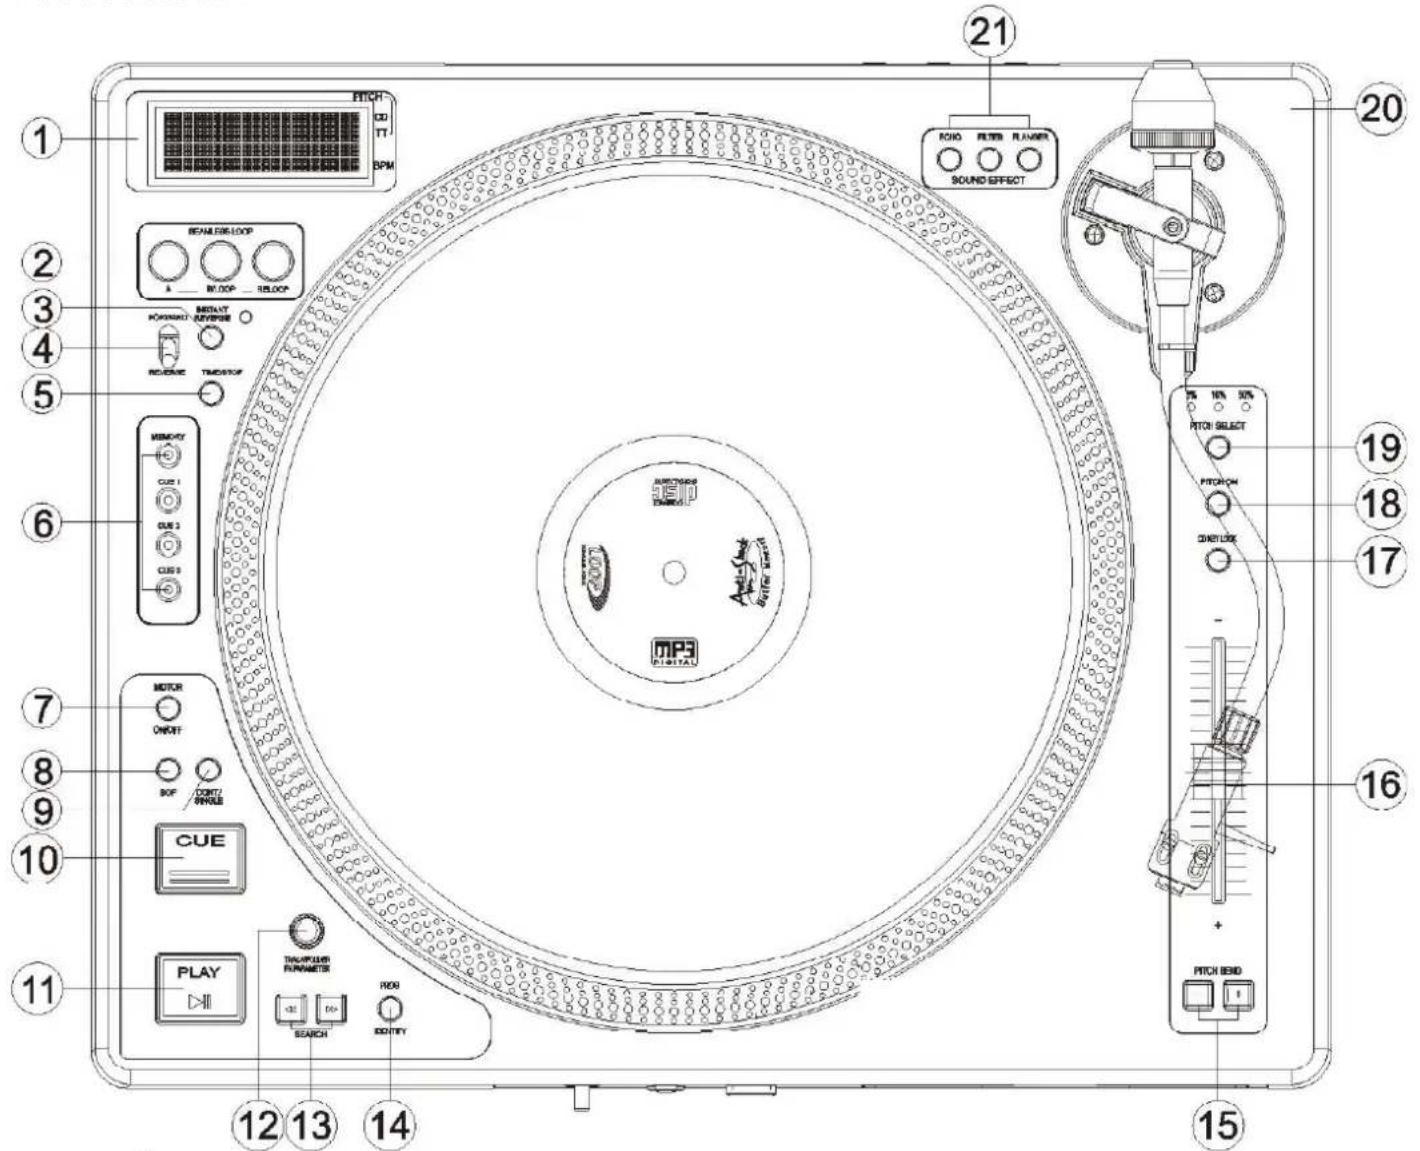
DESCRIPTION OF THE FUNCTIONS
Top View:
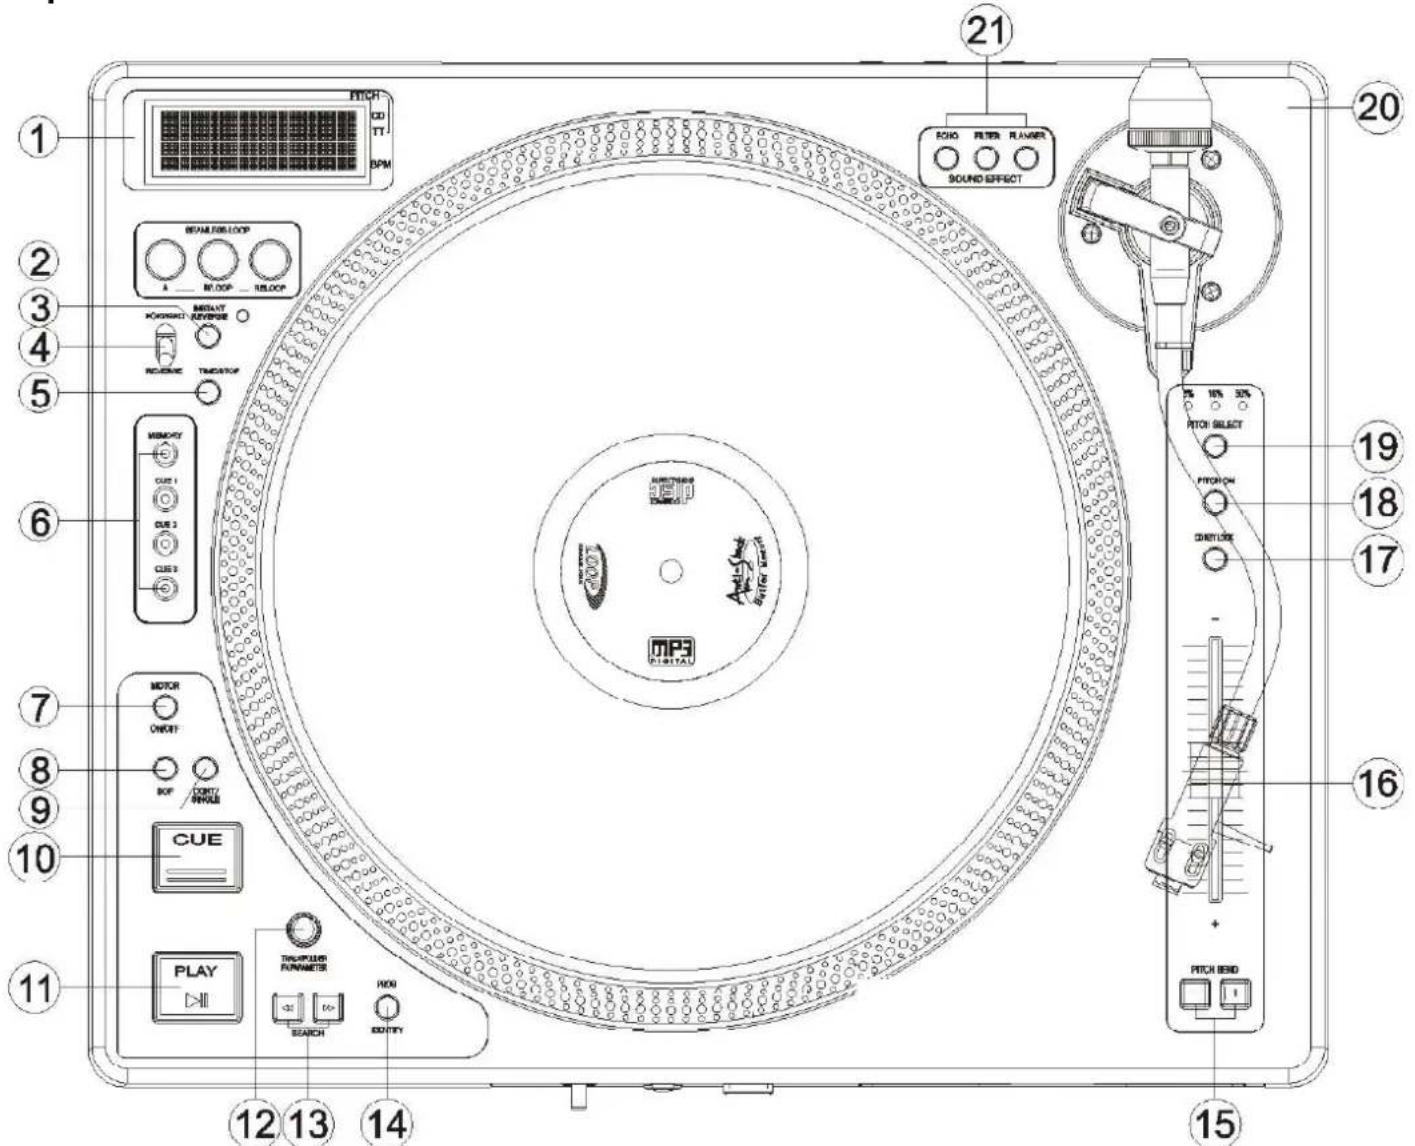
1. L.C.D.
These liquid crystal displays (L.C.D.) indicate the track numbers, time (minutes, seconds, frames), pitch range, and relative playback information.
2. Seamless Loop
There is A, B/LOOP/ EXIT, RELOOP buttons.
i. A BUTTON--"start point" (A point. Also, Cue 1 could be A point) After setting up the A point, the green Led light up
ii. B/LOOP EXIT BUTTON:---"End point"(B point). Press the B/LOOP button to set up the B point and start the loop playback automatically. Loop lights on the display and the 3 LEDs flash. Press this button again to exit the LOOP playback.
iii. Return to the loop playback by pressing the RELOOP while in performance.
iv. Change " START POINT" and " END POINT" by pressing the A& B/ LOOP EXIT button again
v. The interval between A and B point must be more than 20 frames; otherwise, the B point will be canceled, then LOOP function disappears and LOOP fades on the display
3. Instant Reverse
i. When Instant Reverse mode ON, the Brake sound cause by motor reverse will not be heard. Under this mode, If the track reverses back from 00:50, and switch back to forward play as 00:45. The track will start to play from 00:55 Please note that there is a 10 seconds buffer for this mode, which means the track can reverse 10 seconds backwards from the point you selected.
ii. Hold the Instant Reverse button for 3 seconds and the LED flashing. Under this mode, the track starts reverse and forward play instantly from the switch point If the track reverses back from 00:50, and switch back to forward play as 00:45. The track will start to play from 00:45
4. Forward/Reverse
Control the direction of the Platter
5. TIME / STOP BUTTON
This button switches the time display between total remaining time, remaining time of the current song, elapsed playing time. The unit will be in the "stop" mode if you continue pressing the button for 3 seconds.
6.3 HOT-CUE
This unit will allow you to play from 3 cue points instantly.
a. Set Cue memory: Press the MEMO button first, and then press the CUE button to complete the CUE setting, then this CUE button will light up.
b.Play" CUE" memory: Upon pressing specific CUE button, it will flash about 5 seconds.
Note: This function is not available during perform REVERSE sound effect.
7. Motor ON/OFF
Switch of the Platter Motor
8. BOP BUTTON
The playback will automatically play from the Cue point upon the button is pressed.
9. CONTINUE/SINGLE Button
To press this button it can switch between auto cue single and continue. The selected mode is indicated on the display.
*AUTO CUE SINGLE - After each track, the unit pauses at the beginning of next track. The playback starts from audible point.
*CONTINUE -To play all tracks continually.
*OUTRO - The unit will play the last 30 seconds of each track. Press the button for 3 seconds to switch OUTRO function.
10.CUE BUTTON
The cue function allows the CD returning to the memorized point. In PAUSE mode, pressing the CUE button to set the cue point, and the CUE button
blinks; in PLAY mode, press this button to pause the unit at the memorized point.
11. PLAY/ PAUSE BUTTON
Each press of this button causes the operation to change between PLAY and PAUSE modes.
12. TRACK/FX PARAMETER KNOB
The Knob select the track to be played and FX Parameter adjust
13.SEARCH BUTTON
Pressed the button to switch the function of Jog Dial between SEARCH and PITCH BEND.
When the indicator LED is light, dial the jog for quick search forward and backward.
- When the indicator LED is off, dial the jog for pitch bend function.
If the jog is unmoved for 8 seconds, the indicator light will go off.
14.PROGRAM BUTTON
You can program the track you want. While the unit is stopped, press the PROG button first to enter memorized mode, by pressing the skip buttons to select the tracks you want to order and then press the PROG button again to compete set up per track. The max tracks you can program are 16 tracks per disc. While playing programmed tracks, the LED of PROG lights up. While the unit is stopped, open the tray disc or turn off the power, the program will be exit.
This button can be used for DISC IDENTIFICATION, please note the point 22
15. PITCH BEND + / - BUTTON
When each of the two CD players is playing, the pitch bend function allows the position of the bass beat to be matched after the pitch has been adjusted. The pitch will automatically rise up to +16% from the current setting while pressing the "+" button. While pressing the " - " button, the pitch will automatically drop to - 16 % from current setting. By the way of changing the pitch the position of the beats can be matched
16. PITCH CONTROL SLIDER
To match the choices of playback speed (8%, 16%, 50%), you can choose what range you want between minimum (up side) and maximum (bottom
side) by moving the pitch control slider.
17. KEY ON/OFF SWITCH
Press the button to switch KEY mode on or off.
- KEY OFF: The display shows the "KEY" in blinking, and the key changed according to the pitch change. The key parameter adjustment is not in
effect
KEY ON: The "KEY" lights on the display, tuming the SCOPE knob to adjust the key. Slide the pitch slider will also change the key.
18. PITCH ON/OFF BUTTON
Press the button to be PITCH ON mode, press it again on the PITCH ON mode, and blinks with unit on the PITCH OFF mode.
19. PITCH % SELECT BUTTON
Select the pitch change range from ± 8% ± 16% ± 50% . The playback speed will change when you move the pitch control slider.
20. TONE ARM SECTION
Type: Universal S-Shape tubular arm
21.EFFECT SELECT KNOB
a. Flanger:
b.Filter
c. Echo
Please check page.9 for the basic operation and adjustment.
22. Disc Identification (CDDA ONLY)
i. Disc Identification function is workable in Pause Mode only
ii. Press MEMO Key for 2 sec, LCD Display shows "SAVE" and MAIN CUE time.
That means the Main Cue point is saving into EEPROM.
As "SAVE" and "MAIN CUE Time" disappear from LCD after 3 seconds, the Main Cue point save procedure is completed.
iii. When EEPROM recognize that there is the MEMO record, LCD Display shows "CUE"
iv. When EEPROM recognize that there is saved CUE Point in EEPROM. LCD Display shows "LOAD" and "MAIN CUE time"
v. Press MEMO + MAIN CUE to Load the Saved CUE TIME to MICON MAIN CUE
vi. Press TIME Button and Switch the Power ON, Press MEMO for 3 sec in "No disc mode" to clear the Memory from EEPROM
As LCD shows "RESET" for 3 seconds, the data is cleared.
23. SLEEP:
Leave the unit unused for 30 minutes; the machine will shut off automatically.
DESCRIPTION OF THE FUNCTIONS Front View
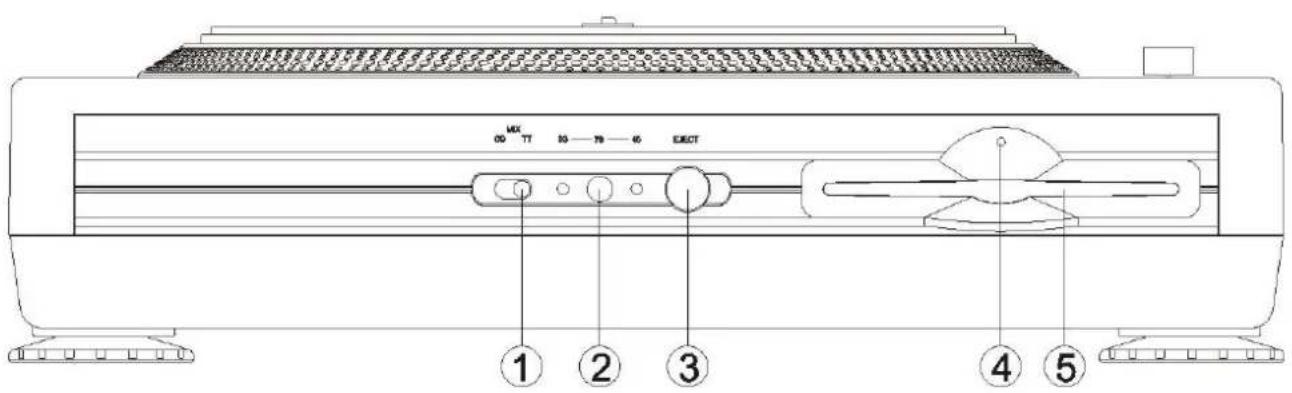
1. CD/Mix/TT
Switch of CD/Mix/TT mode
2.RPM selector
Selector of 33/45/78 rpm, holds the button for 3 seconds to switch to 78 rpm
3.EJECT BUTTON
Press to eject the disc.
Note: Disc can't be ejected unless the stop or pause button has been pushed first
4. Drive in use light
Light will blink when the disc drive is in use.
5.DISC SLOT
Insert and remove the CDDA disc.
LCM INSTRUCTION
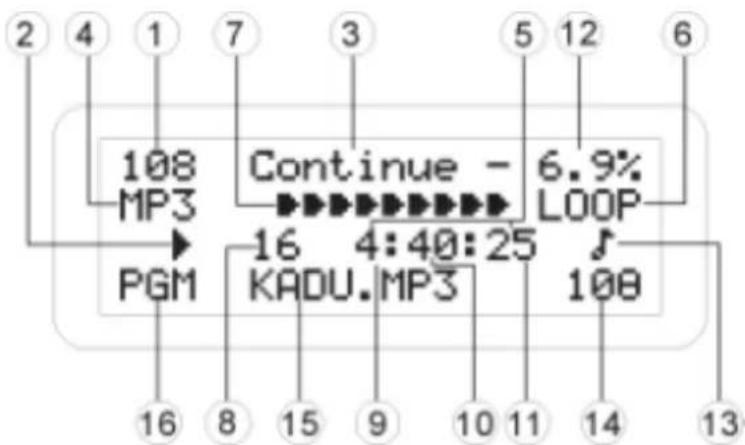
This unit can display text information on the display when playing CD text discs which contain text information in English category.
The CD text disc includes the mark shown at the right.
Note:
This unit can provide a text display of the following types of characters.
Other types of characters will result in"" being displayed.
Alphabet ABCDEFGHIJKLMNOPQRSTUWXYZ abcdefghijklmnoparstuvWXYZ
Numbers 0123456789
Symbols 1#"#%&'()*+,-/;<=>?[¥]SPACE
1. TOTAL TRACK - the track numbers of the CD or CARD.
2. The unit is in playing/ paused.
3.CONT/SINGLE-Shows when the unit is set to play the all tracks continually or play only one track.
4. MP3 - Lights up when the unit is playing MP3 file, depending on mode setting
- TIME MODE (ELAPSED, TOTAL, and REMAIN) Shows the time as it is taking place, how much time is left on full CD or on a particular track.
- LOOP - lights up when loop effects are active.
- TIME BAR - Show the time length depending on the setting of the "TIME" mode.
- TRACK - Shows the track number that is playing.
- MINUTES - Shows the minutes elapsed or remaining.
- SECONDS - Shows the seconds elapsed or remaining depending on mode setting.
- FRAMES - The CD Player breaks down a second into 75 frames for accurate cueing. This shows the frames elapsed or remaining depending on mode setting.
- PITCH - The pitch change range
13.BPM:ManualBPMmode :AutoBPMMode - Number of Beat per minute
- ID3 tag of CD/MP3 : Press "Search" button (above Dial Wheel) button for 2 seconds to display the ID3 data, file name°B Folder name°B Artist name°B Title name and Album name, press this button again to confirm it.
- PGM-Shows when you program the track you want
DESCRIPTION OF THE FUNCTIONS
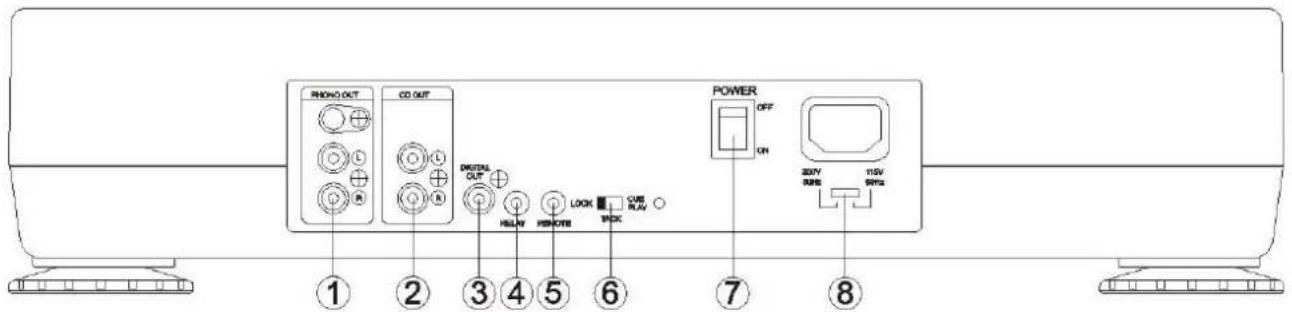
Rear View
1. PHONO OUT (RCA Jacks)
The audio from Turntable is output from these jacks. Connect to the PHONO input of the mixer.
1. CD OUT (RCA Jacks)
The audio from each CD player is output from these jacks. Connect to the line input of the mixer.
2.DIGITAL OUT
The digital from each CD player is output from these jacks. Connect to the line input of the D/A Amplifier.
3. POWER (Power Switch)
Press the power switch to turn the unit on, and the LED indicator will be light.
To switch the POWER off by pressing the POWER switch again.
4. Relay Connector
This connector is used for connecting to another CD player to allow Relay function to work.
5. Remote
This connector is used for connecting to FADERSTART wire remote control unit.
6. TACT / LOCK / CUE PLAY option
Select the type of switch in the mixer for FADERSTART wire remote control.
7. POWER (Power Switch)
Press the power switch to turn the unit on.
8. AC input voltage selector:
Switch between 115V @ 60Hz and 230V @ 50Hz
BASIC OPERATION
There are 3 modes for CDJ800TT (control switch on the FRONT PANEL)
1.CD
2.MIX (CD/TURNTABLE)
3. TT (TURNTABLE)
1. CD
- Under PAUSE Mode, Press PLAY Button to memorize MAIN CUE
- Select between 33 / 45 rpm/min
- FORWARD / REVERSE SWITCH: which control CDDA, PLAY, FORWARD / REVERSE
4.MOTOR ON/OFF
a. When MOTOR LED ON, turntable tums or stop as you press Play or Pause button.
CD disc will follow the turntable turning speed and affect by the Pitch Control setting
b. When MOTOR LED OFF, turntable will stop and CD disc still affect by Pitch Control setting
- INSTANT REVERSE:
When Instant Reverse mode ON, the Brake sound cause by motor reverse will not be heard.
6.EFFECT:
a. LED ON to start EFFECT Display show EFFECT Parameter for 5 sec back to the last displayed EFFECT
b. Effect Adjustment: EFFECT KEY HOLD Turn the Encoder anti-clockwise to reduce the EFFECT Gain
Turn the Encoder clockwise to increase the EFFECT Gain, PUSH Encoder to switch to Parameter +10 mode
c. EFFECT Setting will be saved before the machine turn off.
- Under MP3 MODE, press the ENCODER to select Folder and release to enter
2.MIX
Under MIX mode:
- MOTOR ON/OFF 'B PITCH / PITCH SLIDE 'B FORWARD / REVERSE
control the Turntable , and other buttons control the CD player - Turntable is not able to control CD player
- There are 3 speed modes for turntable (33 / 45 / 78), if switch to 78 rpm/min under CD MODE, Turntable rpm will reduce to 45 rpm/min automatically (only 33/45 for CD mode)
- EFFECT operation method remain as same as CD MODE's.
- No REVERSE function for CD PLAY.
3. Turntable
- There are 3 speed modes for turntable (33 / 45 / 78), if switch to 78 rpm/min under CD MODE, Turntable rpm will reduce to 45 rpm/min automatically (only 33/45 for CD mode)
- Platter does not turn as in MOTOR OFF. As MOTOR ON, press PLAY/PAUSE to start or pause the Platter.
- PITCH / PITCH SLIDE which control the Turntable speed.
- No function for all the other buttons except PLAY / PAUSE button
4. Effect Parameter Setting
Turn the Track knob to adjust the Effect parameter as the Effect On
Flanger:
Sync on:1-4~64-1 (default:4-1)
Sync off: 25~800 (default: 400)
Determine the length of FLANGER effect.
SYNC-OFF, 0.25 sec is the shortest, and 8 sec is longest;
SYNC_ON, 1/4 beat is the shortest and 64/1 beats is the longest.
Echo:
Sync: 1-4~64-1 (default: 1-2)
Sync off: 25~400 (default: 50)
Determine the delay time of ECHO effect. SYNC OFF, 0.01 sec is the shortest, and 4 sec is longest; SYNC_ON, 1 beat is the shortest and 4/1 beat is the longest.
Filter:
Sync: 1-4~64-1 (default: 8-1)
Sync off: 0~100 (default: 50)
Determine the scanning time of FILTER effect. 1/4 beat is the shortest and 64/1 beats is the longest
When Sync off, select the band of frequency. The number increased, the frequency is close to the treble. T
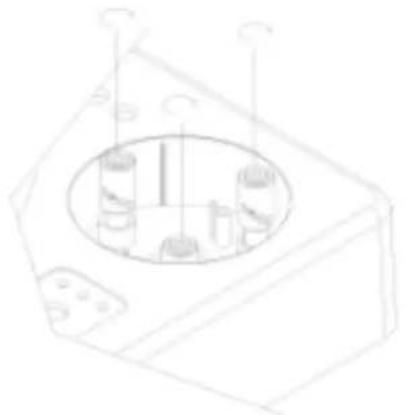
ADJUSTMENT OF THE TONEARM BASE HEIGHT
- Release the three screws first
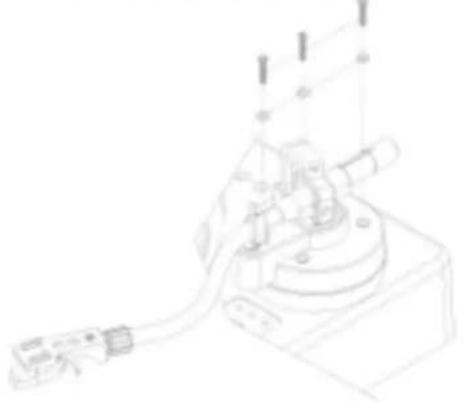
- Take off the Tonearm base
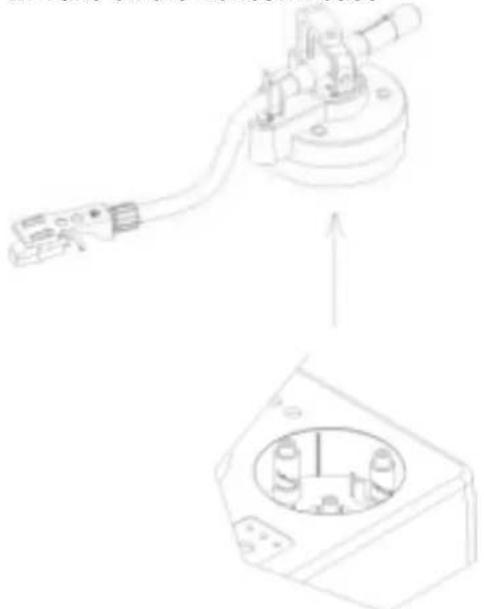
- Screw these three copper cylinders clockwise to increase or anti-clockwise to decrease the height
DESCRIPTION DES FONCTIONS INDIVIDUELLES
Vue de dessus :
1. PHONO OUT (RCA jack)
1. CD OUT (RCA jack)
- INSTANT REVERSE (Marche arrriere immediate):