MAX 7143 - DJ Equipment US Blaster - Free user manual and instructions
Find the device manual for free MAX 7143 US Blaster in PDF.

User questions about MAX 7143 US Blaster
0 question about this device. Answer the ones you know or ask your own.
Ask a new question about this device
Download the instructions for your DJ Equipment in PDF format for free! Find your manual MAX 7143 - US Blaster and take your electronic device back in hand. On this page are published all the documents necessary for the use of your device. MAX 7143 by US Blaster.
USER MANUAL MAX 7143 US Blaster
text_image
MAX SEAR MAX 7341USER'SMANUAL

text_image
CAUTION RISK OF ELECTRIC SHOCK. DO NOT OPENCAUTION:
TO REDUCE THE RISK OF ELECTRIC SHOCK DO NOT REMOVE THE COVER (OR BACK) THERE ARE NO SERVICEABLE PARTS INSIDE. REFER SERVICING TO QUALIFIED SERVICE PERSONNEL.
The lighting flash with arrowhead symbol, within an equilateral triangle, is intended to alert the user to the presence of un insulated "dangerous voltage" within the products enclosure that may be of sufficient magnitude to constitute a risk of electric shock to persons.
The exclamation point within an equilateral triangle is intended to alert the user to the presence of important operating and maintenance(servicing) instructions in the literature accompanying the appliance.
WARNING:
To reduce the risk of fire or electrical shock, do not expose this appliance to rain or moisture. Electrical equipment should NEVER be kept or stored in damp environments. The products do not Compatible with HCSD card and Mp3 display stick.
DANGER:
Invisible laser radiation when open and interlock failed or defeated. avoid direct exposure to beam.
CAUTION:
This product utilizes a laser use of controls or adjustments other than those Specified herein may result in hazardous radiation exposure.
IMPORTANT
Use of controls or adjustments or performance of procedures other than those specified herein may result in hazardous radiation exposure.
USERMANUAL
text_image
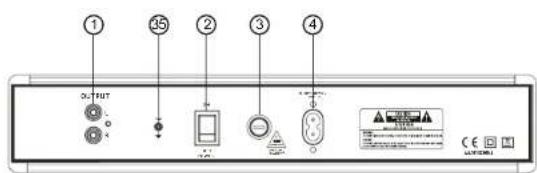
OUTPUT 35 2 3 4 CE LUTTER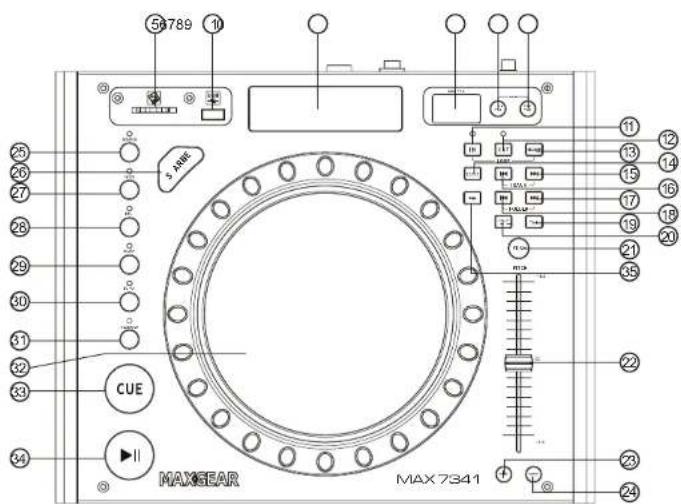
text_image
54789 10 3 AIRE CUE MAXSEAR MAX 73411. STEREO MAIN OUTPUT
Unbalanced RCA connectors controlled by the master fader.
2. POWERSWITCH
Press the power switch to turn the unit on. To switch the POWER off press the POWER switch again.
3. FUSES
Under normal operation the fuses should not blow. A blown fuse usually indicates an overload or fault condition. To change the fuse, remove the power cord, pry off the fuse block with a small flathead screwdriver and change the blown fuses. Refer to the specification for fuse current ratings.
4.ACCORD
Used this cable to connect the AC mains power to the unit
5. SD PORT
Insert the SD card.
6.USBPORT
Insert the USB.
7.DISPLAY
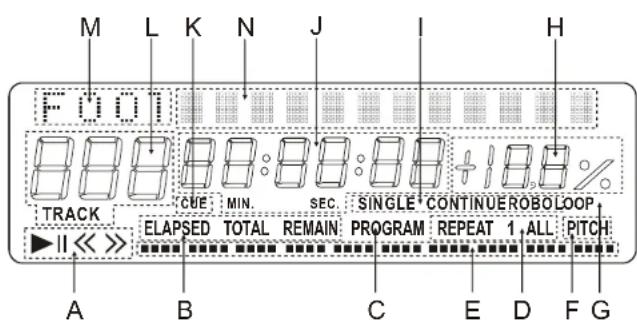
text_image
M L K N J I H F U D TRACK CUE MIN. SEC SINGLE CONTINUE ROBO LOOP ▶ II << >> ELAPSED TOTAL REMAIN PROGRAM REPEAT 1 ALL PITCH A B C E D F GA. OPERATING MODE
These indicate the operating mode of the SD CARD or USB player
▶: The SD CARD or USB player is playing the SD CARD or USB.
I : The playback is paused
B. TIME MODE INDICATORS
ELAPSED: Played time of the selected track.
TOTALREMAINING: Total remaining play time of the SD CARD or USB.
REMAINING: Remaining play time of the selected track.
C. "PROGRAM" INDICATOR
This indicates the player is in programme mode.
D.REPEATINDICATOR
REPEAT1: The SD CARD or USB player is playing the selected track repeatedly.
REPEATALL: The SD CARD or USB player is playing the entire SD CARD or USB repeatedly.
E.TIMEBAR INDICATOR
This is a graphical representation of the "Minute, second and frame displays" (C).
F."PITCH"INDICATOR
This indicates the pitch slider (12) is activated.
G."LOOP"INDICATOR
This indicates the SD CARD or USB player is currently playing inapresetloop.
H.PITCHDISPLAY
This indicates the playback speed (pitch), from 16% to +16%.
I. PLAY MODE INDICATORS
SINGLE: The SD CARD or USB player is in single mode.
CONTINUE: The SD CARD or USB player is in continue mode.
ROBO: The SD CARD or USB player is in relay mode.
J. MINUTE, SECOND AND FRAME DISPLAYS
These displays shows the current time, the value changes depends on the time mode selected.
K."CUE"INDICATOR
This indicates a new cue is set.
L.TRACKNUMBER
This displays the position, number of track of the SD CARD or USB, which is playing
M.FOLDERDISPLAY
N. ID3 COMMUNICATION DISPLAY
8.BPMEFX
9. FX TAP BUTTON
10. CUE TAP BUTTON
11. IN BUTTON (LOOP SYSTEM)
This button sets the beginning of the loop. The Loop indicator on the display flashes.
12.OUT BUTTON(LOOP BUTTON)
When you press this button, you set the end point of the seamless loop and you start the loop. To finish the loop, press again this button.
13. RELOOP BUTTON (LOOP SYSTEM)
This button is used to start the last saved loop.
14.SD/USBBUTTON
- Press the first : control the SD card function.
- Press the second: control the USB function.
- Press along time, after display "P-OFF" and will shut off the power for SD card/USB.
- If you take away the SD card/USB, then pressing the bottom, will start up the SD/USB.
15.SKIP>>IBUTTON
In the "TRACK" mode, is next track.
- SKIP |<< BUTTON
In the "TRACK" node, is last track.
- SKIP>>IBUTTON
In "FOLDER"NODE, IS NEXT FOLDER.
- SKIPI<<BUTTON
In the *FOLDER*mode, is last folder.
- TIMEBUTTON
Use this knob to choose the time mode: Elapsed time, remaining time or total remaining time.
- CONTINUE / SINGLE BUTTON
Press these to switch between the SINGLE and CONTINUOUS play mode. The selected mode is indicated on the LCD. In SINGLE mode, after each track, the unit stops the reading. In continue mode, the unit read all track and stops.
21.PITCHBUTTON
If you push this button ,the adjustment of the pitch potentiometer is available.
- PITCHCONTROL
Use this fader to increase or decrease the speed of the track.
- PITCH BEND + BUTTON
The pitch will automatically rise when the + button is pressed and return to the original pitch when it is released.
24.PITCHBEND-BUTTON
The pitch will drop while the - button is pressed and return to the original pitch when it is released.
25.SCRATCHBUTTON
When the indicator LED is light, dial the jog for SCRATCH function.
- SEARCH BUTTON
When the indicator LED is light, dial the jog for quick search forward and backward.
27.FILTERBUTTON
Use the Filter button -27- to deactivate a band pass filter which permits playing at a certain uency.
28.PANBUTTON
The Pan button-28- activates a Balance effect. This effect, depending on the beat frequency, alternates the signal from the left to the right loudspeaker side.
29.PHASEBUTTON
Use the Phase button -29- to activate the phase effect. Although similar to a flanger, it emphasise the upper pitch less and sounds slightly more harmonious.
30.ECHOBUTTON
Use the Echo button -30- to activate a Reverb/Echo effect.
31.FLANGERBUTTON
Use the Flanger button -31- to activate the flanger effect. This frequently applied effect is similar to the Phase effect, but slightly more harmonious, emphasises the upper pitch more and is reminiscent of a flying aircraft.
- JOG & SHUTTLE WHEELS
The CD player features an extra large Jog Wheel for a real vinyl-like operation. This is generally divided into two sections for scratch applications. The top section is touch sensitive and responds to the body's own electricity
- similar to a vinyl record on the turntable. The outer rubberised ring has been designed for pitch bending - similar to the edge of a turntable's platter.
If the Scratch function -25- has been deactivated, the entire Jog Wheel also works as a Search and Pitch Bend wheel. By turning clockwise and counter-clockwise while in Cue and Pause mode, you can precision-frame-search a Cue Point. While in Play mode, use the Jog Wheel, similar to a turntable, for pitch bending (during deactivated Scratch -25-). This is a quick increase (push start) or decrease (stop) of the pitch. The faster the Jog Wheel is turned, the quicker the change of pitch. The same effect can be achieved with the Pitch Bend buttons -23- and Pitch Bend buttons -24-.
- CUEBUTTON
- In pause mode use the search button to search the position you want.
- Now press play button.
- Press CUE button will go back to where you start.
- PLAY/PAUSEBUTTON
Each time you press the PLAY/PAUSE button, the operation changes from play to pause or rompause to play.
- PGMBUTTON
In STOP mode, you can program several tracks (20 tracks max.):
- Press the PAUSE button to enter in the stop mode
- Press the PGM button to enter in the program mode
-Use the skip track buttons to choose the track you want to listen then press the PGM button
to enter your choice.
- Use one more time the skip track buttons to choose the track you want to listen then press the PGM button to enter your choice.
- Repeat the operation to select all the track you want to listen
- Press the PLAY / PAUSE button to start the playback
SPECIFICATIONS:
Mp3 Decoding....Support 16/22.05/24/32/44.1/48kHz sampling frequencies and bit
rate from 32kbps to 320kbps
Power Supply AC 220-240V\~50 Hz
Dimension....325x260x82mm
CE