USER MANUAL VT12 ROLAND
Look What You Can Do!
The VT-12 is the ideal tool for improving your vocal skills.
You can use the VT-12 anytime and anywhere-by yourself or in a group, at home or in the studio.
Checking Your Pitch
The VT-12 can detect the pitch not only of a single voice, but also of two voices! When singing harmony with another person, you can use it to check that you're both singing the correct pitches.

As a Metronome
The VT-12 can provide a guide tone to help you keep the correct tempo when you're singing alone, or when practicing a cappella or with a vocal group.
Vocal Training
The VT-12 provides an effective way to warm up or to practice vocal exercises. You can use the built-in tracks to practice vocalizing before a choral or live performance, or use it to polish your vocal technique and expression.

What are tracks?
The VT-12 contains built-in tracks that you can use when practicing (warming up or exercising). In addition to the built-in tracks, you can also record your own favorite songs (p. 14).
Look What You Can Do! 2
Panel Descriptions 5
Top Panel 5
Side Panel (Connecting Your Equipment) 6
Before You Use the VT-12 8
Installing the Batteries. 8
Turning the Power On 9
Using the DoReMi Sheet. 9
Tips for Using the VT-12 10
Using the Stand 10
Checking the Pitch 11
Practicing 13
Record and Practice a Favorite Song 14
Using the Metronome. 15
Troubleshooting 16
Audio Flow 17
Main Specifications 18
USING THE UNIT SAFELY 19
IMPORTANT NOTES 22
Before using this unit, carefully read the sections entitled: "USING THE UNIT SAFELY" (p. 19) and "IMPORTANT NOTES" (p. 22). These sections provide important information concerning the proper operation of the unit. Additionally, in order to feel assured that you have gained a good grasp of every feature provided by your new unit, Owner's manual should be read in its entirety. The manual should be saved and kept on hand as a convenient reference.
Copyright © 2012 ROLAND CORPORATION
All rights reserved. No part of this publication may be reproduced in any form without the written permission of ROLAND CORPORATION.
Roland is a registered trademark of Roland Corporation in the United States and/or other countries.
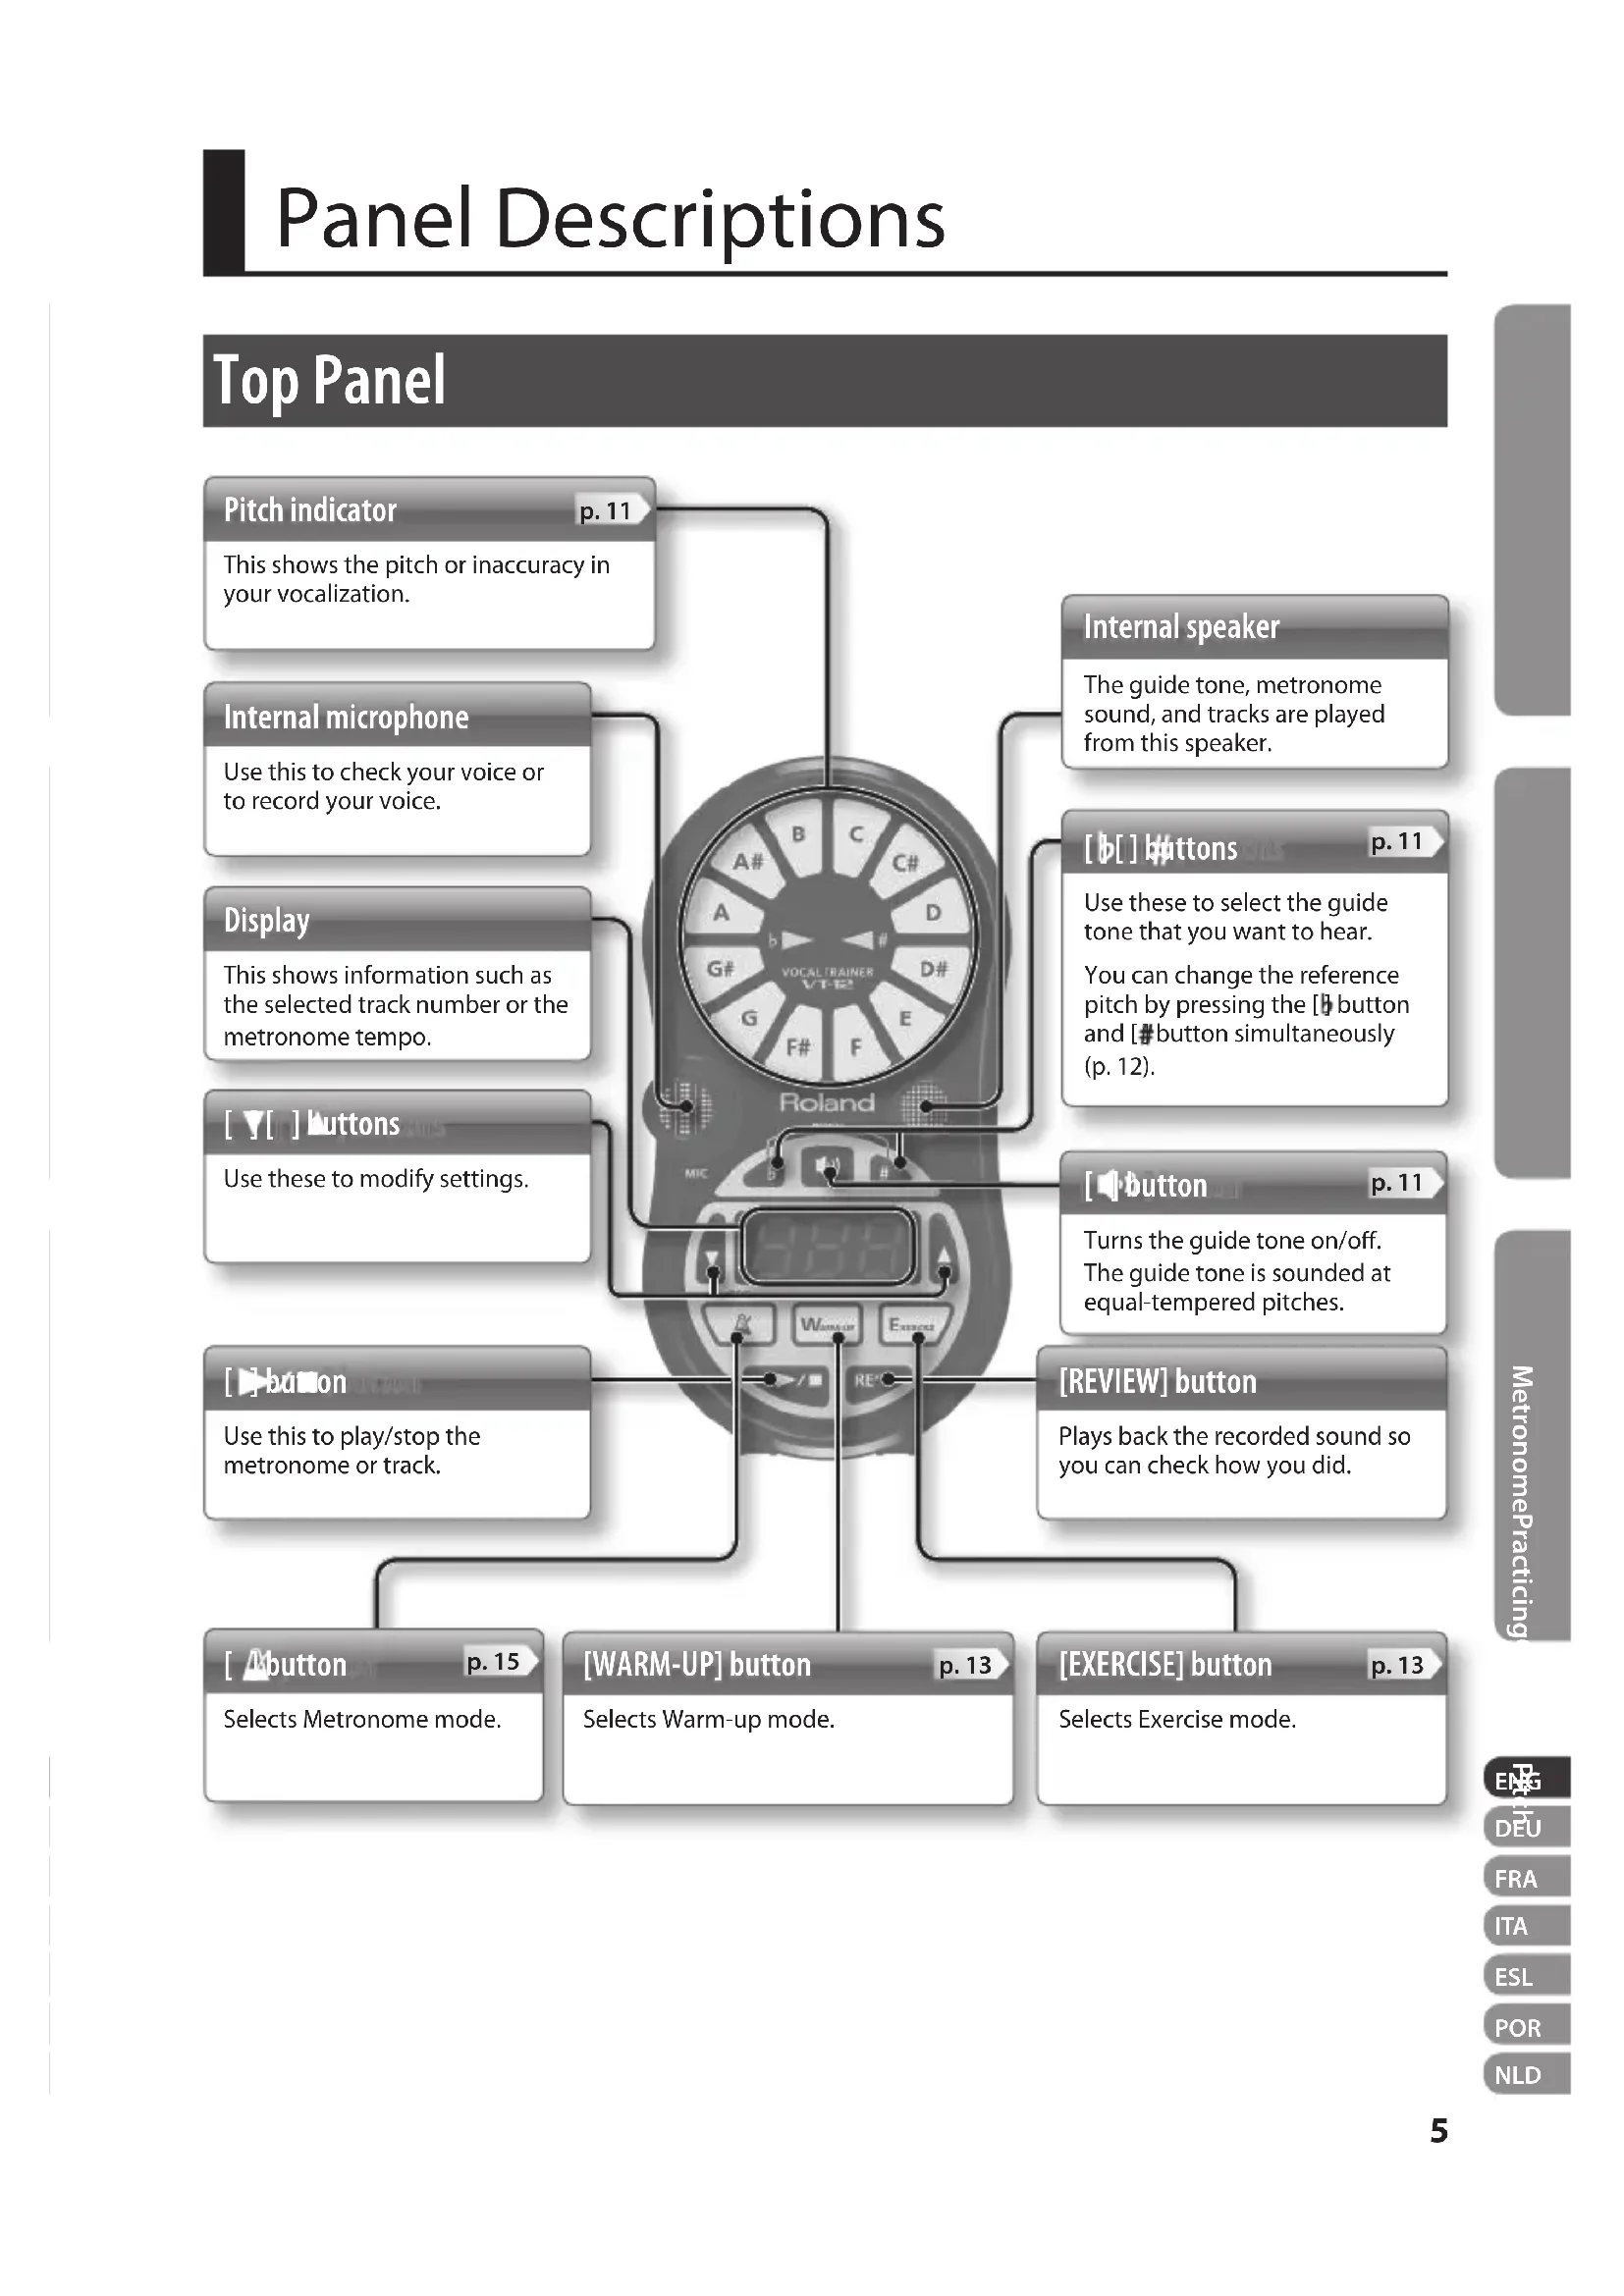
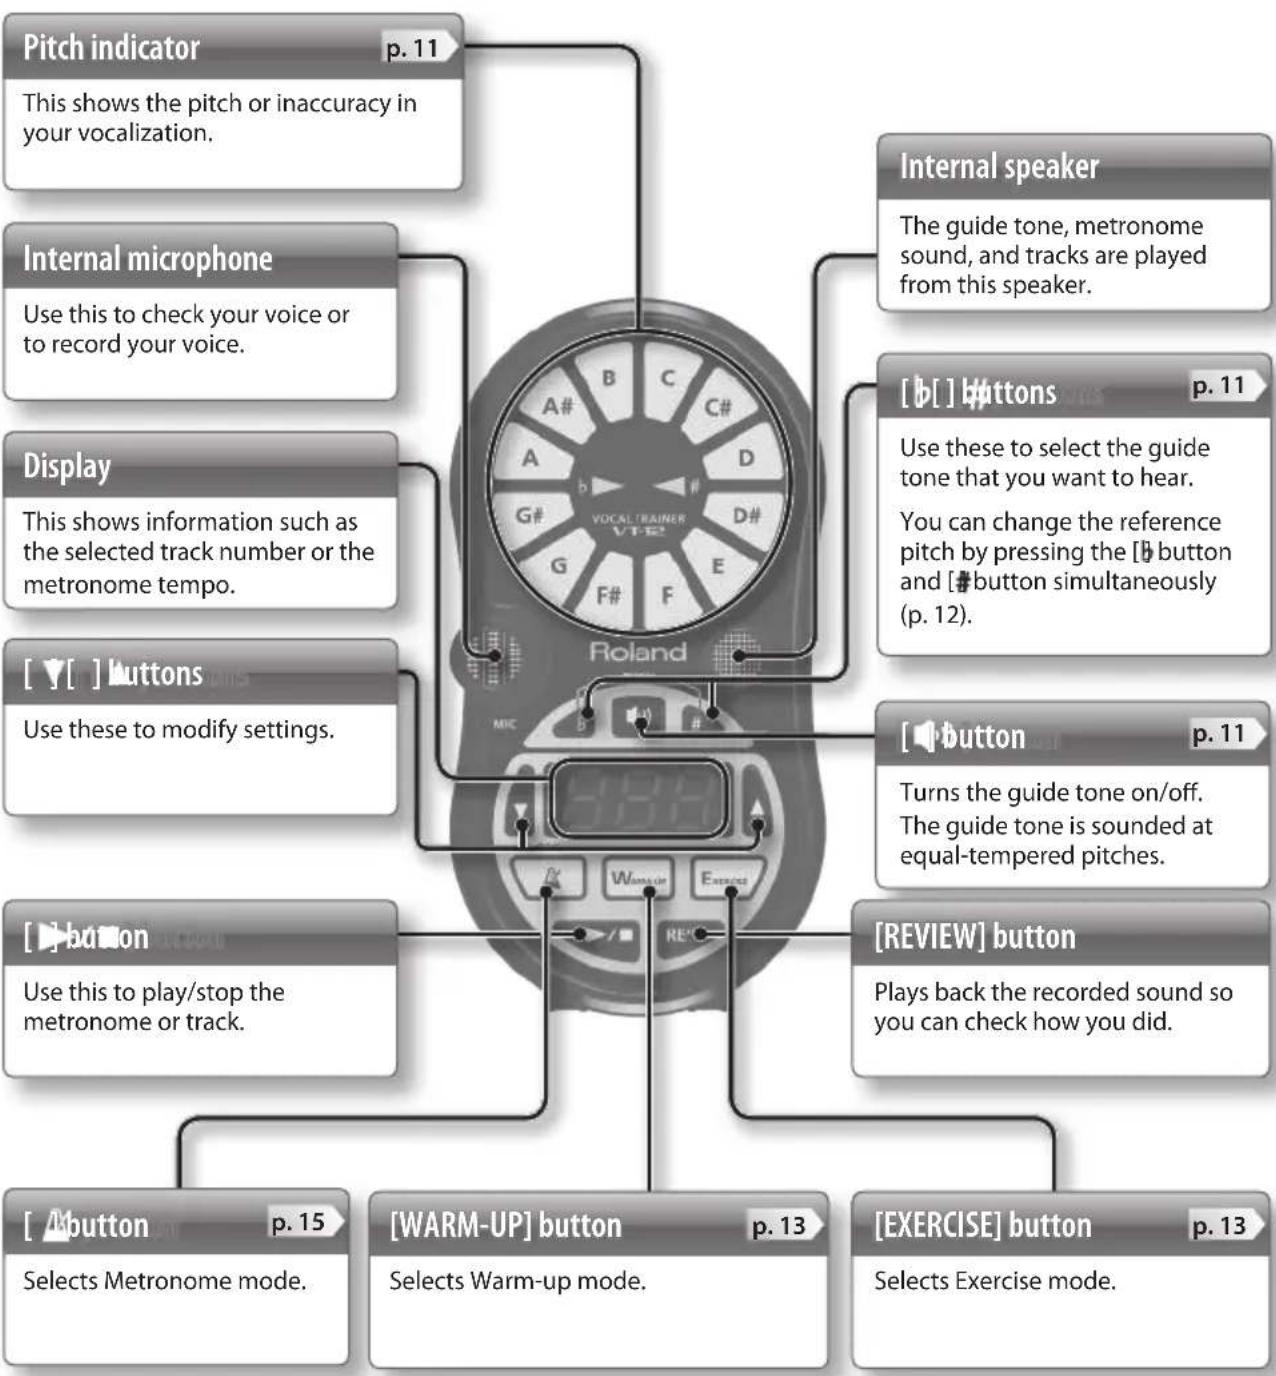
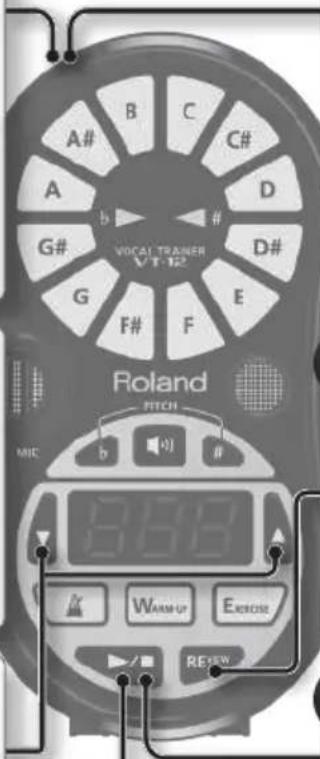
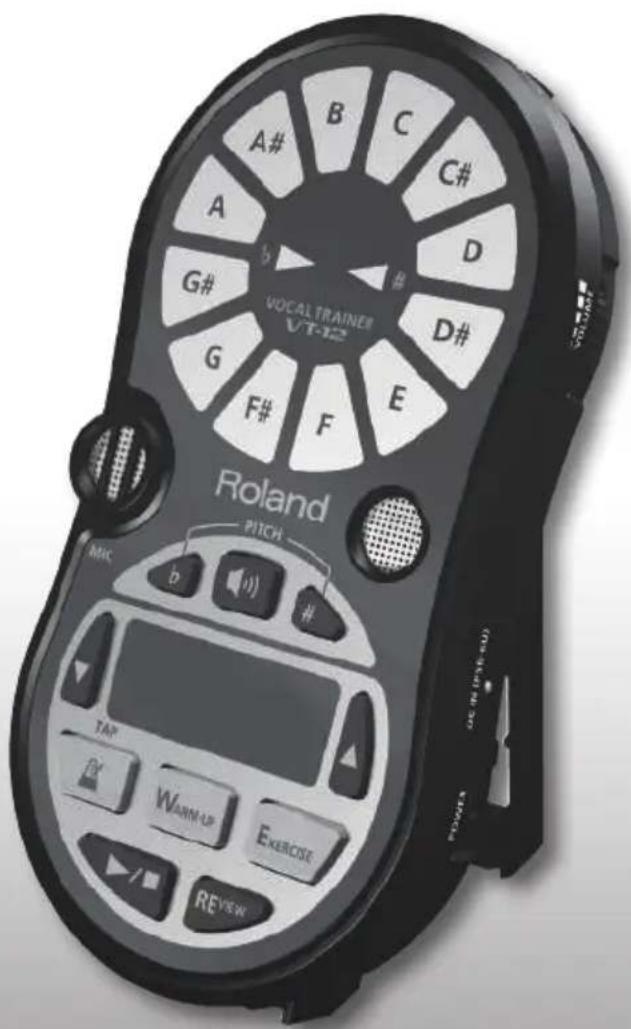
Panel Descriptions
Top Panel
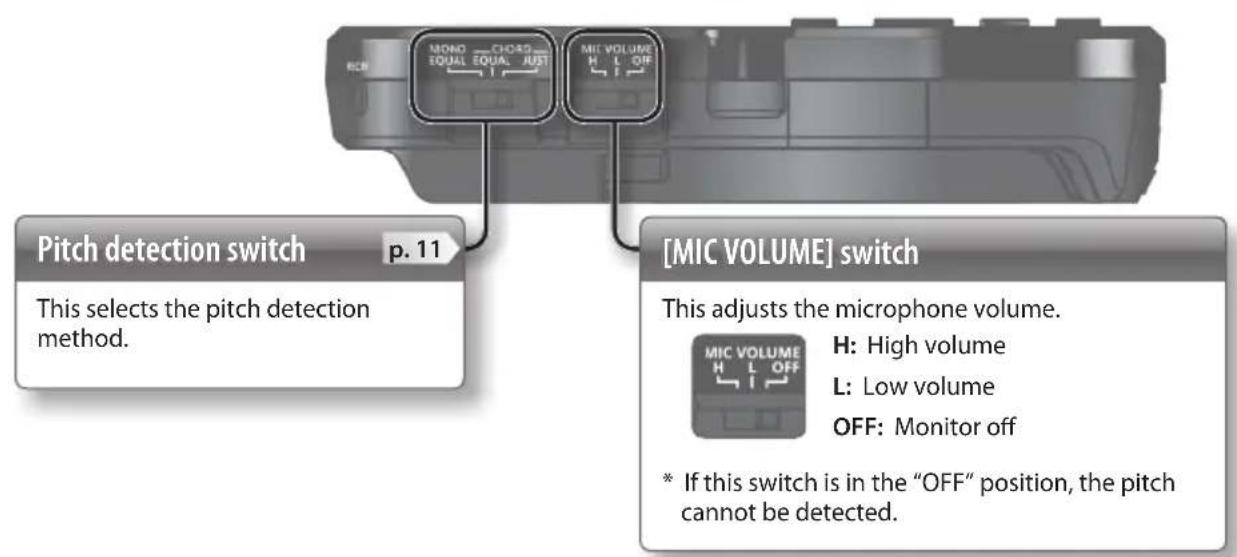
Side Panel (Connecting Your Equipment)

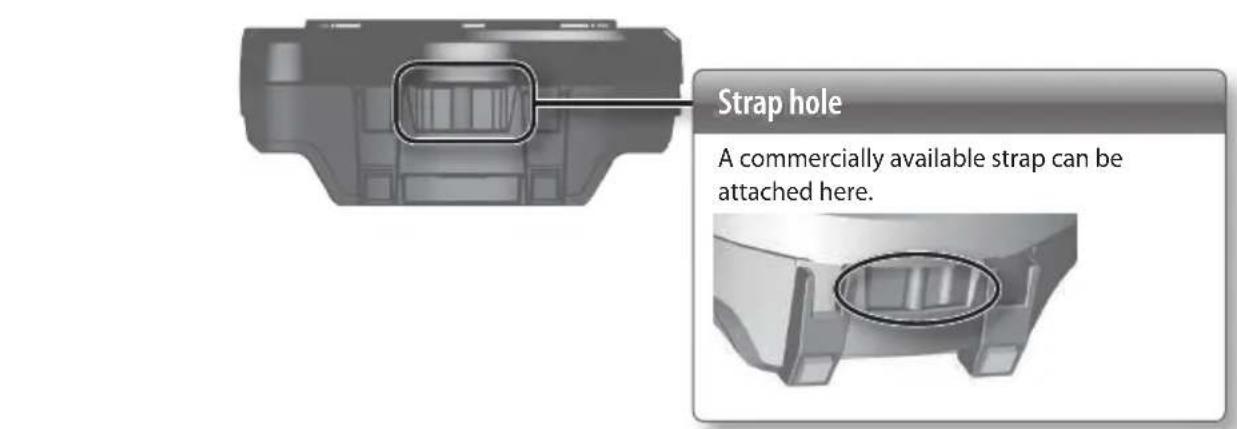

Caution when making connections
- To prevent malfunction and equipment failure, always turn down the volume, and turn off all the units before making any connections.
-
If you're using an external speaker, feedback (a whine or howl) can occur depending on the position of the external speaker relative to the internal microphone. If this occurs, take the following steps.
-
Changing the orientation of the internal microphone.
- Relocating internal microphone at a greater distance from external speakers.
- Lowering volume levels.
- Set the [MIC VOLUME] switch to the "OFF" position.
Installing the Batteries
Insert the batteries (two AA batteries) as shown in the illustration, taking care to observe the correct polarity.

Cautions when using batteries
- As the batteries run low, the display will indicate "1." When this occurs, please install fresh batteries.
-
If used improperly, batteries may explode or leak and cause damage or injury. In the interest of safety, please read and observe the following precautions.
-
Carefully follow the installation instructions for batteries, and make sure you observe the correct polarity.
- Avoid using new batteries together with used ones. In addition, avoid mixing different types of batteries.
- Remove the batteries whenever the unit is to remain unused for an extended period of time.
- Never keep batteries together with metallic objects such as ballpoint pens, necklaces, hairpins, etc.
-
Used batteries must be disposed of in compliance with whatever regulations for their safe disposal that may be observed in the region in which you live.
-
Incorrect handling of batteries, rechargeable batteries, or a battery charger can cause leakage, overheating, fire, or explosion. Before use, you must read and strictly observe all of the precautions that accompany the batteries, rechargeable batteries, or battery charger.
- When using rechargeable batteries and a charger, use only the combination of rechargeable batteries and charger specified by the battery manufacturer.
- If operating this unit on batteries, please use alkaline batteries or rechargeable Ni-MH batteries.
- If operating this unit on batteries, please disconnect the AC adaptor from this unit.
- Even if batteries are installed, the unit will turn off if you connect or disconnect the power cord from the AC outlet while the unit is turned on, or if you connect or disconnect the AC adaptor from the unit.
Expected battery life under continuous use: Alkaline: 6 hours
- These figures will vary depending on the specifications of the batteries and the actual conditions of use.
Turning the Power On
- Once everything is properly connected (p. 6), be sure to follow the procedure below to turn on their power.
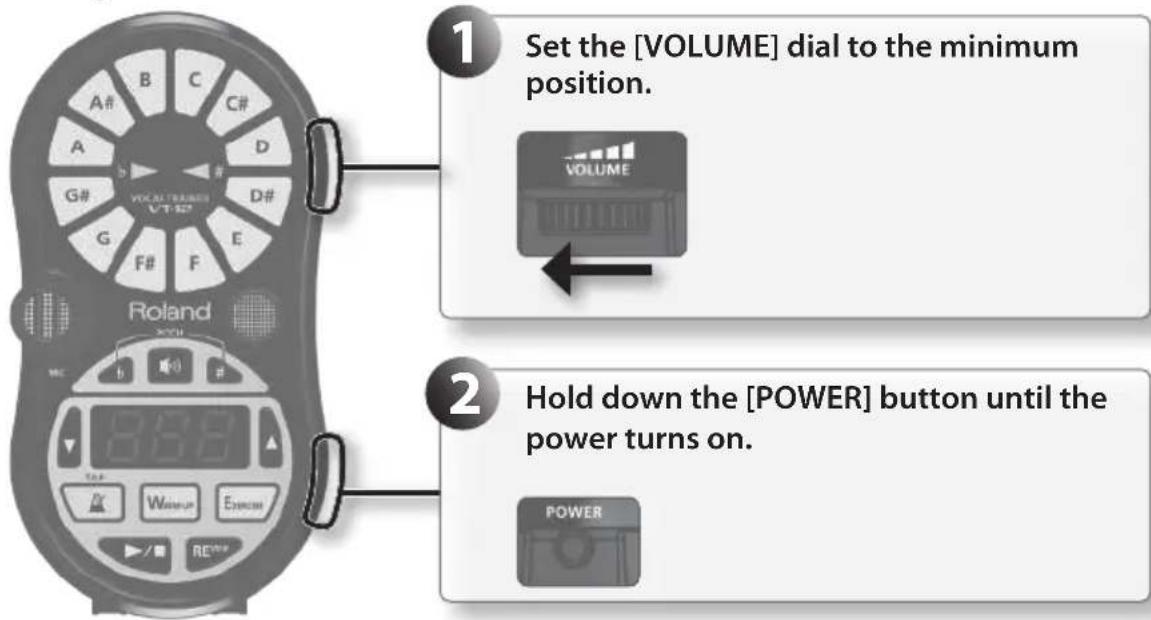
Cautions about the power
- Power to this unit will be turned off automatically after 30 minutes have passed without any of its buttons being pressed (including time that metronome is sounding), or 30 minutes have passed since playback of a track has stopped.
- Before turning the unit on/off, always be sure to turn the volume down. Even with the volume turned down, you might hear some sound when switching the unit on/off. However, this is normal and does not indicate a malfunction.
- This unit is equipped with a protection circuit. A brief interval (a few seconds) after turning the unit on is required before it will operate normally.
Using the DoReMi Sheet
By affixing the included DoReMi sheet to the pitch indicator, you can use the DoReMi indications to check the names of the notes.
If you want to check the names of the notes when using movable "Do" solfege, affix the DoReMi sheet with "Do" positioned at the note name of the tonic you're using.
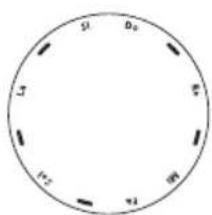
DoReMi sheet
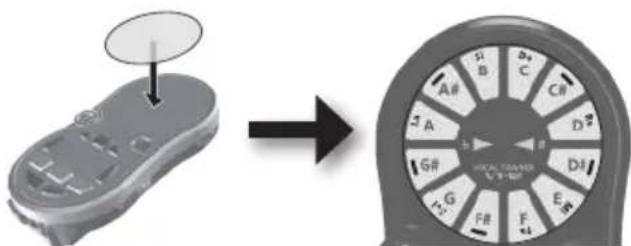
- Before using the DoReMi sheet, be sure to remove the backing paper and the blue protective sheet.
Tips for Using the VT-12
Hold the VT-12 in your hand and sing in the posture shown by the illustration.
Use headphones if you want to check the accuracy of your pitch while playing a track or the metronome.
Using headphones will make pitch detection more accurate. It will also make it easier for you to hear the recorded sound.

MEMO
Should you encounter any of the situations described below, check the setting of the [MIC VOLUME] switch (p. 6).
- Pitch indicator is unresponsive, or does not respond as it should.
- Volume of sound from the microphone is low.
Using the Stand
You can use the stand to keep the VT-12 upright.
When using the VT-12 with a group, the stand provides a convenient way to place the VT-12 upright on a desk or table.
When doing so, you should keep the VT-12 about 1m (40 inches) away from the singers.
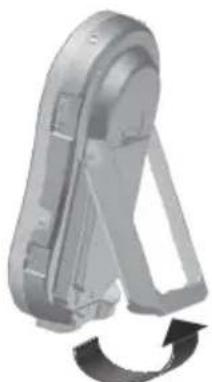
- To return the stand to its original position, fold it inward until it clicks into position.
You'll probably want to begin by checking your pitch.
The VT-12 is able to check the pitch of not just one, but two voices simultaneously.
This makes it convenient for checking the pitch of two people singing harmony.
1 Select the type of pitch detection.
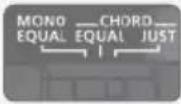
MONO EQUAL: One voice will be detected using equal temperament.
CHORD EQUAL: Two voices will be detected using equal temperament.
CHORD JUST: Two voices will be detected using just intonation (major).
MEMO
The key for just intonation is determined by the lower pitch.
If the VT-12 is sounding a guide tone, the key is determined by the guide tone. If a guide tone is being sounded, only one voice can be detected.
Before you start vocalizing, sound the guide tone (equal tempered) to hear the correct pitch.
MEMO
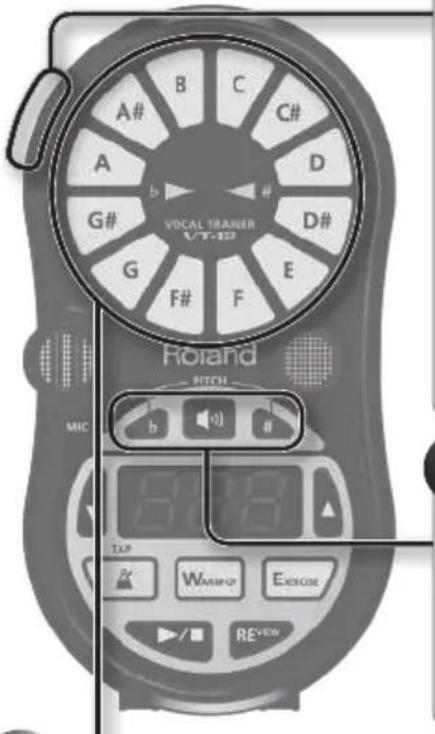
You can use the [b] button and [#] button to change the guide tone.
3 Vocalize, and check your pitch.
Vocalize the pitch that you intend to match.
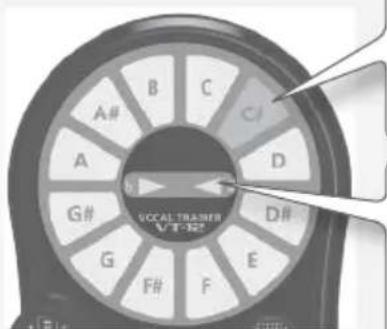
The note name that is closest to the detected pitch will light.
Gets brighter as the discrepancy in pitch grows smaller; gets dimmer if the pitch discrepancy increases.
If a guide tone is sounding, the note name of the guide tone will also light.
- If the pitch indicator does not respond even when you are vocalizing, check the setting of the [MIC VOLUME] switch (p. 6).
| Indicates the amount of pitch discrepancy. Lit: ▲Unlit: △ |
| MONO EQUAL | Pitch is flat | b ▲ △# |
| Pitch is correct | b ▲ △# |
| Pitch is sharp | b ▲ △# |
| CHORD EQUAL | The high note is flat relative to the low note | b ▲ △# |
| CHORD JUST | The pitch interval between the two notes is correct | b ▲ △# |
| The high note is sharp relative to the low note | b ▲ △# |
Changing the reference pitch
- Press the [b] button and [#] button simultaneously.
The display will indicate the current reference pitch.
- Use the [][] buttons to specify the desired reference pitch.
Range: 415-465 Hz (default value: 440 Hz)
-
If you do nothing for a predetermined amount of time, the indication of the reference pitch will disappear, and the unit will automatically return to the pitch checking mode.
-
Press the [b] button and [#] button simultaneously.
The indication of the reference pitch will disappear, and the unit will automatically return to the pitch checking mode.
- During the playback of Preset tracks, the reference pitch is fixed at 440 Hz.
What is just intonation?
Just intonation is a method of tuning that ensures pure fifth and third intervals.
If you select just intonation, you'll need to specify the tonic (for a major scale this will be C) that's appropriate for the key of your song.
The VT-12 will assign the lower of two voices as the tonic.
If a guide tone is sounding, the guide tone will be the tonic.
About pitches in just intonation
The VT-12 can detect just intonation pitches only in a major key.
If the guide tone is C, the pitches are calculated using the following ratios.
| CC# | DD#EF | | | | |
| Equal temperament (cent) 0 | 100200300 | 400500 | | | | |
| Just intonation (cent) 07120 | 4316386 | 498 | | | | |
| Ratio 125/24 9/8 6/5 5/4 4/3 | | | | | | |
| F# GG# A A# B | | | | |
| Equal temperament (cent) | 600 | 700 | 800 | 900 | 1000 | 1100 |
| Just intonation (cent) | 569 | 702 | 773 | 884 | 1018 | 1088 |
| Ratio | 25/18 3/2 | 25/16 5/3 | 9/5 15/8 | | | |
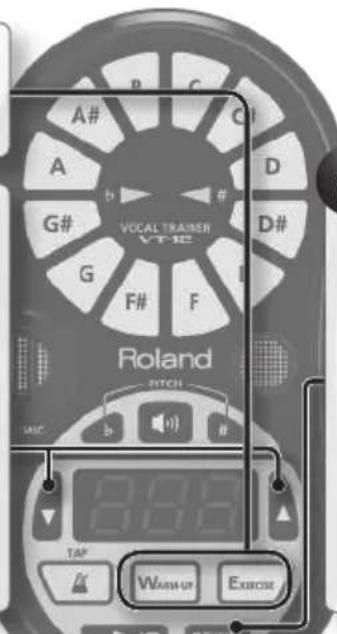
Practicing
The VT-12 provides two practice modes: Warm-up mode and Exercise mode. Each mode contains tracks (p. 3) that are ideal for the corresponding type of practice. Since the sound you produce while practicing is automatically recorded to the relevant tracks, you can listen to it afterwards (Review function).
| Warm-up mode This contains tracks for vocalization practice that will warm up your voice. |
| Exercise mode | This contains tracks for improving your vocal technique, such as enhancing your breathing control and broadening your vocal range. |
MEMO
For more about practicing, you can also refer to the separate "Practice Guide."
It provides helpful advice on vocalizing and singing, and tips for practicing with each track.
- Each time a track is played back, a new recording is started. If you play back a track that was previously recorded, the sound that was recorded on that track will be overwritten. If you stop the playback of a track within 3 seconds after the moment it was started, sound will not be recorded on that track.
1 Select a practice mode.
The button of the selected mode will light.
MEMO
- By repeatedly pressing the button for the mode you selected, you can switch between preset tracks and user tracks.
If not even one user track has been recorded, the display will indicate "U--."
- For details on the tracks, refer to the separate "Track List."
The recorded sound will begin playing. If nothing is recorded, the display will indicate"-."
MEMO
Depending on the track you've selected, you may be able to turn on/off the sounding of the vocals of the track by pressing the [REVIEW] button during playback of the recorded sound.
The track will play back, and recording of the sound will begin.
Track playback and sound recording will stop.
4 Sing along with the track.
As you sing, pay attention to your own pitch and to the pitches of the track that's playing.
Lit: Pitches you sing
Blinking: Pitches of the track
- With some tracks (User tracks and certain Preset tracks), the unit will not indicate the pitches by blinking.
Preset tracks and user tracks
The VT-12 contains built-in preset tracks (001-) for each mode. You can also record tracks via the REC IN jack and use them as user tracks (U01-U10). (User tracks are common to both modes.)
Record and Practice a Favorite Song
You can record your favorite songs into the VT-12 via the REC IN jack, and use them as user tracks. A recorded song can be used in both Warm-up mode and in Exercise mode.
Track length Maximum 10 minutes (per track)
Number of tracks Maximum 10 tracks
- If you select a previously recorded track number and record into it, the previously recorded song will be overwritten. If you stop within 3 seconds after beginning to record, the song will not be recorded.
- When you've finished recording a song, you must unplug the cable from the REC IN jack. The VT-12 will not perform any other operations while a cable is plugged into the REC IN jack.
1 Connect your external audio device to the REC IN jack (p. 6).


The display will alternately indicate "rEc" and "U**"; the VT-12 is ready to record the song.
2 Play back the song on your external audio device.
Adjust the volume of the sound to be captured.
While monitoring the sound on the internal speaker or through headphones, adjust its volume using the controls on the external audio device.
Recording will begin.
During recording, the display will indicate "rEc" and the pitch indicator will light.
8 Disconnect your external audio device from the REC IN jack.
Try practicing with the user track you recorded (p. 14).
Playback of the recorded song will start.
Check to make sure the song was recorded correctly. If the song was not recorded, the display will indicate "---"
Recording will stop.
5 Play back the song on your external audio device.
MEMO
If you want to delete the songs you've recorded, restore the VT-12 to its factory settings (p. 23).
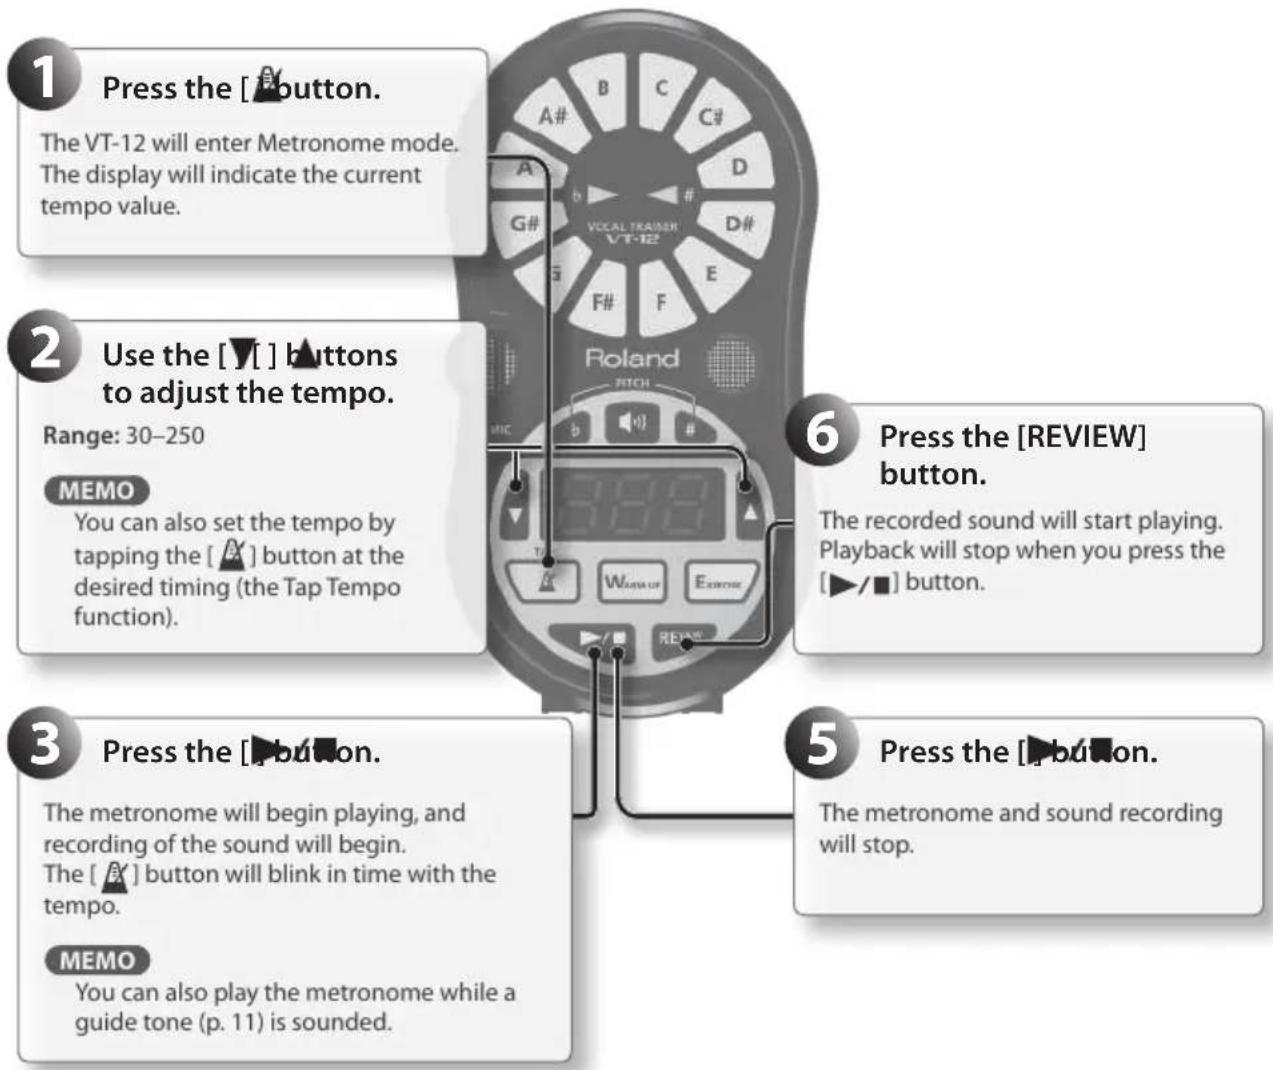
Using the Metronome
You may want to practice by singing at the tempo of the metronome.
The sound is automatically recorded while the metronome is playing, so you'll be able to listen to yourself afterward (the Review function).
- A new recording will start each time you sound the metronome. The previously made recording will be overwritten. If you stop the metronome within 3 seconds, the sound will not be recorded.
- A maximum of 10 minutes can be recorded in metronome mode. When 10 minutes have been exceeded, recording will stop. The metronome will continue sounding even after recording stops.
- You cannot set the time signature.

| Problem Items to check Action | Page | | |
| Power won't turn on | Could the batteries be exhausted? | Install fresh batteries. p. 8 | |
| Is the specified AC adaptor (PSB-6U; sold separately) connected correctly? | Check the connection once again. Never use any AC adaptor other than the specified model. | p. 7 |
| Power won't turn off Is "Err" shown in the display? | own in the display? | First, make sure that all tracks are stopped and all song captures are complete; then, you can turn off the power. | - |
| No sound/Insufficient volume | Are connections with other devices correct? | Check the connections again. p. 6 | |
| Could the volume of a connected external speaker be lowered? | Check the settings of the connected device. | - |
| Is the [VOLUME] dial set appropriately? | Adjust the volume appropriately. | p. 7 |
| Is the [MIC VOLUME] switch set appropriately? | Select the appropriate setting. p. 6 | |
| Could headphones be connected? | If headphones are connected, no sound will be produced from the internal speaker. | - |
| Insufficient volume from the internal speaker | Could the batteries be exhausted? | Install fresh batteries. p. 8 | |
| The volume level of the instrument connected to OUTPUT/PHONES jack is too low. | Could you be using a connection cable that contains a resistor? | Use a connection cable that does not contain a resistor. | - |
| Sound is distorted | Is the [VOLUME] dial set appropriately? | Adjust the volume appropriately. | p. 7 |
| Recording stops while you're recording a song | Could you be attempting to record for more than ten minutes? | Recording can be carried out for a maximum of ten minutes (per song). | - |
| Insufficient volume or distorted sound in a recorded song | Are you recording at the appropriate volume? | Adjust the volume on the external audio device. | - |
| Pitch is not detected/Unexpected operation occurs | Is the [MIC VOLUME] switch set appropriately? | Select the appropriate setting. p. 6 | |
| Could you be trying to check the pitch in a noisy location? | Check the pitch in a location without excessive noise. | - |
| Is the setting for the reference pitch appropriate? | Set it to an appropriate value. During the playback of Preset tracks, the reference pitch is fixed at 440 Hz. | p. 12 |
| During track playback, the b and #pitch indicators light frequently. | In order to allow for the quick check of the pitch during track playback, the b and #pitch indicators will light rapidly. If you play back what has been recorded by pressing the [REVIEW] button, these indicators will light in the normal manner. | - |
| Power turns off unexpectedly | Power to this unit will be turned off automatically after 30 minutes have passed without any of its buttons being pressed (including time that metronome is sounding), or 30 minutes have passed since playback of a track has stopped. | - |
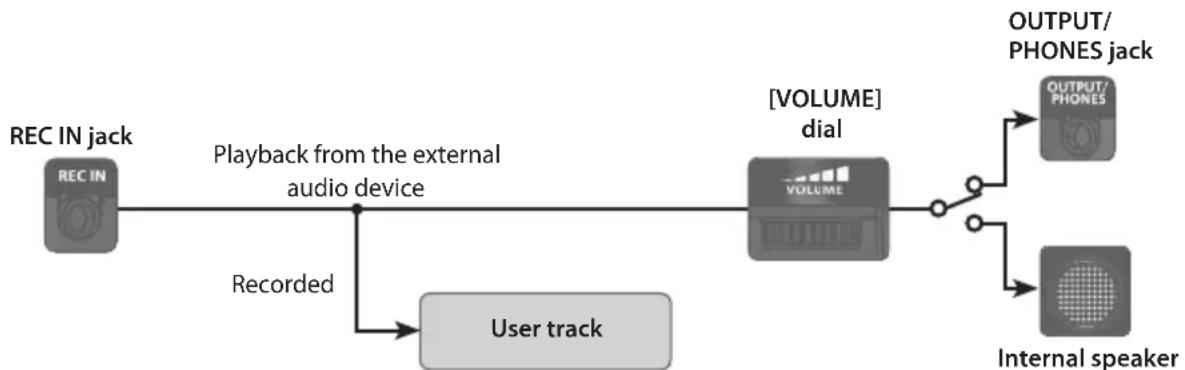
When playing back a track
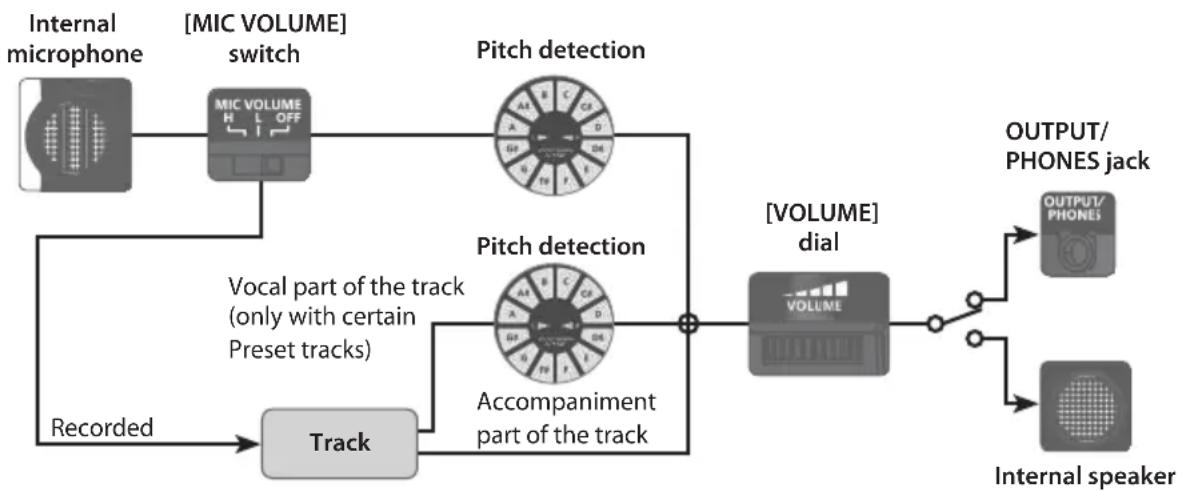
* The sound from the internal microphone will not be produced by the internal speaker.
When playing (reviewing) the recorded sound
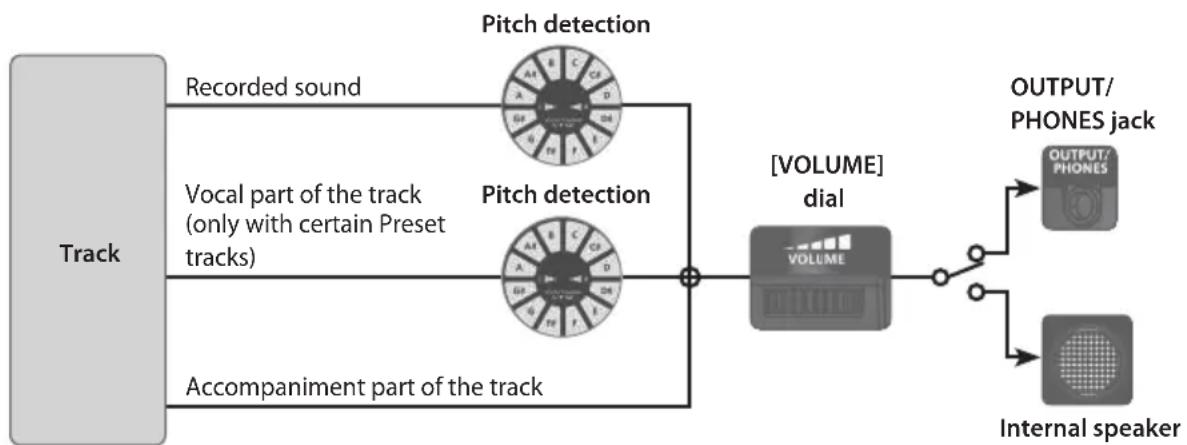
When recording a song
Roland VT-12: Vocal Trainer
| Tuner |
| Tuning Range C2 (65.4 Hz)-A5 (88 0.0 Hz) |
| Tuning Accuracy +/-1 cent | |
| Reference Tone | Reference Pitch: A4 = 415-465 Hz (1 Hz steps)
Reference Tone Range: A3-G#5 (24 notes in the chromatic scale) |
| Metronome |
| Tempo 30-250, Accuracy: +/-0.1 % | |
| User Track |
| Track Length Maximum 10 minutes (per track) |
| Number of tracks Number of tracks: Maximum 10 tracks |
| Input/Output |
| Nominal Input Level REC IN jack: 0 dBu |
| Input Impedance REC IN jack: 9.5 k ohms |
| Output Level OUTPUT/PHONES jack: 15 mW + 15 mW (In case 16 ohms load) |
| Recommended Load Impedance: 16 ohms or greater |
| Others |
| Speaker Mono | |
| Connectors | OUTPUT/PHONES jack (Stereo miniature phone type)
REC IN jack (Stereo miniature phone type)
DC IN jack |
| Display | 7 segments, 3 characters (LED)
Pitch indicator |
| Power Supply | Alkaline battery (AA, LR6) or Rechargeable Ni-MH battery (AA, HR6) x 2,
AC adaptor (PSB-6U: sold separately) |
| Current Draw 380 mA | |
| Expected battery life under continuous use | Alkaline (AA, LR6): Approx. 6 hours
* These figures will vary depending on the specifications of the batteries
and the actual conditions of use. |
| Dimensions | 70 (W) x 134 (D) x 28 (H) mm
2-13/16 (W) x 5-5/16 (D) x 1-1/8 (H) inches |
| Weight 150 g / 6 oz (including batteries) |
| Accessories | Alkaline battery (AA, LR6) x 2
DoReMi sheet
Owner's manual
Practice guide
Track list |
| Options (sold separately) | Carrying pouch (OP-RP1)
AC adaptor (PSB-6U)
* When purchasing an AC adaptor, be sure to specify the adaptor (from
the list that follows) that is designed for the region in which it will be
used, and the voltage supplied there. (PSB6U-120/PSB6U-230EU/PSB6U-
230UK/PSB6U-240A) (sets containing PSB-6U and power cord). |
- 0 dBu=0.775 Vrms
- In the interest of product improvement, the specifications and/or appearance of this unit are subject to change without prior notice.
USING THE UNIT SAFELY
INSTRUCTIONS FOR THE PREVENTION OF FIRE, ELECTRIC SHOCK, OR INJURY TO PERSONS
About WARNING and CAUTION Notices
| ▲WARNING | Used for instructions intended to alert the user to the risk of death or severe injury should the unit be used improperly. |
| ▲CAUTION | Used for instructions intended to alert the user to the risk of injury or material damage should the unit be used improperly.
* Material damage refers to damage or other adverse effects caused with respect to the home and all its furnishings, as well to domestic animals or pets. |
About the Symbols
| A | The \( \bigtriangleup \) symbol alerts the user to important instructions or warnings.The specific meaning of the symbol is determined by the design contained within the triangle. In the case of the symbol at left, it is used for general cautions, warnings, or alerts to danger. |
| B | The \( \bullet \) symbol alerts the user to items that must never be carried out (are forbidden). The specific thing that must not be done is indicated by the design contained within the circle. In the case of the symbol at left, it means that the unit must never be disassembled. |
| C | The \( \bullet \) symbol alerts the user to things that must be carried out. The specific thing that must be done is indicated by the design contained within the circle. In the case of the symbol at left, it means that the power-cord plug must be unplugged from the outlet. |
ALWAYS OBSERVE THE FOLLOWING

WARNING
Do not disassemble or modify by yourself
Do not open (or modify in any way) the unit or its AC adaptor.

Do not repair or replace parts by yourself
Do not attempt to repair the unit, or replace parts within it (except when this manual provides specific instructions directing you to do so). Refer all servicing to your retailer, the nearest Roland Service Center, or an authorized Roland distributor, as listed on the "Information" page.

Do not use or store in the following types of locations
Subject to temperature extremes (e.g., direct sunlight in an enclosed vehicle, near a heating duct, on top of heat-generating equipment); or are

- Damp (e.g., baths, washrooms, on wet floors); or are
- Exposed to steam or smoke; or are
- Subject to salt exposure; or are
- Humid; or are
- Exposed to rain; or are
- Dusty or sandy; or are
- Subject to high levels of vibration and shakiness.

WARNING
Do not place in an unstable location
Make sure you always have the unit placed so it is level and sure to remain stable. Never place it on stands that could wobble, or on inclined surfaces.

Use only the specified AC adaptor and the correct voltage
Use only the specified AC adaptor (PSB-6U), and make sure the line voltage at the installation matches the input voltage specified on the AC adaptor's body. Other AC adaptors may use a different polarity, or be designed for a different voltage, so their use could result in damage, malfunction, or electric shock.

Use only the included power cord
Use only the attached power-supply cord. Also, the included power cord must not be used with any other device.

Do not bend the power cord or place heavy objects on it
Do not excessively twist or bend the power cord, nor place heavy objects on it. Doing so can damage the cord, producing severed elements and short circuits. Damaged cords are fire and shock hazards!


WARNING
Avoid extended use at high volume
This unit, either alone or in combination with an amplifier and headphones or speakers, may be capable of producing sound levels that could cause permanent hearing loss. Do not operate for a long period of time at a high volume level, or at a level that is uncomfortable. If you experience any hearing loss or ringing in the ears, you should immediately stop using the unit, and consult an audiologist.

Don't allow foreign objects or liquids to enter unit
Never allow foreign objects (e.g., flammable objects, coins, wires) or liquids (e.g., water or juice) to enter this product. Doing so may cause short circuits, faulty operation, or other malfunctions.


Turn off the unit if an abnormality or malfunction occurs
Immediately turn the unit off, remove the AC adaptor from the outlet, and request servicing by your retailer, the nearest Roland Service Center, or an authorized Roland distributor, as listed on the "Information" page when:

The AC adaptor, the power-supply cord, or the plug has been damaged; or
- If smoke or unusual odor occurs; or
- Objects have fallen into, or liquid has been spilled onto the unit; or
The unit has been exposed to rain (or otherwise has become wet); or
- The unit does not appear to operate normally or exhibits a marked change in performance.
Adults must provide supervision in places where children are present
When using the unit in locations where children are present, be careful so no mishandling of the unit can take place. An adult should always be on hand to provide supervision and guidance.


WARNING
Do not drop or subject to strong impact
Protect the unit from strong impact. (Do not drop it!)

Do not share an outlet with an unreasonable number of other devices
Do not force the unit's power-supply cord to share an outlet with an unreasonable number of other devices. Be especially careful when using extension cords—the total power used by all devices you have connected to the extension cord's outlet must never exceed the power rating (watts/ amperes) for the extension cord. Excessive loads can cause the insulation on the cord to heat up and eventually melt through.

Do not use overseas
Before using the unit in a foreign country, consult with your retailer, the nearest Roland Service Center, or an authorized Roland distributor, as listed on the "Information" page.

Handle batteries carefully
- Batteries, rechargeable batteries, or a battery charger must never be recharged, heated, taken apart, or thrown into fire or water.

- Never expose batteries, rechargeable batteries, or a battery charger to excessive heat such as sunshine, fire or the like.

Incorrect handling of batteries, rechargeable batteries, or a battery charger can cause leakage, overheating, fire, or explosion. Before use, you must read and strictly observe all of the precautions that accompany the batteries, rechargeable batteries, or battery charger.

- When using rechargeable batteries and a charger, use only the combination of rechargeable batteries and charger specified by the battery manufacturer.


CAUTION
Place in a well ventilated location
The unit and the AC adaptor should be located so their location or position does not interfere with their proper ventilation.

Grasp the plug when connecting or disconnecting the AC adaptor
Always grasp only the plug on the AC adaptor cord when plugging into, or unplugging from, an outlet or this unit.

Periodically clean the AC adaptor's plug
At regular intervals, you should unplug the AC adaptor and clean it by using a dry cloth to wipe all dust and other accumulations away from its prongs. Also, disconnect the power plug from the power outlet whenever the unit is to remain unused for an extended period of time. Any accumulation of dust between the power plug and the power outlet can result in poor insulation and lead to fire.

Manage cables for safety
Try to prevent cords and cables from becoming entangled. Also, all cords and cables should be placed so they are out of the reach of children.

Avoid climbing on top of the unit, or placing heavy objects on it
Never climb on top of, nor place heavy objects on the unit.

Do not connect or disconnect the AC adaptor with wet hands
Never handle the AC adaptor or its plugs with wet hands when plugging into, or unplugging from, an outlet or this unit.

Disconnect everything before moving the unit
Before moving the unit, disconnect the AC adaptor and all cords coming from external devices.

Unplug the AC adaptor from the outlet before cleaning
Before cleaning the unit, turn it off and unplug the AC adaptor from the outlet (p. 7).


CAUTION
If there is a possibility of lightning strike, disconnect the AC adaptor from the outlet
Whenever you suspect the possibility of lightning in your area, disconnect the AC adaptor from the outlet.

Handle batteries carefully
If used improperly, batteries may explode or leak and cause damage or injury. In the interest of safety, please read and observe the following precautions (p. 8).


- Carefully follow the installation instructions for batteries, and make sure you observe the correct polarity.
- Avoid using new batteries together with used ones. In addition, avoid mixing different types of batteries.
- Remove the batteries whenever the unit is to remain unused for an extended period of time.
- Never keep batteries together with metallic objects such as ballpoint pens, necklaces, hairpins, etc.
- Used batteries must be disposed of in compliance with whatever regulations for their safe disposal that may be observed in the region in which you live.
Handle leaking batteries carefully


- If fluid has leaked from a battery, make sure not to touch it with your bare hands.
If any of the leaking fluid gets into your eyes, the loss of vision may result. Do not rub your eyes; use clean water to flush them thoroughly. Then, promptly see a doctor.
- Burning of the skin or dermatitis may result if fluid has gotten onto your skin or clothing. Use clean water to flush affected areas thoroughly; then, promptly see a doctor.
- Using a soft cloth, carefully wipe any remaining fluid from the inside of the battery compartment. Then, install new batteries.
IMPORTANT NOTES
Power Supply
- Do not connect this unit to same electrical outlet that is being used by an electrical appliance that is controlled by an inverter or a motor (such as a refrigerator, washing machine, microwave oven, or air conditioner). Depending on the way in which the electrical appliance is used, power supply noise may cause this unit to malfunction or may produce audible noise. If it is not practical to use a separate electrical outlet, connect a power supply noise filter between this unit and the electrical outlet.
- The AC adaptor will begin to generate heat after long hours of consecutive use. This is normal, and is not a cause for concern.
- To prevent malfunction and equipment failure, always make sure to turn off the power on all your equipment before you make any connections.
- Power to this unit will be turned off automatically after 30 minutes have passed without any of its buttons being pressed (including time that metronome is sounding), or 30 minutes have passed since playback of a track has stopped.
Power Supply: Use of Batteries
- When installing or replacing batteries, always turn this unit off and disconnect any other devices you may have connected. This way, you can prevent malfunction and damage.
- The life of the supplied batteries may be limited, since its primary purpose was to enable testing.
If operating this unit on batteries, please use alkaline batteries or rechargeable Ni-MH batteries.
- If operating this unit on batteries, please disconnect the AC adaptor from this unit.
- Even if batteries are installed, the unit will turn off if you connect or disconnect the power cord from the AC outlet while the unit is turned on, or if you connect or disconnect the AC adaptor from the unit.
Maintenance
-
For everyday cleaning wipe the unit with a soft, dry cloth or one that has been slightly dampened with water. To remove stubborn dirt, use a cloth impregnated with a mild, non-abrasive detergent. Afterwards, be sure to wipe the unit thoroughly with a soft, dry cloth.
-
Never use benzine, thinners, alcohol or solvents of any kind, to avoid the possibility of discoloration and/or deformation.
Placement
- Using the unit near power amplifiers (or other equipment containing large power transformers) may induce hum. To alleviate the problem, change the orientation of this unit; or move it farther away from the source of interference.
- This device may interfere with radio and television reception. Do not use this device in the vicinity of such receivers.
- Noise may be produced if wireless communications devices, such as cell phones, are operated in the vicinity of this unit. Such noise could occur when receiving or initiating a call, or while conversing. Should you experience such problems, you should relocate such wireless devices so they are at a greater distance from this unit, or switch them off.
- Do not expose the unit to direct sunlight, place it near devices that radiate heat, leave it inside an enclosed vehicle, or otherwise subject it to temperature extremes. Excessive heat can deform or discolor the unit.
- When moved from one location to another where the temperature and/or humidity is very different, water droplets (condensation) may form inside the unit. Damage or malfunction may result if you attempt to use the unit in this condition. Therefore, before using the unit, you must allow it to stand for several hours, until the condensation has completely evaporated.
Depending on the material and temperature of the surface on which you place the unit, its rubber feet may discolor or mar the surface. You can place a piece of felt or cloth under the rubber feet to prevent this from happening. If you do so, please make sure that the unit will not slip or move accidentally.
- Do not put anything that contains water on this unit. Also, avoid the use of insecticides, perfumes, alcohol, nail polish, spray cans, etc., near the unit. Swiftly wipe away any liquid that spills on the unit using a dry, soft cloth.
Repairs and Data
- Please be aware that all data contained in the unit's memory may be lost when the unit is sent for repairs. Roland assumes no liability concerning such loss of data.
Additional Precautions
- Please be aware that the contents of memory can be irretrievably lost as a result of a malfunction, or the improper operation of the unit.
- Use a reasonable amount of care when using the unit's buttons, sliders, or other controls; and when using its jacks and connectors. Rough handling can lead to malfunctions.
- When disconnecting all cables, grasp the connector itself—never pull on the cable. This way you will avoid causing shorts, or damage to the cable's internal elements.
- To avoid disturbing others nearby, try to keep the unit's volume at reasonable levels. You may prefer to use headphones, so you do not need to be concerned about those around you.
- Some connection cables contain resistors. Do not use cables that incorporate resistors for connecting to this unit. The use of such cables can cause the sound level to be extremely low, or impossible to hear. For information on cable specifications, contact the manufacturer of the cable.
Copyrights/License/Trademark
- It is forbidden by law to make an audio recording, video recording, copy or revision of a third party's copyrighted work (musical work, video work, broadcast, live performance, or other work), whether in whole or in part, and distribute, sell, lease, perform, or broadcast it without the permission of the copyright owner.
- Do not use this product for purposes that could infringe on a copyright held by a third party. We assume no responsibility whatsoever with regard to any infringements of third-party copyrights arising through your use of this product.
- Purchasers of this product are NOT permitted to extract said content in original or modified form, for the purpose of distributing recorded medium of said content or making them available on a computer network.
- MMP (Moore Microprocessor Portfolio) refers to a patent portfolio concerned with microprocessor architecture, which was developed by Technology Properties Limited (TPL). Roland has licensed this technology from the TPL Group.
- This product contains eCROS integrated software platform of eSOL Co., Ltd. eCROS is a trademark of eSOL Co., Ltd. in Japan.
- Company names and product names appearing in this document are registered trademarks or trademarks of their respective owners.
Returning to the Factory Settings
Here's how to return the VT-12 to its factory-set condition.
- This will erase all recorded sound and user tracks.
- If the batteries have insufficient power ("L O" appears in the display), you won't be able to restore the factory settings. In such cases, you should replace the batteries with new ones, or use an AC adapter; then you can proceed with restoring the factory settings.
The display will indicate "Factory reset."
If you decide to cancel the operation, press either the [A], [WARM-UP], or [EXERCISE] button.
The VT-12 will be returned to its factory-set state.
- Do not turn off the power while the pitch indicator b ▷ and are lighting alternately.
Roland
VOCAL TRAINER
VT-12
Bedienungsanleitung
ENG
DEU
FRA
ITA
ESL
POR
NLD
No permitted by law.
Instalando as pilhas 8
Instalando as pilhas
Wat is reine stemming?
Numerlengthe Maximum
0 minutes (per nummer)
Aantal numerms Maximum
10 nummers
When you need repair service, call your nearest Roland Service Center or authorized Roland distributor in your country as shown below.
AFRICA
EGYPT
A Fanny Trading Office
9, EBN Hagar Al Askalyan Street,
ARD E1 Golf, Helopolis,
Cairo 11341, EGYPT
TEL: (022)417-1828
REUNION
MARCEL FO-YAM Sarl
25 Rue Jules Hermann, Chaudron-BP79 97 491
Ste Clotide Cedex, REUNION ISLAND
TEL: (0262) 218-429
SOUTH AFRICA
Paul Bothner(PTY) Ltd.
Royal Cape Park, Unit 24
Londonderry Road, Ottery 7800
Cape Town, SOUTH AFRICA
TEL: (021) 799 4900
TAIWAN
ROLAND TAIWAN ENTERPRISE
CO., LTD.
9F-S, No. 112 Chung North Road Sec. 2TANWAO R.C.
TEL: (02) 2561 3319
THAILAND
Theera Music Co., Ltd.
100-108 Sai Vermg Nakornkasetem, New Road, Sumpantawong, Bangkok 10100, THAILAND
TEL: (02) 224-8821
VIETNAM
VETHUONG CORPORATION
386 CACH MANG THANG TAM ST,
DIST.3.HO CHI MINH CITY,
VET NAM
TEL: (08) 9316540
OCEANIA
AUSTRALIA/ NEW ZEALAND
Roland Corporation Australia Pty. Ltd. 34 Campbell Avenue Dee Why West NSW 2099, AUSTRALIA
For Australia
TEL: (02) 9982 8266
For New Zealand
TEL: (09) 1098 715
CENTRAL/LATIN AMERICA
ARGENTINA
Instrumentor Musicales S.A. Av.Santa Fe 20SS (1123) Buenos Aires, ARGENTINA Tel:101316508-2700
BARBADOS
A&B Music Supplies LTD
12 Webster Industrial Park
Wildey, St.Michael, BARBADOS
TEL: (246) 430-1100
BRAZIL
Roland Brasil Ltda.
Rua San Jose, 211
Parque Industrial San Jose
Cota - São Paulo - SP, BRAZIL
TEL: (011) 4615 5666
CHILE
Commercial Fancy II S.A.
Rut: 96.919.420-1
Nataniel Cox #739, 4th Floor
Santiago - Centro, CHILE
TEL: (02) 384-2180
COLOMBIA
Centre Musical Ltda.
Cra 43 B No 25 A4 Bododega 9
Medellin, COLOMBIA
C05TA161
JUAN Bansbach Instrumentos Musicales
Ave.1, Calle 11, Apartado 10237, San Jose, COSTA RICA
TEL:258-0211
CURACAO
Zeelandla Music Center Inc.
Orionweg 30
Curacao, Netherland Antilles
TEL: (305) 926866
DOMINICAN REPUBLIC Instruments Fernando Giraldez Srl, Italy
Sanchez Naco
Santo Domingo,
DOMINICAN REPUBLIC
TEL: (809) 683 0305
ECUADOR
Mus Musika Rumichaca 822 y Zaruma Guayaquil-ECUADOR TEL: (593-4) 2302364
EL SALVADOR
Roland Ireland
E2 Calmout Park, Calmout Avenue, Dublin 12, Republic of IRELAND
TEL: (01)4234444
ITALY
MOCO INC.
Jadeh Makhsous Karaj (K-9),
Nakhe Zarin Aye.
Jalal Street, Reza Alley No.4
Tehran 1389716791, IRAN
TEL: (021)-44545370-5
ISRAEL
Hallit P. Greenspoon & Sons Ltd.
8 Retzif Ha'alia Hashnia St.
Tel: Aviv-Yabo ISRAEL
TEL: (03) 6823666
JORDAN
Roland Canada Ltd. (Head Office)
5480 Parkwood Way Richmond B.C.V6V 2M4, CANADA TEL: (64) 370-6164
Roland Canada Ltd. (Toronto Office) 170 Admiralty Boulevard Mississauga ON LST 2 CANADA TEL: (905) 362 9707
U.S.A.
Roland Corporation U.S.
S100 S. Eastern Avenue
Los Angeles, CA 90040-2938, U.S.A.
TEL: (323) 890 3700
For EU Countries

m = 311
This symbol indicates that in EU countries, this product must be collected separately from household waste, as defined in each region. Products bearing this symbol must not be discarded together with household waste.
DE Dieses Symbol bedetet, dass these Product in EU-Landern getrennt vom Hausmull gesammelt werden muss gemae den regionalen Bestimmungen. Mit thisem Symbol gekennzechnete Produkte durlen nicht zusammen mit den Hausmull entsorgt werden.
FR Ce symbole indique que dans les pays de l'Union europeenne, ce produit doit être collecté séparément des ordures menagères selon les directives en vigueur dans chacun de ces pays. Les produits portant ce symbole ne doivent pas être mis au rebut avec les ordures menagères.
Questo symbolo indica che nei paesi della Corunuita europea quello prodotto devesse essere smalitto separatamente dai normali rifiuti domestici, secondo la legalazione in vigore in ciascun paese. I prodotti che riportano quello sibbol non devono essere smalitti insieme ai rifiuti domestici. Ai sensi dell'art. 13 del D.L.gls. 25 luglio 2005 n. 151.
Es Este symbolo indica que en los paises de la Union Europea este producto debe recogerse aparte de los residuos domesticos, tal como estregulado en cada zona. Los produits con este symbolo no se deben depositar con los residuos domesticos.
Estesimboloindicaque nospuisesdaUE,arecolhaesteproduto devera ser feita separadamente do lixo domestico,deacordo com os regulamentos de cada regiao. O produits que aparecem este simbolo nãodeferrareseliminadosjuntamentecomolixo domestico.
NL Dit symbool geeft aan dat in landen van de EU dit product geschaden van huishoudelijk afval moet worden angeboden, zoals bepaal per gemeente of regio. Producten die van dit symbool voorzien, mogen Niet samen met huishoudelijk afval worden verwijderd.
DK Dette symbol angiver, at i EU-lande skal dette produit opsames adskilt fra husholdningsaffald, som defineret i haver enkelt region. Produkter med dette symbol ma ikke smides udammen med hushholdningsaffald.
NO Dette symbolet indikeret at Produktet ma behandles som spezialavfall i EU-land, it. til retningsliner for den enkelte regionen, og ilke kastes sammen med vanlig husholdningsavfall. Produkter som er merket med dette symbolet, ma ikke kastes sammen med vanlig husholdningsavfall.
SE Symbolen anger att EU-lander maste den har produit kasseras separat fran hushallsavfall, i enlight met varje regions bestammelser. Produktmer med den har symbolen farr inte kasseras tillsammans med hushallsavfall.
Fi Tama merkinti ilmaisee, etta tueote on EU-maisa kerattiva erillain kottialousjfteist kunkin alueen voimassa olevien mahrysten mukaisesti. Taller markinnall varustetuja tuotteia ei saa havittaa kotitalousjfteiden mukana.
Hu Ez a szibolum az jelenti, hogy az Europai Unioban ezt a termeket a haztartasi hulladktól elkūnítve, az adott regioban érvényes szabályozás zerint kell gýfjteni. Az ezzel a szimbolummal ellattot termekket nem szabad a haztartasi hulladk kéze dobi.
Symbol oznacza, ze zgodnie z regulacjami w odpowiednim regionie, w krajach UE produktu nie naley wyrzucac z odpadami domowymi. Produktow opatrzonych tym symbolem nie mozza utylizowac racem z odpadami domowymi.
Tento symbol udáva, Že v zemich EU musi byt tento yfrobek sbrán oddělené od domacho odpadu, jak ur ecneno pro kázdy region. Výroky nosouci tento symbol se nésmi vyhazovat spo lu domácim odapadem.
SK Tento symbol vyadruje, ze v krajinach EU sa musi zber tohto produktu vykonjav' ododeme od domovho odpadu, podla nariadieni platn'y konkretnej krajine. Produktys tymto symbolom sa nesmu vyhadzovat spo lu s domovym odpadom.
See sumbol naitab, et EL-i mades taleb see toode olemprugist eraldi koguda, nii nagu on igas pirknonas maikratletud. Selle smboliga margritud tooteid ei tohi ara visa koos omeprugica.
Sis simbolis rodo, kad BS salyse fis produktas turi buti surenkamas atskirai nuo buitiniu attieku, kaip nustatyia kiekviename regione. Siuo simboliu pazenklinti produktai neturi buti ismetami kartu su butinemis attiekomis.
Sis symbols norada, ka ES valstso produktj jaevic atsevi kno majsaimnecbta atkriturniemi, ka noteikts katra regiana. Produktus ar so simbolu nedrikt izmest kopar majsaimnecbta atkriturniemi.
Ta simulb oznacujc, da je treba proizvod v drzavh EU zhirati locen do gospodinjskh odpadkov, takot kote dolcen v vsaki regii. Proizvoda s temznakomi dovolgeno odlagat skupaj z gospodjinskim odpadki.
To oujalo autu uodnauon on oic xngg ng E.E. to ovayxqarva qoovn 0e nve va ovkytey aouycoa oto ra vnoocox oooagopata, oopovv 0e ovo npiaovran or aie nayn. Ta oipovn no ne givov to ovayxqarva 0e jaofo dev nne v aoogatovra yae ta oaxea anogqata.
For China
有关产品中所含有害物质的说明
IMPORTANT: THE WIRES IN THIS MAINS LEAD ARE COLOURED IN ACCORDANCE WITH THE FOLLOWING CODE.
BLUE: NEUTRAL
BROWN: LIVE
As the colours of the wires in the mains lead of this apparatus may not correspond with the coloured markings identifying the terminals in your plug, proceed as follows:
The wire which is coloured BLUE must be connected to the terminal which is marked with the letter N or coloured BLACK.
The wire which is coloured BROWN must be connected to the terminal which is marked with the letter L or coloured RED.
Under no circumstances must either of the above wires be connected to the earth terminal of a three pin plug.

For EU Countries
This product complies with the requirements of EMC Directive 2004/108/EC.
For the USA
FEDERAL COMMUNICATIONS COMMISSION RADIO FREQUENCY INTERFERENCE STATEMENT
This equipment has been tested and found to comply with the limits for a Class B digital device, pursuant to Part 15 of the FCC Rules. These limits are designed to provide reasonable protection against harmful interference in a residential installation. This equipment generates, uses, and can radiate radio frequency energy and, if not installed and used in accordance with the instructions, may cause harmful interference to radio communications. However, there is no guarantee that interference will not occur in a particular installation. If this equipment does cause harmful interference to radio or television reception, which can be determined by turning the equipment off and on, the user is encouraged to try to correct the interference by one or more of the following measures:
Reorient or relocate the receiving antenna.
- Increase the separation between the equipment and receiver.
- Connect the equipment into an outlet on a circuit different from that to which the receiver is connected.
- Consult the dealer or an experienced radio/TV technician for help.
This device complies with Part 15 of the FCC Rules. Operation is subject to the following two conditions:
(1) this device may not cause harmful interference, and
(2) this device must accept any interference received, including interference that may cause undesired operation.
This equipment requires shielded interface cables in order to meet FCC class B limit.
Any unauthorized changes or modifications not expressly approved by the party responsible for compliance could void the user's authority to operate the equipment.
For Canada
NOTICE
This Class B digital apparatus meets all requirements of the Canadian Interference-Caising Equipment Regulations.
AVIS
This product contains chemicals known to cause cancer, birth defects and other reproductive harm, including lead.
Roland