
BS 1295 - Vacuum Cleaner CLATRONIC - Free user manual and instructions
Find the device manual for free BS 1295 CLATRONIC in PDF.
| Brand | Clatronic |
| Model | BS 1295 |
| Product type | Canister vacuum cleaner |
| Power supply | 220-240 V, 50/60 Hz |
| Nominal power | 800 W |
| Net weight | 4.7 kg |
| Energy class | A |
| Annual energy consumption | 26.6 kWh/year |
| Carpet performance class | F |
| Hard floor performance class | B |
| Dust re-emission class | F |
| Sound power level | 82 dB(A) |
| Dust bag | SSB 101 / Swirl® Y 05® |
| Motor filter | Washable (clean after about 10 bag changes) |
| Exhaust filter | Washable |
| Telescopic tube | Yes, with length adjustment |
| Power regulator | Yes, on switch |
| Air regulator | Yes, on handle |
| Cable winder | Yes, with storage button |
| Included accessories | Floor nozzle, crevice tool, brush (2-in-1) |
| Parking function | Yes, hook at the back |
Frequently Asked Questions - BS 1295 CLATRONIC
User questions about BS 1295 CLATRONIC
0 question about this device. Answer the ones you know or ask your own.
Ask a new question about this device
Download the instructions for your Vacuum Cleaner in PDF format for free! Find your manual BS 1295 - CLATRONIC and take your electronic device back in hand. On this page are published all the documents necessary for the use of your device. BS 1295 by CLATRONIC.
USER MANUAL BS 1295 CLATRONIC
Thank you for selecting our product. We hope that you will enjoy use of the appliance.
Symbols in these Instructions for Use
Important information for your safety is specially marked. It is essential to comply with these instructions in order to avoid accidents and prevent damage to the machine:
WARNING:
This warns you of dangers to your health and indicates possible injury risks.
CAUTION:
This refers to possible hazards to the machine or other objects.
i NOTE:
This highlights tips and information.
General Notes
Read the operating instructions carefully before putting the appliance into operation and keep the instructions including the warranty, the receipt and, if possible, the box with the internal packing. If you give this device to other people, please also pass on the operating instructions.
- The appliance is designed exclusively for private use and for the envisaged purpose. This appliance is not fit for commercial use.
- Do not use the appliance outdoors. Keep it away from sources of heat, direct sunlight, humidity (never dip it into any liquid) and sharp edges. Do not use the appliance with wet hands. If the appliance is humid or wet, unplug it immediately.
- When cleaning or putting it away, switch off the appliance and always pull out the plug from the socket (pull the plug itself, not the lead) if the appliance is not being used and remove the attached accessories.
- Do not operate the machine without supervision. If you leave the room you should always turn the device off. Remove the plug from the socket.
- The device and the mains lead have to be checked regularly for signs of damage. If damage is found the device must not be used.
- Use only original spare parts.
- In order to ensure your children's safety, please keep all packaging (plastic bags, boxes, polystyrene etc.) out of their reach.
WARNING!
Do not allow small children to play with the foil. There is a danger of suffocation!
Special Safety Instructions for this appliance
- Do not try to repair the appliance on your own. Always contact an authorized technician. To avoid the exposure to danger, always have a faulty cable be replaced only by the manufacturer, by our customer service or by a qualified person and with a cable of the same type.
- This appliance can be used by children aged from 8 years and above and persons with reduced physical, sensory or mental capabilities or lack of experience and knowledge if they have been given supervision or instruction concerning use of the appliance in a safe way and understand the hazards involved.
Children shall not play with the appliance. -
Cleaning and user maintenance shall not be made by children without supervision.
-
Do not suck up liquids!
- Do not suck up hot ashes or pointed or sharp objects!
- Do not use the device in damp rooms!
- Never use without the filter. Check that the filter is inserted correctly!
- Hair, clothing and body parts away from the vacuum nozzle during use!
- Keep the vacuum cleaner away from sources of heat like radiators, ovens, etc.!
Overview of the Components
1 Air slide
2 Telescopic suction pipe
3 Holder for accessories and hook for stowage clip on the bottom of the device
4 Slide for telescopic suction pipe
5 Floor nozzle (with hook (not shown))
6 Lever for extending and retracting the brushes
7 Power cord with plug
8 Cable-winding button
9 Stowage clip
10 On/Off button and suction power control
11 Cover for extraction filter
12 Dust bag filling display
13 Connection head of the vacuum hose
14 Hose connection
15 Opener dust bag compartment
16 Suction hose
Rear side of the device (not shown):
Storage compartment with dual accessory (combined crevice and brush nozzle)
Start-up
- Insert the connection head of the suction hose into the hose connector until it locks in place. To do so, please press the buttons simultaneously. In order to release the hose again, please press the buttons once more on the connection head.
- Keep the buttons pressed down and then pull out the hose.
- Insert the vacuum tube into the handle if required.
- Then assemble the floor nozzle and/or the accessories.
Nozzle Attachment
Floor nozzle (5)
The floor nozzle features castors for easier movement
You can clean smooth surfaces and carpets with the floor nozzle.
- Adjust the brushes outwards or inwards using the lever (6). Best use of the appliance depends on the texture of the floor covering. We recommend the following use:
Use without brushes: For vacuuming floor coverings with a deep pile
Use with brushes: For vacuuming smooth floors and carpets with a shallow pile
Crevice and jointed nozzle
For vacuuming upholstery, curtains and in corners and crevices etc.
The stowage compartment with the crevice nozzle and brush nozzle can be found on the back of the appliance next to the mains cord.
NOTE: "2-in-1" nozzle:
When this is folded together it can be used as a groove nozzle. If you would like to use the brush nozzle, pull the brush section in the direction of the arrow until it locks in place.
To detach the nozzle attachments from the suction pipe, pull them off by turning them slightly.
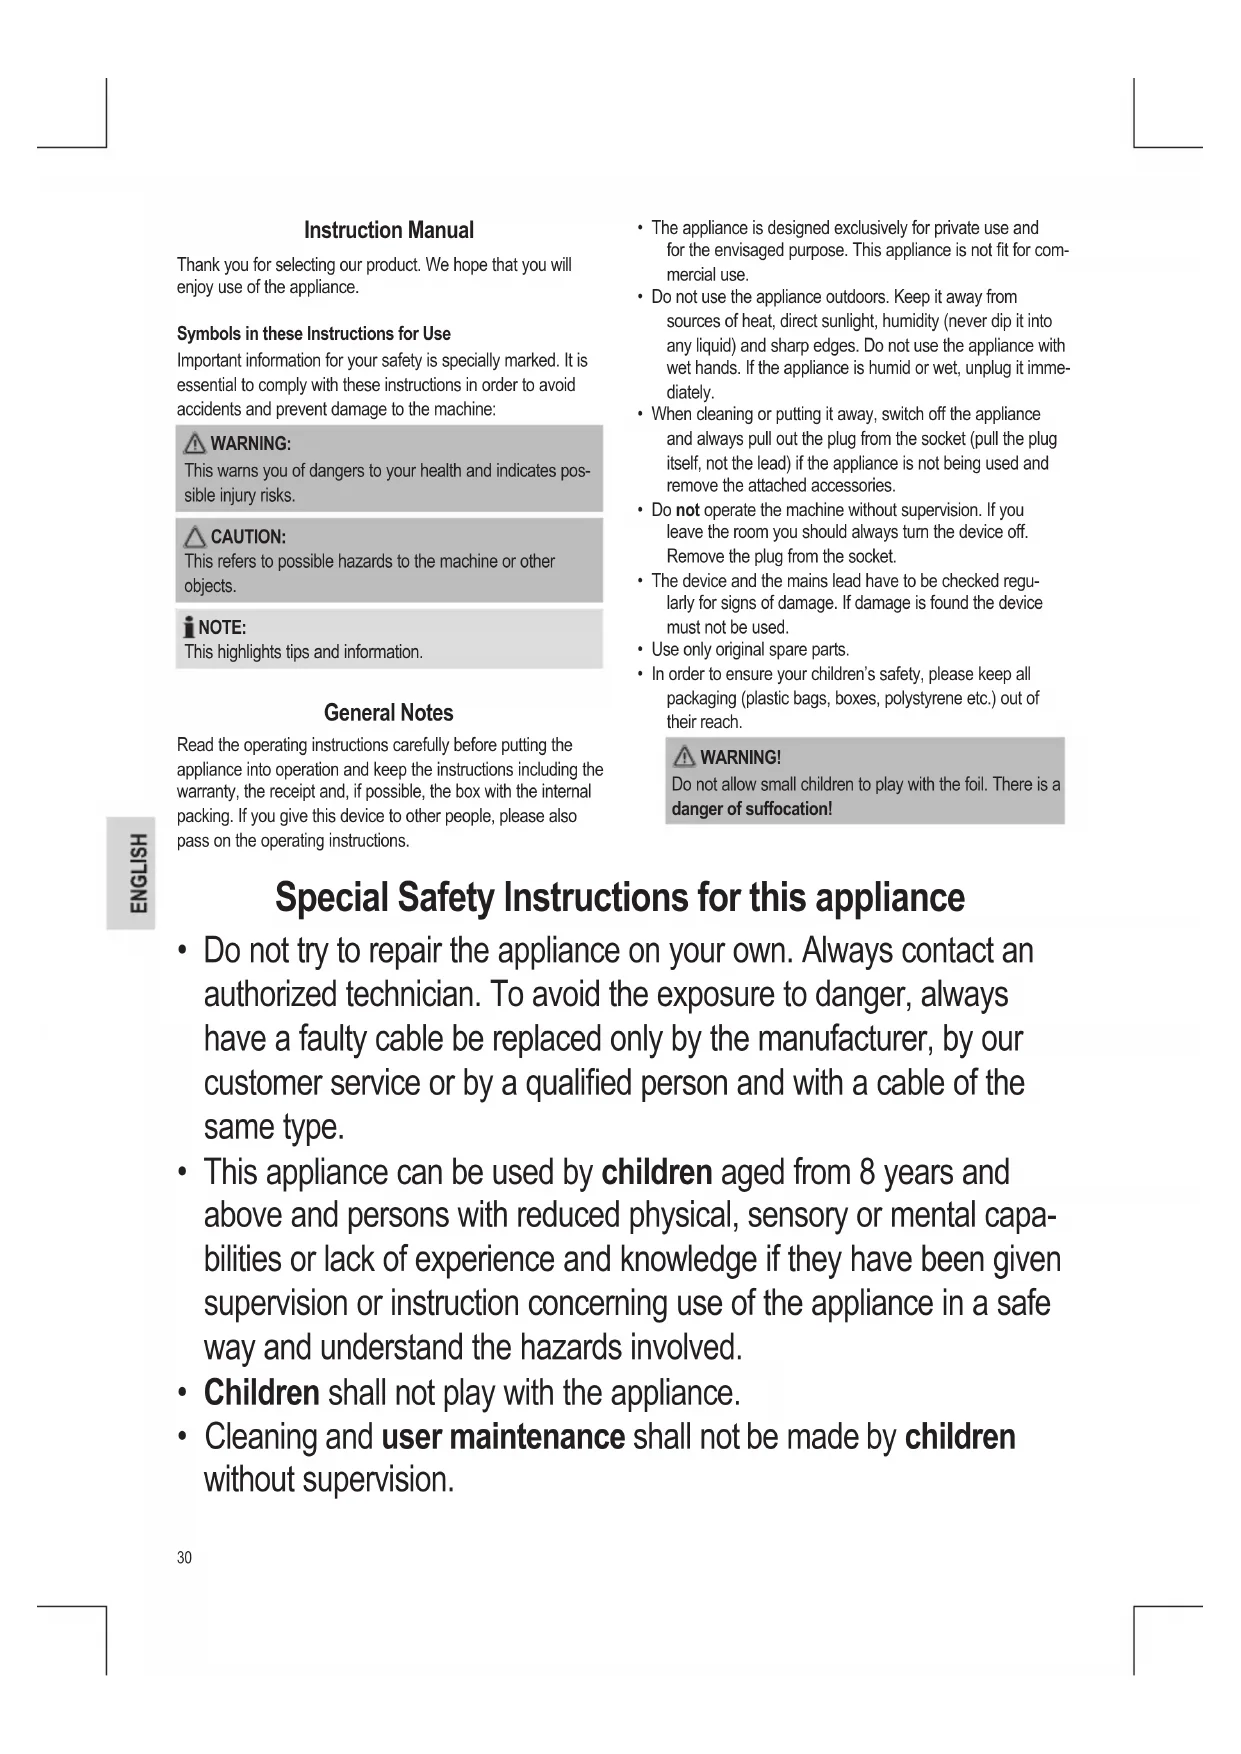
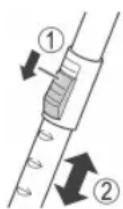
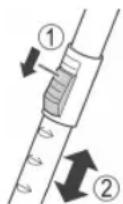
Telescopic suction pipe
The length of the telescopic suction pipe can be adjusted individually:
- Loosen the locking mechanism by sliding and holding the button (4) in the direction of the arrow marking.
- Extract one tube from the other to the desired length.
- Release the button in order to lock the connection.
Mains cable
Pull the mains cable from the cable compartment.

CAUTION:
- Pull out the cable up to the maximum length indicated with the yellow mark.
- Never pull the cable out up to the red mark as the cable winding can be damaged.

NOTE:
If the red mark is visible, pull in the cable with the help of the cable winding button back to the yellow mark.
Electrical connection
- Before connecting the plug to the wall socket, check whether the mains voltage is correct. Refer to the information on the rating plate of the device.
- Connect the device to a certified wall socket only.
On/Off button, combined with suction power control (10)
Press:
Press the button to turn the device on or off.
Rotate:
Turn the suction power control clockwise if you want to increase the suction power.
Low suction power: for curtains, sensitive material.
Moderate suction power: for deep pile velour carpets and textile floor covering.
High suction power: for robust carpets and floors.
Using the Appliance
- Insert the mains plug into a correctly installed power socket.
- Turn the device on by the on/off switch by pressing down the button.
- Set the "carpet/hard floor" switch, depending on the floor covering.
- Adjust the suction power with the suction power control.
- Vacuum at a steady speed. There is no need to exert pressure.
NOTE:
Pay attention to the range that can be covered with the cable length!
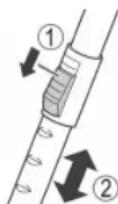
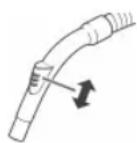
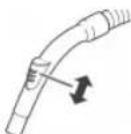
Air Slide (1)
Open the air slide on the hose handle in order to regulate the airflow or to clear any particles sticking to the nozzle.
Switching off and Winding up the Mains Lead
- Turn the vacuum cleaner off by the on/off switch and remove the plug from the socket.
- Keep the plug in your hand.
- Press the cable winding button and guide the cable. Hold the cable to avoid wrapping.
Maintenance
Dust bag replacement display (12)
Hold the hose up into air. If the display for the vacuum bag change shows "red", the dust bag is full. Please change it.
Changing the dust bag
- Pull the plug out of the socket.
- Use the opener (15) to open the lid of the dust bag compartment.
NOTE:
The lid can be locked in upright position. Do not push the lid beyond the locking mechanism! Otherwise the mounting could break away.
- Flip the holder of the dust bag open.
- Then remove the dust bag by pulling it upwards.
- Insert a new bag. Please ensure that the bag is located correctly in the guide mechanism.
- Press down the fastener with the bag. The bag must be located completely in the dust bag compartment. Close the cover so that it snaps into place.
Filter
Your appliance has two filters.
Motor protection filter (inlet filter)
The inlet filter is located in the dust bag compartment. The filter is located vertically in the rear section of the dust housing. Remove the filter by pulling upwards.
Cleaning the Filter Element
Clean the engine protection filter after 10 dust bag changes. If necessary, the filter can also be washed in warm water without any additives. Place it back into place only once it is completely dry!
Outlet filter (11)
The appliance is also equipped with an outlet filter.
It is located on the back of the device behind the cover.
- Press down the button on the cover to open it.
- Remove the cover.
- Remove the filter insert and clean it as described above.
- Once dried completely, reinstall the filter insert.
- Closing the cover: First position the cover on the bottom. Then press the button in order to lock the cover on the top.
Cleaning
WARNING:
- Before cleaning remove the mains lead from the socket.
- Under no circumstances should you immerse the device in water for cleaning purposes. Otherwise this might result in an electric shock or fire.
CAUTION:
- Do not use a wire brush or any abrasive items.
- Do not use any acidic or abrasive detergents.
Clean the housing with a soft, dry cloth without additives.
Storage
- Let the device cool down completely.
- Wind the cable completely.
- Please insert the hook of the floor nozzle into the parking assistant on the rear of the device.
- If you want to stand the appliance vertically: Attach the hook of the holder (3) to the stowage clip on the bottom of the device.
Troubleshooting
The Device Does Not Work.
Remedy:
Check the connection to the mains.
The device does not suck up anything.
Possible Cause:
The suction power is set too low.
Remedy:
Check the position of the control.
Possible Cause:
The dust bag is full.
Remedy:
Renew the dust bag.
or
Possible Cause:
The filters are dirty.
Remedy:
Clean the components.
Possible Cause:
There is a foreign body in the suction tube or the nozzle.
Remedy:
Check the accessories for foreign bodies.
Technical Data
Model: BS 1295
Power supply: 220-240 V ~, 50/60 Hz
Protection class:
Net weight: 4.7 kg
Dust filter bag: SSB 101 / Swirl® Y 05®
Swirl®, Y 05® is a registered trademark of a company of the Melitta Group which is not associated with the company Clatronic International GmbH.
The right to make technical and design modifications in the course of continuous product development remains reserved.
Technical Data for vacuum cleaners
COMMISSION DELEGATED REGULATION (EU) Nr. 665/2013
| Trade mark Clatronic | ||
| Model BS 1295 | ||
| Energy efficiency class1) | A | |
| energy consumption | ||
| annual energy consumption2) | kWh/year | 26.6 |
| Cleaning performance class | ||
| Carpet cleaning performance class | F | |
| Hard floor cleaning performance class | B | |
| Dust re-emission class F | ||
| Sound power level dB(A) re1pW | 82.0 | |
| Rated input power W 800 |
1) A (highest efficiency) to G (lowest efficiency).
2) Indicative annual energy consumption (kWh per year), based on 50 cleaning tasks.
Actual annual energy consumption will depend on how the appliance is used.
The device meets the European standards and directives in the current version at delivery:
Low Voltage Directive (LVD) 2006/95/EC
Electromagnetic Compatibility (EMC) Legislation Directive 2004/108/EC
RoHS-directive 2011/65/EU
Ecodesign-directive (ErP) 2009/125/EC
- Ecodesign requirements for vacuum cleaners COMMISSION REGULATION (EU) No 666/2013
Disposal
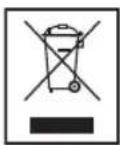
Meaning of the "Dustbin" Symbol
Protect our environment: do not dispose of electrical equipment in the domestic waste.
Please return any electrical equipment that you will no longer use to the collection points provided for their disposal.
This helps avoid the potential effects of incorrect disposal on the environment and human health.
This will contribute to the recycling and other forms of reutilisation of electrical and electronic equipment.
Information concerning where the equipment can be disposed of can be obtained from your local authority.
Instrukcja obstugi
CTC Clatronic Sp. z o.o
HacdaKdIy nIiNOrMaE KOniuaTka, kI noJIerWuyOyB II nepeCyBaHH.
BukopocToByHte HacaIky dny niDnOrn, 06 np6upatn pIBHI NOBepxHi Ta KINIMM.
Btaryte Ta Btaryte uTk 3a donomoroBaxen (6).
Cnoci6 BnKOpNCaHHN npnnaNy 3aJIeKHTb BiD TEKCTpyn Ha-nilbHOro NOKpTTra. Mn peKOMeHnycMo Taki CnOcoBn BnKOpNCaHHN:
Bes 3acctocybaHHH uHTK:
Длгпбираннг HaninbHnx nokpntb i3 DoBmM BOPCOM
BaHHM JITK
Дяприбираня рibнix niДNor Ta KINIMiB i3 KopoTКIM BOPCOM
Pn3haeTbca DnM'Knx Me6IIB, TOp, KytB, IJINH Ta iHworo.
BiDcIK DnIPO3MIUeHHN UINHHOi HAcAKn i HAcAKn 3i UITKoH Opo3aIOBAHNI B 3aHi NuaCTnHi npNCPTO 3a Ka6eNem XNBHeHH.
I P N M I T K A. Conno "2 B 1":
BCKnAedeHOMByBnIJIeCOnIO MoXHa BnKOpNCaTaN DnY nCTKn ⅢJINH. RaIc BoAM NotpIbHa cyHKUJy ⅢJTK,NotrHiTB3aIcDeTaN B HApPmKy cTpiKn Do yNpy (nOKn He no-yyeTe KnaauHn).
I06 BiD'edHATn npuHaJn HacaKn BiD Tpyb, CTaHITb Ioro, 3JeKApnoBepTaOuN.
TeleckoniuHa BCMOKTyBaIbHa Tpy6a
IOBxHny TeNeckoNiuHOI BCMOKTyBaIbHOI Tpy6n MoKHa BiDpeyHOBaTN 3a BNachHMN Notpe6amn:
- BldnycttB pfikcatop, 3cyHywn Ta ytpmmyoH KNOpky (4) 3a CtpiKIOU.
- BucyhThe BHytpiHIO Tpy6y 30BHIHbOHa Notpi6Hy DOBxNHy.
- BiDnyctitb KhoIky, 106 3aΦiKcyBaTn 3'EDHaHHa.
Ka6eJb JxNBeHnHa
BntnHtib ka6eJIb JxNBeHHa 3 BiDcIKy dIra Ka6eJIIO.
YBAGA.
-03BONRAETbCBAITryBaTnKa6eJIbeEneKtpuHoiMepexi MaKcImaJIbHO Do KOBJTOI NO3HaKN.
3abopohraTbCBAITyBaTN KaBEnI Do cepBOHOI NO-3Nauch -Ce MOKe NOLIKODHTN CNTeMy 3MOYBaHHa KaBenl!
ППИМITКА.
Ku Bo NnobaynuepBOHy no3HaKy,HaTNCHTb Kna-BiI Dn 3MOyBaHHKaBEnIO IBaHITb NOro Do KOBTOI NO3Ha- KN.
Iiuc npaui 3eepaTe yBary Ha doBxHy Ka6eio I He nepeBnuyte 6e3neuHy dny npinay BiDCTahb!
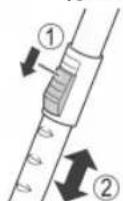
3acnlnka nna nobitrpa(1)
BikpnTe 3acnHKy nIIO nobITpaHa pyuIu nnHry, uO6 biPeryIOBATn nobITpA 60 BuAnHTn npEpmETn 3 conna.
BmKahn i 3moTyBaHn Ka6eHIO
- BmKHiTb NINOCOC HATNCKyBaHHM NEpeMnKaa DnB BMnKAHHBmMnKaHHBNTRHiTb BNkY 3 pOeTKI.
- TpimaiTe Bnky Bpyci.
- HatncHtB KnabiIg IJI 3MOyBaHHa Ka6eHIO i npITPMuYte Ka6eHb, 106 3a6e3neHTn HadiHne i 6e3neHHe 3MOyBaHHa
TexhuiHn doJra
CnHn 3mHn MiKy dnc mittra (12)
TpmaTe 7nAnr 6e3 Hanyu y nobItpi. KaNo 03NaHc 3aMIn Mua Ka cTaE YepBOHO, Miok dIy NnTy NobHm. Ioro cnId HeraiHo 3aMiHtN.
3aMiHa MiIky dIy CMITT
-
BntarHItb BnJiky i3 pO3eTkn.
-
3a donomoroCnCTem BiDkPmbHHa (15) BiDkPmTe BiCiK DnMIka DnI Nny.
ITPIMITKA.
KpiuKy MoxHa 3a#ikcyBaTN B BepTKaJIbHOMy noIIOXeHHi. He ITOBxaIte KpuiKy dani BiD nOIOKeHHa #kCaTopa! Ihakwe Moke 3naMaTcNc KpInneHH.
- BiiKpnIte TpImaH MiHaKn IINy, BiXnINBUn Noro.
- BntarHittb miUOK y HanpRmky "yBepx".
- 3amihb miok Ha HOBNI, pnuOmy cIiD peteIbHO BCTABJNTN IORO B KpInneHHa.
- Hatncitb KpilneHH 3 naKetom BnH. NaKet Mae 3haxoDITNC NOBHCIOY bIDINKy NINOCoca. 3akpiTe Kpniky RaNka i nepeKoHaItec B TOMy, IO BIn 3aKpNTm Do ynpOy (knaaHnH).
Φinbtp
Bau ninnocmae DBA qinbtpn.
Φinbmp 3axucmy Momopy (xiaHui φinbmp)
Φinbtp DnBxHOro Nobitp Bn 3HaIeTe B ruiKy, De 3aXoDntbc MiWok DnA CmTT. Ioro 3akpinHe B 3aHn CTHU Koprnyc BeptkaJIbHo. BuTnHiB φinbtp yBepx.
OuueenHn Eknaduuy fInbmpy
ΦinbTp dπa 3axcTy MOTOpy cnid Ochunatn nicra np6n3Ho DecTn 3mH mikky dπa cmTT. RaKuo BIn 3abpydneHni, Ioro cnI nponolickyBatn BVenri BoDj be3 doabAeHHMaIOuHX 3acobib.BctabnaTe φinbTp tiBkn nicra toro, kBn NobhicTTO BvCOxHe!
Φinbp dπeuxidno noimpr (11)
Пиюсoc Мае сьлгдя ВixidHOro nobitpr.
Bin po3taoobaHn nD kpiuKOIO Ha 3aDii NOBepxHi np-CTpoI.
- Hatncitb KhoNky Ha KpMUsi, i BOHa BiKpnTeBcra.
- BmIMtB kPmIky.
- BnIMtB pfInbTp i nOuHCTiB NOrO y cnOci6, HabeHeHn BNJIe.
- TIOBHCIO BNCUINBUNIΦJIbTpyBaIbHn eIeMeHT, BCTaBTe II HA MICue.
- 3akpnTTKpNIuKn: CnoaTky BkIaIitb y rHizdo HNxHIO qactNHy KpNIuKn, a NOTIM HaTNCiBt b KHONy, uO6 3aΦikCyBatn BepXHIO qACTNHy KpNIuKn.
UH

PONEPEIXEHHY.
- Перацьим захди витасу Te Bnky 3 po3eTKI eJIeKTPo-Mepexi.
3a6bopohraetbcra onyckatn npnaad dny ouhneHHB BODy. LcEmoKe cTaTn npuHIO eJeKtpuHoro cTpymy a6o noxeki.

YBAGA.
He BnKOpNCTOByTe DpoTHi a6o iHsi npeDmetn, 10 dpraIb.
- He BnKOpNCTOByIte CnIbHODiIOHi a6o a6pa3NBHi 3ac06n OUYIeHHJ.
Kopnyc cnid OunuByaM'koH, cyxio TKaHHIO 6e3 doDatKObIX 3ac06iB.
36epiraHHa
JaTe NIOOCOC MyoKINBicTB OCTTN DO HOpMaJIbHOI TEMpepatpN.
-Повсichtо Вягніть Кабель В корпс 3а Доломою НAMOTyBaHy.
- Tayok conna Ha dHni ci cnid nobicntn Ha npinadj Ha 3a-dnhi cstopoH npinady.
- JIkuo NtpiBHO BCTAHOBHTN pInctpiB VertkaJIbHO:
BCTABTe rak TpIMaHa (3) y 3aTnckau DnIg 36epirAHn, po3-taUOBAHy HNkHJyacTHNI npCTPOHO.
UcyHeHH HeNoJaOK
IJIa OTCOEINHHeN KOHcEBbIX HacaDOK OT BCacbIBaIOUeero NaTpy6ka Heo6xOdmo IX CnEKA NOBepTbBaTb.
Teneckonnuecka BcacbBaioua Tpy6a
IMeETcB03MOXHOCTbpeynpOBKnIINHbTeNECKONUeCKO BCAcbIBaIOUeTpy6bI:
1.CdBnHbTe B HnpaBHeHm CtpEknUydepKuBaIte NOn3yHok (4),YTo6blOTKJIOHTb MExAHNIm 6IoKIpOBKn.
2. BbIDBnHbTe Tpy6y Ha Tpe6yemoe paccTOrHHe.
3. OTnyCTnTE nOJ3yHOK, YTO6bI 3aФNKCuPOBaTb Tpy6y.
UHyp 3JektponntaHn
BbITaHHTe 3Hyp 3JIeKTPoPNTAHnI 3OTcKa dIy shHypa.
BHIMAHINE:
- BbTacknBaIte UHyp TOnbKO Do MAKcMaIbHOJ DNINHbI, yka3aHHoJ XeTTOJ MeTKoJ.
- He ByITaRnBaIte Ka6eNb DaIbIe KpaChO MTeKn, HNaUae MOxH0 NOBpeDnTb yCTpOInCTBO CBopaYBaHnA IUnHypa.
IINPMMEAHNAI:
EcnBnHa KpaCha MeTka, BdBnHbTe HHyp BHyTp b c NOMOJIHO KHONK CBopaunBaHna WHyp BnIOb Do JeNTOn METkN.
3Jektpnueeckoe noKIOHcHHe
- Papei noKIOHHeM BUNKcTeBoro UHpya B po3eTKy cETn 3NEKTPoNTaHn y6eDITecb, YTO HApRKeHne B cETn COOTBeTCTByET XapAKTEpNtIKam yCTpoNCTBA. CM. DaHHbIe Ha NaCnOPTHO TaJIuYke yCTpoNCTBA.
-Подкночаite yctpoicTBO TOIbko K cepTnФицрOBaHHoH NaCTeHHo pO3eTKe.
KhONka BkIIOUeHnE, O6bEiINHeHHa C peryrTOpOM MoHOCTH BCacBIBAHN (10)
Haxamue:
HaKMTe KhoNky, YTObI BKIOCHITb INBbIKIOCHITb yCTpoi-CTBO.
BpaueHue:
IobepHnTepeyIaTOpMOUHOCTNBCaCbIBAHnNoYacBOBc TcpeJIke,ECNN BbIXOTNE NOBbICITb MOUHOCTb BCaCbIBAHn.
MaNaMoUHocTbBCaBbAHnI:Длшт,чВСТВИТeьнБИМATEpuaNoB.
CpeHnra MOUHOCTb BCaCBIBAHNIA: IINBENIOPOBbIX KOIBPOB C BbICOKM BOPCOM INIOLOBbIX DOPOXKe HA TEKCTNJbHOJ OCHOBe.
- BbICOKa MOUHOCb BCaCbIbAHNIA DnI rpy6bIX KOBPOB IN NOJIOB.
IcnoJIb3OBAHnE npnbopa
- BCTaBtBe BnIKy 3JIeKTPoINTaHnB I npabINbHO yCTaHOB-NeHHyO 3JIeKTPuYeCKyO p03ETy.
- BkIIOHTe ycTPOINCTBO npeeknOHaTeIeM BkN/BlKn, HaxaBero KHOIIky.
-
YctaHOBITE nepeKIOUATEJIb "KOBeP/NOI" B 3aBcIMOCTNOT MecTa OYNCNTN.
-
PerynpyTe MoUHocTb BCaCbIbAHNc NOMOu bIO peryIaTOPa MOUHOCTH BCaCbIBAHN.
- IpoBODHTy CnoCTOHHo CKOpocTbHO.He Tpe6yeTc npnlaratb 3HaHTeJIbHOrO yCINIA.
IIPIMMEyAHNA:
O6paTnTE BHNMaHHe Ha paCCToHHe, KOtOpoe oBeCne- YBaTeCdnnHou shypa!
BeryHok Bo3dyxa (1)
OTkpOte6eryHok BO3dyxa Ha pyyke ⅢaHa, cyObI perynipoBaT NOtOK BO3dyxa HIN ydaNITb PnpDMeTb, npnInuNe K HacaKe.

BbIKIOHHe N CBOPaUNBaHne 3NepTPONTAHn
- BbIKHIOHTe nbIEcOC nepeKIIIOUaTEJIEM BKN/BBIKI IN 3-BNEKNTE BNJIKY IN 3 JNEKTPIUeCKOIN PO3ETKN.
2.Дергимп Вишив pykax. - HaxMMTE KONky CBopauMBAHnI SHypa I HappaBnIe TshHyp B nbilecoc. DepxMe shy pyKaMn I He dOnyckaTe 6bpa3OBAHne neTeb.
06cnykmbaHne
OKHO 3aMeHbI MeuKa dny nbun (12)
Держinteшалг,He npiximamK nony.EcIn BOKHE 3amehbl MeWka nbItecoca BnHa KpaChaMeTKa,3HaHT MeWOK noJIOH. Poxayynta,3ameHnte erO.
3aMeHa MeIka IJIy IIbII
- ɪnʒaɪnʌkɪte Bɪŋkɪy nɪ pɔːtɪkɪ.
2.Испьзугу (15),чтобл окрытб кршу OTceka MEшka dny nbiIN.
IIPIMMEAHNAH:
KpbIuKy MoXHO 3aФmKcnpOBaTb B OTKpbITOM NIOJKeHn. He pnxHMaIte KpbIuKy B 3aKpBtOM NIOJKeHn! HNaHe MOKHO CnOMaTb ee KpenneHne.
3.ПepeBepHnTe DepeKaTeIb MeuKa IJIЯ Пbln B OTKpbItoe nIOJXKeHne.
4. 3aTeM N3BLeKIne MeWOk DnIy TbIIN, BbITaUH Ero BBepX.
5.BCTaBbTe HOBBI MEuO.K. IOnKaIyIcTa, oBeCneYbTe npabInbHoe nIOJKeHHe MEuKa B HnPaBJIooX.
6. HaxMMTE BHN3 KpENHHe MEuKa. MeWOK DOnJKeH 6bITb NOHOCtBcB CBOeM OTCKe. 3aKpoTe KpbIuKy Do 3aUeJIKNBaHnHa MeCTe.
ΦnJIbTp
Pnp6op nmeet Dba pfNtpra.
Φunbmp 3aumbl Momopaa (enyckhofΦunbmp)
BnyckHOHnIbTp HaxoDHTcB OTCKe MeuKa IJIa NII. 3TOTnIbTp paCNOIOXe BepTKKaIbHo B 3aDHe YactN KOpTyCa IJIa MEuKa IJIa NII. IVBLeKNTe FInbTp, BBITAUINB erO BBepx.
OucmcKa KOMnoHeHmoe punbmpa
OuuaTe pnt 3aunTbI MOTOPa nocne kackdbix 10 aMeH Meuka dIy PbIN. Pn Heo6xOAnMoCTN, pInIbTp MOXHO npomblB T eIIOB Bode 6e3 PnIMeHHeN HcTReAUX CpeCDTB. YctahOBtE pInbTp o6paTHO TObKO nocne nONHO BbcIbxaHnI!
Bbmyckhou qunbmp (11)
Pnp6op TaKe He Meet BbIpyckHO pNtBp.
PnBtp paCnoOKeH Ha 3aDHe NaneHIn yCTpoiCTBa nO, KpbIkwKo.
- TTo6bI OTkpbItb KpbIiKky, HaxMnTe paCnoIoxKeHHyIO Ha Hei KhoNkY.
- CHIMMTE KpbliKy.
- CHIMITE ΦπιβTpуOμIyU BCTaBky N OuNCTITe ee, KaK paCCMOTpeHO BbIe.
4.ПОПИСТБИЗ ВИCYSUITEФИЛТРУОДУВCTABКИСCHOBAYCTAHOBITE eeByCTPOICTBO. - 3aKpbItne KpbIuKn: Chayana ycTaHOBITE KpbIuKy CHN3y. 3aTeM HaxMtTE KHONKY, YTO6bI 3aΦNKCuPObaTb BepXHIOO HaCTb KpbIuKN.
UncTka
I P E D U N P E X D E H N E:
- Перацткои n3BneKNTe BnIKy n3 po3etkn.
- Hn npi kaKnx o6cToIeJIbCTBax He donyckaIte norgyKeHny yCTpoIcTBA B BODy C cIbIIO OuNcTK. IHaue BO3MOxJeuYdap 3JIeKTPnueCKm TOKOM IIN BO3rOpaHne.
BHIMAHINE:
He npimehnTe npoBOnuHyU uetky nIn a6pa3nBhie maternbl.
He nCnoIb3ayTe KNCIObTI NnN a6pa3NBbIe YnCTaIIne cpeIcTBA.
OuHCTIte KOpNc MmKoM cyXoTkAhb6e3 YnCTaIcx CpeDCTB.
XpaHeHne
- 06ecneyte nonHoe octbIbAHne yctpoIcTBA.
-Полноctьс CBepHnTe shyp. - PtoKanyIcTa, BCTaBbTe KpOK HacaDn Dn PA Na HbI CToyn npxpaHemn Ha 3aDne CTOpOHe yCtpoiCTBa.
EcnHyxHO NoCTaBnTB nbIeoc BepTKaJIbHO:BCTaBBTe KpOK Ha depKataene (3) B 3axIM dIg KpenneHnHa 3aDHe nAeHn ycTPOcTBA.
DnarHocTnka
- YCTPOINCTBO He pa6oTaET.
YcmpaHeHue:
IpoBepbTe IOpKJIeHHeN K cETn 3JIeKTPoNTaHn.
- YCTPOINCTBO HE BCACbIBaET.
Bozmokhna npuyuHa:
UCTAHOBJIeHa CImUKOM MaJnA MOUHOCb BCaCbIbAHN.
YcmpaHeHue:
PpOBeBpe nIOJoxHeHpepyIaTopa.
Bozmokhna npuyuHa:
3anJHHeM MeWok nIy nbIi.
YcmpaHeHue:
3aMeHHTe MeWOKIIN.
N
Bozmoxhna npuyuHa:
Pra3HbIeΦnltpa.
YcmpaHHeue:
OuICTe 3TN KOMIOHENTbl.
Bozmoxhna npuHa:
IocToPOHHn IpeDMeT HaxoDITcB BO BCaCbIBaHcUeI Tpy6e nIN B HacaKe.
YcmpaHeHue:
PpOBepbTe 3TN pINHaIeXHocTn Ha NoCTOpOHHe npEd-Metbl.
TexHnueckne daHHbIe
Modenb: BS 1295
3NeKtponItaHHe: 220-240 B~,50/60 T
Klacc 3aunrbl:
Bec 6e3 yIaKOBKn: 4,7 K
Mewok dny nbini: SSB 101 / Swirl Y 假 Y 058
Swirl®, Y 05®ялгета зерпсгювьим Товарьим 3нakом компани Melitta Group, КOTОТЯ He CBЯЗАСКOMпаньй Clatronic International GmbH.
CoxpaHcHo npaBo Ha TexNueckne N KOHCTpyKUOnHOHbIe N3-MeHeHHB B pAMkAx npoDnKaioUeCp a3pa60TK npOdyKTA.
TexHueckne XapakTeprncTnKn nbJnecoca
JEJIENPOBAHHbI PEJIAMEHT KOMNCCNN (EC) No 665/2013
(LVD) 2006/95/EC aaii iaiy
2004/108/EC 2011/65/EU 2009/125/EC
666/2013 6
AaS 10000000000000000000000000000000000000000
i 1
#
laalj jgndll
gall gill clnnae yin jil 1
jie-eiie
(3)Jolal Jl:
jiaJiaJia jia
jao gaoall cai jia jia jia jia jia jia jia jia jia jia jia jia jia jia jia jia jia jia jia jia jia jia jia jia jia jia jia jia jia jia jia jia jia jia jia jia jia jia jia jia jia jia
y
sall sll
jglz11 1
a a a a a a a a a a a a a a a a a a a
Jaii Jaii jilie baiy jaii 2
1 3
4
Jauaia 1 a Jaaia 1 a Jaaia 1 a Jaaia .4
aaii aiaaaie 5
:
Jlsll Jgab aai j Sany gail
(1) ( a + b) = 4 ②
jia: jia gao gao jia jia jia jia jia jia jia
a
A. solly, 1
4g 1
JyI /JyIJI JIJI 1
.
.2
aillil 1sll lssl al. aegg jll jie baii .3
A
(12)
aikai jai jai jai jai jai jai jai jai jai jai jai jai jai jai jai jai jai jai jai jai jai jai jai jai jai jai jai jai jai jai jai jai jai jai jai jai jai jai jai jai jai jai jai jai jai jai jai jai jai
.0000 1
i
:
J 1
a1 = 2,an + 1 = 2( 3n + 1) ( 3n + 2)
.
Jaaia kkiy jkaii jaii jaii jaii jai
jll baiall Jia jaiai 1
.
Jgall jai 4
.3
J
a_b = 70.
i j j 15 15 15 15 15 15 15
y
aai jaiy jaiy jaiy jaiy jaiy jaiy jaiy jaiy jaiy jaiy jaiy jaiy jaiy jaiy jaiy jaiy jaiy jaiy jaiy jaiy jaiy jaiy jaiy jaiy jaiy jaiy jaiy jaiy jaiy jaiy jaiy jaiy jaiy jaiy
j 1
(10)
biol
aaii iai jj jai jai jil jil
Cllgall aale o jbi
1
2
j 3
4
() 5
7
j8
jzai 9
J 10
11
12
13
14
Juaa oJaa 15
Jaua 16
:()
a 1
#
j 10000000000000000000000000000000000000000000000000000000000000000
a
Layclally bai, jall Jia Jia liy Jia lai 1
S gll qall sol 1, plll jall jialll
g yjrls jall iac laiie jilll
jglglaall aalll alal
J 10000000000000000000000000000000000000000000000000000000000000000000000000000000
GARANTIEKARTE
warranty card - garantiekaart - carte de garantie - scheda di garanzia - tarjeta de garantia - cartao de garantia - garantikort - karta gwarancyjna - zarucni list - kartica jamstva - carte de garantie - fapaunonha Kapta - zarucny list - garancijski list - garanciajegy - rapaHTHnHOpMynap - rapaHTNnHbTanoH -
BS 1295
24 Monate Garantie gemäß Garantieerklungung 24 months warranty according to warranty declaration - 24 maanden garantie volgens garantieverklungung 24 mois de garantie selon la déclaration de garantie - 24 mesi de garanzia secondo la dichiarazione di garanzia - 24 meses de garantia de acuwordo con la déclaration de garantia - 24 meses de garantia, de accordo con a déclaration de garantia - 24 ménedes garanti i hencholdit garantibeteingelsene - 24 misiace gwarancji na podstawie owiadzenia gwarancjynego - zaruka 24 mescic podle prohlasi et zaruka - 24 mesezno jamstvo u skladi s'amstvenon déclaracion - 24 luni garantie conform déclaratie de garantie - 24 meceza rapaniu B cboTcTBeV C rapaunHnHaTe kapaanu - 24 mezacna zarana zarauka podla vhyalasieno z aruka - 24 mezeena garcianca, skladino z garancjsko izavo - 24 honap garancia a garancaifelteteleken leirtak szerit - rapaHTNHa Na 24 Mecui jBINOIOIBA SAHI npa ranHIO - 24 meCRIA corNAcho ZARHNHbIM RAPANTINHMnpaRnAM-
Kaufdatum, Handlsterpmel, Unterschrift - date of purchase, dealer stamp, signature - aankoo-datum, dealerstemp, handekingtem - dace dacha, timpon du concessionaire, signature - data acquisito, timbo del rivenitore, firma - fecha de compra, seile del distribuidor, firma - pice de compra, camro do distribuidor, asistnatura - kipjedtate, forhandemisterpmel, signature - data zakupu, pieze zpradewcny, p-odpi - datum zakupeni, zinkhe produce, podop - datum kapovne, zig trovca, potip - data de azchite, stampia fumizuriol, semnaturia - Data na nikmna, Tepa - na PpOdaanai, Tognoz - datum nakpu, pehta ob-cho-dnka/ predajcu, podop - datum na nikmna, zig trovca, podop - variablc datuna, keresikedi belyegozie, alilas - dat npriobkanien, Tepa-ika npoDAanai, ngnoz - Data npoiopderenoei, Ekinam npoDanaia, Tognoz-

CiatRONICINTERNATIONAL GMBH
www.clatronic.com

- Symbols in these Instructions for Use
- WARNING:
- CAUTION:
- i NOTE:
- General Notes
- WARNING!
- Special Safety Instructions for this appliance
- Overview of the Components
- Rear side of the device (not shown):
- Start-up
- Nozzle Attachment
- Floor nozzle (5)
- Crevice and jointed nozzle
- Telescopic suction pipe
- Mains cable
- NOTE:
- Electrical connection
- On/Off button, combined with suction power control (10)
- Press:
- Rotate:
- Using the Appliance
- Air Slide (1)
- Switching off and Winding up the Mains Lead
- Maintenance
- Dust bag replacement display (12)
- Changing the dust bag
- Filter
- Motor protection filter (inlet filter)
- Outlet filter (11)
- Cleaning
- Storage
- Troubleshooting
- Technical Data
- The device meets the European standards and directives in the current version at delivery:
- Disposal
- Meaning of the "Dustbin" Symbol
- Instrukcja obstugi
- TeleckoniuHa BCMOKTyBaIbHa Tpy6a
- Ka6eJb JxNBeHnHa
- YBAGA.
- ППИМITКА.
- 3acnlnka nna nobitrpa(1)
- BmKahn i 3moTyBaHn Ka6eHIO
- TexhuiHn doJra
- CnHn 3mHn MiKy dnc mittra (12)
- 3aMiHa MiIky dIy CMITT
- ITPIMITKA.
- Φinbtp
- UH
- PONEPEIXEHHY.
- 36epiraHHa
- UcyHeHH HeNoJaOK
- Teneckonnuecka BcacbBaioua Tpy6a
- UHyp 3JektponntaHn
- BHIMAHINE:
- IINPMMEAHNAI:
- 3Jektpnueeckoe noKIOHcHHe
- KhONka BkIIOUeHnE, O6bEiINHeHHa C peryrTOpOM MoHOCTH BCacBIBAHN (10)
- BpaueHue:
- IcnoJIb3OBAHnE npnbopa
- IIPIMMEyAHNA:
- BeryHok Bo3dyxa (1)
- BbIKIOHHe N CBOPaUNBaHne 3NepTPONTAHn
- 06cnykmbaHne
- OKHO 3aMeHbI MeuKa dny nbun (12)
- 3aMeHa MeIka IJIy IIbII
- IIPIMMEAHNAH:
- ΦnJIbTp
- Φunbmp 3aumbl Momopaa (enyckhofΦunbmp)
- UncTka
- I P E D U N P E X D E H N E:
- XpaHeHne
- DnarHocTnka
- TexHnueckne daHHbIe
- #
- jglz11 1
- :
- A
- i
- :
- J
- a_b = 70.
- y
- j 1
- (10)
- biol
- Cllgall aale o jbi
- :()
- jglglaall aalll alal
- GARANTIEKARTE
- BS 1295
Brand : CLATRONIC
Model : BS 1295
Category : Vacuum Cleaner