TAC 3000 - Air purifier TROTEC - Free user manual and instructions
Find the device manual for free TAC 3000 TROTEC in PDF.



| Product type | Air Purifier |
| Brand | Trotec |
| Model | TAC 3000 |
| Dimensions (L x W x H) | 885 x 460 x 532 mm |
| Weight | 36 kg |
| Power supply | 230 V / 50-60 Hz, 2.8 A, 450 W |
| Max air flow (with G4+H13 filter) | 1150 m³/h |
| Sound level (at 1 m) | 65 dB(A) |
| Dust class | H (according to DIN 60335-2-69, TRGS 519) |
| Compatible filters | G4, F7, F9, E10-H14, M5-F9 bag filter |
| Filter configuration | Vario-Shift (pre-filter housing + main filter housing) |
| Air hose connection | DN 250 mm (suction and discharge) |
| Operating hours counter | Yes, integrated |
| Flow regulation | Continuous via rotary knob |
| Filter monitoring | Pressure sensors with indicator lights and audible alarm |
| Maintenance | Housing cleaning, visual inspection, filter replacement |
| Safety | Overvoltage protection, emergency stop, child safety instructions |
| Included accessories | Operating manual |
| Optional accessories | Filters, 7.6 m air hose, conductive casters |
| Storage temperature | Dry, protected from frost and heat |
Frequently Asked Questions - TAC 3000 TROTEC
User questions about TAC 3000 TROTEC
0 question about this device. Answer the ones you know or ask your own.
Ask a new question about this device
Download the instructions for your Air purifier in PDF format for free! Find your manual TAC 3000 - TROTEC and take your electronic device back in hand. On this page are published all the documents necessary for the use of your device. TAC 3000 by TROTEC.
USER MANUAL TAC 3000 TROTEC
Inhaltsverzeichnis
https://hub.trotec.com/?id=47617
Sicherheit
Version II - alternativ:
Inbetriebnahme
Table of contents
Information on the use of these instructions .... 2
Safety 2
Information about the device....4
Transport and storage....5
Assembly and start-up....6
Operation 11
Available accessories.... 12
Errors and faults.... 12
Maintenance 13
Disposal 14
Technical annex....15
EU Declaration of Conformity (original)...... 27
Information on the use of these instructions
Symbols

Danger
This signal word indicates a hazard with a high risk level which, if not avoided, will result in serious injury or death.

Warning
This signal word indicates a hazard with an average risk level which, if not avoided, can result in serious injury or death.

Warning of electrical voltage
This symbol indicates dangers to the life and health of persons due to electrical voltage.

Caution
This signal word indicates a hazard with a low risk level which, if not avoided, can result in minor or moderate injury.
Notice
This signal word indicates important information (e.g. material damage), but does not indicate hazards.

Info
Information marked with this symbol helps you to carry out your tasks quickly and safely.

Follow the manual
Information marked with this symbol indicates that the instructions must be observed.
You can download the current version of these instructions via the following link:

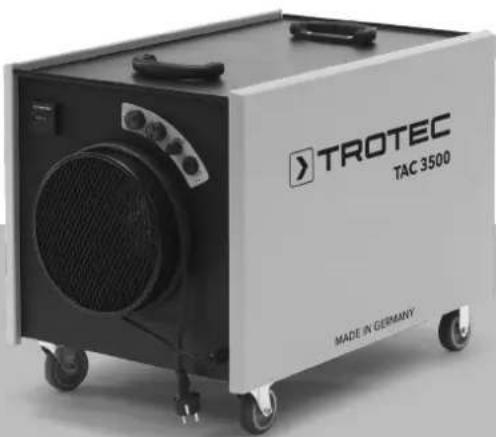
TAC 3500

https://hub.trotec.com/?id=47617
Safety
Read this manual carefully before starting or using the device. Always store the manual in the immediate vicinity of the device or its site of use.

Warning
Read all safety warnings and all instructions.
Failure to follow the warnings and instructions may result in electric shock, fire and/or serious injury.
Save all warnings and instructions for future reference.
This appliance can be used by children aged from 8 years and above and persons with reduced physical, sensory or mental capabilities or lack of experience and knowledge if they have been given supervision or instruction concerning use of the appliance in a safe way and understand the hazards involved.
Children shall not play with the appliance. Cleaning and user maintenance shall not be done by children without supervision.
- Do not use the device in potentially explosive rooms or areas and do not install it there.
- Do not use the device in an aggressive atmosphere.
- Place the device in an upright and stable position on a horizontal and stable surface.
- Let the device dry out after a wet clean. Do not operate it when wet.
- Do not use the device with wet or damp hands.
- Do not expose the device to directly squirting water.
- Never insert any objects or limbs into the device.
- Do not cover the device during operation.
- Do not sit on the device.
- This appliance is not a toy. Keep away from children and animals.
- Check accessories and connection parts for possible damage prior to every use of the device. Do not use any defective devices or device parts.
- Ensure that all electric cables outside of the device are protected from damage (e.g. caused by animals). Never use the device if electric cables or the power connection are damaged!
- The mains connection must correspond to the specifications in the Technical annex.
- Insert the mains plug into a properly fused mains socket.
- Observe the technical data when selecting extensions to the power cable. Completely unroll the extension cable. Avoid electrical overload.
- Before carrying out maintenance, care or repair work on the device, remove the mains plug from the mains socket. Hold onto the mains plug while doing so.
- Switch the device off and disconnect the power cable from the mains socket when the device is not in use.
- Do not under any circumstances use the device if you detect damages on the mains plug or power cable. If the supply cord is damaged, it must be replaced by a special cord or assembly available from the manufacturer or its service agent. Defective power cables pose a serious health risk!
- When positioning the device, observe the minimum distances from walls and other objects as well as the storage and operating conditions specified in the Technical annex.
- Make sure that the air inlet and outlet are not obstructed.
- Make sure that there are no loose items or dirt located in the immediate surroundings of air inlet and air outlet.
- Do not remove any safety signs, stickers or labels from the device. Keep all safety signs, stickers and labels in legible condition.
- Make sure that the suction side is kept free of dirt and loose objects.
- Dispose of replaced filters properly, especially after filtering substances hazardous to health.
- Never use the device as storage place or footstep.
Intended use
Only use the device to clean atmospheric air from non-conducting and non-combustible dusts, fogs or suspended matter whilst using the appropriate filter classes and adhering to the technical data.
The device is intended to be used in commercial areas.
Any use other than the intended use is regarded as misuse.
Reasonably foreseeable misuse
- Do not place the device on wet or flooded ground.
- Do not place any objects, e.g. clothing, on the device.
- Do not use outdoors.
- Do not use the device to siphon off vapours or fluids.
- Do not make any unauthorised modifications, alterations or structural changes to the device.
Personnel qualification
People who use this device must:
- have basic knowledge of how to safely handle electrical equipment.
- have read and understood the instructions, especially the Safety chapter.
Electrically skilled person
Electrically skilled personnel must be able to read and understand electric circuit diagrams, to put electrical systems into service and to maintain them, to wire control cabinets, to ensure the functionality of electrical components and to identify possible hazards from electrical and electronic systems.
Instructed person
Instructed persons have been informed of the tasks they were entrusted with as well as of potential hazards resulting from inappropriate behaviour. They are allowed to operate and transport the device and perform simple maintenance activities (cleaning the housing, cleaning the fan).
The device is to be maintained and looked after by instructed personnel.
Residual risks

Warning of electrical voltage
Work on the electrical components must only be carried out by an authorised specialist company!

Warning of electrical voltage
Before any work on the device, remove the mains plug from the mains socket!
Do not touch the mains plug with wet or damp hands. Hold onto the mains plug while pulling the power cable out of the mains socket.

Caution
Risk of injury from parts being whirled up! Before switching the device on, make sure that there are no loose parts (clothing, hair ...) located near the air inlet or outlet!
Notice
Observe the overvoltage protection.
The device comes equipped with an overvoltage protection. When checking for electrical safety, please bear in mind that the test voltage has to be reduced to 250 V.
Notice
Do not operate the device without an air filter inserted into the air inlet!
Without the air filter, the inside of the device will be heavily contaminated. This can reduce the performance and result in damage to the device.
Notice
Do not use abrasive cleaners or solvents to clean the device.
Behaviour in the event of an emergency
-
Switch the device off.
-
Disconnect the device from the mains by removing the mains plug from the socket. When doing so, be sure to hold the plug, not the cable.
-
Do not reconnect a defective device to the mains.
Information about the device
Device description
Air cleaners are used to filter the room air. On building sites and renovation areas high concentrations of dust can arise, for instance when using angle grinders or during blasting, chiselling or demolition operations as well as when mixing dry mortar or tile cement.
Depending on the inserted filter, the air cleaners of the TAC series serve to eliminate various dusts, e.g. from asbestos, building rubble, quartz, flour, wood, etc., but also mould spores, paint particles and mineral fibres in the air, possibly arising during the above-mentioned operations.
This dust is to be vacuumed off as close as possible to the point of origin in order to reduce the pollution of the breathing air to a minimum. Depending on the used filter quality it is permissible to employ the device for the separation of quartziferous mineral dusts, wood dust, lead-containing dusts, artificial mineral fibres or high-temperature fibres.
Application as vacuum generator for mould remediation and asbestos abatement is also a possibility. In case of other hazardous substances there are additional requirements; hence observe the corresponding Technical Rules for Hazardous Substances (TRGS) or the country-specific regulations.
The device is suited for:
• producing a vacuum in a room, e.g. in heavily contaminated spaces;
- air purification in workspaces via air circulation, e.g. indoor building sites, workshops etc.;
• producing overpressure in a room, e.g. cleanroom;
• supplying filtered fresh air.
The device is structured as follows:
• housing with stacking aid
• adjustable fan for air transport
• filter monitoring for air volume flow
The device may be equipped with various filters. It provides the user with the possibility of configuring both the filter quality and the filter chain arrangement for the respective field of application. The filters must be selected according to the area of application.
The device is approvable for asbestos abatement as per TRGS 519, dust class H.

Info
The filters are not included in the scope of delivery! Choose the filters according to the area of application from our filter range. Insert the selected filters prior to initial start-up.
Device depiction
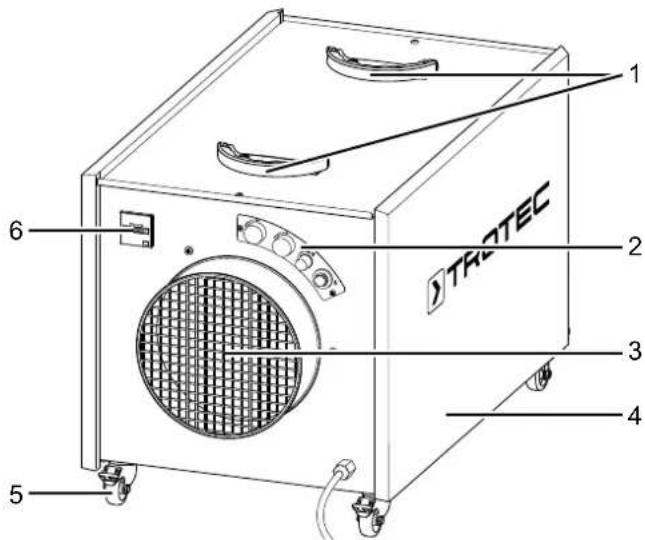
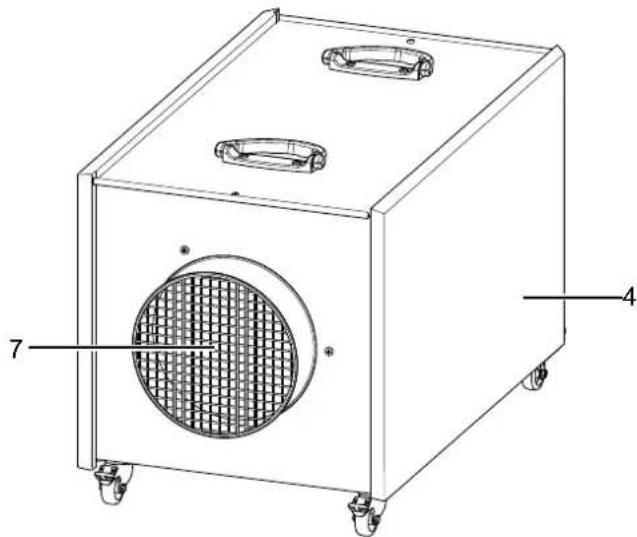
| No. Designation |
| 1 transport handles |
| 2 control panel |
| 3 air outlet opening |
| 4 side panel (service flap) |
| 5 wheel |
| 6 operating hours counter |
| 7 air inlet opening |
Transport and storage
Notice
If you store or transport the device improperly, the device may be damaged.
Note the information regarding transport and storage of the device.
Transport
Before transporting the device, observe the following:
• The device is switched off.
- The device is disconnected from the mains and the mains plug has been disconnected.
After transporting the device, proceed as follows:
- The device has been set up in an upright and stable position.
Storage
When the device is not being used, observe the following storage conditions:
- Store the device in a dry location and protected from frost and heat.
- Store the device in an upright position where it is protected from dust and direct sunlight.
- If required, use a cover to protect the device from invasive dust.
Assembly and start-up
Scope of delivery
- 1 x Device
- 1 x Manual
Unpacking the device

Warning
There is a danger of suffocation for children due to packaging material! Keep packaging films and parts away from children. There is a risk of death due to suffocation.
-
Open the cardboard box and take the device out.
-
Completely remove the packaging.
-
Fully unwind the power cable. Make sure that the power cable is not damaged and that you do not damage it during unwinding.
Assembly
Inserting the filters

Info
The filters are not included in the scope of delivery! Choose the filters according to the area of application from our filter range. Insert the selected filters prior to initial start-up.
Prior to start-up the filter chain of the device must be configured according to the desired field of application. For this, two filter boxes are available.
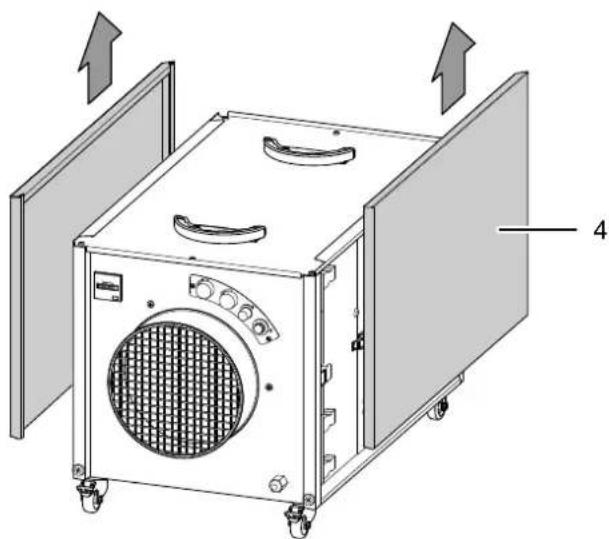
The filter boxes are located behind the lateral service flaps (4).
- For filter mounting remove the two side panels (4) towards the top.
-
Open the tension locks (10) on both sides of the device.
-
First pull out the tensioning frame (9).
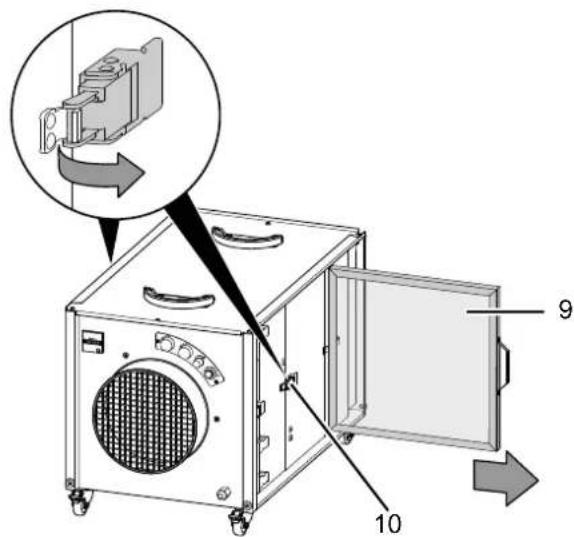
- Remove further boxes from the device as required.
Notice
For all filter installations always observe the correct flow direction according to the direction of the air current (air flow direction: from back to front)!
BOX 1: PRE-FILTER BOX
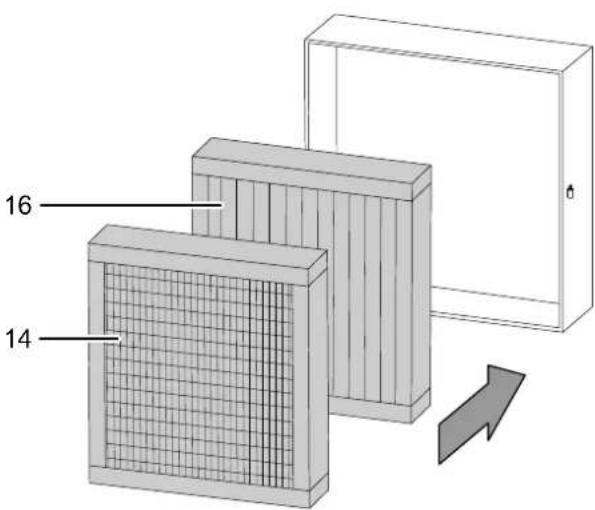
The pre-filter box can be equipped with a coarse filter G and/or a fine filter F.
We recommend using at least one coarse filter for pre-cleaning, so as to maximize the service life of the subsequent filter.
• coarse filter G: Z-line filter G4 (14)
- fine filter F: pleated M5 to F9 (16)
The coarse filter is to be assembled in a way that it is the first in the air stream.
BOX 2: FILTER BOX
One of the following main filter types is inserted in the FILTER BOX.
Version I:
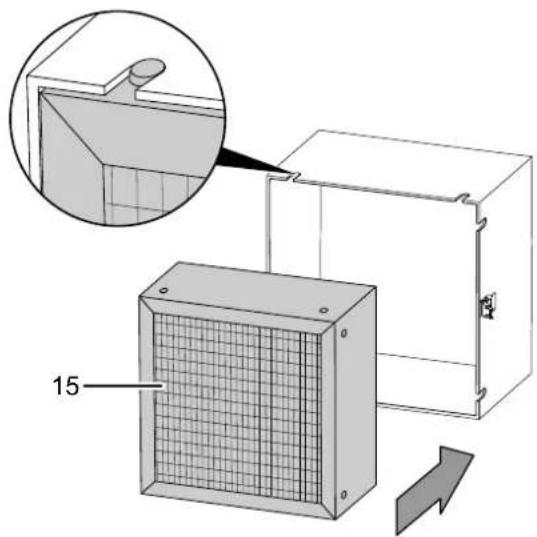
High-efficiency particulate air filter: E10 to H14 or dust class M to H (15)
The high-efficiency particulate air filter is inserted in the filter box with its clip-on frame as follows:
- Pull the clip-on frame out of the guiding grooves.
- Attach the clip-on frame to the air outlet side of the HEPA filter.
- Push HEPA filter and clip-on frame into filter box 2. Make sure that the clip-on frame again fits into the guiding grooves. If applicable, place the HEPA filter with the clip-on frame on a table and fit filter box 2 to the clip-on frame from above.
Version II – alternative:
Bag filter: M5 to F9
When a bag filter is used, the fine filter in pre-filter box 1 may be omitted.
The bag filter is simply inserted in the filter box without further assembly. The clip-on frame does not need to be removed for this.
Notice
When the device warns of a spent pre-filter (box 1) or main filter (box 2), still a flow rate of 500 m 3 /h (TAC 1500) or 1000 m 3 /h (TAC 3500) is ensured. For an effective filtration of pollutants the scheduled directives of the (German) employer's liability insurance association recommend to exchange the filter.
Filter types (not included in the scope of delivery)
The designated air filters are especially geared to these devices and come with the largest possible filter surface based on the geometric dimensions. This ensures maximum air flow rate and service life for safe operation.
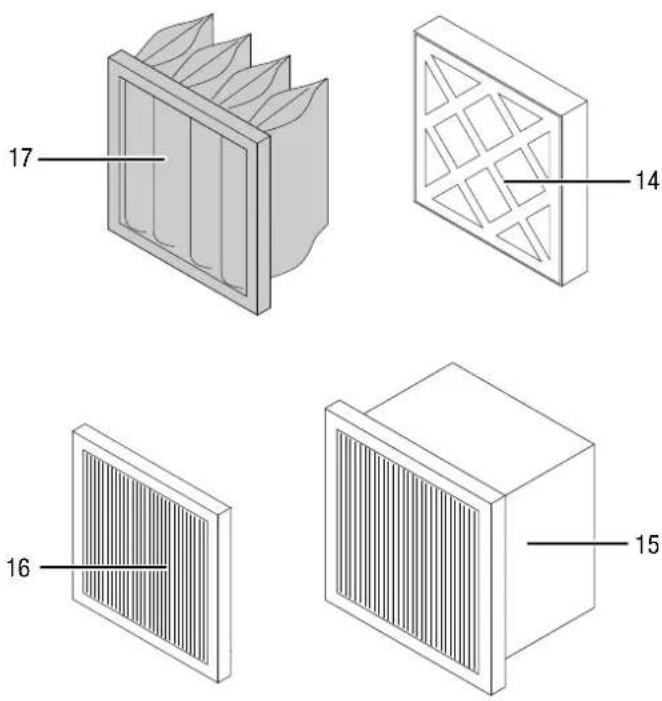
| No. Designation |
| 14 Z-line filter G4 |
| 15 HEPA filter E10 to H14 / dust class M + H |
| 16 pleated filter M5 to F9 |
| 17 bag filter M5 to F9 |
The Vario-shift function provides the user with the possibility of selecting the filter quality and the filter ladder according to the case of application and the applicable rules and regulations.
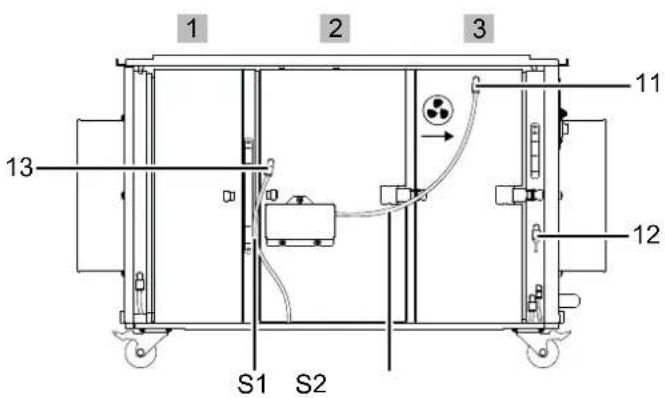
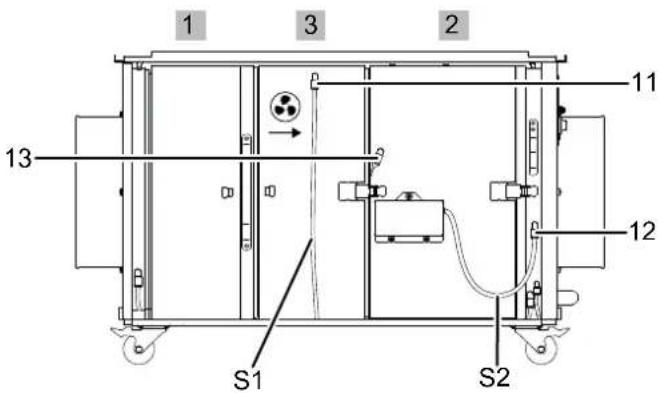
Filter ladder and configuration depend on the pollutant particle size, filtration efficiency and the field of application. The filter technology is monitored by sensors. For proper monitoring of the filter function sensor hose lines are connected to both filter boxes.
Configuration A
General configuration for the air filtration of coarse dusts and fine particulates or the separation of suspended matter according to EN 60335-2-69 up to dust class H. Here the filtration of dust particles and other suspended material harmful and hazardous to health has priority. The filter ladder must be operated in a vacuum, i.e. with terminal fan: the fan is to be arranged downstream of the main filter FILTER BOX 2.
Configuration B
Here air is usually lead from a contaminated area into a clean area, e.g. as filtered fresh air supply. Suspended matter as per EN 1822-1:1998 up to filter class H14 can be filtered, a higher filtration efficiency is possible with a reduced air volume. The filter ladder is operated at excess pressure, i.e. with terminal fine filter: the fan is to be arranged upstream of the main filter FILTER BOX 2.
The TAC series is equipped with Vario-shift function. This means that the filter elements can be variably arranged for all application scenarios and in line with the regulations.
Side view electrics:
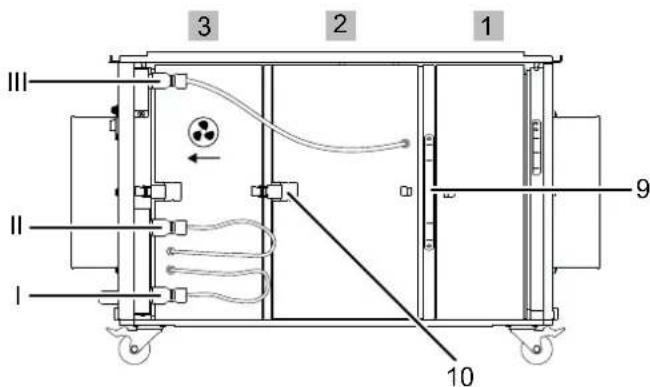
No. Designation
| 1 | PRE-FILTER BOX: COARSE FILTER G and/or FINE FILTER F |
| 2 | FILTER BOX: HEPA filter or bag filter |
| 3 | FAN BOX |
| I | connection for filter box 2 |
| II connection for fan control | |
| III | connection for fan box 3 |
| 9 tensioning frame | |
| 10 tension lock | |
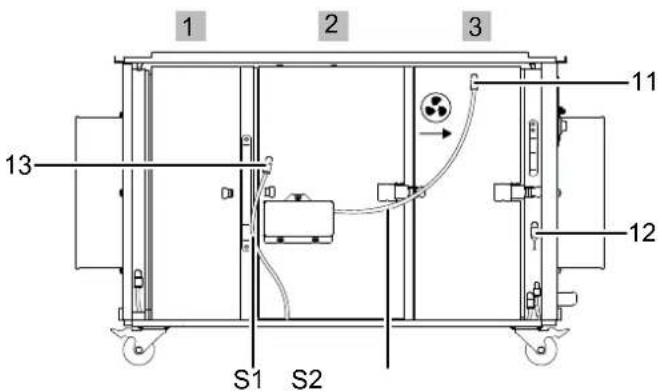
Side view sensor hose side:
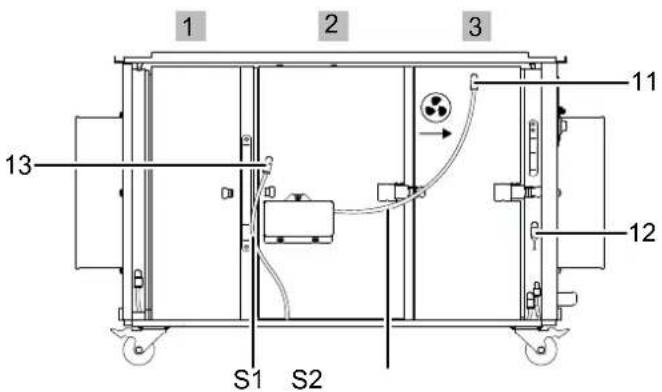
| No. Designation | |
| S1 sensor hose S1 | |
| S2 sensor hose S2 | |
| 11 | measuring position for fan box 3 |
| 12 measuring position for frame (here with dummy plug) | |
| 13 | measuring position for filter box 2 |
Arranging and connecting filter boxes
For maximum efficiency bag and Z-line filters are to be assembled vertically.
- Place PRE-FILTER BOX 1 with inserted filter to the first position behind the air inlet opening.
- Insert FILTER BOX 2 and FAN BOX 3 according to the desired configuration.
- Insert the tensioning frame behind PRE-FILTER BOX 1.
- Close all tension locks, both on the side of the electrics and on the sensor hose side.
- Connect the cable connections on the side of the electrics to the corresponding plugs:
| Plug Cable Connection | ||
| CABLE 1 | black grey III | |
| CABLE 2 | white black II | |
| CABLE 3 | black black I |
Configuration A:
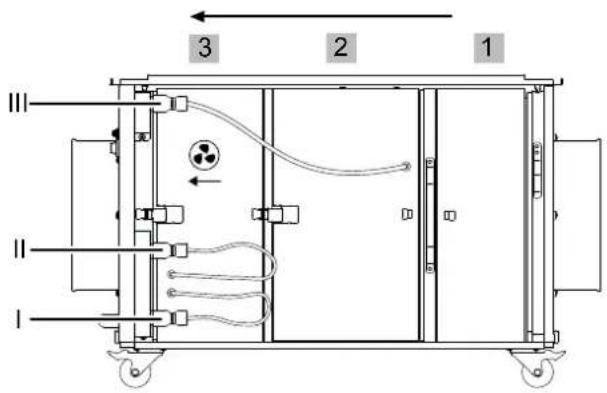
Configuration B:

Then connect the two sensor hoses on the sensor hose side in accordance with the selected configuration:
Configuration A
(11): sensor hose S2 => fan box 3
(12): dummy plug B => frame
(13): sensor hose S1 => filter box 2
Configuration B
(11): sensor hose S1 => fan box 3
(12): sensor hose S2 => frame
(13): dummy plug B => filter box 2
Notice
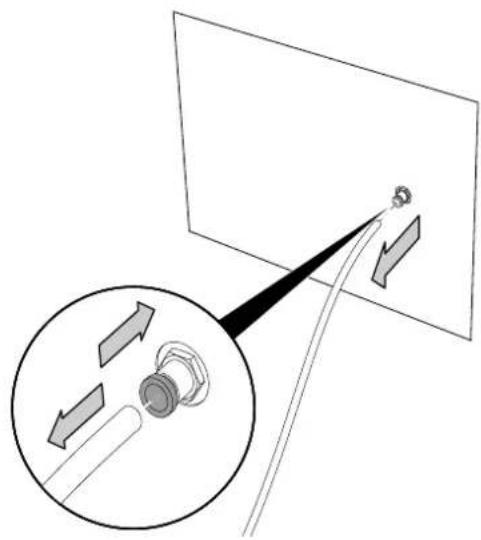
Push the sensor hoses firmly into the corresponding sensor socket until the hose securely clicks into place. The dummy plug has to be relocated depending on the configuration – for proper functioning the sensor sockets must not remain open.
In order to remove hose or dummy plug, press the outer ring of the measuring point and pull hose or dummy plug at the same time.
Start-up
When positioning the device, observe the minimum distance from walls or other objects as described in the chapter Technical annex.
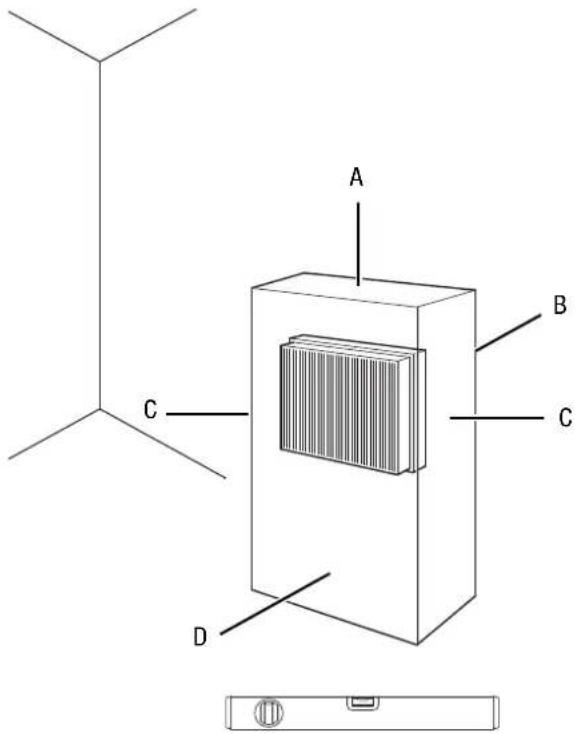
- Before restarting the device, check the condition of the power cable. If there are doubts as to the sound condition, contact the customer service.
- Place the device in an upright and stable position on a horizontal and stable surface.
- Do not create tripping hazards when laying the power cable or other electric cables, especially when positioning the device in the middle of the room. Use cable bridges.
- Ensure that the extension cables are completely unrolled.
- Position the device near the source of air contamination.
- When positioning the device, keep a sufficient distance to heat sources.
- Make sure that no curtains or other objects interfere with the air flow.
- Make sure that the air inlet and outlet are not obstructed.
Installation of the device in the room, the air of which is to be purified
- When positioning the device, make sure it is located in the centre of the room the air of which is to be cleaned.
Alternatively, you can also position the device near the source of air contamination.
- Prior to operation you have to ensure that the filters have been installed in the device as desired.
- Also check, whether the pressure sensors are connected correctly. If the device, during operation, emits a warning of a filter being spent, the respective filter has to be replaced.
If the device issues a warning, although a new filter has only just been inserted, check whether all sensor hoses are firmly attached.
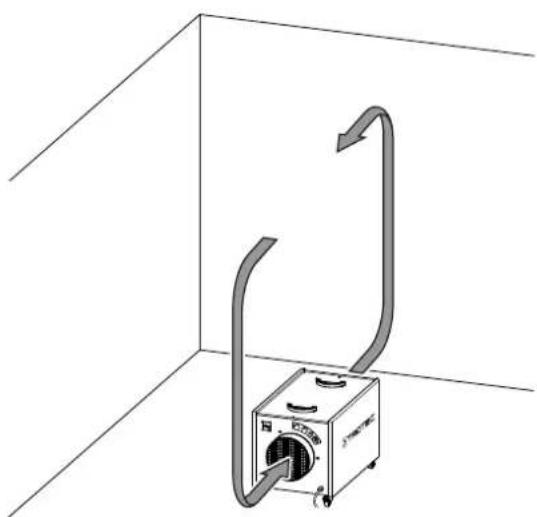
- The device works in recirculation mode, this means that the contaminated air enters the air cleaner via the air inlet opening and is blown out through the air outlet opening in purified state.
Air purification in sealed off area via air circulation:
Installation of the device outside of the room, the air of which is to be purified
The device can be connected in either recirculation or ventilation mode.
- In recirculation mode, the air to be cleaned is led via a hose from the room into the air inlet opening of the device. The purified air is fed through another hose from the air outlet opening and back into the room.
- In ventilation mode, the air to be cleaned is led via a hose from the room into the air inlet opening of the device. This creates a slight negative pressure in the room. Clean, fresh air flows in from outside.
Installation variants for maintaining the pressure:
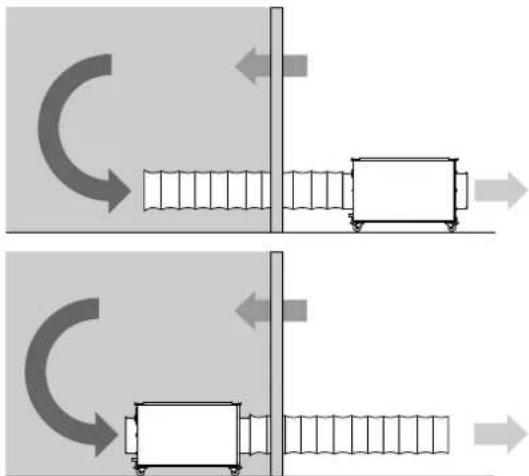
When connecting hoses, the following must be observed:
- The used pipes and hoses must be designed for the available static compression of the fans. They should preferably be laid in a straight line and at full length. 7.6 m of air hose each can be connected to the air inlet and air outlet openings of the device.
- There ought to be a minimum distance of 1 m between air inlet and air outlet opening.
Connecting the power cable
- Connect the mains plug to a properly secured socket.
Operation
Operating elements
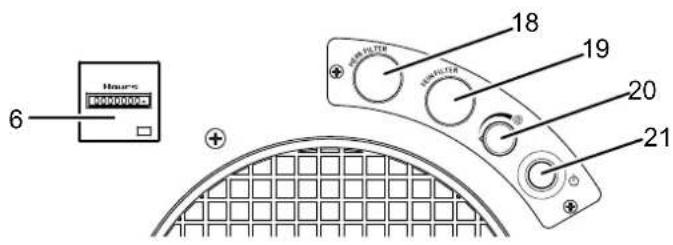
| No. | Designation Meaning | |
| 6 | Operating hours counter Indication of operating hours | |
| 18 | Visual and acoustic filter change indicator FILTER BOX 2 | Indication of required HEPA or bag filter change |
| 19 | Visual and acoustic filter change indicator PRE-FILTER BOX 1 | Indication of required coarse or fine filter change |
| 20 | Air volume control dial For setting the desired air volume | |
| 21 | Power button For switching the device on or off | |
Switching the device on
-
Ensure that air inlet and outlet are not covered.
-
Turn the air volume control dial (20) counter-clockwise to the lowest air volume.
-
Press the Power button (21).
→ The Power button (21) lights up.
Adjusting the air volume
By use of the infinitely variable air flow regulation you can adjust the fan speed and thus regulate the air flow rate of the device.
With the filter arrangement G4, F7 and H13 to meet the requirements of dust class H, the device with connected exhaust air hose (7.6 m, laid in 2 90° arcs) reaches an air flow rate of 1150 m³/h.
If the filter change indicator (18) or (19) warns that a filter change will soon be required, a min. air flow rate of 1000 m3/h will still be ensured.
Exchange the corresponding filters in a timely manner.
-
To increase the air volume, turn the air volume control dial (20) clockwise.
-
To decrease the air volume, turn the air volume control dial (20) counter-clockwise.
Shutdown

Warning of electrical voltage
Do not touch the mains plug with wet or damp hands.
- Switch off the device.
- Disconnect the device from the mains by removing the mains plug from the socket. When doing so, be sure to hold the plug, not the cable.
Available accessories

Warning
Only use accessories and additional equipment specified in the instructions. Using insertion tools or accessories other than those specified in the instructions may cause a risk of injury.
| Designation Article number | |
| G4 Z-line filter / ISO coarse 75 % 7.16 | 0.000.428 |
| F7 pleated filter cartridge / ISO ePM10 75 % | 7.160.000.429 |
| F7 bag filter / ISO ePM10 75 % 7.160 | 000.430 |
| H13 HEPA filter approved for dust class H | 7.160.000.431 |
| G3 spray paint filter / ISO coarse 30 % | 7.160.000.432 |
| Activated carbon filter 7.160.000.434 | |
| Air transport hose Tronect SP-T, length 7.6 m | 6.100.001.205 |
Errors and faults
The device has been checked for proper functioning several times during production. If malfunctions occur nonetheless, check the device according to the following list.
The device does not start:
- Check the power connection.
- Check the power cable and mains plug for damage.
- Check the on-site fusing.
- Wait for 10 minutes before restarting the device. If the device is not starting, have the electrics checked by a specialist company or by Trotec.
The device is loud or vibrates:
- Check whether the device is set up in a stable and upright position.
The device gets very warm, is loud or is losing power:
- Check the air inlet and air filter for dirt. Remove external dirt.
The device gives off an unpleasant odour:
- Smoke, e.g. dense tobacco smoke, odours and contaminations may be in the air. Ventilate the room.
The device still does not operate correctly after these checks:
Contact the manufacturer's customer service. If necessary, take the device to an authorised specialist electrical company or to the manufacturer for repair.
Maintenance
Activities required before starting maintenance

Warning of electrical voltage
Do not touch the mains plug with wet or damp hands.
- Switch the device off.
- Disconnect the device from the mains by removing the mains plug from the socket. When doing so, be sure to hold the plug, not the cable.

Warning of electrical voltage
Tasks which require the device to be opened must only be carried out by authorised specialist companies or by the manufacturer.
Notice
Observe the overvoltage protection.
The device comes equipped with an overvoltage protection. When checking for electrical safety, please bear in mind that the test voltage has to be reduced to 250 V.
Cleaning the housing
Clean the housing with a soft, damp and lint-free cloth. Make sure that no moisture enters the housing. Protect electrical components from moisture. Do not use any aggressive cleaning agents such as cleaning sprays, solvents, alcohol-based or abrasive cleaners to dampen the cloth.
Visual inspection of the inside of the device for dirt
- Remove the air filters.
- Use a torch to illuminate the openings of the device.
- Check the inside of the device for dirt.
- If you see a thick layer of dust, clean the inside of the device with a vacuum cleaner.
- Reinsert the air filters.
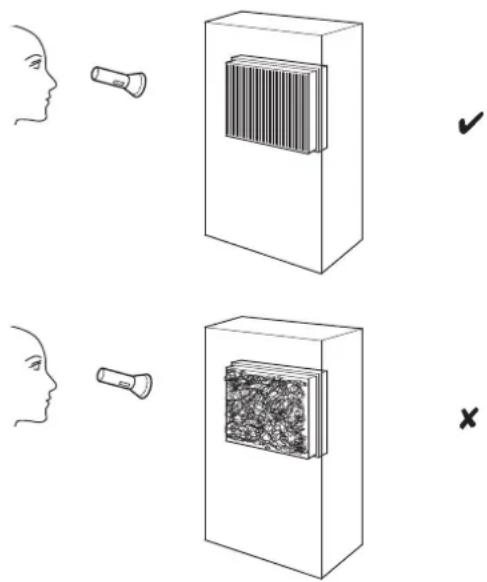
Cleaning the inside of the device
- First remove the filters and the filter frame as described in the Assembly and start-up chapter.
- Clean the inside of the device and the filter frame with a soft, damp and lint-free cloth. Make sure that no moisture enters the housing. Protect electrical components from moisture. Do not use any aggressive cleaning agents such as cleaning sprays, solvents, alcohol-based or abrasive cleaners to dampen the cloth.
- Reinsert the filters and the filter frame into the device.
Changing the filter(s)
The filters must be changed if the filter change indicator for FILTER BOX 2 (18) or PRE-FILTER BOX 1 (19) lights up during operation and an acoustic signal is emitted.
If a filter needs to be replaced, please proceed as described in the Inserting the filters section in the Assembly and start-up chapter.
Disposal
Always dispose of packing materials in an environmentally friendly manner and in accordance with the applicable local disposal regulations.

The icon with the crossed-out wheeled bin indicates that this device and any associated components must not be disposed of with household waste at the end of their life, in accordance with the Waste Electrical and Electronic Equipment Directive (2012/19/EU) and national laws.
You will find collection points for free return of waste electrical and electronic equipment in your vicinity. The addresses can be obtained from your municipality or local administration. You can also find out about other return options that apply for many EU countries on the website https://hub.trotec.com/?id=45090. Otherwise, please contact an official recycling centre for electronic and electrical equipment authorised for your country. The separate collection of waste electrical and electronic equipment aims to enable the re-use, recycling and other forms of recovery of waste equipment as well as to prevent negative effects for the environment and human health caused by the disposal of hazardous substances potentially contained in the equipment.
Only for United Kingdom
According to Waste Electrical and Electronic Equipment Regulations 2013 (SI 2013/3113) (as amended) devices that are no longer usable must be collected separately and disposed of in an environmentally friendly manner.
Technical annex
Technical data
| Parameter Value | |
| Model TAC 3500 | |
| Article number 1.580.000.117 | |
| Recommended amount of air for dust class H | 1000 m3/h |
| Dust class(as per DIN 60335-2-69) | dust class H (transmittance ≤ 0.005 % ) for substances with a max. allowable concentration of ≤ 0.1 mg/m3 ,carcinogenic hazardous substances as per GefStoffV § 11 (Ordinance on Hazardous Substances), TRGS 905 or 906 (Technical Rules for Hazardous Substances), approvable for asbestos abatement as per TRGS 519 |
| Motor power 450 W | |
| Power supply 1/N/PE ~ 230 V / 50–60 Hz | |
| Nominal current 2.8 A | |
| Connection cable CEE 7/7, cable length 3 mrubber conduit (H05RR-F3G1) length = 3.5 m | |
| Air transport hose connector inlet/outlet side | 250 mm |
| Sound level (at a distance of 1 m) 65 | dB(A) |
| Dimensions(length x width x height) | 885 x 460 x 532 mm |
| Weight 36 kg | |
Recommendation for filter combinations specific to the application and corresponding room size suitability
| suitable for rooms sized up to 1) | |||
| Fields of application Filter combination | ation m | 3 | m2 |
| Coarse dust 2) (≤ 3 ACH6) G4 500 | 170 | ||
| Fine particulates 3) (≤ 3 ACH6) G4 | + F7 to F9 | 270 90 | |
| Suspended matter 4) (≤ 3 ACH6) | G4 + H13 | 100 34 | |
| Hygienic areas 5) (≤ 3 ACH6) | G4 + H13 | 70 | 23 |
1) With an assumed room height of 3 m; 2) Typical coarse dust tasks: sawing, filing; 3) Typical fine dust tasks: restoration works with materials containing minerals or glass wool; 4) Typical suspended matter tasks: grinding, asbestos abatement or mould remediation, mineral dusts etc.; 5) H13 downstream; 6) Air exchange per hour
Optional equipment (upon request)
| Guiding wheels with pneumatic tyres, traceless |
| Trestle rollers (instead of guiding wheels) |
| Fork pockets for fork lifts |
Performance chart
![| Point | X [m³/h] | Y [Pa] | |-------|----------|--------| | A | 0 | 1150 | | B | 1000 | 800 | | C | 1600 | 700 | | D | 2000 | 450 | | E | 2200 | 400 | | F | 2200 | 350 |](/content/2026/02/393694/images/f97de9f8978384f750c09fa14cd40d2bba08d09ae306b82d580a5dcb84d48f89.jpg)
| A Fan | |
| B Recommended amount of air for dust class H | |
| C With G4+H13 filter | combination (approval for dust class H) and air transport hose* |
| D With G4+F7 filter | combination and air transport hose* |
| E With G4 filter and air transport hose* | |
| F Without filter, with air transport hose* | |
| * Connected to the pressure side, standard length 7.6 m, laid with one 90° arc. When the air hose is laid stretched and arc-free, an increase of air volume by up to 25 % is possible! | |
Overview Info

The position numbers of the spare parts differ from those describing the positions of the components mentioned in these instructions.
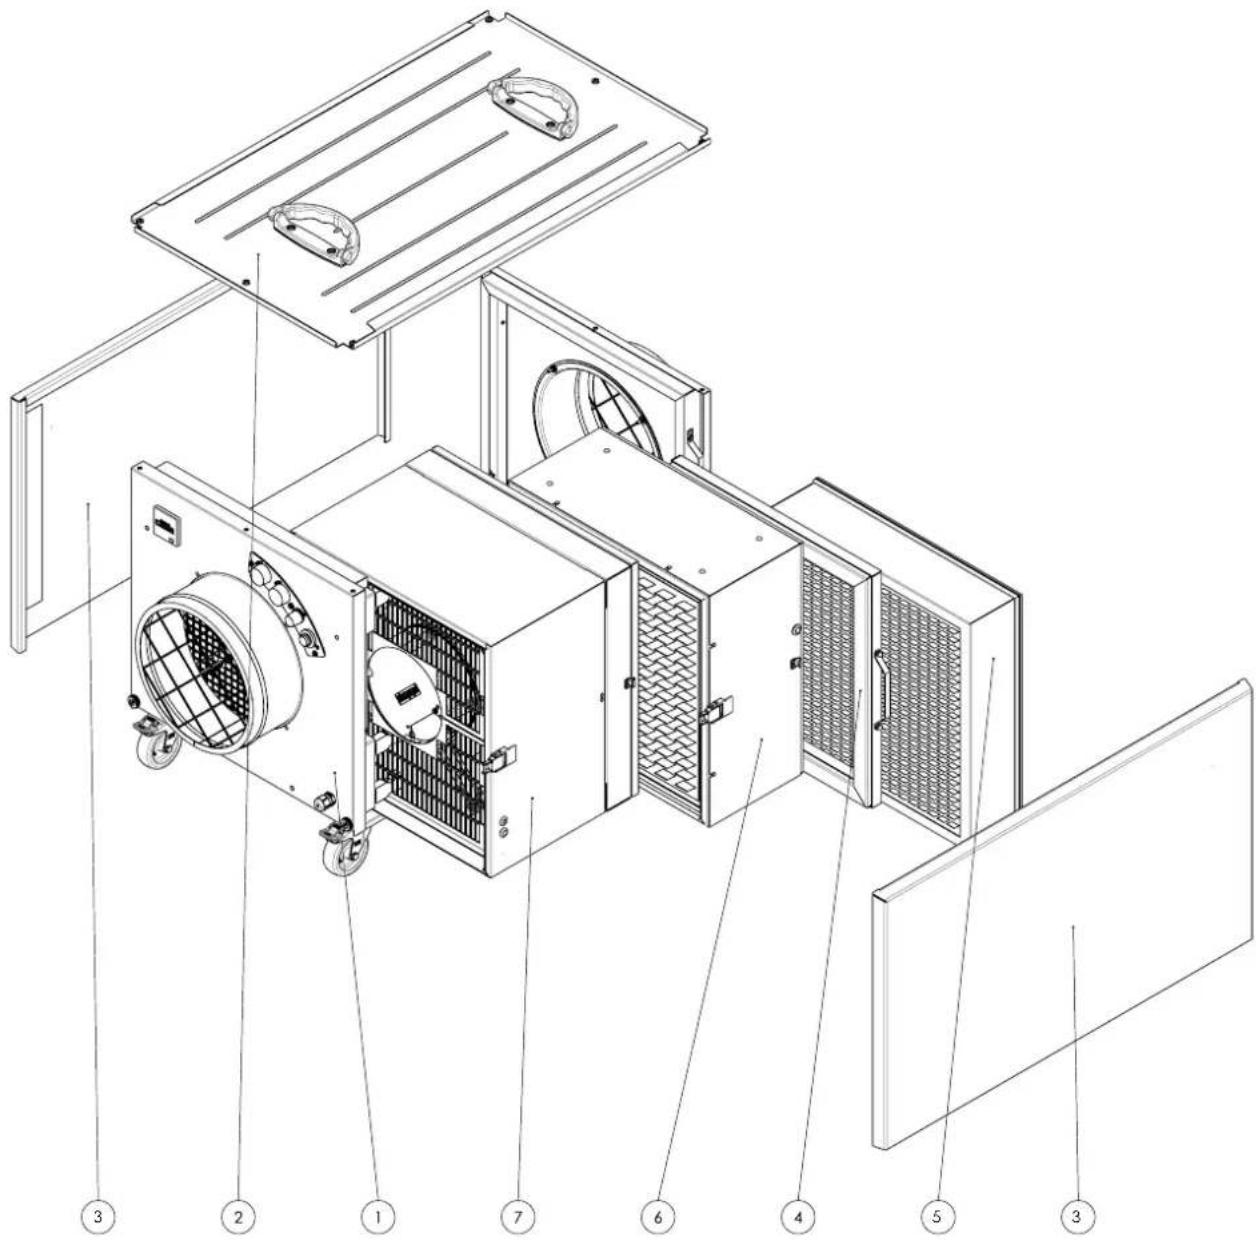
| No. Designation Article number No. Designation Article number | |||||
| 1 Basic housing ZAT0004855 5 Paper filter ZAT0003486 | |||||
| 2 Cover ZAT0004859 6 HEPA ZAT0003493 | |||||
| 3 Panel P10008268 7 Fan housing B1555 | |||||
| 4 Tension element ZAT0003483 | |||||
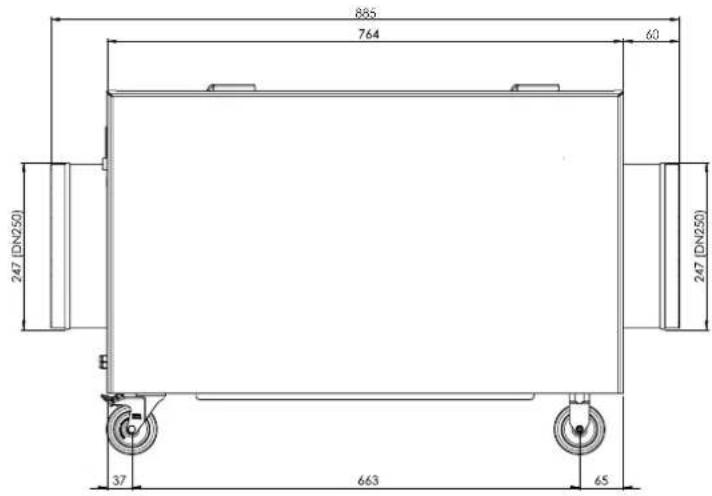
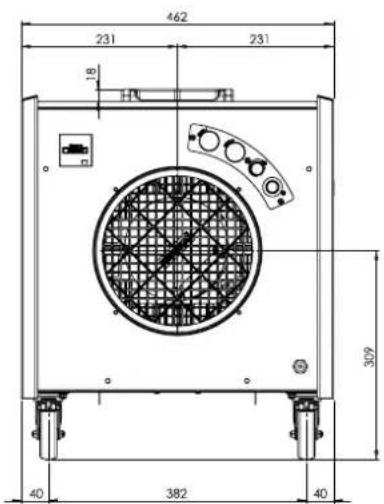
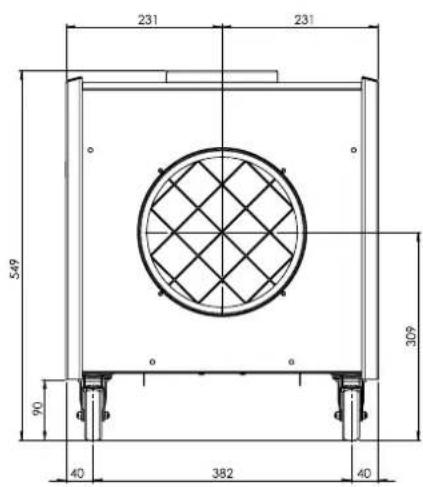
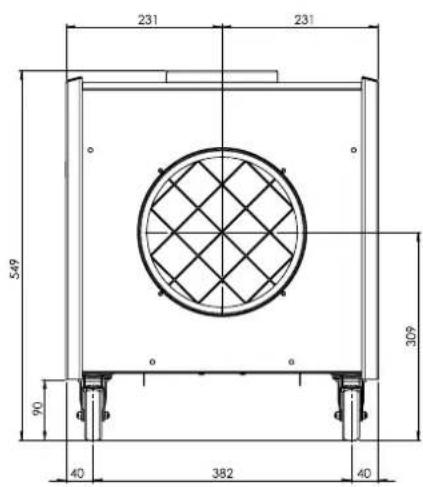
Dimensions Info
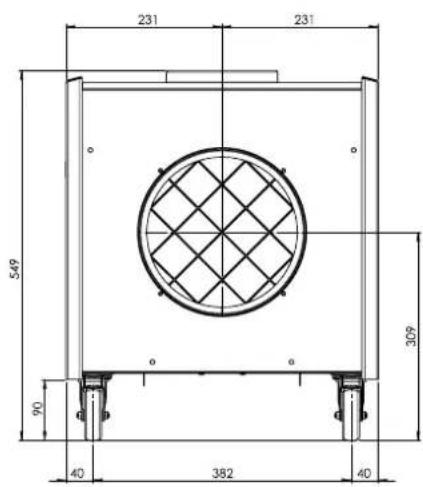

The dimensions are given in millimetres.
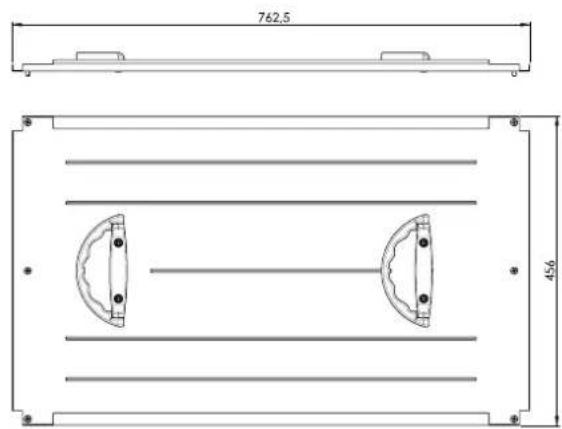
Basic housing Info

The position numbers of the spare parts differ from those describing the positions of the components mentioned in these instructions.
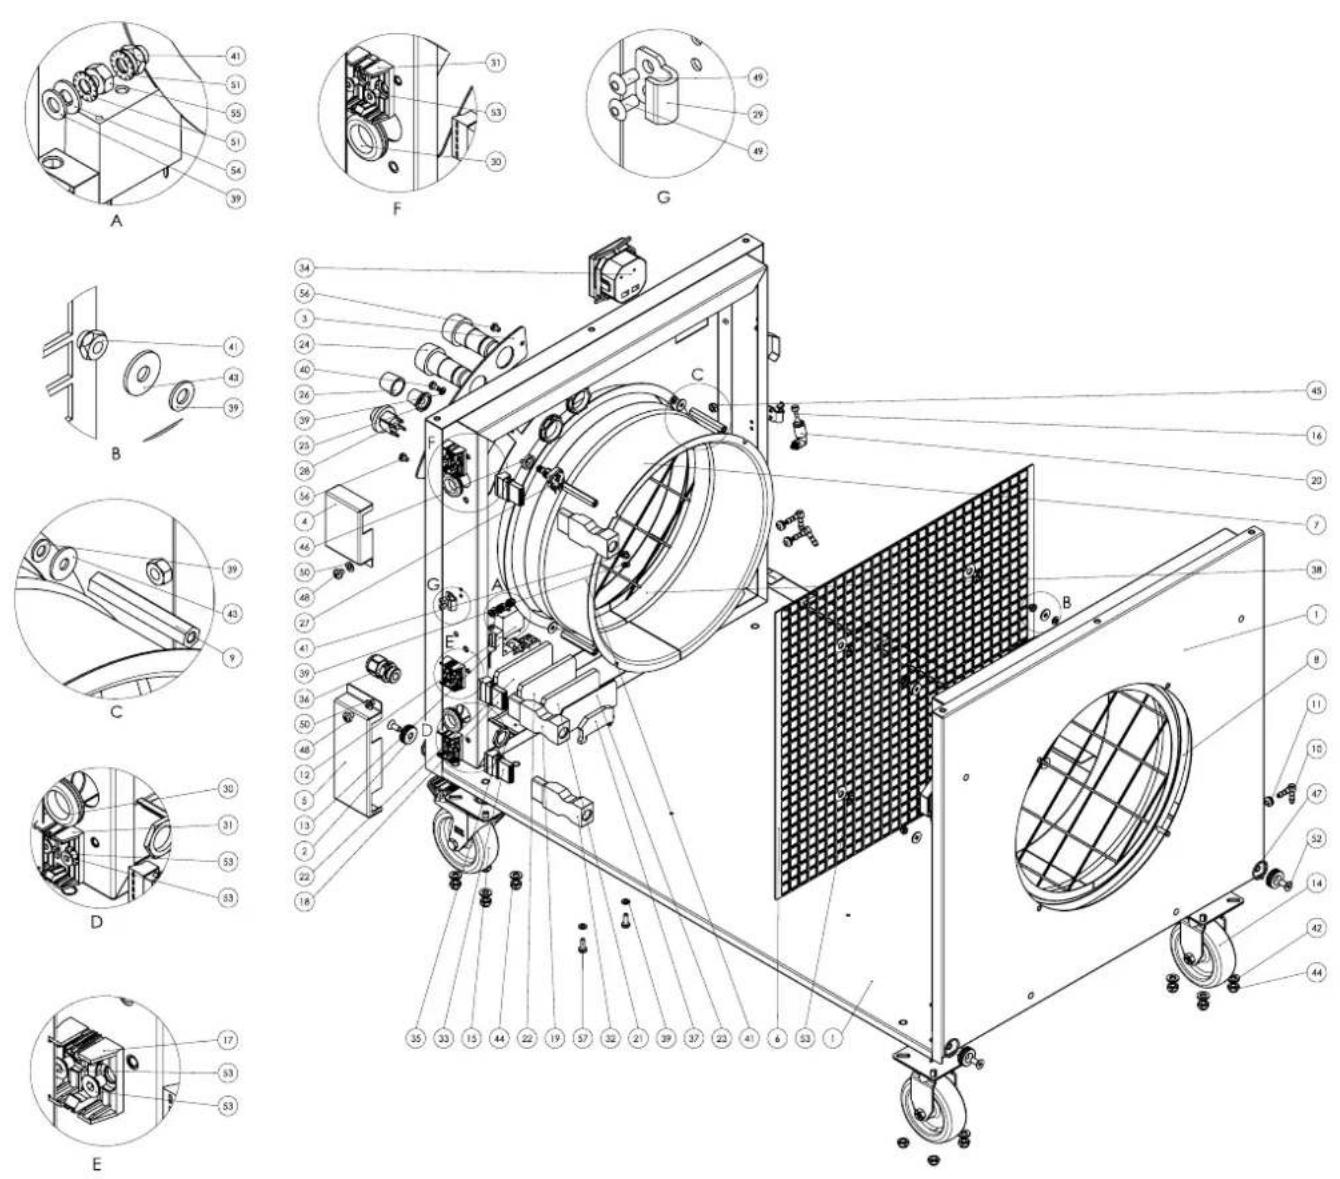
| No. | Designation Article number | No. | Designation Article number | |||
| 1 | Basic housing SBG P10008269 30 Sealing plug P10000651 | |||||
| 2 | Guide bushing P10001409 31 Mounting plate P10000646 | |||||
| 3 | Operating element P10008202 32 Plug P10000644 | |||||
| 4 | Mounting bracket P10002156 33 Socket P10000645 | |||||
| 5 | Mounting bracket P10002155 34 Operating hours counter P10001137 | |||||
| 6 | Touch protection P10002218 35 Nut | P10003618 | ||||
| 7 | Flanged collar P10000654 36 Cable gland | P10007561 | ||||
| 8 | Gasket strip P10000357 37 End stop | P10001031 | ||||
| 9 | Spacer sleeve P10001596 38 Diff. pressure switch | P10001733 | ||||
| 10 | Angle piece P10000562 39 Washer | P10001310 | ||||
| 11 | Pass-through sleeve P10001418 40 Screw | P10000322 | ||||
| 12 | Relay P10000042 41 Nut | P10000013 | ||||
| 13 | Mounting clip P10000043 42 Washer | P10000019 | ||||
| 14 | Trestle roller P10001531 43 Washer | P10000449 | ||||
| 15 | swivel castor P10001530 44 Nut | P10000500 | ||||
| 16 | Sealing plug P10001646 45 Nut P10000006 | |||||
| 17 | Mounting plate P10000649 46 Washer P10000364 | |||||
| 18 | Socket P10000648 47 O-ring P10001421 | |||||
| 19 | Plug P10000647 48 Screw P10001179 | |||||
| 20 | Angle fitting P10001306 | 49 | Rivet | P10001108 | ||
| 21 | Feed-through terminal P10001026 50 Washer | P10001134 | ||||
| 22 | Feed-through terminal P10001028 51 Washer | P10001112 | ||||
| 23 | End plate P10001029 52 Screw | P10000336 | ||||
| 24 | Signal lamp P10002353 53 Screw | P10003856 | ||||
| 25 | Rotary button P10001250 54 Washer | P10000038 | ||||
| 26 | Cap P10001249 55 Nut | P10000208 | ||||
| 27 | Potentiometer P10001751 56 Screw | P10001010 | ||||
| 28 | Switch P10001376 57 Screw P10000443 | |||||
| 29 | Locking hook P10000616 | |||||
Cover Info

The position numbers of the spare parts differ from those describing the positions of the components mentioned in these instructions.
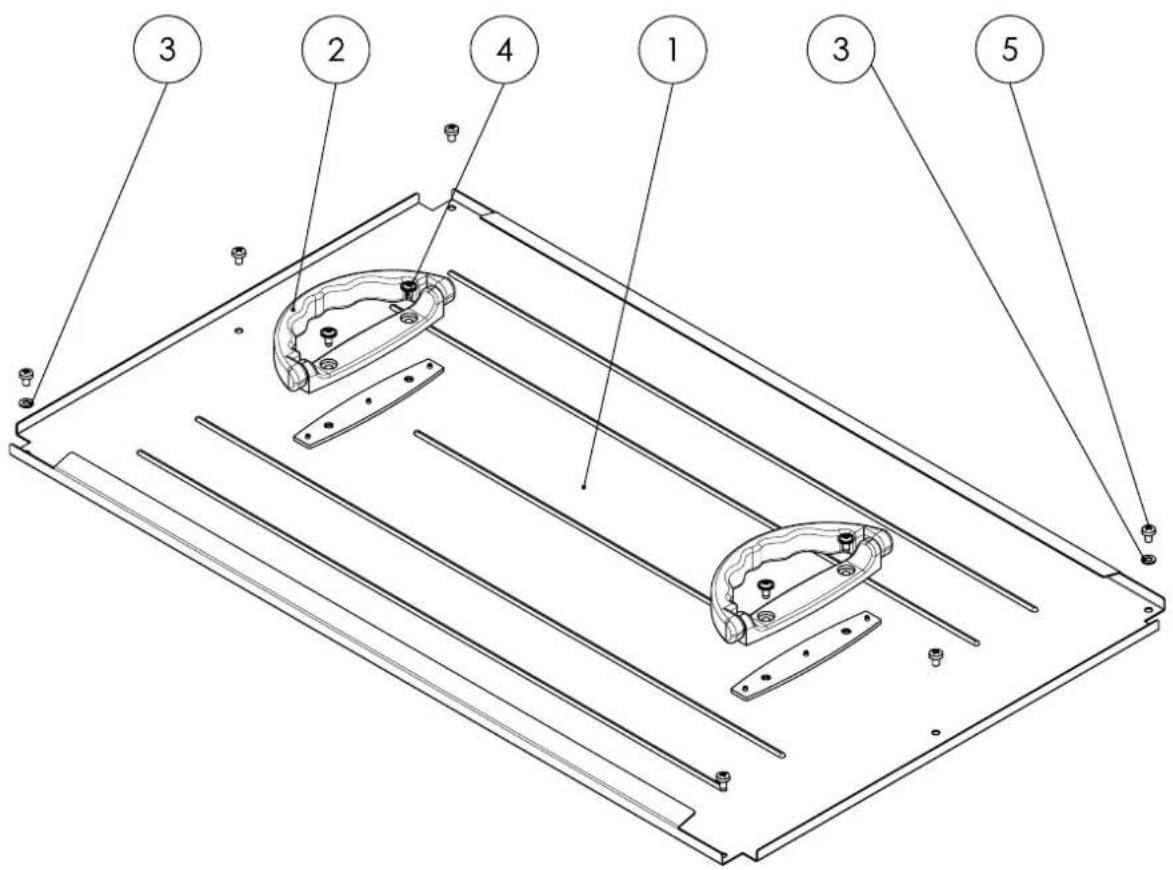
| No. Designation Article number | No. Designation Article number | |||
| 1 Cover SBG P10008270 4 Screw | P10000568 | |||
| 2 Handle P10001246 5 Screw P10001265 | ||||
| 3 Washer P10001134 | ||||
Tension element Info

The position numbers of the spare parts differ from those describing the positions of the components mentioned in these instructions.
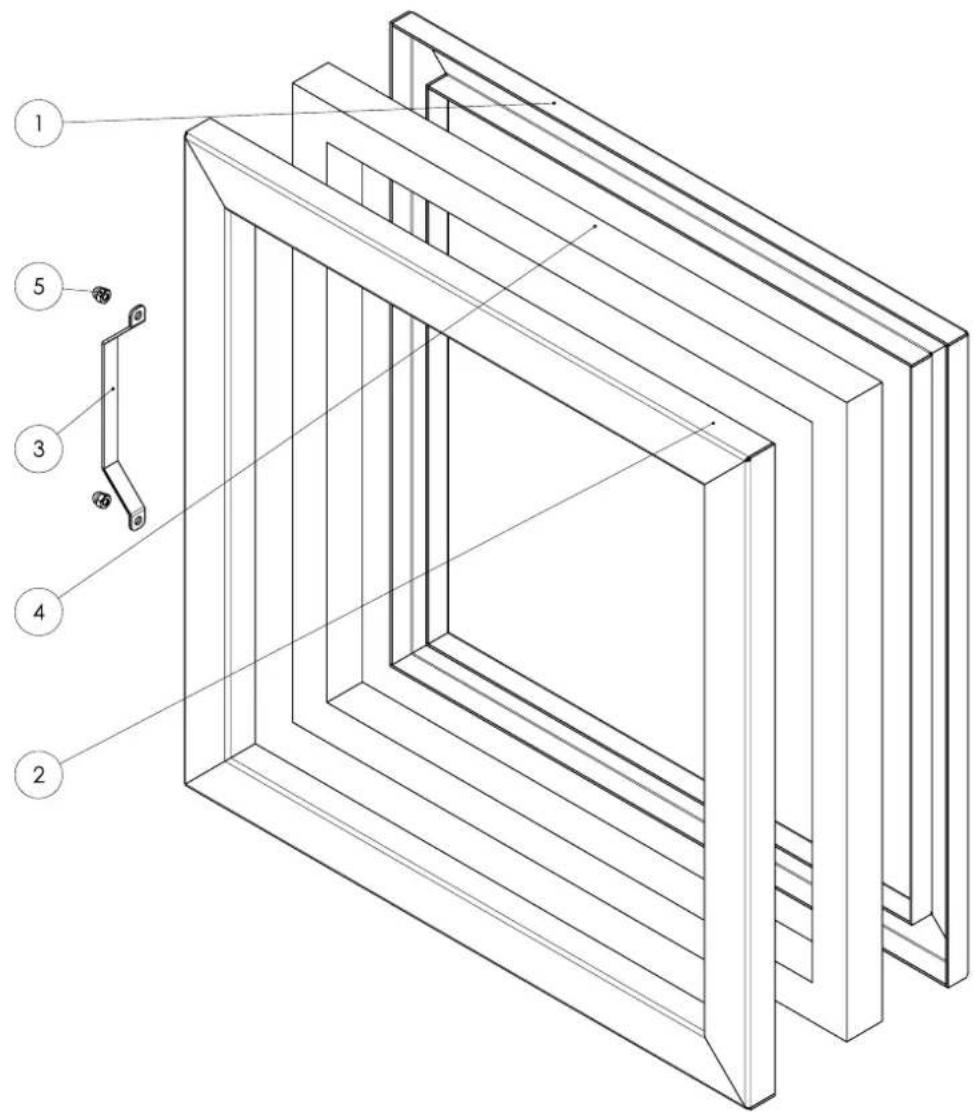
| No. Designation Article number | No. Designation Article number | |||
| 1 Tensioning frame P10002210 4 | Seal P10001422 | |||
| 2 Tensioning frame SBG P10002217 | 5 Nut P1000768 | |||
| 3 Handle P10002158 | ||||
HEPA filter Info

The position numbers of the spare parts differ from those describing the positions of the components mentioned in these instructions.
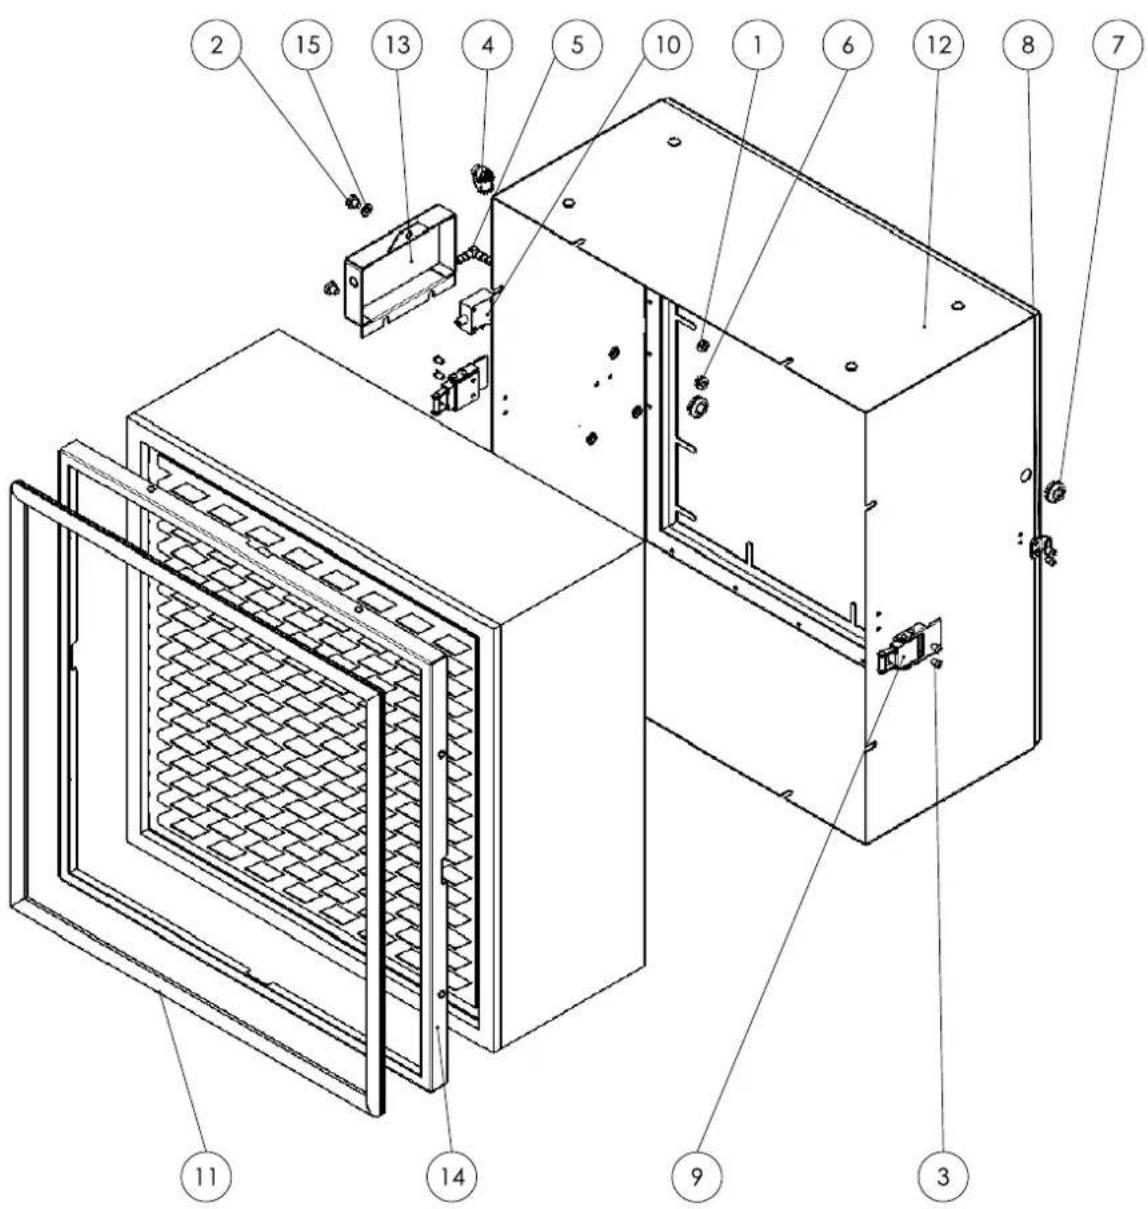
| No. Designation Article number No. Designation Article number | |||||
| 1 Nut P10000006 9 Spring tension element P10000615 | |||||
| 2 Screw P10001179 10 Diff. pressure switch P10001733 | |||||
| 3 Rivet P10001108 11 Seal P10001855 | |||||
| 4 Angle fitting P10001306 12 HEPA frame SBG P10002212 | |||||
| 5 Angle piece P10000562 13 Supply box | P10002149 | ||||
| 6 Pass-through sleeve P10001418 14 HEPA frame | P10002214 | ||||
| 7 Pass-through sleeve P10002306 15 Washer | P10001134 | ||||
| 8 Locking hook P10000616 | |||||
Fan housing Info

The position numbers of the spare parts differ from those describing the positions of the components mentioned in these instructions.
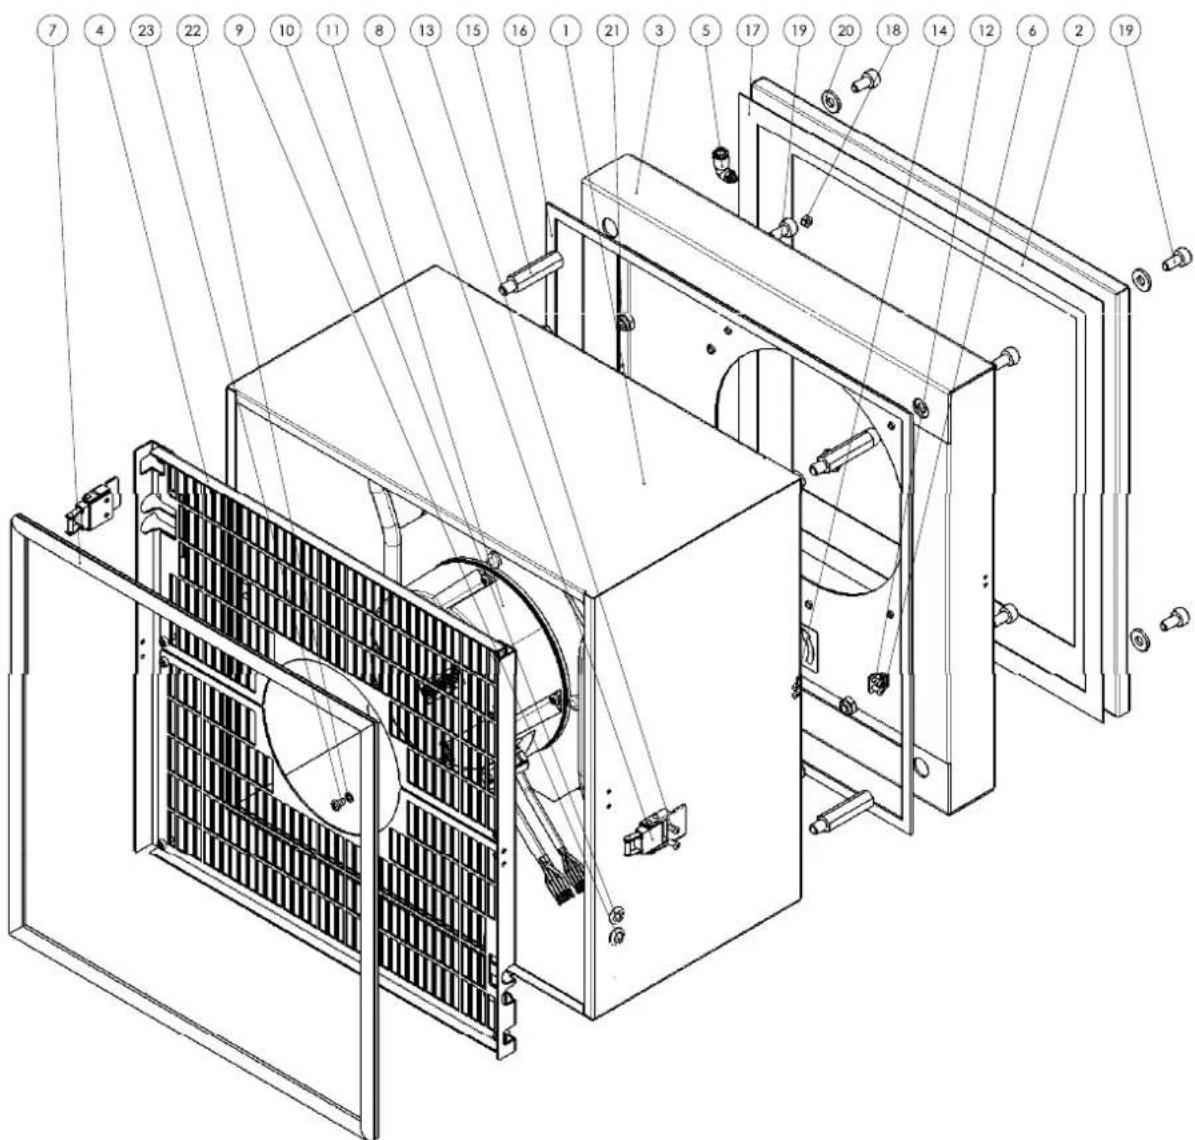
| No. Designation Article number No. Designation Article number | |||||
| 1 Fan frame SBG P10002211 13 Blind rivet P10007233 | |||||
| 2 Fan inlet P10002216 14 Rivet P10001108 | |||||
| 3 Spacer frame P10008258 15 Spacer sleeve P10008216 | |||||
| 4 Tamper protection B1554 16 Gasket strip P10000357 | |||||
| 5 Angle fitting P10001306 17 Gasket strip | P10007745 | ||||
| 6 Locking hook P10000616 18 Nut | P10000006 | ||||
| 7 Seal P10001855 19 Screw | P10000424 | ||||
| 8 Spring tension element P10000615 20 Washer | P10004279 | ||||
| 9 Feed-through P 1000 1679 21 Nut | P10000099 | ||||
| 10 Feed-through P10001417 22 Washer P10001112 | |||||
| 11 Fan P10002324 23 Screw | P1000032 | ||||
| 12 Blind rivet P10001966 | |||||
Paper filter Info

The position numbers of the spare parts differ from those describing the positions of the components mentioned in these instructions.
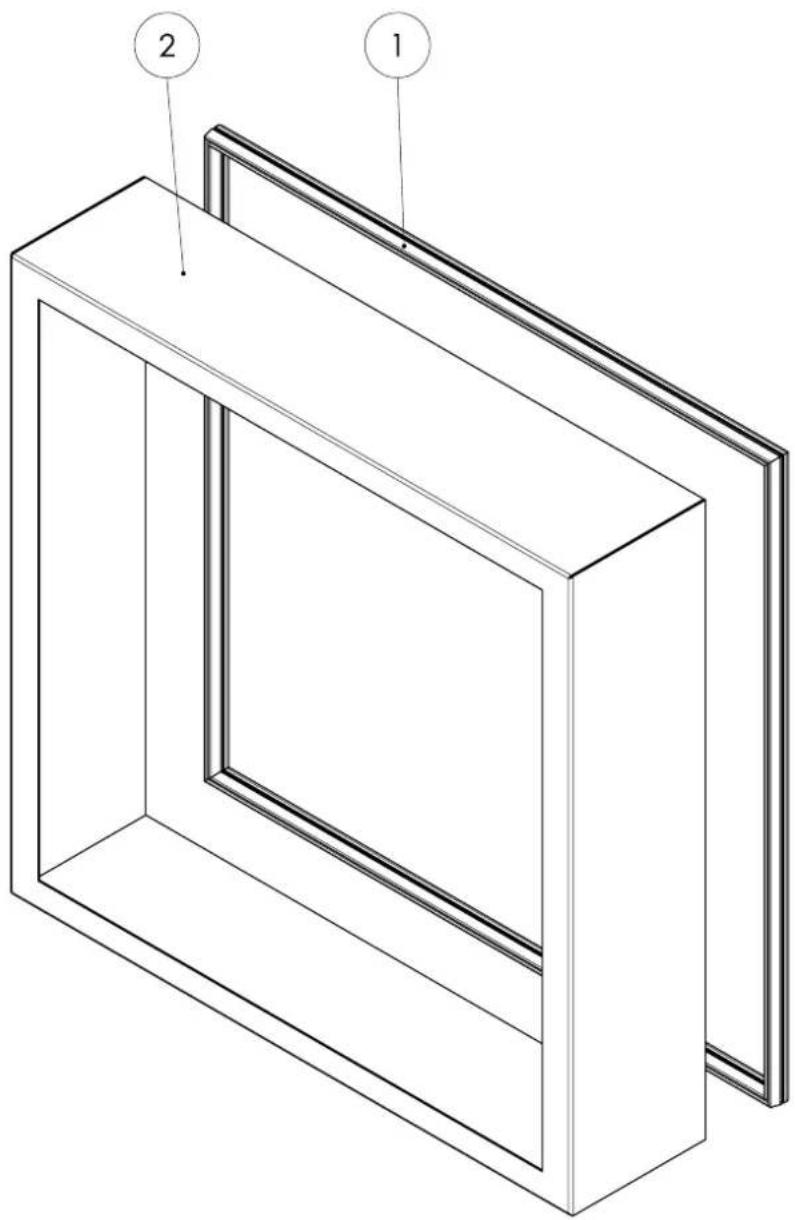
| No. | Designation Article number | No. Designation Article number | |||
| 1 Seal | P10000290 2 Prefilter frame | P10002213 |
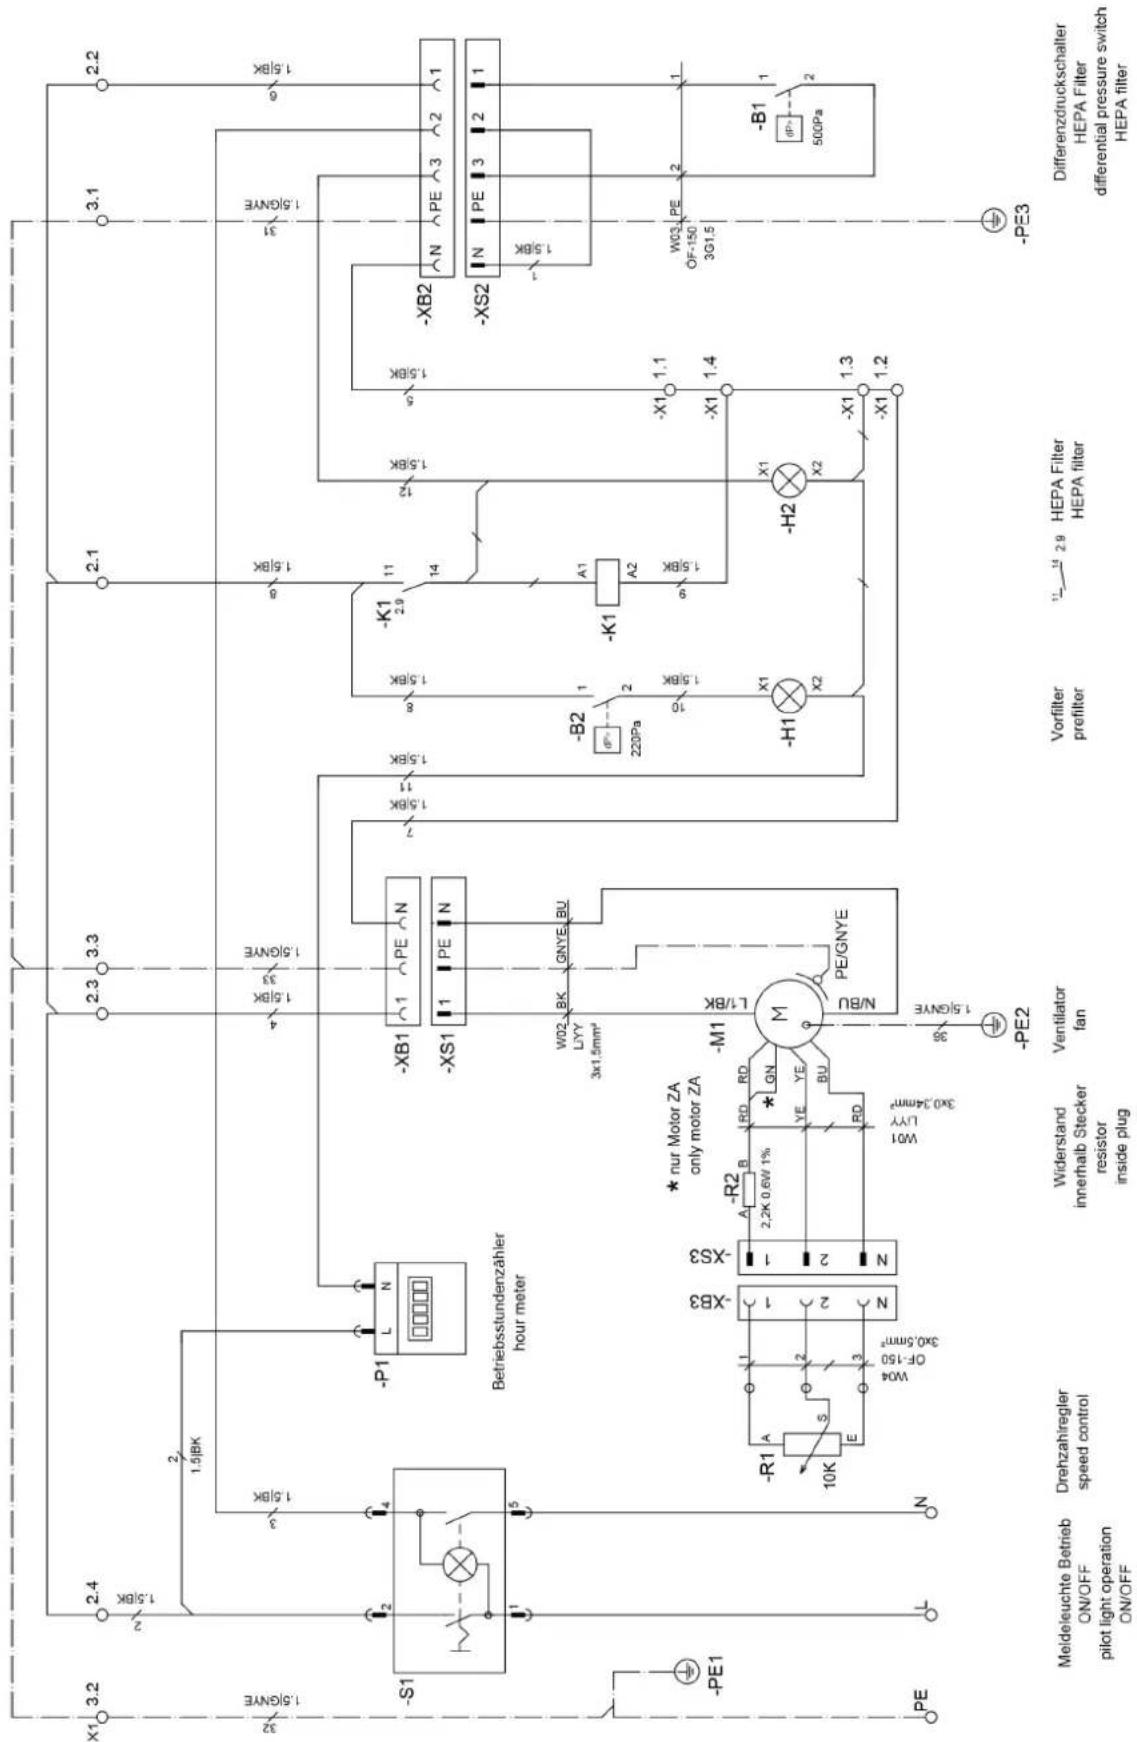
Circuit diagram
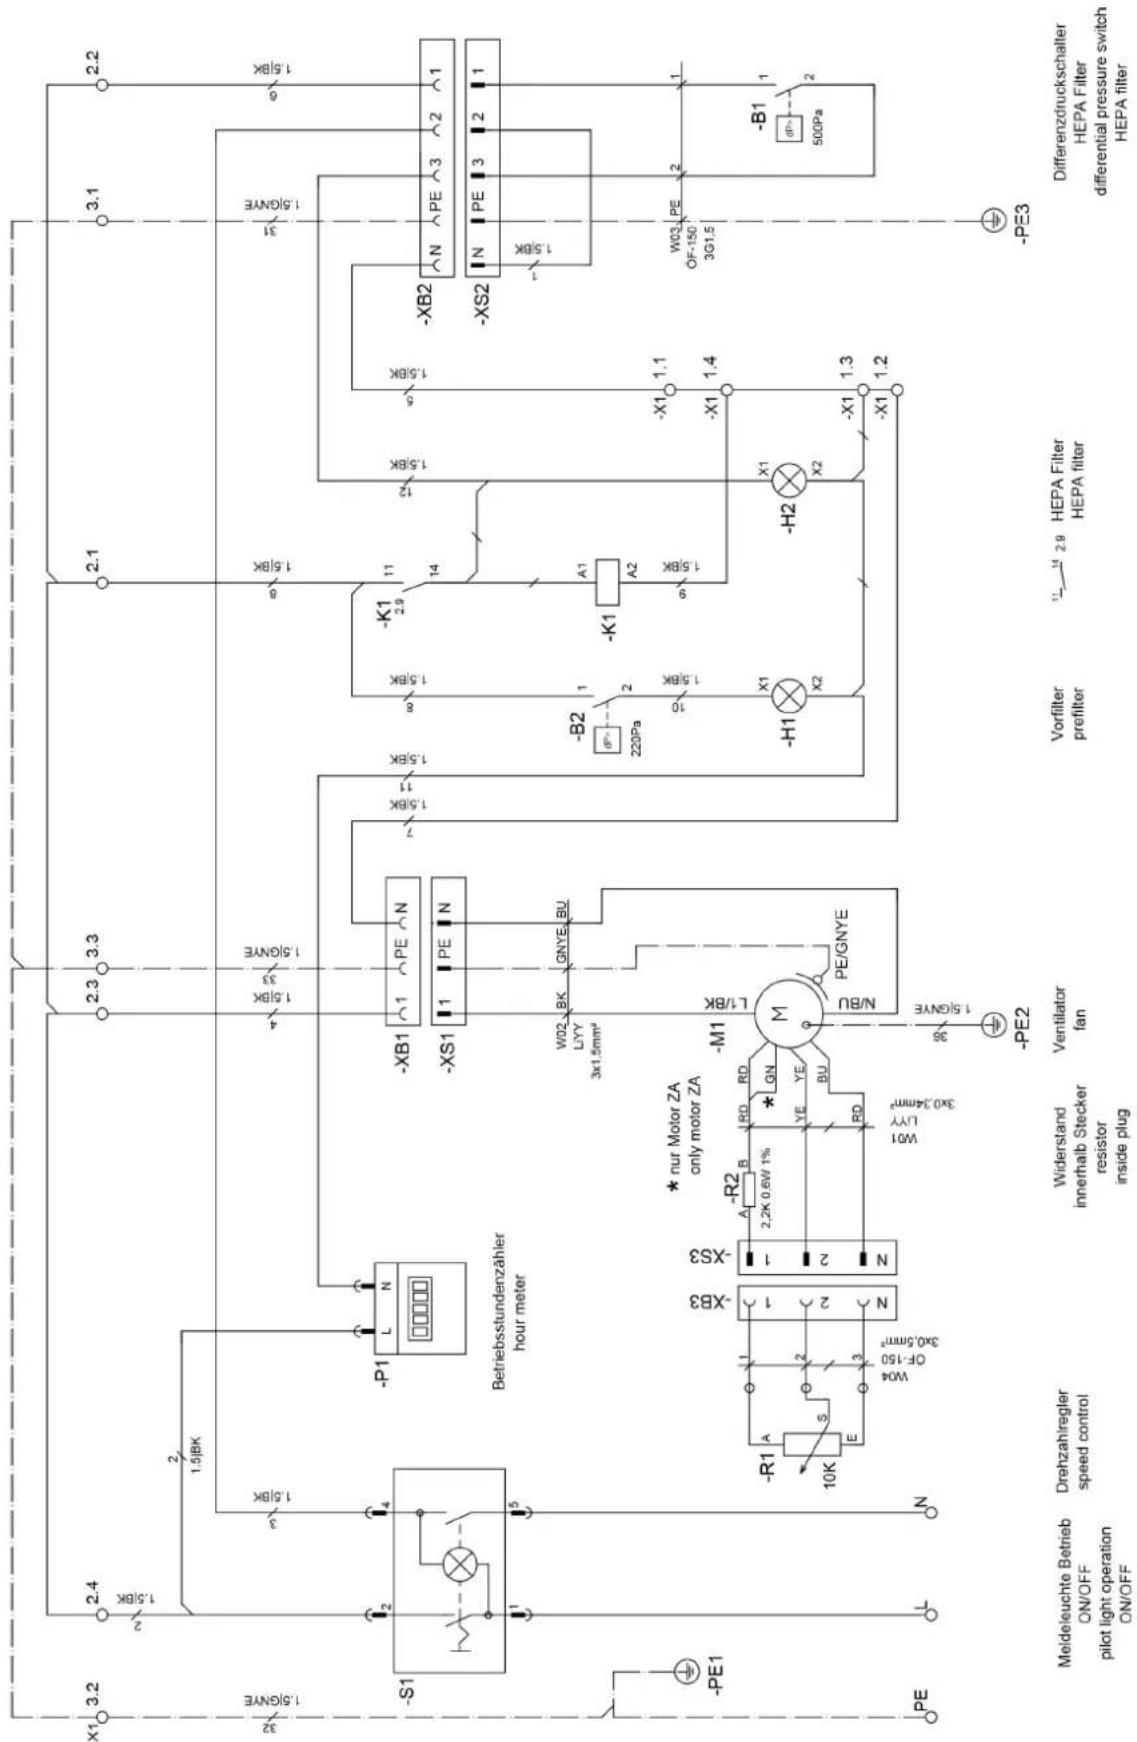
EU Declaration of Conformity (original)
Declaration of conformity in accordance with the EC Machinery Directive 2006/42/EC, Annex II, Part 1, Section A
We – Trotec GmbH – declare in sole responsibility that the product designated below was developed, constructed and produced in compliance with all relevant provisions of the EC Machinery Directive in the version 2006/42/EC.
Product model / Product: TAC 3500
Product type: air cleaner
Year of manufacture as of: 2024
The product also complies with all relevant provisions of the following directives/regulations:
• 2011/65/EU
• 2014/30/EU
Applied harmonised standards:
• EN ISO 12100:2010
• EN ISO 13849-1:2015
• EN ISO 13857:2019
• EN ISO 14118:2018
• EN 55011:2016
• EN 55011:2016/A1:2017
• EN 55011:2016/A11:2020
• EN 60204-1:2018
• EN 60335-1:2012
• EN 60335-1:2012/AC:2014
• EN 60335-1:2012/A11:2014
• EN 60335-1:2012/A13:2017
• EN 60335-1:2012/A15:2021
• EN 60335-2-65:2003
• EN 60335-2-65:2003/A11:2012
Applied national standards and technical specifications:
• EN 55011:2016/A2:2012
• EN 60335-1:2012/A16:2023
• EN 60335-2-65:2003/A1:2008
• EN 60335-2-65:2003/A12:2022
• EN 60335-2-65:2003/A2:2022
• EN 60335-2-65:2003/C1:2004
• EN 62233:2008
Manufacturer and name of the authorised representative of the technical documentation:
Trotec GmbH
Glebbener Straße 7, D-52525 Heinsberg
Phone: +49 2452 962-400
E-mail: info@trotec.de
Place and date of issue:
Heinsberg, 17.11.2024
Joachim Ludwig, Managing Director
Trotec GmbH
Grebener Str. 7
52525 Heinsberg
Germany
+49 2452 962-0
+49 2452 962-200
online@trotec.com
www.trotec.com
FR
TRADUCTION DE LA NOTICE ORIGINALE
PURIFICATEUR D'AIR
Sommaire
https://hub.trotec.com/?id=47617
Sécurité
Mise en service
Indholdsfortegnelse
https://hub.trotec.com/?id=47617
Sikkerhed
Version II - alternativ:
Lommefilter: M5 til F9
Hvis der anvendes et lommefilter, kan filfiltret i forfilterboks 1 bortfalde.
Ibrugtagning
| Nr. Betegnelse Varenummer Nr. Betegnelse Varenummer | |||
| 1 Kabinet ZAT0004855 5 Papirfilter ZAT0003486 | |||
| 2 Dæksel ZAT0004859 6 HEPA ZAT0003493 | |||
| 3 Paneler P10008268 7 Ventilatorhus B1555 | |||
| 4 Spændeelement ZAT0003483 | |||
Mål Info
| Nr. Betegnelse Varenummer Nr. Betegnelse Varenummer | |||||
| 1 Afdækning SBG P10008270 4 Skrue P10000568 | |||||
| 2 Greb P10001246 5 Skrue P10001265 | |||||
| 3 Skive P10001134 | |||||
Spændeelement Info

| Nr. | Betegnelse Varenummer Nr. | Betegnelse Varenummer | |||
| 1 | Møtrik P10000006 9 Fjederspæn | deelement P10000615 | |||
| 2 | Skrue P10001179 10 Differenstrykkontakt P10001733 | ||||
| 3 | Nitter P10001108 11 Tætningsliste P10001855 | ||||
| 4 | Vinkelforskruning P10001306 12 | Ramme HEPA SBG P10002212 | |||
| 5 | Vinkelstykke | P10000562 13 Forsyningsboks | P10002149 | ||
| 6 | Kabeltylle | P10001418 14 Ramme HEPA | P10002214 | ||
| 7 | Kabeltylle | P10002306 15 Skive P10001134 | |||
| 8 | Låsekrog | P10000616 | |||
Ventilatorhus Info

| Nr. | Betegnelse Varenummer Nr. | Betegnelse Varenummer | |||
| 1 | Ramme ventilator SBG P100022 | 11 13 Blindnitter P10007233 | |||
| 2 | Indgang ventilator P10002216 14 | Nitter P10001108 | |||
| 3 | Afstandsramme P10008258 15 | Afstandsbøsning P10008216 | |||
| 4 | Indgrebsbeskyttelse B1554 16 Tætningsbånd | P10000357 | |||
| 5 | Vinkelforskruning | P10001306 17 Tætningsbånd | P10007745 | ||
| 6 | Låsekrog | P10000616 18 Møtrik | P10000006 | ||
| 7 | Tætningsliste | P10001855 19 Skrue | P10000424 | ||
| 8 | Fjederspændeelement | P10000615 20 Skive P10004279 | |||
| 9 | Gennemføring | P 1000 1679 | 21 | Møtrik | P10000099 |
| 10 | Gennemføring | P10001417 22 Skive | P10001112 | ||
| 11 | Ventilator | P10002324 23 Skrue | P1000032 | ||
| 12 | Blindnitter P10001966 | ||||
Papirfilter Info

Sisällysluettelo
https://hub.trotec.com/?id=47617
Turvallisuus
LAATIKKO 1: ESISUODATINLAATIKKO
LAATIKKO 2: SUODATINLAATIKKO
Käyttöönotto
| Nro | Nimike Tuotenumero Nro | Nimike Tuotenumero | |||
| 1 | Peruskotelo ZAT0004855 5 Paperisuodatin ZAT0003486 | ||||
| 2 | Kansi ZAT0004859 6 HEPA ZAT0003493 | ||||
| 3 | Paneelit P10008268 7 Puhallinkotelo B1555 | ||||
| 4 | Kiinnityselementti ZAT0003483 | ||||
Mitat Tietoa
| Nro | Nimike Tuotenumero Nro | Nimike Tuotenumero | |||
| 1 | Peruskotelo SBG P10008269 30 | Sulkutulppa P10000651 | |||
| 2 | Ohjausholkki P10001409 31 | Asennuslevy P10000646 | |||
| 3 | Hallintaelementti P10008202 32 | Pistoke P10000644 | |||
| 4 | Asernuspidike P10002156 33 | Liitin P10000645 | |||
| 5 | Asennuspidike P10002155 34 | Käyttötuntilaskuri P10001137 | |||
| 6 | Kosketussuoja | P10002218 35 Mutteri | P10003618 | ||
| 7 | Putkimuhvi | P10000654 36 Kaapeliholkki | P10007561 | ||
| 8 | Tiivistenauha | P10000357 37 Päätytuki | P10001031 | ||
| 9 | Väliholkki | P10001596 38 Paine-erokytkin | P10001733 | ||
| 10 | Kulmakappale P10000562 39 | Aluslevy | P10001310 | ||
| 11 | Läpivientikappale P10001418 40 | Ruuvi | P10000322 | ||
| 12 | Rele | P10000042 41 Mutteri | P10000013 | ||
| 13 | Asennusklipsi | P10000043 42 Aluslevy | P10000019 | ||
| 14 | Kiintopyörä | P10001531 43 Aluslevy | P10000449 | ||
| 15 | Kääntöpyörä P10001530 44 | Mutteri | P10000500 | ||
| 16 | Sulkutulppa P10001646 45 | Mutteri | P10000006 | ||
| 17 | Asennuslevy P10000649 46 | Aluslevy | P10000364 | ||
| 18 | Liitin P10000648 47 | O-rengas | P10001421 | ||
| 19 | Pistoke P10000647 48 | Ruuvi | P10001179 | ||
| 20 | Kulmaliitin | P10001306 49 Niitti | P10001108 | ||
| 21 | Läpivientiliitin | P10001026 50 | Aluslevy | P10001134 | |
| 22 | Läpivientiliitin | P10001028 51 | Aluslevy | P10001112 | |
| 23 | Päätylevy | P10001029 52 | Ruuvi | P10000336 | |
| 24 | Merkkivalo | P10002353 53 | Ruuvi | P10003856 | |
| 25 | Kiertonuppi | P10001250 54 | Aluslevy | P10000038 | |
| 26 | Suojus | P10001249 55 | Mutteri | P10000208 | |
| 27 | Potentiometri | P10001751 56 | Ruuvi | P10001010 | |
| 28 | Kytkin | P10001376 57 | Ruuvi | P10000443 | |
| 29 | Sulkuhaka | P10000616 | |||
Kansi Tietoa

| Nro | Nimike Tuotenumero Nro | Nimike Tuotenumero | |||
| 1 | Kansi SBG P10008270 4 Ruuvi P10000568 | ||||
| 2 | Kahva P10001246 5 Ruuvi P10001265 | ||||
| 3 | Aluslevy P10001134 | ||||
| Nro | Nimike Tuotenumero Nro | Nimike Tuotenumero | |||
| 1 | Kiinnityskehys P10002210 4 Tiivistse P10001422 | ||||
| 2 | Kiinnityskehys SBG P10002217 5 Mutteri P1000768 | ||||
| 3 | Kahva P10002158 | ||||
| Nro Nimike Tuotenumero Nro | Nimike Tuotenumero | |||
| 1 Mutteri P10000006 9 Jousikiristyselementti P10000615 | ||||
| 2 Ruuvi P10001179 10 Paine-erokytkin P10001733 | ||||
| 3 Niitti P10001108 11 Tiiviste P10001855 | ||||
| 4 Kulmaliitin P10001306 12 HEPA-kehys SBG P10002212 | ||||
| 5 Kulmakappale P10000562 13 Huoltokotelo | P10002149 | |||
| 6 Läpivientikappale | P10001418 14 HEPA-kehys | P10002214 | ||
| 7 Läpivientikappale | P10002306 15 Aluslevy | P10001134 | ||
| 8 Sulkuhaka P10000616 | ||||
| Nro | Nimike Tuotenumero Nro | Nimike Tuotenumero | |||
| 1 | Puhallinkehys SBG P10002211 1 | 3 Sokkoniitti P10007233 | |||
| 2 | Puhaltimen sisääntulo P1000221 | 6 14 Niitti P10001108 | |||
| 3 | Välikehys P10008258 15 Väliholkki P10008216 | ||||
| 4 | Kosketussuoja B1554 16 Tiivistenauha | P10000357 | |||
| 5 | Kulmaliitin P10001306 17 Tiivistenauha | P10007745 | |||
| 6 | Sulkuhaka P10000616 18 Mutteri | P10000006 | |||
| 7 | Tiiviste P10001855 19 Ruuvi | P10000424 | |||
| 8 | Jousikiristyselementti P10000615 20 Aluslevy | P10004279 | |||
| 9 | Läpivienti P 1000 1679 | 21 Mutteri | P10000099 | ||
| 10 | Läpivienti P10001417 22 Aluslevy | P10001112 | |||
| 11 | Puhallin P10002324 23 Ruuvi | P1000032 | |||
| 12 | Sokkoniitti P10001966 | ||||
Sommario
https://hub.trotec.com/?id=47617
Sicurezza
Messa in funzione
Inhoudsopgave
https://hub.trotec.com/?id=47617
Veiligheid
In gebruik nemen
| Nr. Aanduiding Artikelnummer | Nr. Aanduiding Artikelnummer | |||
| 1 Basisbehuizing ZAT0004855 5 Papierfilter ZAT0003486 | ||||
| 2 Deksel ZAT0004859 6 HEPA ZAT0003493 | ||||
| 3 Panelen P10008268 7 Behuizing ventilator B1555 | ||||
| 4 Spanelement ZAT0003483 | ||||
Afmetingen Info

| Nr. Aanduiding Artikelnummer Nr. Aanduiding Artikelnummer | |||||
| 1 Frame ventilator SBG P10002211 13 Popnagel P10007233 | |||||
| 2 Inlaat ventilator P10002216 14 Klinknagel P10001108 | |||||
| 3 Afstandsframe P10008258 15 Afstandsbus P10008216 | |||||
| 4 Ingrijpbescherming B1554 16 Afdichtband P10000357 | |||||
| 5 Haakse schroefkoppeling P10001306 17 Afdichtband P10007745 | |||||
| 6 Sluithaak P10000616 18 Moer | P10000006 | ||||
| 7 Afdichting P10001855 19 Bout | P10000424 | ||||
| 8 Veerspanelement P10000615 20 Ring | P10004279 | ||||
| 9 Doorvoer | P 1000 1679 | 21 | Moer | P10000099 | |
| 10 Doorvoer P10001417 22 Ring | P10001112 | ||||
| 11 Ventilator P10002324 23 Bout | P1000032 | ||||
| 12 Popnagel P10001966 | |||||
Papierfilter Info

Innholdsfortegnelse
https://hub.trotec.com/?id=47617
Sikkerhet
| Nr. Betegnelse | |
| 1 | FORFILTERBOKS: GROVFILTER G og/eller FINFILTER F |
| 2 | FILTERBOKS: HEPA- eller lommefilter |
| 3 | VIFTEBOKS |
| I | Tilkobling for filterboks 2 |
| II | Tilkobling for viftestyring |
| III | Tillkobling for vifteboks 3 |
| 9 | Spennramme |
| 10 | Spennlås |
Sidevisning sensorslangesiden:
| Nr. Betegnelse | |
| S1 Sensorslange S1 | |
| S2 Sensorslange S2 | |
| 11 | Målested for vifteboks 3 |
| 12 Målepunkt for ramme (her med blindplugg) | |
| 13 | Målepunkt for filterboks 2 |
Igangsetting
| Nr. Betegnelse Artikkelnummer Nr. Betegnelse Artikkelnummer | |||||
| 1 Basishus ZAT0004855 5 Papirfilter ZAT0003486 | |||||
| 2 Lokk ZAT0004859 6 HEPA ZAT0003493 | |||||
| 3 Paneler P10008268 7 Viftehus B1555 | |||||
| 4 Spennelement ZAT0003483 | |||||
Dimensjoner Info
| Nr. | Betegnelse | Artikkelnummer | Nr. | Betegnelse | Artikkelnummer | ||
| 1 | Basishus | SBG P10008269 30 | Stopplugg | P10000651 | |||
| 2 | Føringshylse | P10001409 31 | Monteringsplate | P10000646 | |||
| 3 | Kontrollelement | P10008202 32 | Stikkontakt | P10000644 | |||
| 4 | Monteringsholder | P10002156 33 | Kontakt | P10000645 | |||
| 5 | Monteringsholder | P10002155 34 | Driftstimeteller | P10001137 | |||
| 6 | Berøringsbeskyttelse | P10002218 | 35 | Mutter | P10003618 | ||
| 7 | Krage | P10000654 36 Kabelgjennomføring | P10007561 | ||||
| 8 | Tetningsbånd | P10000357 37 Endestøtte | P10001031 | ||||
| 9 | Avstandshylse | P10001596 38 Diff.-bryter | P10001733 | ||||
| 10 | Vinkelstykke | P10000562 39 Skive | P10001310 | ||||
| 11 | Gjennomføringshette | P10001418 40 Skrue | P10000322 | ||||
| 12 | Relé | P10000042 41 Mutter | P10000013 | ||||
| 13 | Monteringsklips | P10000043 42 Skive | P10000019 | ||||
| 14 | Fast trinse | P10001531 43 Skive | P10000449 | ||||
| 15 | Styrehjul | P10001530 44 Mutter | P10000500 | ||||
| 16 | Stopplugg | P10001646 45 Mutter | P10000006 | ||||
| 17 | Monteringsplate | P10000649 46 Skive | P10000364 | ||||
| 18 | Kontakt | P10000648 47 O-ring | P10001421 | ||||
| 19 | Stikkontakt | P10000647 48 Skrue | P10001179 | ||||
| 20 | Vinkelskrue | P10001306 49 Nagle | P10001108 | ||||
| 21 | Gjennomføringsklemme | P10001026 50 Skive | P10001134 | ||||
| 22 | Gjennomføringsklemme | P10001028 51 Skive | P10001112 | ||||
| 23 | Endeplate | P10001029 52 Skrue | P10000336 | ||||
| 24 | Signallys | P10002353 53 Skrue | P10003856 | ||||
| 25 | Dreieknapp | P10001250 54 Skive | P10000038 | ||||
| 26 | Hette | P10001249 55 Mutter | P10000208 | ||||
| 27 | Potensiometer | P10001751 56 Skrue | P10001010 | ||||
| 28 | Bryter | P10001376 57 Skrue | P10000443 | ||||
| 29 | Låsehake | P10000616 | |||||
Lokk Info

| Nr. Betegnelse Artikkelnummer | Nr. Betegnelse Artikkelnummer | |||
| 1 Deksel SBG P10008270 4 Skrue | P10000568 | |||
| 2 Håndtak P10001246 5 Skrue P10001265 | ||||
| 3 Skive P10001134 | ||||
Spennelement Info

| Nr. Betegnelse Artikkelnummer | Nr. Betegnelse Artikkelnummer | |||
| 1 Spennramme P10002210 4 Tetning P10001422 | ||||
| 2 Spennramme SBG P10002217 5 | Mutter P1000768 | |||
| 3 Håndtak P10002158 | ||||
HEPA-filter Info

| Nr. Betegnelse Artikkelnummer | Nr. Betegnelse Artikkelnummer | ||||
| 1 Mutter P10000006 9 Fjærspenningselement P10000615 | |||||
| 2 Skrue P10001179 10 Diff.-bryter P10001733 | |||||
| 3 Nagle P10001108 11 Tetning P10001855 | |||||
| 4 Vinkelskrue P10001306 12 Ramme HEPA SBG P10002212 | |||||
| 5 Vinkelstykke | P10000562 13 Forsyningsboks | P10002149 | |||
| 6 Gjennomføringshette | P10001418 14 Ramme HEPA | P10002214 | |||
| 7 Gjennomføringshette | P10002306 15 Skive | P10001134 | |||
| 8 Låsehake | P10000616 | ||||
Viftehus Info

| Nr. Betegnelse Artikkelnummer | Nr. Betegnelse Artikkelnummer | ||||
| 1 Ramme vifte SBG P10002211 13 | Blindnagle P10007233 | ||||
| 2 Inngang vifte P10002216 14 Nagle P10001108 | |||||
| 3 Avstandsramme P10008258 15 | Avstandshylse P10008216 | ||||
| 4 Inngrepssikring B1554 16 Tetningsbånd P10000357 | |||||
| 5 Vinkelskrue | P10001306 17 Tetningsbånd P10007745 | ||||
| 6 Låsehake | P10000616 18 Mutter | P10000006 | |||
| 7 Tetning | P10001855 19 Skrue | P10000424 | |||
| 8 Fjærspenningselement | P10000615 20 Skive | P10004279 | |||
| 9 Gjennomføring | P 1000 1679 | 21 Mutter P10000099 | |||
| 10 Gjennomføring | P10001417 22 Skive | P10001112 | |||
| 11 Vifte | P10002324 23 Skrue | P1000032 | |||
| 12 Blindnagle P10001966 | |||||
Papirfilter Info

| Nr. Betegnelse Artikelnummer | Nr. Betegnelse Artikelnummer | |||
| 1 Tetning P10000290 2 Forfilterramme P10002213 | ||||
Koblingsskjema
içindekiler
https://hub.trotec.com/?id=47617
| No. | Tanım Ürün numarası No. | Tanım Ürün numarası | |||
| 1 | Ana gövde SBG P10008269 30 Sızdırmaz tapa P10000651 | ||||
| 2 | Kılavuz kovan P10001409 31 Montaj plakası P10000646 | ||||
| 3 | Kumanda elemanı P10008202 32 Fış P10000644 | ||||
| 4 | Montaj braketi P10002156 33 Yuva P10000645 | ||||
| 5 | Montaj braketi P10002155 34 Çalışma saati sayacı P10001137 | ||||
| 6 | Temas koruması P10002218 35 Somun | P10003618 | |||
| 7 | Faturalı çerçeve P10000654 36 Vidalı kablo bağlantısı | P10007561 | |||
| 8 | Şerit conta P10000357 37 Uç desteği | P10001031 | |||
| 9 | Mesafe kovanı P10001596 38 Fark basıncı şalteri P10001733 | ||||
| 10 | Açılı parça P10000562 39 Pul | P10001310 | |||
| 11 | Lastik rondela P10001418 40 Civata | P10000322 | |||
| 12 | Röle P10000042 41 Somun | P10000013 | |||
| 13 | Montaj klipsi P10000043 42 Pul | P10000019 | |||
| 14 | Sehpa tekerleği P10001531 43 Pul | P10000449 | |||
| 15 | Manevra tekerleği P10001530 44 Somun | P10000500 | |||
| 16 | Sızdırmaz tapa P10001646 45 Somun | P10000006 | |||
| 17 | Montaj plakası P10000649 46 Pul | P10000364 | |||
| 18 | Yuva P10000648 47 O-ring | P10001421 | |||
| 19 | Fiş P10000647 48 Civata | P10001179 | |||
| 20 | Açılı vidalı bağlantı P10001306 49 Perçin | P10001108 | |||
| 21 | Geçiş klemensi P10001026 50 Pul | P10001134 | |||
| 22 | Geçiş klemensi P10001028 51 Pul | P10001112 | |||
| 23 | Uç plakası P10001029 52 Civata | P10000336 | |||
| 24 | Sinyal lambası P10002353 53 Civata | P10003856 | |||
| 25 | Döner düğme P10001250 54 Pul | P10000038 | |||
| 26 | Başlık P10001249 55 Somun | P10000208 | |||
| 27 | Potansiyometre P10001751 56 Civata | P10001010 | |||
| 28 | Şalter P10001376 57 Civata | P10000443 | |||
| 29 | Kapatma kancası P10000616 | ||||
Kapak Bilgi


- INHALTSVERZEICHNIS
- SICHERHEIT
- VERSION II - ALTERNATIV
- INBETRIEBNAHME
- TABLE OF CONTENTS
- INFORMATION ON THE USE OF THESE INSTRUCTIONS
- SYMBOLS
- DANGER
- WARNING
- WARNING OF ELECTRICAL VOLTAGE
- CAUTION
- NOTICE
- INFO
- FOLLOW THE MANUAL
- SAFETY
- INTENDED USE
- REASONABLY FORESEEABLE MISUSE
- PERSONNEL QUALIFICATION
- ELECTRICALLY SKILLED PERSON
- INSTRUCTED PERSON
- RESIDUAL RISKS
- BEHAVIOUR IN THE EVENT OF AN EMERGENCY
- INFORMATION ABOUT THE DEVICE
- DEVICE DESCRIPTION
- TRANSPORT AND STORAGE
- TRANSPORT
- STORAGE
- ASSEMBLY AND START-UP
- SCOPE OF DELIVERY
- UNPACKING THE DEVICE
- ASSEMBLY
- INSERTING THE FILTERS
- BOX 1: PRE-FILTER BOX
- BOX 2: FILTER BOX
- VERSION I
- VERSION II – ALTERNATIVE
- FILTER TYPES (NOT INCLUDED IN THE SCOPE OF DELIVERY)
- CONFIGURATION A
- CONFIGURATION B
- ARRANGING AND CONNECTING FILTER BOXES
- START-UP
- INSTALLATION OF THE DEVICE IN THE ROOM, THE AIR OF WHICH IS TO BE PURIFIED
- INSTALLATION OF THE DEVICE OUTSIDE OF THE ROOM, THE AIR OF WHICH IS TO BE PURIFIED
- CONNECTING THE POWER CABLE
- OPERATION
- SWITCHING THE DEVICE ON
- ADJUSTING THE AIR VOLUME
- SHUTDOWN
- AVAILABLE ACCESSORIES
- ERRORS AND FAULTS
- THE DEVICE DOES NOT START
- THE DEVICE IS LOUD OR VIBRATES
- THE DEVICE GETS VERY WARM, IS LOUD OR IS LOSING POWER
- THE DEVICE GIVES OFF AN UNPLEASANT ODOUR
- THE DEVICE STILL DOES NOT OPERATE CORRECTLY AFTER THESE CHECKS
- MAINTENANCE
- ACTIVITIES REQUIRED BEFORE STARTING MAINTENANCE
- CLEANING THE HOUSING
- VISUAL INSPECTION OF THE INSIDE OF THE DEVICE FOR DIRT
- CLEANING THE INSIDE OF THE DEVICE
- CHANGING THE FILTER(S)
- DISPOSAL
- ONLY FOR UNITED KINGDOM
- OVERVIEW INFO
- BASIC HOUSING INFO
- COVER INFO
- TENSION ELEMENT INFO
- HEPA FILTER INFO
- FAN HOUSING INFO
- PAPER FILTER INFO
- EU DECLARATION OF CONFORMITY (ORIGINAL)
- THE PRODUCT ALSO COMPLIES WITH ALL RELEVANT PROVISIONS OF THE FOLLOWING DIRECTIVES/REGULATIONS
- APPLIED HARMONISED STANDARDS
- APPLIED NATIONAL STANDARDS AND TECHNICAL SPECIFICATIONS
- MANUFACTURER AND NAME OF THE AUTHORISED REPRESENTATIVE OF THE TECHNICAL DOCUMENTATION
- FR
- SOMMAIRE
- SÉCURITÉ
- MISE EN SERVICE
- INDHOLDSFORTEGNELSE
- SIKKERHED
- IBRUGTAGNING
- SPÆNDEELEMENT INFO
- VENTILATORHUS INFO
- PAPIRFILTER INFO
- SISÄLLYSLUETTELO
- TURVALLISUUS
- LAATIKKO 1: ESISUODATINLAATIKKO
- LAATIKKO 2: SUODATINLAATIKKO
- KÄYTTÖÖNOTTO
- KANSI TIETOA
- SOMMARIO
- SICUREZZA
- MESSA IN FUNZIONE
- INHOUDSOPGAVE
- VEILIGHEID
- IN GEBRUIK NEMEN
- AFMETINGEN INFO
- PAPIERFILTER INFO
- INNHOLDSFORTEGNELSE
- SIKKERHET
- IGANGSETTING
- DIMENSJONER INFO
- SPENNELEMENT INFO
- VIFTEHUS INFO
- IÇINDEKILER
- KAPAK BILGI
Brand : TROTEC
Model : TAC 3000
Category : Air purifier