
RW12D - Subwoofer KLIPSCH - Free user manual and instructions
Find the device manual for free RW12D KLIPSCH in PDF.
| Product Type | Active subwoofer (amplified) |
| Brand | Klipsch |
| Model | RW-12D |
| Speaker driver | 12 inches (30.5 cm) |
| Amplifier power | 200 Watts RMS (estimated) |
| Frequency response | 25 Hz to 120 Hz (estimated) |
| Low-pass filter | Adjustable from 40 to 120 Hz, or bypass (LFE mode) |
| Phase adjustment | 0° to 180°, adjustable in steps |
| EQ modes | Punch (60 Hz), Depth (30 Hz), Flat (neutral) |
| Preset memories | 3 (Movie, Music, Night) |
| Inputs | Line In (RCA stereo/LFE), High Level Input (binding posts) |
| Power mode | Auto On / Always On (switchable) |
| Display | LCD screen with brightness adjustment |
| Keyboard lock | Yes, via key code |
| Infrared remote control | Built-in IR sensor (codes available at klipsch.com) |
| Dimensions (approx.) | 41 x 39 x 46 cm (H x W x D) |
| Weight (approx.) | 18 kg (39.7 lbs) |
| Power supply | Mains 220-240 V, 50/60 Hz (depending on version) |
| Standby consumption | < 0.5 W (estimated) |
| Maintenance and cleaning | Dust with dry cloth or vacuum brush |
| Warranty | 5 years (speaker), 2 years (electronics) in the USA and Canada |
| Reparability | Refer to a certified repair technician |
| Compliance information | CE, FCC Class B, ICES-003, NMB-003 |
Frequently Asked Questions - RW12D KLIPSCH
User questions about RW12D KLIPSCH
0 question about this device. Answer the ones you know or ask your own.
Ask a new question about this device
Download the instructions for your Subwoofer in PDF format for free! Find your manual RW12D - KLIPSCH and take your electronic device back in hand. On this page are published all the documents necessary for the use of your device. RW12D by KLIPSCH.
USER MANUAL RW12D KLIPSCH
IMPORTANT SAFETY INSTRUCTIONS
- READ these instructions.
- KEEP these instructions.
- HEED all warnings.
- FOLLOW all instructions.
- DO NOT use this apparatus near water.
- CLEAN ONLY with dry cloth.
- DO NOT block any ventilation openings. Install in accordance with the manufacturer's instructions.
- Do not install near any heat sources such as radiators, heat registers, stoves, or other apparatus (including amplifiers) that produce heat.
- DO NOT defeat the safety purpose of the polarized or grounding type plug. A polarized plug has two blades with one wider than the other. A grounding type plug has two blades and a third grounding prong. The wider blade or the third prong are provided for your safety. If the provided plug does not fit into your outlet, consult an electrician for replacement of the obsolete outlet.
- PROTECT the power cord from being walked on or pinched, particularly at plugs, convenience receptacles, and the point where they exit from the apparatus.
- ONLY USE attachments/accessories specified by the manufacturer.
-
USE only with a cart, stand, tripod, bracket, or table specified by the manufacturer, or sold with the apparatus. When a cart is used, use caution when moving the cart/apparatus combination to avoid injury from tip-over.
-
UNPLUG this apparatus during lightning storms or when unused for long periods of time.
- REFER all servicing to qualified service personnel. Servicing is required when the apparatus has been damaged in any way, such as power-supply cord or plug is damaged, liquid has been spilled or objects have fallen into the apparatus, the apparatus has been exposed to rain or moisture, does not operate normally, or has been dropped.
- DO NOT expose this apparatus to dripping or splashing and ensure that no objects filled with liquids, such as vases, are placed on the apparatus.
- To completely disconnect this apparatus from the AC Mains, disconnect the power supply cord plug from the AC receptacle.
- The mains plug of the power supply cord shall remain readily operable.

The exclamation point, within an equilateral triangle, is intended to alert the user to the presence of important operating and maintenance (servicing) instructions in the literature accompanying the product.

The lightning flash with arrowhead symbol within an equilateral triangle, is intended to alert the user to the presence of uninsulated "dangerous voltage" within the product's enclosure that may be of sufficient magnitude to constitute a risk of electrical shock to persons.
WARNING: To reduce the risk of fire or electrical shock, do not expose this apparatus to rain or moisture.
No naked flame sources - such as candles - should be placed on the product.
WARNING: Do Not Open! Risk of Electrical Shock. Voltages in this equipment are hazardous to life. No user-serviceable parts inside. Refer all servicing to qualified service personnel.
Place the equipment near a main power supply outlet and make sure that you can easily access the power breaker switch.
WARNING: This product is intended to be operated ONLY from the AC Voltages listed on the back panel or included power supply of the product. Operation from other voltages other than those indicated may cause irreversible damage to the product and void the product's warranty. The use of AC Plug Adapters is cautioned because it can allow the product to be plugged into voltages in which the product was not designed to operate. If the product is equipped with a detachable power cord, use only the type provided with your product or by your local distributor and/or retailer. If you are unsure of the correct operational voltage, please contact your local distributor and/or retailer.
INSPECTION
We want your new speaker system to look as good as it did leaving the factory! Please check promptly for any transit damage. Carefully unpack your new speaker system and verify the components against the packing list. In extreme circumstances, items may have become damaged in transit. If any damage is discovered, notify the delivery service and dealer where the system was purchased. Make a request for inspection, and follow their instructions for evaluation. Be sure to keep the product's original shipping carton.
POSITIONING YOUR REFERENCE SERIES SUBWOOFER
Klipsch powered subwoofoers are designed to reproduce deep bass and deliver the impact that makes your movies and music come alive. Typically, optimum performance will result if you place your subwoofer in a corner of the room on the same wall as your front channel speakers (Refer to figures 1 & 2). Please note that room placement can have a dramatic effect upon the performance of your powered subwoofer. Corner placement, as suggested above, will increase the amount of bass output, while placing the subwoofer along the middle of a wall, or out in the room will decrease the amount of bass output. Experiment with a number of different placement options and control settings to find the one that best suits your particular room and taste. When choosing your subwoofer's location, keep in mind that you will need to connect the subwoofer's built-in amplifier to an AC power outlet.
CONNECTIONS AND CONTROLS
CAUTION: Turn off your amplifier and your subwoofer before making any connections. Do not connect both the "High Level" and "Line Level" inputs at the same time as damage to your equipment could result.
RW-10d / RW-12d / RSW-10d
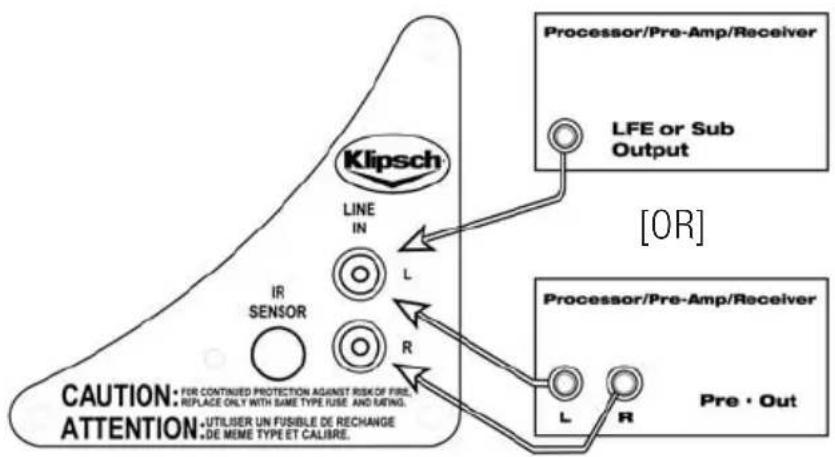
"LINE IN"-This input is designed as the standard or default input for the subwoofer. It accepts signals from the Left and Right channel pre-amp, subwoofer or LFE outputs of your electronics via the RCA jack inputs. Connect to the "RIGHT" and/or "LEFT/LFE" inputs on the subwoofer's rear panel (Refer to figures 3 and 5).
RW-10d / RW-12d
"HIGH LEVEL IN" - These connections can be used as an alternate connection method to the line level hook up. Using 16- gauge or larger speaker wire, connect the Red "positive" (+) terminal of your amplifier's Left channel to the Red "positive" (+) terminal of your subwoofer's Left channel "HIGH LEVEL IN" terminal. Connect the Black "negative" (-) terminal of your amplifier's Left channel to the Black "negative" (-) of your subwoofer's Left channel "HIGH LEVEL IN" terminal. Repeat this procedure for the Right channel connections (refer to Figure 4). Take care that no bare wires from any of the connections can touch any of the other terminals as damage to your equipment could result.
CONTROLS
All of the subwoofer's controls, and changes to control settings, are accessed through the cursor key pad and display on the top of the subwoofer's cabinet. The only exception to this is the main AC power switch which is located on the rear panel of the subwoofer.
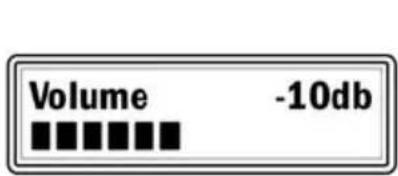
- Use the (UP) or (Down) key to scroll through the list of control options.
- Use the (Left) or (Right) Key to make adjustments to a given control setting
- Use (IE Center Key) when the appears on the display to store and recall custom settings or to lock the keypad
-
After adjusting the individual control parameters for "Volume", "EQ Mode", "Low-pass filter" and "Phase", your settings can be stored in one of three user memories ("Movie", "Music" and "Night"). This allows for global recall of all of the above settings to tailor the subwoofer's performance to compensate for differing source material and uses.
The display will return to the "Volume" screen after 10 seconds if no adjustments are made while in any other control or display mode. -
In periods of low humidity, it is possible that a static electricity discharge to the subwoofer may cause a momentary interruption in the subwoofer's output or changes to the LCD display content. Any display content errors will be corrected when the screen changes modes.
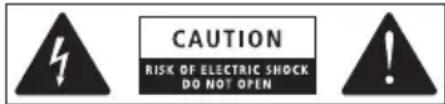
"Volume" - Use the Left/Right cursor keys to adjust the subwoofer's volume level to match the output of your main speakers. The volume control on your system's main amplifier or pre-amplifier will be the overall volume control for your subwoofer and full range speakers. Press and hold (or press and release) the Left cursor key to decrease the subwoofer's volume. Press and hold (or press and release) the Right cursor key to increase the subwoofer's volume to the desired level. From this screen press the down cursor key to access other control settings.
"Recall Settings:" - This screen is used to select any one of three, user defined, memory presets titled "Movie", "Music" and "Night". Use the Left/Right cursor keys to select the desired group of stored control settings and press the Center key to apply them. "Settings Recalled!" will then be displayed. All of the user settings, in the three memory presets, can be erased and restored to their default values by scrolling down to the last "System Info" screen. Press the Right cursor key twice to get to the "System Reset" screen. Press the center cursor key and all user settings will be replaced with the default settings. "Reset Complete" will be displayed. During initial setup, skip this screen until all other initial control adjustments have been made. From this screen press the down or up cursor key to access other control settings.
"EQ Mode:" - This screen is used to select two different Bass emphasis settings, titled "Punch" and "Depth". They are designed to complement different types of program material, such as movie soundtracks or music. The "Punch" setting emphasizes the 60Hz region while the "Depth" setting boosts the 30Hz range. A third setting is titled "Flat" which defeats these two settings. Use of either of these EQ settings will slightly reduce the subwoofer's maximum output capability as they will require more of the subwoofer's amplifier power. Use the Left/Right cursor keys to select the desired EQ setting. From this screen press the down or up cursor key to access other control settings.
"Lowpass" - This screen is used to adjust the subwoofer's upper frequency limit to achieve a proper blend with your system's main speakers. A higher frequency (Hz) is typically used with smaller, bass limited main speakers and a lower frequency setting is customarily used with larger floorstanding models. This filter can be adjusted from 40Hz to 120Hz, as required, or defeated if the low pass filter function is being performed by your system's electronics. Use the Left/Right cursor keys to adjust the lowpass filter. To defeat this filter press and hold the Right cursor key until "Lowpass OFF LFE Mode" is displayed. Refer to your surround processor's owner's manual for more Bass
Management information. From this screen press the down or up cursor key to access other control settings.
"Phase" - This screen is used to adjust the subwoofer's acoustic phase to match that of your main speakers. Use the Left/Right cursor keys to adjust the subwoofer's phase from 0^ to 180^ . The proper setting of this control is highly dependant on room acoustics and the position of your subwoofer in the room. After setting the volume and lowpass controls set the phase to 0^ and listen to a recording with a prominent, repeating bass line in your intended listening position. Repeat this process with the 180^ setting and use the setting that yields the greatest amount of bass output. If neither of these settings is better than the other experiment with intermediate settings. From this screen press the down or up cursor key to access other control settings.
"Save Settings:" - This screen is used to store all of the above control settings in one of three memory presets ("Music", "Movie" and "Night"). Use the Left/Right cursor keys to select the desired preset and press the Enter key to store your current control settings. "Settings Saved!" will be displayed. After the settings are stored in memory the display will return to the default "Volume" adjustment screen. From this screen press the up or down cursor key to access other control settings.
"Disp Brightness" - This screen is used to adjust the brightness level of the display screen. Use the Left/Right cursor keys to select from any one of 4 different brightness intensities. From this screen press the down or up cursor key to access other control settings.
"Power:" - This screen is used to select the "Auto On" or the "Always On" power mode for the Subwoofer's amplifier. Use the Left/Right cursor keys to select between these two modes. When "Auto On" is selected, the subwoofer will automatically turn on when it senses a signal. It will automatically turn off after 20 minutes if no signal is present and "Standby" will be displayed. In the "Always On" setting the subwoofer will remain on as long as the main A/C power switch on the subwoofer's rear panel is in the "ON" position. From this screen press the down or up cursor key to access other control settings.
"Keypad Lock" - This screen is used to lock the keypad and prevent your settings from being changed by other users. After making all desired adjustments press the Center key to lock the keypad. "Keypad Locked Hold and to unlock" will be displayed. The display will then return to the default "Volume" screen. To unlock the keypad press and hold the Left and Right keys until "Keypad Unlocked" is displayed. The display will again return to the default "Volume" screen. It is suggested that you write down all of your settings for future reference in case the keypad is unlocked and your settings are changed by another user.
For more information on the controls mentioned in this manual and on the bass management settings of your electronics, see your authorized Klipsch dealer or visit www.klipsch.com.
BACK PANEL FEATURES
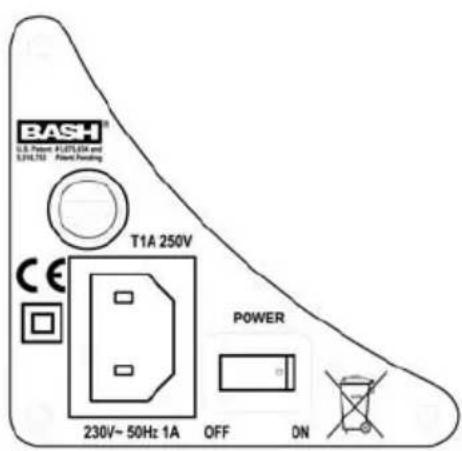
"POWER" ON/OFF - This is the main A/C power switch for the subwoofer. This switch must be in the "ON" position for the subwoofer to operate and for the "AUTO/ON" feature to function. Set this switch to the "OFF" position if the subwoofer will not be used for an extended period of time (i.e. vacation).
IR SENSOR - An infrared remote control sensor is included on the rear panel of your subwoofer for integration with A/V remote control systems. The IR codes for this subwoofer can be obtained by visiting www.klipsch.com. A dedicated hand held remote control does not exist for these models.
CARE AND CLEANING OF YOUR POWERED SUBWOOFER
Your subwoofer has a durable vinyl finish that should only require dry dusting or cleaning with a dry cloth. Avoid the use of abrasive or solvent-based cleaners and harsh detergents. The brush attachment of your vacuum should remove any dust from your subwoofer enclosure.
WARRANTY - U.S. AND CANADA ONLY
The Warranty below is valid only for sales to consumers in the United States or Canada. KLIPSCH, L.L.C. ("KLIPSCH") warrants this product to be free from defects in materials and workmanship (subject to the terms set forth below) for a period of five (5) years from the date of purchase. During the Warranty period, KLIPSCH will repair or replace (at KLIPSCH's option) this product or any defective parts (excluding electronics and amplifiers). For products that have electronics or amplifiers, the Warranty on those parts is for a period of two (2) years from the date of purchase.
To obtain Warranty service, please contact the KLIPSCH authorized dealer from which you purchased this product. Proof of purchase in the form of a bill of sale or receipted invoice, which is evidence that this product is within the Warranty period, must be presented or included to obtain Warranty service.
This Warranty is invalid if (a) the factory-applied serial number has been altered or removed from this product or (b) this product was not purchased from a KLIPSCH authorized dealer. You may call 1-800-KLIPSCH to confirm that you have an unaltered serial number and/or you purchased from a KLIPSCH authorized dealer.
This Warranty is only valid for the original purchaser and will automatically terminate prior to expiration if this product is sold or otherwise transferred to another party.
This Warranty does not cover cosmetic damage or damage due to misuse, abuse, negligence, acts of God, accident, commercial use or modification of, or to any part of, the product. This Warranty does not cover damage due to improper operation, maintenance or installation, or attempted repair by anyone other than KLIPSCH or a KLIPSCH dealer which is authorized to do KLIPSCH warranty work. Any unauthorized repairs will void this Warranty. This Warranty does not cover product sold AS IS or WITH ALL FAULTS.
REPAIRS OR REPLACEMENTS AS PROVIDED UNDER THIS WARRANTY ARE THE EXCLUSIVE REMEDY OF THE CONSUMER. KLIPSCH SHALL NOT BE LIABLE FOR ANY INCIDENTAL OR CONSEQUENTIAL DAMAGES FOR BREACH OF ANY EXPRESS OR IMPLIED WARRANTY ON THIS PRODUCT. EXCEPT TO THE EXTENT PROHIBITED BY LAW, THIS WARRANTY IS EXCLUSIVE AND IN LIEU OF ALL OTHER EXPRESS AND IMPLIED WARRANTYES WHATSOEVER, INCLUDING BUT NOT LIMITED TO, THE WARRANTY OF MERCHANTABILITY AND FITNESS FOR A PRACTICAL PURPOSE.
Some states do not allow the exclusion or limitation of incidental or consequential damages or implied warranties so the above exclusions may not apply to you. This Warranty gives you specific legal rights, and you may have other rights, which vary from state to state.
WARRANTY OUTSIDE THE UNITED STATES AND CANADA
The Warranty on this product if it is sold to a consumer outside of the United States or Canada shall comply with applicable law and shall be the sole responsibility of the distributor that supplied this product. To obtain any applicable warranty service, please contact the dealer from which you purchased this product, or the distributor that supplied this product.
FCC AND CANADA COMPLIANCE INFORMATION:
Note: This equipment has been tested and found to comply with the limits for a Class B digital device, pursuant to part 15 of the FCC Rules. These limits are designed to provide reasonable protection against harmful interference in a residential installation. This equipment generates, uses and can radiate radio frequency energy and, if not installed and used in accordance with the instructions, may cause harmful interference to radio communications. However, there is no guarantee that interference will not occur in a particular installation. If this equipment does cause harmful interference to radio or television reception, which can be determined by turning the equipment off and on, the user is encouraged to try to correct the interference by one or more of the following measures:
- Reorient or relocate the receiving antenna.
- Increase the separation between the equipment and receiver.
- Connect the equipment into an outlet on a circuit different from that to which the receiver is connected.
- Consult the dealer or an experienced radio/TV technician for help.
Modifications not expressly approved by the manufacturer could void the user's authority to operate the equipment under FCC rules.
This class B digital apparatus complies with Canadian ICES-003.
Eligible to bear the CE mark, Conforms to European Union Low Voltage Directive 73/23/EEC; Conforms to European Union EMC Directive 89/336/EEC and 2004/108/EC.
CONSIGNES DE SECURITE IMPORTANTES
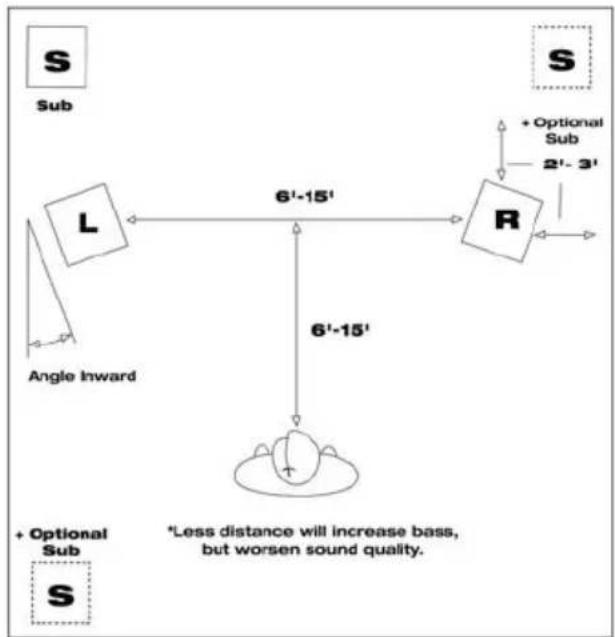
FIGURE 1
STEREO PLACEMENT

FIGURE 2
MULTICHANNEL PLACEMENT
FIGURE 3
RW-10d/RW-12d
LINE LEVEL
CONNECTIONS
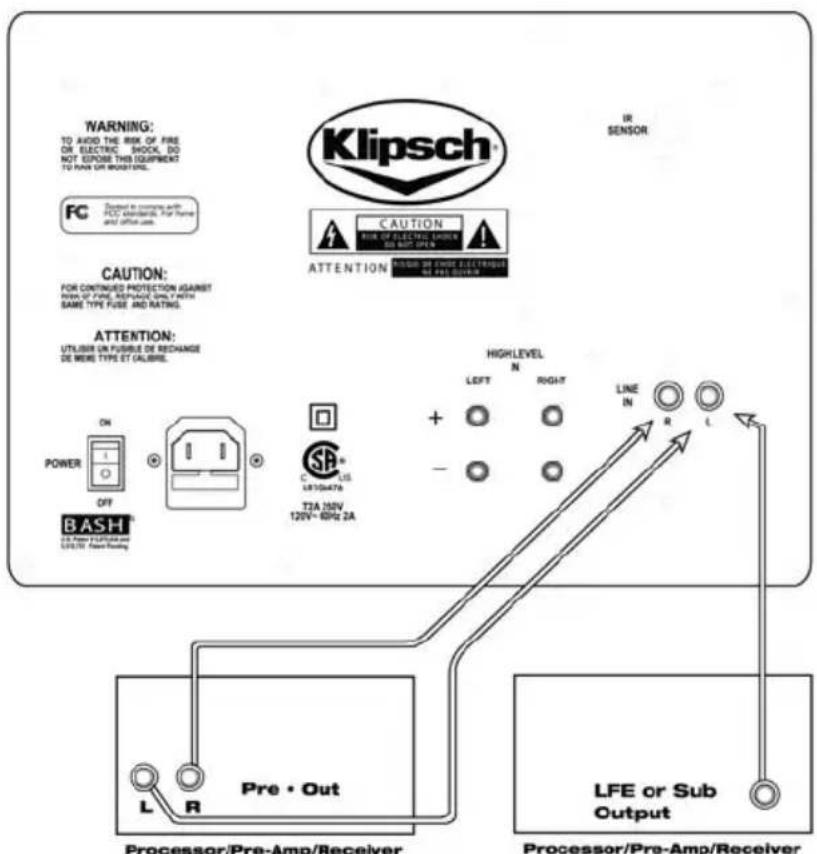
[OR]
FIGURE 4
RW-10d/RW-12d
HIGH LEVEL
CONNECTIONS
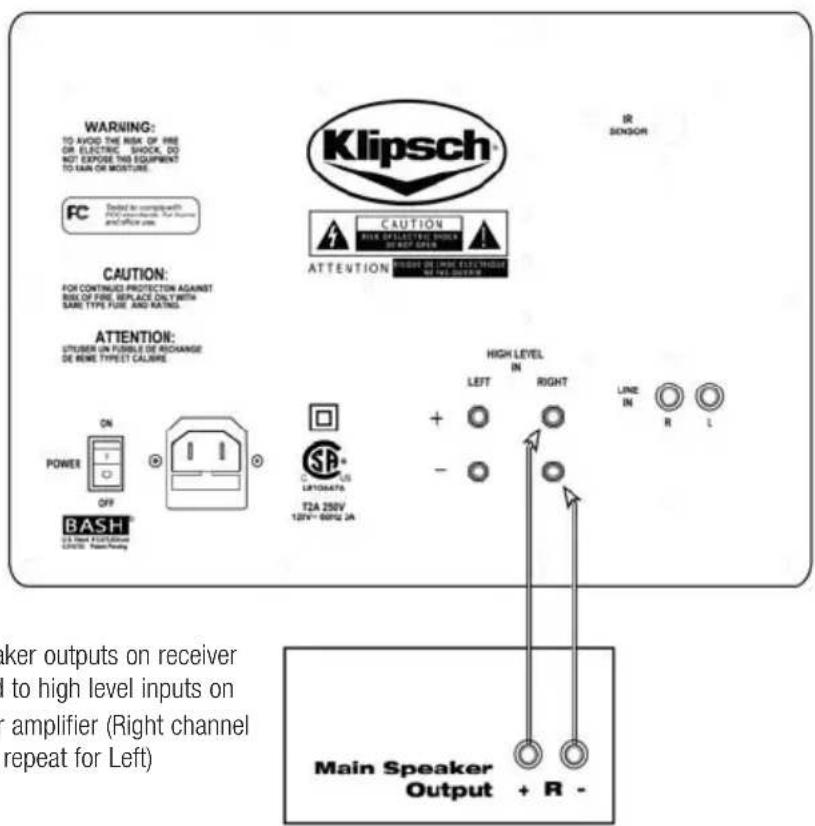
Receiver
FIGURE 5
RSW-10d LINE LEVEL
CONNECTIONS

- IMPORTANT SAFETY INSTRUCTIONS
- INSPECTION
- POSITIONING YOUR REFERENCE SERIES SUBWOOFER
- CONNECTIONS AND CONTROLS
- RW-10d / RW-12d / RSW-10d
- RW-10d / RW-12d
- CONTROLS
- BACK PANEL FEATURES
- CARE AND CLEANING OF YOUR POWERED SUBWOOFER
- WARRANTY - U.S. AND CANADA ONLY
- WARRANTY OUTSIDE THE UNITED STATES AND CANADA
- FCC AND CANADA COMPLIANCE INFORMATION:
- CONSIGNES DE SECURITE IMPORTANTES
- FIGURE 4
- FIGURE 5
Brand : KLIPSCH
Model : RW12D
Category : Subwoofer