
DH10D - Dehumidifier FAGOR - Free user manual and instructions
Find the device manual for free DH10D FAGOR in PDF.

| Product type | Dehumidifier |
| Brand | Fagor |
| Model | DH10D |
| Power supply | 220-240 V ~ 50 Hz |
| Power consumption | 240 W |
| Tank capacity | 1.5 litres |
| Operating temperature | 5 °C to 35 °C |
| Adjustable humidity range | 35% to 80% RH (in 5% steps) |
| Noise level | 45 dB(A) |
| Continuous operation | Yes (maximum dehumidification) |
| Auto shut-off when tank full | Yes |
| Automatic defrost | Yes |
| Filter type | Washable air filter |
| Filter cleaning frequency | At least every 30 days |
| Continuous drainage possible | Yes (hose not included, 12 mm diameter) |
| Tank maintenance | Clean every 2 weeks with mild detergent |
| Safety | Frost protection, auto shut-off when tank full or incorrectly positioned |
| Repairability | Fagor authorized technical service |
| Country of manufacture | Not specified |
Frequently Asked Questions - DH10D FAGOR
User questions about DH10D FAGOR
0 question about this device. Answer the ones you know or ask your own.
Ask a new question about this device
Download the instructions for your Dehumidifier in PDF format for free! Find your manual DH10D - FAGOR and take your electronic device back in hand. On this page are published all the documents necessary for the use of your device. DH10D by FAGOR.
USER MANUAL DH10D FAGOR
(1) INDEASE, 2005-08 (3) OFICUM DE NECHASTIIS MUSEBLES ECONOMICS (HARD MANS) IN THE MAINTIZARE. The most inclusive resources the trial be met by the metric appreciation in the Liner's Manual.
natural_image
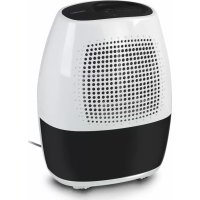
Illustration of a white and gray portable water heater with grid pattern (no text or symbols)DESHUMIDIFICADOR / DEHUMIDIFIER / AΦΥΓΡΑΝΤΗΣ / PÁRAMENTESÍTÓ /
ODVLHČOVAC / ODWILŽACZ POWIETRZA /
natural_image
Diagram of a portable electric heater with cooling fins and heat exchangers (no text or labels)18.2 1/4.7 Hm2 Dec 7
56.3 04.2 2 J#A1 Oraa
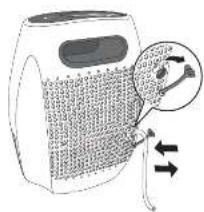
Fig. 4 2 Nos. Dec. 4
Bk 4 Oct 4 1
16.2. 14.2. 15.3. Dec. 5
19.1. 04.1. 17.1. Ch
Eq. 1.Jam 2q. Fm.1
Eq. Cor. 1


ES
1. CARACTERÍSTICAS TÉCNICAS
Water tank capacity:
1.5 liters (DH-10D) 3 liters (DH-20D)
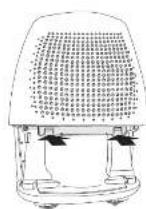
2. APPLIANCE DESCRIPTION (FIG. 1)
- Control panel
- Air intake grille
- Water tank
- Air filter (behind the air intake grille)
- Handle
- Air Outlet grille
- Power cord band (Used only when storing the unit.)
- Drain hose outlet
- Power Cord
- Power Plug
Interference suppression: The interference of this appliance has been suppressed in accordance with interference suppression standards.
Electromagnetic compatibility: This appliance complies with the CEM standards of electromagnetic compatibility.
3. SAFETY WARNINGS
- Before using the appliance for the first time, read this instruction manual carefully and keep it for later reference.
- Before using the appliance, ensure that the domestic mains voltage is the same as that indicated on the plaque fixed to the appliance.
- The appliance must be installed in accordance with the national regulations for electrical installations.
- On removing the packaging, check the appliance is in perfect condition. In case of doubt, contact the nearest authorised Technical Assistance Service.
-
Keep all packaging elements (plastic bags, polystyrene foam, etc.) out of the reach of children, as they could be dangerous.
-
The electrical safety of the appliance is only guaranteed if it is connected to an installation with an earth connection.
- We do not recommend the use of adaptors, plugs and/or extension leads. If it is absolutely necessary to use such elements, use only those which comply with current safety standards, taking care not to exceed the power limit indicated on the adaptor and/or extension lead.
- This appliance is for domestic use only. Any other use is considered unsuitable and dangerous.
- In case of breakdown or malfunctioning, switch off the appliance. Do not attempt to repair it. If any repairs are necessary, they must only be made by a Technical Assistance Service authorised by the manufacturer. Insist on the use of original spare parts. Failure to comply with these points could be a safety hazard.
- The user must not replace the cable. If it is damaged or needs replacing, this must only be done by a Technical Assistance Service authorised by the manufacturer. Do not use the appliance if the cable or plug are damaged.
- The manufacturer holds no liability for any damages arising from unsuitable or improper use of the appliance or from repairs carried out by non-qualified personnel.
IMPORTANT: Never for any reason cover the appliance during operation as this could lead to dangerous overheating.
PARTICULARLY:
- Important: This appliance must not be used near baths, showers, sinks, etc.
- Do not install the appliance close to sources of heat, or in spaces where the air may contain gases, oil or sulphur, or in areas exposed to radiation.
- Do not spill any water or flammable liquids on the appliance.
- Do not handle the appliance with wet hands.
- Do not switch the appliance on and off by plugging it in and unplugging it.
-
Altering or modifying the appliance's functional characteristics could be dangerous.
-
Unplug the appliance when not in use, before moving it, and before carrying out any cleaning or maintenance.
- Never pull on the cable to remove the plug.
- Do not place any heavy or hot objects on the appliance.
- Do not allow children to handle or play with the appliance.
- Do not push any objects through the air inlet/outlet grilles as this could be dangerous when the fan is running at high speed.
- Do not cover the air inlet/outlet grilles.
- Do not use the appliance in narrow, sealed rooms.
- This appliance should not be used by physically, sensorially or mentally handicapped people or people without experience or knowledge of it (including children), unless they are supervised or instructed in the use of the appliance by a person responsible for their safety.
- Children should be watched to ensure they do not play with the appliance.
FOR CORRECT FUNCTIONING
- IMPORTANT: Place the appliance on a flat, stable surface.
- Close the doors and windows of the room in which the appliance is to be used.
- The temperature in the room in which the appliance is to be used must be between 5°C and 35°C. If the temperature exceeds these limits the compressor will stop working.
- If the ambient temperature is lower than 5^ C, the absolute humidity will be very low and it will therefore not be necessary to use the dehumidifier.
- When the appliance stops, wait around 5 minutes before starting it up again.
- Do not place any objects or pour any liquids into the water tank.
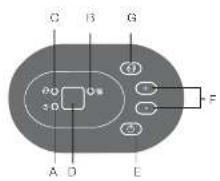
4. CONTROL PANEL
Indicator lights
A. Power on indicator light (green)
B. Water tank full indicator light (red)
Glows when the watertank is ready to be emptied, or when the watertank is removed or not replaced in the proper position.
NOTE: The water level control switch shuts off the dehumidifier when the watertank is full, or when the watertank is removed or not replaced in the proper position. When the setting humidity is reached, the unit will be shut off automatically.
Wait 3 minutes before resuming operation
After the unit has stopped, it can not be restart operation in the first 3 minutes. This is to protect the unit. Operation will automatically start after 3 minutes.
When frost builds up on the evaporator coils, the compressor will cycle off and the fan will continue to run until the frost disappears.
C. Continuous operation on indicator light (green)
D. Display
Shows the set % humidity level while setting, then shows the actual ( ±5% accuracy) room % humidity level.
Error codes:
E1. Humidity sensor error—Unplug the unit and plug it back in. If error repeats, call for service.
E2. Temperature sensor error—Unplug the unit and plug it back in. If error repeats, call for service
Protect codes:
P1. Unit is defrosting—Allow the unit to automatically defrost. The protect will clear after the unit self defrosts.
P2. Water tank is full or watertank is not in the right position—Empty the water tank and replace in the right position
5. FUNCTIONING
E Power pad
Press to turn the dehumidifier on and off.
F Humidity set control pads
The humidity level can be set within a range of 35% RH (Relative Humidity)
to 80 % RH (Relative Humidity) in 5% increments.
For drier air, press the – pad and set to a lower percent value (%).
For damper air, press the + pad and set to a higher percent value (%).
G Continuous pad
Select for the dehumidifier to operate continuously for maximum dehumidification until the watertank is full. The humidity set control pads cannot be used when continuous operation is on. Press this pad again to cancel continuous operation.
NOTE: After the +/-/continuous pad is pressed, the unit can not be restart the operation in 6 minutes.
6. DRAINING OFF THE CONDENSATION WATER
WATER TANK
- Every few weeks, clean the water tank to prevent growth of mold, mildew and bacteria. Partially fill the water tank with clean water and add a little mild detergent. Swish it around in the water tank, empty and rinse.
NOTE: Do not use a dishwasher to clean the water tank. After clean, the water tank must be in place and securely seated for the dehumidifier to operate.
- When the water tank is full, the unit will automatically stop running, and the Full indicator light goes on. Slowly pull out the water tank. Grip the left and right handles securely, and carefully pull out straight so water does not spill. Do not put the water tank on the floor because the bottom of the water tank is uneven.
- Otherwise the water tank will fall and cause the water to spill.
- Throw away the water and replace the water tank. The water tank must be in place and securely seated for the dehumidifier to operate.
NOTE: The machine will re-start when the water tank is restored in its correct position.
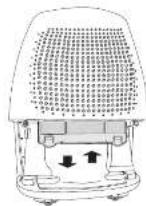
CONNECTION FOR CONTINUOUS DRAINAGE
- Water can be automatically emptied into a floor drain by attaching the unit with a water hose ( 12 mm) (not included).
- Remove the rubber plug from the back of the unit and store it in a safe location.
- Insert the water hose into the unit from the drain outlet in the back of the unit as shown in Fig. 3. Attach the water hose to the drain hose outlet of the unit. Maker sure the connection of the water hose and the drain hose outlet of the unit is tight and do not let the water leak.
- Then lead the water hose to the floor drain or a suitable drainage facility. The drainage facility should be lower than the drain outlet of the unit.
- Be sure to run the water hose sloping downward and let the water to flow out smoothly.
NOTE: When the continuous drain feature is not being used, remove the drain hose from the outlet and attach the rubber plug back to the drain outlet.
7. MAINTENANCE AND CLEANING
Unplug the appliance before carrying out any maintenance or cleaning.
Clean the outside of the appliance with a soft damp cloth.
Do not use water, solvents or similar substances to clean the appliance. Do not use abrasive cleaning agents.
CLEAN THE AIR FILTER
The air filter behind the front grille should be checked and cleaned at least every 30 days or more often if necessary.
NOTE: DO NOT RINSE OR PUT THE FILTER IN AN AUTOMATIC DISHWASHER.
- To remove:
- Pull the water tank out as shown in Fig. 2.
- Grip the tabs on the filter and press them in slightly to take them out from the filter holder, then pull out the filter downward.(see Fig. 4-5).
- Clean the filter with warm, soapy water. Rinse and let the filter dry before replacing it. Do not clean the filter in a dishwasher.
- To attach:
- Insert the filter into the unit, then press the tabs in on the filter slightly and push the filter upward. (See Fig. 5).
CAUTION:
DO NOT operate the dehumidifier without a filter because dirt and lint will clog it and reduce performance.
8. TROUBLESHOOTING
Below is a list of possible causes which you should check before calling the Technical Assistance Service. Only contact an authorised Technical Assistance Service if you still cannot start up the appliance after having checked the indications below. Do not manipulate the appliance in any other way, and do not attempt to replace or repair the electrical components. Otherwise, you will be responsible for all expenses given rise to, even during the guarantee period.
The appliance does not work
• Is it correctly plugged in?
- Has a fuse blown?
- Has there been an electricity cut?
• Is the water tank correctly fitted?
• Is the water tank full?
• Is the air filter dirty?
- Are the air inlet and outlet grilles obstructed?
The dehumidification capacity is low
- Is the air filter dirty?
• Is the room temperature too low?
• Is the air inlet or outlet blocked? - Have you selected a degree of humidity higher than the ambient humidity?
The appliance does not reach the degree of humidity set even after it has been working for a long time
- Are you opening the doors or windows too often?
• Is there an appliance generating
humidity in the room?
• Is the room too large?
• Is the floor uneven or too soft?
• Is the appliance correctly positioned?
The appliance is functioning noisily
Water is dripping from the appliance
- Is the condensation water tray outlet above the water tank blocked?
9. INFORMATION FOR THE CORRECT DISPOSAL OF ELECTRICAL AND ELECTRONIC APPLIANCES

At the end of its working life, the product must not be disposed of as urban waste. It must be taken to a special local authority differentiated waste collection centre or to a dealer providing this service. Disposing of a
household appliance separately avoids possible negative consequences for the environment and health deriving from inappropriate disposal and enables the constituent materials to be recovered to obtain significant savings in energy and resources.
To remind you that you must collaborate with a selective collection scheme, the symbol shown appears on the product warning you not to dispose of it in traditional refuse containers.
For further information, contact your local authority or the shop where you bought the product.
FR
1. CARACTÉRISTIQUES TECHNIQUES
1.5 litro (DH-10D) 3 litro (DH-20D)
2. GAILUAREN IDENTIFIKAZIOA (1. IRUD.)

- ES
- CARACTERÍSTICAS TÉCNICAS
- APPLIANCE DESCRIPTION (FIG. 1)
- SAFETY WARNINGS
- PARTICULARLY:
- FOR CORRECT FUNCTIONING
- CONTROL PANEL
- Indicator lights
- Error codes:
- Protect codes:
- FUNCTIONING
- E Power pad
- F Humidity set control pads
- G Continuous pad
- DRAINING OFF THE CONDENSATION WATER
- WATER TANK
- CONNECTION FOR CONTINUOUS DRAINAGE
- MAINTENANCE AND CLEANING
- CLEAN THE AIR FILTER
- NOTE: DO NOT RINSE OR PUT THE FILTER IN AN AUTOMATIC DISHWASHER.
- - To attach:
- CAUTION:
- TROUBLESHOOTING
- The appliance does not work
- The dehumidification capacity is low
- The appliance does not reach the degree of humidity set even after it has been working for a long time
- The appliance is functioning noisily
- Water is dripping from the appliance
- INFORMATION FOR THE CORRECT DISPOSAL OF ELECTRICAL AND ELECTRONIC APPLIANCES
- FR
- CARACTÉRISTIQUES TECHNIQUES
- GAILUAREN IDENTIFIKAZIOA (1. IRUD.)
Brand : FAGOR
Model : DH10D
Category : Dehumidifier