
DVBS202HD - Satellite receiver DENVER - Free user manual and instructions
Find the device manual for free DVBS202HD DENVER in PDF.
| Product Type | HD Satellite Receiver |
| Brand | Denver |
| Model | DVBS202HD |
| Power Supply | AC 100-240V ~ 50/60Hz, max. 8W |
| Video Resolution | 1080p, 1080i, 720p, 576p, 576i |
| TV Format | PAL, NTSC |
| Audio Formats | MPEG-1 Layer I/II, MPEG-2, MPEG-4 AAC, LPCM/RAW |
| Connections | LNB Input, Loop Out, HDMI, SCART, USB 2.0, Digital Audio Coaxial Output |
| Main Functions | DVB-S/S2 reception, MPEG-2/MPEG-4/H.264, DiSEqC 1.0/1.1/1.2/1.3 (USALS), EPG, Teletext, 5000-channel list, 64 satellites, 2500 transponders |
| External Storage Capacity | USB up to 500 GB (FAT32, NTFS) |
| Supported File Formats | Photo: JPEG, BMP, PNG; Audio: MP3, AAC; Video: AVI, MPG, DAT, VOB, MKV, MJPEG |
| Software Update | via USB (FAT32), OTA |
| Parental Control | Yes (default password 000000) |
| Dimensions | Approx. 180 x 120 x 40 mm (estimated) |
| Weight | Approx. 0.5 kg (estimated) |
| Safety | Overvoltage protection, do not expose to water or excessive heat, do not open |
| Care and Cleaning | Unplug before cleaning, use a dry soft cloth |
| General Information | HD satellite receiver with multilingual user interface, remote control, suitable for use with satellite dish |
Frequently Asked Questions - DVBS202HD DENVER
User questions about DVBS202HD DENVER
0 question about this device. Answer the ones you know or ask your own.
Ask a new question about this device
Download the instructions for your Satellite receiver in PDF format for free! Find your manual DVBS202HD - DENVER and take your electronic device back in hand. On this page are published all the documents necessary for the use of your device. DVBS202HD by DENVER.
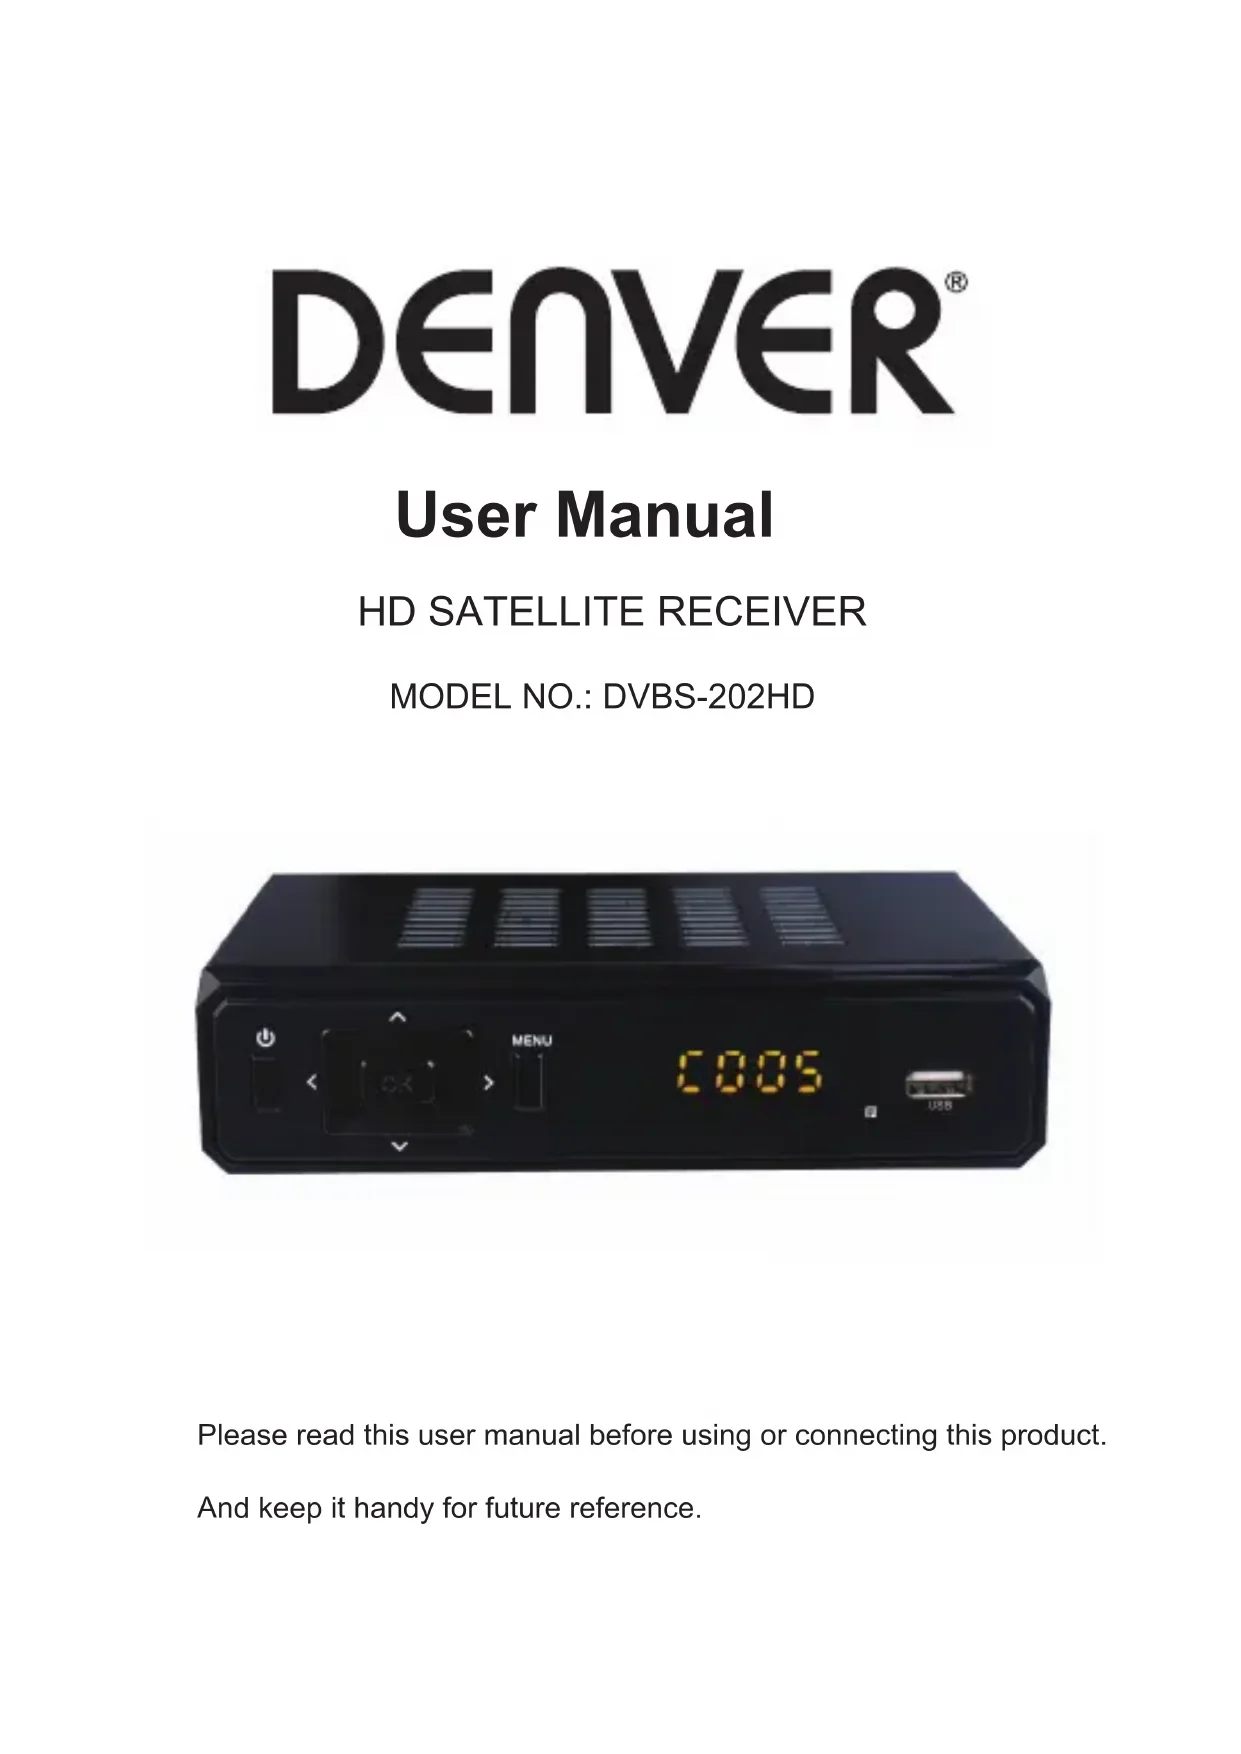
USER MANUAL DVBS202HD DENVER
Please read this user manual before using or connecting this product. And keep it handy for future reference.
User Manual
Please read these precautions before operating this unit.
1. Power cord protection
To avoid any malfunctions of the unit, and to protect against electric shock, fire or personal injury, please observe the following.
- Hold the plug firmly when connecting or disconnecting the AC power cord.
- Keep the AC power cord away from heating appliances.
- Never put any heavy object on the AC power cord.
- Do not attempt to repair the AC power cord in any way.
- Never make or change connections with the power switched on.
2.Placement
Avoid placing the unit in areas of:
- Direct sunlight or heating radiators
•High temperature (over 35°C) or high humidity (over 90%) - Dust as the internal parts may be seriously damaged.
3. Non-use periods
When the unit is not being used, turn it off. When left unused for a long period of time, the unit should be unplugged from the power source.
4. No fingers or other objects inside
- Touching internal parts of this unit is dangerous, and may cause serious damage to the unit.
Do not attempt to disassemble the unit. - Do not put any foreign object in this unit.
5. Keep away from water
- Keep the unit away from flower vases, tubs, sinks, etc. if liquids are spilled into the unit, serious damage could occur.
User Manual
INTRODUCTION
This user manual is intended to guide you through the operation for the DVB-S2 FTA High Definition digital Terrestrial Receiver.
A password will be required when modifying advanced options in the Menu. The default password is "000000".
MAIN FUNCTIONS AND FEATURES
- Fully DVB-S/DVB-S2/MPEG-2/MPEG-4/H.264 compliant
2.SCART/HDMI output, USB 2.0
3.SCPC & MCPC receivable from C/Ku band satellites
4.DiSEqC 1.0/1.1/1.2/1.3(USALS) supported - Universal LNB, NIT search support
6.DiSEqC1.0/DiSEqC1.2 and USALS protocols - Electronic program guide(EPG), VBI Teletext, Support up to 64 satellites
- Up to 2,500 transponders, Frequency range : 950-2150MHz
- Auto / Manual Program search, Multi-language supported
- USB 2.0, Software upgrade, Multimedia Playback, OTA software upgrade
- Transmission mode: LDPC/BCH (DVB-S2) 8PSK/QPSK, DVB-S QPSK
- Support up to 5000 channels
- Support up full HD 1080P, HDMI 1.3
User Manual
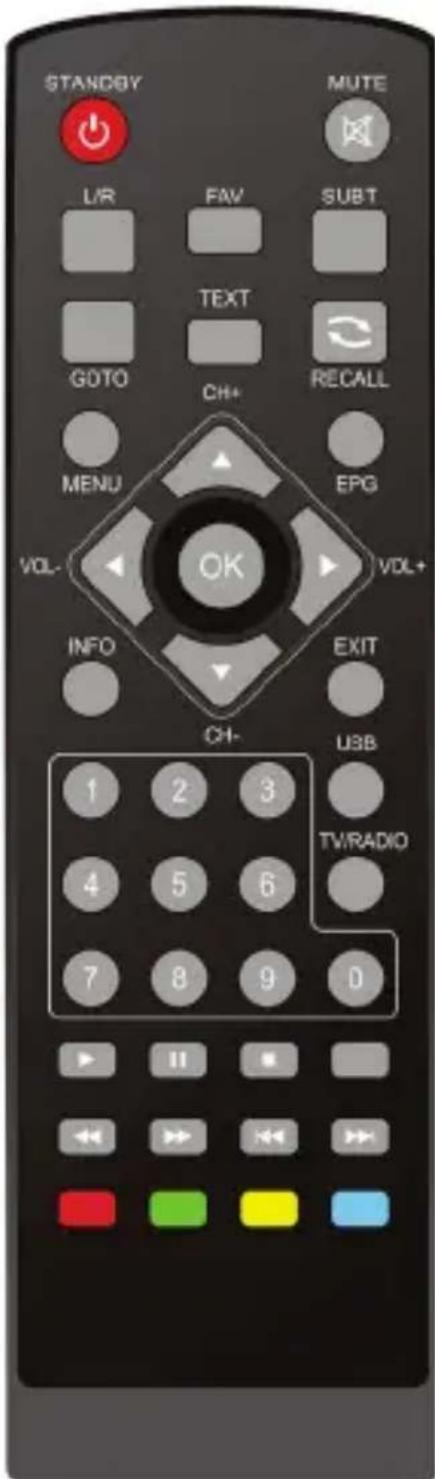
STANDBY: Turn on / off
Number Key: <0-9>
SUBT: Enter/exit subtitle menu
EPG: Electronic Program Guide
Menu: Enter main menu
Direction key: Up/down/left/right
OK: Confirm selection on operating menu
Or hot-key of "QUICK SELECT" in full-screen playing
VOL -/+ : Volume adjusting
TEXT : DVB-S2 teletext
GOTO: Go forward or backward under replaying recorded file
USB: Play previous USB media
INFO: Display program information in full-screen playing
Mute: Turn off / on voice.
Recall: Return to previous menu
L/R: Audio mode operation
EXIT: Go back directly to full screen display
CH+/CH-: Go next/previous channel.
FAV: Show favourites list
TV/RADIO: Switch between TV and Radio mode
PLAY/PAUSE: Pause/Play movie playing
Stop: Stop movie playing
PREV: Previous chapter
NEXT: Next chapter
FR: Rewind
FF: Fast forward
For color keys: Function keys in different window.
User Manual
FRONT AND REAR PANEL
REAL PANEL
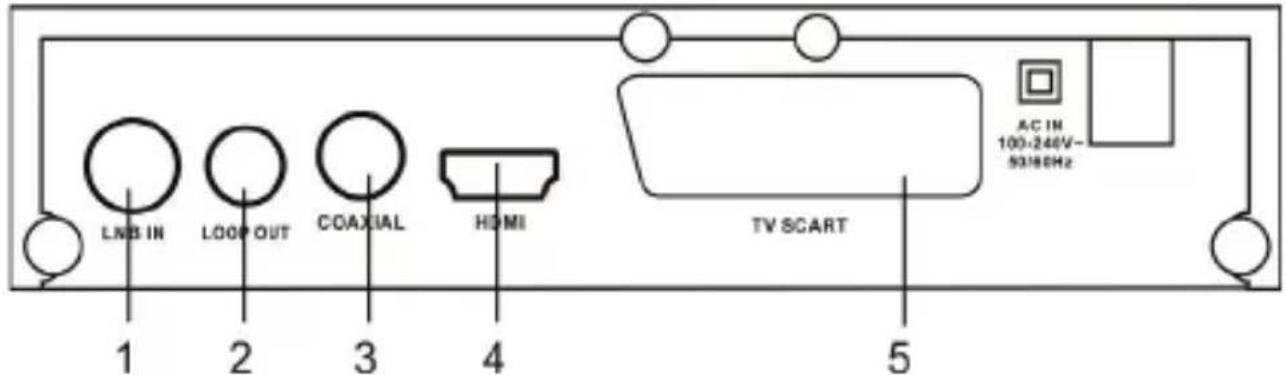
- Connect to satellite antenna cable
- LOOP OUT modulator with CH11, for old TV.
- Connected to TV HDTV interface
- Composite Video output
- Analog audio output
- Digital audio output
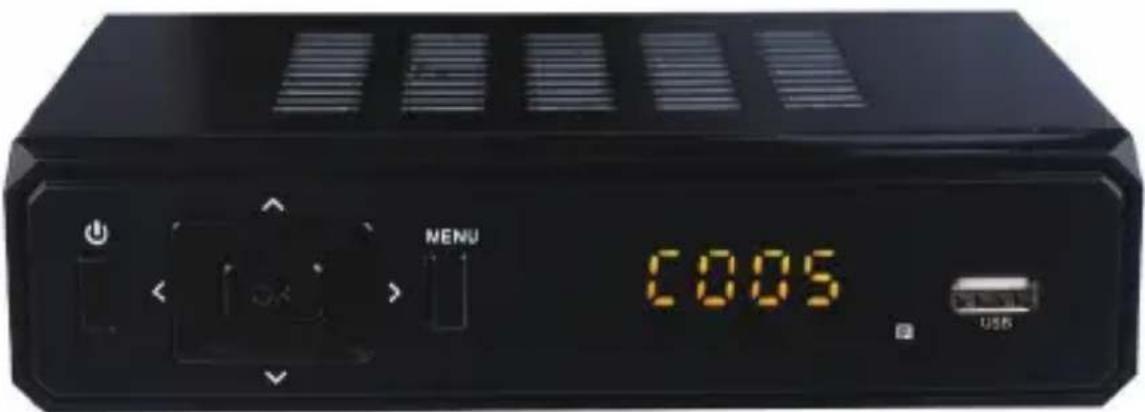
FRONT PANEL
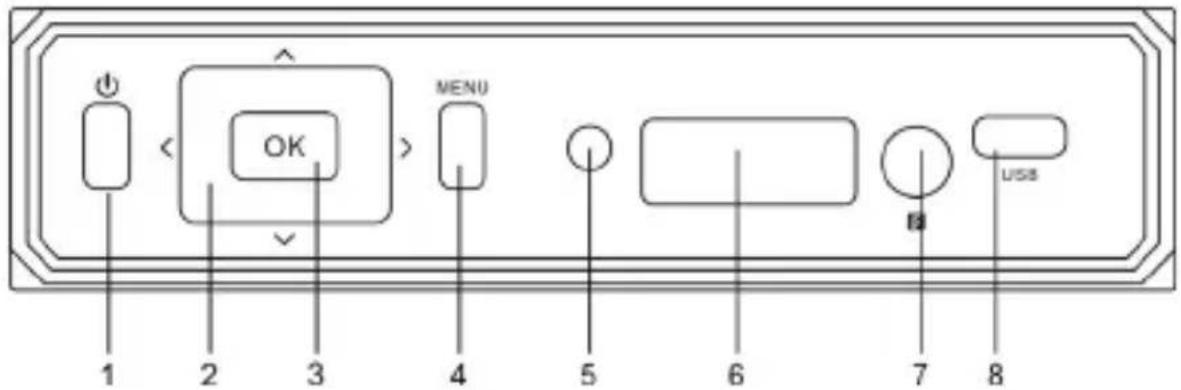
- Power on/off button
3.OK button - MENU button
- Works signal light
6.LED display window - Remote control signal sensor
- USB jack
2.Direction button(Channel+/-, Volume +/-)
User Manual
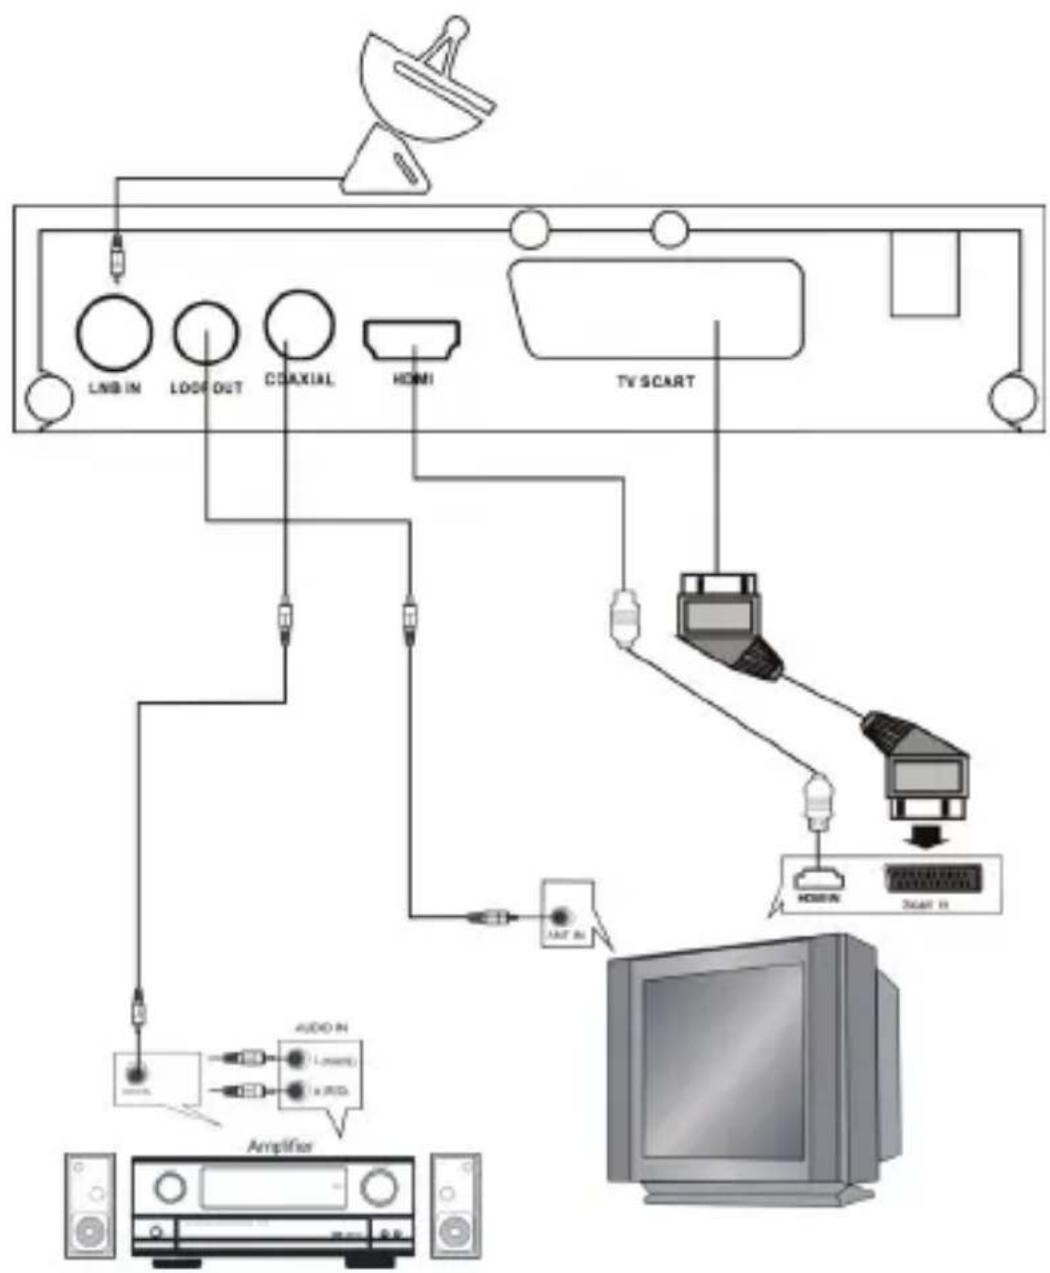
INSTALLATION
CONNECTING THE RECEIVER
Before you connect your STB to your TV please ensure that it's is placed on a flat and stable surface. Now that your STB is in position connect it to your TV and any other peripheral devices. Please refer to the below diagram and your TVs user manual for cable installation instructions.
Connect your STB to power on your TV and the STB before continuing to the initial set up guide.
flowchart
graph TD
    A["Antenna"] --> B["LNB IN"]
    A --> C["LOO OUT"]
    A --> D["COAXIAL"]
    A --> E["HDMI"]
    A --> F["TV SCART"]
    B --> G["Audio In"]
    C --> G
    D --> G
    E --> G
    F --> H["TV Switch"]
    G --> I["Amplifier"]
    H --> J["Computer"]
User Manual
INSTALLATION GUIDE
If you are using the unit for the first time or have restored the unit to Factory Default, the installation Guide Menu will appear on you TV screen. Follow the help information that at the bottom of the window to select preference menu language and suitable country (region) and
start channel search.
(1) [OSD Language] Press RIGHT/LEFT key to select a language.
(2) [Country] Press RIGHT/LEFT key to select your country of residence.
(3) [Channel Search] Press RIGHT/LEFT or OK key to begin Automatic channel search.
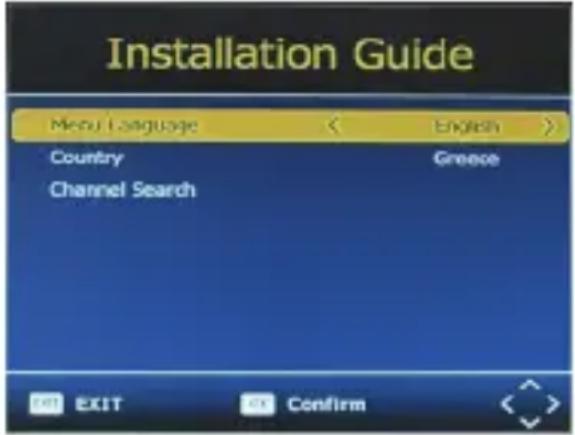
If no channels is found during the channel searching process, please check your antenna connections and antenna are in working order. After the scanning process is completed the receiver with automatically save the scanned channels and display the first channel in the list. While you are using the unit, you can access the CHANNEL search menu to do the AUTO/MANUAL channel search. Press MENU key on the remote and select [Channel Search] using RIGHT/LEFT keys.
This Menu provides options to adjust the Search Channel settings. Press UP/DOWN to select an option and press RIGHT/LEFT to adjust the settings. Press EXIT to exit the Menu.
MENU
MAIN MENU
Most functions are available in main menu. Follow the operation help information on the bottom of the menu to modify the preference options. A password will be required when modifying advanced options in the Menu. The Default password is "000000".
Press the menu key on the remote control; you can access the Main Menu. There are 7 items for setup. Use the LEFT and RIGHT keys to navigate through the menu. Select the desired option and press the OK key or the RIGHT key to adjust the settings. Press the EXIT key to exit the main menu.
User Manual
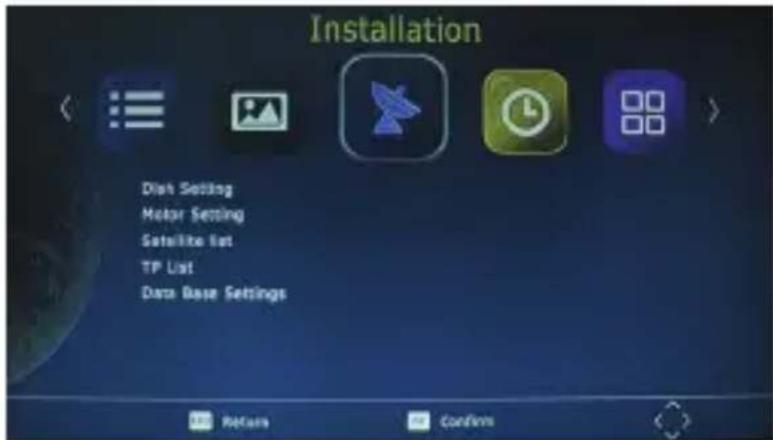
A. Installation
1.Dish Setting
In this menu, you can set detailed parameters for selected satellites, such as LNB Type, DiSEqC, 22K, Motor and so on.
Satellite: It will list the satellites which chosen in 'Satellite Setting' menu.
LNB: It should be match the type value of LNB you used, support 5150, 5170, 9750, 10600, 10750, 11300, 11475, 5150/5750, Universal(9750/10600), Universal F(9750/10750) and USER LNB which allow you to define it by yourself.
Transponder: It will list the existed TP list and try to lock the signal with the current parameters.
DiSEqC 1.0:If you are using DiSEqC 1.0 switcher, you should set it to match your DiSEqC switcher. There are None, 1/4, 2/4, 3/4, 4/4, ToneburstA and ToneburstB for your option.
DiSEqC 1.1: If you are using DiSEqC 1.1 switcher, you should set it to match your DiSEqC switcher. There are None, 1/16, 2/16, 16/16 for option.
22K Tone:If you are using 22K switcher, you should set it to match your 22K switcher. There are ON, Off and None for option when the LNB type is not the Universal type, while 22K Tone will be Auto when LNB type is set to Universal.
Polarization: Horizontal or Vertical.
Motor: It support DiSEqC1.2 and USALS motor both.
Unicable: This function is used for some customer, especially in Turkey.
There is a table to show the signal Strength and Quality of current TP of current satellite with current parameters.
(RED): Press this button to jump to 'TP Manager' menu directly.
(GREEN):Press this button to jump to 'Auto Scan' menu directly.
2.Motor Setting
3.Satellite List
4.TP List
5.Data Base Settings
a.Save the program list to the USB device
b.Restore the list of programs that are saved in the USB to the machine.
User Manual
B. Time & Date
1.Time Offset
Select auto or manual for GMT offset adjustments.
2.Time Zone
Select the Time Zone offset when [Time Offset] IS TO MANUAL.
3.Date
4.Time & Date
5.Sleep
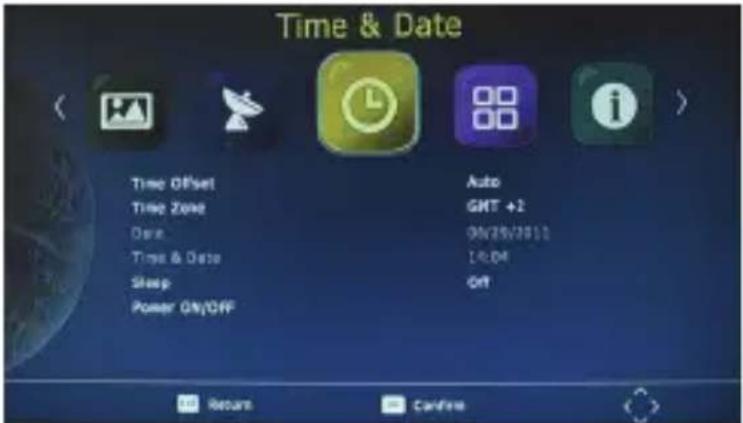
Select the desired time for the Auto-shut off function (from 1 hour to 12 hours or set it to Off).
6.Power ON/OFF
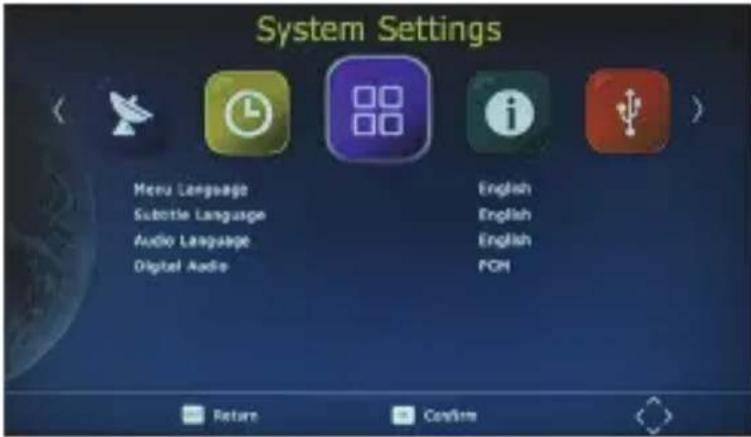
C. System Settings
1. Menu Language
Change the ON Screen Display language.
2. Subtitle Language
Select the subtitle language.
3.Audio Language
If the program has multi-languages. Set your preference here.
4. Digital Audio
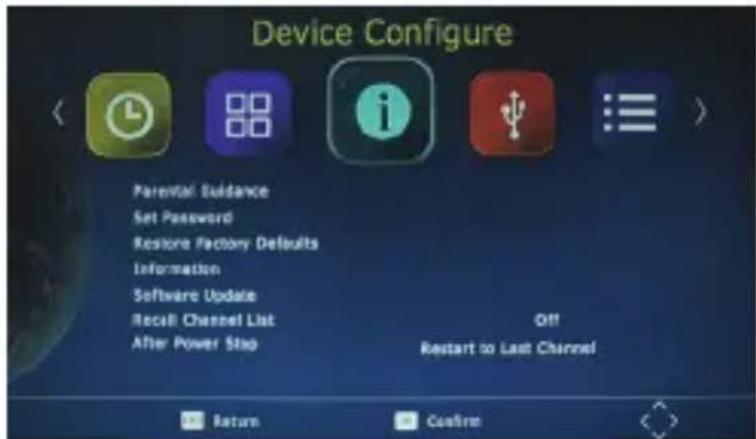
D. Device Configure
1. Parental Guidance
The options for setting up the age reference starts from 4 years to 18 years. To access this function you will require to input a code. The default password is “000000”. This function can also be deactivated simply by setting it to OFF.
2.Set Password
It allows you to modify the default password, which is "000000".
User Manual
3.Restore Factory Defaults
It allows you to restore the unit to its default factory settings. You will be asked to enter your password "000000". Press "OK" key once done.
Note: This function will delete all your saved channels and your personal settings.
4.Information
You can check the software version of your unit.
5. Software Update
The USB port is also used to perform a software Update
COPY THE SOFTWARE UPDATE FILE FROM YOU PC TO A USB FLASH DRIVE
- To upgrade your unit via USB, plug the USB compactible drive to the PC and backup the entire data of the USB drive. Right click the USB drive and select Format item. Format at USB drive as FAT32 file system.
NOTE: To perform a software upgrade of the Receiver, please ensure the USB Flash Drive or Portable hard disk is in FAT32 file system format. The USB port for software updates is not compatible with USB Flash drives or Portable Hard Disk Drives in NTFS, FAT16 or U3 PRO File System formats.
2, Press MENU, move right to enter SYSTEM SET UP, move down to enter SOFTWARE UPDATE. Press ENTER and enter USB drive, choose update file name.
NOTE: Please do not remove the USB drive from the receiver or power off the receiver during the upgrade process. This may damage the receiver.
6. Recall Channel List
7. After Power Stop
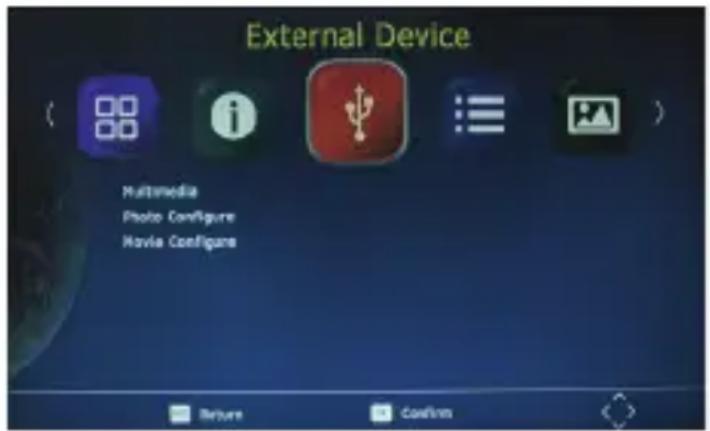
E. External Device
1. Multimedia
While in TV mode, press the “USB” button to access to the Multimedia menu. The menu contains 4 different icons: Music, Photo, Movie and Records.
Music Playing: Select "MUSIC" icon,
move the cursor to enter the path of the desired audio file. Press the OK button to play the selected audio file.
User Manual
Photo Viewing: Choose PHOTO icon, and enter the path of the desired photo files. Press OK button to view the desired photo files.
Movie Playing: Choose MOVIE icon, and move the cursor to choose the path of the desired video files. Press the OK button to play the desired video files.
Records Playing: Select Records icon. Select the recorded file you want to play, press OK to begin playback. Press the RECALL key to move up to the next Folder. Press the RED key to switch between Preview and Full screen modes. Use the YELLOW key to delete the file you don't want. Press the GREEN key to rename the recorded file if desired.
2. Photo Configure
You can adjust the slide time, slide mode and aspect ration here.
3. Movie Configure
You can set the Aspect Ratio, Subtitle Specific, Subtitle background and Subtitle Font-colour here.
F. Channels Manager
1.Edit Channels
To edit your channels (to lock, Skip, favorite, move or delete a program), you need to enter a password. Enter the default password "000000". The master unlock password is "888888".
2.EPG
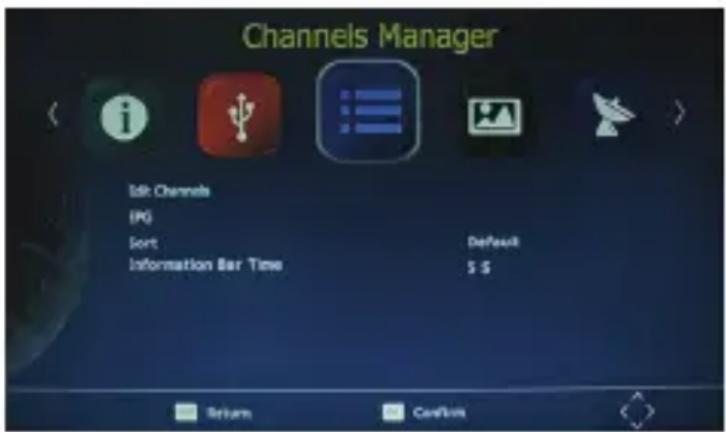
The EPG is an on-screen TV guide that shows scheduled programs seven days in advance for every tuned channel. Press the EPG key on the Remote Control to access the Electronic Program Guide.
3.Sort
Note: it's important to deactivate the LCN function while sorting out the position of the channels. The “Sort” function allows you to sort the channels by different methods:
By LCN: This will sort the channels by ascending order.
By Service name: This will sort the channels in alphabetical order.
By Service ID: This will sort the channels by Service ID.
By ONID: This will sort the channels according to eh ONID.
User Manual
4. Bar time
Press bar time to change the display time of the information when switching the channels.
G. TV Setting
1. Aspect Ratio
The aspect ratio of the video can be 4:3 (also know as Anamorphic Image) or 16:9 (also know as widescreen TV). Normally the aspect ratio of standard definition video should be 4:3 and the high definition video should be 16:9. In order to get excellent quality on the TV set, press the MENU key
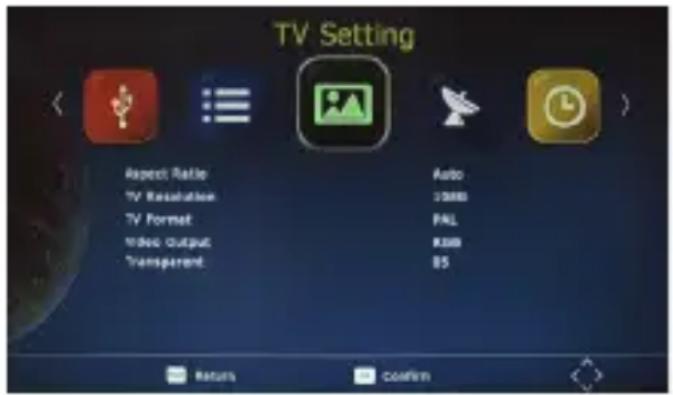
to enter the menu, and choose the aspect ratio setup menu to set suitable aspect ratio. The screenshot of the aspect ratio window is illustrated below.
2.TV Resolution
You can choose different resolution according to your TV: 576i, 576p, 720p, 1080i, 1080p.
3.TV Format
TV format: PAL/NTSC
4. Video Output
CVBS, RGB
5. Transparent
Press transparent to change the background of the menu.
Daily use
INFO. KEY
Press “ INFO” key to display the Information banner while viewing TV programs Information banner:
L/R KEY
Some programs may have multilingual audio language and this audio broadcast may be on a different audio mode such as Stereo, Left or Right. All the available audio languages will be displayed on the audio track window when you press the L/R key. The Screenshot illustrates this below. If there is no audio output after you have selected the audio language. It indicates that there is no audio on the current audio mode, so you have to select the previous audio mode.
User Manual
SUBT KEY
Certain programs have multilingual subtitle information. All available subtitle languages will be displayed in the subtitle information window when you press the SUBT key. The screenshot illustrates this below. Follow the help information in the subtitle window to select preferred subtitle.
PREV/NEXT KEY & F.R./F.F. KEY
The PREV/NEXT key and F.R./F.F. key can be used during playback of multimedia programs from your external USB device. Press the PRE/NEXT key to go to the previous/next program and F.R./F.F. key to fast forward or rewind during playback.
EPG
Press EPG key to display the on screen electronic program guide.
This displays a 7 day Electronic Program Guide for all programs being broadcast from all broadcasters.
TV CHANNEL AND RADIO CHANNEL LIST
Press OK key to display all TV channels or all Radio channels. Follow the help information at the bottom of the window to select preferred channel.
FAVOURITE CHANNEL
Setting up Favourite TV or Radio Channels:
You Can add preferred channels to a favourite's channel list. Press the Menu key to access the Program Edit Menu. The Favourite channel option allows you to classify the channels by different genre: Movies/News/Sports/Music. Press the “FAV” or “OK” key to confirm your selection. A heart shaped symbol will appear next to that channel which confirms your selection.
Disable Favourite TV or Radio Channels:
Press the Menu key to access the Program Edit Menu. The list of the favourite channels will be displayed. Highlight the desired channel to disabled. Press" FAV" button, select the "Disable" option and press the "FAV" or "OK" key to cancel. Press the "Exit" key to exit the menu.
User Manual
View Favourite Channel:
While in normal viewing mode, press the “FAV” key to access to your favourite channel menu. Press the LEFT or RIGHT keys on your remote to access to the classified Sub-Menu (Movies/News/Sports/Music). Press the UP or DOWN keys to browse through your favourite channels. Press the “OK” key to select your favourite channel.
Delete a TV or RADIO Program:
Press the Menu key to access the Program Edit Menu. Select the program you wish to delete and press the "BLUE" key on your remote. A warning message will appear on your TV screen. Press the "OK" key to confirm the deletion of the channel. Repeat the above procedure to delete further channels.
Skip TV or RADIO Channel:
Press the Menu key to access the Program Edit Menu. Select the channel you would like to "Skip" and press the "GREEN" key on your remote. A skip symbol will appear. Now the channel is marked as a SKIP. To save your settings and exit the menu, press the "Exit" key.
Move a TV or RADIO Program:
Press the Menu key to access the Program Edit Menu. Select the desired channel you wish to move and press the "RED" key on your remote. A "MOVE" symbol will appear on your TV screen. Press the UP or DOWN keys to move the channel to the desired position. Press the "OK" key to the confirm your selection. Repeat the above process to move further channels.
WARNING:
To use the USB for media playback Function, Instant recording function, TV program guide timer recording function, TIMESHIFT function, Playback recorded program function and Multimedia player function it is necessary to connect an external device such as a USB flash drive or an external hard disk drive to the USB port. The maximum capacity of HDD supported by the STB is up to a size of 500GB. It support FAT32 and NTFS file formats.
1) Multimedia player
MENU+ multimedia you can now select to view photos, play mp3 music files and view movie files via the multimedia player/known supported files are outlined below.
NTFS, FAT32 and FAT16 file systems are supported.
User Manual
| player Supported file | |
| photo JPEG,BMP PNG | |
| music | mp3 aac |
| movice | Avi, mpg, dat, vob, mkv, mjpeg |
2) Format portable hard disk
A format hard disk function has also been provided Formatting a hard disk will permanently delete all the data on the hard disk. it is strongly recommended to backup all the data before formatting you hard disk drive.
Troubleshooting
The below table is s list of common problems that many occur with your receiver.
| fault Possible cause | ||
| Power on, but nothing displayered on screen | Unit not turned on at mains switch | Ensure power plug is plugged into wall scoket and switch is on |
| TV picture drops out and thr unit displayers "NO signal" | Antenna is not properly connected or you are in a bad reception area | Talk to your local TV antenna technician about recwption problems in your area and whether a new antenna woule benefit you |
| Receiving digital TV but missing some channels | Antenna is not properly connected or you are in a bad reception area | Talk to your local TV antenna technician about recwption problems in your area and whether a new antenna woule benefit you |
| Remote is not working | Batteries are flat or there is interference | Talk to your local TV antenna technician about recwption problems in your area and whether a new antenna woule benefit you |
User Manual
SPECIFICATIONS
| SECTION ITEM DESCRIPTION | ||
| DVB-S/S2 TUNER | Input Frequency: | 950 ~2150MHz |
| Loop out frequency: | 950 ~2150 MHz | |
| Input level: | -80~-20dBm | |
| Input impedance 75 Ω | ||
| CHANNEL DECODING | Demodulation QPSK, 8PSK | |
| FEC mode | DVB-S: 1/2, 2/3, 3/4, 5/6. 7/8 | |
| DVB-S2: 1/2, 3/5, 2/3, 3/4, 4/5, 5/6, 8/9, 9/10 (QPSK) 3/5, 2/3, 3/4, 5/6, 8/9, 9/10 (8PSK) | ||
| Symbol Rate | DVB-S: 2.0~ 45 MS/s | |
| Demodulation | QPSK, 8PSK, DVB-S2: 10-30 Mb/s (QPSK), 10-31Mb/s (8PSK) | |
| DEMULTIPLE XER | Standard ISO/IEC 13818-1 | |
| Input Max. Bit Stream Rate | 100Mbps(Serial)/12.5MBps(Parallel) | |
| VIDEO DECODING | Standard | ISO/IEC 13818-2, MPEG-2 MP@ML, MPEG-4 AVC (MP L4.1) |
| Aspect ratio | 4:3, 16:9 | |
| Video format | PAL-B / NTSC-M / PAL-N / PAL-M | |
| Video resolution 1080P, 1080I,720P,480P/576P,480i/576i SD compatible | ||
| AUDIO DECODING | Standard | ISO/IEC 13818-3 |
| Decoding | MPEG-1 Layer I and II, MPEG-2, MPEG-4 AAC | |
| Output mode | LPCM, RAW | |
| Sampling frequency | 32, 44.1, 48KHz | |
| Volume level | 24 Levels | |
| AV OUTPUT | Video de-emphasis | CCIR REC.405-1, 625LINES |
| Video bandwidth | 5.5MHz | |
| Video output impedance | 75Ω | |
| Video output level | 1.0Vp-p | |
| Audio output | Stereo | |
| Audio output frequency | 20Hz~ 20KHz | |
| Audio output impedance | Low | |
| Audio output level | A 1.0Vrms ± 2dB into 10K. | |
| OTHERS | Power input Spec. | AC100-240V~50/60Hz. Max.8W |
ALL RIGHTS RESERVED, COPYRIGHT DENVER ELECTRONICS A/S


Electric and electronic equipment and included batteries contains materials, components and substances that can be hazardous to your health and the environment, if the waste material (discarded electric and electronic equipment and batteries) is not handled correctly.
Electric and electronic equipment and batteries is marked with the crossed out trash can symbol, seen below. This symbol signifies that electric and electronic equipment and batteries should not be disposed of with other household waste, but should be disposed of separately.
As the end user it is important that you submit your used batteries to the appropriate and designated facility. In this manner you make sure that the batteries are recycled in accordance with legislature and will not harm the environment.
All cities have established collection points, where electric and electronic equipment and batteries can either be submitted free of charge at recycling stations and other collection sites, or be collected from the households. Additional information is available at the technical department of your city.
Imported by:
DENVER ELECTRONICS A/S
Omega 5A, Soeften, DK-8382 Hinnerup, Denmark
www.facebook.com/denverelectronics
DENVER®
Bedienungsanleitung
HD SATELLITEN-RECEIVER
MODELL-NR.: DVBS-202HD
3. Configuration film

Manuale d'uso
FUNKCJE GŁÓWNE I WŁAŚCIWOŚCI
flowchart
graph TD
    A["TV SCART"] --> B["LNB IN"]
    A --> C["LOD OUT"]
    A --> D["CDAXIAL"]
    A --> E["HDMI"]
    A --> F["TV SCART"]
    A --> G["Home Device"]
    G --> H["Switch"]
    H --> I["Switch H"]
    I --> J["Monitor"]
    J --> K["Audio H (1 mmH)"]
    J --> L["Audio H (2 kHz)"]
    J --> M["Audio H (3 kHz)"]
    J --> N["Audio H (4 kHz)"]
    J --> O["Audio H (5 mmH)"]
Manual do Utilizador
PÄÄTOIMINNOT JA OMINAISUUDET
- User Manual
- Power cord protection
- 2.Placement
- Non-use periods
- No fingers or other objects inside
- Keep away from water
- INTRODUCTION
- MAIN FUNCTIONS AND FEATURES
- FRONT AND REAR PANEL
- REAL PANEL
- FRONT PANEL
- INSTALLATION
- CONNECTING THE RECEIVER
- INSTALLATION GUIDE
- MENU
- MAIN MENU
- Installation
- 1.Dish Setting
- 2.Motor Setting
- 3.Satellite List
- 4.TP List
- 5.Data Base Settings
- Time & Date
- 1.Time Offset
- 2.Time Zone
- 3.Date
- 4.Time & Date
- 5.Sleep
- 6.Power ON/OFF
- System Settings
- Menu Language
- Subtitle Language
- 3.Audio Language
- Digital Audio
- Device Configure
- Parental Guidance
- 2.Set Password
- 3.Restore Factory Defaults
- 4.Information
- Software Update
- COPY THE SOFTWARE UPDATE FILE FROM YOU PC TO A USB FLASH DRIVE
- Recall Channel List
- After Power Stop
- External Device
- Multimedia
- Photo Configure
- Movie Configure
- Channels Manager
- 1.Edit Channels
- 2.EPG
- 3.Sort
- Bar time
- TV Setting
- Aspect Ratio
- 2.TV Resolution
- 3.TV Format
- Video Output
- Transparent
- Daily use
- INFO. KEY
- L/R KEY
- SUBT KEY
- PREV/NEXT KEY & F.R./F.F. KEY
- EPG
- TV CHANNEL AND RADIO CHANNEL LIST
- FAVOURITE CHANNEL
- Disable Favourite TV or Radio Channels:
- View Favourite Channel:
- Delete a TV or RADIO Program:
- Skip TV or RADIO Channel:
- Move a TV or RADIO Program:
- WARNING:
- 1) Multimedia player
- 2) Format portable hard disk
- Troubleshooting
- DENVER®
- Bedienungsanleitung
- Configuration film
- Manuale d'uso
- FUNKCJE GŁÓWNE I WŁAŚCIWOŚCI
- Manual do Utilizador
- PÄÄTOIMINNOT JA OMINAISUUDET
Brand : DENVER
Model : DVBS202HD
Category : Satellite receiver