IBT 7967 N I79T67NO - Basket NEFF - Free user manual and instructions
Find the device manual for free IBT 7967 N I79T67NO NEFF in PDF.
| Brand | NEFF |
| Model | IBT 7967 N I79T67NO |
| Product type | Range hood |
| Operating modes | External extraction and Recirculation |
| Suction power | Multiple adjustable speeds + intensive mode |
| Lighting | Halogen bulbs (12 V, 20 W max., G4 socket) |
| Remote control | Yes, with replaceable battery |
| Grease filter | Metal, dishwasher-safe |
| Activated carbon filter | Replace approximately once a year |
| Saturation indicator | Yes, audible and visual for grease and carbon filters |
| Audible signal | Yes (key confirmation and saturation alarm) |
| Run-on function | 10 minutes after cooking |
| Automatic shutdown | Intensive mode after 10 minutes |
| Housing material | Stainless steel, aluminum, plastic |
| Control panel | Touch keys |
| Cleaning and maintenance | Hot water and dish soap, avoid abrasives and alcohol |
| Safety | Important instructions: do not flambé, use with gas hobs, etc. |
| Spare parts available | Grease filters, activated carbon filters, halogen bulbs |
| General information | User manual, installation and maintenance available in multiple languages |
Frequently Asked Questions - IBT 7967 N I79T67NO NEFF
User questions about IBT 7967 N I79T67NO NEFF
0 question about this device. Answer the ones you know or ask your own.
Ask a new question about this device
Download the instructions for your Basket in PDF format for free! Find your manual IBT 7967 N I79T67NO - NEFF and take your electronic device back in hand. On this page are published all the documents necessary for the use of your device. IBT 7967 N I79T67NO by NEFF.
USER MANUAL IBT 7967 N I79T67NO NEFF
natural_image
Line drawing of a kitchen fan with ventilation grilles and mounting holes (no text or symbols)
natural_image
Pure electrical circuit symbol for a battery, no text or labels presentEFF
de Seite 3-10
en page 11 – 18
fr page 19 - 26
nl pagina 27 - 34
it pagina 35–42
es página 43-50
pt página 51–58
SV sid 59 - 66
no side 67 - 74
fi sivu 75 - 82
da side 83 - 90
Betriebsarten
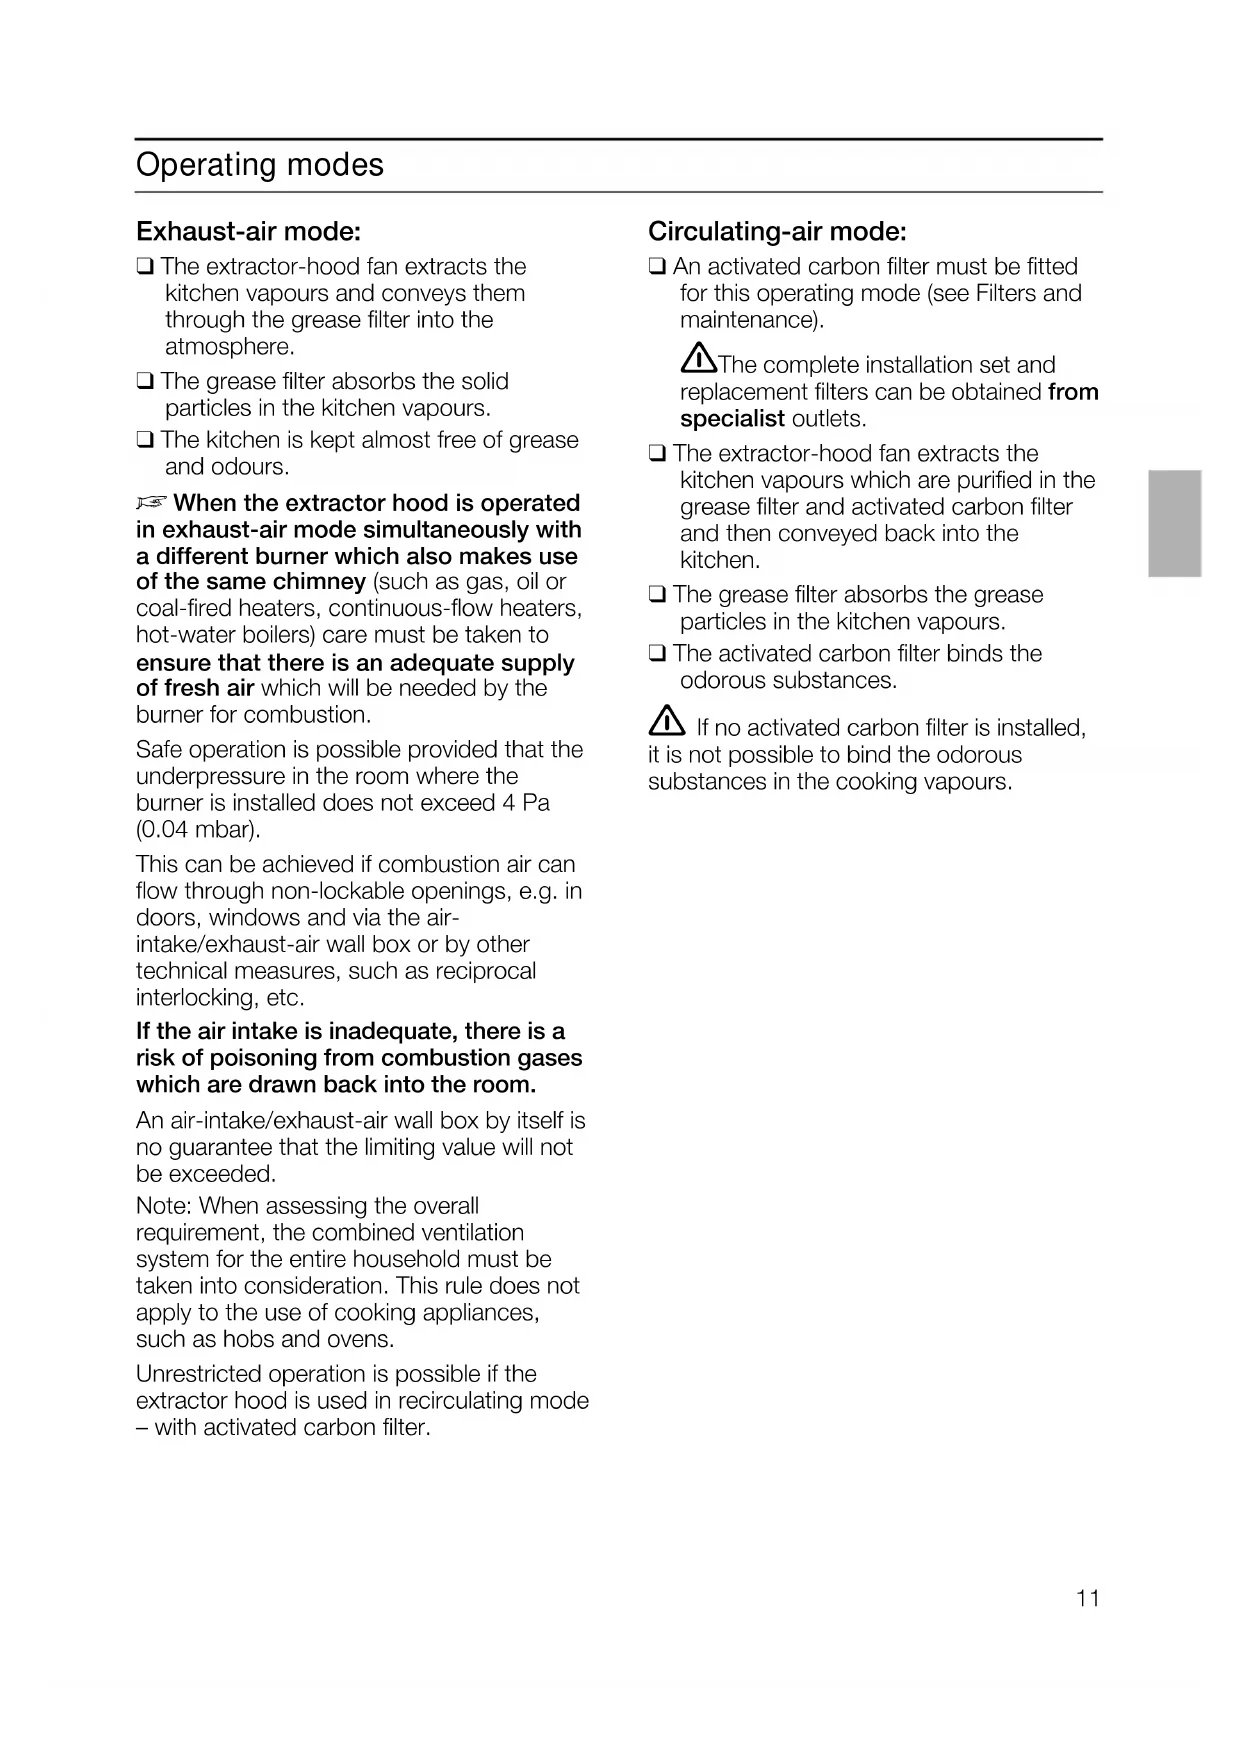
Abluftbetrieb:
natural_image
Simple line drawing of a trash bin with no text or symbols☐ The extractor-hood fan extracts the kitchen vapours and conveys them through the grease filter into the atmosphere.
☐ The grease filter absorbs the solid particles in the kitchen vapours.
☐ The kitchen is kept almost free of grease and odours.
When the extractor hood is operated in exhaust-air mode simultaneously with a different burner which also makes use of the same chimney (such as gas, oil or coal-fired heaters, continuous-flow heaters, hot-water boilers) care must be taken to ensure that there is an adequate supply of fresh air which will be needed by the burner for combustion.
Safe operation is possible provided that the underpressure in the room where the burner is installed does not exceed 4 Pa (0.04 mbar).
This can be achieved if combustion air can flow through non-lockable openings, e.g. in doors, windows and via the air-intake/exhaust-air wall box or by other technical measures, such as reciprocal interlocking, etc.
If the air intake is inadequate, there is a risk of poisoning from combustion gases which are drawn back into the room.
An air-intake/exhaust-air wall box by itself is no guarantee that the limiting value will not be exceeded.
Note: When assessing the overall requirement, the combined ventilation system for the entire household must be taken into consideration. This rule does not apply to the use of cooking appliances, such as hobs and ovens.
Unrestricted operation is possible if the extractor hood is used in recirculating mode – with activated carbon filter.
Circulating-air mode:
☐ An activated carbon filter must be fitted for this operating mode (see Filters and maintenance).
The complete installation set and replacement filters can be obtained from specialist outlets.
☐ The extractor-hood fan extracts the kitchen vapours which are purified in the grease filter and activated carbon filter and then conveyed back into the kitchen.
☐ The grease filter absorbs the grease particles in the kitchen vapours.
☐ The activated carbon filter binds the odorous substances.
⚠️ If no activated carbon filter is installed, it is not possible to bind the odorous substances in the cooking vapours.
Before using for the first time
Important notes:
☐ The Instructions for Use apply to several versions of this appliance. Accordingly, you may find descriptions of individual features that do not apply to your specific appliance.
☐ This extractor hood complies with all relevant safety regulations.
Repairs should be carried out by qualified technicians only.
Improper repairs may put the user at considerable risk.
Before using your appliance for the first time, please read these Instructions for Use carefully. They contain important information concerning your personal safety as well as on use and care of the appliance.
☐ Please retain the operating and installation instructions for a subsequent owner.
☐ This appliance is labelled in accordance with European Directive 2002/96/EG concerning used electrical and electronic appliances (waste electrical and electronic equipment – WEEE). The guideline
natural_image
Simple line drawing of a trash bin with no text or symbolsdetermines the framework for the return and recycling of used appliances as applicable throughout the EU.
Gas hobs / Gas cookers
Do not use all the gas hotplates simultaneously for a prolonged period (max. 15 minutes) at maximum thermal load, otherwise there is a risk of burns if the housing surfaces are touched or a risk of damage to the extractor hood. If the extractor hood is situated over a gas hob, operate the hood at maximum setting if three or more gas hotplates are operated simultaneously.
Note that one large burner of more than 5 kW (Wok) is equivalent to the power of 2 gas burners.
Never operate a gas cooking area without a cooking utensil on it. Regulate the flame in such a way that it does not project over the cooking utensil.
Safety instructions
⚠️Do not flambé food directly under the extractor hood.
! Risk of grease filter catching fire due to flames.
⚠ The hotplates must always be covered with a utensil.
⚠️ Restrictions apply to the use of the extractor hood over a solid-fuel burner (coal, wood, etc.). (See Installation instructions).
⚠️ Do not use the appliance if damaged.
⚠ The appliance is not intended for use by young children or infirmed persons without supervision.
Young children should be supervised to ensure they do not play with the appliance.
⚠️If the connecting cable for this appliance is damaged, the cable must be replaced by the manufacturer or his customer service or a similarly qualified person in order to prevent serious injury to the user.
⚠ The appliance may be connected to the mains by a qualified technician only.
⚠ Dispose of packaging materials properly (see Installation instructions).
⚠ This extractor hood is designed for domestic use only.
Light bulbs must always be fitted when the extractor hood is in use.
⚠️ Defective bulbs should be replaced immediately to prevent the remaining bulbs from overloading.
⚠️ Never operate the extractor hood without a grease filter.
⚠️ Overheated fat or oil can easily catch fire.
If you are cooking with fat or oil, e.g. chips, etc., never leave the cooker unattended.
⚠️ Carefully clean the extractor hood before switching on for the first time.
⚠️ Never allow children to play with the appliance.
Do not let adults or children operate the appliance unsupervised:
- if they are mentally or physically unable to use the appliance safely and correctly,
- if they don't have the knowledge and experience to use the appliance safely and correctly.
⚠ The most effective method of removing vapours produced during cooking is to:
☐ Switch the ventilator ON as soon as you begin cooking.
☐ Switch the ventilator OFF a few minutes after you have finished cooking.
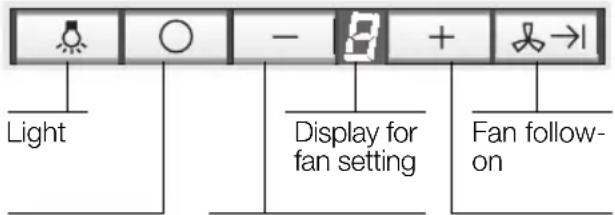
Fan OFF Reduce fan speed Fan ON and increase speed Intensive setting
Acoustic signal:
☐ When a button is pressed, this is verified by an acoustic signal.
Setting the required fan speed:
☐ Press the + button. The fan speed is increased by one step.
☐ Press the – button. The fan speed is reduced by one step.
☐ Press the 0 button. The displayed ☐ goes out shortly afterwards.
Or:
- Keep pressing the – button until the fan switches off. The displayed ☐ goes out shortly afterwards.
Intensive setting:
Maximum power is obtained at the intensive setting. It is only required for short intervals.
☐ Keep pressing the + button until a P appears in the display.
☐ If the intensive setting is not cancelled by hand, the fan will automatically switch back to step ☑ after 10 minutes.
Fan follow-on:
□ Press the button.
The fan continues to run at step 1 for 10 minutes, and at the same time a dot flashes in the display. After this period the fan switches off automatically.
Lighting:
☐ The light can be switched on at any time, even though the fan is switched off.
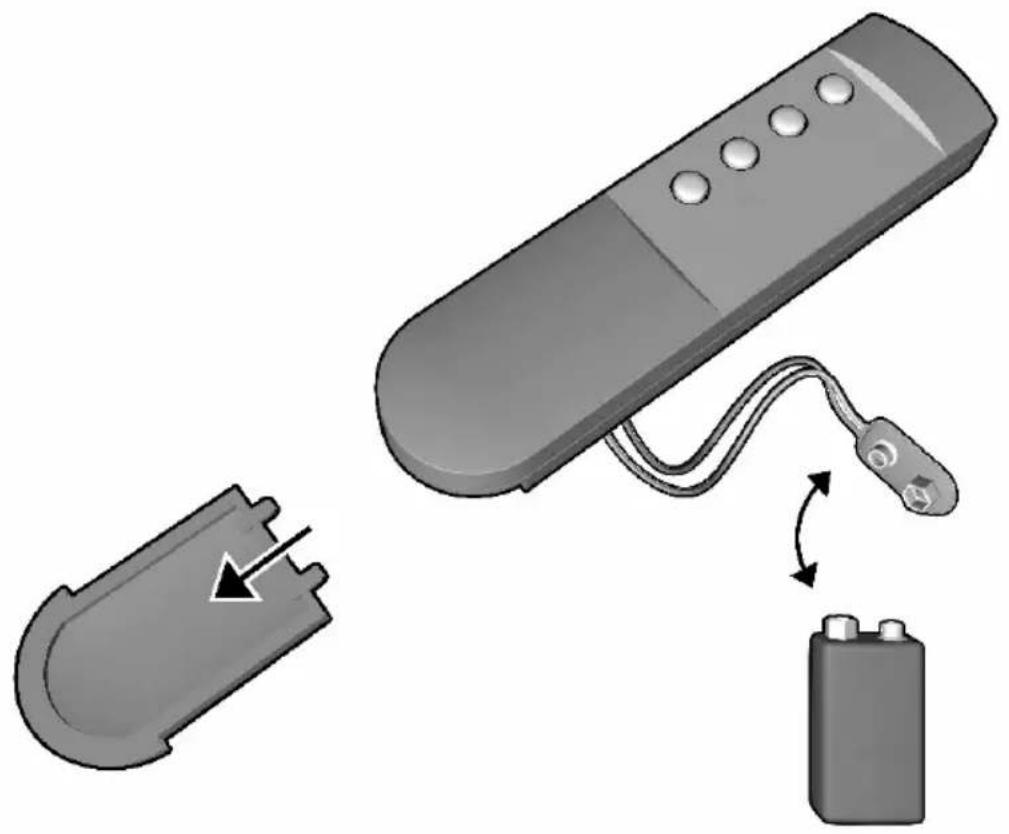
RemoteControl:
☐ The hood is equipped with a remote infrared control with 4 push buttons which enables to switch on and off the light, to switch on and off the hood and to regulate the speeds. + Increases the motor speed. - Reduces the motor speed till it stops. → The fan continues to run at step 1 for 10 minutes, and at the same time a dot flashes in the display. After this period the fan switches off automatically.
LIGHT.
☐ The infrared remote control is fed by a battery. When battery is exhausted it is necessary:
-
To open the small door located on the underside of the remote-control, sliding it in the direction of the arrow (see Fig.6).
-
Extract the battery and replace it with a new one having the same characteristics.
-
Put the small door of the battery back. Follow National norms for waste disposal of batteries.
Grease filters:
Metal filters are used to trap the greasy element of the vapours that develop during cooking.
The filter mats are made from non-combustible metal.
Caution:
As the filter becomes more and more saturated with grease, not only does the risk of it catching fire increase but the efficiency of the extractor hood can also be adversely affected.
Important:
By cleaning the metal grease filters at appropriate intervals, the possibility of them catching fire as a result of a build-up of heat such as occurs when deep-fat frying or roasting is taking place, is reduced.
Saturation indicator:
When the grease filters becomes saturated, the display symbol lights up and a signal sounds. The signal is switched off when the fan is switched off. The grease filters should be cleaned straight away.
Cleaning the metal grease filters:
☐ In normal operation (1 to 2 hours daily), the metal grease filter must be cleaned 1 x a month.
☐ The filters can be cleaned in a dish-washer. It is however possible that they will become slightly discoloured.
☐ The filter must be placed loosely, and NOT wedged, in the dishwasher.
Important:
Metal filters that are saturated with grease should not be washed together with other dishes etc.
☐ When cleaning the filters by hand, soak them in hot soapy water first of all. Do not use aggressive, acidic or caustic cleaners. Then brush the filters clean, rinse them thoroughly and leave the water to drain off.
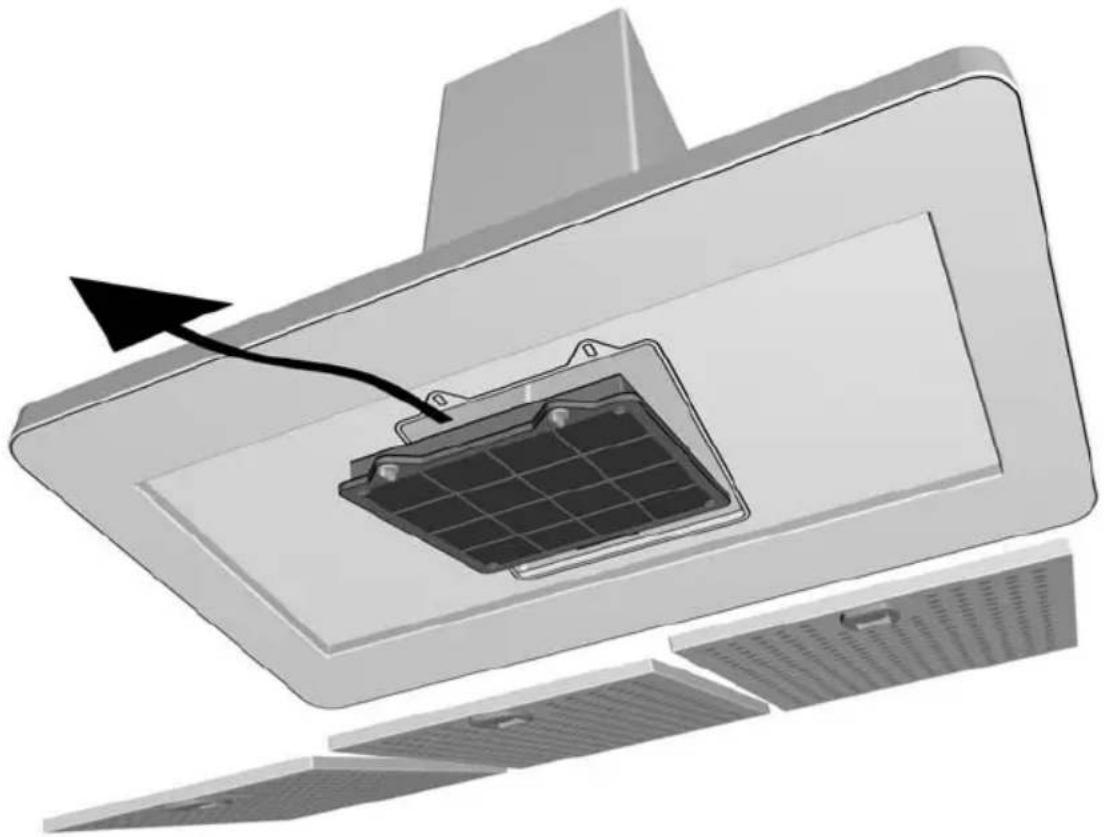
Removing and inserting the metal grease filters:
Warning: The halogen bulbs must be switched off and cool.
- Press the handles on the grease filters downwards and fold the grease filters down. Fig. 1.
- Clean the filters.
- Insert the clean filters back into the hood.
- Clearing the = display.
☐ Press the 0 button 2 x in succession. A signal sounds and the ≡ display goes out.
Activated carbon filter:
For neutralizing odours in recirculating mode.
Caution:
As the filter becomes more and more saturated with grease, there is an increased risk of fire and the function of the extractor hood may be impaired.
Important:
Change the activated carbon filter promptly to prevent the risk of fire from the accumulation of heat when deep-fat frying or roasting.
Saturation indicator:

When the activated carbon filter becomes saturated, the display symbol lights up and a signal sounds. The signal is switched off when the fan is switched off. The activated carbon filter should be replaced straight away.
Filters and maintenance
Inserting the filter:
Warning: The halogen bulbs must be switched off and cool.
- Remove the metal filters (see "Removing and inserting the metal grease filters").
- Insert the activated carbon filter. Fig. 2.
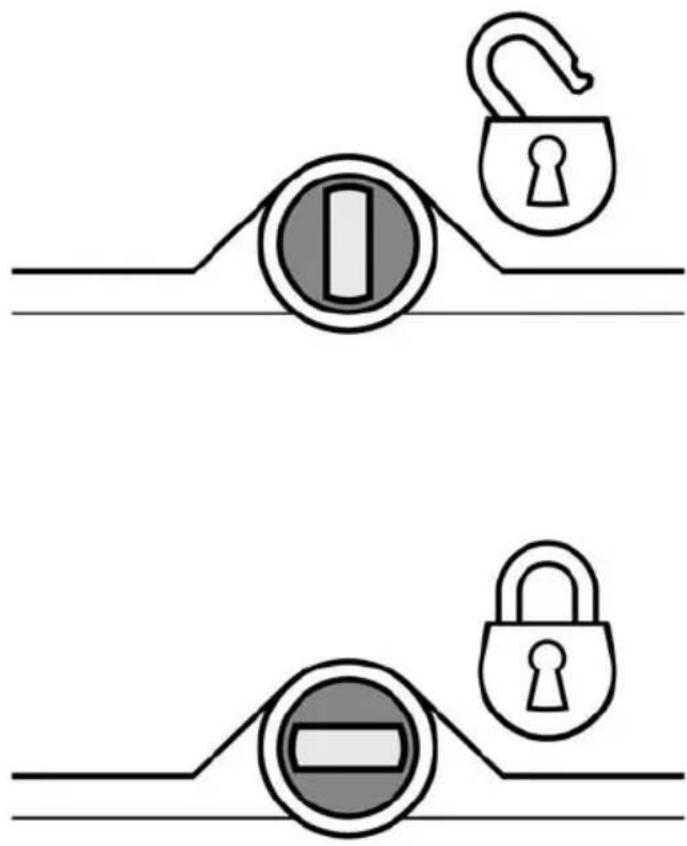
- Raise the activated carbon filter in front and rotate the closures by 90^ . Fig 3.
- Insert the metal grease filters (see "Removing and inserting the metal grease filters").
- Cancel the in the display.
☐ Press the 0 button twice in rapid succession. A signal sounds and the display symbol, goes out.
Removing the filter:
Warning: The halogen bulbs must be switched off and cool.
- Remove the metal filters.
- Rotate the closures by 90^ and remove the activated carbon filter downwards. Fig. 3.
- Insert the metal grease filters.
Replacing the activated carbon filter:
☐ During normal operation (1 to 2 hours per day) the activated carbon filters should be replaced approximately 1 x year.
☐ A replacement filter can be obtained from any authorized dealer.
□ Use original filters only.
By doing so you will obtain maximum performance from your extractor hood.
Disposing of the old activated carbon filter:
☐ There are no pollutants in the activated carbon filters. They can therefore be disposed of as part of your normal domestic refuse.
Cleaning and care
Isolate the extractor hood by pulling out the mains plug or switching off the fuse.
⚠ Do not clean the extractor hood with abrasive sponges or with cleaning agents which contain sand, soda, acid or chlorine!
☐ Clean the extractor hood with a hot soap solution or a mild window cleaner.
☐ Do not scrape off dried-on dirt but wipe off with a damp cloth.
☐ When cleaning the grease filters, remove grease deposits from accessible parts of the housing. This prevents the risk of fire and ensures that the extractor hood continues operating at maximum efficiency.
☐ Note: Do not use alcohol (spirit) on plastic surfaces, as dull marks may appear.
Caution: Ensure that the kitchen is adequately ventilated. Avoid naked flames!
⚠ Clean the operating buttons with a mild soapy solution and a soft, damp cloth only. Do not use stainless-steel cleaner to clean the operating buttons.
Stainless steel surfaces:
☐ Use a mild non-abrasive stainless steel cleaner.
☐ Clean the surface in the same direction as it has been ground and polished.
☐ We recommend our stainless steel cleaner no. 461731.
See enclosed service booklet for order address.
Aluminium and plastic surfaces:
☐ Do not use dry cloths.
☐ Use a mild window cleaning agent.
☐ Do not use aggressive, acidic or caustic cleaners.
Observe the warranty regulations in the enclosed service booklet.
Replacing the light bulbs
- Switch off the extractor hood and pull out the mains plug or switch off the electricity supply at the fuse box.
When switched on, the halogen bulbs become very hot. Even for some time after the bulbs have been switched off there is still a risk of burns.
2. Remove the bulb ring with a screwdriver or similar tool. Fig. 4.
3. Replace the halogen light bulb (conventional halogen bulb, 12 Volt, max. 20 Watt, G4 cap).
Caution: Refer to Fig. 5 for plug-in lampholder.
Take hold of the bulb with a clean cloth.
- Re-insert the bulb ring.
- Plug the appliance into the mains or switch it on at the fuse box.
Note: If the light does not function, check that the bulbs have been inserted correctly.
Setting the saturation indicator
If it becomes necessary to change the operating mode (exhaust-air/recirculating mode), the saturation indicator for the filters must also be altered (see Installation Instructions).
If you encounter a problem
If an or appears in the display:
☐ See "Filters and maintenance" Section.
If is not possible to operate the extractor hood:
☐ Disconnect the extractor hood from the mains electricity supply by pulling out the plug or switching it off at the main fuse box.
Wait for approx. 1 minute and then switch it on again.
If you have any questions or if a fault occurs, please call Customer Service.
(See list of Customer Service representatives).
When you call, please quote the following:
E-Nr.
FD
Enter the relevant numbers into the box above. The E-Nr. (product no.) and FD (production date) are shown on the nameplate which can be seen inside the extractor hood after the filter frame has been detached.
The manufacturer of the extractor hoods accepts no liability for complaints which can be attributed to the design and layout of the pipework.
natural_image
Simple line drawing of a trash bin with no text or symbolsVentilation intensive:
natural_image
Simple line drawing of a trash bin with no text or symbolsGaskookplaten / gasfornuizen
natural_image
Simple line drawing of a trash bin with no text or symbolsnatural_image
Simple line drawing of a trash bin with no text or symbolsnatural_image
Simple line drawing of a trash bin with no text or symbolsnatural_image
Simple line drawing of a trash bin with no text or symbolsnatural_image
Simple line drawing of a trash bin with no text or symbolsGassplater / Gasskomfyr
natural_image
Simple line drawing of a trash bin with no text or symbolsnatural_image
Simple line drawing of a trash bin with no text or symbolsnatural_image
Diagram of a room interior with perforated floor and door, showing a curved arrow indicating direction (no text or symbols)Abb. 2
natural_image
Diagram of a computer kitchen with an open panel and a black arrow pointing to a component (no text or symbols present)Abb. 3
natural_image
Two identical diagrams showing a padlock icon with an open lock and a minus sign, connected by horizontal lines (no text or symbols)Abb. 4

natural_image
Diagram showing a screwdriver inserted into a circular component on a surface, with an arrow indicating rotational motion (no text or symbols present)Abb. 5

natural_image
Illustration of a hand adjusting a small component with a circular component and a tool, no text or symbols presentAbb. 6