PF500 - Digital piano YAMAHA - Free user manual and instructions
Find the device manual for free PF500 YAMAHA in PDF.

| Product Type | Digital Piano |
| Brand | YAMAHA |
| Model | PF500 |
| Keyboard | 88 weighted keys (graded) |
| Polyphony | 64 notes |
| Number of Sounds | 24 |
| USB Connectivity | Type B |
| MIDI Connectivity | MIDI In/Out |
| Serial Port (TO HOST) | RS-232C/RS-422 |
| Compatible Operating Systems | Windows 95/98/Me/NT4.0/2000/XP, Mac OS 8.0 to 9.2.2 |
| Included Software | File Utility, Acrobat Reader, OMS (Mac) |
| Functions | Recording, playback, demonstration, file transfer |
| Power Supply | AC adapter (12 V) |
| Maintenance | Clean with a soft, dry cloth |
| Safety | Do not expose to humidity, avoid dust |
| Included Accessories | CD-ROM, installation manual |
| Repairability | Spare parts available from Yamaha after-sales service |
| Warranty | 1 year (according to applicable legislation) |
Frequently Asked Questions - PF500 YAMAHA
User questions about PF500 YAMAHA
0 question about this device. Answer the ones you know or ask your own.
Ask a new question about this device
Download the instructions for your Digital piano in PDF format for free! Find your manual PF500 - YAMAHA and take your electronic device back in hand. On this page are published all the documents necessary for the use of your device. PF500 by YAMAHA.
USER MANUAL PF500 YAMAHA
- The software and this Installation Guide are exclusive copyrights of Yamaha Corporation.
- Use of the software and this guide is governed by the SOFTWARE LICENSING AGREEMENT which the purchaser fully agrees to upon breaking the seal of the software packaging. (Please read carefully the AGREEMENT at the end of this guide before installing the application.)
Copyright of the software or reproduction of this guide in whole or in part by any means is expressly forbidden without the written consent of the manufacturer. - Yamaha makes no representations or warranties with regard to the use of the software and documentation and cannot be held responsible for the results of the use of this guide and the software.
This disc is a CD-ROM. Do not attempt to play the disc on an audio CD player. Doing so may result in irreparable damage to your audio CD player. - Copying of the commercially available music data is strictly prohibited except for your personal use.
The company names and product names in this Installation Guide are the trademarks or registered trademarks of their respective companies.
Future upgrades of application and system software and any changes in specifications and functions will be announced separately. - Depending on the version of your operating system, the screen shots and messages shown in this guide may differ to those that you see on your computer screen.
BESONDERE HINWEISE
Important Notices about the CD-ROM
Data Types
This CD-ROM includes application software.
Please refer to page 4 (Windows) and 9 (Macintosh) for details about the software and how to install it.
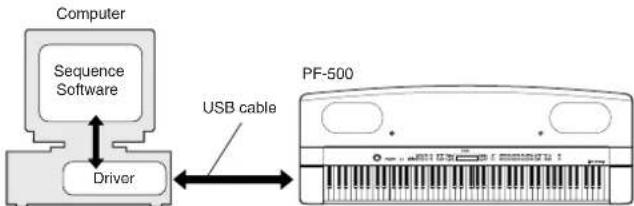
These applications allow you to transfer data between your computer and the PF-500.

CAUTION
Never attempt to play back the included CD-ROM on an audio CD player. Doing so may result in damage to your hearing as well as to your CD player/audiospeakers.
Operating System (OS)
The applications in this CD-ROM are provided in versions for both Windows and Macintosh operating systems. The installation procedure and the applications themselves differ depending on the operating system that you are using. Please refer to the appropriate installation instructions.
→ Windows Read page 3, 5, 13.
Macintosh Read page 3, 10, 13.
Media format
The PF-500 and the File Utility software are compatible with the MS-DOS format media.
The following steps are the same for both Windows and Macintosh.
Verify that your system meets the operating requirements of the software (File Utility, driver, etc.) (Windows page 5, Macintosh page 10).
Connect the PF-500 to your computer.
Refer to the owner's manual for details on connections.
Note Depending on the computer system you are using, some types of connections may not be possible.
Install the driver appropriate for your type of connection into your computer, and make the necessary settings.
The arrow symbols shown below represent cables.
- Connection using a USB cable USB connector of the PF-500 USB connector of the computer ... Windows page 5, Macintosh page 10
- Connection using a serial cable TO HOST connector of the PF-500 Serial port of the computer (RS-232C or RS-422 connector) ... page 7
- Connection using MIDI cables MIDI connector of the PF-500 MIDI interface device Computer ... Windows page 5, Macintosh page 10
Install the software (File Utility, etc.)
Refer to pages 5 (Windows) or 10 (Macintosh) for the installation procedure.
Start up the software.
For subsequent operation, refer to the owner's manual for each software program (online help/PDF manual).
In order to view PDF files, you will need to install Acrobat Reader in your computer (Windows page 5, Macintosh page 10).
Limitations on the PF-500 when using the File Utility
The accessory CD-ROM contains a File Utility program.
By using this software, you can transfer files between the internal memory of the PF-500 and your computer, and edit them. There are some operating states of the PF-500 in which it is not possible to use the File Utility or in which some File Utility functions are not available.
You cannot use File Utility to perform file operations in the following states.
- Demo song mode
- Song recording/playback mode
During file operations - During the various [SONG SETTING] operations
The following operations cannot be performed while File Utility is running.
- File operations
- Song loading
- Track button on/off
The following operations cannot be performed on the PF-500.
- Changing the name of a protected song (A "protected song" is song data such as a preset song that has been copied to the storage memory.)
- Changing the filename extension of a file
- Japanese display in the LCD screen
- Creating a folder
- Copying a folder from the computer to the storage memory
- Copying a file within the same folder
- Transmitting a protected song to the computer
- Transmitting path information to a device
NOTE When transferring a file between the PF-500 and your computer, you must set the type of characters on your PF-500 ([CharacterCode]) to match the language of the operating system for the computer in which you installed File Utility. If the character code of the PF-500 does not match the language of the computer that is running File Utility, the file may not be handled correctly.
Note On the PF-500, the File Utility ID is fixed at "1". If you specify an ID other than "1," you will be unable to transmit or receive data. For details on the File Utility ID, refer to the File Utility PDF manual.
Contents of the CD-ROM
The CD-ROM contains a variety of applications (with installers) and data in the following folders.
| Folder Name Application | Name Contents | |
| Acroread_Acrobat Reader | *1 *2 | PDF (Portable Document Format) viewer. Enables you to view each PDF manual for the applications. |
| FileUtil_File Utility | *2 | Enables you to manage files in the storage memory on the PF-500. |
| MIDI Setup Enables you to use the File Utility. | ||
| USBdrv_YAMAHA USB MIDI Driver (for Win98, Me) Enables your computer to communicate with the PF-500 when your computer and the PF-500 are connected using a USB cable. | ||
| USBdrv2k_YAMAHA USB MIDI Driver (for Win2000, XP) | ||
| Mididrv_YAMAHA CBX Driver Allows the serial port of your computer to be connected directly to the PF-500 so that MIDI messages can be transferred. | ||
| SongData Demonstration | Song Enables you to use the File Utility to transmit data to the PF-500 so you can enjoy demo song (SMF file) playback on the PF-500. | |
| Adv Piano Suite Lite You can experience the essence of the Adventus Piano Suite, a music software for learning, playing, and creating. | ||
| advdoc | Getting Started with Piano Suite Lite | Basic guide for setup and exploration of Piano Suite Lite. |
| yamahamusicsoft.com | Yamaha various software | Introduction for music software products from Yamaha. |
1 Unfortunately, Yamaha makes no guarantee concerning the stability of this program nor can it offer user support for it.
2 The applications are supplied with online/PDF manuals.
Minimum System Requirements
NOTE Depending on your operating system, it may be necessary to satisfy conditions in addition to those listed below.
- File Utility (including MIDI setup)
Computer: PC with 75 megahertz (MHz); Intel® Pentium®/ CeleronTM family
OS: Windows® 95/98/98SE/Me/NT4.0/2000/XP Home Edition/XP Professional
Available Memory: 16 MB or more
Hard Disk: 4 MB or more
Display: 640 × 480 , High Color (16 bit)
- USB MIDI Driver
Computer: PC (with USB port) with 166 megahertz (MHz); Intel® Pentium®/Celeron™ family
OS: Windows® 98/98SE/Me/2000/XP Home Edition/XP Professional
Available Memory: 32 MB or more
Hard Disk: 2 MB or more
YAMAHA CBX Driver
OS: Windows® 95/98/98SE/Me/NT4.0/2000/XP Home Edition/XP Professional
Software Installation
- NOTE For details about the application software which has no installation guide described below, refer to the online manual of each software.
Acrobat Reader
In order to view the PDF manuals included with each application, you'll need to install Acrobat Reader.
- Note If an older version of Acrobat Reader is installed on your PC, you'll need to uninstall it before proceeding.
Double-click on the "Acroread" folder. Four different language folders will be displayed.
Select the language you want to use and double-click on its folder. "ar500.exe" file will be displayed. ("" indicates the selected language.)
Double-click on the "ar500***.exe."
Acrobat Reader Setup Dialog box will be displayed.
4 Execute the installation by following the on-screen directions. After installation is complete, the Acrobat folder appears on your PC (in Program Files, as the default). For information on using the Acrobat Reader, refer to the Reader Guide in the Help menu.
USB MIDI Driver
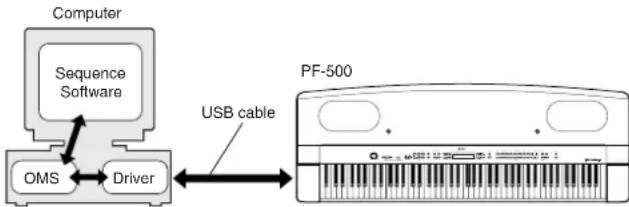
To operate the PF-500 from your computer via USB, you'll need to install the appropriate driver software.
The USB-MIDI driver is software that transfers MIDI data back and forth between sequence software and the PF-500 via a USB cable.
Windows 98/Me users See below.
Windows 2000 users Scc page 6.
Windows XP users See page 7.
Before you install the USB MIDI driver, you can minimize the possibility of problems by putting your computer in the following state.
- Close all applications and windows that you are not using.
- Disconnect all cables from the PF-500 except for the cable whose driver you are installing.
- Installing the driver on a Windows 98/Me system
1 Start the computer.
Insert the included CD-ROM into the CD-ROM drive.
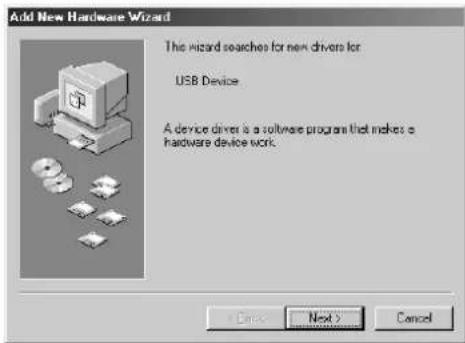
Make sure the POWER switch on the PF-500 is set to OFF and use the USB cable to connect the USB terminal of the computer (or the USB hub) to the USB terminal of the PF-500. When the PF-500 is turned on, the computer automatically displays the "Add New Hardware Wizard." If the Add New Hardware Wizard does not appear, click "Add New Hardware" in the Control Panel.
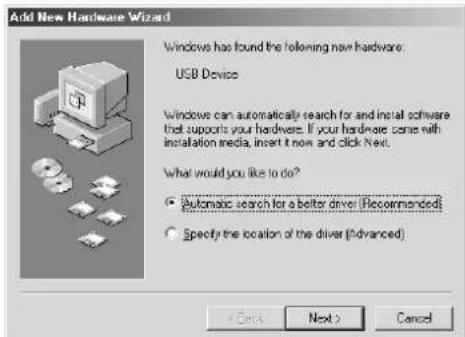
For Windows Me users, check the radio button to the left of "Automatic search for a better driver (Recommended)" and click [Next]. The system automatically starts searching and installing the driver. Proceed to Step 8. If the system does not detect the driver, select "Specify the location of the driver (Advanced)" and specify the CD-ROM drive's root directory (e.g., D:) to install the driver.
Windows 98
Windows Me
4 Click [Next].
The window below enables you to select the search method.
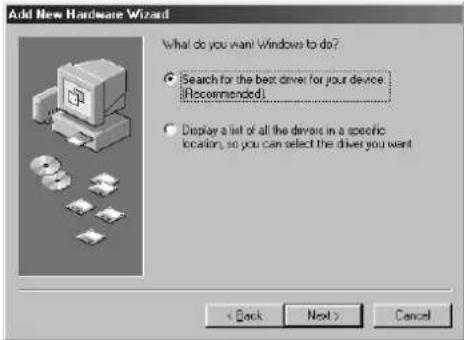
Check the radio button to the left of "Search for the best driver for your device. (Recommended)." Click [Next].
The window below enables you to select a location in which to install the driver.
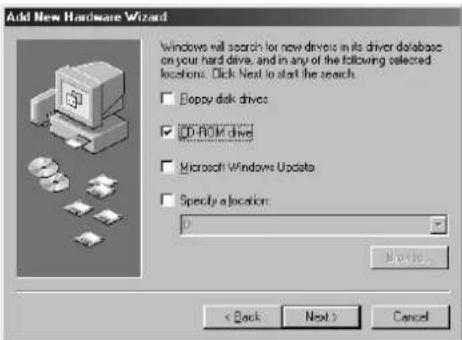
Check the "CD-ROM drive" box and uncheck all other items. Click [Next].
Note The system may ask you to insert a Windows CD-ROM while it checks for the driver. Specify the USBdrv directory of the CD-ROM drive (such as D:\USBdrv) and continue the installation.
- NOTE When using the Windows 98, specify the USBdrv directory of the CD-ROM drive (such as D:\USBdrv) and continue the installation.
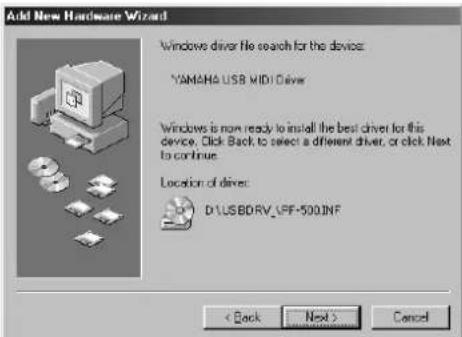
When the system detects the driver on the CD-ROM and is ready for installation, it displays the following screen.
Make sure that the "YAMAHA USB MIDI Driver" is listed, and click [Next]. The system starts the installation.
When the installation is complete, the following screen appears. Click [Finish].
NOTE Some computers may take about ten seconds to show this screen after the installation is complete.

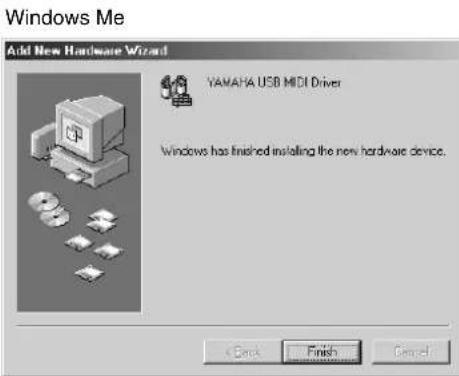
The driver has been installed.
- Installing the driver on a Windows 2000 system
Start the computer and use the "Administrator" account to log into Windows 2000.
2 Select [My Computer | Control Panel | System | Hardware | Driver Signing | File Signature Verification], and check the radio button to the left of "Ignore -Install all files, regardless of file signature" and click [OK].
Insert the included CD-ROM into the CD-ROM drive.
Make sure the POWER switch on the PF-500 is set to OFF and use the USB cable to connect the USB terminal of the computer (or the USB hub) to the USB terminal of the PF-500. When the PF-500 is turned on, the computer automatically displays the "Found New Hardware Wizard." Click [Next].
Check the radio button to the left of "Search for a suitable driver for my device. (Recommended)." Click [Next]. The window that appears enables you to select a location in which to install the driver.
Check the "CD-ROM drives" box and uncheck all other items. Click [Next].
The system may ask you to insert a Windows CD-ROM while it checks for the driver. Specify the "USBdrv2k" directory of the CD-ROM drive (such as D:\USBdrv2k\ and continue the installation.
When the installation is complete, the system displays "Completing the Found New Hardware Wizard." Click [Finish].
Some computers may take about ten seconds to show this screen after the installation is complete.
8 Restart the computer.
The driver has been installed.
Installing the driver on a Windows XP system
1 Start the computer.
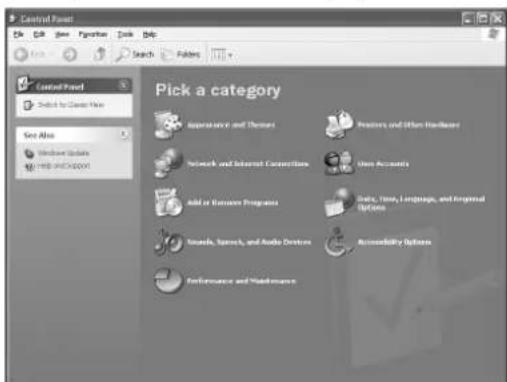
Select [Start | Control Panel]. If the control panel appears as shown below, click "Switch to Classic View" in the upper left of the window. All control panels and icons will be displayed.
System | Hardware | Driver Signing | File Signature Verification], and check the radio button to the left of "Ignore -Install all files, regardless of file signature" and click [OK].
Click the [OK] button to close System Properties, and then click "X" in the upper right of the window to close the Control Panel.
Insert the included CD-ROM into the CD-ROM drive.
Make sure the POWER switch on the PF-500 is set to OFF and use the USB cable to connect the USB terminal of the computer (or the USB hub) to the USB terminal of the PF-500. When the PF-500 is turned on, the computer automatically displays the "Found New Hardware Wizard."
Check the radio button to the left of "Search for a suitable driver for my device. (Recommended)." Click [Next]. The system starts the installation.
When the installation is complete, the system displays "Completing the Found New Hardware Wizard." Click [Finish]. Some computers may take about ten seconds to show this screen after the installation is complete.
9Restart the computer. The driver has been installed.
Serial Driver
Double-click on the "Mididrv" folder. "Setup.exe" file will be displayed.
Double-click on the "Setup.exe" file. When the setup has been initialized, the "Welcome" window will appear.

Click [Next]. The "Select operation" window will appear.
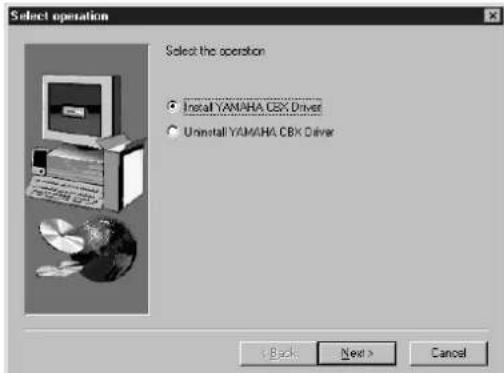
4Click the radio button to the left of "InstallYAMAHA CBX Driver." Click [Next].
The license agreement for the YAMAHA CBX Driver will be displayed. Please read it carefully.
Click [Yes]. The "Select COM port" window will appear.
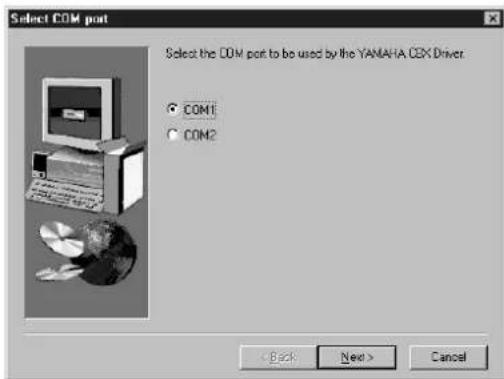
7Click the radio button to the left of the COM port to use. Normally you will use COM1. Click [Next]. "Select the number of MIDI output ports" will appear.
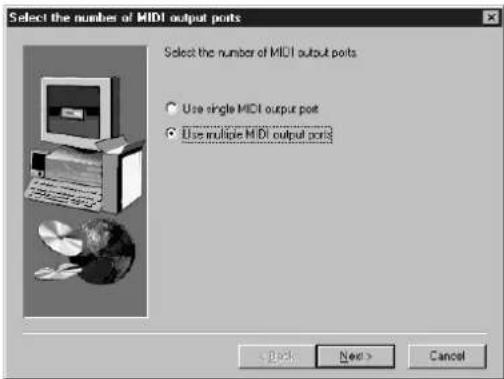
3Click the radio button to the left of the "Use multiple MIDI output ports" and click [Next]. The MIDI driver will be installed, and the "MIDI Mapper Question" window will appear.
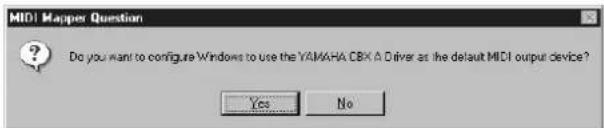
Click [Yes].
The system displays the following message "Set the HOST SELECT switch on a tone module to PC-2."
Click [OK].
A message will inform you that setup has been completed.
In order for the newly installed YAMAHA CBX Driver to take effect, make sure that "Yes, I want to restart my computer now" is installed, and click [OK]. The computer will restart.
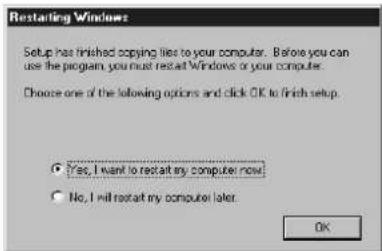
The driver has been installed.
File Utility, MIDI Setup
Once you've installed these software programs, you can use your computer to access and organize data stored to media connected to the PF-500 (Storage memory).
Double-click on the "FileUtil" folder in the CD-ROM. "Setup.exe" file will be displayed.
Double-click on the "Setup.exe" file. The File Utility setup dialog will be displayed.
3 Execute the installation by following the on-screen directions.
For details, refer to the on-line Help or the PDF owner's manual.
MIDI port setting (MIDI SETUP)
Before setting the MIDI port on the File Utility, you should set the MIDI port from the MIDI SETUP toolbar.
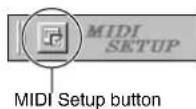
1Start the File Utility.
Click the MIDI Setup button in the Toolbar called up via step #1.
In the MIDI Setup window called up via step#2, click the [▼] button at the right end of each box and make the port settings as shown.
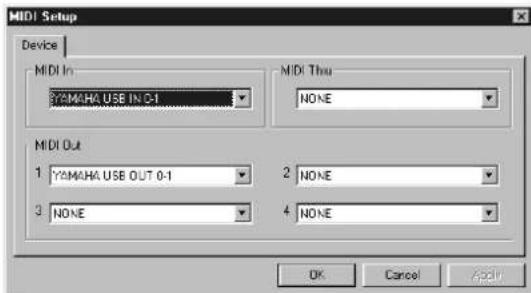
In order for MIDI ports to be available here, you'll need to select the relevant MIDI port within the application software—File Utility. This is the port that you'll use in the various software. For details on setting the MIDI port, refer to the PDF manual of File Utility.
Contents of the CD-ROM
The CD-ROM contains a variety of applications (with installers) and data are contained in the following folders.
| Folder Name Application | Name Contents | |
| Acroread_Acrobat Reader | 4.0 *1 *2 | PDF (Portable Document Format) viewer. Enables you to view each PDF manual for the applications. |
| OMS_Open Music System | m (OMS) 2.3.8 *2 | Enables you to use several MIDI applications on the Mac OS. |
| OMS Setup for YAMAHA Contains the OMS Setup files for the Yamaha PF-500. | ||
| USBdrv_YAMAHA USB | MIDI Driver Enables your computer to communicate with the PF-500 when your computer and the PF-500 are connected using a USB cable. | |
| FileUtil_File Utility | *2 | Enables you to manage files in the storage memory on the PF-500. |
| SongData Demonstration | Song Enables you to use the File Utility to transmit data to the PF-500 so you can enjoy demo song (SMF file) playback on the PF-500. | |
| yamahamusicsoft.com | Yamaha various software | Introduction for music software products from Yamaha. |
1 Unfortunately, Yamaha makes no guarantee concerning the stability of this program nor can it offer user support for it.
2 The applications are supplied with online/PDF manuals.
- OMS® and OMS® ademarks of Opcode Systems, Inc.
Minimum System Requirements
- File Utility
Computer: A Macintosh computer with a PowerPC or later CPU
OS: Mac OS 8.0 through 9.2.2 (Mac OS X is not supported.)
Available Memory: 6 MB or more
Hard Disk: 4 MB or more (except for OMS)
Display: 640 × 480 , 256 colors or more
Other: OMS 2.3.3 or later (included in the CD-ROM in the
package)
- USB MIDI Driver
Computer: A Macintosh computer with a USB connector and a PowerPC or later CPU
OS: Mac OS 8.6 through 9.2.2 (Mac OS X is not supported.)
Available Memory: 64 MB or more (128 MB or more is recommended)
NOTE Turn off virtual memory.
Hard Disk: 2 MB or more
Other: OMS 2.3.3 or later (included in the CD-ROM in the package)
Software Installation
5Note For details about the application software which has no installation guide described below, refer to the owner's manual of each software.
Acrobat Reader 4.0
In order to view the PDF manuals included with each application, you'll need to install Acrobat Reader.
Double-click on the "Acroread" folder.
Four different language folders will be displayed: English, German, French and Spanish.
Select the language you want to use and double-click on its folder. "Reader Installer" will be displayed.
The Installer name may differ depending on the language you select.
Double-click on the "Reader Installer."
Acrobat Reader Setup Dialog will be displayed.
4 Execute the installation by following the directions appearing on the screen.
After installation is complete, the Acrobat folder appears on your computer (in Hard Disk, as the default).
For information on using the Acrobat Reader, refer to the Reader Guide in the Help menu.
Open Music System (OMS) 2.3.8
OMS allows you to use several MIDI applications on the Mac OS at the same time.
Double-click on the "OMS_ folder (English version only). Install OMS 2.3.8" will be displayed.
Double-click on "Install OMS 2.3.8."
OMS Setup Dialog will be displayed.
3 Execute the installation by following the on-screen directions. After the installation, select "Restart."
6 NOTE After the installation is complete, you may possibly encounter an error message warning that the installer did not close. In this case, go to the "File" menu and select "Quit" to close the installer. Then reboot the computer.
After restarting the Macintosh, you will find the "Opcode"/"OMS Applications" folder on your computer (Hard Disk, as the default).
Copy the "OMS_2.3_Mac.pdf" in the CD-ROM to the "OMS Applications" folder (drag-and-drop it to the folder).
Refer to the "OMS_2.3_Mac.pdf" (English version only) how to use the application.
Copy the "OMS Setup for YAMAHA" in the CD-ROM to the "OMS Applications" folder (drag-and-drop it to the folder).
In the "OMS Setup for YAMAHA" folder you will find the OMS Setup files for the Yamaha tone generators, which can be used as templates.
USB MIDI Driver
To operate the PF-500 from your computer via USB, you'll need to install the appropriate driver software.
The USB-MIDI driver is software that transfers MIDI data back and forth between sequence software and the PF-500 via a USB cable.
First install OMS before you install the USB-MIDI driver. Also, after installing the driver, you will need to set up OMS (above).
1 Start the computer.
Insert the included CD-ROM into the CD-ROM drive. The system displays the CD-ROM icon on the desktop.
Double-click the CD-ROM icon and double-click the "Install USB Driver" icon in the "USBdrv_ folder to display the following installation screen.

4 The "Install Location" box displays the destination of the installation. If you wish to change the destination disk or folder, use the [Switch Disk] button and the pop-up menu to specify the desired destination.
NOTE This box usually displays the start-up disk as the destination.
Click the [Install] button. The system displays the following message: "This installation requires your computer to restart after installing this software. Click Continue to automatically quit all other running applications." Click [Continue].
NOTE To cancel the installation, click [Cancel].
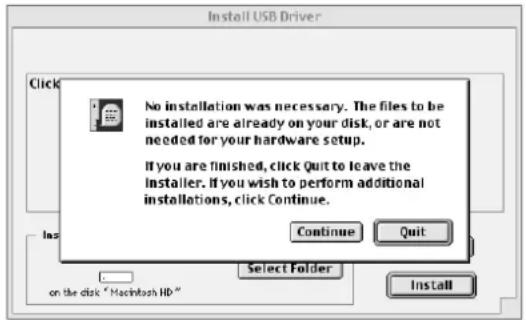
The installation starts. If the driver has already been installed, you will receive the following message. To return to step 3, press [Continue]. To complete the installation, click [Quit].
When the installation is complete, the system displays the following message: "Installation was successful. You have installed software which requires you to restart your computer." Click [Restart]. The computer automatically restarts. You can locate the installed files in the following locations:
- System Folder | Control Panels | YAMAHA USB MIDI Patch
- System Folder | Extensions | USB YAMAHA MIDI Driver
- System Folder | OMS Folder | YAMAHA USB MIDI OMS Driver
File Utility, MIDI Setup
Once you've installed these software programs, you can use your computer to access and organize data stored to media connected to the PF-500 (Storage memory).
Double-click on the "FileUtil" folder in the CD-ROM. "Install File Utility" file will be displayed.
Double-click on the "Install File Utility" file. The File Utility installation dialog will be displayed. Execute the installation by following the on-screen directions.
After installing, restart the computer.
For details, refer to the on-line Help or the PDF owner's manual.
Setting up OMS (For USB connection)
The OMS studio setup file for the PF-500 is contained in the included CD-ROM. This studio setup file is used for setting up OMS.
5Note Before performing the following procedure, the OMS and USB MIDI Driver should be installed.
Use a USB cable to connect the USB terminal of the computer (or the USB hub) to the USB terminal of the PF-500 and turn the PF-500's power on.
Start the computer.
Insert the included CD-ROM into the CD-ROM drive of your Macintosh computer. The CD-ROM icon appears on the desktop.
Double-click on the CD-ROM icon, "OMS_", and "OMS Setup for YAMAHA." The file "PF-500-USB" appear. Copy these to the hard disk on your computer.
NOTE If you want to use a serial connection instead of using USB, please copy and use the following files.
“PF-500-Printer”
Use this for serial connection via the printer port.
“PF-500-Modem”
Use this for serial connection via the modem port.
NOTE When using the serial connection for the File Utility, set the MIDI Out:/ MIDI In: setting in the OMS Port Setup to MIDI Time Piece-Printer, or MIDI Time Piece-Modem.
Double-click on the "PF-500-USB" file to start the OMS Setup.
After starting the OMS Setup, the Studio setup file double-clicked in step #5 opens.

- Note If is not indicated at the right of the setup file name, select "Make Current" from the "File" menu and execute the save operation.
The OMS studio setup has been completed.
- Note After the OMS studio setup above has been completed, your computer will recognize only the PF-500 as a MIDI instrument. If you use another MIDI instrument in addition to the PF-500 or you add a second PF-500 to the existing system, you should create an original Studio Setup file. For details, refer to the on-line manual supplied with the OMS.
Depending on the Macintosh and operating system version that you are using, the included studio setup file for the PF-500 still may not work even after you have performed the above steps. (MIDI transmission and reception will not be possible even if the setup is valid.)
In this case, use the following procedure to re-create the setup file.
Connect the PF-500 and Macintosh via USB or serial cable, and turn on the power of the PF-500.
Start up OMS Setup, and from the "File" menu, choose "New setup."
The OMS driver search dialog box will appear. Check [Modem] or [Printer] if you are using a serial connection. Uncheck both of these if you are using a USB connection.
4 Click the [Find] button to search for the device. When the search has succeeded, the OMS Driver Setting dialog box will display the following.
For a USB connection: USB-MIDI 1
For a serial connection: MIDI Time Piece-Modem (Printe)
- If the device was found correctly, click the [OK] button to proceed.
- If the device was not found, re-check that the cable connections are correct, and repeat the procedure from step 1.
Make sure that the port is shown below the device that was found. (In the case of the PF-500, this will be a name such as USB-MIDI, Modem, or Printer.) Check the check box for the port, and then click the [OK] button.
A dialog box will appear, allowing you to name the file that will be saved. Input the desired filename, and click [Save]. This completes OMS setup.
From the "Studio" menu, choose "Test," and click the port icon. If a channel sounds on the PF-500, the system is operating correctly.
For details on using OMS, refer to OMS_2.3_Mac.pdf, included with OMS.
The driver cannot be installed.
-
Is the USB cable connected correctly?
-
Check the USB cable connection.
Disconnect the USB cable, then connect it again. -
[Windows] Is the USB function enabled on your computer?
When you connect the PF-500 to the computer for the first time, if the "Add New Hardware Wizard" does not appear, the USB function on the computer may be disabled. Perform the following steps.
① Double-click "System" in the Control Panel to open the System Properties window.
Double-click the "Device Manager" tab and make sure that no "!" or "x" marks appear at "Universal serial bus controller" or "USB Root Hub." If you see an "!" or "x" mark, the USB controller is disabled. For more information, refer to the owner's manual of your computer.
- [Windows] Is any unknown device registered?
If driver installation fails, the PF-500 will be marked as an "Unknown device," and you will not be able to install the driver. Delete the "Unknown device" by following the steps below.
① Double-click "System" in the Control Panel to open the System Properties window.
② Double-click the "Device Manager" tab. With the "View devices by type" check box checked, look for "Other devices."
③ If you find "Other devices," double-click it to extend the tree to look for "Unknown device." If one appears, select it and click the [Remove] button.
④ Remove the USB cable from the PF-500, and make the connection again.
⑤ Install the driver again.
When controlling the PF-500 from your computer via USB, the PF-500 does not operate correctly or no sound is heard.
- Did you install the driver?
- If you are using a Macintosh, did you install OMS before installing the USB MIDI driver?
- Is the USB cable connected correctly?
- Are the volume settings of the tone generator, playback device, and application program set to the appropriate levels?
- Have you selected an appropriate port in the application software?
- Are you using the latest USB MIDI driver? The latest driver can be downloaded from the www.yamahasynth.com Web site.
- Is the HOST SELECT switch set correctly?
Playback response is delayed.
- Does your computer satisfy the system requirements?
- Is any other application or device driver running?
[Macintosh]
Turn off virtual memory.
DisableAppleTalk.
Cannot suspend or resume the computer correctly.
- Do not suspend the computer while the MIDI application is running.
- If you are using Windows 2000, you may not be able to suspend/ resume normally, depending on the particular environment (USB Host Controller, etc.). Even so, simply disconnecting and connecting the USB cable will allow you to use the PF-500 functions again.
How can I delete or re-install the driver?
[Windows Me/98]
① When the PF-500 is recognized correctly, double-click "System" in the Control Panel to open the System window.
Double-click the "Device Manager" tab, select "YAMAHA USB MIDI Driver" and delete it.
③ Use the MS-DOS prompt or Explorer to delete the following three files.
5NOTE To delete these files using Explorer, select "Fol Options" from the Tool (View) menu, and select "Show all files (and folders)."
\WINDOWS\INF\OTHER\YAMAHAPF-500.INF
\WINDOWS\SystemXgusb.drv
- \WINDOWS\SYSTEM\Ymidusb.sys
④ Disconnect the USB cable.
⑤Restart the computer.
6Re-install the driver.
[Macintosh]
①Delete the files in the following locations:
- System Folder | Control Panels | YAMAHA USB MIDI Patch
- System Folder | Extensions | USB YAMAHA MIDI Driver
- System Folder | OMS Folder | YAMAHA USB MIDI OMS Driver
② Restart the computer.
③Install the driver and set up OMS.
File Utility, MIDI Setup
Open Music System (OMS) 2.3.8
File Utility, MIDI Setup
File Utility, MIDI Setup
Open Music System (OMS) 2.3.8
File Utility, MIDI Setup
- File Utility (incluida MIDI Setup)
Open Music System (OMS) 2.3.8
The following is a legal agreement between you, the end user, and Yamaha Corporation ("Yamaha"). The enclosed Yamaha software program is licensed by Yamaha to the original purchaser for use only on the terms set forth herein. Please read this licensing agreement with care. Opening this package indicates that you accept all terms outlined herein. If you do not agree to the terms, return this package unopened to Yamaha for a full refund.
1. GRANT OF LICENSE AND COPYRIGHT
Yamaha grants you, the original purchaser, the right to use one copy of the enclosed software program and data ("SOFTWARE") on a single-user computer system. You may not use it on more than one computer or computer terminal. The SOFTWARE is owned by Yamaha and is protected by Japanese copyright laws and all applicable international treaty provisions. You are entitled to claim ownership of the media in which the SOFTWARE is included. Therefore, you must treat the SOFTWARE like any other copyrighted materials.
2. RESTRICTIONS
The SOFTWARE program is copyrighted. You may not engage in reverse engineering or reproduction of the SOFTWARE by other conceivable methods. You may not reproduce, modify, change, rent, lease, resell, or distribute the SOFTWARE in whole or in part, or create derivative works from the SOFTWARE. You may not transmit or network the SOFTWARE with other computers. You may transfer ownership of the SOFTWARE and the accompanying written materials on a permanent basis provided that you retain no copies and the recipient agrees to the terms of the licensing agreement.
3. TERMINATION
The licensing condition of the software program becomes effective on the day that you receive the SOFTWARE. If any one of the copyright laws or clauses of the licensing conditions is violated, the licensing agreement shall be terminated automatically without notice from Yamaha. In this case, you must destroy the licensed SOFTWARE and its copies immediately.
4. PRODUCT WARRANTY
Yamaha warrants to the original purchaser that if the SOFTWARE, when used in normal conditions, will not perform the functions described in the manual provided by Yamaha, the sole remedy will be that Yamaha will replace any media which proves defective in materials or workmanship on an exchange basis without charge. Except as expressly set forth above, the SOFTWARE is provided "as is," and no other warranties, either expressed or implied, are made with respect to this software, including, without limitation the implied warranties of merchantability and fitness for a particular purpose.
5. LIMITED LIABILITY
Your sole remedies and Yamaha's entire liability are as set forth above. In no event will Yamaha be liable to you or any other person for any damages, including without limitation any incidental or consequential damages, expenses, lost profits, lost savings or other damages arising out of the use or inability to use such SOFTWARE even if Yamaha or an authorized dealer has been advised of the possibility of such damages, or for any claim by any other party.
6. GENERAL
This license agreement shall be interpreted according to and governed by Japanese laws.
This document is printed on recycled chlorine free (ECF) paper with soy ink.
© 2002 Yamaha Corporation