Clavinova CVP409PM - Digital piano YAMAHA - Free user manual and instructions
Find the device manual for free Clavinova CVP409PM YAMAHA in PDF.

| Product type | Digital Piano |
| Brand | YAMAHA |
| Model | Clavinova CVP409PM |
| Number of keys | 88 keys (graded weighted keyboard) |
| Polyphony | 128 notes (common estimate for CVP series) |
| Speakers | Built-in stereo system |
| Main features | Song playback, recording, automatic accompaniment, lessons, USB connection, Internet Direct Connection |
| Included software | USB-MIDI driver, MEGAEnhancer, Digital Music Notebook, Musicsoft Downloader, 50 greats for the Piano |
| Connectivity | USB TO HOST, USB TO DEVICE, MIDI (via USB) |
| Power supply | AC adapter (included); typical consumption: 15 W |
| Dimensions (approx.) | Width: 1400 mm, Depth: 600 mm, Height: 900 mm |
| Weight (approx.) | 60 kg |
| Included accessories | CD-ROM Accessory, owner's manual, USB cable, music stand |
| Maintenance and cleaning | Clean with a soft, dry cloth; do not use solvents |
| Safety | Do not expose to humidity, extreme temperatures or shocks; disconnect before cleaning |
| Spare parts and repairability | Contact an authorized Yamaha service center for any repairs; the CD-ROM should not be used on an audio/video player |
| Operating system compatibility | Windows 2000/XP/Vista (32 and 64 bit) |
| Keyboard type | Graded Hammer Action Keyboard |
Frequently Asked Questions - Clavinova CVP409PM YAMAHA
User questions about Clavinova CVP409PM YAMAHA
0 question about this device. Answer the ones you know or ask your own.
Ask a new question about this device
Download the instructions for your Digital piano in PDF format for free! Find your manual Clavinova CVP409PM - YAMAHA and take your electronic device back in hand. On this page are published all the documents necessary for the use of your device. Clavinova CVP409PM by YAMAHA.
USER MANUAL Clavinova CVP409PM YAMAHA
Accessory CD-ROM for Windows
Installation Guide/Installationshandbuch/Manuel d'installation/Guía de instalación
SPECIAL NOTICES
- The software and this Installation Guide are exclusive copyrights of Yamaha Corporation.
- Use of the software and this guide is governed by the SOFTWARE LICENSE AGREEMENT which the purchaser fully agrees to upon breaking the seal of the software packaging. (Please read carefully the AGREEMENT at the end of this guide before installing the application.)
- Copying of the software or reproduction of this guide in whole or in part by any means is expressly forbidden without the written consent of the manufacturer.
- Yamaha makes no representations or warranties with regard to the use of the software and documentation and cannot be held responsible for the results of the use of this guide and the software.
- Copying of the commercially available music data is strictly prohibited except for your personal use.
- The company names and product names in this Installation Guide are the trademarks or registered trademarks of their respective companies.
- Software such as the USB-MIDI driver may be revised and updated without prior notice. Make sure to check and download the latest version of the software from the following site. http://music.yamaha.com/download
- Future upgrades of application and system software and any changes in specifications and functions will be announced separately.
BESONDERE HINWEISE
Important Notices about the CD-ROM
Data Types
This CD-ROM includes application software. Please refer to page 4 for software installation instructions.

CAUTION
This CD-ROM is not meant for use with an audio/visual system (CD player, DVD player, etc.). Never attempt to use the disk on equipment other than a computer.
Operating System (OS)
The applications in this CD-ROM are provided in versions for Windows operating systems.
CD-ROM Installation Procedure
Before breaking the seal of the software packaging, please read carefully the Software License Agreement at the end of this guide.
① Check the system requirements to make sure that the software will run on your computer (page 3).
②Insert the included CD-ROM into the CD-ROM drive.
The Start window should appear automatically. (Users of Windows Vista will need to click [Start.exe] to open the Start window after inserting the CD-ROM.)
③Connect the instrument to the computer.
Refer to the Owner's Manual of the instrument.
④ Install the USB-MIDI driver to the computer (page 4).
⑤Install the software (page 6).
⑥ Start up the software.
For subsequent operations, refer to the owner's manual for each software program (online help/PDF manual). If you have any problems in driver installation, refer to the "Troubleshooting" on page 7.
To view PDF files, you must install Adobe Reader on your computer. If you do not have Adobe Reader, you can download the application from the Adobe website at the following URL: http://www.adobe.com
Contents of the CD-ROM
The start window as shown below will appear automatically when you insert the included CD-ROM. (Users of Windows Vista will need to click [Start.exe] to open the Start window after inserting the CD-ROM.) By clicking each menu on the Start window, you can access the User Registration page on the Internet and download some of the wide variety of application software available.
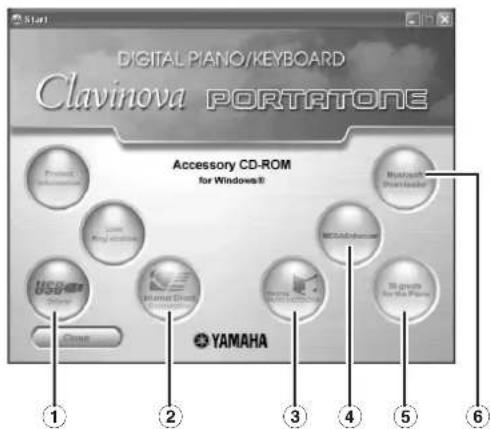
Application / Data Name Folder Name Contents
| 1 | USB-MIDI Driver(Windows 2000/XP) | USBdrv2k_ | This software is necessary when using your instrument with a computer via a USB connection. It enables MIDI communication and control between the instrument and the computer. |
| USB-MIDI Driver(Windows Vista/XP x64) | USBdrvVista_ | ||
| 2 | Internet Direct Connection Flash Demo IDC_FlashDemo | Full-motion demo software which introduces all features of the Internet Direct Connection, from within the program.Please note that the Internet Direct Connection function may not be available depending on your instrument. | |
| 3 | Digital Music Notebook (Available at Yamaha website.) | Digital Music Notebook is a combination music learning program and online service that makes it easy and fun to practice and master your favorite songs.Digital Music Notebook can be downloaded from the Internet. | |
| Digital Music Notebook Flash Demo DMN_FlashDemo | Full-motion demo software which introduces all features of the Digital Music Notebook, from within the program. | ||
| 4 | MEGAEnhancer (Available at Yamaha website.) | Allows conversion of conventional XG/GM song data to song data optimized for use with the Mega Voice feature (on a compatible instrument or tone generator.MEGAEnhancer makes MIDI guitar and bass tracks come to life, with enhanced realism and expression.MEGAEnhancer can be downloaded from the Internet. | |
| 5 | 50 greats for the Piano SongData | Piano Song files which can be played back via the song playback function of the instrument. | |
| 6 | MUSICsoft Downloader (Available at Yamaha website.) | Utilizing a connection between the instrument and a computer, this application allows you to directly download song data to the instrument.Microsoft Downloader can be downloaded from the Internet. | |
- All the applications listed above are supplied with online/PDF manuals.
Minimum System Requirements
| Application/Data OS | CPU Memory Hard Disk | |||
| USB Driver for Windows 2000/XP | Windows 2000/XP Home Edition/XP Professional | 166 MHz or higher; Intel® Pentium®/Celeron® Processor family | 32 MB or more (64 MB or more is recommended) | at least 3 MB of free space |
| USB Driver for Windows Vista/XP x64 | Windows Vista/XP Professional x64 Edition | 800 MHz or higher; Intel® Pentium®/Celeron® Processor family or Intel® 64 compatible processor | 512 MB or more | at least 3 MB of free space |
5 NOTE For the System Requirements of the other software available in the CD-ROM, see the respective download page on the web. The download page can be displayed by clicking the software menu on the Start window and the "download" button in the next page.
Uninstall (Removing the installed application)
To remove any installed application software:
Select [START] → [Settings] → [Control Panel] → [Add/
Remove Programs] → [Install/Uninstall], then select the application to be removed and click [Add/Remove...].
Follow the on-screen instructions to uninstall the application.
NOTE The button names or menus may differ depending on the computer OS.
F NOTE For instructions on uninstalling the USB-MIDI driver, refer to "How can I remove the driver?" in the "Troubleshooting" section (page 7).
USB-MIDI Driver
To operate the instrument from your computer via USB, you'll need to install the appropriate driver software.
The USB-MIDI driver is software that transfers MIDI data back and forth between sequence software and the instrument via a USB cable.

flowchart
graph LR
    A["Computer"] --> B["Sequence Software"]
    B --> C["Driver"]
    C --> D["MIDI instrument (Clavinova, etc.)"]
    D -->|USB cable| C
For Windows XP: See the column at right.
For Windows 2000: See page 5.
For Windows Vista: See page 5.
NOTE See the Yamaha Download page at the following URL for up-to-date news on USB-MIDI driver: http://music.yamaha.com/download/
Check the drive name of the CD-ROM drive you will be using (D:, E:, Q:, etc.) The drive name is displayed beside the CD-ROM icon in your "My Computer" folder. The root directory of the CD-ROM drive will be D:\, E:\, or Q:\, respectively.
■ Installing the driver on Windows XP
①Start the computer and use the “Administrator” account to log on to Windows XP.
②Select [Start] → [Control Panel].
If the control panel appears as “Pick a category”, click “Switch to Classic View” in the upper left of the window. All control panels and icons will be displayed.
③ Go to [System] → [Hardware] → [Driver Signing Options] and check the radio button to the left of "Ignore" and click [OK].
④ Click the [OK] button to close System Properties, and then click "X" in the upper right of the window to close the Control Panel.
⑤Insert the included CD-ROM into the CD-ROM drive. The Start window will appear automatically.
⑥First, make sure the POWER switch on the instrument is set to OFF, then use a USB cable to connect the USB connector of the computer to the USB TO HOST connector of the instrument. When the instrument is turned on, the computer automatically displays the "Found New Hardware Wizard."
If the Wizard window is not displayed automatically, refer to "Troubleshooting."
If the system displays “Found New Hardware” in the lower right corner, wait until “Found New Hardware Wizard” is displayed. (The Wizard window may take a while to display on some computers.)
If the Wizard window prompts you to specify whether or not to connect to Windows Update, select the radio button for "No, not this time," then click [Next].
⑦Check the radio button to the left of “Install the software automatically (Recommended).” Click [Next]. The system starts the installation.
A NOTE If during the installation the system displays “...has not passed Windows Logo testing to verify its compatibility with Windows XP,” click [Continue Anyway].
8 When the installation is complete, the system displays "Completing the Found New Hardware Wizard." Click [Finish]. (The Wizard window may take a while to display on some computers.)
⑨Restart the computer.
If the system displays “Found New Hardware” in the lower right corner, wait until “System Settings Change” is displayed. (The Wizard window may take a while to display on some computers.)
C. NOTE This Wizard window will not appear when using Windows XP Professional x64 Edition. There is no need to restart the computer.
When using Windows XP Professional x64 Edition, the Support Module must be installed.
After installing the USB-MIDI drivers for all the connected USB devices, select "My Computer" from the Start menu. Right-click the CD-ROM icon and select "Open" from the popup menu. Select "USBdrvVista_" → "XPx64SupportModule" → "Setup.exe" and launch "Setup.exe." Follow the on-screen directions.
A NOTE Once the Support Module is installed, this step is not necessary, even if you've connected a new USB device or updated the USB-MIDI driver.
The USB-MIDI driver installation is complete.
■Installing the driver on Windows 2000
①Start the computer and use the “Administrator” account to log on to Windows 2000.
② Select [My Computer] → [Control Panel] → [System] → [Hardware] → [Driver Signing] → [File Signature Verification], and check the radio button to the left of "Ignore—Install all files, regardless of file signature" and click [OK].
③Insert the included CD-ROM into the CD-ROM drive. The Start window will appear automatically.
4 First, make sure the POWER switch on the instrument is set to OFF, then use a USB cable to connect the USB connector of the computer to the USB TO HOST connector of the instrument. When the instrument is turned on, the computer automatically displays the "Found New Hardware Wizard." Click [Next].
(The Wizard window may take a while to display on some computers.) If the Wizard window is not displayed automatically, refer to “Troubleshooting.”
⑤Check the radio button to the left of "Search for a suitable driver for my device (Recommended)." Click [Next].
⑥Check the "CD-ROM drives" box and uncheck all other items. Click [Next].
NOTE The system may ask you to insert a Windows CD-ROM while it checks for the driver. Specify the "USBdrv2k_" folder of the CD-ROM drive (such as D:\USBdrv2k_) and continue the installation.
⑦Click [Next].
C NOTE If the Wizard panel informs you that "The software you are about to install does not contain a Microsoft digital signature," click [Yes].
8 When the installation is complete, the system displays "Completing the Found New Hardware Wizard." Click [Finish]. (The Wizard window may take a while to display on some computers.)
⑨ Restart the computer. The USB-MIDI driver installation is complete.
■Installing the driver on Windows Vista
① Start the computer and use the “Administrator” account to log on to Windows Vista.
②Insert the included CD-ROM into the CD-ROM drive. The AutoPlay window will appear.
③Click [Run Start.exe]. The Start window will appear automatically.
4First, make sure the POWER switch on the instrument is set to OFF, then use a USB cable to connect the USB connector of the computer to the USB TO HOST connector of the instrument. When the instrument is turned on, the computer automatically displays the "Found New Hardware" window. Click "Locate and install driver software (recommended)".
If the window is not displayed automatically, refer to "Troubleshooting." (Some computers may take a while to display the window.)
NOTE If the "User Account Control" window appears, click [Continue].
⑤If a message allowing Windows to search online for driver software appears, click “Don’t search online.”
⑥If a message prompting you to insert the disk that came with your device appears, click [Next].
The system starts the installation.
NOTE If the "Windows Security" window appears, confirm this software is authored by Yamaha Corporation then click [Install].
⑦When the installation is complete, the system displays the message “The software for this device has been successfully installed.” Click [Close].
(Some computers may take a while to display the window.) The USB-MIDI driver installation is complete.
MEGAEnhancer
IMPORTANT
- Instruments not compatible with the Mega Voice feature cannot properly play back song data created with the MEGAEnhancer program.
- When installing MEGAEnhancer to Windows XP, 2000 or Vista, make sure to log on to the Administrator account.
- To install MEGAEnhancer, your computer must be connected to the Internet and be online.
① Insert the included CD-ROM into the CD-ROM drive of the computer.
The Start window appears on the screen. Each menu on the window indicates the application or data contained in the Accessory CD-ROM.
②Click "MEGAEnhancer" on the Start window.
The page which explains the details about MEGAEnhancer is displayed on the window.
③Click "MEGAEnhancer Download" button at the bottom of the window.
The Download page on the web is displayed. Verify that your system meets the requirements before installing the software.
Digital Music Notebook
IMPORTANT
- When installing Digital Music Notebook to Windows XP or Vista, make sure to log on to the Administrator account.
- To install Digital Music Notebook, your computer must be connected to the Internet and be online.
① Insert the included CD-ROM into the CD-ROM drive of the computer.
The Start window appears on the screen. Each menu on the window indicates the application or data contained in the Accessory CD-ROM.
②Click "DIGITAL MUSIC NOTEBOOK" on the Start window.
The page which explains the details about Digital Music Notebook is displayed on the window.
③Click "Digital Music Notebook Download" button at the bottom of the window.
④ Automatically jump at the site of Digital Music Notebook. Follow the on-screen instructions to download the application.
IMPORTANT
Credit card settlement is required to purchase Digital Music Notebook content. Credit card processing may not be possible for some areas, so please check with your local authorities to make sure that your credit card can be used.
Musicsoft Downloader
IMPORTANT
- When installing Musicsoft Downloader to Windows XP, 2000 or Vista, make sure to log on to the Administrator account.
- To install Musicsoft Downloader, your computer must be connected to the Internet and be online.
①Insert the included CD-ROM into the CD-ROM drive of the computer.
The Start window appears on the screen. Each menu on the window indicates the application or data contained in the Accessory CD-ROM.
②Click "Musicsoft Downloader" on the Start window.
The page which explains the details about Musicsoft Downloader is displayed on the window.
③Click "MUSICsoft Downloader Download" button at the bottom of the window.
The Download page on the web is displayed. Verify that your system meets the requirements before installing the software.
F NOTE For the instrument including this Accessory CD-ROM, you can use only the Musicsoft Downloader as a file transfer application software. Other applications such as File Utility and Song Filer cannot be used.
The driver cannot be installed.
- Is the USB cable connected correctly?
→Check the USB cable connection.
→Disconnect the USB cable, then connect it again.
- Is the USB function enabled on your computer?
→When you connect the instrument to the computer for the first time, if the “Add New Hardware Wizard” does not appear, the USB function on the computer may be disabled. Perform the following steps.
① Select [Control Panel]* → [System] → [Hardware] → [Device Manager] (for Windows XP/2000), or select [Control Panel] → [Device Manager] (for Windows Vista).
* Classic View only in Windows XP.
②Make sure that no “!” or “x” marks appear at “Universal serial bus controller” or “USB Root Hub.” If you see an “!” or “x” mark, the USB controller is disabled.
• Is any unknown device registered?
→If driver installation fails, the instrument will be marked as an "Unknown device," and you will not be able to install the driver. Delete the "Unknown device" by following the steps below.
① Select [Control Panel]* → [System] → [Hardware] → [Device Manager] (for Windows XP/2000), or select [Control Panel] → [Device Manager] (for Windows Vista).
* Classic View only in Windows XP.
②Look for “Other devices” in the menu “View devices by type.”
③If you find "Other devices," double-click it to extend the tree to look for "Unknown device." If one appears, select it and click the [Remove] button.
④Remove the USB cable from the instrument, and make the connection again.
⑤ Install the driver again. (See page 4.)
When controlling the instrument from your computer via USB, the instrument does not operate correctly or no sound is heard.
• Did you install the driver (page 4)?
- Is the USB cable connected correctly?
- Are the volume settings of the instrument, playback device, and application program set to the appropriate levels?
- Have you selected an appropriate port in the sequence software?
- On the Clavinova, check whether the Piano Lock is engaged or not.
- Are you using the latest USB-MIDI driver?
The latest driver can be downloaded from the web site (page 4).
Playback response is delayed.
- Does your computer satisfy the system requirements?
- Is any other application or device driver running?
Cannot suspend or resume the computer correctly.
- Do not suspend the computer while the MIDI application is running.
- You may not be able to suspend/resume normally, depending on the particular environment (USB Host Controller, etc.). Even so, simply disconnecting and connecting the USB cable will allow you to use the instrument functions again.
How can I remove the driver?
① Start the computer and use the “Administrator” account to log on to Windows.
Close all applications and windows that are open.
②Insert the included CD-ROM into the CD-ROM drive.
③ Select [Start] → [My Computer] (for Windows XP), or select [My Computer] (for Windows 2000), or select [Start] → [Computer] (for Windows Vista).
④Right-click the CD-ROM icon and select "Open" from the pop-up menu.
⑤Select "USBdrvVista_" or "USBdrv2k_" folder → "uninstall" folder → "uninstall.exe" file and launch the "uninstall.exe." file.
Follow the on-screen instructions to uninstall the driver.
NOTE When using a 64-bit OS, click "uninstall_x64.exe." from the "USBdrvVista_" folder.
C NOTE If the "User Account Control" window appears, click [Continue].
Datentypen
Yamaha hereby grants you the right to use one copy of the software program(s) and data (“SOFTWARE”) accompanying this Agreement. The term SOFTWARE shall encompass any updates to the accompanying software and data. The SOFTWARE is owned by Yamaha and/or Yamaha’s licensor(s), and is protected by relevant copyright laws and all applicable treaty provisions. While you are entitled to claim ownership of the data created with the use of SOFTWARE, the SOFTWARE will continue to be protected under relevant copyrights.
- You may use the SOFTWARE on a single computer.
- You may make one copy of the SOFTWARE in machine-readable form for backup purposes only, if the SOFTWARE is on media where such backup copy is permitted. On the backup copy, you must reproduce Yamaha's copyright notice and any other proprietary legends that were on the original copy of the SOFTWARE.
- You may permanently transfer to a third party all your rights in the SOFTWARE, provided that you do not retain any copies and the recipient reads and agrees to the terms of this Agreement.
2. RESTRICTIONS
- You may not engage in reverse engineering, disassembly, decompilation or otherwise deriving a source code form of the SOFTWARE by any method whatsoever.
- You may not reproduce, modify, change, rent, lease, or distribute the SOFTWARE in whole or in part, or create derivative works of the SOFTWARE.
- You may not electronically transmit the SOFTWARE from one computer to another or share the SOFTWARE in a network with other computers.
- You may not use the SOFTWARE to distribute illegal data or data that violates public policy.
- You may not initiate services based on the use of the SOFTWARE without permission by Yamaha Corporation.
Copyrighted data, including but not limited to MIDI data for songs, obtained by means of the SOFTWARE, are subject to the following restrictions which you must observe.
- Data received by means of the SOFTWARE may not be used for any commercial purposes without permission of the copyright owner.
- Data received by means of the SOFTWARE may not be duplicated, transferred, or distributed, or played back or performed for listeners in public without permission of the copyright owner.
- The encryption of data received by means of the SOFTWARE may not be removed nor may the electronic watermark be modified without permission of the copyright owner.
3. TERMINATION
This Agreement becomes effective on the day that you receive the SOFTWARE and remains effective until terminated. If any copyright law or provisions of this Agreement is violated, the Agreement shall terminate automatically and immediately without notice from Yamaha. Upon such termination, you must immediately destroy the licensed SOFTWARE, any accompanying written documents and all copies thereof.
4. LIMITED WARRANTY ON MEDIA
As to SOFTWARE sold on tangible media, Yamaha warrants that the tangible media on which the SOFTWARE is recorded will be free from defects in materials and workmanship under normal use for a period of fourteen (14) days from the date of receipt, as evidenced by a copy of the receipt. Yamaha's entire liability and your exclusive remedy will be replacement of the defective media if it is returned to Yamaha or an authorized Yamaha dealer within fourteen days with a copy of the receipt. Yamaha is not responsible for replacing media damaged by accident, abuse or misapplication. TO THE FULLEST EXTENT PERMITTED BY LAW, YAMAIIA EXPRESSLY DISCLAIMS ANY IMPLIED WARRANTIES ON THE TANGIBLE MEDIA, INCLUDING THE IMPLIED WARRANTIES OF MERCHANTABILITY AND FITNESS FOR A PARTICULAR PURPOSE.
5. DISCLAIMER OF WARRANTY ON SOFTWARE
You expressly acknowledge and agree that use of the SOFTWARE is at your sole risk. The SOFTWARE and related documentation are provided "AS IS" and without warranty of any kind. NOTWITHSTANDING ANY OTHER PROVISION OF THIS AGREEMENT, YAMAHA EXPRESSLY DISCLAIMS ALL WARRANTIES AS TO THE SOFTWARE, EXPRESS, AND IMPLIED, INCLUDING BUT NOT LIMITED TO THE IMPLIED WARRANTIES OF MERCHANTABILITY, FITNESS FOR A PARTICULAR PURPOSE AND NON-INFRINGEMENT OF THIRD PARTY RIGHTS. SPECIFICALLY, BUT WITHOUT LIMITING THE FOREGOING, YAMAHA DOES NOT WARRANT THAT THE SOFTWARE WILL MEET YOUR REQUIREMENTS, THAT THE OPERATION OF THE SOFTWARE WILL BE UNINTERRUPTED OR ERROR-FREE, OR THAT DEFECTS IN THE SOFTWARE WILL BE CORRECTED.
6. LIMITATION OF LIABILITY
YAMAHA'S ENTIRE OBLIGATION HEREUNDER SHALL BE TO PERMIT USE OF THE SOFTWARE UNDER THE TERMS HEREOF. IN NO EVENT SHALL YAMAHA BE LIABLE TO YOU OR ANY OTHER PERSON FOR ANY DAMAGES, INCLUDING, WITHOUT LIMITATION, ANY DIRECT, INDIRECT, INCIDENTAL OR CONSEQUENTIAL DAMAGES, EXPENSES, LOST PROFITS, LOST DATA OR OTHER DAMAGES ARISING OUT OF THE USE, MISUSE OR INABILITY TO USE THE SOFTWARE, EVEN IF YAMAHA OR AN AUTHORIZED DEALER HAS BEEN ADVISED OF THE POSSIBILITY OF SUCH DAMAGES. In no event shall Yamaha's total liability to you for all damages, losses and causes of action (whether in contract, tort or otherwise) exceed the amount paid for the SOFTWARE.
7. THIRD PARTY SOFTWARE
Third party software and data (“THIRD PARTY SOFTWARE”) may be attached to the SOFTWARE. If, in the written materials or the electronic data accompanying the Software, Yamaha identifies any software and data as THIRD PARTY SOFTWARE, you acknowledge and agree that you must abide by the provisions of any Agreement provided with the THIRD PARTY SOFTWARE and that the party providing the THIRD PARTY SOFTWARE is responsible for any warranty or liability related to or arising from the THIRD PARTY SOFTWARE. Yamaha is not responsible in any way for the THIRD PARTY SOFTWARE or your use thereof.
- Yamaha provides no express warranties as to the THIRD PARTY SOFTWARE. IN ADDITION, YAMAIIA EXPRESSLY DISCLAIMS ALL IMPLIED WARRANTIES, INCLUDING BUT NOT LIMITED TO THE IMPLIED WARRANTIES OF MERCHANTABILITY AND FITNESS FOR A PARTICULAR PURPOSE, as to the THIRD PARTY SOFTWARE.
- Yamaha shall not provide you with any service or maintenance as to the THIRD PARTY SOFTWARE.
- Yamaha is not liable to you or any other person for any damages, including, without limitation, any direct, indirect, incidental or consequential damages, expenses, lost profits, lost data or other damages arising out of the use, misuse or inability to use the THIRD PARTY SOFTWARE.
8. GENERAL
This Agreement shall be interpreted according to and governed by Japanese law without reference to principles of conflict of laws. Any dispute or procedure shall be heard before the Tokyo District Court in Japan. If for any reason a court of competent jurisdiction finds any portion of this Agreement to be unenforceable, the remainder of this Agreement shall continue in full force and effect.
9. COMPLETE AGREEMENT
This Agreement constitutes the entire agreement between the parties with respect to use of the SOFTWARE and any accompanying written materials and supersedes all prior or contemporaneous understandings or agreements, written or oral, regarding the subject matter of this Agreement. No amendment or revision of this Agreement will be binding unless in writing and signed by a fully authorized representative of Yamaha.