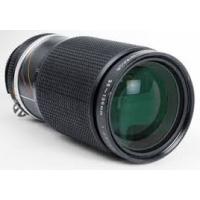
AI-S ZOOM-NIKKOR 35-135MM F/3.5-4.5 - Camera lens NIKON - Free user manual and instructions
Find the device manual for free AI-S ZOOM-NIKKOR 35-135MM F/3.5-4.5 NIKON in PDF.


User questions about AI-S ZOOM-NIKKOR 35-135MM F/3.5-4.5 NIKON
0 question about this device. Answer the ones you know or ask your own.
Ask a new question about this device
Download the instructions for your Camera lens in PDF format for free! Find your manual AI-S ZOOM-NIKKOR 35-135MM F/3.5-4.5 - NIKON and take your electronic device back in hand. On this page are published all the documents necessary for the use of your device. AI-S ZOOM-NIKKOR 35-135MM F/3.5-4.5 by NIKON.
USER MANUAL AI-S ZOOM-NIKKOR 35-135MM F/3.5-4.5 NIKON
| スイーニルメラ | A/L | B | C | D | E | G1 | G2 | G3 | G4 | H1 | H2 | H3 | H4 | J | K/P | M | R | T | U |
| F3 | ● | ◎ | ◎ | ● | ● | ● | ● | ● | |||||||||||
| F2 | ● | ◎ | ◎ | ● | ● | ● |
構円の決定やビnt合わせの目的には
10 Depth-of-field scale
11 Macro range line (orange)
12 Focal length scale
13 Aperture indexes (green and brown)
14 Mounting ring
15 Aperture ring
16 EE servo coupling post
BEFORE USING THE LENS
(Read the following carefully to get the most out of your new lens now and in the many years to come.)
Your new Zoom-Nikkor 35-135mm f/3.5-4.5, a compact, high-performance lens, covers the most popular focal lengths from wide to normal to telephoto. This makes it as ideal for simple snapshots and candidas as for portraiture. Built-in macro focusing capability at 135mm enables you to move in on tiny subjects, too, for stunning closeups.
You focus and zoom using just one ring for quicker response. At the 135mm focal length setting you can get continuous focusing down to 0.4m (1.3 ft) through the lens' macro function. The maximum reproduction ratio is 1:3.8. For even greater magnification, just add an optional Nikon close-up lens. And for special effects, try a variety of optional 62mm filters.
Made of the highest quality Nikon optical glass, your lens produces sharp images with high contrast at all focal lengths, with all aberrations well corrected. In addition, Nikon Integrated Coating (NIC) is applied to all air-to-glass surfaces of the lens elements to minimize ghost images and flare and assure photographs with natural color rendition.
With suitably equipped Nikon cameras, this lens offers "Automatic Maximum Aperture Indexing" (AI). The meter coupling ridge and automatic diaphragm function together to permit full aperture exposure measurement. For non-AI type Nikon cameras, this lens is also fitted with a meter coupling shoe to permit the same operation.
MOUNTING THE LENS
Align the green aperture index 13 on the lens with the mounting index on the camera and insert the lens in the camera's bayonet mount. Then twist the lens counterclockwise until it clicks into place. (To remove, depress the lens release button on the camera and twist the lens clockwise.)
Note: When mounting the lens on an Al-type camera with a lift-up meter coupling lever, make sure the lever is in the "down" position; when mounting on a camera without this lever (non-Al type), "manual" maximum aperture indexing is required. For more information, refer to the camera's instruction manual.
FOCUS/ZOOM
B·C
With its single control ring, this lens lets you focus and zoom in and out rapidly in one smooth operation.
To focus, while looking through the camera's viewfinder, turn the focus/zoom ring (1) until the image on the focusing screen appears crisp and clear.
To zoom in or out, look through the viewfinder and slide the focus/zoom ring up or down until the desired composition is framed on the focusing screen. The major focal lengths of 35mm , 50mm , 70mm and 135mm are indicated on the lens barrel for quick reference.
MACRO FOCUSING
D
At 135mm , the lens can be focused beyond the minimum focusing distance of 1.5m (5 ft): just set the focus/zoom ring to the orange line/ ^ ^ setting. The effective minimum focal distance and maximum reproduction ratio then become 0.4m (1.3 ft) and 1:3:8, respectively. Remember, however, that on the macro mode you cannot zoom the lens.
Notes:
1) Although your lens has macro focusing capability, you are still advised to use a Micro-Nikkor lens for document copying or slide duplication where sharpness is a critical requirement.
2) When using this lens in macro range, the focus/zoom ring tightens slightly.
RECOMMENDED FOCUSING SCREENS
Various interchangeable focusing screens are available for Nikon F3- and F2-series cameras to suit any type of lens or picture-taking situation. Those which are recommended for use with this Zoom-Niktor 35-135mm f/3.5-4.5 lens are listed below. For screens used for Nikon cameras other than F3- and F2-series cameras (e.g., Nikon FA, FE2, FM2 and FE), refer to the column for F3-series cameras. For the K2, B2 and E2 focusing screens, refer to the columns on the K, B and E screens, respectively. For details, also refer to your focusing screen's instruction sheet.
| Camera | Screen | A/L | B | C | D | E | G1 | G2 | G3 | G4 | H1 | H2 | H3 | H4 | J | K/P | M | R | T | U |
| F3 | ◎ | ◎ | ◎ | ◎ | ◎ | ◎ | ◎ | ◎ | ||||||||||||
| F2 | ◎ | ◎ | ◎ | ◎ | ◎ | ◎ |
When the Teleconverter TC-201, TC-200 or TC-14A is attached to this lens, use the following table:
| Camera\Screen | A/L | B | C | D | E | G1 | G2 | G3 | G4 | H1 | H2 | H3 | H4 | J | K/P | M | R | T | U |
| F3 | ● | ◎ | ◎ | ● | ● | ● | ● | ● | |||||||||||
| F2 | ● | ◎ | ◎ | ● | ● | ● |
= Excellent focusing
= Acceptable focusing
The split-image rangefinder, microprism or cross-hair area is dim.
Focus on the surrounding matte area.
= Acceptable focusing
Slight vignetting (or moiré phenomenon, in the case of the microprism) affects the screen image. The image on the film, however, shows no trace of this.
Blank means inapplicable.
Note: The Teleconverters TC-301, TC-300, TC-14B and TC-14 cannot be attached to this lens.
VARIABLE APERTURE
As the lens is zoomed out from 35mm to 135mm , the maximum aperture goes down by approximately two-thirds of an f/stop, from 3.5 to 4.5. The two aperture indexes engraved on the chrome mounting ring indicate the difference: the green index is for use at the 35mm setting, while the brown one is for the 135mm setting. For intermediate focal length settings, align the aperture ring between the two indexes. The relationship between the focal length and the maximum aperture is shown in Diagram 1. When the zoom lens is used with cameras with through-the-lens (TTL) metering, you need not worry about adjusting the aperture. However, when an independent exposure meter is used, slight adjustment is required, as in Diagram 1.
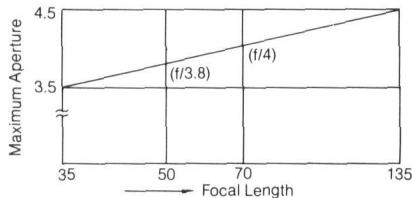
Diagram 1
FLASH PHOTOGRAPHY
Follow the instructions below when you take pictures with the speedlight unit because the maximum aperture of this lens varies according to the focal length set.
- In TTL automatic flash photography (when using the SB-18, SB-17, SB-16A/B or SB-15)
No adjustment is required because the variation in aperture is automatically accounted for. However, when the flash-to-subject distance is close to either the near or far limit of the auto shooting range corresponding to your working aperture, the working aperture may have to be changed as you zoom in or out.
- In non-TTL automatic or manual flash photography
Slight adjustment is required. You can obtain the roughly correct exposure over all focal length settings by using the intermediate setting between the green and brown aperture indexes. For perfect exposure, adjust the coupling aperture according to Diagram 1.
- In combination with the speedflight SB-19 or SB-E mounted on the Nikon FG-20 or EM
Make sure you set the shooting mode selector of the SB-19 or camera selector of a new-type SB-E to the "A" position. With an older-type SB-E you can get the correct exposure with a setting at "FE·FM" using the procedure mentioned above. In case you set SB-19's selector at B, or SB-E's selector at B or EM, you can obtain correct exposure only at the 135mm setting. With color negative film this shift might not affect the picture itself because of the film's larger exposure latitude. Slide film, however, has a narrower exposure range so its use is not recommended.
DEPTH-OF-FIELD SCALE
Depth of field (i.e., the zone of sharp image focus) can be checked by reading the color-coded depth-of-field indicators 10 engraved on the lens barrel. Each pair of depth-of-field indicators is color coded with a corresponding f/number on the aperture scale. You can measure the depth of field by reading the distance between two color-coded lines on the distance scale.
You can also determine exact depth of field by depressing the depth-of-field preview button or lever on the camera as you look through the viewfinder.
INFRAREDPHOTOGRAPHY
In infrared photography, the plane of sharpest focus is slightly more distant than the one produced by visible light. As a general rule, you can compensate for shift in focus by referring to the red infrared index line (3) engraved on the lens barrel. After sharply focusing the subject through the viewfinder, check the focused distance and turn the focusing ring to the left until the prefocused distance figure is aligned with the infrared index. Then attach the filter to the lens and take the picture.
SPECIFICATIONS
Focal length: 35mm to 135mm
Maximum aperture: f/3.5 to 4.5
Lens construction: 15 elements in 14 groups
Picture angle: 62^ to 18^
Distance scale: Graduated in meters and feet from 1.5m (5 ft) to infinity () ; macro focusing mode at 135 focal length setting down to 0.4m (1.3 ft) indicated by the orange line and letter "M"
Focusing/zooming control: Via a single control ring; focusing done by turning the ring, zooming by sliding it in or out; reference marks for focal length settings of 35mm , 50mm , 70mm and 135mm provided; focusing in macro mode made by turning focus/zoom ring right or left
Macro focusing function: Possible only at 135mm focal length setting; close focusing down to 0.4m (1.3 ft) possible; 1.3.8 maximum reproduction ratio
Aperture scale: f/3.5 to f/22 on both standard and aperture-direct-readout scale; f/4 indicated only by click-stop
Diaphragm: Fully automatic
Exposure measurement: Via full-aperture method
Mount:Nikon bayonet mount
Attachment size: 62mm dia. (P = 0.75mm)
Dimensions: Approx. 68mm dia. × 104mm extension from flange; approx. 112mm long (overall)
Weight: Approx. 600g
ACCESSIONS
| Supplied | Optional |
| 62mm snap-on front lens cap | 62mm screw-in filters |
| Rear lens cap LF-1 | Screw-in lens hood HN-22 |
| Hard lens case CL-15S | |
| Soft lens pouch No. 62 | |
| Teleconverter TC-201 | |
| Teleconverter TC-14A |
LENS CARE
- Although you should always keep the lens surfaces clean, rough cleaning must be avoided. Wipe with a soft, clean cotton cloth moistened with alcohol to remove grease or fingerprints from the lens surfaces.
If you use ether in cleaning the lens, a smudge sometimes appears on the surface of a multi-coated lens. If this happens, wipe it again with a cotton cloth moistened with alcohol.
- To protect the lens surface from dirt or damage, the use of an L37C filter is recommended at all times. The lens hood also helps to protect the lens.
- Keep the lens cap in place whenever the lens is not in use.
- Attach both the front and rear caps when the lens is stored separately.
- To ensure proper fit of the lens when stored in the leather lens case, set the lens' focusing ring to the infinity () setting.
NOMENKLATUR
| Kamera | Einstellchebe | ||||||||||||||||||
| A/L | B | C | D | E | G1 | G2 | G3 | G4 | H1 | H2 | H3 | H4 | J | K/P | M | R | T | U | |
| F3 | ◎ | ◎ | ◎ | ◎ | ◎ | ◎ | ◎ | ◎ | |||||||||||
| F2 | ◎ | ◎ | ◎ | ◎ | ◎ | ◎ | |||||||||||||
| Kamera | Eingebelcheibe | ||||||||||||||||||
| A/L | B | C | D | E | G1 | G2 | G3 | G4 | H1 | H2 | H3 | H4 | J | K/P | M | R | T | U | |
| F3 | ● | ◎ | ◎ | ● | ● | ● | ● | ● | ● | ||||||||||
| F2 | ● | ◎ | ◎ | ● | ● | ● | |||||||||||||
MISE AU POINT/ZOOMING

| Botter\Verre | A/L | B | C | D | E | G1 | G2 | G3 | G4 | H1 | H2 | H3 | H4 | J | K/P | M | R | T | U |
| F3 | ◎ | ◎ | ◎ | ◎ | ◎ | ◎ | ◎ | ◎ | |||||||||||
| F2 | ◎ | ◎ | ◎ | ◎ | ◎ | ◎ |
| Bother Verre | A/L | B | C | D | E | G1 | G2 | G3 | G4 | H1 | H2 | H3 | H4 | J | K/P | M | R | T | U |
| F3 | ● | ◎ | ◎ | ● | ● | ● | ● | ● | |||||||||||
| F2 | ● | ◎ | ◎ | ● | ● | ● |
= Mise au point excellente
- = Mise au point acceptable
CONSEILS POUR LA PHOTOGRAPHIE AU FLASH
| Camara\Pantalla | A/L | B | C | D | E | G1 | G2 | G3 | G4 | H1 | H2 | H3 | H4 | J | K/P | M | R | T | U | |
| F3 | ◎ | ◎ | ◎ | ◎ | ◎ | ◎ | ◎ | ◎ | ||||||||||||
| F2 | ◎ | ◎ | ◎ | ◎ | ◎ | ◎ |
| Pantalla Camaara | A/L | B | C | D | E | G1 | G2 | G3 | G4 | H1 | H2 | H3 | H4 | J | K/P | M | R | T | U |
| F3 | ● | ◎ | ◎ | ● | ● | ● | ● | ● | |||||||||||
| F2 | ● | ◎ | ◎ | ● | ● | ● |
= Enfoque excellente
= Enfoque acceptable
| Fotocamera | Schemo | A/L | B | C | D | E | G1 | G2 | G3 | G4 | H1 | H2 | H3 | H4 | J | K/P | M | R | T | U |
| F3 | ◎ | ◎ | ◎ | ◎ | ◎ | ◎ | ◎ | ◎ | ||||||||||||
| F2 | ◎ | ◎ | ◎ | ◎ | ◎ | ◎ |
| Fotocamera | Schemo | A/L | B | C | D | E | G1 | G2 | G3 | G4 | H1 | H2 | H3 | H4 | J | K/P | M | R | T | U |
| F3 | ● | ◎ | ◎ | ● | ● | ● | ● | ● | ||||||||||||
| F2 | ● | ◎ | ◎ | ● | ● | ● |