B1583WSN - Oven NEFF - Free user manual and instructions
Find the device manual for free B1583WSN NEFF in PDF.

| Product type | Built-in electric oven |
| Brand | Neff |
| Model | B1583WSN |
| Appliance dimensions (W x H x D) | 59.5 cm x 59.5 cm x 55.0 cm |
| Built-in frame dimensions (W x H x D) | 56.0 cm x 59.0 cm x 55.0 cm |
| Net weight | 40 kg |
| Rated voltage | 220-240 V ~ 50/60 Hz |
| Total power | 3.6 kW |
| Cooking functions | 4D hot air, hot air, top/bottom heat, grill, large area grill, bottom heat, defrost, hot air + grill, automatic programming |
| Oven capacity | 71 liters |
| Temperature range | 50 °C to 275 °C |
| Cleaning type | Pyrolytic self-cleaning |
| Interior lighting | Halogen lamp |
| Oven door | Cool door with removable glass |
| Safety | Door lock, automatic safety shut-off, child lock, residual heat indicator |
| Supplied accessories | Grid, baking tray, drip pan |
| Installation type | Built-in, side screw fixing |
| Power cable | H05VV-F 3x1.5 mm², length 1.2 m |
| Energy efficiency class | A+ |
| Repairability index | 8.4 / 10 |
Frequently Asked Questions - B1583WSN NEFF
User questions about B1583WSN NEFF
0 question about this device. Answer the ones you know or ask your own.
Ask a new question about this device
Download the instructions for your Oven in PDF format for free! Find your manual B1583WSN - NEFF and take your electronic device back in hand. On this page are published all the documents necessary for the use of your device. B1583WSN by NEFF.
USER MANUAL B1583WSN NEFF
For the installer and kitchen expert!
Important installation notes:
Properly dispose of packaging materials.
Do not use oven door handle for transporting or handling the unit during installation.
WARNING: Connection and first start of the appliance may only be performed by an authorised specialist.
□ Connection must be made using an H05VV-F mains connection cable.
Rated consumption, rated voltage and type no. of the appliance:
See appliance nameplate behind the oven door to the left beneath the side edge of the oven.
The unit's nameplate is located at on the right sidewall of the unit.
- Electrical safety of the appliance can be ensured only if the equipment earth in the building installation has been installed according to regulations.
On the installation side a separating device shall be provided.
Any switch with a contact gap exceeding 3mm may be considered a separating device.
Other examples are LS switches, fuses and contactors.
In the case of repairs interrupt all power connections to the unit.
The connection diagram is located on the rear panel of the appliance.
Connectable built-in hobs
Cooking surface and appliance must be from the same manufacturer and marked with a point on the instructions sticker. Otherwise functional failures will result. They must have the same rated voltage (see nameplate).
Furniture programmes
Cooker conversion cabinets from virtually all lines of kitchen furniture are suitable for installing the built-in cooker. However, the veneers or plastic laminates on the conversion cabinets must be applied with heat-resistant cement (90 C). If plastic laminates or cement are not sufficiently heat-resistant, warping, bubbling or detachment of the finish may result.
Based on the testing regulations for heat exposure, the unit complies with type Y.
Connecting the built-in hob
Prior to connecting the built-in hob, the built-in cooker must be installed.
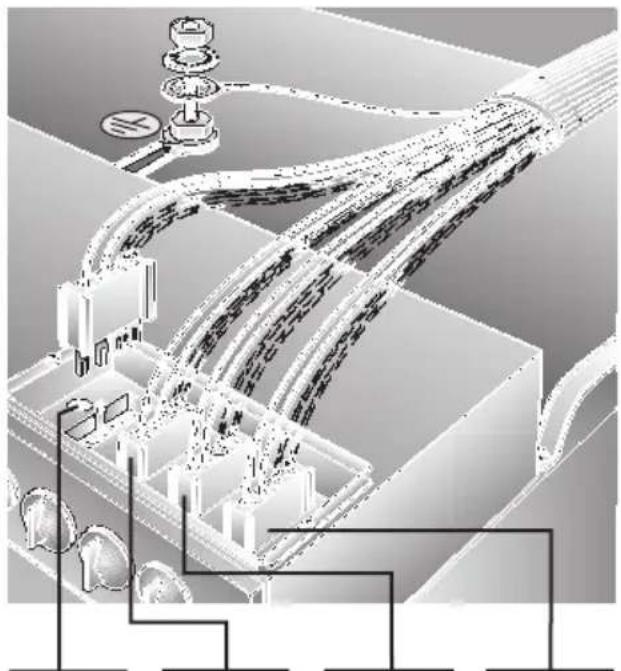
WARNING: Strictly observe the connecting diagram on the cooker and the assembly instructions for the built-in hob.
The green-yellow earth line of the built-in hob must be connected to the earthing screw of the built-in cooker.
If the earth line is not properly connected, there is the danger of electric shock.
Important: The colour-coded plugs of the built-in hob must be plugged into the receptacles of the same colour on the built-in cooker.
Connecting diagram for built-in hob
Cookers with four-connector blocks:
White left front
Black left rear
Green right rear
Blue right front
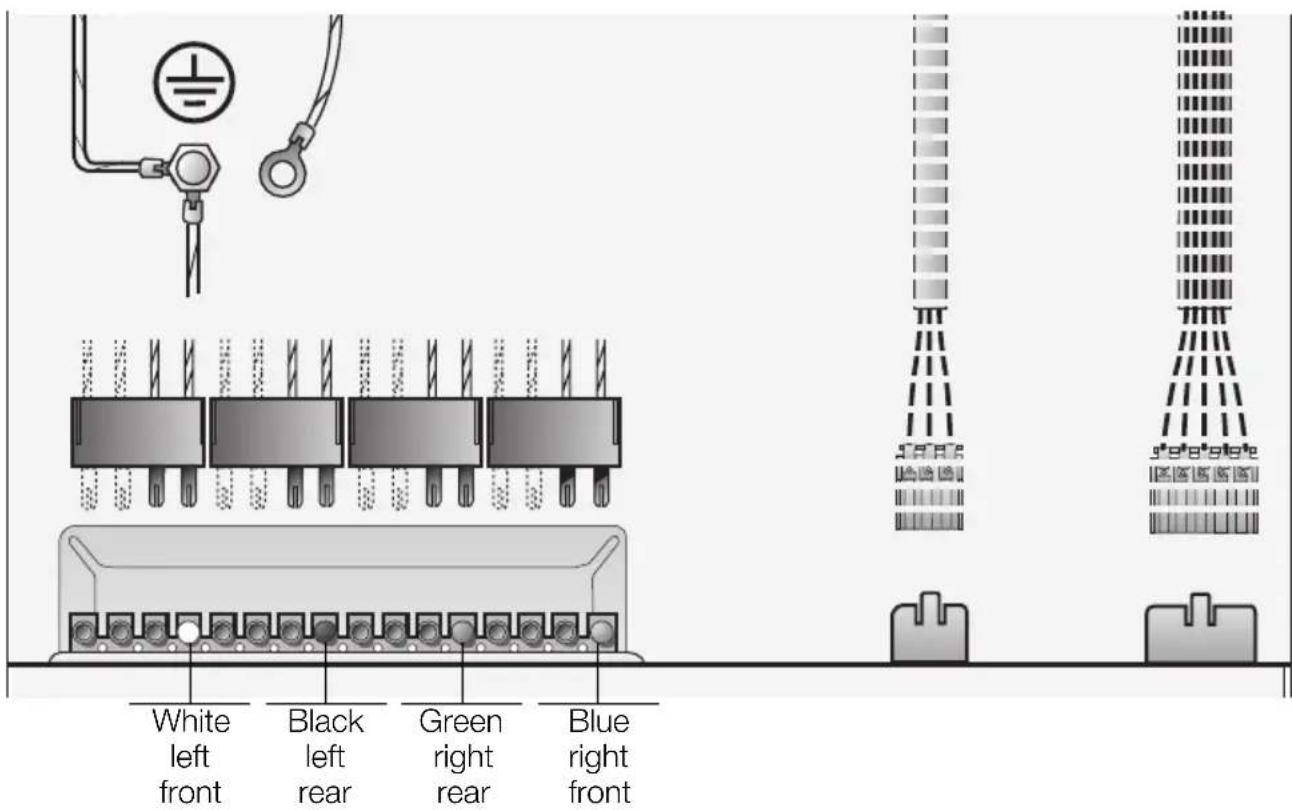
Cookers with receptacle strips:
Installation of the hob
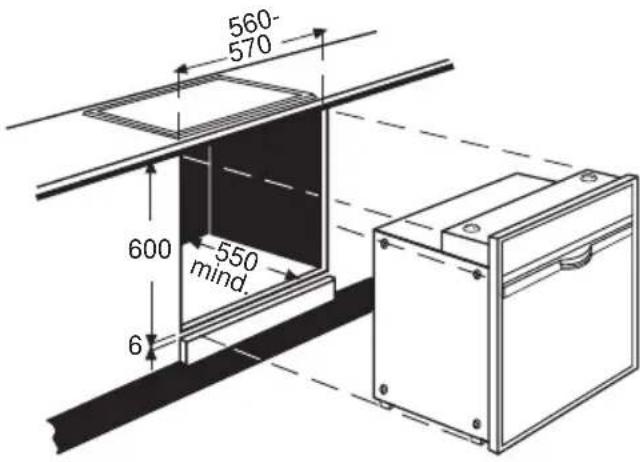
WARNING: The appliance may be installed with a high cabinet or a high wall only on one side of it. On the respective opposite side, the height of an adjacent piece of furnishing may not exceed the height of the working surface in which the hob is installed. The distance between the high wall on the side of the hob and the rear wall must comply with the assembly instructions for the built-in hob. Observe the protection class for heat exposure as stated in the assembly instructions.
Installation procedure:
Push the built-in cooker into the installation roughing of the conversion cabinet and align the unit until it is in a level position.
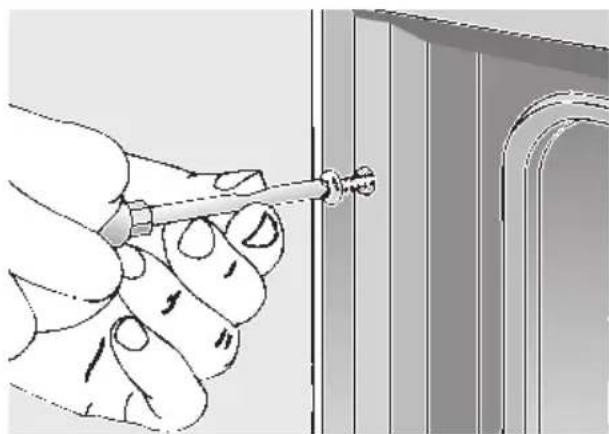
- Open the oven door and, using one screw on each side, fasten the built-in cooker to the side strips of the conversion cabinet (see illustration). The two screws (supplied with the built-in cooker) must be started slightly outward.
Verify that the built-in cooker is positioned securely and in a level position, and that the required installation dimensions have been maintained.
In units featuring telescoping extensions, these may not move by themselves.
In units featuring automatic oven cleaning, after filling 0,4 l of cleaning solution into the recess in the oven floor, the liquid must not spill toward the front.
The properly installed appliance must be covered on all sides in such a fashion that not even components with rough insulation are exposed to the touch. The cover must be removable with tools only.