Compact 210 - Fridge GRAM - Free user manual and instructions
Find the device manual for free Compact 210 GRAM in PDF.
| Brand | Gram |
| Model | Compact 210 |
| Product type | Refrigerator |
| Field of use | Food product storage |
| Installation | On a flat and horizontal floor; avoid heat sources and direct sunlight |
| Ventilation | Free air circulation under, behind and above the appliance |
| Power supply | Voltage indicated on the rating plate; use the provided detachable cable |
| Control panel | Digital display with +, -, P and on/off keys |
| Temperature setting | Press P, use + or -, confirm by pressing P again or wait 15 seconds |
| Defrosting | Automatic (4 times per day); manual possible by pressing the defrost key for 4 seconds |
| Temperature alarm | Audible and visual alarm in case of temperature deviation (HA, HB, id) |
| Keyboard lock | Yes, press P and + simultaneously for 1 second |
| Lighting | Only on models with glass door; switch under the control panel |
| Door reversal | Possible for solid doors (procedure described); glass doors by certified technician |
| Maintenance | Clean regularly with mild soapy solution; vacuum the condenser; do not use high-pressure cleaner |
| Safety | Do not use sharp objects for defrosting; cut off power before cleaning; do not obstruct the panel |
| Refrigerant | R600a (depending on model) |
| Weight | Not specified in the manual |
Frequently Asked Questions - Compact 210 GRAM
User questions about Compact 210 GRAM
0 question about this device. Answer the ones you know or ask your own.
Ask a new question about this device
Download the instructions for your Fridge in PDF format for free! Find your manual Compact 210 - GRAM and take your electronic device back in hand. On this page are published all the documents necessary for the use of your device. Compact 210 by GRAM.
USER MANUAL Compact 210 GRAM
natural_image
Exterior view of multiple stainless steel kitchen cabinets and refrigerators (no visible text or labels)Safety information....30
Location....31
General description....36
Electrical connection....37
General use....38
Starting up....40
Temperature setting....41
Temperature alarm 41
Error codes....42
Defrosting....42
Defrost water....43
Keylock....44
Illumination....44
Reversing the door....45
Cleaning 46
Door gaskets....46
Long term storage....46
Service 47
Disposal 48
EC-Declaration of conformity....49
Dnhalt
natural_image
Technical line drawing of a mechanical device with mounting base and side panel (no text or symbols)Fig. 1
Compact 210/310/410 med hjul eller ben:
natural_image
Two identical line drawings of a rectangular structure with arrows indicating direction, no text or symbols present.Fig. 2

natural_image
Technical diagram of a structural support system with arrows indicating force or movement (no text or symbols present)Fig. 3
natural_image
Line drawing of a two-wheeled cart with wheels and directional arrows indicating motion (no text or symbols)Fig. 4

natural_image
Technical line drawing of a refrigerator with mounting base and side panel, showing front and side views (no text or symbols)Fig. 6
natural_image
Technical line drawing of an open industrial refrigerator with internal cooling pipes and a hanging hose (no text or symbols)Fig. 8
Afrimning. Lyser under afrimning.

natural_image
Technical line drawing of an industrial machine with internal components and a downward arrow indicating a component (no text or symbols present)Fig.10
Tastaturlås
Tastaturet kan låses og dermed sikres mod uautoriseret brug.
For at läse tastaturet:
Tryk på og samtidigt i 1 sekund, og displayet viser "Loc" som indikation af, at tastaturet er låst.
For at låse tastaturet op:
Tryk på og samtidigt i 1 sekund, og displayet viser "UnL" som indikation af, at tastaturet er låst op.
Belysning
natural_image
Line drawing of an open refrigerator with internal compartments and a black arrow pointing to the door (no text or symbols)Fig. 11
Vending af dør
text_image
Make it OK, OHT11: 215-65-92 Type: Punching Photography Silt Input Order: 34 A. Contact ID: Particular g: Classical class: Indoor/Indoor Non-provided Cytoparticles Pre solid contents are correct - not used - Class Indoor/Indoor SiltFig. 12
Bortskaffelse
text_image
RoHS 2002/95/ECEnglish
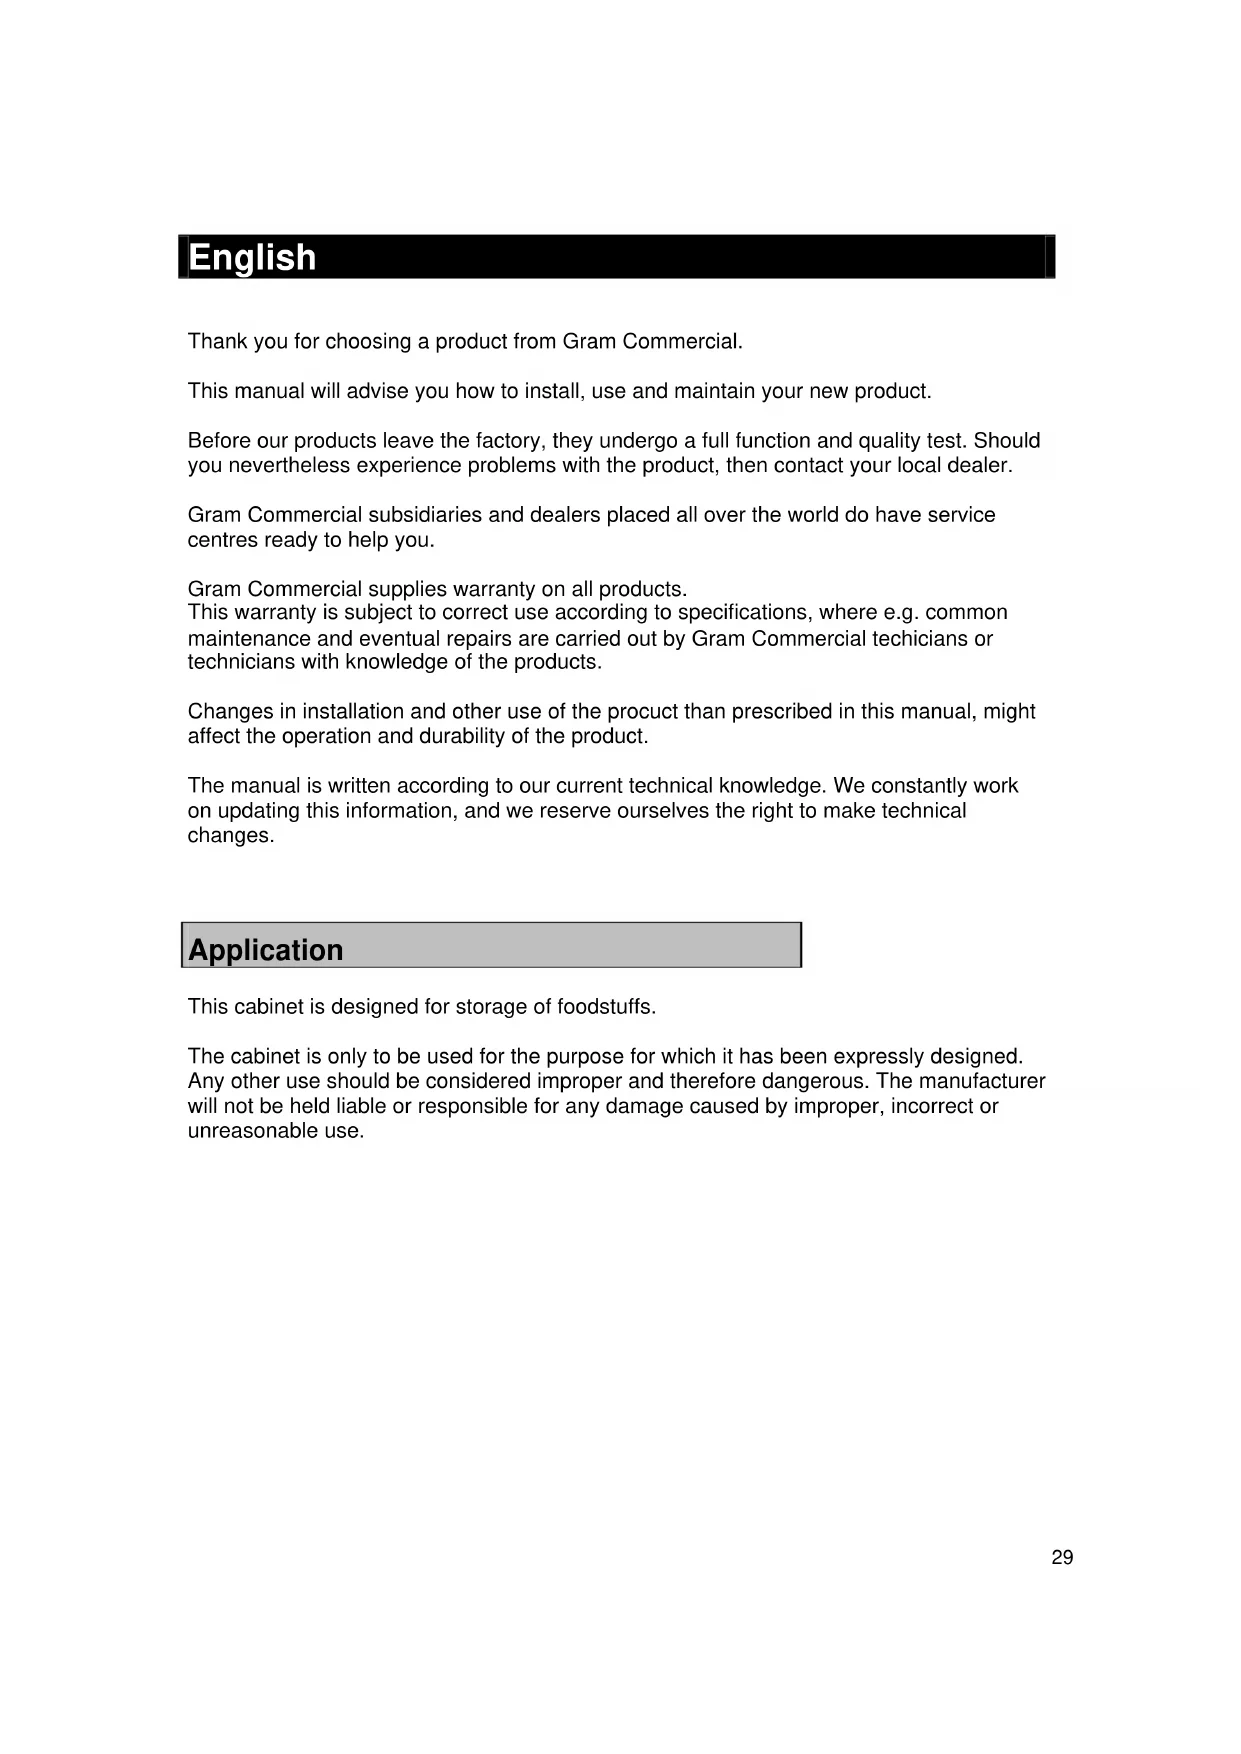
Thank you for choosing a product from Gram Commercial.
This manual will advise you how to install, use and maintain your new product.
Before our products leave the factory, they undergo a full function and quality test. Should you nevertheless experience problems with the product, then contact your local dealer.
Gram Commercial subsidiaries and dealers placed all over the world do have service centres ready to help you.
Gram Commercial supplies warranty on all products.
This warranty is subject to correct use according to specifications, where e.g. common maintenance and eventual repairs are carried out by Gram Commercial technicians or technicians with knowledge of the products.
Changes in installation and other use of the product than prescribed in this manual, might affect the operation and durability of the product.
The manual is written according to our current technical knowledge. We constantly work on updating this information, and we reserve ourselves the right to make technical changes.
Application
This cabinet is designed for storage of foodstuffs.
The cabinet is only to be used for the purpose for which it has been expressly designed. Any other use should be considered improper and therefore dangerous. The manufacturer will not be held liable or responsible for any damage caused by improper, incorrect or unreasonable use.
Safety information
Important
Description of symbols used in this manual.

Warning Lacking observation to these instructions might result in accidents with personal injury.

Important If these instructions are not observed, the product might be damaged or destroyed.
Be aware that Gram Commercial has taken precautions to ensure that the safety of the product is in order.
Please read carefully the following information regarding safety.

It is important, that everyone who are to use or install the product, to have access to this manual.

This appliance is not intended for use by persons with reduced physical, sensory or mental capabilities, or lack of experience and knowledge, unless they have been given supervision or instruction concerning use of the appliance by a person responsible for their safety.

Children should be supervised to ensure that they do not play with the appliance.

The product contains components with software.
Gram Commercial has taken measures to ensure, that the software is free of errors, and that the software has been developed according to IEC 60601-1-4 (software in medical products).
This implies a risk analysis, which shows a small remnant of risk that unwanted/unintended operation might occur under certain conditions.
According to the above rules, it should be informed/considered if a necessary risk analysis should be carried through on the partial machine. More details of the remnant risk can be supplied by Gram Commercial if necessary.

The appliance might contain parts with sharp edges in the compressor compartment, and in the inside compartment.

The appliance is not to be transported on a sack truck, there is a danger of loosing the balance, causing danger to persons.

Do not pull the power cord to disconnect the appliance, or when moving the appliance.
Location
When receiving the cabinet, check the packaging material for damage.
If any damage occurs at the packaging material, it should be considered if the cabinet might have been damaged too. If the damage is substantial, please contact your dealer.
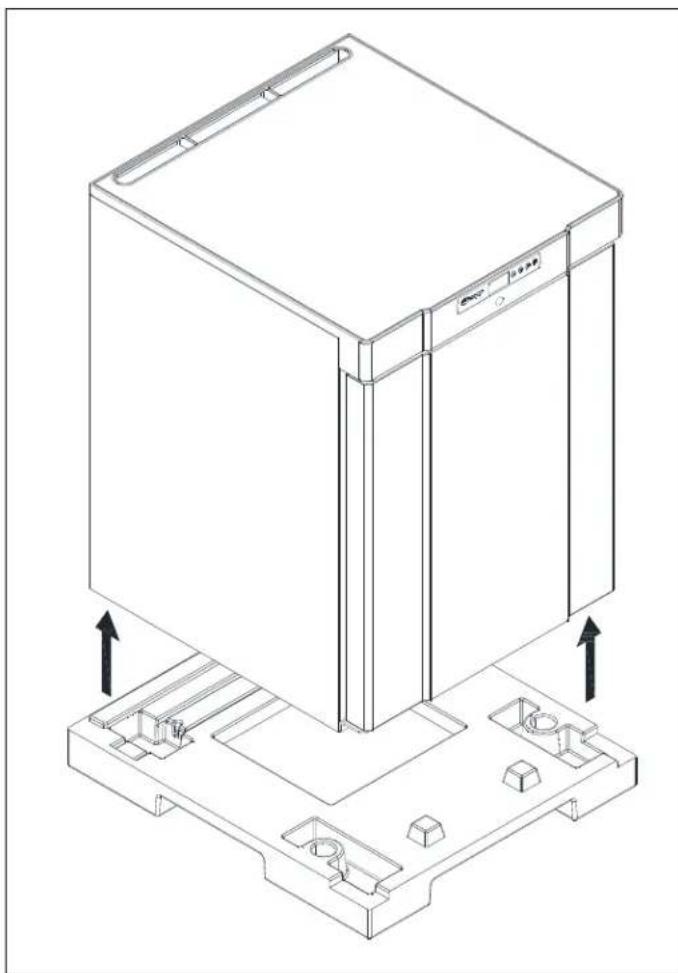
How to remove the transport pallet:
Compact 210 with skids/small wheels:
The cabinet can be lifted off the pallet.
natural_image
Technical line drawing of a mechanical device with mounting base and side panel (no text or symbols)Fig. 1
Compact 210/310/410 with castors or legs:
The cabinet is tilted slightly backward, and the front part of the pallet can be removed. Then the cabinet is tilted slightly forward, and the rear part can be removed.

This task requires at least 2 persons.

natural_image
Two identical line drawings of a rectangular structure with directional arrows indicating movement or force (no text or symbols)Fig. 2

If the cabinet has been transported in horizontal position it must stand upright at least 2 hours before it is started to allow the oil from the compressor to run back.

Because of the heavy weight of the cabinet, the floor might be damaged or scratched when moving the cabinet.
Correct set up gives the most effective operation.
The cabinet should be located in a dry and adequately ventilated room.
To ensure efficient operation, it may not be placed in direct sunlight or against heat-emitting surfaces. The cabinet is designed to operate in an ambient temperature of up to +32°C.
Avoid placement of the cabinet in a chlorine/acid-containing environment (swimming bath etc.) due to risk of corrosion.
The cabinet and parts of the interior is equipped with a protecting film, which should be removed before use.
Clean the cabinet with a mild soap solution before use.
The set up place must be level and horizontal.
For versions with legs, use the adjustable legs to make sure that the cabinet stands level and upright.

natural_image
Technical diagram of a mechanical assembly with arrows indicating force or movement (no text or symbols present)Fig.3
For versions with castors, the locking devices of the two front castors must be activated, when the cabinet is in place. The base must be level, and the cabinet may not be placed on frames or the like.

natural_image
Line drawing of a two-wheeled cart with wheels and directional arrows indicating motion (no text or symbols)Fig. 4
Cabinets equipped with a glass door, must be fastened to a stable surface to ensure the cabinet does not tilt, when the door is open. Brackets for fastening is supplied with the cabinet.
See how to mount brackets at Fig.5.

text_image
515 35 20 Upper edge of cabinet 4x Ø8 mmFig. 5

To ensure that users, surroundings and stored items are not injured/damaged if the cabinets tilts, these brackets must be mounted.
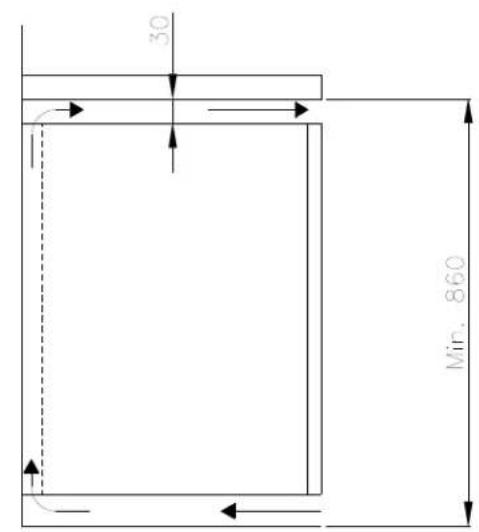
The cabinet can be installed freestanding against a wall or Compact 210 can be built under a worktop.
The cabinet must have sufficient ventilation and free air circulation beneath, above and behind the cabinet. There must be a minimum clearance of 30 mm above the cabinet.

natural_image
Pure geometric diagram with dashed and solid lines forming a square frame, no text or symbols presentA
text_image
30 Min. 860B
General description
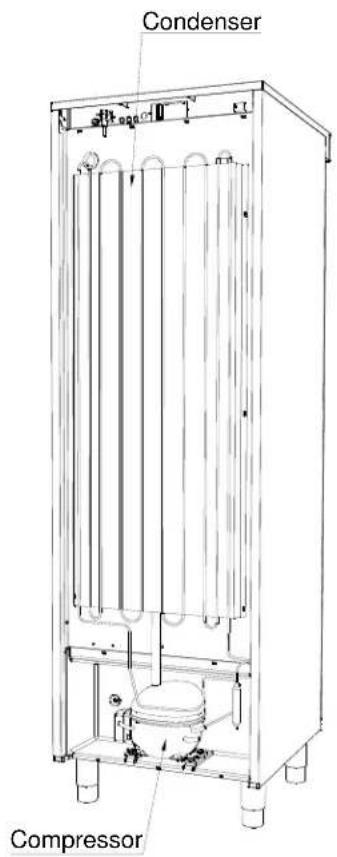
text_image
Condenser Compressor
text_image
Display Control panel Door gasket Air intake Air distribution plate Shelves for storage DoorFig. 7
Electrical connection
Read the text below thoroughly before electrical connection.

The cabinet is intended for connection to alternating current. The connection voltage (V) and frequency (Hz) are shown on the name plate in the cabinet (see Fig. 12). Only the supplied detachable cord is to be used (see Fig. 8).

Never use an extension cord for this appliance!
If a wall socket is placed in a longer distance than the length of the supplied power cord, contact an electrician to establish a wall socket within the range of the supplied power cord.

If the cabinet is defective, the cabinet must be examined by a service electrician from Gram Commercial or an authorised refrigeration company with knowledge of Gram's products.
Connecting the detachable cord:

natural_image
Technical line drawing of an open industrial refrigerator with internal compartments and a hanging handle (no text or symbols)Fig. 8
Always disconnect the power if interruptions in power supply occur, and when electrical parts are removed/put on, and before cleaning and maintenance of the appliance.
Repairing of electrical/technical parts may only be performed by a service electrician from Gram Commercial or an authorised refrigeration company with knowledge of Gram's products.
Do not use the appliance before all coverings are installed, so that live or rotating machine parts can not be touched.
The cabinet is not to be used outdoor.
All earthing requirements stipulated by the local electricity authorities must be observed. The cabinet plug and wall socket should then give correct earthing. If necessary, contact an electrician.

Make sure the appliance is switched off at the socket before service is performed on electrical parts. It is not sufficient to switch off the cabinet by the START/STOP key as there will still be voltage to some electrical parts of the cabinet..
General use

Do not block vent holes in the front panel.

Do not damage the refrigeration system parts.

During normal operation, some parts of the refrigeration system in the compressor compartment might reach high temperatures, and could therefore cause burns if touching these components.
Do not use electrical devices inside the cabinet.


To ensure correct and efficient air flow in the cabinet, the shaded areas must be kept free of products. (see Fig. 9)

All products to be stored, that are not wrapped or packed, must be covered in order to avoid unnecessary corrosion of the inner parts of the cabinet.

If any controller parameters are changed from default, this could cause that the appliance is not functioning normally, and harmful temperatures could damage products that are kept inside the appliance.

If the appliance is turned off, wait minimum 3 minutes before turning the appliance on again. This is to protect the compressor from damage
Be aware, if bottles are stored near the air outlet, they may freeze up and break, causing a risk of injury.
Do not pack the cabinet with foods. Allow some space between them to ensure a good airflow.
Moist or fresh foods and those with a strong smell should be wrapped up in a plastic film or packed in a container. Otherwise the food may dry up or give their smell to other foods.
Foods containing acetic acid or yeast should be wrapped up in plastic film. Otherwise they may accelerate corrosion of the evaporator and metal parts, resulting in failure.

Connect the cabinet to main power.
To turn on the cabinet, push 📄 for 2 seconds.
The display shows the actual cabinet temperature, and indicates that power is connected.
The cabinet is turned off likewise, by pushing 📋 for 2 seconds.
Control lights
The following control lights are located at the display:

Compressor. This LED is on while the compressor is running. Flashes during temperature setting.

Defrosting. This LED is turned on during defrosting cycle.

Evaporator fan. This LED is turned on while the evaporator fan is running.

Alarm. This LED is turned on if an alarm occurs. See chapter on temperature alarm and errors.
Temperature setting
The temperature is set as follows:
Push the button, the compressor lamp flashes.
Push or to set the temperature.
Push P again to save the set value. The compressor lamp is turned off, unless the compressor is running. Alternatively, do not operate any buttons for 15 seconds, the controller switches back to temperature display, and the set value is saved automatically.
If there is a power failure, the controller will remember the settings. When the power returns, the cabinet will start up again.
Temperature alarm
The controller is equipped with a temperature alarm, which constantly monitors the cabinet temperature. The lamp lights, if an alarm has occurred.
The following alarms can be displayed:
AL low temperature alarm
AH high temperature alarm
Id open door alarm
Displaying alarm values:
Push the button, and keep pushed for 1 second. Push or until "LS" is displayed. Now, push and one of the alarm codes above is displayed. Use the or button to select the wanted value. Push again, and the alarm values are displayed.
Example – alarm AH:
9.0 the temperature alarm value is 8.0°C
dur alarm duration
h01 the alarm lasted for 1 hour ....(continues)
n15 .... and 15 minutes
AH selected alarm value
Each value is displayed alternately for approx. 1 second.
To exit the alarm menu, push and the selected alarm is displayed (in this example "AH"). Push again, and the current cabinet temperature is displayed.
Deleting alarms:
Push, and keep pushed for 1 second. Push or until "rLS" is displayed.
Now push . Then push or + within 15 seconds and set "149". Push
again, and the display fashes "----" for 4 seconds. The alarms are now deleted, the LED is turned off, and the controller returns to temperature display.
Error codes
Pr1 If error Pr1 is displayed, it means that the temperature sensor is defect.
Request service assistance.
In the meantime, the cabinet will aim to maintain the set temperature.
Pr2 If error Pr2 is displayed, there are problems with the evaporator sensor. The sensor should be replaced as soon as possible. Request service assistance.
Defrosting
K/KG 210/410:
Defrosting is automatically performed 4 times every 24 hours, by circulating the air inside the cabinet during compressor standstill periods. The defrost LED lights to indicate the defrosting cycle is running.
F/FG 210/410:
Defrosting is automatically performed 4 times every 24 hours, by a heating element mounted at the evaporator.
Manual defrosting:
If the cabinet is operating under severe load (frequent door opening and frequent replenishment), manual defrosting can become necessary.
Manual defrosting is performed as follows:
Push for 4 seconds, and defrosting is started. The defrost LED lights to indicate the defrosting cycle is running.

Do not use sharp or pointed objects to accelerate the defrosting process.
Defrost water
The cabinet expels defrost water during defrosting, which is led into a tray in the compressor compartment (see Fig. 10).
A re-evaporation pipe from the refrigeration system, placed in the tray, re-evaporates the water.

It is recommended to clean the tray at least once a year. Remember to disconnect the cabinet before cleaning.
Be careful not to damage the re-evaporation pipe during cleaning.

natural_image
Technical line drawing of an open industrial refrigerator with internal pipes and a central cylindrical component (no text or symbols)Fig. 10
Keylock
The keys can be locked and in this way secured against unauthorized use of the appliance.
To lock the keys:
Press and at the same time for 1 second, "Loc" is shown to indicate the keys are locked.
To unlock the keys:
Press and at the same time for 1 second, "UnL" is shown to indicate the keys are unlocked.
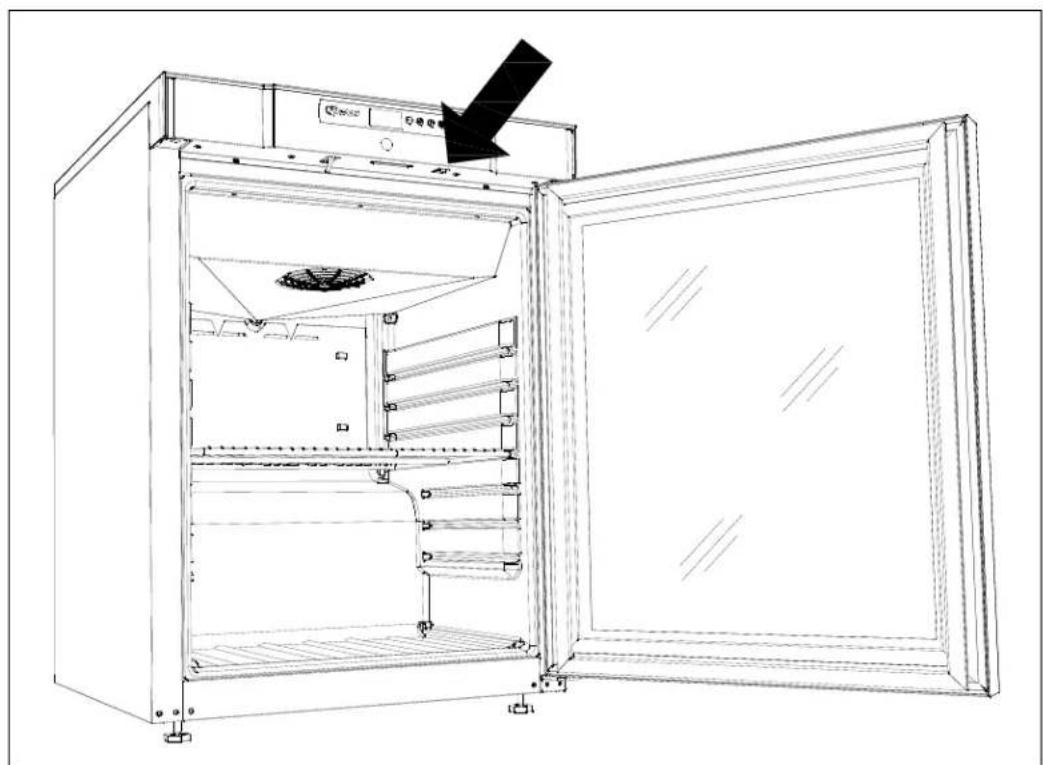
Illumination
Applies only to models with glass door.
The light can be switched on or off by the switch underneath the control panel.
natural_image
Line drawing of an open refrigerator with internal compartments and a black arrow pointing to the door (no text or symbols)Fig. 11
Reversing the door
The door can be changed from righthand-hinged to lefthand-hinged, or vice versa.
To do so, proceed as follows:
Models with solid door:

text_image
A B C D- Switch off the power at the mains socket.
- Dismantle the two screws that hold the control panel at front and back, pull the panel a little forward, and then tilt it upwards.
- Dismantle the hinge at pos. A, and lift off the door.
- Dismantle the hinge at pos. B, and mount it at pos. D.
- Turn the door 180°, and fix it at the hinge pos. D.
- Mount the hinge from pos. A in pos. C, and move bracket from pos. C to pos. A.
- Fasten the control panel again. Apply power to the cabinet again.
Models with glass door:
The door should only be reversed by a service electrician from Gram Commercial or an authorised refrigeration company with knowledge of Gram's products.
Cleaning
Insufficient cleaning will cause that the cabinet will not work at optimum performance, or eventually it will be defective.

Before cleaning, the cabinet should always be disconnected.
Do not flush the cabinet with water, do not use water jet or steam hose as this may cause short-circuits in the electrical system.
Cleansing agents containing chlorine or compounds of chlorine as well as other corrosive means, are not to be used, as they might cause corrosion to the stainless panels of the cabinet and the evaporator.
The compressor compartment and in particular the condenser must be kept free from dust and dirt. This is best done with a vacuum cleaner and a brush.
The air filters on the condenser and the front panel can be removed and cleaned in a dishwasher at max. 50°C.
For the external maintenance – use stainless steel polish.
The cabinet should be cleaned internally with a mild soap solution at suitable intervals and checked thoroughly before it is put into operation again.
Door gaskets
This chapter deals with the importance of a well-functioning door gasket.
Gaskets are an important part of a refrigerator/freezer. Gaskets with reduced functionality, reduces the tightness of the cabinet. Reduced tightness might cause increased humidity, internal icing, an iced up evaporator (leading to reduced refrigeration capacity), and in worst case reduced lifecycle of the cabinet.
Therefore it is important to be aware of the condition of the gasket. Regular inspection is recommended.
The gasket should be cleaned regularly with a mild soap solution.
If a gasket needs replacement, contact your supplier.
Long term storage
If the cabinet is taken out of operation, and need to be prepared for long-term storage, clean the inside compartment, the door and door gasket thoroughly with a hot soapy damp cloth.
Eventual remnants of food could create mould.
Service
If refrigeration fails, first investigate whether the unit has been unintentionally disconnected or switched off at the socket, or whether a fuse has blown.
If it is not possible to find the cause of the refrigeration failure, please contact Gram technical department.
When contacting us please tell us the name and serial number (S/N) / (WWYY) of the cabinet. This information is stated on the name plate, see Fig. 10.
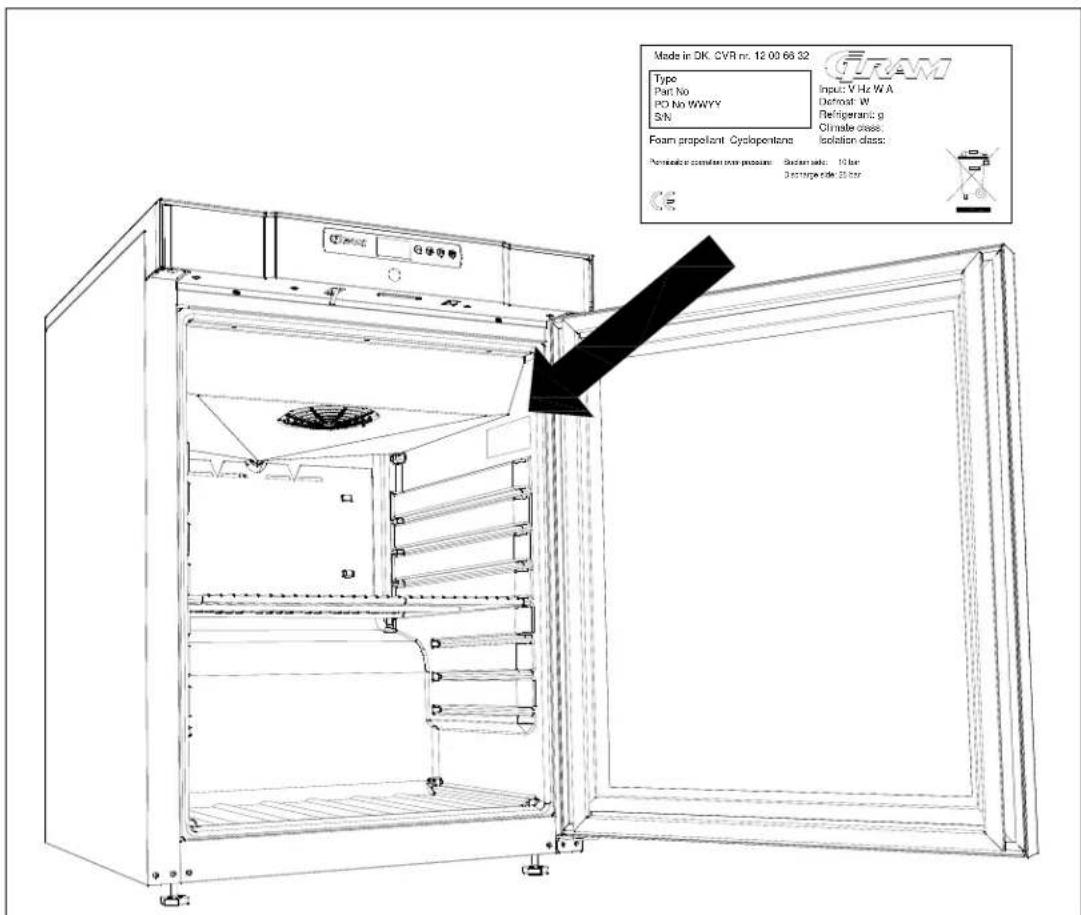
text_image
Made in DK. CVR no: 12 00 68 32 Type Part No PO No WWYY S/N Input: V Hz W.A Drain: W Refrigerantig Climate class: Isolation class: Foam propellant Cyclopentene Permeable condensate flow pressure: Shocker side: 10 bar 3 discharge side: 25 barFig.12
Disposal
The below only concerns the United Kingdom.
Disposal of an old cabinet is only available when we are delivering a new one at the same time. Cabinets must be fully defrosted and emptied prior to collection.
Gram recognises that our products for the catering market are considered as WEEE when they become obsolete. To ensure that Gram's responsibilities are handled correctly and environmentally friendly, we are signed up the largest Business to Business compliance scheme in the UK – B2B Compliance http://www.b2bcompliance.org.uk
B2B Compliance will on our behalf deal with all areas of our responsibilities when collecting and disposing of equipment which fall under the UK WEEE regulations. B2B Compliance can be contacted on telephone number 01691 676124.
natural_image
Simple line drawing of a trash bin with no text or symbolsEC-Declaration of conformity
We, Gram Commercial A/S, declare under sole responsibility that the following products:
Name:
GRAM COMPACT
Refrigerant: R134a, R404A, R600a, R290
To which this declaration relates, is in compliance with all the applicable essential requirements, and other provisions of the European Council Directive.
Directive of the European Parliament and of the Council:
- Directive for Machinery 2006/42/EF
- Low voltage Directive 2006/95/EF
- EMC Directive 2004/108/EF
- RoHS Directive 2002/95/EF
Gram Commercial A/S
Aage Grams Vej 1
DK-6500 Vojens
Telephone: +45 73 20 12 00
Vojens, 13. januar 2012
John B. S. Petersen
Approval Manager
ISO 9001
BUREAU VERITAS Certification


text_image
RoHS 2002/95/ECDeutsch
natural_image
Isometric line drawing of a server rack unit with mounting base and control panel (no text or symbols)Fig.1
natural_image
Two identical architectural floor plan diagrams with directional arrows indicating movement, no text or symbols present.Fig. 2

natural_image
Diagram of a structural support system with arrows indicating force or movement (no text or symbols present)Fig. 3
natural_image
Line drawing of a two-wheeled cart with wheels and directional arrows indicating motion (no text or symbols)Fig. 4

natural_image
Simple geometric diagram showing a square with dashed vertical line and curved arrows, labeled 'A' at bottom (no text or symbols within the diagram itself)
text_image
30 Min. 860 BFig.5
natural_image
Technical line drawing of a refrigerator with mounting base and side panel, showing internal components and assembly (no text or symbols)Fig.6
Produktbeschreibung

natural_image
Technical line drawing of a mechanical device with internal components and a hanging handle (no text or symbols)Fig. 8
natural_image
Technical line drawing of a mechanical device with internal components and a downward arrow indicating a component (no text or symbols present)Fig.10
Tastensperre
natural_image
Line drawing of an open refrigerator with internal shelves and a door, showing no text or symbols.Fig. 11
Umschlagen der Tür
text_image
CREAM Type: P0/100 P0 to AWY B/N Form popular: Cytopetone Imped by: 25 W H/A Screw: 9 Rip/stop g C drive class: labeled in bedbox Form used as an assembly for the system - Tires (4-8) diagram.1.dwgFig. 12
Entsorgung
text_image
RoHS 2002/95/ECFrancais
natural_image
Technical line drawing of a mechanical device with mounting base and control panel (no text or symbols)Fig.1
natural_image
Two identical line drawings of a rectangular structure with directional arrows indicating movement or force (no text or symbols)Fig.2

natural_image
Technical diagram of a mechanical assembly with arrows indicating motion or force direction (no text or symbols)Fig. 3
natural_image
Line drawing of a four-wheeled cart with wheels and directional arrows indicating motion (no text or symbols)Fig. 4

natural_image
Technical line drawing of a refrigerator with mounting feet and front panel, showing internal components and assembly (no text or symbols)Fig.6
natural_image
Technical line drawing of an open industrial refrigerator with internal compartments and a hanging handle (no text or symbols)Fig. 8
natural_image
Technical line drawing of an industrial machine with internal components and a downward arrow indicating a component (no text or symbols present)Fig.10
natural_image
Line drawing of an open refrigerator with a black arrow pointing to the top panel (no text or symbols present)Fig. 11
text_image
Mode In DK CVR nr. 12 06 05 32 Type: Part No: PO No: KWYY SN Input: V Hz W/A Dichout, VI Ret-grip: L/g Dimine strain: Solution case: Foam propellant Cyclopentane Permeable propellant transducers: Solar side: H2 air Distance: 0.5 kmFig.12
Mise au rebut
natural_image
Simple line drawing of a trash bin with no text or symbols- Directive Machines 2006/42/EF
- Directive basse tension 2006/95/EF
- Directive EMC 2004/108/EF
- Directive RoHS 2002/95/EF
Gram Commercial A/S
Aage Grams Vej 1
DK-6500 Vojens
Telephone: +45 73 20 12 00
Vojens, 13. januar 2012
John B. S. Petersen
text_image
RoHS 2002/95/ECNederlands
natural_image
Technical line drawing of a mechanical device with mounting base and side panel (no text or symbols)Fig.1
natural_image
Two identical line drawings of a rectangular structure with side supports and directional arrows indicating movement (no text or symbols)Fig.2

natural_image
Diagram of a mechanical or structural assembly with arrows indicating direction of movement, no text or symbols present.Fig. 3
natural_image
Line drawing of a two-wheeled cart with wheels and directional arrows indicating motion (no text or symbols)Fig. 4

natural_image
Technical line drawing of a microwave oven with mounting brackets and internal structure, shown in two orthographic views (no text or symbols present)Fig.6
natural_image
Technical line drawing of a mechanical device with internal components and a hanging component (no text or symbols)Fig. 8
natural_image
Technical line drawing of an industrial machine with internal components and a downward arrow indicating a component (no text or symbols present)Fig.10
Toetsenslot
natural_image
Line drawing of an open refrigerator with internal compartments and a black arrow pointing to the door (no text or symbols)Fig.11
Omkeren van de deur
text_image
RoHS 2002/95/ECSvenska
natural_image
Technical line drawing of a mechanical device with mounting base and side panel (no text or symbols)Fig.1
Compact 210/310/410 med hjul eller ben:
natural_image
Two identical architectural diagrams showing vertical supports with directional arrows indicating movement or force (no text or symbols)Fig.2

natural_image
Pure geometric diagram with dashed and solid lines forming a square frame, no text or symbols presentA

text_image
30 Mfr. 860B
Fig.5
natural_image
Technical line drawing of a refrigerator with mounting brackets and internal components, shown in two orthographic views (no text or symbols present)Fig.6
natural_image
Technical line drawing of a mechanical device with internal components and a hanging component (no text or symbols)Fig. 8
natural_image
Technical line drawing of an industrial machine with internal components and a downward arrow indicating a component (no text or symbols present)Fig.10
Knapplås
natural_image
Line drawing of an open refrigerator with a black tray and control panel (no text or symbols)Fig.11
Vändning av dörr
text_image
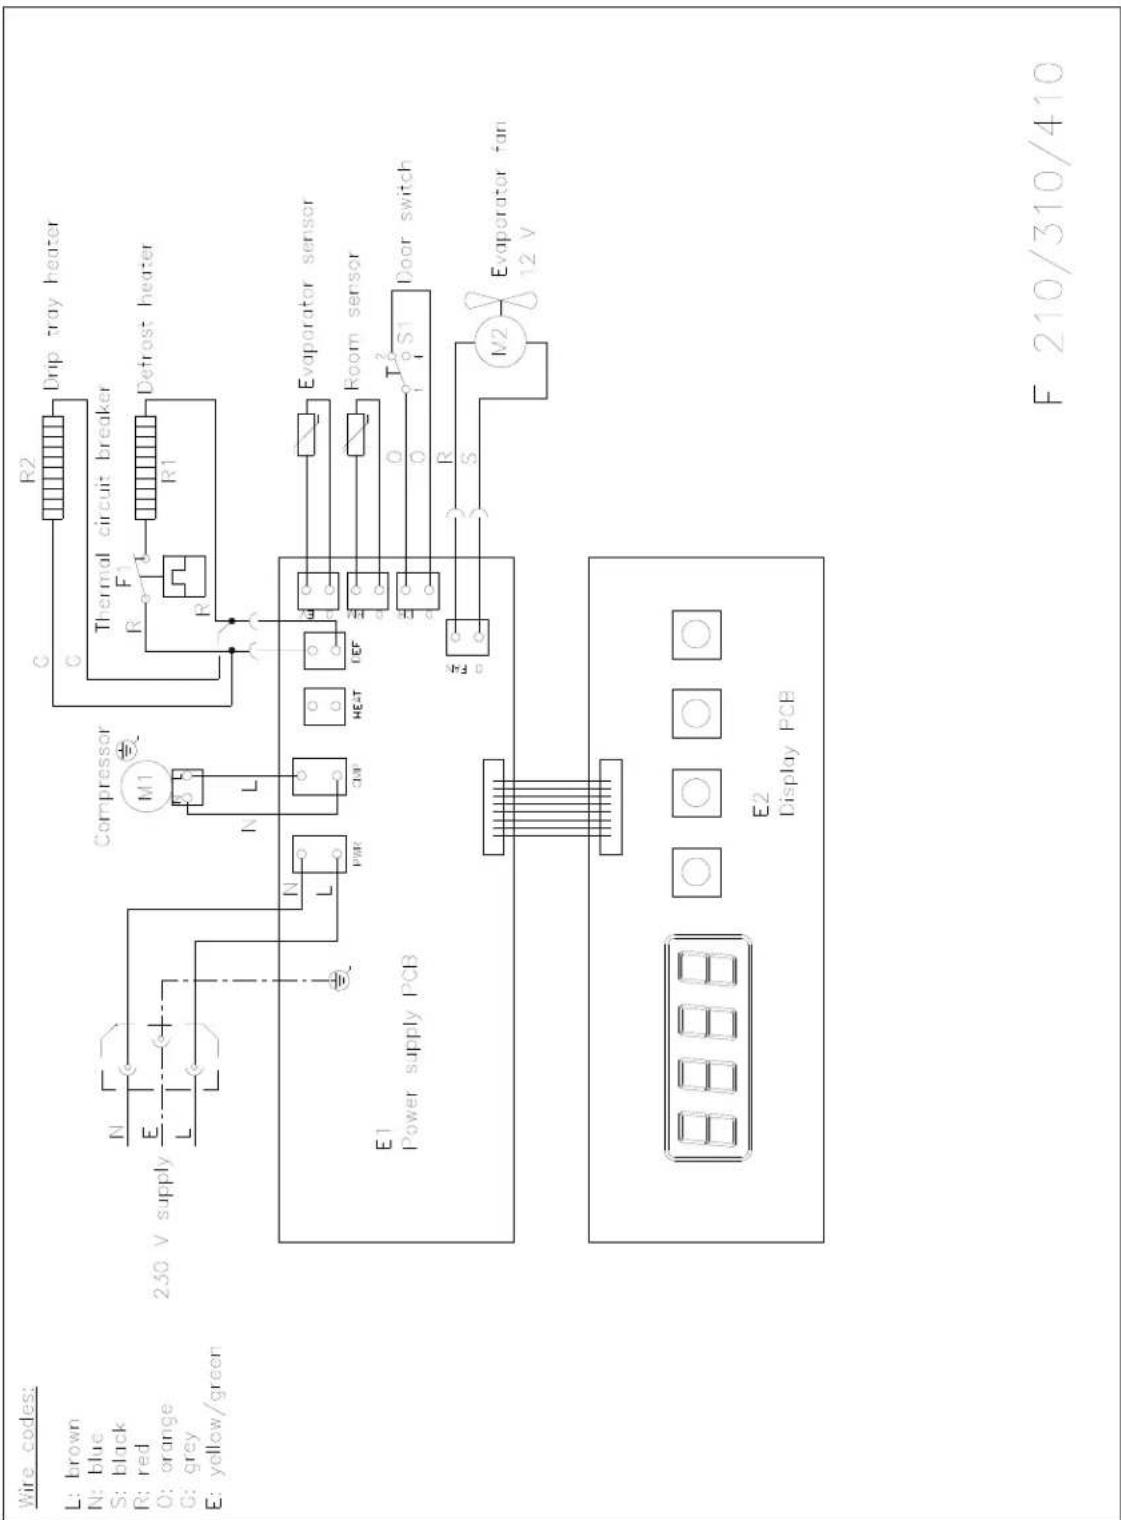
RoHS 2002/95/ECEI-diagram / Wiring diagram / Schaltbild

text_image
Wire codes: L: brown N: blue S: black R: red O: orange E: yellow/green 230 V supply N E L M1 Compressor N L E1 Power supply PCB Room sensor T2 S1 Door switch PWR CMP F40 R S M2 Evaporator fan 12 V E2 Display PCB K 210/310/410
text_image
Wire codes: L: brown N: blue S: black R: red O: orange E: yellow/green 230 V supply N E1 Power supply PCB E2 Display PCB Tratio T1 LED light strip L1 S2 S Light switch 230 V/24 V M1 Compressor N L FAB CMP Room sensor T2 S1 Door switch R S M2 Evaporator fan 12 V KG 210/310/410