Fidelity sms - Phone TOPCOM - Free user manual and instructions
Find the device manual for free Fidelity sms TOPCOM in PDF.
User questions about Fidelity sms TOPCOM
0 question about this device. Answer the ones you know or ask your own.
Ask a new question about this device
Download the instructions for your Phone in PDF format for free! Find your manual Fidelity sms - TOPCOM and take your electronic device back in hand. On this page are published all the documents necessary for the use of your device. Fidelity sms by TOPCOM.
USER MANUAL Fidelity sms TOPCOM
natural_image
Black office telephone with cord and keypad, no visible text or symbols on device bodyUSER MANUAL
HANDLEIDING
MANUEL D'UTILISATEUR
GEBRAUCHSANWEISUNG
MANUAL DE USUARIO
MANUALE D'ISTRUZIONI
INSTRUKCJA OBSŁUGI
UÛIVATELSKÁ PRÍRUCKA
HASZNÁLATI UTASÍTÁS
BRUKSANVISNING
!! Important !!
To use 'Caller ID' (display caller), this service has to be activated on your phone line. Normally you need a separate subscription from your telephone company to activate this function. If you don't have the Caller ID function on your phone line, the incoming telephone numbers will NOT be shown on the display of your telephone.
!! Belangrijk !!
fidelitySMS_front.fm Page 3 Tuesday, August 5, 2003 10:34 AM


text_image
17 21 1 2 3 22 4 23 8 5 6 7 17 21 1 2 R VM M1 M2 M3 12 13 14 15 OK 16 20 Ø 17 ABC AIC 18 19 Topcom Fixedity[EMS] 9 10 11
natural_image
Pure geometric diagram with crosshair and circular shapes, no text or symbols present1 INSTALLATION 5
2 BUTTONS/LED 5
3 DISPLAY/LED 5
3.1 Standard display information 5
4 SETTING 6
4.1 Setting the language of the display text 6
4.2 Setting the Date and Time 6
4.3. Setting the Dial Prefix 6
4.4. Setting the Display contrast 6
4.5. Telephone reset 6
5 MAKING A PHONE CALL 7
5.1 Last number redial 7
5.2 Deactivating the microphone (mute) 7
5.3 Ringer volume 7
5.4 Flash Key 7
6 CALLER ID
6.1 General information 7
6.2 Call list 7
6.2.1 Scrolling through the Call List 8
6.2.2 rasing numbers from the Call List 8
6.2.3 Calling a number from the Call List 8
6.3 Voice mail 8
7 PHONE BOOK
7.1. Use of the alphanumerical keypad 8
7.2 Adding a number to the Phone Book 8
7.3 Saving a number from the Call list in the Phone Book 8
7.4 Selecting and calling a number from the Phone Book by name 9
7.6 Erasing a number and name from the Phone Book 9
8 MEMORY NUMBERS
8.1 Adding a number to a Direct Memory 9
8.2 Saving a number from the Call list to a Direct Memory 9
8.3 Calling a number a Direct Memory number 10
8.5 Erasing a number and name from the Direct Memory 10
9. SMS (SHORT MESSAGES SERVICE) 10
9.1 Protocol selection 10
9.2 Protocol 1 10
9.2.1 SMS Settings 10
9.2.2 Sending Short Messages 11
9.2.3 Re-sending Short Messages (outbox) 12
9.2.4 New Incomming Messages (Inbox) 12
9.3 Protocol 2 13
9.3.1 SMS Settings 13
9.3.2 Sending SMS Messages 14
9.3.3 Re-sending Short Messages (outbox) 15
9.3.4 New Incomming Messages (Inbox) 16
10 SAFETY INSTRUCTIONS 17
11 CLEANING 17
12 WARRANTY 17
13 TECHNICAL DATA 17
1 INSTALLATION
- Put batteries in the battery compartment to activate the display :
- Open the battery compartment at the bottom of the unit.
- Insert 4 AA batteries (1.5V).
- Close the battery compartment.
- Connect one end of the line cord to the telephone line wall socket and the other end to the bottom of the phone.
Note: Instead of using batteries, you can also use an adapter (DC 9V / 300 mA ( )) (adapter not included), this adapter needs to be compliant to the CE standard EN60950
The memories remain saved, even without batteries or electricity supply (flash memory) ! Never change batteries when the telephone line is connected !
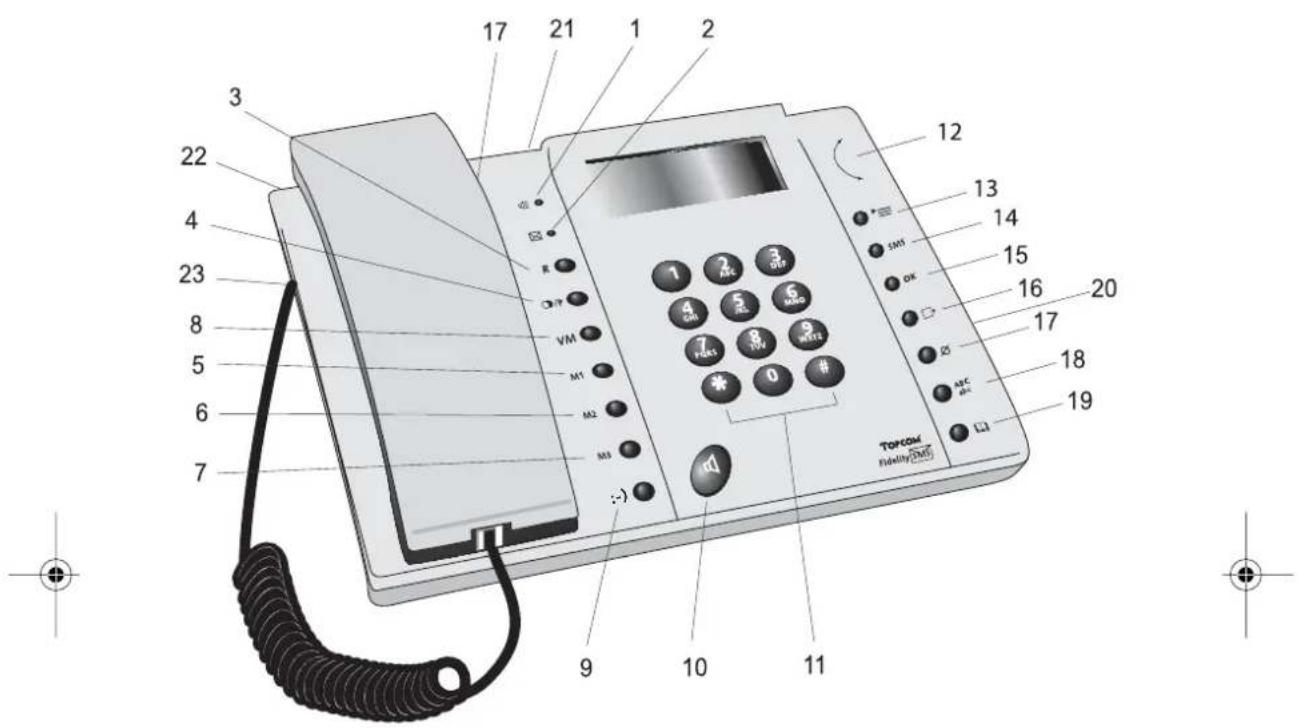
2 B UTTONS/LED
1 ' Handsfree' indicator
2 ' New Calls' indicator
3 F lash
4 Redial / Pause button
5 D irect Memory button M1
6 D irect Memory button M2
7 D irect Memory button M3
8 Voice Mail button VM
9 Smiley button
10 Handsfree button
11 Alphanumerical keyboard
12 Scroll switch (
13 Menu button
14 SMS button
15 OK Button
16 Escape button
17 Erase/Mute-button
18 Caps ABC -> abc
19 Phonebook button
20 Volume Switch
21 Ring volume switch
22 Adapter input
23 Telephone line input
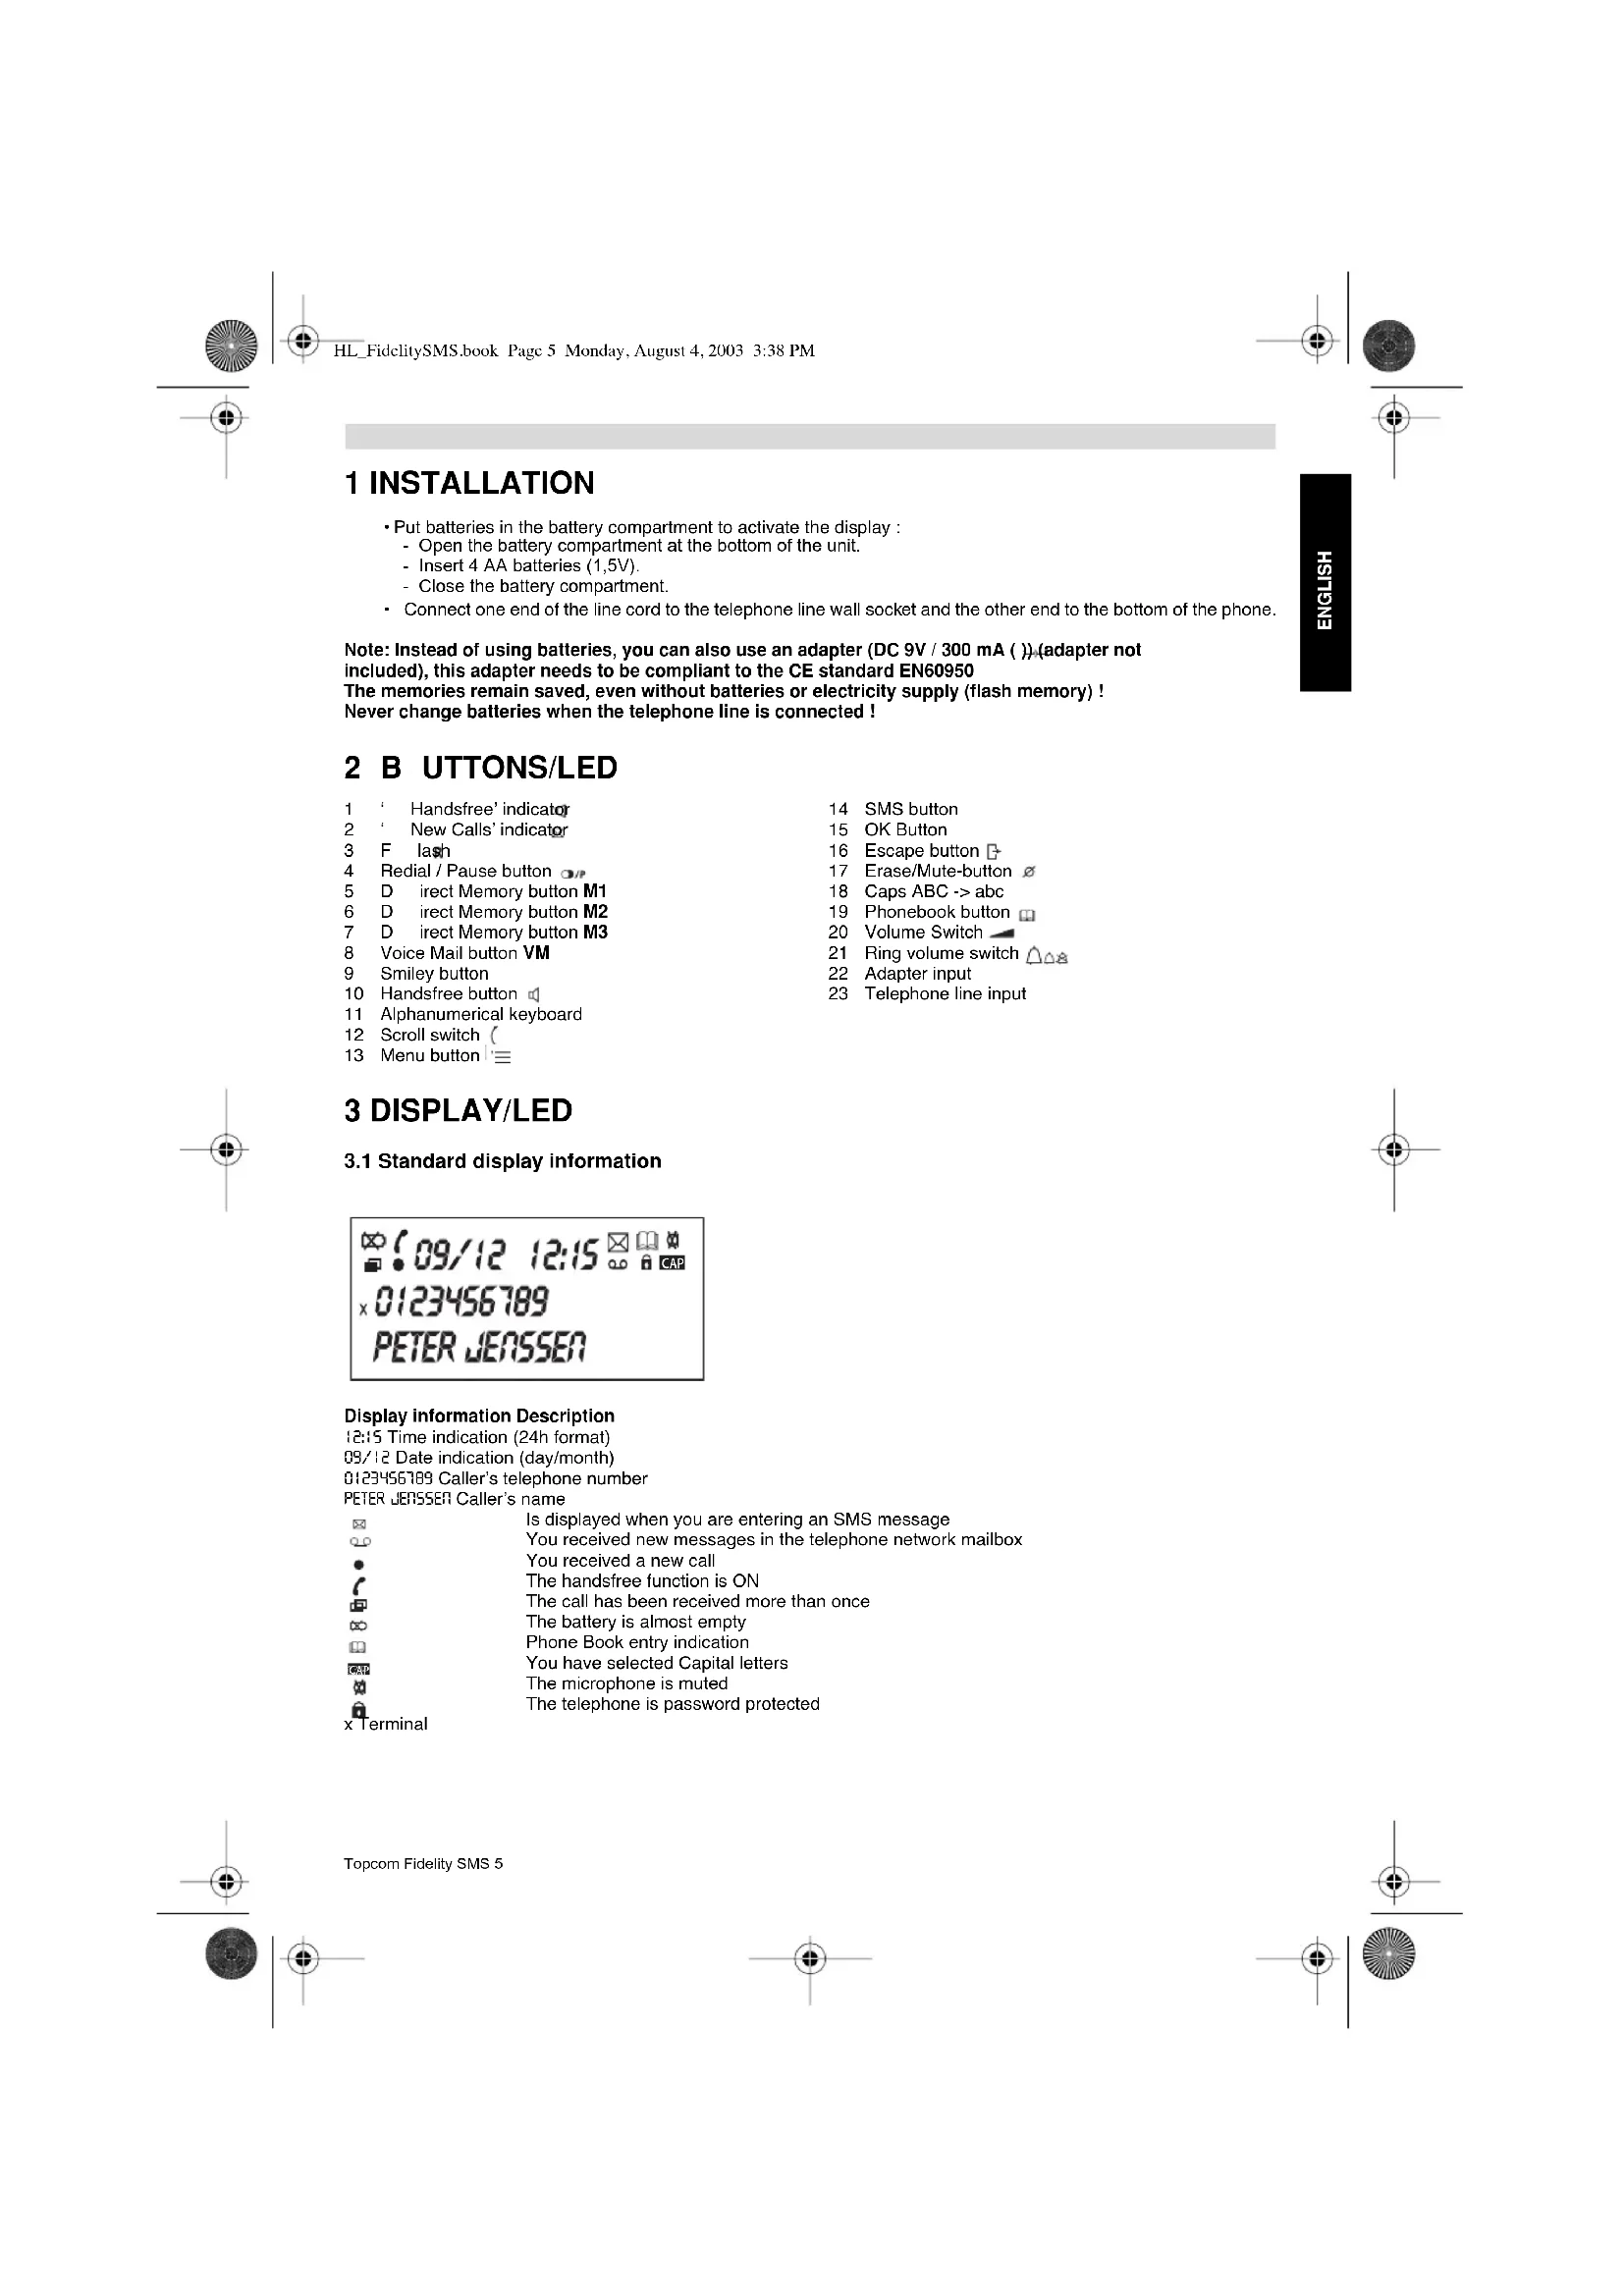
3 DISPLAY/LED
3.1 Standard display information


Display information Description
12:15 Time indication (24h format)
09/12 Date indication (day/month)
0123456789 Caller's telephone number
PETER JENSSEN Caller's name
| x Terminal | Is displayed when you are entering an SMS message |
| You received new messages in the telephone network mailbox | |
| You received a new call | |
| The handsfree function is ON | |
| The call has been received more than once | |
| The battery is almost empty | |
| Phone Book entry indication | |
| You have selected Capital letters | |
| The microphone is muted | |
| The telephone is password protected |
Topcom Fidelity SMS 5


4 SETTING
4.1 Setting the language of the display text
You can select the desired language as follows:
- Press the Menu button .
- Use the scroll switch to select the 'Setting'.
- Press OK
- Use the scroll switch to select the 'Language'
- Press OK
- Use the scroll switch to select the desired language
- Press OK to confirm
- Press the Escape button 3 times to leave the menu.
4.2 Setting the Date and Time
When you have a subscription to the Caller ID service and your telephone provider sends the date and time together
with the telephone number, the phone's clock will be set automatically.
It is also possible to set the clock manually:
- Press the Menu button . '=
- Use the scroll switch to select 'Setting'.
- Press OK
- Use the scroll switch to select 'Date & Time'
- Press OK
- Enter the day, month, hour and minutes using the numerical keypad.
- Press OK to confirm
- Press the Escape button twice to leave the menu.
4.3. Setting the Dial Prefix
When you dial out a telephone number from the Call list, the programmed prefix will be added in front of the telephone number. This function is useful when you have a PABX where you have to dial a prefix to take the external line.
- Press the Menu button .
- Use the scroll switch to select 'Setting'.
- Press OK
- Use the scroll switch to select 'Dial Prefix'
- Press OK
- Enter prefix using the numerical keypad. Wrong entered numbers can be erased with the erase button ∅.
- Press OK to confirm
- Press the Escape button twice to leave the menu.
4.4. Setting the Display contrast
To change the display contrast
- Press the Menu button .
- Use the scroll switch to select the 'Setting'.
- Press OK
- Use the scroll switch to select 'Contrast'
- Press OK
- Use the scroll switch to select the desired display contrast
- Press OK to confirm
- Press the Escape button twice to leave the menu.
4.5. Telephone reset
If you want to bring the telephone back in its initial status, it is possible to reset the telephone. When you reset your telephone, all stored information will be lost.
- Press the Menu button . '≡
- Use the scroll switch to select the 'Setting'.
- Press OK
- Use the scroll switch to select 'Reset V...'
- Press OK, 'Confirm?' is displayed
- Press OK to confirm
- Press the Escape button twice to leave the menu.
6 Topcom Fidelity SMS
5 M AKING A PHONE CALL
There are 2 ways to make a phone call :
-
Enter the telephone number. If needed, you can erase the last digits by pressing the Erase button. Pick up the handset or press the Handsfree button After 3 seconds, the phone number will be dialled automatically.
-
Pick up the receiver or press the Handsfree button. Enter the telephone number.
Note: The call duration timer is shown on the 3rd line of the display [h:mm:ss].
5.1 Last number redial
The Fidelity SMS saves the 5 last dialled telephone numbers in the memory with indication of the call duration, the date and the time. Press the Redial button to scroll through the Redial memory. When the desired number appears on the display, there are two ways to call back:
-
Press the Handsfree button. The desired number will be dialled automatically in handsfree.
-
Pick up the receiver. The number will be dialled automatically after 3 seconds.
Note: The Redial button can also be used as a Pause button while entering a telephone number! The letter 'P' appears on the display on the location where you have added a pause of 3 sec.
5.2 Deactivating the microphone (mute)
It is possible to deactivate the microphone during a conversation by pressing the Erase/Mute button. You can now talk freely without the caller hearing you. The 'Mute' icon appears on the display when the microphone is deactivated. Press the Erase/Mute button again if you want to resume your conversation.
5.3 Ringer volume
When you receive a phone call, the unit will ring. The ring volume can be adjusted by means of the Ring Volume switch at the back of the phone (Hi-Lo-, Off-).
5.4 Flash Key
Press the Flash button (R) to use certain services as 'Call Waiting' (if this service is provided by your telephone company); or to transfer phone calls when you are using a telephone exchange (PABX).
6 CALLER ID
6.1 General information
When you have a subscription to the Caller ID service, the caller's phone number and name (when supported by the network) will appear on the display. If you saved the telephone number with the name in the Phone Book or in the direct memory, the programmed name will be shown on the display (name tagging function).
During an incoming call, the following information can appear on the display:
NUMBER UNKNOWN
You have a subscription to the Caller ID service but the caller's number is not available (for ex. international calls).
NUMBER BLOCKED
You have a subscription to the Caller ID service but the caller's number is a private number.
6.2 Call list
The Fidelity SMS has a Call List where 40 incoming telephone numbers with name can be stored. The phone numbers you have received more than once, will not be stored, but the repeat indicator will be displayed. Every incoming number is saved in the Call List with indication of date and time.
In standby mode the number of new received calls is shown on the display. The new message LED will blink until you have checked all New messages.


6.2.1 Scrolling through the Call List
You can scroll through the Call list by means of the Scroll switch (To leave the Call list press the Escape button.
Repeated messages are indicated with 📄
New messages are indicated with
6.2.2 Erasing numbers from the Call List
a) Erasing one number
- Select the call you wish to erase by means of the Scroll switch.
- Press the Erase button once. "CLEAR?" appears on the display.
- Press the OK-button to confirm or use the Scroll switch to scroll through the rest of the Call List.
b) Erasing the entire Call List
- Enter the Call List, press the Erase button, "OLEAR?" appears on the display.
- Select "CLEAR ALL" by means of the Scroll switch.
- Press OK to confirm.
6.2.3 Calling a number from the Call List
- Select the desired telephone number with the Scroll switch. (
• Press the handsfree button and the number will be dialled automatically in handsfree mode. Pick up the handset
if you want to communicate over the handset.
6.3 Voice mail
When you have received a voice mail message in your Personal Voice Mail Box, the Voice Mail symbol appears on the display. As soon as you have listened to the messages in the mailbox, the symbol disappears.
7 PHONE BOOK
You can store up to 99 names (max. 15 characters) and numbers (max. 20 digits) in the Phone Book of the Fidelity SMS.
7.1. Use of the alphanumerical keypad
Use the alphanumerical keypad to enter text. To select a letter, press the corresponding button. For ex. if you press numerical button '5', the first character (J) will be shown on the display. Press multiple times if you want to select another character under this button.
Press button '2' twice to select the letter 'B'. If you want to select 'A' as well as 'B', press button '2' once to select 'A', wait for 2 seconds until the cursor has moved to the next location and press then button '2' twice to select 'B'. Wrongly entered characters can be erased by pressing the Erase button. You can move the cursor by using the Scroll switch. The character in front of the cursor will be erased.
7.2 Adding a number to the Phone Book
- Press the Menu button.
- Use the scroll switch to select 'Add Entry'.
- Press OK.
- Enter the desired telephone number and press OK.
- Enter the name by means of the alphanumerical keypad and press OK to confirm.
- Use the scroll switch to select 'Save Phonebook?'.
- Press OK to confirm and wait until the number is stored.
7.3 Saving a number from the Call list in the Phone Book
- Select the desired call from the Call list with the Scroll switch. (
- Press OK.
- Use the scroll switch to select 'Save Number?' and press OK.
- Modify the number if necessary or press the OK to confirm. The name is shown on the display (if sent by the Caller-ID).
- Enter the name by means of the alphanumerical keypad and press OK to confirm.
- Use the scroll switch to select 'Save Phonebook?'.
- Press OK to confirm and wait until the number is stored.
8 Topcom Fidelity SMS
7.4 Selecting and calling a number from the Phone Book by name
- Press the Phone Book button
- Enter one or more characters of the desired name by means of the alphanumerical keypad.
- Search for the name in the Phone Book by using the Scroll switch (. The first name that begins with this character, appears on the display. When there is no name with this character available, the next name of the alphabetical list will be shown on the display.

- Use the Scroll switch to search for a name.
- When the desired name is shown on the display, pick up the handset or Press the handsfree button. The number will be dialled automatically.
7.5 Changing a number and name from the Phone Book
- Select the desired number from the Phone Book by name as mentioned in 7.4.
- Press OK
- Use the scroll switch to select 'Edit?'.
- Press OK to confirm.
- Edit the telephone number when necessary.
- Press OK to confirm
- Use the scroll switch to select 'Save Phonebook?'.
- Press OK to confirm and wait until the number is stored.
7.6 Erasing a number and name from the Phone Book
- Select the desired number from the Phone Book by name as mentioned in 7.4.
- Press OK
- Use the scroll switch to select 'Clear?'.
- Press OK to confirm.
• Wait until the number is removed out of the Phone Book.
8 M EMORY NUMBERS
You can program 4 Direct (M1-M3 and Voice Mail) (numbers: max 20digits, name: max. 15 characters). These memory numbers can be dialled: by pressing M1-M3 or VM (one button).
Under the Voice Mail button VM you can program the Voice Mail number. If you press this button, the unit goes to handsfree mode and the Voice Mail number will be dialled automatically.
8.1 Adding a number to a Direct Memory
- Press the Menu button .
- Use the scroll switch to select 'Add Entry'.
- Press OK.
- Enter the desired telephone number and press OK.
- Enter the name by means of the alphanumerical keypad and press OK to confirm.
- Use the scroll switch to select 'Save M1,M2...?'.
- Press OK to confirm
- Press the desired Direct Memory key (M1, M2, M3 or VM), 'Saved' appears on the display.
8.2 Saving a number from the Call list to a Direct Memory
- Select the desired call from the Call list with the Scroll switch. (
- Press OK.
- Use the scroll switch to select 'Save Number?'.
- Press OK to confirm
- Modify the number if necessary or press the OK to confirm. The name is shown on the display (if sent by the Caller-ID).
- Enter or edit the name by means of the alphanumeric keypad and press OK to confirm.
- Use the scroll switch to select 'Save M1,M2...?'.
- Press OK to confirm.
- Press the desired Direct Memory key (M1, M2, M3 or VM), 'Saved' appears on the display.


8.3 Calling a number a Direct Memory number
- Press the desired Direct Memory key, the stored number is displayed.
In case you select the VM number, the number is dialled out automatically in handsfree. - For the other Direct Memories, press handsfree or pick up the handset.
8.4 Changing a number and name of a Direct Memory
The VM Direct Memory cannot be changed or erased only overwritten.
- Press the desired Direct Memory key, the stored number is displayed.
- Press OK to confirm
- Use the scroll switch to select 'Edit?'.
- Press OK to confirm.
- Edit the telephone number when necessary.
- Press OK to confirm
- Use the scroll switch to select 'Save M1,M2...?'.
- Press OK to confirm.
- Press the desired Direct Memory key (M1, M2, M3 or VM), 'Saved' appears on the display.
8.5 Erasing a number and name from the Direct Memory
- Press the desired Direct Memory key, the stored number is displayed.
- Press OK to confirm
- Use the scroll switch to select 'Clear?'.
- Press OK to confirm.
9. SMS (SHORT MESSAGES SERVICE)
To use SMS, this service has to be activated on your phone line. Normally you need to call a special number to get a subscription from your telephone company to activate this function. Please contact your telephone company for this service. The phone can send and receive SMS messages (maximum 160 characters). Minimum 10 messages will be stored in the In- and Outbox.
9.1 Protocol selection
The Fidelity SMS support 2 SMS protocols (protocol 1 = default) In the enclosed annex, a list of operators/country indicates which protocol is supported. In case your telephone operator is not shown, contact them to know the supported protocol.
To set a protocol:
- Remove a batterie
- Press and hold 1 to select Protocol 1 or
- Press and hold 2 to select Protocol 2
- Release the button as soon as the protocol number is shown in the display.
Follow the instruction related to the selected protocol.
9.2 Protocol 1
9.2.1 SMS Settings
Before using the SMS function, you have to change the next settings:
- Nr. SMS Out : Contains the telephone number of the SMS center. This number is needed to send SMS messages towards the server.
- Nr. SMS In: When the SMS center sends you a new message, this telephone number is send together with the message. With this information, the telephone knows that it is an incoming SMS.
- Terminal Number : If more SMS devices are on the same telephone line, you can give each device another terminal number (0-9), so that SMS messages can be send to each device separately. In case the network does not allow to use an additional Terminal Number, select '-' by pressing the delete key ∅
- Delivery Mode : Depending on the networkoperator an additional digit must be sent after the Nr. SMS out and the Terminal Number. In case the network does not support the additional Delivery mode, select '-' by pressing the delete key ∅
The settings are different per country and operator. Please check the extra sheet added in this manual for different countries (ADDENDUM) or contact your local networkoperator.
10 Topcom Fidelity SMS


a. Setting the Service Center number for outgoing SMS.
- Press the Menu button.
- Use the scroll switch to select the 'Setting'.
- Press OK
- Use the scroll switch to select 'Nr. SMS Out'
- Press OK
- Enter the SC number received from the telephone operator
Wrong entered digits can be erased by pressing the delete key - Press OK to confirm
- Press the Escape button twice to leave the menu.
b. Setting the Service Center number for incoming SMS.
- Press the Menu button . '≡
- Use the scroll switch to select the 'Setting'.
- Press OK
- Use the scroll switch to select 'Nr. SMS In'
- Press OK
- Enter the SC number received from the telephone operator
Wrong entered digits can be erased by pressing the delete key
- Press OK to confirm
- Press the Escape button twice to leave the menu.
c. Setting the Terminal Number for Incomming SMS.
- Press the Menu button .
- Use the scroll switch to select the 'Setting'.
- Press OK
- Use the scroll switch to select 'Terminal Number'
- Press OK
- Use the scroll switch ( to select the desired Terminal number or enter the number with the Keypad. (Select '-' by pressing the delete key when the terminal number is not supported by your network operator)
- Press OK to confirm
- Press the Escape button twice to leave the menu.
d. Setting the Deliver Mode Identifier for Outgoing SMS.
- Press the Menu button.
- Use the scroll switch to select the 'Setting'.
- Press OK
- Use the scroll switch to select 'DMI setting'
- Press OK
- Use the scroll switch (to select the desired Terminal number or enter the number with the Keypad. (Select '-' by pressing the delete key when the Delivery Mode Identifier is not supported by your network operator)
- Press OK to confirm
- Press the Escape button twice to leave the menu.
9.2.2 Sending Short Messages
- Press the SMS button
- Use the scroll switch to select 'Write Message'.
- Press OK
- Enter the Short Message by using the Alphanumerical keypad (see 7.1)
- Press OK
- Use the scroll switch to select the 'Send SMS?'.
- Press OK
- Enter the desired telephone number.
In case you want to reach a specific Terminal Number, you have to add the Terminal number of the receiver after the telephone number (Telephonenumber + Terminal number).
- Press OK, the display shows 'Send?'
- Press OK to confirm. Wait until the display indicates that the message has been sended.
You can leave the menu at any time by pressing the Escape button ☐
Topcom Fidelity SMS 11
9.2.3 Re-sending Short Messages (outbox)
Sent messages are stored in the 'Outbox'. Also when the telephone indicated 'Error' during sending the message can be found, edited and send again out of the Outbox.
a. Selecting a sent message
- Press the SMS button
- Use the scroll switch to select 'Outbox'.
- Press OK, The last message is displayed.
- Use the scroll switch to select the desired SMS.
- Press OK, The message is displayed.
- Use the scroll switch to scroll through the complete message.
- Press OK if you want to Edit and resent, to forward or to erase the message.
b. Editing and resending a sent message
After selecting the message (9.2.3. a):
- Use the scroll switch to select 'Edit'.
- Press OK
- Edit the Short Message by using the Alphanumerical keypad (see 7.1)
- Press OK
- Use the scroll switch to select the 'Send SMS?'.
- Press OK
- Enter the desired telephone number + terminal number (if allowed)
- Press OK, the display shows 'Send?'
- Press OK to confirm. Wait until the display indicates that the message has been sent.
c. Forward a sent message
You have the possibility to sent the same message to other users.
After selecting the message (9.2.3. a):
- Use the scroll switch to select 'Forward'.
- Press OK
- Use the scroll switch to select the 'Send SMS?'.
- Press OK
- Enter the desired telephone number + terminal number (if allowed)
- Press OK, the display shows 'Send?'
- Press OK to confirm. Wait until the display indicates that the message has been sent.
d. Erasing sent message out of the Outbox
After selecting the message (9.2.3. a):
- Use the scroll switch to select 'Clear?'.
- Press OK
- Wait until the display indicates that the message has been deleted. The next message is displayed.
9.2.4 New Incomming Messages (Inbox)
When you receive a new message the display shows 'Receiving...'. The New Message indicator will blink once the message is stored. The number of New messages is displayed.
All incoming messages are stored in the 'Inbox'.
Stored messages can be replied, forwarded or you can select to dial the number of the sender.
a. Selecting a received message
- Press the SMS button
- Use the scroll switch to select 'Inbox'.
- Press OK, The newest message is displayed.
- Use the scroll switch to select the desired SMS.
- Press OK, The complete message is displayed.
- Use the scroll switch to scroll through the complete message.
- Press OK if you want to reply, to forward or to dial the telephone number of the sender.
b. Replying a received message
After selecting the message (9.2.4. a):
- Use the scroll switch to select 'Reply?'.
- Press OK
- Enter a new Short Message by using the Alphanumerical keypad (see 7.1)
- Press OK
12 Topcom Fidelity SMS

- Use the scroll switch to select the 'Send SMS?'.
- Press OK
- Edit, if necessary, the desired telephone number + terminal number (if allowed)
- Press OK, the display shows 'Send?'
- Press OK to confirm. Wait until the display indicates that the message has been sent.
c. Forward a received message
You have the possibility to forward the received message to other users.
After selecting the message (9.2.4. a):
- Use the scroll switch to select 'Forward'.
- Press OK
- Edit the Short Message by using the Alphanumerical keypad (see 7.1)
- Press OK
- Use the scroll switch to select the 'Send SMS?'.
- Press OK
- Edit the telephone number + terminal number (if allowed)
- Press OK, the display shows 'Send?'
- Press OK to confirm. Wait until the display indicates that the message has been sent.
d. Calling the telephone number of the received message
You have the possibility to call the sender.
After selecting the message (9.2.4. a):
- Use the scroll switch to select 'Return Call'.
- Press OK
• The telephone number will be dialed automatically in handsfree.
e. Storing the telephone number of the received message.
You have the possibility to store telephone number of the sender in the phonebook.
After selecting the message (9.2.4. a):
- Use the scroll switch to select 'Save number?'
- Modify the number if necessary or press the OK to confirm. The name is shown on the display (if sent by the Caller-ID).
- Enter the name by means of the alphanumerical keypad and press OK to confirm.
- Use the scroll switch to select 'Save Phonebook?'
- Press OK to confirm and wait until the number is stored.
f. Erasing received message out of the Outbox
After selecting the message (9.2.4. a):
- Use the scroll switch to select 'Clear?'.
- Press OK
- Wait until the display indicates that the message has been deleted. The next message is displayed.
9.3 Protocol 2
9.3.1 SMS Settings
Before using the SMS function, you have to change the next settings:
- Nr. SMS Out: Contains the telephone number of the SMS center. This number is needed to send SMS messages towards the server.
- Nr. SMS In: When the SMS center sends you a new message, its telephone number is send together with the message. With this information, the telephone knows that it is an incoming SMS.
- Terminal Number : If more SMS devices are on the same telephone line, you can give each device another terminal number (1-9), so that SMS messages can be send to each device separately. (Default '1')
- Password protected mailboxes: Sent or received messages will be stored in a public or in a personal mailbox. The Fidelity SMS supports 3 personal mailboxes which are password protected. To reach a personal mailbox, the sender has to add a Public Key (5 characters) to its message. In case that no public key have been added, all messages will be stored in the public mailbox.
The settings are different per country and operator. Please check the extra sheet added in this manual for different countries (ADDENDUM) or contact your local networkoperator.
a. Setting the Service Center number for outgoing SMS.
- Press the Menu button .
- Use the scroll switch to select the 'Setting'.
Topcom Fidelity SMS 13


- Press OK
- Use the scroll switch to select 'Nr. SMS Out'
- Press OK
- Enter the SC number received from the telephone operator
- Press OK to confirm
- Press the Escape button twice to leave the menu.
b. Setting the Service Center number for incoming SMS.
- Press the Menu button .
- Use the scroll switch to select the 'Setting'.
- Press OK
- Use the scroll switch to select 'Nr. SMS In'
- Press OK
- Enter the SC number received from the telephone operator
- Press OK to confirm
- Press the Escape button twice to leave the menu.
c. Setting the Terminal Number for Incomming SMS.
- Press the Menu button . '≡
- Use the scroll switch to select the 'Setting'.
- Press OK
- Use the scroll switch to select 'Terminal Number'
- Press OK
- Enter the desired Terminal Number (1-9)
- Press OK to confirm
- Press the Escape button twice to leave the menu.
d. Dedicating a password to a personal mailbox and setting the Public Key
- Press the Menu button
- Use the scroll switch to select the 'Setting'.
- Press OK
- Use the scroll switch to select 'Password'
- Press OK
- Use the scroll switch to select the Personal Mailbox (1-3)
- Enter the old Password (default = 0000)
- Enter the new Password
- Press OK to confirm
- Enter the Public key using the alphanumeric keypad.
- Press OK to confirm
- Press the Escape button twice to leave the menu.
9.3.2 Sending SMS Messages
- Press the SMS button
- Select the mailbox using the Scroll switch.
- Press OK
- Enter the password when you have selected a personal mailbox (see 9.3.1.d)
The Public mailbox is not password protected.
- Use the scroll switch to select 'Write Message'.
- Press OK
- Enter the Short Message by using the Alphanumerical keypad (see 7.1)
- Press OK
a. Sending an SMS message
- Use the scroll switch to select 'Send SMS?'.
- Press OK
- Enter the telephone number
- Press OK
• To sent a message to a Password 'Public Key' protected mailbox, enter the Public Key (5 alphanumeric
characters) and press OK to confirm
The received can only read the message after entering the identical code.
• To sent a message without Public Key, press OK without entering any digit.
- Enter the receivers Terminal Number (1-9)
- Press OK, the display indicates 'Notify (Y/N)'
14 Topcom Fidelity SMS


- Select 'Yes' (in case you want to be informed by the SMS center of the correct reception of the message) or 'No' by using the scroll switch (
- Press OK, the display shows 'Send?'
- Press OK to confirm. Wait until the display indicates that the message has been sent.
You can leave the menu at any time by pressing the Escape button ☐
b. Sending a Fax message
After entering the message,
- Use the scroll switch to select 'Send Fax?'.
- Press OK
- Enter the Fax number.
- Press OK
- Enter the Fax Heading by using the alphanumeric keyboard (see 7.1)
- Press OK
- Press OK, the display shows 'Send?'
- Press OK to confirm. Wait until the display indicates that the message has been sent.
You can leave the menu at any time by pressing the Escape button ☐
c. Sending an email message
After entering the message,
- Use the scroll switch to select 'Send Email?'.
- Press OK
- Enter the email address
- Press OK, the display shows 'Send?'
- Press OK to confirm. Wait until the display indicates that the message has been sent.
You can leave the menu at any time by pressing the Escape button ☐
d. Saving a written message
After entering the message,
- Use the scroll switch to select 'Save text?'.
- Press OK to confirm. Wait until the display indicates that the message has been saved.
The message have been saved in the outbox.
You can leave the menu at any time by pressing the Escape button ☐
9.3.3 Re-sending Short Messages (outbox)
Sent messages are stored in the 'Outbox'. Also when the telephone indicated 'Error' during sending the message can be found, edited and send again out of the Outbox.
a. Selecting a sent message
- Press the SMS button
- Select the mailbox using the Scroll switch.
- Press OK
- Enter the password when you have selected a personal mailbox (see 9.3.1.d)
The Public mailbox is not password protected.
- Use the scroll switch to select 'Outbox'
- Press OK, The last message is displayed.
- Use the scroll switch to select the desired SMS.
- Press OK, The complete message is displayed.
- Use the scroll switch to scroll through the complete message.
- Press OK if you want to Edit and resent, to forward or to erase the message.
b. Editing and resending a sent message
After selecting the message:
- Use the scroll switch to select 'Edit'.
The message is displayed. You can now edit the old message by using the alphanumeric keyboard (see 7.1)
Follow the same instruction as mentioned in '9.3.2 Sending a message' for sending the edited message as SMS, fax or email.
c. Forward a sent message
You have the possibility to sent the same message to other users.
After selecting the message:
- Use the scroll switch to select 'Forward'.
Topcom Fidelity SMS 15


Follow the same instruction as mentioned in '9.3.2 Sending a message' for forwarding the same message as SMS, fax or email.
d. Erasing a sent message out of the Outbox
After selecting the message:
- Use the scroll switch to select 'Clear?'.
- Press OK
- Wait until the display indicates that the message has been deleted.
e. Saving the telephonenumber to your phonebook.
After selecting the message:
- Use the scroll switch to select 'Save Phonebook'.
- Press OK
Wait until the display indicates that the message has been deleted.
9.3.4 New Incomming Messages (Inbox)
When you receive a new message the display shows 'Receiving...'. The New Message indicator will blink once the message is stored. The number of New messages is displayed MSGS.
All incoming messages are stored in the 'Inbox'.
Stored messages can be replied, forwarded or you can select to dial the telephonenumber of the sender.
a. Selecting a received message
- Press the SMS button
- Select the mailbox using the Scroll switch.
- Press OK
- Enter the password when you have selected a personal mailbox (see 9.3.1.d)
The Public mailbox is not password protected.
- Use the scroll switch to select 'Inbox'.
- Press OK. The newest message is displayed.
- Use the scroll switch to select the desired SMS.
- Press OK, The complete message is displayed.
- Use the scroll switch to scroll through the complete message.
- Press OK if you want to reply, to forward or to dial the telephone number of the sender.
b. Replying a received message
You have the possibility to sent the same message to other users.
After selecting the received message:
- Use the scroll switch to select 'Reply?'.
- Follow the same instruction as mentioned in '9.3.2 Sending a message' for sending a reply on the received message.
c. Forward a received message
You have the possibility to forward the received message to other users.
After selecting the received message:
- Use the scroll switch to select 'Forward'.
- Follow the same instruction as mentioned in '9.3.2 Sending a message' for forwarding the same message as SMS, fax or email.
d. Making a phone call to the sender of the received message
You have the possibility to call the sender.
After selecting the received message:
- Use the scroll switch to select 'Return Call'.
- Press OK
• The telephone number will be dialed automatically in handsfree.
e. Erasing sended message out of the Outbox
After selecting the received message:
- Use the scroll switch to select 'Clear?'
- Press OK
- Wait until the display indicates that the message has been deleted. The next message is displayed.
16 Topcom Fidelity SMS
f. Saving the telephonenumber to your phonebook.
After selecting the message:
- Use the scroll switch to select 'Save Phonebook'.
- Press OK
Wait until the display indicates that the message has been saved.
10 SAFETY INSTRUCTIONS
Do not place the basic unit in a damp room or at a distance of less than 1.5 m away from a water source. Keep water away from the telephone.
Do not use the telephone in environments where there is a risk of explosions.
Dispose of the batteries and maintain the telephone in an environment-friendly manner.
11 CLEANING
Clean the telephone with a slightly damp cloth or with an anti-static cloth. Never use cleaning agents or abrasive solvents.
12 WARRANTY
- This equipment comes with a 24-month warranty. The warranty will be honoured on presentation of the original bill or receipt, provided the date of purchase and the unit type are indicated.
- During the time of the warranty Topcom will repair free of charge any defects caused by material or manufacturing faults. Topcom will at its own discretion fulfil its warranty obligations by either repairing or exchanging the faulty equipment.
• Any warranty claims will be invalidated as a result of intervention by the buyer or unqualified third parties. - Damage caused by inexpert treatment or operation, and damage resulting from the use of non-original parts or accessories not recommended by Topcom is not covered by the warranty.
- The warranty does not cover damage caused by outside factors, such as lightning, water and fire, nor does it apply if the unit numbers on the equipment have been changed, removed or rendered illegible.
Note: Please do not forget to enclose your receipt if you return the equipment.
13 TECHNICAL DATA
Dialling options: DTMF (tone)
Batteries: 4 x 1.2V, AA
non-rechargeable
Ambient temperature: +5 °C to +45 °C
Permitted relative air humidity: 25 to 85 %
Power supply base adapter: 9 VDC 100 mA
+
The CE symbol indicates that the unit complies with the essential requirements of the R&TTE directive.
1 INSTALLATIE 19
2 TOETSEN/LED 19
3 DISPLAY/LED 19
natural_image
Pure geometric diagram with crosshair and circular pattern (no text or symbols)1 INSTALACIÓN
natural_image
Pure geometric diagram with crosshair and circular pattern (no text or symbols)1 INSTALLAZIONE
2 NYOMÓGOMBOK/LED 113
3 KIJELZö/LED 113
natural_image
Pure geometric diagram with crosshair and circular pattern (no text or symbols)1 ÜZEMBEHELYEZÉS
This product is in compliance with the essential requirements and other relevant provisions of the R&TTE directive 1999/5/EC. The Declaration of conformity can be found on :
http://www.topcom.net/support/declarations/
U8006069