Balance - Phone TOPCOM - Free user manual and instructions
Find the device manual for free Balance TOPCOM in PDF.

User questions about Balance TOPCOM
0 question about this device. Answer the ones you know or ask your own.
Ask a new question about this device
Download the instructions for your Phone in PDF format for free! Find your manual Balance - TOPCOM and take your electronic device back in hand. On this page are published all the documents necessary for the use of your device. Balance by TOPCOM.
USER MANUAL Balance TOPCOM
To use 'Caller ID' (display caller), this service has to be activated on your phone line. Normally you need a separate subscription from your telephone company to activate this function. If you don't have the Caller ID function on your phone line, the incoming telephone numbers will NOT be shown on the display of your telephone.
Belangrijk
text_image
Diagram of a mobile phone with numbered labels pointing to key keys and buttons- 2C Handset -
text_image
TOPCOM 13- 2D Base -
UK The features described in this manual are published with reservation to modifications.
NI. De in deze handleiding besehreven mogelijkheden worden gepublieceerd onder voorbehoud van wijzigingen.
F Les possibilités décrites dans ce manuel sont publiées sous réserve de modifications.
D Die in dieser Bedienungsanleitung umschriebenen Möglichkeiten, werden vorbehaltlich Änderungen puhliziert.
ES Las características descritas en este manual pueden ser objeto de futuras modificaciones.
PT As características descritas neste manual são publicadas sob reserva de modificação.
GR θι λειτουργίες που περιγράφονται στο παρόν εγχειρίδιο, δημοσιεύονται με επιρόλαξη τοχόν τροποπούησεων.
PL Właściwości opisane w niniejszej instrukcji obsługi są publikowane z zatrzeżeniem prawa wprowadzenia zmian.
UK To be connected to the public analogue telephone network.
NL Geschikt voor aansluiting op het openbare analoog geschakelde telefoonnetwerk.
F Il est destiné à être raccordé au réseau de télécommunication public.
D Kompatibel für den analogen Telefonanschluss.
ES Conexión a la red telefónica analógica
PT Para efectuar a ligação com a rede pública analógica.
GR Πρέπει να συνδεθεί σε ένα δημόσιο αναλογικό τηλεφωνικό δίκτυο.
PL. Do podłączenia do publicznej analogowej sieci telefonicznej.
UK The CE symbol indicates that the unit complies with the essential requirements of the R&TTE directive.
NL. Het toestel voldoet aan de basiseisen van de R&TTE-richtlijn. Dit wordt bevestigd door de CE-markering.
F La conformité de l'apparcil avec les exigences fondamentales de la directive européenne R&TTE relative aux terminaux, est confirmée par le label CE.
D Die Übereinstimmung des Gerätes mit den grundlegenden Anforderungen der R&TTE-Directive ist durch das CE-Kennzeichen bestätigt.
ES El sello CE corrobora la conformidad del equipo con los requerimientos básicos de la directiva R&TTE.
PT O símbolo CE indica que esta unidade cumpre com os requisitos essenciais da directiva R&TTE.
GR To σύμβολο CE δείχνει ότι η μονάδα συμμορφώνεται με τις βασικές υπατήσειζης οδηγίας R&TTE.
PL Symbol CE oznacza. że urządzenie spełnia istotne wymogi dyrektywy R&TTE.
UK Hereby, TOPCOM EUROPE N.V., declares that this device is in compliance with the essential requirements and other relevant provisions of Directive 1999/5/EC. The Declaration of conformity can be found on:
NL Hierbij verklaart TOPCOM EUROPE N.V. dat het toestel in overeenstemming is met de essentiële eisen en de andere relevante bepalingen van richtlijn 1999/5/EG. De conformiteitsverklaring kan gevonden worden op:
FR Par la présente TOPCOM EUROPE N.V. déclare que l'appareil est conforme aux exigences essentielles et aux autres dispositions pertinentes de la directive 1999/5/CE. La déclaration de conformité peut être consultée sur :
DE Hiermit erklärt TOPCOM EUROPE N.V., dass sich das Gerät in Übereinstimmung mit den grundlegenden Anforderungen und den übrigen einschlägigen Bestimmungen der Richtlinie 1999/5/EG befindet. Die Konformitätserklärung finden Sie an der folgenden Stelle:
ES Por medio de la presente TOPCOM EUROPE N.V. declara que el dispositivo cumple con los requisitos esenciales y cualesquiera otras disposiciones aplicables o exigibles de la Directiva 1999/5/CE. Puede encontrarse la Declaración de conformidad en:
PT TOPCOM EUROPE N.V. declara que este equipamento está conforme com os requisitos essenciais e outras disposições da Directiva 1999/5/CE. A Declaração de Conformidade pode ser encontrada em:
GR Με την π αρουσα topcom europe n.v. δηλωνει στι συσκεύΗσ συμμορφωνεται π ροσ τισ ουσιώδεισ απ αιτησεισ και τισ λοιπ εσ σΧετικεσ διαταξεισ τησ οδηγιασ 1999/5/εκ. Τη Δήλωση συμμόρφωσης μπορείτε να βρείτε εδώ:
PL Niniejszym TOPCOM EUROPE N.V. oswiadcza, ze wyrobu jest zgodny z zasadniczymi wymogami oraz pozostałymi stosownymi postanowieniami Dyrektywy 1999/5/EC. Deklarację zgodności można znaleźć w:
http://www.topcom.net/cedeclarations.asp

UK This product works with rechargeable batteries only. If you put non-rechargeable batteries in the handset and place it on the base, the handset will be damaged and this in NOT covered under the warranty conditions.
1 Safety instructions .... 15
2 Getting started 15
2.1 How to use this user guide.... 15
2.2 Installing the base 16
2.3 Installing the handset 16
2.4 Keys / LED's 17
2.5 Symbols 18
2.6 Navigating the menu.... 18
2.7 Menu overview 18
3 Using the telephone....19
3.1 Switching the handset on/off 19
3.2 Changing the menu language.... 19
3.3 Receiving a telephone call 19
3.4 Making an external telephone call.... 19
3.5 Making an internal telephone call.... 20
3.6 Internal call transfer.... 20
3.7 Conference call 20
3.8 Handsfree mode 20
3.9 Speaker volume during call 20
3.10 Display of call duration.... 21
3.11 Microphone mute 21
3.12 Pause key 21
3.13 Locating a handset (Paging function) 21
3.14 Redial memory 21
3.15 Using the alphanumerical keypad 21
4 Phonebook....22
4.1 To add an entry into the phonebook 22
4.2 To dial an entry from the phonebook.... 22
4.3 To modify a name and number 22
4.4 Delete an entry from the phonebook.... 23
5 Caller Identification....23
6 Personalize the handset 24
6.1 Adjusting the ring volume 24
6.2 Choosing the ring melody.... 25
6.3 Activation/deactivation of beeps 25
6.4 Handset name.... 25
6.5 Automatic answer 26
6.6 Reset the handset 26
6.7 Keypad lock 27
6.8 Setting the time 27
6.9 Setting the alarm 27
7 Base settings 27
7.1 Adjusting the ring volume 27
7.2 Choosing the ring melody.... 27
7.3 Changing the PIN code 28
7.4 Setting the dialing mode 28
7.5 Flash time duration 28
8 Managing multiple handsets....28
8.1 Adding a new handset.... 28
8.2 Removing a handset.... 29
8.3 Setting up a handset on another base 29
8.4 Selecting a base.... 30
9 SMS....30
9.1 How to write an SMS.... 30
9.2 Sending an SMS 30
9.3 Read and view the list of received messages (Inbox).... 31
9.4 Multiple users 31
9.5 SMS settings 32
10 Troubleshooting....34
11 Technical data Technical characteristics....34
12 Topcom Warranty 35
12.1 Warranty period 35
12.2 Warranty handling 35
12.3 Warranty exclusions 35
13 Disposal of the device (environment)....35
14 Cleaning....35
Nederlands
4 Agenda (Phonebook) 109
1 Safety instructions
- Only use the charger plug supplied. Do not use other chargers as this may damage the battery cells.
- Only insert rechargeable batteries of the same type. Never use ordinary, non-rechargeable batteries. Insert rechargeable batteries so they connect to the right poles (indicated in the battery compartment of the handset).
- Do not touch the charger and plug contacts with sharp or metal objects.
• The operations of some medical devices may be affected.
- The handset may cause an unpleasant buzzing sound in hearing aids.
- Do not place the basic unit in a damp room or at a distance of less then 1.5 ~m away from a water source. Keep water away from the handset.
- Do not use the telephone in environments where there is a risk of explosions.
- Dispose of the batteries and maintain the telephone in an environment-friendly manner.
- As this telephone cannot be used in case of a power cut, you should use a mains-independent telephone for emergency calls, e.g. a mobile phone.
2 Getting started
2.1 How to use this user guide
In this user guide, following method is used to clarify the instructions:

Text..... "DISPLAY".
Text that appears on the display of the phone is shown in the right column between quotation marks.
Key to press.
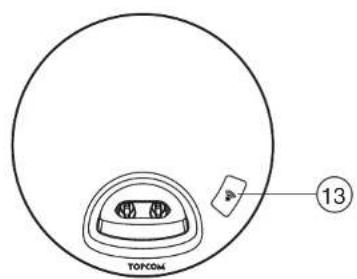
2.2 Installing the base
1Plug one end of the adaptor into the outlet and the other end into the adaptor jack on the bottom of the base.
2Connect one end of the telephone cord with the wall phone jack and the other end to the bottom of the base.
3Put the telephone- and AC power line cord in the base guides as shown on picture 2A.
flowchart
graph TD
    A["Component A"] -->|C| B["Power Plug"]
    B -->|B| C["Output"]
    C -->|C| D["External Circuit"]
    D -->|A| E["External Circuit"]
    style A fill:#f9f,stroke:#333
    style B fill:#ccf,stroke:#333
    style C fill:#cfc,stroke:#333
- 2A Back view of base -
A. Telephone wall outlet
B. Power cable
C. Telephone cord
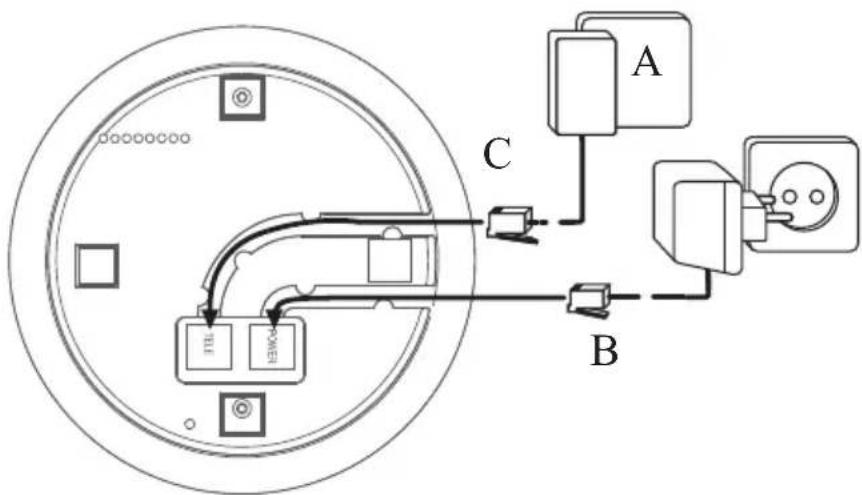
2.3 Installing the handset
1Open the battery compartment as shown on picture 2B.
2Insert the batteries respecting the polarity (+ and -).
3Close the battery compartment.
4Leave the handset on the base unit for 20 hours.
text_image
A B- 2B Back view of handset -
A. Cover
B. Rechargeable batteries

Before you use the telephone for the first time, you must first make sure the battery is charged for 20 hours. If you do not do this, the telephone will not work optimally.
2.4 Keys / LED's
Handset
- Display
- Redial / pause / up key
- Menu / OK key
- Call log / down key
- Phonebook key
- Alphanumeric keys
- INT key
- On / off / flash key
- Keypad lock
- Handsfree key
- On-hook / off-hook key
- Mute / delete / esc key
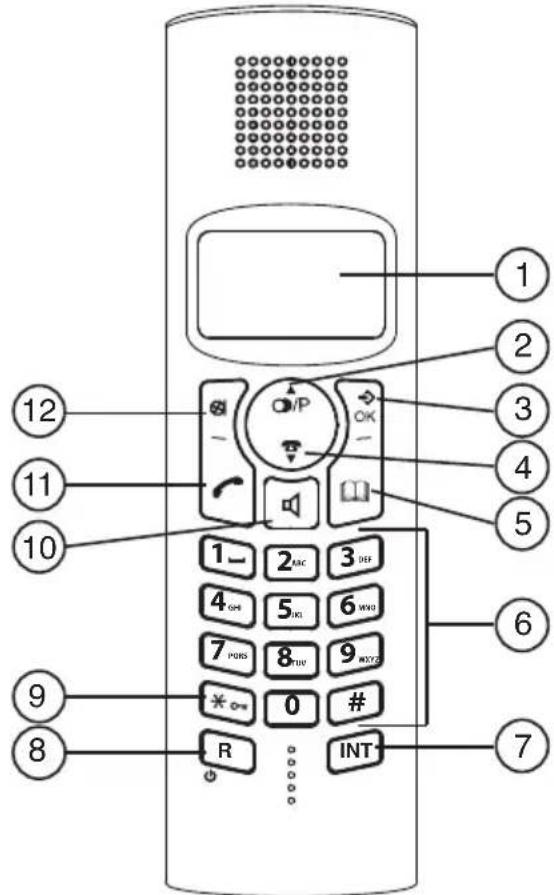
text_image
1 2 3 4 5 6 7 8 9 10 11 12 OP OK 1- 2KC 3HF 4GH 5KJ 6WKB 7PORS 8PHV 9MYXT *# 0 # R INT- 2C Handset -
Base
- Paging key
text_image
TOPCOM 13- 2D Base -
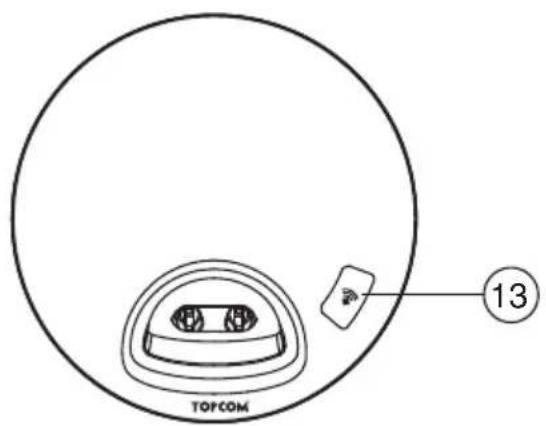
Display
In standby mode, the display shows the time and the handset number:
12-05 HS1
text_image
Toolbar icons including Y, down arrow, email, phone call, text, audio, navigation, and play button- 2E Display -
2.5 Symbols
| ext | Off hook; you are online Handset keypad locked |
| External call You are in the phonebook | |
| int | Internal call Battery low |
| New numbers in call list Battery medium | |
| Answered call Battery full | |
| Unanswered call Battery empty | |
| Your are in the menu New voice mail | |
| Handsfree Handset within base range | |
| Indicates that the displayed number is longer than the screen (12 digits) | |
| New SMS message |
The antenna flashes when the handset is not registered on the base
2.6 Navigating the menu
The Topcom Balance has a menu system which is easy to use. Each menu leads to a list of options. The menu map is shown on the following paragraph.
/OK


1 When the handset is switched on and in standby, press the menu key to open the main menu.
2Scroll to the desired menu option. The menu options scroll in a loop (you return to the first after the last).
3 Press the OK key to view further options or to confirm the setting displayed.
⊗
Press the delete key to return to the previous level in the menu.
2.7 Menu overview
| Menu Submenu items | |
| PHONEBOOK | ADD ENTRYMODIFY ENTRYDELETE ENTRY |
| SMS | INBOXPERSONAL SMSWRITEDELETE ALLSMS SETTINGS |
| SETUP | BASE VOLUMEBASE MELODYDEL HANDSETPIN CODEDIAL MODEDEFAULT |
| HANDSET | BEEPINT RING VOLEXT RING VOLINT MELODYEXT MELODYAUTO ANSWERNAMELANGUAGEKEYLOCK? |
| DATE - TIME | DATE SETCLOCK SETALARM SET |
| REGISTER | SELECT BASEREG BASE |
3 Using the telephone
3.1 Switching the handset on/off
[Non-Text]
1Press and hold the on/off key for 8 seconds on the handset. The handset will search the base.
[Non-Text]
2Press and hold the on/off key for 8 seconds. The display will go off.
3.2 Changing the menu language
/OK
1Enter the menu


3.3 Receiving a telephone call
To take the call:

1Press the off-hook key. OR Lift the handset off its base if you have activated “Automatic answer”. (See “6.5 Automatic answer”)
You are connected to your correspondent.
2Press the on-hook key to hang up or put the handset back on the base.
3.4 Making an external telephone call
Direct dialing

1Press the off-hook key to start the call.

2Dial the telephone number.

3Press the on-hook key to hang up or put the handset back on the base.

To correct a number use the delete key to delete an entered digit.
Pre-dialing

1Dial the telephone number.

2Press the off-hook key to start the call.

3Press the on-hook key to hang up or put the handset back on the base.
3.5 Making an internal telephone call
INT
1Press the internal call key.

2Enter the number of the internal handset (1 to 5).

3Press the on-hook key to hang up or put the handset back on the base.
3.6 Internal call transfer
Transfer an external call to an other handset.
INT
1Press the internal call key.

2Enter the number of the internal handset (1 to 5), the external caller is put on hold.

3 When the other handset picks up, press the on-hook key to hang up and transfer the call.
INT
If the internal correspondent does not pick-up, press the Internal call key again to reconnect to the external caller on line.

4Press the on-hook key to hang up or put the handset back on the base.
3.7 Conference call
Only possible when more then one handset are registered to the base!
You can converse simultaneously with an internal correspondent and an external correspondent.
During an external call:
INT
1Press the internal call key.

2Enter the number of the internal handset (1 to 5).
#
3When the other handset picks up, press and hold the ' key.
INT
If the internal correspondent does not pick-up, press the Internal call key again to reconnect to the external caller on line.

4Press the on-hook key to hang up or put the handset back on the base.
3.8 Handsfree mode
You can speak with your correspondent without picking up the handset.

1 Press the handsfree key during a call to activate or deactivate the handsfree mode.
3.9 Speaker volume during call

1 During a conversation, press the up or down key to change the volume accordingly.

The handsfree volume is also adjusted together with the receiver in the handset as above described.
3.10 Display of call duration
The call duration is displayed after 15 seconds, in minutes - seconds.
At the end of each call, the total call duration is displayed for 5 seconds.
3.11 Microphone mute
It is possible to mute the microphone during a conversation.
| ⊗| | 1Press the mute key. You can talk freely without being heard by the calling party.“MUTE” is displayed. |
| ⊗| | 2Press the mute key again to return to normal mode. |
3.12 Pause key
When dialing a number you can add a pause between two digits:
O/P
1Press the redial/pause key for 2 seconds.
3.13 Locating a handset (Paging function)
| • | 1Press the paging key on the base. |
| All handsets registered with the base will ring. | |
| 4+5+6+7 | 2Press any key on the handset to stop the ringing. |
3.14 Redial memory
You can redial up to 10 of the last numbers called. If you have stored a name in the phonebook to go with the number, the name will be displayed instead.
| ○/P | 1Press the redial key. |
| ▲▼ | 2Select a number. If the number is in the phonebook, the name will be shown. |
| ⇨/OK | When the name is displayed, you can toggle between the name and the number by pressing the OK key! |
| 3Press the off-hook key to start the call. | |
| 4Press the on-hook key to return to standby. |
3.15 Using the alphanumerical keypad
With your telephone, you can also enter alphanumeric characters. This is useful for entering a name into the phonebook, giving a name to the handset, ...
To select a letter, press the corresponding key as many times as necessary.
For example, to select an 'A', press '2' once. To select a 'B', press '2' twice and so on.
To select ‘A’ and then ‘B’ consecutively, press ‘2’ once, wait until the cursor moves on to the next character, then press ‘2’ twice.
| Press ‘1’ to select a space. | |
| Press the delete key to delete a character. |
The keypad characters are as follows:
| Key | First press | Second press | Third press | Fourth press | Fifth press | |
| 1 | s | p | a | c | e | - 1 |
| 2 | A | B | C | 2 | ||
| 3 | D | E | F | 3 | ||
| 4 | G | H | I | 4 | ||
| 5 | J | K | L | 5 | ||
| 6 | M | N | O | 6 | ||
| 7 | P | Q | R | S | ||
| 8 | T | U | V | 8 | ||
| 9 | W | X | Y | Z | ||
| 0 | 0 |
4 Phonebook
Each handset can store up to 50 telephone numbers and names. Names can be up to 12 characters long and numbers up to 20 digits.
To enter alphanumerical characters, refer to the section "3.15 Using the alphanumerical keypad".
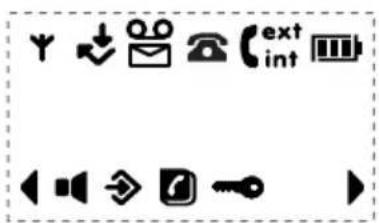
4.1 To add an entry into the phonebook
text_image
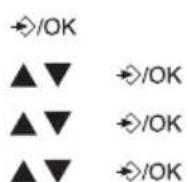
/OK ▲▼ ▲▼ 4+ 5- 6- →/OK →/OK →/OK →/OK 4+ 5- 6- →/OK ▲▼ →/OK1 Enter the menu.
2 Select "PHONEBOOK" and confirm.
3 Select "ADD ENTRY" and confirm.
4 Enter the name and confirm.
Press the phonebook key to exit the menu without taking any modifications into account.
5 Enter the number and confirm.
6 Select a ring melody (1-10) and confirm.
4.2 To dial an entry from the phonebook

1 Press the phonebook key.
2 Select a name or enter the first letter of the name. (The list scrolls in alphabetical order.)
Press the OK key if you first like to see the telephone number.
If the telephone number is longer then 12 digits, press the OK key again to see the complete number.
3 Press the off-hook key to start the call.
4 Press the on-hook key to hang up or put the handset back on the base.
4.3 To modify a name and number
1 Enter the menu.
2 Select "PHONEBOOK" and confirm.
3 Select "MODIFY ENTRY" and confirm.
4 Select the name to modify and confirm.
5Delete the unwanted characters and enter the new name. Confirm.
6Enter the new number and confirm.
7Select a ring melody (1-10) and confirm.
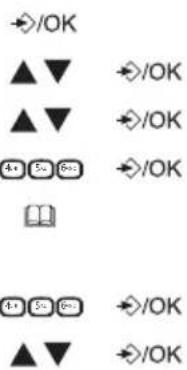
4.4 Delete an entry from the phonebook
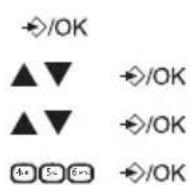
text_image
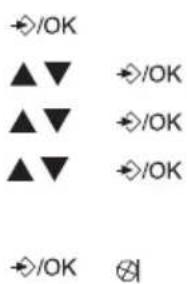
/OK ▲▼ +/OK ▲▼ +/OK ▲▼ +/OK +/OK ⊗1 Enter the menu 2 Select "PHONEBOOK" and confirm. 3 Select "DELETE ENTRY" and confirm. 4 Select a name or enter the first letter of the name and confirm. "CONFIRM" appears on the display. 5 Confirm or cancel.
5 Caller Identification

This service only works when you have a Caller ID/Clip subscription. Please contact your telephone company.
When you receive an external call, the telephone number of the caller appears on the handset display. The telephone can receive calls in both FSK and DTMF. You can also see his or her name if it is transmitted by the network. If the name is programmed in the phonebook, the name in the phonebook is displayed!
The caller identity is replaced by the call duration after 15 seconds in communication. It is still possible to display the caller's identity after this time by pressing the OK key repeatedly for the name and number.
The telephone can store 40 calls in a Call List (received and missed calls) that can be reviewed later. This function is only available if your are subscribed to the caller ID information. When the memory is full, the new calls automatically replace the oldest calls in the memory.

New or missed calls are signaled by a blinking icon on the display.
To consult the list of calls:
| 1Press the call log key. | |
| If there are no calls in the list “EMPTY” will appear. | |
| ▲▼ | 2Scroll through the calls. The callers names will be shown if the name is send by the network or is stored in the phonebook. If you are at the end of the list you will hear a beep tone. |
| When is shown, this call is been answered. When is shown, the call is unanswered | |
| →/OK | 3Press the OK key to see the telephone number. |
| →/OK | If the telephone number is longer then 12 digits, press the OK key again to see the complete number. |
| →/OK | 4Press the OK key again to see the time and date when the call is received. |

5Press the OK key to add this entry to the phonebook if it's not already stored: Press OK when "ADD" is shown on the display. Enter or modify the name and press OK. Enter or modify the telephonenumber and press OK. Select the melody (1-10) which will be heard when this number is calling by means of the up/down keys and press OK. The entry will be stored in the phonebook.

6Press the off-hook key to call back a correspondent, when their telephone number or name are displayed.
You can delete each entry separately:


1Scroll to the call you want to delete and delete.
"DELETE" appears on the screen.


2Confirm or cancel.
To delete all entries at ones:

1Press the delete key long (2 seconds).
"DELETE ALL" appears on the screen.


2Confirm or cancel.
6 Personalize the handset

Every programmation is confirmed at the end by a double or single long beep. A double beep confirms the validation of your choice. A long beep signifies that the modification has not been taken into account.
6.1 Adjusting the ring volume
Handset ring volume internal/external calls
The handset ring volume for internal or external calls can be set separately. You can choose from 5 handset ringer volume levels and "OFF".

When the handset is inside the base, the base will not ring during incoming call. So when the handset ring volume is turned off and handset is inside the base, your phone will not ring anymore!

1Enter the menu


2Select "HANDSET" and confirm.


3Select "INT RING VOL" to change the internal volume or "EXT RING VOL" to change the external volume and confirm.

4Select a volume (1 to 5 or "OFF").


5Confirm or return to the previous menu.
6.2 Choosing the ring melody
The base and each handset can ring with a different melody. The handsets can ring with a different melody according to whether the call is internal or external. You can choose from 10 different ringer melodies:
| →/OK | 1Enter the menu | |
| ▲▼ | →/OK | 2Select “SETUP” and confirm. |
| ▲▼ | →/OK | 3Select “HANDSET” and confirm. |
| ▲▼ | →/OK | 4Select “INT MELODY” to change the internal melody or “EXT MELODY” to change the internal melody and confirm. |
| ▲▼ | 5Select a melody (1 to 10). | |
| →/OK | ⊗ | 6Press the OK key to confirm or return to the previous menu. |
6.3 Activation/deactivation of beeps
The handsets can emit a beep tone when a key is pressed, when the batteries are low or when the handset is out of range.
Key pressed beep tone on/off
| →/OK | 1Enter the menu | |
| ▲▼ | →/OK | 2Select “HANDSET” and confirm. |
| ▲▼ | →/OK | 3Select “BEEP” and confirm. |
| ▲▼ | →/OK | 4Select “KEYTONE” and confirm. |
| ▲▼ | →/OK | 5 Select “ON” to activate or “OFF” to deactivate and confirm. |
Low battery
| →/OK | 1Enter the menu | |
| ▲▼ | →/OK | 2Select “HANDSET” and confirm. |
| ▲▼ | →/OK | 3Select “BEEP” and confirm. |
| ▲▼ | →/OK | 4Select “LOW BATTERY” and confirm. |
| ▲▼ | →/OK | 5 Select “ON” to activate or “OFF” to deactivate and confirm. |
Handset out of range
| →/OK | 1Enter the menu | |
| ▲▼ | →/OK | 2Select “HANDSET” and confirm. |
| ▲▼ | →/OK | 3Select “BEEP” and confirm. |
| ▲▼ | →/OK | 4Select “OUT RANGE” and confirm. |
| ▲▼ | →/OK | 5 Select “ON” to activate or “OFF” to deactivate and confirm. |
6.4 Handset name
You can change the name displayed on the handset (max. 9 characters). This function allows you to personalize each handset.
| →/OK | 1Enter the menu | |
| ▲▼ | →/OK | 2Select “HANDSET” and confirm. |
| ▲▼ | →/OK | 3Select “NAME” and confirm. |
4Enter the name you want and confirm.
Press the delete key to delete a character. Press and hold the phonebook key to exit the menu without taking any modifications into account.
6.5 Automatic answer
When there is a incoming call and the handset is on the base, the phone automatically takes the line when lifted. This is the default setting, but can be set off:

1Enter the menu
2Select "HANDSET" and confirm.
3Select "AUTO ANSWER" and confirm.
4 Select "ON" to activate or "OFF" to deactivate and confirm.
6.6 Reset the handset
It is possible to return the phone to the original default configuration. This is the configuration which was installed when you first received the telephone.
To return to default settings:
1Enter the menu
2Select "SETUP" and confirm.
3Select "DEFAULT" and confirm.
4Enter the 4 digit PIN code (default =0000) and confirm.
Default parameters are:
Low battery beeps On Out of range warning beeps Off
Key tone On
Auto answer On
Internal melody 1
Internal volume 3
External melody 3
External volume 3
Ear volume 3
Phonebook
Call log list Empty
Redial list Empty
PIN code 0000
Dial mode DTMF
Keypad lock Off
Empty

| Returning to default settings will delete all entries in the phonebook and call log.
The PIN code will also be reset to 0000.
6.7 Keypad lock
The keypad can be locked so that no settings can be changed or no telephone number can be dialed. The icon will appear on the screen when keypad is locked.
Locking the keypad
*
1Press and hold the ' key for 3 seconds. The keypad will be locked.
Unlock the keypad
*
1Press any key, "PRESS" will appear on the screen.
2Press the ' key within 3 seconds.
6.8 Setting the time
/OK
▲▼ →/OK
▲▼ →/OK
4×5×6×7/OK
1Enter the menu
2Select "DATE - TIME" and confirm.
3Select "CLOCK SET" and confirm.
4Enter the time (24h format) and confirm.
6.9 Setting the alarm
/OK
▲▼ →/OK
▲▼ →/OK
▲▼ →/OK
4.5670 /OK
▲▼ →/OK
1Enter the menu
2Select "DATE - TIME" and confirm.
3Select "ALARM SET" and confirm.
4Select "ON" to turn on the alarm and confirm.
Enter the time (24h format) when the alarm must be activated and confirm. OR
Select "OFF" to turn off the alarm and confirm.
7 Base settings
7.1 Adjusting the ring volume
Base ring volume
You can choose from 5 ringer volume levels and "OFF".
/OK
▲▼ →/OK
▲▼ →/OK
▲▼
/OK
1Enter the menu
2Select "SETUP" and confirm.
3Select "BASE VOLUME" and confirm.
4Select a volume ("OFF" or 1 to 5).
5Confirm or return to the previous menu.
7.2 Choosing the ring melody
The base and each handset can ring with a different melody. To set the base melody:
/OK
▲▼ /OK
▲▼ →/OK
▲▼ →/OK
/OK
1Enter the menu
2Select "SETUP" and confirm.
3Select "BASE MELODY" and confirm.
4Select a melody (1 to 5).
5Confirm or return to the previous menu.
7.3 Changing the PIN code
Certain functions are only available to users who know the PIN code.
By default the PIN code is 0000. To change the PIN code:
| →/OK | 1Enter the menu | |
| ▲▼ | →/OK | 2Select “SETUP” and confirm. |
| ▲▼ | →/OK | 3Select “PIN CODE” and confirm. |
| 4+5-6+8 | →/OK | 4Enter the old 4 figure PIN code and confirm. |
| 4+5-6+8 | →/OK | 5Enter a new 4 figure PIN code and confirm. |
| 4+5-6+8 | →/OK | 6Enter the new PIN code a second time and confirm. |
7.4 Setting the dialing mode
There are two types of dialing mode: DTMF/Tone dialing (most common) and pulse dialing (for older installations).
To change the dialing mode:
| →/OK | 1Enter the menu | |
| ▲▼ | →/OK | 2Select “SETUP” and confirm. |
| ▲▼ | →/OK | 3Select “DIAL MODE” and confirm. |
| ▲▼ | →/OK | 4Select the dialing mode and confirm. |
7.5 Flash time duration
Press the flash key ‘R’ (key 7 - picture 2C Handset) to use certain services on your external line such as “call waiting” (if your phone company offers this feature); or to transfer calls if you use a telephone exchange (PABX). The Flash key ‘R’ is a brief interruption of the line. You can set the flash time to 100ms or 250ms.
| →/OK | 1Enter the menu | |
| ▲▼ | →/OK | 2Select “SETUP” and confirm. |
| ▲▼ | →/OK | 3Select “RECALL” and confirm. |
| ▲▼ | →/OK | 4Choose “RECALL1” for short flash time (100ms) or “RECALL2” for long flash time (250ms) and confirm. |
8 Managing multiple handsets
8.1 Adding a new handset

Only needed when you have deregistered a handset or when you bought a new one.
You can register new handsets on the base if these handsets support the DECT GAP protocol. The base can support a maximum of 5 handsets. If you already have 5 handsets, and you wish to add another one or change one handset, you must first delete a handset, then associate the new handset.
Putting the base into registration mode:

1Press and hold the paging key on the base for 6 seconds. The base will then emit a beep tone.
Register the new handset:
If your additional handset is a Topcom Balance
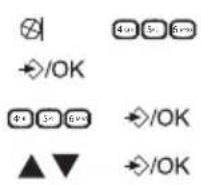
| →/OK | 2Enter the menu | |
| ▲▼ | →/OK | 3Select “REGISTER” and confirm. |
| ▲▼ | →/OK | 4Select “REG BASE” and confirm. |
| ←→→→→→ | →/OK | 5Enter the number of the base to be associated with the handset (1-4) and confirm. (The flashing numbers are already in use.) |
| ←→→→→→ | →/OK | 6Enter the base PIN code (0000 by default) and confirm. |
| The handset will start searching for the DECT base. If the handset has located the base, it will display the base identification number. | ||
| →/OK | ⊗ | 7Confirm or stop. |
| If the handset does not locate the base, it will return to the standby mode after a few seconds. Try again by changing the base number and check that you are not in an environment with interference. Move closer to the base. |
If your handset is another model
After starting the registration procedure on the base, refer to the handset manual to find out how to register the handset. The handset must be GAP compatible.
The icon and the text "NOT REG" flashes on the display when the handset is not associated with the base.
When a handset is associated with a base, it is attributed a handset number by the base. It is this number that is displayed on the handset after the name and must be used for internal calls.

DECT GAP Profile only guarantees that basic calling-functions will work correctly between different brands/types. There's a possibility that certain services (like CLIP) will not work correctly.
8.2 Removing a handset
This procedure needs to be carried out on a different handset then the one you want to remove.
| →/OK | 1Enter the menu | |
| ▲▼ | →/OK | 2Select “SETUP” and confirm. |
| ▲▼ | →/OK | 3Select “DEL HANDSET” and confirm. |
| ←→/OK | →/OK | 4Enter the base PIN code (0000 by default) and confirm. |
| ▲▼ | →/OK | 5Select the handset to be removed and confirm. |
8.3 Setting up a handset on another base
If you want to use a Topcom Balance handset with a base of another model. The base must be GAP compatible.
| 1 Put the base in registration mode, refer to the base manual. | |
| →/OK | 2Enter the menu |
| ▲▼ →/OK | 3Select “REGISTER” and confirm. |
| ▲▼ →/OK | 4Select “REG BASE” and confirm. |
| 5Enter the number of the base to be associated with the handset and confirm. | |
| 6Enter the base PIN code and confirm. |

The handset will start searching for the DECT base. If the handset has located the base, it will display the base identification number.
7 Confirm or stop.
8.4 Selecting a base
You can switch your handset between bases. The handsets can be registered up to 4 bases simultaneously. When selecting the base, the current selected base is indicated by a blinking base number.
If you select "AUTO" the handset will automatically search for another base when you are out of range. The handset must first be registered with each base individually.
/OK
▲▼ →/OK
▲▼ →/OK
▲▼ →/OK
1Enter the menu
2Select "REGISTER" and confirm.
3Select "SELECT BASE" and confirm.
4Select a base or select "AUTO" and confirm.

When you have activated Automatic base selection and the handset is out of range on the current base, the handset will only search for the strongest base in standby (not during communication).
9 SMS
You can send and receive SMS with your Topcom Balance telephone. This section tells you how to use the SMS feature. You can store a total of 15 SMS messages sent and received, each with up to 160 characters.

Before sending and receiving SMS text messages you need to set the telephone number of your Network's SMS centre for outgoing and incoming messages (See “SMS service centre numbers”).
9.1 How to write an SMS
The method is the same as entering a name in the phonebook (See “3.15 Using the alphanumerical keypad”).
To enter a space press '1'.
9.2 Sending an SMS
/OK
▲▼ →/OK
▲▼ →/OK
4:5:6:7/OK
4:5:6:7:8:9:10:11:12:13:14:15:16:17:18:19:20:21:22:23:24:25:26:27:28:29:30:31:32:33:34:35:36:37:38:39:40:41:42:43:44:45:46:47:48:49:50:51:52:53:54:55:56:57:58:59:60:61:62:63:64:65:66:67:68:69:70:71:72:73:74:75:76:77:78:79:80:81:82:83:84:85:86:87:88:89:90:91:92:93:94:95:96:97:98:99:100
1Enter the menu
2Select "SMS" and confirm.
3Select "WRITE" and confirm.
4Start writing the message and confirm.
5Enter the telephone number and confirm to send the message.
The SMS will be sent out automatically.
9.3 Read and view the list of received messages (Inbox)
Your Topcom Balance display indicates the number of new messages you have received. ✉ shown on the screen. The SMS LED on the base is blinking.
A beep indicates you have just received a new message.

When the number of new messages is indicated on the display.
1Press the OK key. The telephone number of the most recent message is listed first.
When the number of new messages is not displayed.

1Enter the menu

2Select "SMS" and confirm.

3Select "INBOX" and confirm.
The telephone number of the most recent message is listed first.

Scroll through all messages and press OK to read the message.
Messages with ‘*’ before the telephone number are unread messages.

Scroll through the whole message and press OK when the whole message is read.

Scroll to select one of the next options:
Reply: Edit the message using the alphanumeric keypad and save it.
Forward: Forward the stored message to another user. Follow the same instructions as for sending an SMS message (See “9.2 Sending an SMS”).
Delete ?: Delete the message. Press OK again to confirm.
Details: To see the phonenumber, date and time of the message. Press OK to confirm.

Press the mute key to return to the inbox menu
9.4 Multiple users
With your Topcom Balance telephone you can register up to 5 handsets on one base. Each handset has it's own handset number (1-5) which is also the terminal number to send Personal messages. All handset have standard terminal number '0' as well. In order to receive personal SMS messages, you must give your correspondents the user Terminal Number that they need to add to your standard telephonenumber (See below). For example, when you have a 2nd handset (Handset 2) this handset will have terminal number = 2.
If no terminal number is add to you telephone number or '0', all handset will receive these messages.
You can can change the terminal number to another one but only from 6-9 (See “Setting the terminal number”).
Receiving personal user SMS

You correspondents will need to add your Terminal Number to your telephone number when they want to send personal SMS.
E.g. If your personal Terminal Number is "1" and your telephone number is 123456789, your correspondents should send their SMS messages to:1234567891!
This is the number you need to remember and give to your correspondents.
Reading personal user SMS
When a new message comes in, your Topcom Balance emits a beep. The screen shows and the number of new messages.
| →/OK | Press the OK key |
| In the SMS list, private messages are flagged with the key icon on the screen. | |
| OR | |
| →/OK | 1Enter the menu |
| ▲▼ →/OK | 2Select “SMS” and confirm. |
| ▲▼ →/OK | 3Select “PERSONAL SMS” and confirm. The telephone number of the most recent message is listed first. |
9.5 SMS settings
Set SMS alert tone ON/OFF
Your handset can play a melody to announce a new text message.
| →/OK | 1Enter the menu | |
| ▲▼ | →/OK | 2Select “SMS” and confirm. |
| ▲▼ | →/OK | 3Select “SMS SETTINGS” and confirm. |
| ▲▼ | →/OK | 4Select “MSG ALERT” and confirm. |
| ▲▼ | →/OK | 5Select “ON” or “OFF” and confirm. |
| ▲▼ | →/OK | 6 Select the desired melody and confirm and go back to previous menu. |
SMS service centre numbers
To send and receive SMS text messages you need the telephone number of your Network's SMS centre. These numbers have been pre-loaded into the Topcom Balance. If you accidentally delete the SEND or RECEIVE SMS service centre numbers you will need to re-enter them in order for your SMS service to work.
The Topcom Balance can store 2 SEND SMS service centre numbers and 2 RECEIVING SMS service centre numbers.
To set the SMS sending centres numbers
| →/OK | 1Enter the menu | |
| ▲▼ | →/OK | 2Select “SMS” and confirm. |
| ▲▼ | →/OK | 3Select “SMS SETTINGS” and confirm. |
| ▲▼ | →/OK | 4Select “SEND CENTRE” and confirm. |
| ▲▼ | →/OK | 5Select “SEND 1” or “SEND 2” and confirm. |
| →/OK | 6 Enter the telephone number of the SMS server |
To set the SMS receiving centres numbers
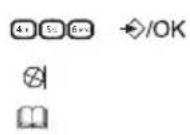
| →/OK | 1Enter the menu | |
| ▲▼ | →/OK | 2Select “SMS” and confirm. |
| ▲▼ | →/OK | 3Select “SMS SETTINGS” and confirm. |
| ▲▼ | →/OK | 4Select “RCV CENTRE” and confirm. |
| ▲▼ | →/OK | 5Select “RECEIVE 1” or “RECEIVE 2” and confirm. |
| →/OK | 6 Enter the telephone number of the SMS server |
Select the SMS centre to send SMS
Because you can set 2 SMS sending centres, you have to select one of both before sending you messages:
| →/OK | 1Enter the menu | |
| ▲▼ | →/OK | 2Select “SMS” and confirm. |
| ▲▼ | →/OK | 3Select “SMS SETTINGS” and confirm. |
| ▲▼ | →/OK | 4Select “SEND SERVICE” and confirm. |
| ▲▼ | →/OK | 5Select “SEND 1” or “SEND 2” and confirm. |
Setting the terminal number
Each handset has terminal number '0' and terminal number = handset number (1-5). You can change the terminal number to another number (6-9) if needed:
| →/OK | 1Enter the menu | |
| ▲▼ | →/OK | 2Select “SMS” and confirm. |
| ▲▼ | →/OK | 3Select “SMS SETTINGS” and confirm. |
| ▲▼ | →/OK | 4Select “TERMINAL NO” and confirm. |
| ⊗I | ⊕⊕⊕⊕ | 5Delete the old terminal number and enter the new one (0, 6-9). |
| →/OK | 6Press OK to confirm. |
Memory full
When the memory is full, you get the screen message "Memory Full". You can no longer send or receive SMSs. To continue to receive SMSs, you can delete some or all of the messages. To delete all the messages stored in the "INBOX" or "PERSONAL SMS":
| →/OK | 1Enter the menu | |
| ▲▼ | →/OK | 2Select “SMS” and confirm. |
| ▲▼ | →/OK | 3Select “SMS SETTINGS” and confirm. |
| ▲▼ | →/OK | 4Select “DELETE ALL” and confirm. |
| ▲▼ | →/OK | 5Select “INBOX” or “PERSONAL SMS” and confirm. |
| 6“CONFORM ?” appears. | ||
| →/OK | ⊗ | 7Confirm or cancel. |
10 Troubleshooting
| Symptom Possible cause Solution | ||
| No display Batteries uncharged | Check the position of the | batteries |
| Recharge the batteries | ||
| Handset turned off Turn on the handset | ||
| No tone Telephone cord badly | connected Check the telephone cord connection | |
| The line is occupied by another handset | Wait until the other handset hangs up | |
| The icon flashes | Handset out of range Bring the handset closer to the base | |
| The base has no power supply | Check the mains connection to the base | |
| The handset is not registered on the base | Register the handset on the base | |
| Base or handset do not ring | The ringing volume is off or low | Adjust the ringing volume |
| Tone is good, but there is no communication | The dialing mode is wrong | Adjust the dialing mode (pulse/tone) |
| Not possible to transfer a call on PABX | The flash time is too short or too long | Change the flash time |
| Telephone does not react when pressing the keys | Manipulation error | Remove the batteries and put them back in place |
11 Technical data Technical characteristics
| Standard | DECT (Digital Enhanced Cordless Telecommunications)GAP (Generic Access Profile) |
| Frequency range | 1880 MHz to 1900 MHz |
| Number of channels | 120 duplex channels |
| Modulation | GFSK |
| Speech coding | 32 kbit/s |
| Emission power | 10 mW (average power per channel) |
| Range | maximum 300m in open space / 10-50m in-house |
| Number of handsets | Up to 5 |
| Base power supply | 230V / 50 Hz / 7,5V DC 300mA |
| Handset Batteries | 2 rechargeable batteries AAA, NiMh 1,2V, 550mAh |
| Handset autonomy | 200 hours in standby |
| Handset talk time | 10 hours |
| Normal conditions of use | +5 °C to +45 °C |
| Dialing mode | Pulse / Tone |
| Flash time | 100 or 250 ms |
12 Topcom Warranty
12.1 Warranty period
The Topcom units have a 24-month warranty period. The warranty period starts on the day the new unit is purchased. There is no warranty on standard or rechargeable batteries (AA/AAA type).
Consumables or defects causing a negligible effect on operation or value of the equipment are not covered.
The warranty has to be proven by presentation of the original or copy of the purchase receipt, on which the date of purchase and the unit-model are indicated.
12.2 Warranty handling
A faulty unit needs to be returned to a Topcom service centre including a valid purchase note and a filled in service card.
If the unit develops a fault during the warranty period, Topcom or its officially appointed service centre will repair any defects caused by material or manufacturing faults free of charge, by either repairing or exchanging the faulty units or parts of the faulty units. In case of replacement, colour and model can be different from the original purchased unit.
The initial purchase date shall determine the start of the warranty period. The warranty period is not extended if the unit is exchanged or repaired by Topcom or its appointed service centre.
12.3 Warranty exclusions
Damage or defects caused by incorrect treatment or operation and damage resulting from use of non-original parts or accessories are not covered by the warranty.
The warranty does not cover damage caused by outside factors, such as lightning, water and fire, nor any damage caused during transportation. No warranty can be claimed if the serial number on the units has been changed, removed or rendered illegible.
Any warranty claims will be invalid if the unit has been repaired, altered or modified by the buyer. This appliance may only be used with rechargeable batteries. If you want to replace the originally included batteries, please check whether the batteries you use are suitable and rechargeable.
Alkaline batteries may under NO circumstances be used in the handsets. If you use Alkaline batteries and place the handset on the basis, the batteries will heat up and may explode. Any damage which may be caused cannot be recovered from the manufacturer and the damage thus caused to the appliance is not covered by the warranty conditions. Any repairs will be charged to you.
13 Disposal of the device (environment)

At the end of the product lifecycle, you should not throw this product into the normal household garbage but bring the product to a collection point for the recycling of electrical and electronic equipments. The symbol on the product, user guide and/or box indicate this.
Some of the product materials can be re-used if you bring them to a recycling point.
By re-using some parts or raw materials from used products you make an important contribution to the protection of the environment. Please contact your local authorities in case you need more information on the collection points in your area.
14 Cleaning
Clean the telephone with a slightly damp cloth or with an anti-static cloth. Never use cleaning agents or abrasive solvents.
Nederlands
text_image
Toolbar icons including email, phone, and navigation symbols- 2E Display -
2.5 Symbols
text_image
/OK ▲▼ ▲▼ 4+ 5- 6+ 4+ 5- 6+ ▲▼ >/OK >/OK >/OK >/OK >/OK >/OKRegister the new handset:
DECT (Digital Enhanced Cordless Telecommunications)
GAP (Generic Access Profile)
Frequentiebereik 1880 MHz tot 1900 MHz
text_image
Toolbar icons including phone, email, keyboard, and navigation symbols- 2E Écran -
2.5 Symboles

9.5 CONFIG SMS "SMS SETTINGS"
DECT(Digital Enhanced Cordless Telecommunications)
GAP (Generic Access Profile)
text_image
Toolbar icons including Y, down arrow, email, phone call, and navigation buttons- 2E Display -
2.5 Symbole
text_image
/OK ▲▼ ▲▼ ←/OK ←/OK ←/OK ←/OK ←/OK ←/OK ▲▼ ←/OK ←/OKtext_image
/OK ▲▼ ▲▼ +/OK +/OK ▲▼ +/OK ⊗text_image
/OK ▲▼ ▲▼ 4×5×6×7 +/OK +/OK +/OK ⊗text_image
/OK ▲▼ +/OK ▲▼ +/OK ▲▼ +/OK +/OK ⊗|text_image
/OK ▲▼ ▲▼ 4+ 5% 6% 4+ 5% 6% 4+ 5% 6% +/OK +/OK +/OK +/OK +/OKtext_image
/OK ▲▼ ▲▼ 4+ 5+ 6+ +/OK +/OK +/OK +/OK +/OKtext_image
Toolbar icons including email, phone, keyboard, audio, and navigation symbols- 2E Pantalla -
2.5 Símbolos
4 Agenda (Phonebook)
text_image
/OK ▲▼ ▲▼ ←/OK ←/OK ←/OK ←/OK ←/OK ←/OK ←/OK ←/OK ←/OK ▲▼text_image
/OK ▲▼ ▲▼ +/OK +/OK ▲▼ +/OK ⊗text_image
/OK ▲▼ ▲▼ 4×5×6m 4×5×6m 4×5×6m +/OK +/OK +/OK +/OK +/OK +/OK +/OKtext_image
/OK ▲▼ ▲▼ 4+ 5+ 6+ 7+ 8+ 9+ 10+ /OK +/OK +/OK +/OK +/OK +/OK +/OK +/OKtext_image
Toolbar with icons for media, phone, email, and navigation functions- 2E Visor -
2.5 Símbolos
text_image
/OK ▲▼ ▲▼ +/OK +/OK +/OK +/OK +/OK +/OK +/OK +/OK +/OK +/OKtext_image
/OK ▲▼ ▲▼ ▲▼ ⊗ +/OK 4+ 5- 6- +/OK ▲▼ +/OK +/OK +/OKtext_image
/OK ▲▼ +/OK ▲▼ +/OK ▲▼ +/OK +/OK ⊗text_image
/OK ▲▼ ▲▼ 4x 5x 6x ©1 Entre no menu
2 Seleccione "TERMINAL" (HANDSET) e confirme.
3 Seleccione "NOME" (NAME) e confirme.
4 Introduza o nome que pretende e confirme.
text_image
/OK ▲▼ ▲▼ ▲▼ ▲▼ +/OK +/OK +/OK +/OK +/OK +/OK 4+ 5+ 6+1Entre no menu 2Seleccione “SMS” e confirme. 3Seleccione “CONFIGURAÇÃO” (SMS SETTINGS) e confirme. 4Seleccione “CENTRO RECEP” (RCV CENTRE) e confirme. 5Seleccione “RECEB. 1” (SEND 1) ou “RECEB. 2” (SEND 2) e confirme. 6 Introduza o número de telefone do servidor de SMS
text_image
/OK ▲▼ +/OK ▲▼ +/OK ▲▼ +/OK ▲▼ +/OK1Entre no menu 2Seleccione “SMS” e confirme. 3Seleccione “CONFIGURAÇÃO” (SMS SETTINGS) e confirme. 4Seleccione “CENTRO MSG” (SEND CENTRE) e confirme. 5Seleccione “ENVIAR 1” (SEND 1) ou “ENVIAR 2” (SEND 2) e confirme.
text_image
/OK ▲▼ ▲▼ ▲▼ ⊗ +/OK +/OK +/OK +/OK 12 5 7 81Entre no menu 2Seleccione “SMS” e confirme. 3Seleccione “CONFIGURAÇÃO” (SMS SETTINGS) e confirme. 4Seleccione “TERMINAL NR” (TERMINAL NO) e confirme. 5Apague o número de terminal antigo e introduza o novo número de terminal (0, 6-9). 6Prima OK para validar.
Memória cheia
text_image
/OK ▲▼ +/OK ▲▼ +/OK ▲▼ +/OK ▲▼ +/OK +/OK ⊗|1Entre no menu 2Seleccione “SMS” e confirme. 3Seleccione “CONFIGURAÇÃO” (SMS SETTINGS) e confirme. 4Seleccione “APAGAR TUDO” (DELETE ALL) e confirme. 5Seleccione “CAIX ENTRADA” (INBOX) ou “MSG PRIVADA” (PERSONAL SMS) e confirme. 6“CONFIRMAR ?” (CONFIRM ?) é apresentado. 7Confirme ou cancele.
text_image
Toolbar with icons for media, phone, video, and navigation functions- 2E Oθόνη -
2.5 Σύμβολα
text_image
/OK ▲▼ ▲▼ 4x 5x 6x ©text_image
/OK ▲▼ →/OK ▲▼ →/OK 4x 5x 6x →/OK ▲▼ →/OKDECT(Digital Enhanced Cordless Telecommunications) GAP (Generic Access Profile)
text_image
Toolbar icons with function labels and function buttons, including email, phone, and navigation functions- 2E Wyświetlacz -
2.5 Symbole
DECT (Digital Enhanced Cordless Telecommunications)
GAP (Generic Access Profile)
DECLARATION OF CONFORMITY
We manufacturer, Topcom Europe Nv, Grauwmeer 17, 3001 Heverlee, Belgium, declare that our product :
Type: Wireless Telephone Device (DECT)
Model: Balance
Class of equipment: Class 1
is in compliance with the essential requirements and other relevant provisions of the R&TTE directive 1999/5/EC and carries the CE mark accordingly.
Supplementary information:
The product complies with the requirements of:
- EN 60950-1:2006
- EN 301489-01 V1.6.1:2002
- EN 301489-06 V1.2.1:2002
- EN 301406 V1.5.1:2003
Date: 25/6/2008
Place: Heverlee, Belgium
Name: Verheyden Geert
Function: Technical Director
Signature:

text_image
ature: A#t K##European contact: Topcom Europe Nv, R&D department, Research Park, Grauwmeer 17, 3001 Heverlee, Belgium. Tel : +32 16 398920 , Fax : +32 16 398939
SERVICE RETURN CARD - RÜCKSENDEKARTE - CARTE DE RETOUR SERVICE - RETOURFICHE
RETURN WITH YOUR DEFECT PRODUCT
natural_image
Two identical rectangular frames with evenly spaced vertical lines, no text or symbols present.Location/Ort./Lieu/Plaats: Post code/Postleitzahl/Code Postal/Postcode:

natural_image
Two identical rectangular frames with vertical lines inside, no text or symbols presentCountry/Land/Pays/Land:
Tel./Tél.:
E-mail:
(Original Proof of Purchase has to be attached to this return card to be valid for warranty)