Wireless Xcam2 - Webcam MARMITEK - Free user manual and instructions
Find the device manual for free Wireless Xcam2 MARMITEK in PDF.

User questions about Wireless Xcam2 MARMITEK
0 question about this device. Answer the ones you know or ask your own.
Ask a new question about this device
Download the instructions for your Webcam in PDF format for free! Find your manual Wireless Xcam2 - MARMITEK and take your electronic device back in hand. On this page are published all the documents necessary for the use of your device. Wireless Xcam2 by MARMITEK.
USER MANUAL Wireless Xcam2 MARMITEK
ENGLISH OWNER'S MANUAL
READ THIS FIRST!
Caution: to reduce risk of electric shock, do not disassemble any part of the videosender system. No user-serviceable parts are inside. If you spill liquid on it, disconnect the unit from the AC outlet to prevent possible fire or shock hazard and consult authorized service personnel. Mains operated equipment or accessories connected to the unit should carry the CE certification mark and should not be modified in any way that might overwrite the safety features.
Warning: To prevent electric shock hazard, do not expose any part of the power supplies to rain or moisture. Do not use near a bath tub, swimmingpool, etc. The camera is rated IP53, Secure against direct rain falling vertically. To rain driven by wind at 30^ from the horizontal.
APPLICATIONS:
Using the Marmitek wireless XCAM2 provides convenience and security in many ways:
- Watch your frontdoor on any TV in your home without running cables.
- Watch your baby's room on any TV anywhere in your house.
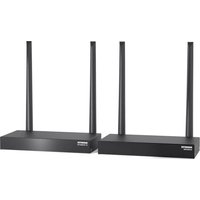
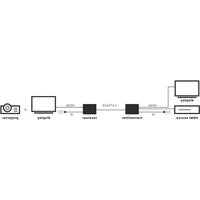
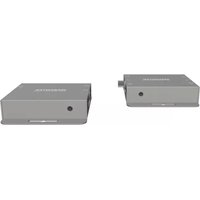
1. HOOKING UP THE MARMITEK XCAM 2 CAMERA:
- Attach the camera to a suitable wall. If using outdoors remember to make a small hole to enable the power lead [C] to pass through.
- The camera is suitable for outdoor use (IP rating 53)
- When using outdoors, fix in place the clear plastic lens cover (supplied)
- Use the smaller of the two power supply's (marked transmitter) and plug the jack into the adaptor socket on the lead from the camera.
- Connect the power supply to the mains and switch on.
- Adjust the antenna [A] until optimum picture quality is reached on the receiving TV.
Only use the supplied mains adaptor!
2. HOOKING UP THE MARMITEK XCAM2 RECEIVER:
- Connect a set of Audio/Video cables to the LINE OUT jacks [H + G] of your GigaVideo Receiver. Connect the other end to your TV.
- Plug the supplied mains adaptor, labelled Receiver 500mA, into a 230Volt -50Hz wall outlet and connect the jack [E] to the 12V jack at the rear of the receiver.
Only use the supplied mains adaptor!
- Switch the Power switch [E] to the ON position.
-
Select the right channel Look for the corresponding channel with your camera by switching the channel slide switch at the bottom of the receiver [I] (camera channel may be changed by removing the rubber cover on the front of the camera base [B]). Receiver and camera should be set to the same channel.
-
Position the GigaVideo Receiver in a convenient location and direct the antenna [D] so that the indented side points in the direction of the room where you've set up the XCAM camera.
3. FINE TUNING YOUR MARMITEK XCAM2 SET:
The wireless GigaVideo usually works best with the indented sides of the antennas [A + D] on the Transmitter and Receiver unit facing each other (i.e. in line of sight). Sometimes however reflections and other effects in the home may affect the signal so that some adjustment of either Transmitter or Receiver antenna may be necessary to get the best signal.
If you are not getting any signal at all:
Check if the receiver is connected to mains and that the Power-Switch is in the ON position. Check that the channel slide switches [ + 1] on both units have been set to the same letter.
If the signal is poor, or there is interference:
Try to change the channel on both units. Do this by adjusting the Channel slide swich [I] on the bottom of the GigaVideo Receiver to any position from A-D. The camera channel may be changed by removing the rubber cover on the front of the camerabase [B] and change the slide switch position. Receiver and camera should be set to the same channel.
4. OPTIONAL FUNCTIONS
Expand you Xcam2 System with up to 16 additional separate cameras (art.no. 09185). Build a complete surveillance system without the hassles of wires!
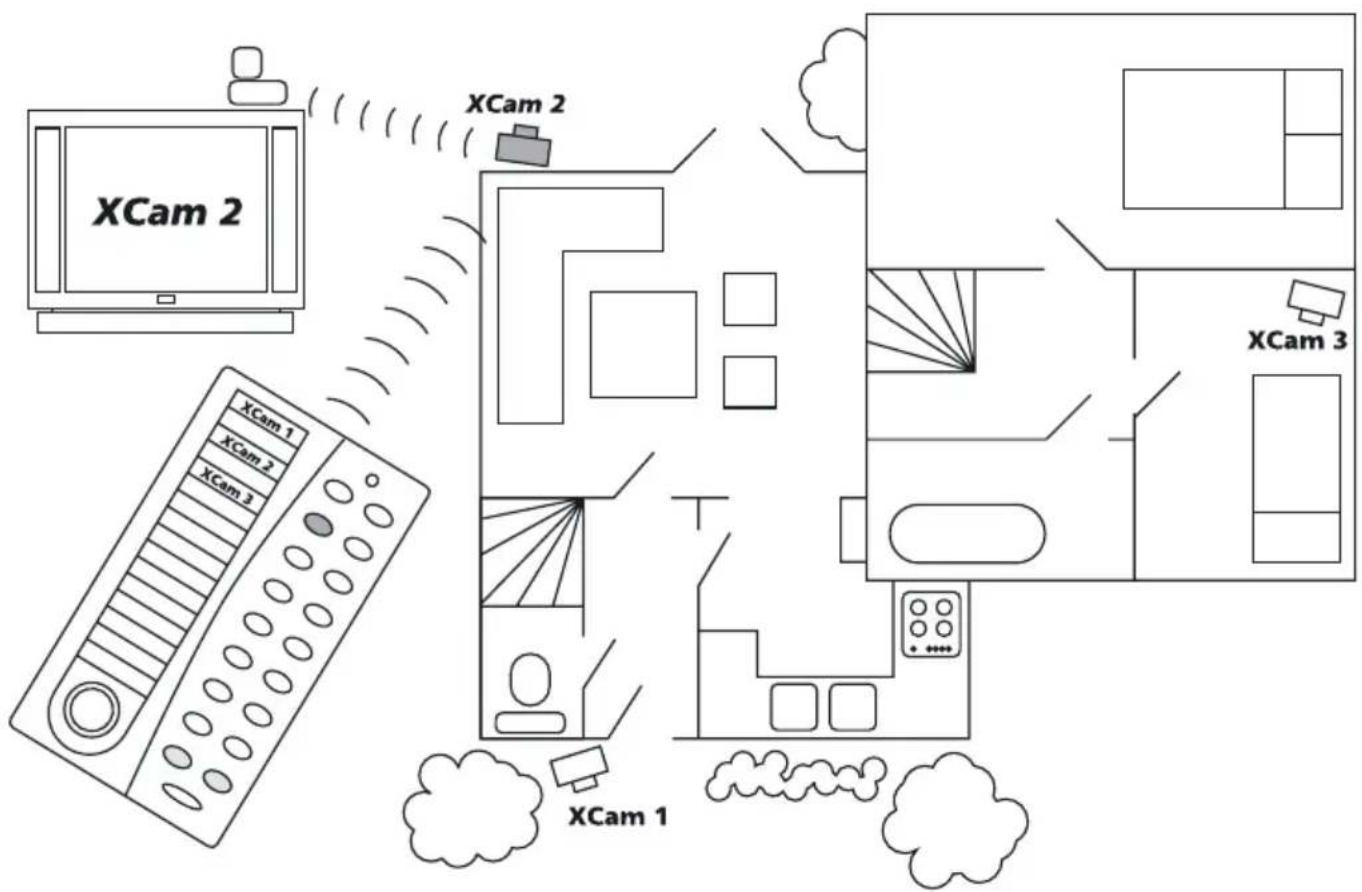
Plus, you can remotely activate the camera of your choice with the included X-10 controllable power supply (XM11). Enjoy the convenience of controlling all your cameras with only one receiver!
Operating instructions for Remote Controlled Power Supply, Model XM11
- The XM11 is used to power and control the XCAM2 wireless camera. Think of the XM11 as an X10 Module that has a 12V output (to power the XCAM2 Camera)
- The XM11 lets you have multiple XCAM2 cameras which all transmit to the same Video Receiver. You are now able to activate the camera of your choice.
- The Marmitek X10 system is used to control the XM11. To do this you need the following components with your XM11: - 1x Marmitek Transceiver (TM13 or Marmitek Security console) - 1x Marmitek RF Remote (HR10, 8in1, KR22...)
Installation:
- Set the House Code dial (A..P) to match the setting on the Transceiver and Remote
- Set the Unit Code dial (1..16) to a different code for all XM11 units (e.g. 1, 2, 3 and 4)
- Set the channel of the XCAM2 camera's and Video Receiver to the same code (A..D, e.g. all to B)
- Plug the XM11 and the Transceiver into the mains outlet. You are now able to control the XM11 units with your remote (the signal is sent from the Transceiver to the XM11 via the existing mains wires)
Use: When you switch on the camera of your choice, the presently active camera will be automatically switched off.
GROUP FUNCTION OF THE MARMITEK X-10 CONTROLLABLE POWER SUPPLY.
The XM11 power supplies allows the use of multiple camera's with one single XCAM2 Receiver.
Whenever you select a camera by your remote control, the camera of your choice will be switched on while the other active camera's will be switched off.
This switch-off function works in 4 groups of 4:
| Group 1 | Group 2 | Group 3 | Group 4 | |
| Camera 1 | 5913 | |||
| Camera 2 | 610 | 14 | ||
| Camera 3 | 7 | 11 | 15 | |
| Camera 4 | 812 | 16 |
Application examples:
-
When you've set one camera to address A1 and a second one to A2, camera 1 will be switched off as soon as you activate camera 2. Camera 1 or 2 will switch off as soon as address A3 or A4 is activated. This setting within one group is a useful feature when you've applied camera's only within the code group A1 through A4.
-
When camera's have been set to A4 and A5, then A4 will not be switched off when you select camera 5. You first have to switch off camera 4 before switching on camera 5. By not following this sequence, both camera signals will be transmitted and cause interference. The setting within 2 code groups can be used when applying cameras as well as lighting using the same House Code.
TECHNICAL SPECIFICATIONS
Marmitek Xcam2 wireless camera:
Power: 12V DC
Transmitter: 4 channels
Channel 1:2.411 GHz
Channel 2: 2.434 GHz
Channel 3:2.453 GHz
Channel 4:2.473 GHz
In France you are only allowed to use channel 3 and 4!
Bandwidth: 18 MHz
Output: 10mW max.
Modulation: FM
RF range: 15 - 30 m through walls and floors
Camera angle: 40^
Light sensitivity: 100 Lux
IP Class: IP 53
Marmitek XCam2 Receiver:
Power: 12V DC
Receiver: 4 channels
Channel 1:2.411 GHz
Channel 2: 2.434 GHz
Channel 3:2.453 GHz
Channel 4:2.473 GHz
In France you are only allowed to use channel 3 and 4!
AV output: 2x Chinch (1x Audio, 1x Video)
Video output: 1 Vpp (typ)
Audio output: 1 Vpp (typ)
Dimensions: 135x100x140 mm
Weight: 235 grams
Copyright Marmitek X-10. The right is reserved to make technical modifications
MaBe: 135x100x140 mm
Gewicht: 235 Gramm
Alimentation: 12V DC
Emetteur: 4 canaux
Canal 1:2.411 GHz
Canal 2: 2.434 GHz
Canal 3:2.453 GHz
Canal 4:2.473 GHz
Alimentation: 12V DC
Récepteur: 4 canaux
Canal 1:2.411 GHz
Canal 2: 2.434 GHz
Canal 3:2.453 GHz
Canal 4:2.473 GHz
Sorties audio/video: 2 x Chinch (1x Audio, 1x Video)
Sortie Video: 1 Vcc (typ)
Sortie Audio: 1 Vcc (typ)
Dimensions: 135x100x140 mm
Poids: 235g
4. OPTIONELE FUNCTIONS
CE DECLARATION OF CONFORMITY
We, Marmitek BV, Netherlands, herewith declare that the following designated product:

Marmitek Xcam2
Complies with the essential protection requirements of the R&TTE directive 1999/5/EC on the approximation of the laws of the Member States relating to Radio Spectrum Matters, EMC and Electrical Safety.
Assessment of compliance of the product with requirements relating to the essential requirements acc. to article 3 R&TTE was based on annex IV of the Directive 1999/5/EC and the following standard:
Radio: I-ETS 300 440: 1995
EMC: ETS 300 683: 1997
Electrical Safety: EN 60 742/06.95
C€0165①
Date:01.12.00
François Rossi
Approval Engineer
Marmitek BV
PO. BOX 4257 - 5604 EG Eindhoven
B D G R E F IRL CH L NL A P FIN S GB
VISIT US AT WWW.MARMITEK.COM