
Stabileyes 12x32 - Binoculars NIKON - Free user manual and instructions
Find the device manual for free Stabileyes 12x32 NIKON in PDF.

| Product Type | Stabilized Binoculars |
| Brand | Nikon |
| Model | StabilEyes 12x32 |
| Magnification | 12x |
| Objective Lens Diameter | 32 mm |
| Real Angular Field | 5° |
| Field at 1000 m | 87 m |
| Exit Pupil | 2.7 mm |
| Brightness | 7.3 |
| Minimum Focus Distance | 3.5 m |
| Eye Relief | 15 mm |
| Interpupillary Distance | 56 – 72 mm |
| Stabilization System | Digital via piezo-gyroscopic sensors and direct motors, compensation ±3° |
| Power | 2 AA alkaline batteries |
| Battery Life | Approximately 6 hours continuous (at 20°C) |
| Operating Temperature | -10°C to 50°C |
| Dimensions (L x W) | 178 x 142 mm |
| Weight (without batteries) | 1130 g |
| Waterproofness | Waterproof, nitrogen purged, floats on water, resistant to 1 m of water for 5 minutes |
| Optics | Multi-coated lenses, phase-corrected prisms |
| Included Accessories | Soft case, strap, eyepiece caps, 2 AA batteries |
| Lens Cleaning | Special lens paper and optical cleaning fluid, circular motion from center to edge |
| Safety | Do not look at the sun, do not use while walking, remove batteries if not used for extended period |
| Repairability | Do not repair yourself, contact an authorized Nikon dealer |
Frequently Asked Questions - Stabileyes 12x32 NIKON
User questions about Stabileyes 12x32 NIKON
0 question about this device. Answer the ones you know or ask your own.
Ask a new question about this device
Download the instructions for your Binoculars in PDF format for free! Find your manual Stabileyes 12x32 - NIKON and take your electronic device back in hand. On this page are published all the documents necessary for the use of your device. Stabileyes 12x32 by NIKON.
USER MANUAL Stabileyes 12x32 NIKON
natural_image
Black Nikon Steblayas 12x32.5" binoculars with visible lens and control knobs (no text or symbols on the device itself)
Steadies your hands and stabilizes your view.
はじめに
natural_image
Close-up of a mechanical component with a rotational arrow indicating motion (no text or symbols)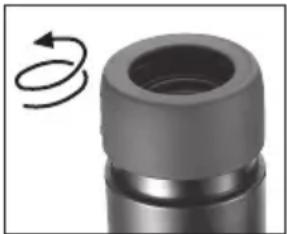
natural_image
Close-up of a mechanical component with a circular arrow indicating rotational motion (no text or symbols)(2) 眼幅調整
natural_image
Close-up of two black binoculars with white directional arrows indicating light or movement (no text or symbols visible)natural_image
Black handheld device with dual lenses and a battery pack, no visible text or symbols注意
natural_image
Close-up of hands holding a Nikon Ultrasonic optical binoculars (no text or symbols visible on the device itself)natural_image
Close-up of a black athletic device with a white arrow pointing to its side panel (no visible text or symbols)natural_image
Close-up of a black plastic cable with a loop, isolated on white background (no text or symbols)natural_image
Close-up of a Nikon DSLR camera with visible lens and attached cable (no text or symbols)natural_image
Close-up of a DSLR camera with a coiled cable and directional arrow indicating cable attachment (no text or symbols)natural_image
Close-up of a black binoculars with attached cables (no visible text or symbols)natural_image
Hand holding a rectangular object with a dashed border (no text or symbols)natural_image
Hand holding a small object with a shaded section, no visible text or symbolsnatural_image
Illustration of a hand turning a circular mechanical component (no text or symbols)Thank you for purchasing Nikon StabilEyes 12x32. Be sure to read this manual thoroughly for proper use.
- The StabilEyes 12x32 uses advanced technology in optics, electronics, and ergonomics.
- The StabilEyes 12x32 is waterproof, can be used in rainy weather, and floats on water.
- The StabilEyes 12x32's stabilization feature cancels out the effects of external vibration and shaking that occurs with hand-held use, for stable viewing without a tripod.
- You can enjoy stable viewing and clear images even from a moving car, sailboat, motorboat, or airplane.
- When stabilization is activated, you can pause it by pressing the "VR PAUSE" button to minimize image instability while panning, shifting among objects in view, or viewing moving objects.
- The lenses are multilayer-coated to give you a wide field of view and reduce eye fatigue. The prisms are phase correction coated to provide sharp contrast and bright images.
Items Supplied
The StabilEyes 12x32 .... 1
Soft case.... 1
Neckstrap (SAA) 1
Eyepiece cap (EAP) 1
Size AA alkaline batteries .... 2
Precautions and Warnings
WARNING:
High level warning against severe personal harm or serious product damage.
CAUTION:
Precautions that should be followed in order to prevent damage to the product or injury to those using it.
WARNING:
Never look directly at the sun or any bright light through the binoculars. Serious harm, including loss of vision, can result.

CAUTION:
- StabilEyes binoculars are waterproof, but cannot be used in water. Although they float on water, you should pick them up as soon as possible if they are dropped into water. They can be damaged if water, dust, sand or other foreign material get inside. Do not open the battery compartment in a marine, high-humidity or dusty environment, as the interior of the binoculars can be compromised. Whether using internal batteries or external power, make sure the O-ring and battery holder or adapter are firmly seated, and locked in position.
- Do not change batteries or power connections in wet or dusty conditions.
- Confirm that the battery holder is correctly attached in position and firmly locked.
- To help prevent impact damage from dropping or falling, do not place the StabilEyes on slippery or unstable surfaces. Also, be aware that damage arising from abuse or misuse can void the StabilEyes warranty.
- If you plan to leave the binoculars stored for long periods of time, keep them in a cool, dry location and remove the batteries or damage could result from leakage.
- When batteries must be replaced, replace all at the same time, using the same type and brand.
- Never attempt to burn batteries in a fire. An explosion could result.
-
While Ni-Cd batteries are rechargeable, never attempt to recharge ordinary batteries, Never short circuit the batteries.
-
Avoid extreme hot and cold temperatures and rapid changes. (For example, if the binoculars have been used in very cold conditions, bringing them into a heated environment could cause condensation to build up. Allow time for a gradual adjustment.)
- If you use the StabilEyes at sea, Nikon recommends that you rinse them clean by dipping them in fresh water, without pouring water onto them directly, following exposure to salt spray/salt air.
- Avoid leaving the binoculars unattended and exposed to direct sunlight. Sunlight rays passing through the lenses could cause a fire.
- Never try to walk and use the binoculars at the same time; accident and injury could result.
- Do not swing the binoculars by the neckstrap; the binoculars might strike and injure someone or be damaged by hitting a solid object.
- Please dispose of any plastic bags that may come with StabilEyes; such bags could suffocate or choke a small child.
- Prolonged use with contact of the rubber eyepieces against the skin can cause irritation. If such a condition persists, consult you doctor.
- If you experience any problem with your StabilEyes binoculars, never attempt to repair them yourself or have them repaired by anyone other than NIKON VISION CO., LTD. Return it to your local dealer or directly to NIKON.
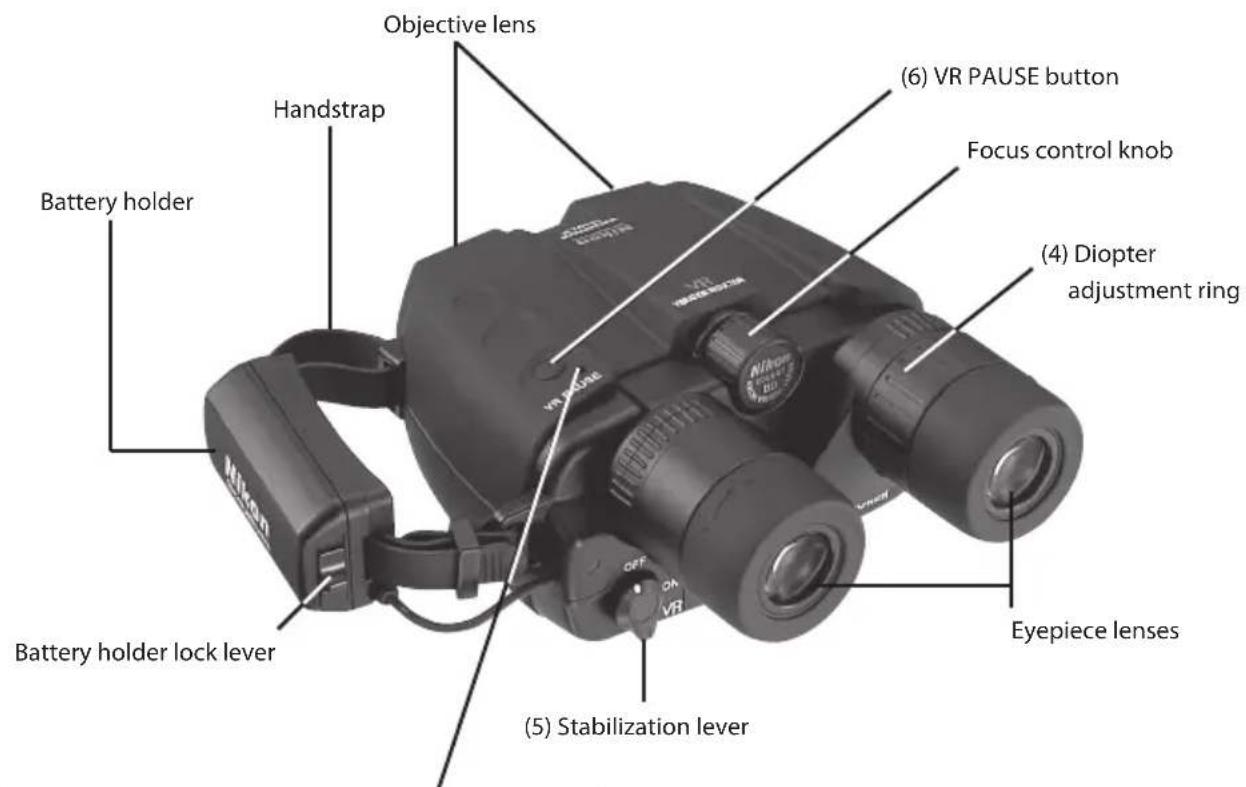
Getting Acquainted
LED II: Glows orange: VR PAUSE on (stabilization is paused)
(5) Stabilization lever
(1) Power button
LED I:
Flashing orange: Power is turned on and the unit is in standby
Glows orange: Stabilization is in standby
Glows green: Stabilization is active
Flashing orange and green: Weak batteries
Glowing red: Batteries are exhausted and should be replaced
Flashing red: System problem
Turns off: Power is turned off
StabilEyes Digital Image Stabilizing — Here's How It Works
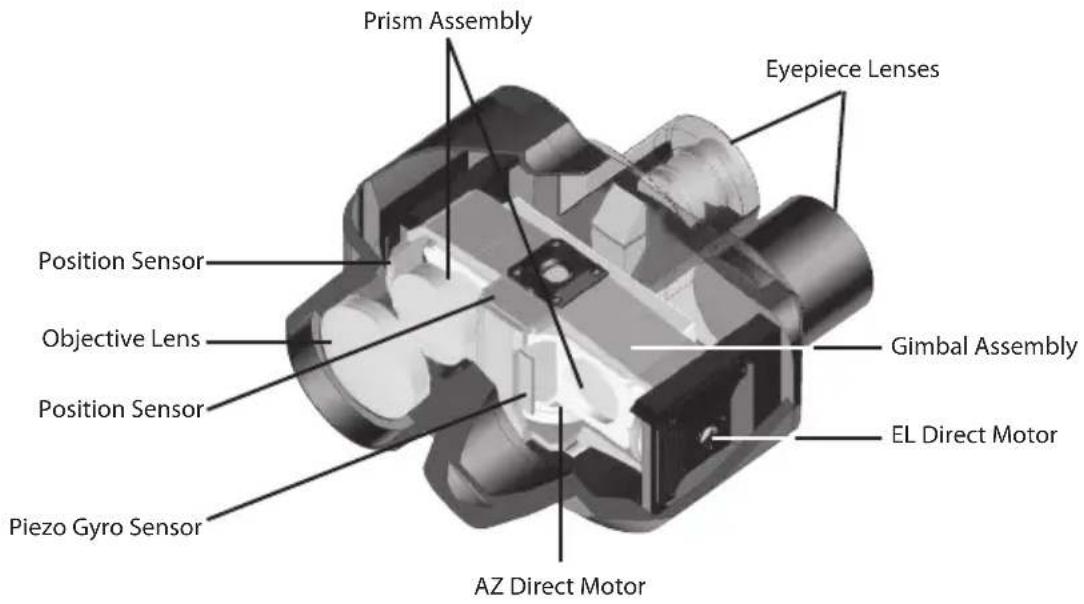
- The piezo gyro vibration sensors and direct-drive motors work together to move a gimbaled assembly with erecting prism to counteract vibration and keep the binoculars steady, which offers shake-free viewing even from a moving vehicle.
- The position sensor activates the stabilization feature as it detects vertical and horizontal motion.
- The newly designed lenses are multicoated for bright images.
- The prisms have a special coating that gives sharper images than even before.
- The eyepieces incorporate advanced optical technology that offers a wide field of view and reduces eye fatigue. They can be pivoted up and down for use with glasses.
- The StabilEyes 12x32 binoculars are waterproof and filled with dry nitrogen to prevent fogging of the optical components.
Fast Start
1) Press the Power button (1) to turn on. The electronic system will start up, and the binoculars will go to Standby mode after about five seconds.
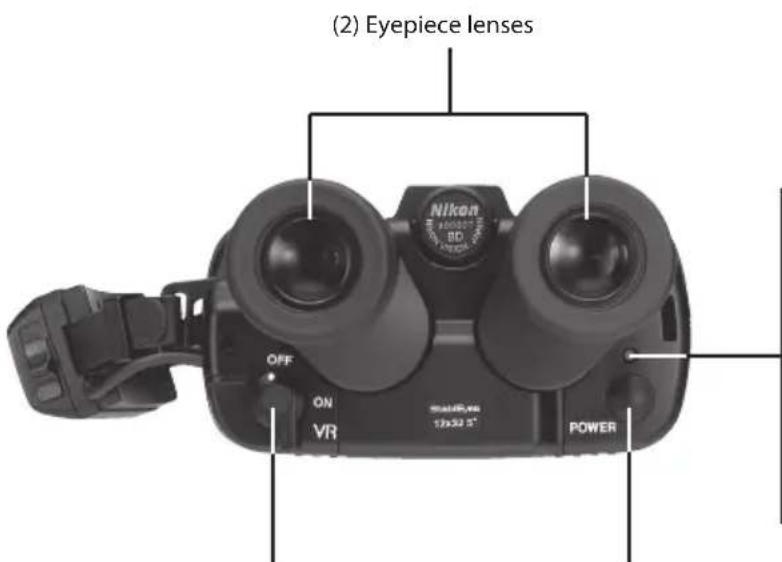
2) Adjust the eyepiece span (2) to match the distance between your two eyes.
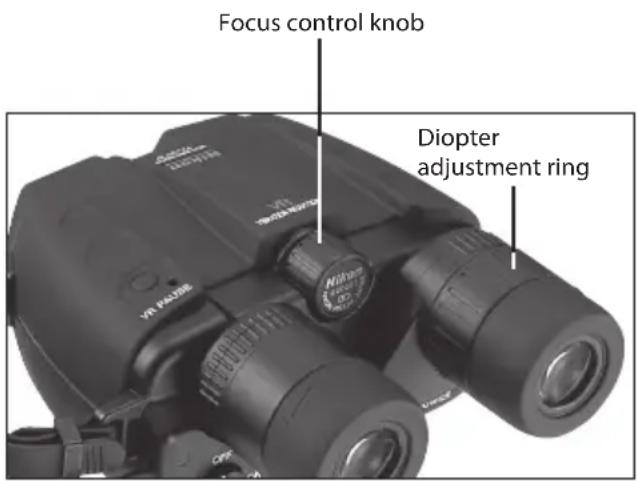
3) Use your left eye as you adjust the focus control knob (3). When the image becomes sharp, use your right eye and turn the diopter adjustment ring (4) to focus for the right eye. Once you have performed the diopter correction, use only the control knob (3) to check focus again.
4) Turn the stabilization lever (5) to the ON position to activate the stabilization feature. While stabilization is activated, you can pause it by pressing the VR PAUSE button to minimize image instability while panning, shifting among objects in view, or viewing moving objects.
5) When finished, turn the stabilization lever (5) to the OFF position and press the Power button (1) to turn off.
6) Replace the lens caps, and return the binoculars to their case.
How to Use and Focus
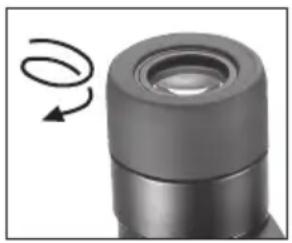
(1) Eyepiece
If you wear glasses or sunglasses when using StabilEyes binoculars, turn the turn-slide-type eyecup to its fully retracted position. For users with normal eyesight, turn the eyecup to its fully extended position.
Eyeglass wearer Non eyeglass wearer
natural_image
Close-up of a mechanical component with a curved arrow indicating rotational motion (no text or symbols)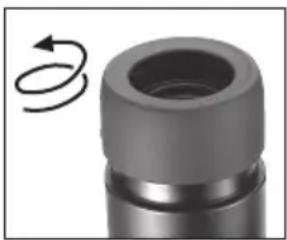
natural_image
Close-up of a mechanical component with a circular arrow indicating rotational motion (no text or symbols)(2) Adjusting the interpupillary distance
Grasp either eyepiece and rotate it towards or away from the center of the binocular (the other eyepiece will move equally in the opposite direction.)
Adjust the interpupillary distance to match the distance between your eyes until you see just one perfectly round image.

natural_image
Close-up of two black binoculars with directional arrows indicating rotation (no text or symbols)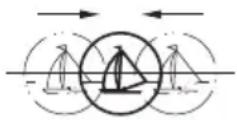
Merge the two circular viewfields into one.
(3) Diopter adjustment
There are two steps to focusing: Close your right eye and use only your left eye as you adjust the focus control knob. When the image is sharp, close your left eye and open your right eye. Twist the right eyepiece, to focus for the right eye. Now open both eyes and the binocular should be perfectly focused. You can do this with the StabliEyes turned on with stabilizing activated or with the power off completely.
When you view a different subject, adjust the focus control knob until you obtain a sharp image.
(4) Stabilization feature
When you press the Power button the first time, the LED lights in orange, and the binoculars go to Standby mode. Your StabilEyes binoculars go through an internal system check and take about five seconds to stabilize their performance.
Then, turn the stabilization lever to the ON position. The LED turns green, indicating that the stabilization feature is active.
As long as you keep the VR PAUSE button pressed, stabilization is paused, so you can minimize image instability while panning, switching among objects in view, or viewing moving objects. Use this function to search among objects using the binoculars.
Setting the stabilization lever back to the OFF position turns the stabilization feature off, and the LED turns orange again, indicating Standby mode.
Set the stabilization lever as you wish.
Stand by mode conserves battery power.
When finished, turn the stabilization lever to the OFF position and press the Power button to turn off. If you leave your StabilEyes binoculars in either Standby or Stabilization mode for a few minutes without using them, the stabilization lever will return to the OFF position, and the binoculars will shut off automatically.
Operating System of StabilEyes
* When power is turned off, the vibration reduction mode resets automatically to "OFF".

flowchart
graph TD
    A["Press the Power button"] -->|Power on| B["Press the Power button"]
    B --> C["Power off"]
    C --> D["Stabilization is turned off"]
    C --> E["Stabilization is left in standby for about five minutes, or stabilization mode, while activated, is not used for about one minute, they automatically shut off."]
    D --> F["Stabilization lever: OFF"]
    D --> G["Stabilization lever: ON"]
    F --> H["Stabilization is in standby"]
    F --> I["Stabilization is in standby"]
    F --> J["Stabilization is in standby"]
    G --> K["Stabilization activated"]
    G --> L["Stabilization activated"]
    G --> M["Stabilization activated"]
    H --> N["Stabilization paused"]
    I --> O["Stabilization paused"]
    J --> P["Stabilization paused"]
    K --> Q["Stabilization paused"]
    L --> R["Stabilization paused"]
    M --> S["Stabilization paused"]
    N --> T["VR PAUSE button"]
    O --> U["VR PAUSE button"]
    P --> V["VR PAUSE button"]
    Q --> W["VR PAUSE button"]
    R --> X["VR PAUSE button"]
    S --> Y["VR PAUSE button"]
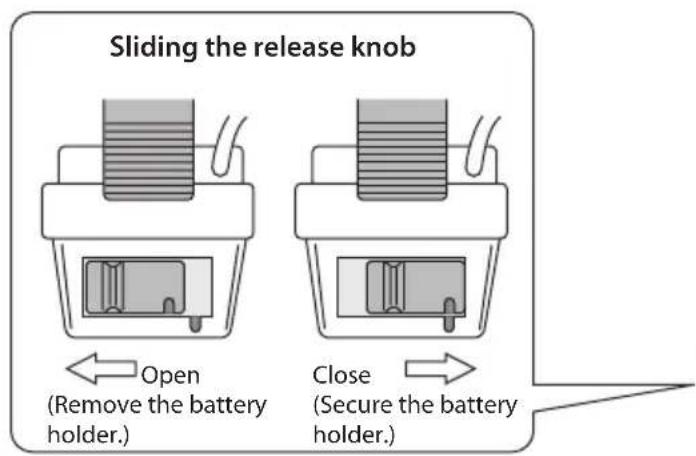
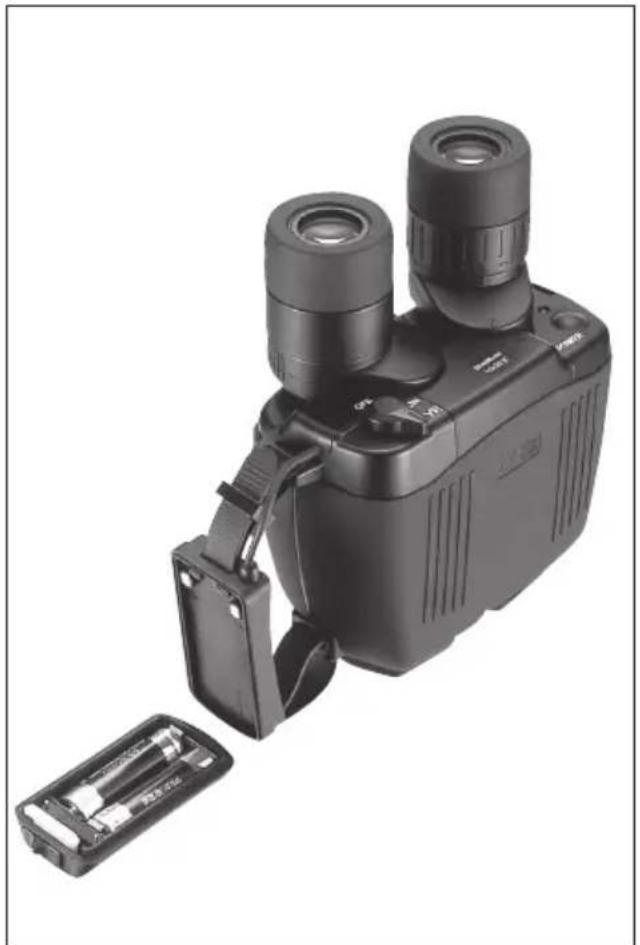
Battery Installation
1) Slide the battery compartment release knob on the handstrap to the Open position to release the battery holder.
2) Insert two new size AA alkaline batteries.
3) Attach the battery holder to the handstrap and slide the release knob to the locked position to secure the compartment.
natural_image
Black handheld device with dual lenses and a battery pack, no visible text or symbolsWARNING
- Use the same type of batteries. Do NOT mix old and new batteries. Doing so can cause leakage or rupture.
- When changing the batteries outdoors, be sure not to let any water get into the battery compartment.
- If you plan to leave the binoculars stored for a prolonged period, remove the batteries in order to prevent natural discharge and/or leakage.
When the batteries are removed, keep the battery holder attached to the handstrap to protect the internal contact points. - Keep the contact points away from any metal. Damage could result.
- NEVER slide the stabilization lever to the ON position if you do not have two batteries installed. Damage could result.
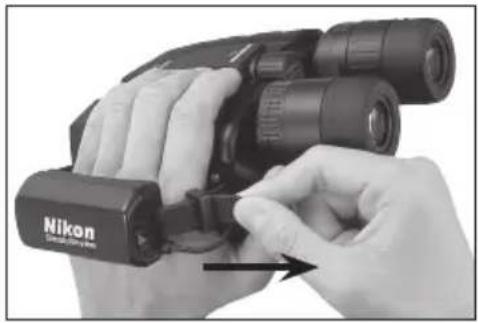
How to use the handstrap
natural_image
Close-up of hands holding a Nikon Ultrasonic optical binoculars (no text or symbols visible on the device itself)The binoculars can be more securely held when you slip your hand through the handstrap.
Slip your hand through the handstrap and adjust the belt length.
To tighten the strap, pull the belt on the eyepiece end.
natural_image
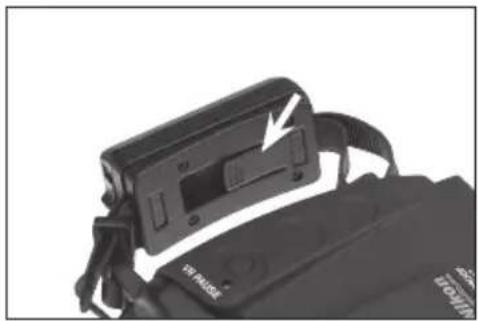
Close-up of a black athletic device with a white arrow pointing to its side panel (no visible text or symbols)To loosen the strap, lift the buckle on the backside of the handstrap and pull on the belt.
WARNING
The handstrap also serves as the battery holder. Do NOT apply strong force or remove the strap from the binoculars. Damage could result.
Installing the Neckstrap
natural_image
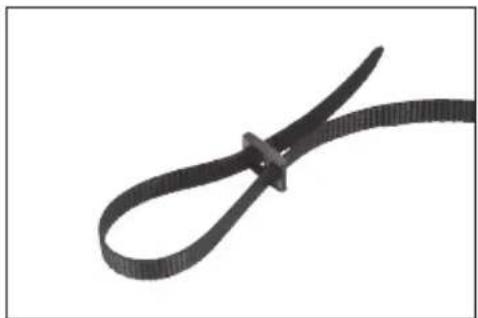
Close-up of a black ribbon cable with looped ends, isolated on white background (no text or symbols)1) Make a large loop at each of the neckstrap
natural_image
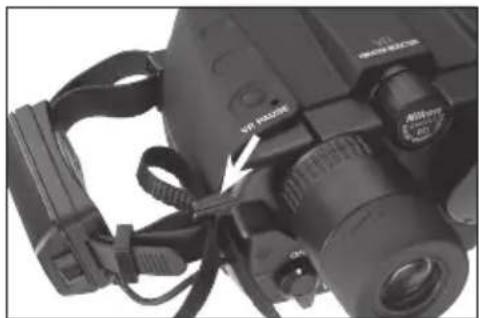
Close-up of a Nikon DSLR camera with attached strap and cable (no visible text or symbols)2) Insert strap through neckstrap bracket
natural_image
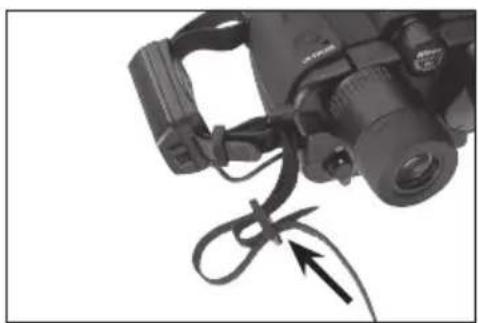
Close-up of a DSLR camera with a coiled cable and directional arrow indicating cable attachment (no text or symbols)3) Lead the strap inside the loop and through the buckle and pull tight. Do the same with the outer loop.

natural_image
Close-up of a black-and-white photo of an optical binocular device with visible lenses and cables (no text or symbols)4) Do the same with the opening in the binoculars to attach the strap on the other side.
Keep Your Lenses Clean
Dust, salt and oil left from fingerprint smudges should never be allowed to remain on the lenses because they can harm the coatings applied to lens surfaces.
Use lens cleaning tissues and lens cleaning fluid. Both are usually available wherever cameras, binoculars or eye glasses are sold. For best results, when you need to clean one lens, clean all four.
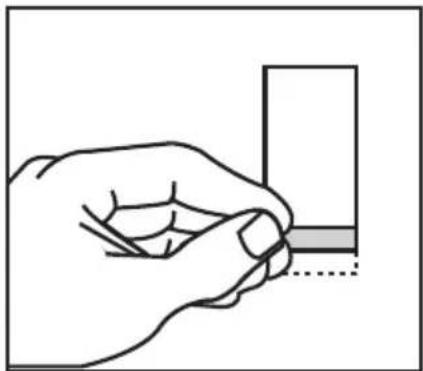
Start by blowing off any dust that may be on the lenses. Then, follow these steps...
natural_image
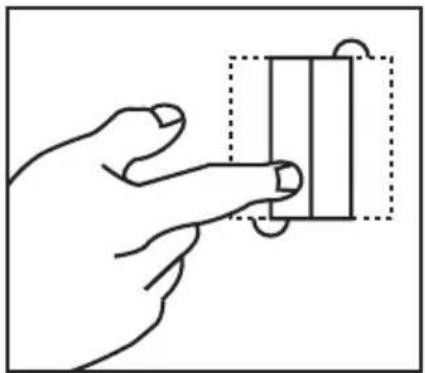
Hand holding a rectangular object with a dashed box and circular arrow, no text or symbols presentTake a single lens tissue and fold it twice as shown.
natural_image
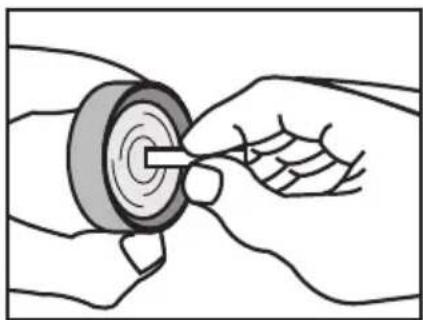
Hand holding a small object with a shaded section, no visible text or symbolsRoll the tissue into a cylinder and moisten only one tip with lens cleaning fluid.
natural_image
Illustration of hands using a tool to adjust or install a mechanical component (no text or symbols visible)Starting in the center of the lens, gently rub in a circular motion from the center to the outside.
Use each tissue only once. Sometimes, it may be necessary to repeat the process.
Specifications
Magnification....12x
Compensation Angle
(Stabilization Freedom)....±3°
Objective Lens Diameter .....32mm
Eye Relief 15mm
Angular field of view (real).....5°
Field of View at 1,000m .....87m
Close Focusing Distance......3.5m
Exit Pupil 2.7mm
Brightness 7.3
Interpupillary Distance Adjustment 56\~72mm
Structure......Waterproof (dry nitrogen purged)
Dimensions: L x W ...... 178 x 142mm
Weight 1130g
(without batteries)
Battery Operating Life ......6 hours
(continuous
operation with four
AA-type alkaline
batteries: at 20°C)
Safe Ambient Temperature Range
-10^ to 50^
(14°F to 122°F)
Due to ongoing product improvement,
specifications may be subject to change without notice.
Waterproof models
The StabilEyes is waterproof, and will suffer no damage to the optical system if submerged or dropped in water to a maximum depth of 1 meter for up to 5 minutes.
The StabilEyes offers the following advantages:
- Can be used in conditions of high humidity, dust and rain without risk of damage.
- Nitrogen-filled design makes it resistant to condensation and mold.
Observe the following when using the StabilEyes:
- As the unit does not have a perfectly sealed structure, it should not be operated nor held in running water.
- Any moisture should be wiped off before adjusting movable parts (focusing knob, eyepiece, etc.) of the StabilEyes to prevent damage and for safety reasons.
To keep your StabilEyes in excellent condition, Nikon Vision recommends regular servicing by an authorized dealer.
This device complies with Part 15 of the FCC Rules. Operation is subject to the following two conditions: (1) This device may not cause harmful interference, and (2) this device must accept any interference received, including interference that may cause undesired operation.
This equipment has been tested and found to comply with the limits for a Class B digital device, pursuant to Part 15 of the FCC Rules and to EU EMC directive. These limits are designed to provide reasonable protection against harmful interference in a residential installation. This equipment generates, uses and can radiate radio frequency energy and, if not installed and used in accordance with the instructions, may cause harmful interference to radio communications. However, there is no guarantee that interference will not occur in a particular installation. If this equipment does cause harmful interference to radio or television reception, which can be determined by turning the equipment off and on, the user is encouraged to try to correct the interference by one or more of the following measures:
- Reorient or relocate the receiving antenna.
- Increase the separation between the equipment and receiver.
- Consult the dealer or an experienced radio/TV technician for help.
This Class B digital apparatus meets all requirements of the Canadian Interference-Causing Equipment Regulations
Félicitations
natural_image
Close-up of a mechanical component with a curved arrow indicating rotational motion (no text or symbols)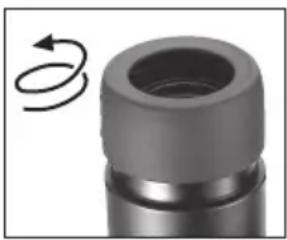
natural_image
Close-up of a mechanical component with a circular arrow indicating rotational motion (no text or symbols)natural_image
Close-up of two black binoculars with directional arrows indicating light or movement (no text or symbols visible)natural_image
Black handheld optical device with dual lenses and a battery pack, no visible text or symbolsAVERTISSEMENT
natural_image
Close-up of hands holding a Nikon Ultrasonic optical binoculars (no text or symbols visible on the device itself)natural_image
Close-up of a black athletic device with a white arrow pointing to its side panel (no visible text or symbols)AVERTISSEMENT
natural_image
Close-up of a black ribbon cable with a loop, isolated on white background (no text or symbols)natural_image
Close-up of a Nikon DSLR camera with visible lens and attached cable (no text or symbols)natural_image
Close-up of a DSLR camera with a coiled cable and directional arrow indicating cable attachment (no text or symbols)natural_image
Close-up of a black binoculars with attached cables and a clip, no visible text or symbolsnatural_image
Hand holding a rectangular object with a dotted border (no text or symbols visible)natural_image
Line drawing of a hand holding a small object, no text or symbols presentnatural_image
Illustration of hands using a tool to adjust a circular component (no text or symbols present)natural_image
Close-up of a mechanical component with a curved arrow indicating rotational motion (no text or symbols)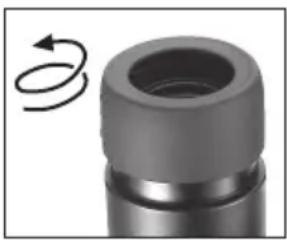
natural_image
Close-up of a mechanical component with a circular arrow indicating rotational motion (no text or symbols)natural_image
Close-up of two black binoculars with directional arrows indicating light or movement (no text or symbols visible)natural_image
Diagram of a mechanical or electrical component with layered structure and internal components (no text or symbols)
Öffnen
natural_image
Simple line drawing of a mechanical component with no text or symbolsSchließen
natural_image
Black handheld optical device with dual lenses and a battery pack, no visible text or symbols⚠ VORSICHT
natural_image
Close-up of hands holding a Nikon Ultrasonic optical binoculars (no text or symbols visible on the device itself)natural_image
Close-up of a black electronic device with a white arrow pointing to a button, partially enclosed in a black strap (no visible text or symbols)⚠ VORSICHT
natural_image
Close-up of a black ribbon cable with looped ends, isolated on white background (no text or symbols)natural_image
Close-up of a Nikon DSLR camera with attached strap and cable (no visible text or symbols)natural_image
Close-up of a DSLR camera with a coiled cable and directional arrow indicating cable attachment (no text or symbols)natural_image
Close-up of a black binoculars with attached cables (no visible text or symbols)natural_image
Line drawing of a hand pressing a button on a rectangular object (no text or symbols)natural_image
Hand holding a small object with a shaded section, no visible text or symbolsnatural_image
Illustration of a hand using a tool to adjust or install a mechanical component (no text or symbols visible)natural_image
Close-up of a mechanical component with a curved arrow indicating rotational motion (no text or symbols)natural_image
Close-up of a mechanical component with a circular arrow indicating rotational motion (no text or symbols)natural_image
Black handheld device with dual lenses and a battery pack, no visible text or symbolsADVERTENCIA
natural_image
Close-up of hands holding a Nikon Ultrasonic optical binoculars (no text or symbols visible on the device itself)natural_image
Close-up of a black electronic device with a white arrow pointing to its side panel, partially enclosed in a dark bag (no visible text or symbols)natural_image
Close-up of a black ribbon cable with looped ends, isolated on white background (no text or symbols)natural_image
Close-up of a Nikon II camera with visible lens and attached cable (no text or symbols)natural_image
Close-up of a DSLR camera with a coiled cable and directional arrow indicating cable attachment (no text or symbols)natural_image
Close-up of a black binoculars with attached cables (no visible text or symbols)natural_image
Hand holding a rectangular object with a dashed outline, no text or symbols visiblenatural_image
Hand holding a small object with a dotted line indicating a detail (no text or symbols)natural_image
Illustration of hands using a tool to adjust a mechanical component (no text or symbols visible)natural_image
Close-up of a mechanical component with a circular arrow indicating rotational motion (no text or symbols)natural_image
Close-up of a mechanical component with a circular arrow indicating rotational motion (no text or symbols)natural_image
Close-up of two black binoculars with directional arrows indicating light or movement (no text or symbols visible)natural_image
Black handheld optical device with dual lenses and a battery pack, no visible text or symbolsAVVERTENZA
natural_image
Close-up of hands holding a Nikon Ultrasonic optical binoculars (no text or symbols visible on the device itself)natural_image
Close-up of a black athletic device with a white arrow pointing to its side panel (no visible text or symbols)natural_image
Close-up of a black ribbon cable with looped ends, isolated on white background (no text or symbols)natural_image
Close-up of a Nikon II camera with visible lens and attached strap (no text or symbols)natural_image
Close-up of a DSLR camera with a coiled cable and directional arrow indicating cable attachment (no text or symbols)natural_image
Close-up of a black binoculars with attached cables and a cable (no visible text or symbols)natural_image
Line drawing of a hand pressing a rectangular block with a dashed outline (no text or symbols)natural_image
Hand holding a small object with a shaded section, no visible text or symbolsnatural_image
Illustration of a hand using a tool to adjust or install a mechanical component (no text or symbols visible)En Symbol for separate collection applicable in European countries
This symbol indicates that this product is to be collected separately.
The following apply only to users in European countries.
- This product is designated for separate collection at an appropriate collection point. Do not dispose of as household waste.
- For more information, contact the retailer or the local authorities in charge of waste management.
Customer Service Department
3-25, Futaba 1-chome, Shinagawa-ku,
Tokyo 142-0043, Japan
Tel: +81-3-3788-7699 Fax: +81-3-3788-7698