StabilEyes 14x40 - Binoculars NIKON - Free user manual and instructions
Find the device manual for free StabilEyes 14x40 NIKON in PDF.
| Product type | Image-stabilized binoculars |
| Brand and model | Nikon StabilEyes 14x40 |
| Magnification | 14x |
| Objective lens diameter | 40 mm |
| Compensation angle (stabilization) | ±5° |
| Apparent field angle | 4° |
| Field at 1000 m | 70 m |
| Minimum focusing distance | 5 m |
| Exit pupil | 2.9 mm |
| Relative brightness | 8.4 |
| Interpupillary adjustment | 60 - 70 mm |
| Waterproof | Yes, waterproof up to 1 meter for 5 minutes, nitrogen-purged |
| Dimensions (L x W x H) | 186 x 148 x 88 mm |
| Weight (without batteries) | 1340 g |
| Power source | 4 AA alkaline batteries |
| Battery life | About 6 hours continuous operation (at 20°C) |
| Operating temperature | -10°C to 50°C |
| Stabilization modes | LAND (terrestrial) and ON BOARD (moving vehicle) |
| Main functions | Digital image stabilization, central focusing, right eyepiece diopter adjustment, LED status indicator |
| Maintenance and cleaning | Clean lenses with optical paper and suitable product; wipe off moisture; rinse with fresh water after marine use |
| Safety | Do not look directly at the sun; do not use while walking; keep out of reach of children (plastic bags) |
| Spare parts and repairability | Repairs must be carried out only by Nikon Vision Co., Ltd. or an authorized dealer |
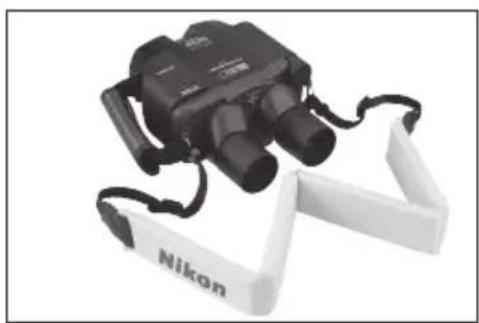
| General information | Supplied with case, wrist strap, shoulder strap, eyepiece covers, 4 AA batteries; multilingual manual |
Frequently Asked Questions - StabilEyes 14x40 NIKON
User questions about StabilEyes 14x40 NIKON
0 question about this device. Answer the ones you know or ask your own.
Ask a new question about this device
Download the instructions for your Binoculars in PDF format for free! Find your manual StabilEyes 14x40 - NIKON and take your electronic device back in hand. On this page are published all the documents necessary for the use of your device. StabilEyes 14x40 by NIKON.
USER MANUAL StabilEyes 14x40 NIKON
Steadies your hands and stabilizes your view.
はしもに
This is the only way to stop the fire.
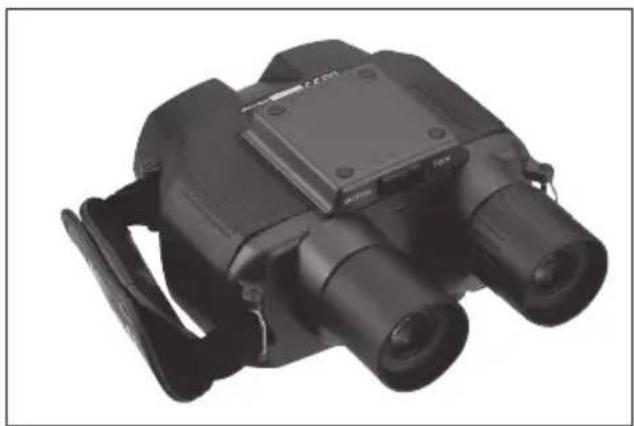
Your new Nikon StabilEyes binoculars represent an outstanding combination of advanced design and technology in optics, electronics, ergonomics and control features. They are the first to combine the most advanced image stabilizing system with a totally waterproof design.
Until now, being able to use a pair of binoculars with power as high as 14x meant either holding them for only a few seconds at a time or steadying them with a tripod or pedestal. It was literally impossible to use such powerful binoculars aboard a moving vehicle, such as a sailboat or powerboat, car, plane or helicopter without investing heavily in exotic equipment. Nikon has changed that.
There are binoculars you can take and use anywhere to enjoy clear, bright, sharp images that are rock steady. Every lens is multicoated and the prisms are phase coated, a feature shared with the world's costliest roof prism binoculars.
Select the stabilization mode — LAND or ON BOARD — that best suits your situation. While the StabilEyes is waterproof, fogproof, and robust enough to deliver many years of dependable performance, it is also a sophisticated electro-optical instrument that deserves proper care in its use and storage. Please read this manual carefully and follow the instructions in order to derive the maximum performance from your StabilEyes binoculars.
Items Supplied
StabilEyes x1
Soft case x1
Hand strap x1
Neckstrap x1
Eyepiece cap x1
Battery (AA-type alkaline) x4
WARNING:
High level warning against severe personal harm or serious product damage.
CAUTION:
Precautions that should be followed in order to prevent damage to the product or injury to those using it.
WARNING:
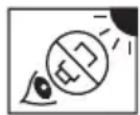
Never look directly at the sun or any bright light through the binoculars. Serious harm, including loss of vision, can result.
CAUTION:
- The StabilEyes binoculars are waterproof. But they can be damaged if water or other foreign material (dust, sand, etc.) gain entry. Do not open the battery compartment in a marine, high-humidity or dusty environment, as the interior of the binoculars can be compromised. Whether using internal batteries or external power, make sure the O-ring and battery holder or adapter are firmly seated, and locked in position.
- Do not change batteries or power connections in wet or dusty conditions.
- To help prevent impact damage from dropping or falling, do not place the StabilEyes on slippery or unstable surfaces. Also, be aware that damage arising from abuse or misuse can void the StabilEyes warranty.
- If you plan to leave the binoculars stored for long periods of time, keep them in a cool, dry location and remove the batteries or damage could result from leakage.
- When batteries must be replaced, replace all four at the same time, using the same type and brand.
- Never attempt to burn batteries in a fire. An explosion could result.
-
While NiCd batteries are rechargeable, never attempt to recharge ordinary batteries, Never short circuit the batteries.
-
Avoid extreme hot and cold temperatures and rapid changes. (For example, if the binoculars have been used in very cold conditions, bringing them into a heated environment could cause condensation to build up. Allow time for a gradual adjustment.)
- If you use the StabilEyes at sea, Nikon recommends that you rinse them clean by dipping them in fresh water, without pouring water onto them directly, following exposure to salt spray/salt air.
- Avoid leaving the binoculars unattended and exposed to direct sunlight. Sunlight rays passing through the lenses could cause a fire.
- Never try to walk and use the binoculars at the same time; accident and injury could result.
- Do not swing the binoculars by the neckstrap; the binoculars might strike and injure someone or be damaged by hitting a solid object.
- Please dispose of any plastic bags that may come with StabilEyes; such bags could suffocate or choke a small child.
- Prolonged use with contact of the rubber eyepieces against the skin can cause irritation. If such a condition persists, consult you doctor.
- If you experience any problem with your StabilEyes binoculars, never attempt to repair them yourself or have them repaired by anyone other than NIKON VISION CO., LTD. Return it to your local dealer or directly to NIKON.
Getting Acquainted
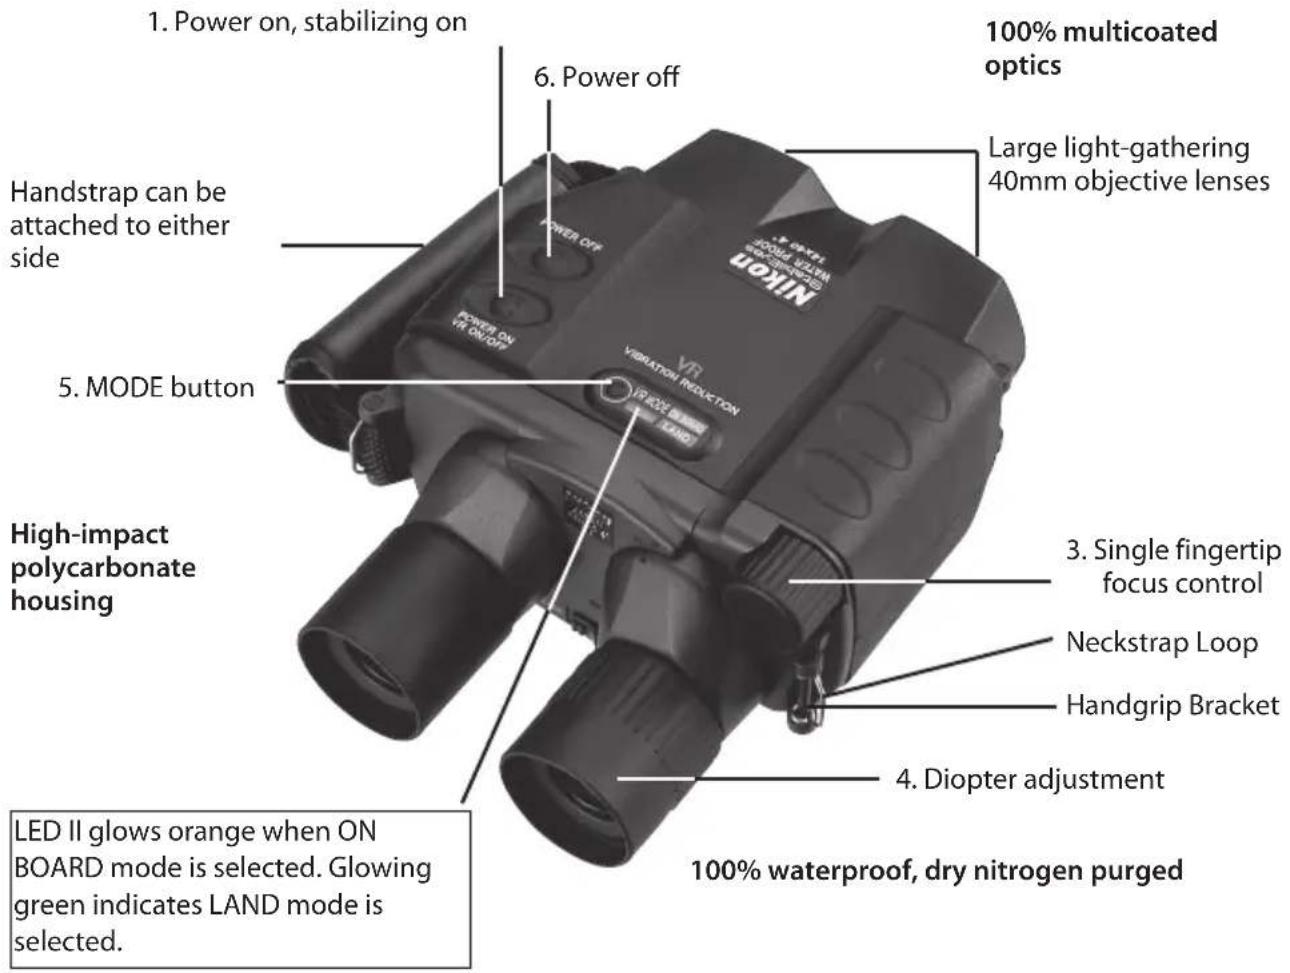
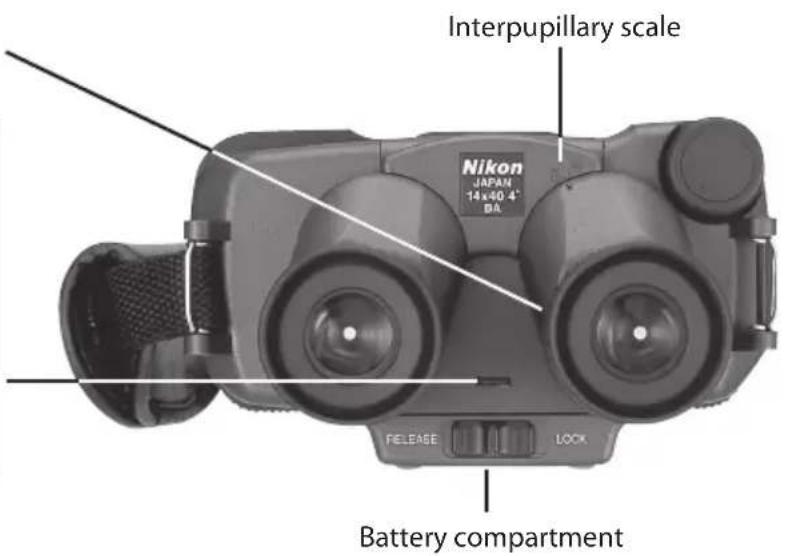
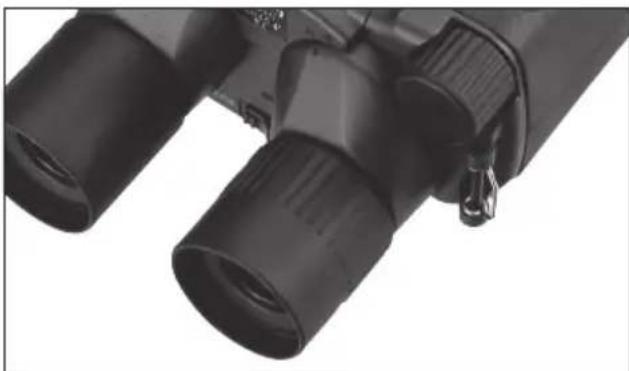
2. Eyepieces adjust for interpupillary distance
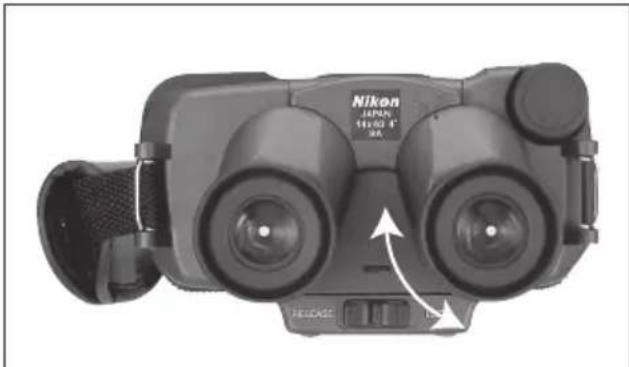
The multi-color LED status indicator (LED I) glows orange when the power is turned on and when the unit is in standby; green confirms stabilization is active. Flashing orange and green indicates weak batteries. Glowing red indicates the batteries are exhausted and should be replaced. Red flashes to warn of a system problem.
Battery Installation
The StabilEyes operates on four AA batteries. To install a fresh set of batteries, turn the binoculars on their back, and slide the lock to the open position.
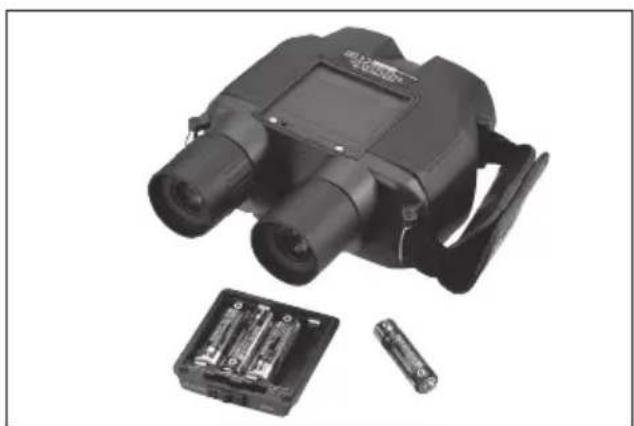
Remove the battery holder and insert the batteries. When returning the battery holder to the binoculars, be certain to seat it properly, with the O-ring in place, and move the slide to the locked position. This seals the binoculars to help keep them waterproof.
Fast Start
- Press the ON button (1) — the system powers up and performs a 5-second system check
- Press the ON button (1) again, stabilization is activated
- Adjust the eyepieces (2) to match the distance between your eyes (until you see a single round image)
- Focus left eye using focus control knob (3)
- Twist the right eyepiece (4) for any necessary diopter correction
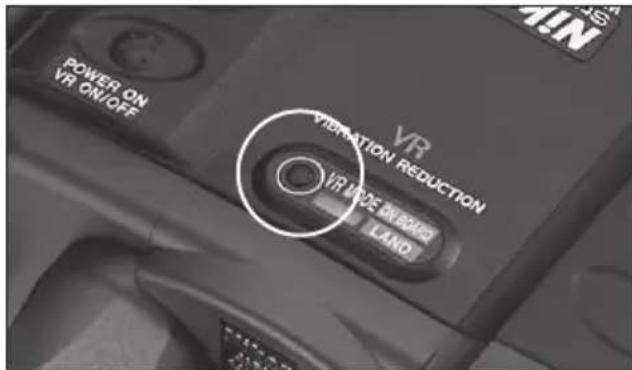
- Select the stabilization mode — LAND or ON BOARD — that best suits your situation by pressing the MODE button (5).
- Check focus again using only the control knob (3)
When you have finished observing, press the OFF button (6), attach the lens caps, and return the StabilEyes to its case.
StabilEyes Digital Image Stabilizing — Here's How It Works
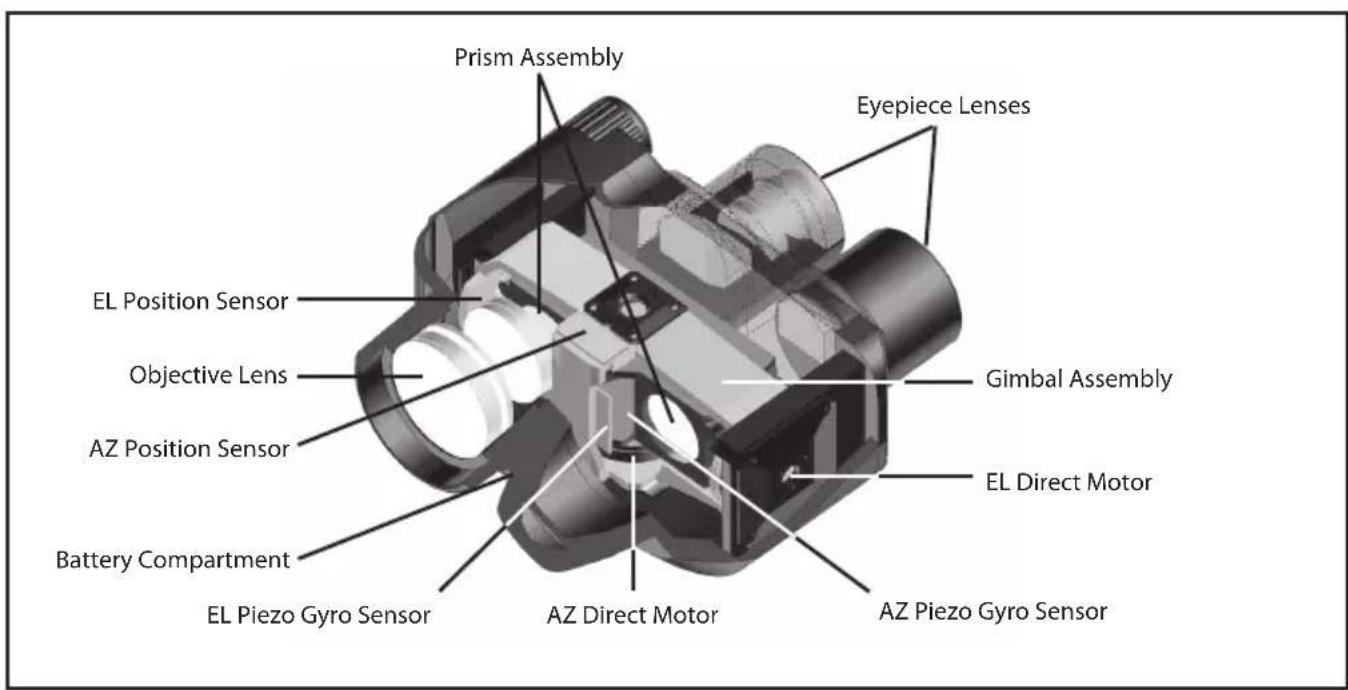
The microprocessor-controlled 14x40 StabilEyes binoculars rely on a system that includes the following: a gimbaled assembly with erecting prisms, sensors that detect vibration and motion vertically and horizontally, and direct drive motors that provide instant correction.
AZ (azimuth) and EL (elevation) piezo gyro vibration sensors detect any cyclical and repetitive motion, such as that encountered on a boat (or any moving platform); the AZ and EL gyro sensors detect the direction in which the binocular is aimed. All four inputs are received by the microprocessor; output signals to the direct drive motors institute the
necessary corrections within the ± 5^ freedom of stabilization angle to achieve ± 0^ accuracy. In operation, the system is silent. The motors operate only when correction is called for, thus conserving power and extending component operating life.
Compared to other binocular image stabilizing schemes, the StabilEyes not only eliminates jittery images due to muscle tremor, but also corrects for vibration as well as the kinds of movements encountered on aircraft, sea and land vehicles.
Switching Stabilization Mode
StabilEyes allows you to switch between the two stabilization modes to suit your situation.
1.LANDmode
Select when using StabilEyes on land, in a relatively stable position with pan or tilt, such as bird watching.
- ON BOARD mode
Select when using StabilEyes in a high-vibration situation, such as on a moving vehicle.
Installing the Handstrand
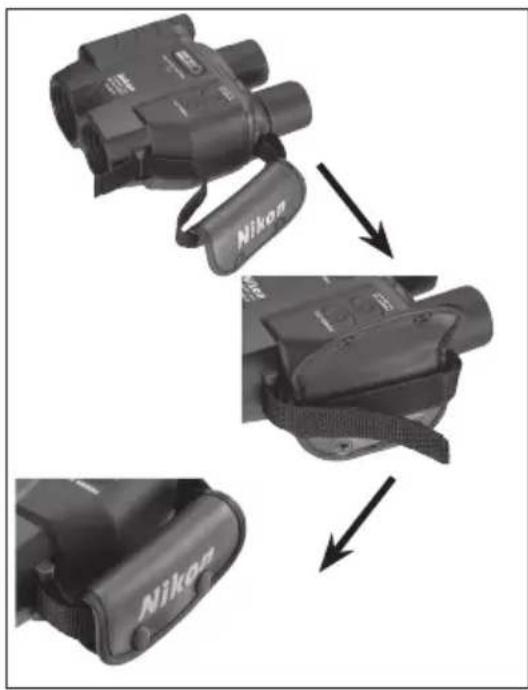
The handstrap may be installed on either side of the StabilEyes. First, open the two snap closures on the handstrap cushion and open both ends of the hook-and-loop strap. As you will see, the strap is permanently attached to the handstrap cushion. Insert one strap through the bracket on the binoculars and press it against itself. Then do the same with the other end of the strap. Close the cover, snap the closures and the handstrap is ready to use.
Installing the Neckstrap
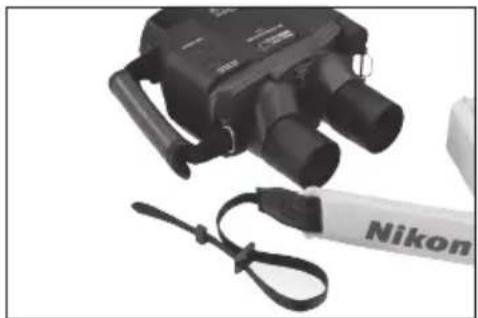
- Make a large loop at each end of the neckstrap.
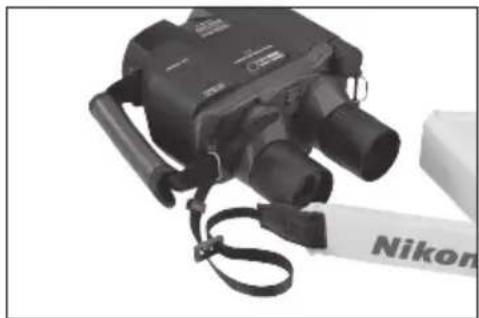
- Insert the strap through the neckstrap bracket.
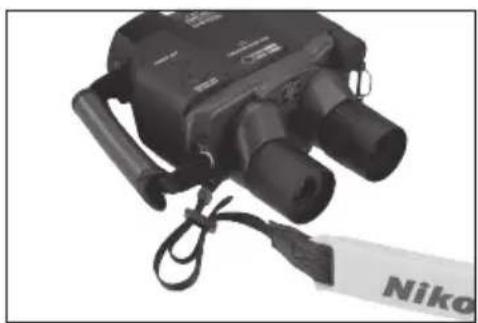
- Lead the strap inside the loop and through the buckle and pull tight. Do the same with the outer loop. Repeat on the other side of the binoculars.
- Neckstrap installed.
How to Use and Focus
- If you wear glasses or sunglasses when using binoculars, fold back the rubber eyecup on each eyepiece (ocular lens) so you can view complete images.
- Next, grasp either eyepiece and rotate it towards or away from the center of the binocular (the other eyepiece will move equally in the opposite direction.)
Adjust the interpupillary distance to match the distance between your eyes until you see just one perfectly round image.
- There are two steps to focusing: Close your right eye and use only your left eye as you adjust the focus control knob (3). When the image is sharp, close your left eye and open your right eye. Twist the right eyepiece, to focus for the right eye. Now open both eyes and the binocular should be perfectly focused. You can do this with the StabliEyes turned on with stabilizing activated or with the power off completely.
- The StabilEyes power on/off sequence is simple. Pressing the POWER ON button (1) the first time activates an internal system check, causing the LED I (located between the two eyepieces) to glow orange. Pressing the POWER ON button a second time activates stabilization, and the LED I turns green.
The stabilization mode default is set for LAND mode (LED II: green). Pressing the MODE button changes it to ON BOARD mode (LED II: orange). Pressing the MODE button causes StabilEyes to switch modes, from ON BOARD to LAND, or vice versa. Simply select the stabilization mode that best suits your viewing situation.
If you press the same button a third time, the StabilEyes goes on standby (orange LED I again). Press it again, stabilization is reactivated. You may repeat this process as often as you wish. Reverting to standby conserves battery power. On the other hand, if you leave the StabilEyes in either standby or stabilization mode for about three minutes without using it, it will shut itself off automatically.
Operating System of StabilEyes
- Turning the power off automatically resets the vibration reduction mode to "Land" mode.
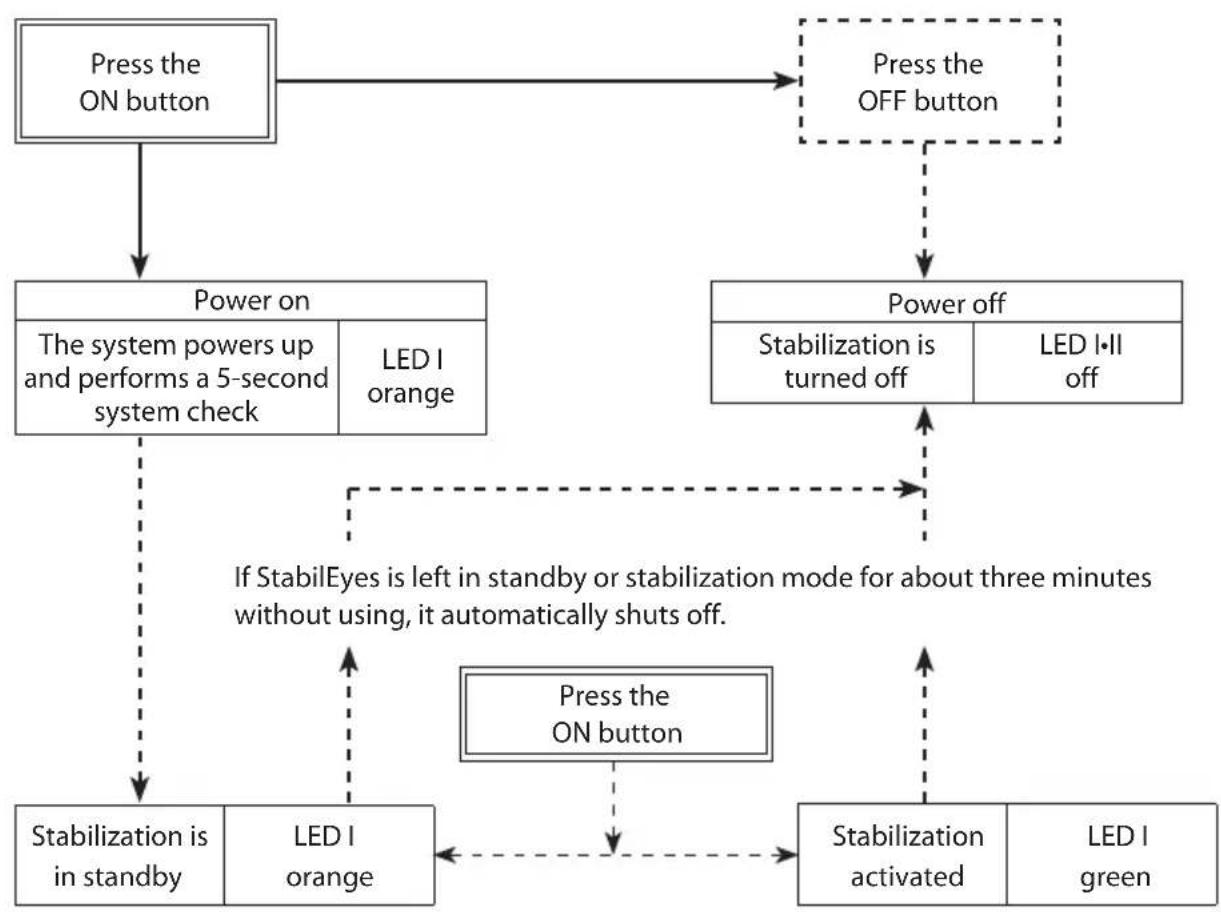
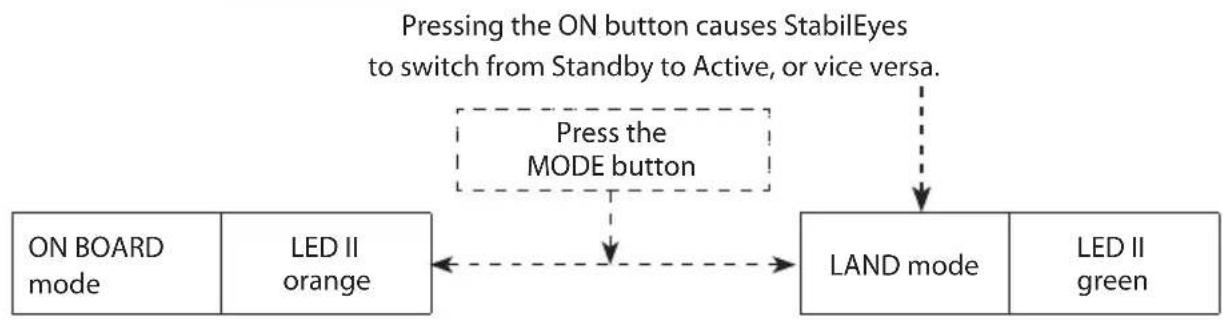
Pressing the MODE button causes StabilEyes to switch modes, from ON BOARD to LAND, or vice versa.
Keep Your Lenses Clean
Dust, salt and oil left from fingerprint smudges should never be allowed to remain on the lenses because they can harm the coatings applied to lens surfaces.
Use lens cleaning tissues and lens cleaning fluid. Both are usually available wherever cameras, binoculars or eye glasses are sold. For best results, when you need to clean one lens, clean all four.
Start by blowing off any dust that may be on the lenses. Then, follow these steps...
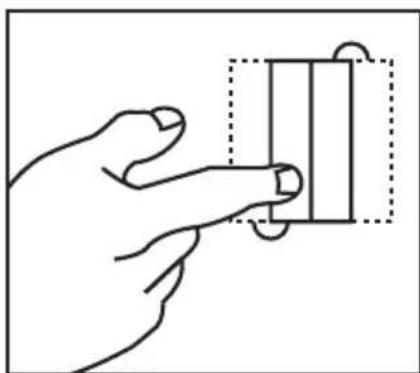
Take a single lens tissue and fold it twice as shown.
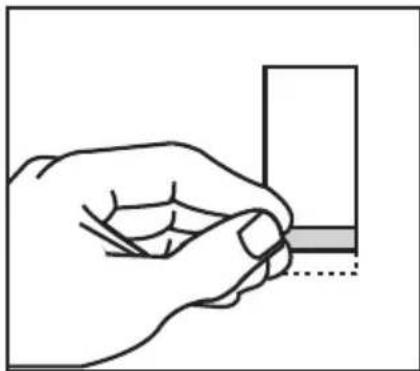
Roll the tissue into a cylinder and moisten only one tip with lens cleaning fluid.
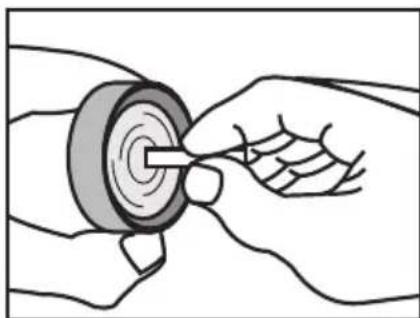
Starting in the center of the lens, gently rub in a circular motion from the center to the outside.
Use each tissue only once. Sometimes, it may be necessary to repeat the process.
Specifications
Magnification. 14x
Compensation Angle
(Stabilization Freedom)....±5°
Objective Lens Diameter. 40mm
Eye Relief 13mm
Apparent Field of View. 4^
Field of View at 1,000m .70m
Close Focusing Distance. 5m
Exit Pupil. 2.9mm
Brightness 8.4
Interpupillary Distance Adjustment 60~70mm
Structure.Waterproof (dry nitrogen purged)
Dimensions: L × W × D. 186 × 148 × 88mm
Weight. 1340g
(without batteries)
Battery Operating Life .6 hours
(continuous
operation with four
AA-type alkaline
batteries: at 20^
Safe Ambient Temperature Range
-10°C to 50°C
(14°F to 122°F)
Due to ongoing product improvement,
specifications may be subject to change without notice.
Waterproof models
The StabilEyes is waterproof, and will suffer no damage to the optical system if submerged or dropped in water to a maximum depth of 1 meter for up to 5 minutes.
The StabilEyes offers the following advantages:
- Can be used in conditions of high humidity, dust and rain without risk of damage.
- Nitrogen-filled design makes it resistant to condensation and mold.
Observe the following when using the StabilEyes: - As the unit does not have a perfectly sealed structure, it should not be operated nor held in running water.
- Any moisture should be wiped off before adjusting movable parts (focusing knob, eyepiece, etc.) of the StabilEyes to prevent damage and for safety reasons.
To keep your StabilEyes in excellent condition, Nikon Vision recommends regular servicing by an authorized dealer.
This device complies with Part 15 of the FCC Rules. Operation is subject to the following two conditions: (1) This device may not cause harmful interference, and (2) this device must accept any interference received, including interference that may cause undesired operation.
This equipment has been tested and found to comply with the limits for a Class B digital device, pursuant to Part 15 of the FCC Rules and to EU EMC directive. These limits are designed to provide reasonable protection against harmful interference in a residential installation. This equipment generates, uses and can radiate radio frequency energy and, if not installed and used in accordance with the instructions, may cause harmful interference to radio communications. However, there is no guarantee that interference will not occur in a particular installation. If this equipment does cause harmful interference to radio or television reception, which can be determined by turning the equipment off and on, the user is encouraged to try to correct the interference by one or more of the following measures:
- Reorient or relocate the receiving antenna.
- Increase the separation between the equipment and receiver.
- Consult the dealer or an experienced radio/TV technician for help.
This Class B digital apparatus meets all requirements of the Canadian Interference-Causing Equipment Regulations
Felicitations
Position de I'oeil 13mm
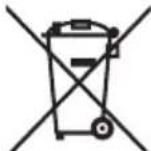
Symbol for separate collection applicable in European countries
This symbol indicates that this product is to be collected separately. The following apply only to users in European countries.
- This product is designated for separate collection at an appropriate collection point. Do not dispose of as household waste.
- For more information, contact the retailer or the local authorities in charge of waste management.

CMBOI COPTHPOBKM Mycopa, MCNONB3yOuMnC B EBpOeNCKX CTpaHAX
JaHbMnCBmON O3HaAET, YTO TOT npOyK TOnKx yTNN3HPOBATcR OTEnbHOOTdpyTnx. PnBeEHnHnHex HOpmaa KAcTaCerToNtboNoB3oBatenen 3cTpaH EapnoI.
-DAHHHn npOyKT DoJKeH yTHIM3nPoBaTbCt ORdJIbHO O TpyHX B COOTBCTCYIOUXn PnEMHbX pHTkX.He BbOpacBaIe DAHHHn npOyKT BmecTe C bITOBm MycopoM.
IOnONHHTeBHyHO MHOPMaIHO BMOXETE NONYHTy npOaBaA HN MY MCTbHX BnACTe,OTBEaAOUX 3aYTINNAIO MyCOPA.

Symbol for speciel bortskaffelse af donne type produit I de europaeiske lande