BAR816HG - Weather Station OREGON SCIENTIFIC - Free user manual and instructions
Find the device manual for free BAR816HG OREGON SCIENTIFIC in PDF.


User questions about BAR816HG OREGON SCIENTIFIC
0 question about this device. Answer the ones you know or ask your own.
Ask a new question about this device
Download the instructions for your Weather Station in PDF format for free! Find your manual BAR816HG - OREGON SCIENTIFIC and take your electronic device back in hand. On this page are published all the documents necessary for the use of your device. BAR816HG by OREGON SCIENTIFIC.
USER MANUAL BAR816HG OREGON SCIENTIFIC
Wireless Weather Station
Model: BAR816HG
USER MANUAL
CONTENTS
Introduction 2
Product Overview 3
Front View. 3
Back View 4
Table Stand and Wall Mount 5
Remote Sensor (RTGR328N) 7
Getting Started 8
Batteries 8
Change Settings 9
Remote Sensor 9
Set Up Thermo / Hygro Sensor (RTGR328N) .... 9
Sensor Data Transmission 10
Search for Sensor 11
Clock and Calendar 11
Radio-Controlled Clock 11
Turn Radio-Controlled Clock ON/OFF 12
SetClock 12
SwitchClockDisplay 12
Alarms 13
Set Daily Alarm 13
Set Pre-Alarm 13
Activate Alarm 14
Snoopze 14
Barometer 14
View Barometer Area 14
Select Measurement Unit 14
View Barometer History 14
Set Altitude 14
Weather Forecast 15
Weather Forecast Icons 15
Temperature and Humidity 15
View Temperature and Humidity Area 16
Select Measurement Unit 16
Select Sensor Channel 16
Minimum / Maximum Records 16
Temp, Humidity & Pressure Trend 16
Comfort Zone 17
Backlight 17
Reset System 17
Safety and Care 17
Warnings 17
Troubleshooting 18
Specifications 18
About Oregon Scientific 20
EU-Declaration of Conformity 20
INTRODUCTION
Thank you for selecting the Oregon Scientific™ Wireless Weather Station (BAR816HG). This powerful device bundles time keeping, weather monitoring, indoor and outdoor temperature and humidity readings, barometric pressure trends and altitude adjustment, into a single tool you can use from the convenience of your home.
In this box, you will find:
- Main unit
Remote sensor (RTGR328N)
Batteries
NOTE The main unit is compatible with the following sensors:
THGR228N, THGR328N, THR228N, THR328N, THWR288.
Additional sensors are sold separately. Please contact your local retailer for more information.
Keep this manual handy as you use your new product. It contains practical step-by-step instructions, as well as technical specifications and warnings you should know.
PRODUCT OVERVIEW
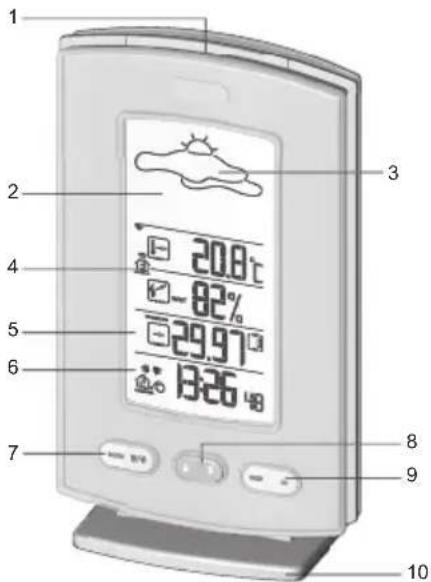
FRONT VIEW
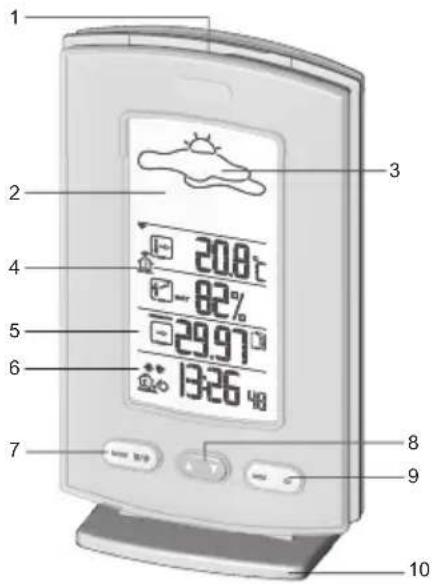
- SNOOZE / LIGHT: Activate 8-minute snooze or backlight
- LCD display
- Weather Forecast Area: Animated weather forecast
- Temperature / Humidity Area: Readings and trend lines; sensor channel number
- Barometer Area: Barometric pressure readings and trend lines
- Clock / Alarm / Calendar Area: Radio-controlled clock; alarms; calendar
- MODE: Switch areas; change settings / display
View alarm status; set alarm
- Increase setting; toggle between display modes Decrease setting; toggle between display modes
- MEM: View current, maximum and minimum temperature / humidity readings and historical barometer readings
CH: Switch remote sensor display - Table stand
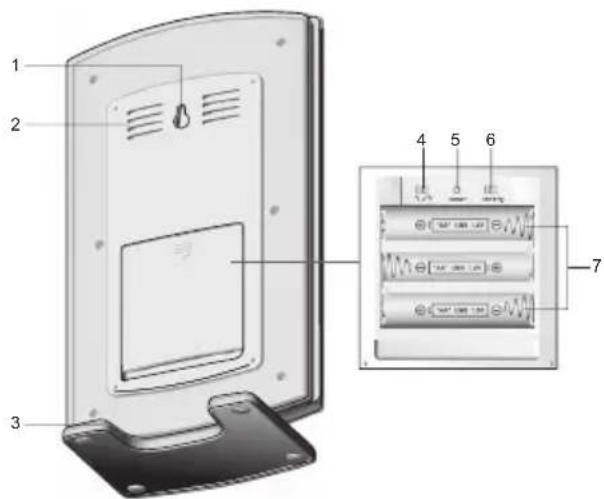
- Wall mount
- Ventilation holes
- Table stand
- ^ C / ^ switch
- RESET button
- mb / inHg switch
- Battery compartment (cover off)
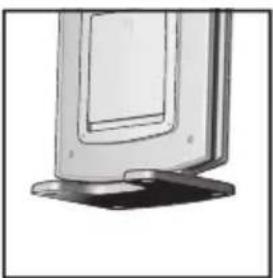
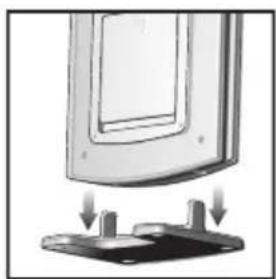
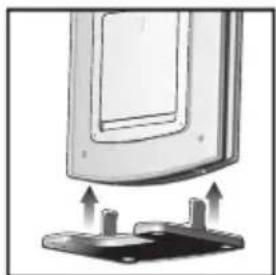
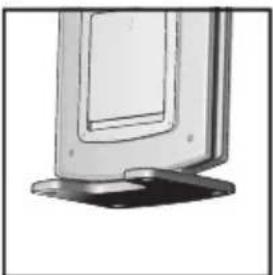
TABLE STAND AND WALL MOUNT
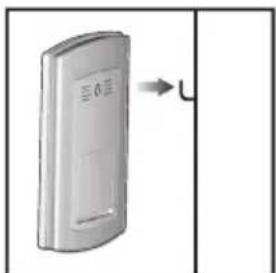
To fix the table stand on to the base of the main unit:
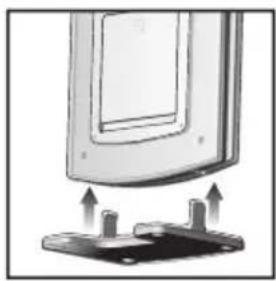
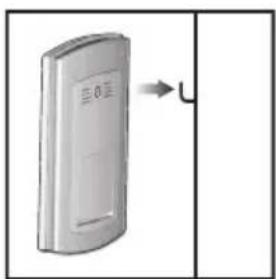
To mount the unit on the wall:
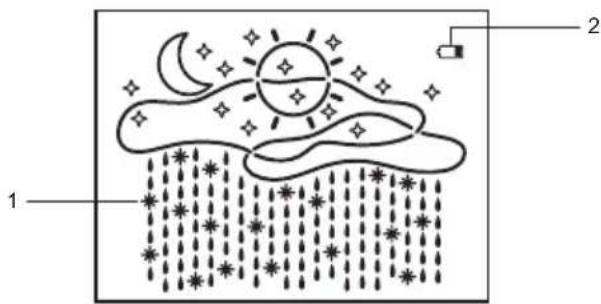
Weather Forecast Area
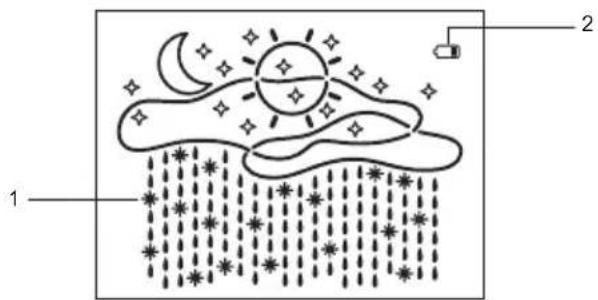
- Weather display
- Low battery icon for main unit
Temperature / Humidity Area
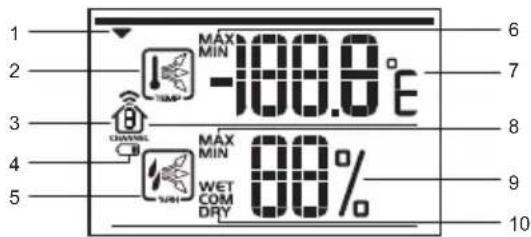
- Selected Area icon
- Temperature trend
- Channel number (1-5) / reception status
- Low battery icon for remote sensor
- Humidity trend
- MAX / MIN temperature
- Temperature - ^ C / ^ F
- MAX / MIN humidity
- Humidity
- Comfort levels
Barometer Area
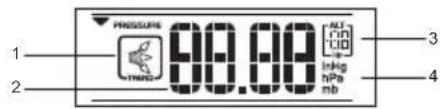
- Barometric pressure trend
- Barometric pressure reading
- Barometric pressure history
e.g., -1 means barometric pressure value one hour ago, -2 means 2 hours ago etc
- Barometric unit
Clock / Alarm / Calendar Area

- Pre-Alarm / Alarm display or setting
- Pre-Alarm is set
- Channel with RF clock reception is locked
- RF clock reception icon
- Daily Alarm is set
- Offset time-zone
- Time / date / calendar
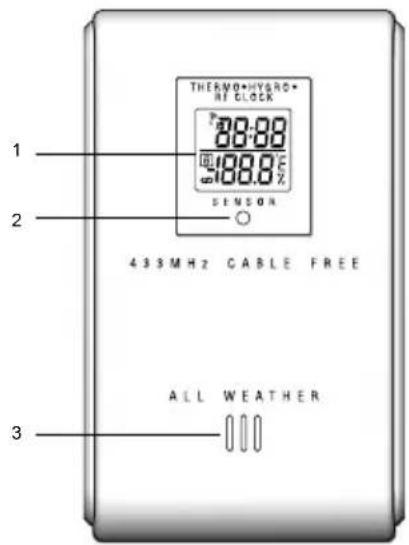
- LCD display
- LED status indicator
- Ventilation duct
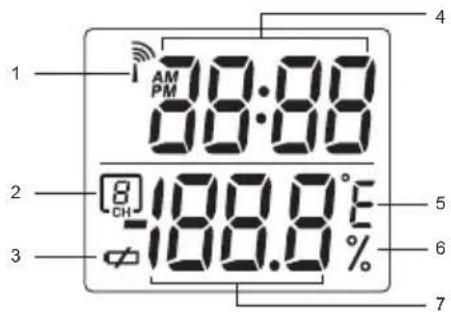
- Signal reception
- Channel number
- Low battery icon
- Time
- Temp (°C or °F)
- Humidity %
- Temp / Humidity
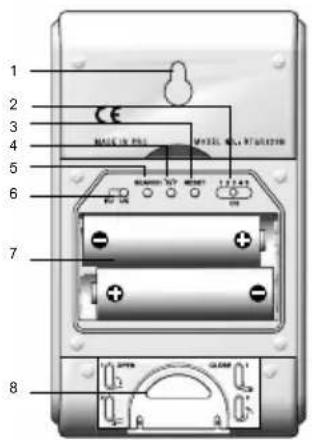
- Wall mount
2.CHANNEL switch (1-5) - RESET
- ^ C / ^
5.SEARCH - EU/UK radio signal format switch
- Battery compartment
- Fold-out stand
GETTING STARTED
BATTERIES
Batteries are supplied with this product:
- Main unit 3 × UM-3 (AA) 1.5V
Remote unit 2× UM-3 (AA) 1.5V
Insert batteries before first use, matching the polarity as shown in the battery compartment. For best results, install batteries in the remote sensor before the main unit. Press RESET after each battery change.
To install the main unit batteries:
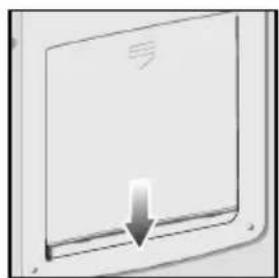
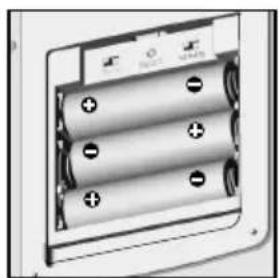

Do not use rechargeable batteries.

shows when batteries are low.
NOTE It is recommended that you use alkaline batteries with this product for longer performance.
| UNIT LOCATION | |
| Main Weather Forecast Area | |
| Remote Temperature / Humidity Area |
CHANGE SETTINGS
- Press MODE to switch between Areas. indicates the selected Area.
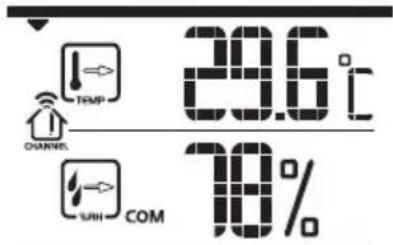
- Most Areas have alternate display options (for example, Clock / Calendar). Press or to switch options, or to switch between clock and alarm.
- Press and hold MODE for 2 seconds to enter setting mode.
- Press or to change settings.
- Press MODE to confirm.
REMOTE SENSOR
This product is shipped with the RTGR328N Thermo / Hygro Sensor. The main unit can collect data from up to 5 Thermo / Hygro Sensors. The main unit is compatible with the following sensors:
THGR228N, THGR328N, THR228N, THR328N, THWR288.
(Additional sensors are sold separately. Contact your local retailer for more information.)
The RTGR328N Sensor collects temperature and humidity readings, and signals from official time-keeping organizations for the radio-controlled clock.
SET UP THERMO / HYGRO SENSOR (RTGR328N)
- Open the battery compartment with a small Phillips screwdriver.
- Insert the batteries.
- Set the channel and radio signal format. The switches are located in the battery compartment.
| SWITCH OPTION | |
| Channel If you are using more than one sensor, select a different channel for each sensor. | |
| Radio Signal EU Format | DCF) / UK (MSF) |
- Press RESET. Then set the temperature unit.
| SWITCH OPTION | |
| Temp °C / °F |
- Close the battery compartment.
To fold out the stand:
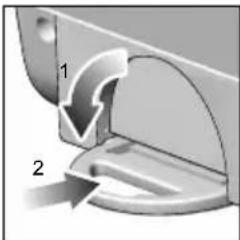
For best results:
- Insert the batteries and select the unit, channel, and radio signal format before you mount the sensor.
- Place the sensor out of direct sunlight and moisture.
- Do not place the sensor more than 70 metres (230 feet) from the main (indoor) unit.
- Position the sensor so that it faces the main (indoor) unit, minimizing obstructions such as doors, walls, and furniture.
-
Place the sensor in a location with a clear view to the sky, away from metallic or electronic objects.
-
Position the sensor close to the main unit during cold winter months as below-freezing temperatures may affect battery performance and signal transmission.
NOTE The transmission range may vary and is subject to the receiving range of the main unit.
You may need to experiment with various locations to get the best results.
SENSOR DATA TRANSMISSION
Data is sent from the sensor(s) every 60 seconds. The reception icon shown in the Temperature / Humidity Area indicates the status.
| NOTE ICON DESCRIPTION | |
| → → | Main unit is searching for sensors. |
| → → | At least 1 channel has been found. |
| CHANNEL | Sensor 1 is sending data. (The number shows which sensor is selected.) |
| — shows in Temp / The selected Humidity Area cannot be found. | Search for the sensor or check batteries. |
SEARCH FOR SENSOR
To search for a Thermo / Hygro sensor, press MODE to navigate to the Temperature/Humidity Area. will show next to the Area. Then, press and hold MEM CH for 2 seconds.
NOTE If the sensor is still not found, check the batteries.
CLOCK ANDCALENDAR
This product tracks the time and date based on radio-controlled signals from the RTGR328N remote sensor, or manual settings that you enter.
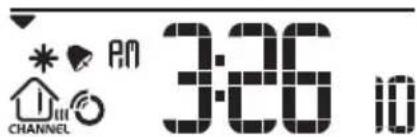
RADIO-CONTROLLED CLOCK
The time and date are automatically updated by radio-controlled clock signals from official time-keeping organizations in Frankfurt (Germany) and Rugby (England) unless you disable this feature. The signals are collected by the remote sensor (RTGR328N) whenever it is within 1500km (932 miles) of a signal.
Initial reception takes 2-10 minutes, and is initiated when you first set up the unit, and whenever you press RESET. Once complete, the reception icon will stop blinking.
The ICON shown in the Clock Area indicates 2 factors:
- Connection between the main unit and the sensor that collects RF signals (10)
RF signal reception (
How these signals work together:
| ICON MEANING | |
| CHANNEL | The unit has contact with the sensor and has synchronized the time. |
| CHANNEL | The unit has contact with the sensor but the time has not been synchronized. |
| CHANNEL | The unit has lost contact with the remote sensor but the time is synchronized. |
| CHANNEL | The unit has lost contact with the remote sensor and the time is not synchronized. |
| CHANNEL | The unit cannot reach the remote sensor. |
NOTE To force a manual search for RF clock reception, press and hold SEARCH on the sensor (RTGR328N) for 2 seconds.
TURN RADIO-CONTROLLED CLOCK ON / OFF
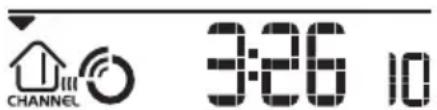
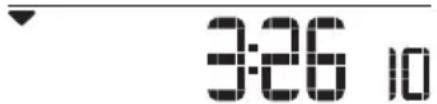
If you wish to manually set the clock, you must first disable the radio-controlled feature. To do this, navigate to the Clock / Alarm Area. Then, press and hold on the main unit for 2 seconds. To enable it, navigate to the Clock / Alarm Area, then press and hold for 2 seconds.
RF clock enabled:
RF clock disabled:
SET CLOCK
You only need to do this if you have disabled the radio-controlled clock, or if you are too far from a RF signal.
- Press MODE to navigate to the Clock Area. will show next to the Area.
- Press and hold MODE for 2 seconds.
- Select the time zone offset hour (+/ -23 hours), 12 / 24 hour format, hour, minute, year, date / month format, month, date and display language.
- Press or to change the setting.
- Press MODE to confirm.
NOTE The language options are (E) English, (F) French, (D) German, (I) Italian, and (S) Spanish. The language you select determines the weekday display.
SWITCH CLOCK DISPLAY
Press MODE to navigate to the Clock Area. will show next to the Area.
Press or to toggle between:
- Clock with seconds
Clock with day - Clock with time-zone offset
Calendar
ALARMS
This product has 2 alarms: The Daily Alarm and a Pre-Alarm for snowy weather. The Daily Alarm can be set to go off at the same time every day. The Pre-Alarm sounds only when the Daily Alarm is activated and the recorded temperature from Channel 1 Sensor falls to 2^ (35.6^) or below.
SET DAILY ALARM
- Press MODE to navigate to the Clock Area. will show next to the Area.
- Press / to view the alarm. (AL will show at the top.)
- Press and hold / for 2 seconds.
- Select the hour and minute. Press or to change settings.
- Press / to confirm.
- The Daily Alarm icon will appear when the alarm is set.
SET PRE-ALARM
The Pre-Alarm can be set to sound 15, 30, 45, or 60 minutes before the Daily Alarm. It will sound whenever the recorded temperature from Channel 1 Sensor falls to 2^ (35.6^) or below.
For example, if you set the alarm to 7:00 AM, and the Pre-Alarm to 45 minutes, the Pre-Alarm will sound at 6:15 AM provided the outdoor temperature at Channel 1 Sensor is 2^ or below.
- Set up and activate the Daily Alarm.
- Press to switch to Pre-Alarm view. (PRE-AL will show at the top.)
- Press and hold / for 2 seconds.
- Press or to select 15, 30, 45 or 60 minutes. This is the amount of time the Pre-Alarm will sound BEFORE the Daily Alarm. The Pre-Alarm is automatically activated when you select a time.
-
Press / to confirm.
-
shows when the Pre-Alarm is set.
NOTE The Daily Alarm will NOT function until the next day if the Pre-Alarm has been triggered. Also, if you deactivate the Daily Alarm, the Pre-Alarm is automatically deactivated.
ACTIVATE ALARM
Navigate to the Clock Area, then press / to switch to Daily Alarm or Pre-Alarm view. To activate or deactivate the alarm, press or .
When the alarm time is reached, the backlight will be on for 8 seconds and crescendo alarm will sound for 2 minutes. Press any key (except snooze) to silence the alarm. It will sound at the same time the next day.
SNOOZE
Press SNOOZE/LIGHT to temporarily disable the alarm for 8 minutes. or will blink while snooze is on.
BAROMETER
This product tracks fluctuations in barometric pressure to provide the weather forecast, and the current and past 24 hours barometric pressure history measurements are recorded by the main (indoor) unit.
VIEW BAROMETER AREA
Press MODE to navigate to the Barometer Area.
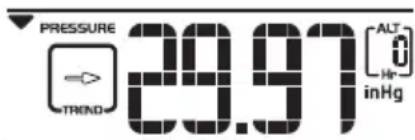
SELECT MEASUREMENT UNIT
Slide the mb / inHg switch (in the clock battery compartment), to change the display unit.
VIEW BAROMETER HISTORY
Navigate to the Barometer Area. Then press MEM repeatedly to scroll through the measurements. The number shown in the HR box indicates how long ago each measurement was taken (e.g. 2 hours ago, 3 hours ago, etc.).
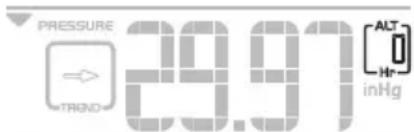
SET ALTITUDE
Set the altitude to match how far above or below sea level you are living. This ensures that the barometric pressure readings are accurate.
- Navigate to the Barometer Area.
- Press and hold MODE for 2 seconds.
- Press or to set the altitude in 10-metre increments (-100m to 2500m).
- Press MODE to confirm.
WEATHER FORECAST
This product forecasts the next 12 to 24 hours of weather within a 30 - 50km (19-31 mile) radius. The forecast is based on barometric pressure trend readings.
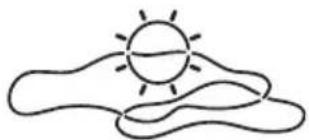
The top area shows an animated icon indicating the forecasted weather.
WEATHER FORECAST ICONS
| ICON | DESCRIPTION |
| Day / Night | Clear |
| Day / Night | Partly cloudy |
| Cloudy |
| ICON | DESCRIPTION |
| Rainy | |
| Snowy |
NOTE The night time icon displays from 6 PM to 6 AM. When the Channel 1 sensor records a temperature of 2^ (35.6^) or lower, the RAINY icon becomes SNOWY.
TEMPERATURE AND HUMIDITY
The weather station can display the following information from any of the 5 remote sensors:
- Current, minimum, and maximum temperatures and relative humidity percentages.
- Comfort level indicator and trend line (rising, falling, or steady).
Data is collected and displayed approximately every 60 seconds.
VIEW TEMPERATURE AND HUMIDITY AREA
Press MODE to navigate to the Temperature and Humidity Areas.
Temperature data is given at the top; Humidity is below.
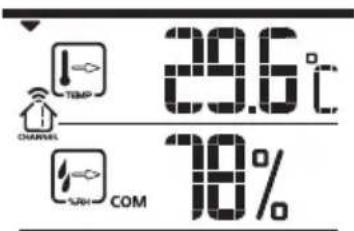
SELECT MEASUREMENT UNIT
Slide the ^ C / ^ F switch (inside the clock battery compartment), to the setting you want.
SELECT SENSOR CHANNEL
Press CH to switch between sensors 1-5.

The house icon shows the selected remote sensor.
T o auto-scan between sensors, press and hold CH for 2 seconds. Each sensor's data will be displayed for 3 seconds.
To end auto-scan, press CH or MEM with the Temperature / Humidity Area selected.
NOTE If you select a sensor that collects only temperature data, the humidity will not be shown.
- Press MEM repeatedly to view current, maximum and minimum records for the selected sensor.
- To clear the records, press and hold MEM for 2 seconds. A beep will sound to confirm that the memory has been cleared.
TEMP, HUMIDITY & PRESSURE TREND
| TREND RISING STEADY FALLING | |||
| TEMPERATURE | |||
| HUMIDITY | |||
| PRESSURE | |||
COMFORT ZONE
The Comfort Zone indicates how comfortable the climate is, based on current temperature and humidity measurements.
| ZONE TEMPERATURE HUMIDITY | ||
| WET Any >70% | ||
| COM | 20-25°C (68-77°F) | 40-70% |
| DRY Any <40% | ||
NOTE This information is shown in the Humidity Area when the current measurement is displayed.
BACKLIGHT
Press SNOOZE / LIGHT to illuminate the backlight for 8 seconds.
RESET SYSTEM
The RESET button is located in the main unit battery compartment. Press RESET when you change the batteries and whenever performance is not behaving as expected (for example, unable to establish radio frequency link with remote unit or radio-controlled clock).
NOTE When you press RESET, all settings will return to default value, and you will lose all stored information.
SAFETY AND CARE
Clean the product with a slightly damp cloth and alcoholfree, mild detergent. Avoid dropping the product or placing it in a high-traffic location.
WARNING
This product is designed to give you years of service if handled properly. Oregon Scientific will not be responsible for any deviations in the usage of the device from those specified in the user instructions or any unapproved alterations or repairs of the product. Observe the following guidelines:
- Never immerse the product in water. This can cause electrical shock and damage the product.
- Do not subject the main unit to extreme force, shock, or fluctuations in temperature or humidity.
- Do not tamper with the internal components.
- Do not mix new and old batteries or batteries of different types.
- Do not use rechargeable batteries with this product.
- Remove the batteries if storing this product for a long period of time.
- Do not scratch the LCD display.
NOTE The technical specification of this product and contents of this user guide are subject to change without notice. Images not drawn to scale.
TROUBLESHOOTING
| PROBLEM SYMPTOM REMEDY | ||
| Barometer Strange readings | Set altitude / unit | |
| Calendar Strange date / month | Change language | |
| Clock | Cannot adjust clock | Disable radio-controlled clock |
| Cannot auto-synch | 1. Adjust batteries 2. Press RESET 3. Manually activate radio-controlled clock | |
| Temp | Shows "LLL" or "HHH" | Temperature is out-of-range |
| Remote sensor | Cannot locate remote sensor | Check batteries |
SPECIFICATIONS
Main Unit Dimensions
L×W×H 120×67×205mm
(4.7 x 2.6 x 8.1 inches)
Weight 364 grams (12.8 ounces)
without battery
Remote Unit Dimensions
L×W×H70×24.5×116mm
(2.76 x 0.96 x 4.57 inches)
Weight 108 grams (0.24 lbs)
without battery
Temperature
Unit ^ C or ^ F
Indoor Range
-5°C to 50°C
(23°F to 122°F)
Outdoor Range
-20°C to 60°C
(-4^ to 140^)
Resolution 0.1^ (0.2^)
Memory Min / Max
Relative Humidity
Range 25% to 95%
Resolution 1%
Memory Min / max
Barometer
Unit mb / hPa or inHg
Resolution 1 mb (0.03 inHg)
Altitude -100 to 2500 metres
(-328 to 8202 feet)
Display Sunny (day / night),
partly cloudy (day / night), cloudy, rainy, snowy
Remote Unit (RTGR328N)
RF frequency 433 MHz
Range Up to 100 metres (328 feet)
with no obstructions
Transmission Approx. every 1 minute
Channel No. 1, 2, 3, 4 or 5
Unit ^ C or ^ F
Radio-Controlled Clock
Synchronization Auto or disabled
Clock display HH:MM:SS
Hour format 12hr AM/PM (MSF format)
24hr (DCF format)
Calendar DD/MM or MM/DD
Day of the week in 1 of
5 languages (E, G, F, I, S)
Alarm Daily & Pre-Alarm;
2-minute crescendo
Snoopze 8-minute snooze
Power
Main Unit
Batteries 3 x UM-3 (AA) 1.5V
Thermo / Hygro Remote Unit
Batteries 2 x UM-3 (AA) 1.5V
NOTE It is recommended that you use alkaline batteries with this product for longer performance.
ABOUT OREGON SCIENTIFIC
Visit our website (www.oregonscientific.com) to learn more about Oregon Scientific products such as digital cameras; MP3 players; children's electronic learning products and games; projection clocks; health and fitness gear; weather stations; and digital and conference phones. The website also includes contact information for our Customer Care department in case you need to reach us, as well as frequently asked questions and customer downloads.
We hope you will find all the information you need on our website, however if you're in the US and would like to contact the Oregon Scientific Customer Care department directly, please visit:
www2.oregonscientific.com/service/default.asp
OR
Call 1-800-853-8883.
For international inquiries, please visit:
www2.oregonscientific.com/about/international.asp
EU-DECLARATION OF CONFORMITY
Hereby, Oregon Scientific, declares that this Wireless Weather Station (BAR816HG) is in compliance with the essential requirements and other relevant provisions of Directive 1999/5/EC.
A copy of the signed and dated Declaration of Conformity is available on request via our Oregon Scientific Customer Service.

COUNTRIES RTTE APPROVAL COMPLIED
All EU countries, Switzerland CH
and Norway
Uber Oregon Scientific 20
THGR228N, THGR328N, THR228N, THR328N, THWR288.
| SCHALTER OPTION | |
| Temp °C/°F | |
THGR228N, THGR328N, THR228N, THR328N, THWR288.
THGR228N, THGR328N, THR228N, THR328N, THWR288.
Paraoculars Paraoculars are used to measure the distance between the eye and the retinal membrane.
THGR228N, THGR328N, THR228N, THR328N, THWR288.
VUE D'ENSEMBLE DU PRODUIT
FACE AVANT
THGR228N, THGR328N, THR228N, THR328N, THWR288.
Altitude -100 à 2500 metres
Frequences RF 433 MHz
Distance de transmission Jusqu'a 70 metres (230 pieds) sans obstacle
Alarmc;Crescendo 2 minutes
THGR228N, THGR328N, THR228N, THR328N, THWR288.
THGR228N, THGR328N, THR228N, THR328N, THWR288.
DE SENSOR DETECTEREN
KLOK WEERGAVE WISSELEN
Apparaat mb / hPa of inHg
Resolutie 1 mb (0,03 inHg)
Hoopte -100 tot 2500 meter
(-328 tot 8202 feet)
Scherm Zonnig (dag / tonight),
Half bewolkt (dag /
Nacht),bewolkt,
regenachtig, sneeuw
Buitensensor (RTGR328N)
RF frequentie 433 MHz
Bereik Tot 70 meter (230 feet)
zonder obstakels
Kanaal No. 1, 2, 3, 4 of 5
Apparaat ^ C of F
Radiogesturde Klok
Snoopze 8-minute snooze
Stroom
Het apparatus
Batterijen 3 x UM-3 (AA) 1,5V
Thermo / Hygro Buitensensor
Batterijen 2× UM-3 (AA) 1,5V
THGR228N, THGR328N, THR228N, THR328N, THWR288.
THGR228N, THGR328N, THR228N, THR328N, THWR288.
THGR228N, THGR328N, THR228N, THR328N, THWR288.
Extra fjärrenheter saljs separat. Kontakta din narraste aterförsäljare for mer information.
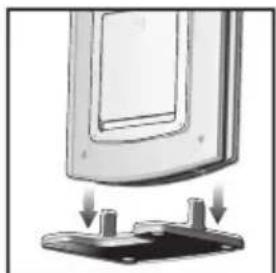
FOR VAGG OCH BORDSPLACERING
Foratt fixera stativetpaa undersidan avprodukten:
For vaggmontering av encheten:
Väderprognosområde
THGR228N, THGR328N, THR228N, THR328N, THWR288.
(Extra fjärrenheter saljs separat. Kontakta din narraste aterförsäljare for mer information.)
