Wake 'n Shake - Alarm bell GEEMARC - Free user manual and instructions
Find the device manual for free Wake 'n Shake GEEMARC in PDF.
User questions about Wake 'n Shake GEEMARC
0 question about this device. Answer the ones you know or ask your own.
Ask a new question about this device
Download the instructions for your Alarm bell in PDF format for free! Find your manual Wake 'n Shake - GEEMARC and take your electronic device back in hand. On this page are published all the documents necessary for the use of your device. Wake 'n Shake by GEEMARC.
USER MANUAL Wake 'n Shake GEEMARC
geemarc™ Wake'n'Shake Hear the Difference
Large display alarm clock with shaker
text_image
12:09 HOLICE STRONG WEAK VWR-SWP OFF ALARM WATERMOLESHKE TONE ALARM TIMER HOUR MINUTE OFF HIGHEnglish P1
Français P11
Deutsch P21
Snooze key / Flash / Dimmer button
text_image
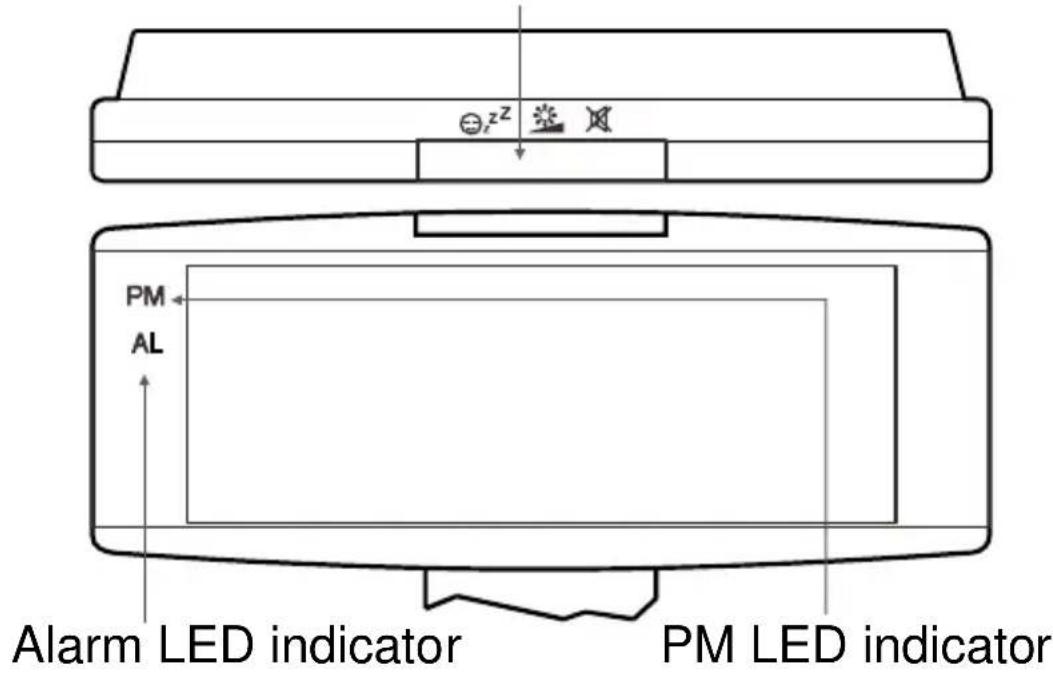
Alarm LED indicator PM LED indicator PM AL z^zShaker Lo / Hi switch

text_image
Alarm mode switch Alarm and ring volume V+F+S V+S V+F V + (○) - A+T OFF T Alarm+ring / Off / Ring function Alarm tone VOLUME Wake-in'5"flake TONE Set alarm Set clock Set hours & minutes Set alarm off for 24H.
text_image
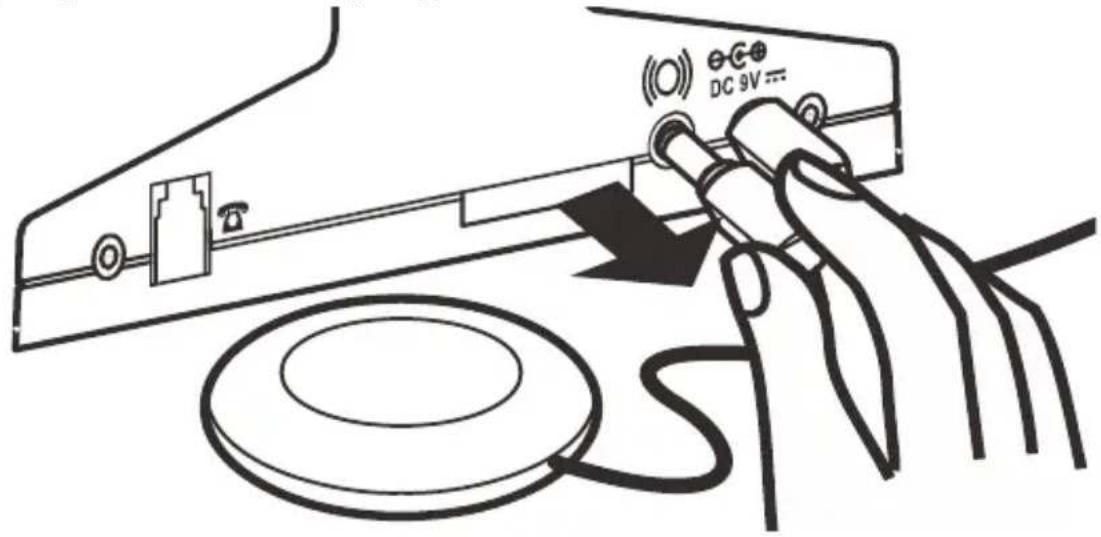
(*)Modular jack (*)Shaker jack (*)Adaptor jack DC 9V Class (Close)2(*) Classified TVN-3 according to EN60950 standard.
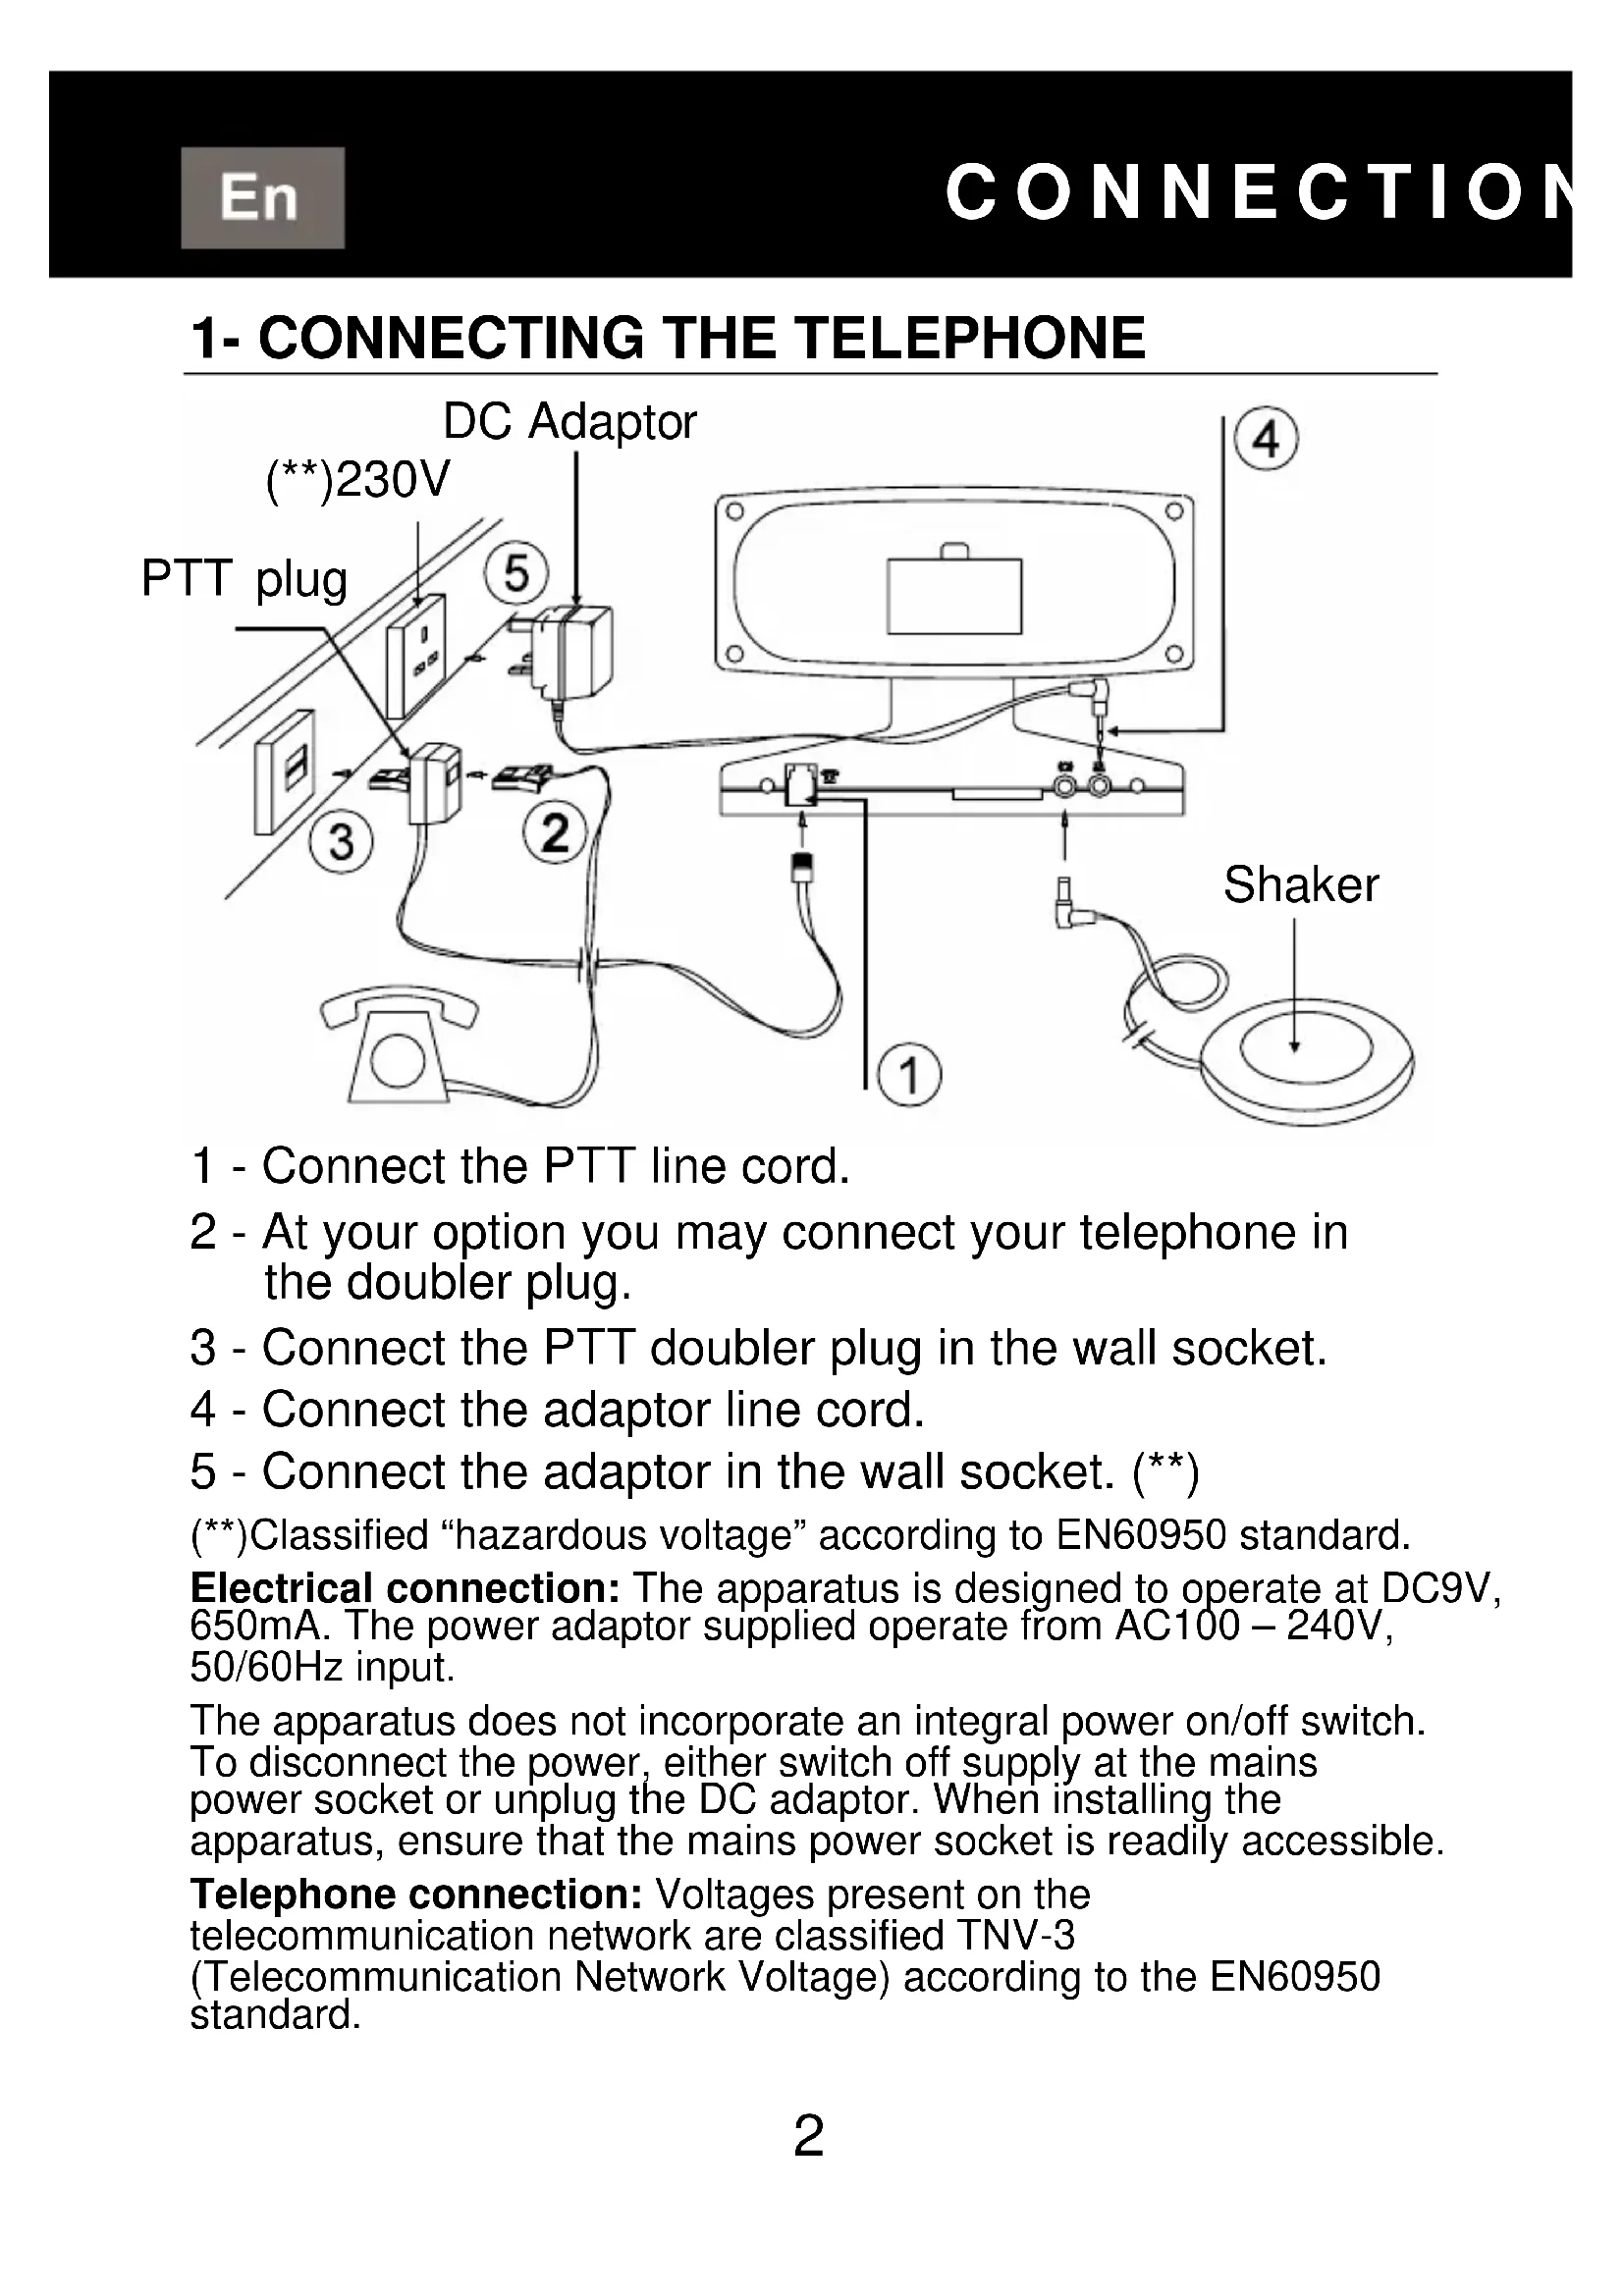
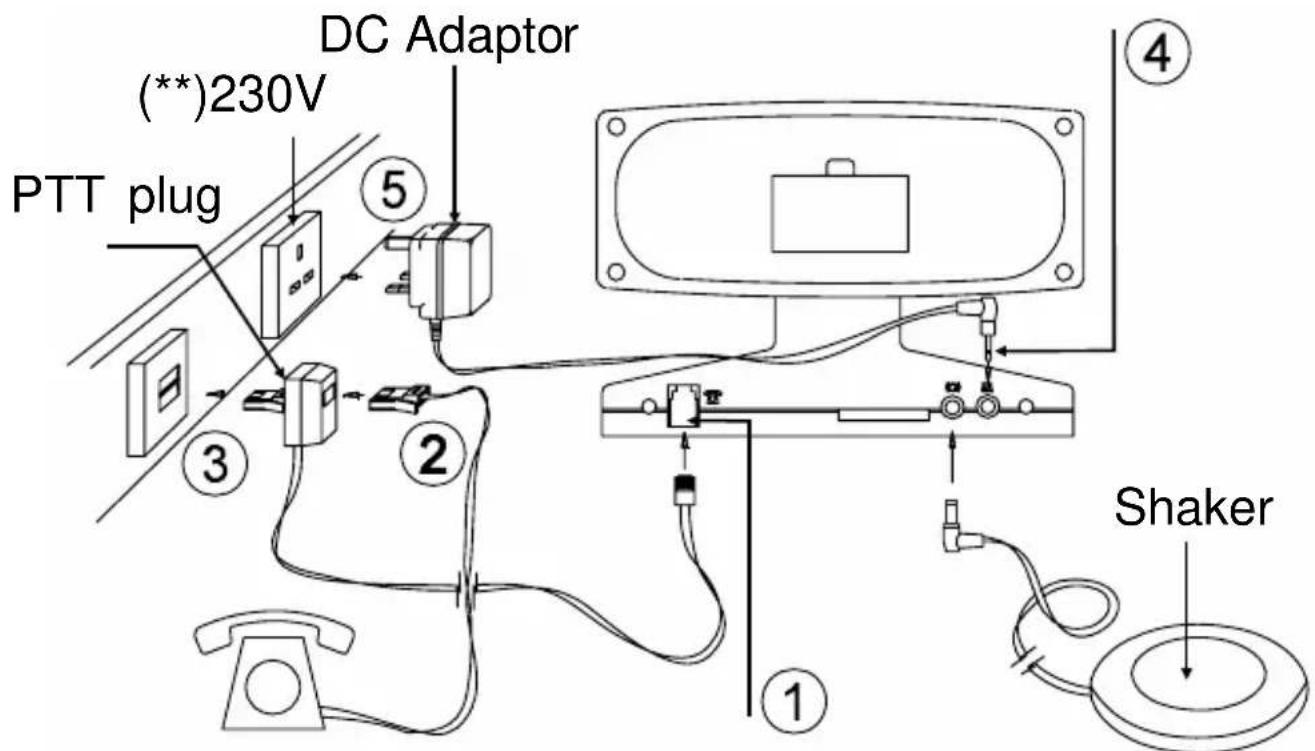
1- CONNECTING THE TELEPHONE
text_image
PTT plug (**)230V DC Adaptor ① ② ③ ④ Shaker1 - Connect the PTT line cord.
2 - At your option you may connect your telephone in the doubler plug.
3 - Connect the PTT doubler plug in the wall socket.
4 - Connect the adaptor line cord.
5 - Connect the adaptor in the wall socket. (**)
(**)Classified "hazardous voltage" according to EN60950 standard.
Electrical connection: The apparatus is designed to operate at DC9V, 650mA. The power adaptor supplied operate from AC100 – 240V, 50/60Hz input.
The apparatus does not incorporate an integral power on/off switch. To disconnect the power, either switch off supply at the mains power socket or unplug the DC adaptor. When installing the apparatus, ensure that the mains power socket is readily accessible.
Telephone connection: Voltages present on the telecommunication network are classified TNV-3 (Telecommunication Network Voltage) according to the EN60950 standard.
2- SETTING THE TIME ( ⏰ )
- Press and hold (set clock) button.
- Press H (hour) and M (minute) until correct hour and minutes appear on the display.
- Release ⏻ (set clock) button.
- For p.m. hours, the p.m. indicator will appear on the display near the inscription PM.
12 / 24 hour format
User can select which hour format to use. To select:
- Press and hold the H (hour) button for 6 seconds to enter the hour selection mode, the display shows "12H" or "24H", then release the hour button.
- Press the H (hour) button to toggle between 12 or 24 hours.
Note: If no selection made within 4 seconds, the last showed format will be chosen, and the clock will return to normal time mode.
3- SETTING THE ALARM TIME (

- Press and hold (set alarm) button.
- Press H (hour) and M (minute) until correct hour and minutes appear on the display.
- Release (set alarm) button.
- Press 📁, H and M to reset the alarm clock to 12.
4- SETTING THE ALARM MODE
Put the function switch on A+T position.
Choose which alarm mode you wish to be awakened to by moving the alarm mode switch to one of the following selections:
V : only shaker activated
V+S : both sound and shaker alarm activated
V+F : both strobe light and shaker alarm activated
V+F+S: strobe light, sound and shaker alarm activated
Note: if user doesn't use the V (shaker function), please unplug the shaker plug from the clock.
text_image
DC 9VWhen the alarm is set to one of the alarm modes, the alarm indicator will appear on the display near the inscription AL.
The table below shows how the alarm modes indicate an incoming call from the alarm clock.
| ALARM MODE ACTION ALARM CLOCK INCOMING CALL | |||
| SOUND Buzzer | With pauses | With pauses | |
| SHAKER Vibrates | With pauses | With pauses | |
| STROBE LIGHT | Flashes With pauses | With pauses | |
The default alarm duration time is 30 minutes. User can adjust the alarm duration time from 1-59 minutes.
To adjust the alarm duration:
- Press and hold the set alarm button for 6 seconds to enter adjust mode. The clock show "30", release the set alarm button.
- Press the M button to adjust the alarm duration time to the desired setting from 1 minute to 59 minutes.
- This new setting will become the new default, until changed by user.
- If no action is take within 3 seconds, then the clock will return to normal time mode.
5- SNOOZE KEY ( ✗ )
When the alarm mode you have chosen is switched on the alarm time setting, pressing the ✗ button will stop the alarm mode for approximately 9 minutes. The alarm will then switch the alarm mode o again for a further 9 minutes. This sequence can be carried out for up to 59 minutes after which the alarm mode will be automatically switched off.
User can adjust the snooze repeat time from 1-30 minutes.
- Press and hold the SNOOZE button for 4 seconds to enter the snooze time adjust mode. When the clock show "9" release the Snooze button.
- Press the M button to adjust the snooze time to the desired setting from 1 minute to 30 minutes.
This new setting will become the new default, until changed by user. If no action is take within 3 seconds, then the clock will return to normal time mode.
6- SWITCHING THE ALARM OFF FOR 24H. (OFF)
Press the alarm off button (OFF), the alarm will then operate at the same time the next day. The alarm if not switched off will continue to sound for up to 59 minutes and then be automatically switched off.
7- RINGER On/Off SWITCH (A+T / OFF / T)
- A+T (alarm + telephone): for the alarm and telephone ring position.
- OFF: alarm and ring off.
- T (telephone): for the telephone ring position.
8- TELEPHONE OPERATION
- Ensure that the telephone has been set up in accordance with the telephone userguide and has been connected as shown in the installation section.
- Select the ringer On/Off switch on the A+T or T position for the ring.
- Choose which of the alarm modes you wish to alert you of your incoming telephone calls (see page 4: V, V+S, V+F, V+S+F).
- When the alarm mode selected indicates there is an incoming telephone call, lift the telephone handset and answer the call. When you have finished the call replace the handset and the alarm will be ready to indicate the next call.
9- Dimmer Function (

There is a 5-level brightness control for the LED display. In normal time model, press the Snooze button once to change the display brightness. The brightness will cycle from bright to dim then from dim to bright (the cycle repeats)
NOTE : The dimmer function will not work when the clock is in snooze mode.
10- VOLUME (VOLUME)
Sets the volume of the ring and the alarm sound.
11- TONE ( TONE )
Sets the tone of the alarm sound.
12- SHAKER SWITCH (+ (○) - )
Sets the motion of the shaker to Lo (-) or Hi (+).
13- BATTERY BACK- UP
It's not necessary to insert a battery for the clock to function. With battery back-up installed, the clock will keep the time and alarm settings in the event of a power cut or the DC adaptor being unplugged.
Check the battery condition after one year, replacing old battery. A leaking battery can destroy your clock.
GUARANTEE
From the moment your Geemarc product is purchased, Geemarc guarantee it for the period of one year.
During this time, all repairs or replacements (at our option) are free of charge. Should you experience a problem then contact our helpline or visit our website at www.geemarc.com. The guarantee does not cover accidents, negligence or breakages to any parts. The product must not be tampered with or taken apart by anyone who is not an authorised Geemarc representative. The Geemarc guarantee in no way limits your legal rights.
IMPORTANT: YOUR RECEIPT IS PART OF YOUR GUARANTEE AND MUST BE RETAINED AND PRODUCED IN THE EVENT OF A WARRANTY CLAIM.
Please note: The guarantee applies to the United Kingdom only.
Declaration: Hereby Geemarc Telecom SA declares that this product is in compliance with the essential requirements and other relevant provisions of the Radio and Telecommunications Terminal Equipment Directive 1999/5/EEC and in particular article 3 section 1a, 1b and section 2.
The declaration of conformity may be consulted at www.geemarc.com

Caution: Radio frequency interference may cause discernible sound on the unit. The sound will end when the interference stops.
RECYCLING DIRECTIVES
The WEEE (Waste Electrical and Electronic Equipment) has been put in place for the products in end of life are recycled in the best way.
When this product is out of order, please do not put it in your domestic waste bin.
Please use one of the following disposal options:
- Remove the batteries and deposit them in an appropriate WEEE skip.
Deposit the product in in a appropriate WEEE skip.
- Or hand the old product to the retailer. If you purchase a new one, they should accept it.
Thus if you respect these instructions you ensure human health and environmental protection.


text_image
geemarc™ Hear the DifferenceFor product support and help visit our website at
www.geemarc.com
telephone 01707 384438
or fax 01707 832529
RECYCLING VORSCHRIFT
Hertfordshire, AL7 1SB
For product support:
01707 384438
www.geemarc.com

eemarc™
Telecom SA
FRANCE
Parc de l'Etoile