
iBT10 - Built-in kit GEEMARC - Free user manual and instructions
Find the device manual for free iBT10 GEEMARC in PDF.


| Product Type | Bluetooth In-Wall Kit |
| Brand | Geemarc |
| Model | iBT10 |
| Bluetooth Technology | Bluetooth 5.1 |
| Bluetooth Chipset | QCC3024 |
| Frequency Range | 2.402-2.480 GHz |
| Operating Range | 10 meters |
| RF Power | <250 mW |
| Power Supply | Rechargeable Li-ion battery 3.7 V / 400 mAh |
| Charging Time | Approximately 2.5 hours |
| Battery Type | Integrated Li-ion battery |
| Charging | USB Type-C 5 V |
| Connectors | 3.5 mm headphone jack, 2.5 mm loop connectors, USB-C |
| Microphone | Built-in |
| Controls | Volume +/-, multi-function button, tone dial, on/off switch |
| Compatibility | Smartphones, Bluetooth TVs, tablets, computers |
| Included Accessories | Headset with earbuds, Li-ion battery, USB-C cable, magnetic loop (optional), lanyard, belt clip, user guide |
| Main Functions | Sound amplification, Bluetooth audio transmission, magnetic loop for hearing aids, call management, volume and tone adjustment |
| Safety | Do not use with pacemaker without medical advice |
| Maintenance | Clean with a soft dry cloth, avoid moisture |
| Warranty | 2 years |
| Manufacturer | Geemarc Telecom S.A., made in China |
| Address | Parc de l'Etoile, 2 Rue Galilée, 59760 Grande-Synthe, France |
Frequently Asked Questions - iBT10 GEEMARC
User questions about iBT10 GEEMARC
0 question about this device. Answer the ones you know or ask your own.
Ask a new question about this device
Download the instructions for your Built-in kit in PDF format for free! Find your manual iBT10 - GEEMARC and take your electronic device back in hand. On this page are published all the documents necessary for the use of your device. iBT10 by GEEMARC.
USER MANUAL iBT10 GEEMARC
Please refer to our website: www.geemarc.com for an up to date user guide, as there may be important updates and changes you need to be aware of.
CONTENTS 1
GENERAL 3
Introduction 3
Unpacking the Telephone 4
DESCRIPTION 5
General Description 5
STEP 1: FIT AND CHARGE THE BATTERY.... 7
Fitting the Battery 7
Charging the Battery 8
Low Battery 9
STEP 2: PLUG IN THE EARPHONE HEADSET OR NECK LOOP....9
Earphone Headset (non-hearing aid users) …… 9
Neck Loop (iBT10 LOOP) 9
STEP 3: PAIRING THE iBT10 ...... 11
How to pair the iBT10 to your smartphone …… 11
How to Pair the iBT10 to a Smart TV 12
How to Pair the iBT10 to a device that doesn't have a display / menu 13
Using the iBT10 with Two Devices 13
STEP 4: LISTEN TO AUDIO / TV FROM A PAIRED DEVICE....15
Volume Adjustment 16
Tone Adjustment.... 17
USING WITH NECK LOOP 18
Microphone 18
MAKING / RECEIVING CALLS 19
How to Make a Call via the iBT10 19
Receiving a Call 19
RECEIVING A CALL WHILE PLAYING MUSIC / LISTENING TO THE TV 20
TURNING OFF THE iBT10 AND ECO MODE 21
TECHNICAL SPECIFICATION....21
TROUBLESHOOTING GUIDE 22
BATTERY SAFETY & DISPOSAL 22
GUARANTEE 23
RECYCLING DIRECTIVES 24
INTRODUCTION
Congratulations on purchasing your Geemarc iBT10 amplified Bluetooth digital headset.
This user guide is for iBT10 with earphone headset and the iBT10 LOOP for use with hearing aids that have a T (Telecoil) setting.
The iBT10 / iBT10 LOOP can be paires to other devices that have Bluetooth ^TM including smartphones, smart TVs, tablets and computers.
The iBT10 is rechargeable and supplied with a Type C USB charging cable.
To get the best use from your iBT10, please read all steps and sections of this user guide.
Keep the user guide in a safe place for future reference.
Warning: For Users with a Pacemaker

If you have a pacemaker, we recommend that you speak with your doctor or qualified health advisor before using this product.
Note: It is important that you read the instructions below in order to use your iBT10 to their full potential. Keep this user guide in a safe place for future reference.
Unpacking the iBT10
The following parts are included with the iBT10:
- iBT10 Bluetooth ^TM device
- Earphone Headset with rubber ear cushions
• 3.7V Li-ion Rechargeable Battery - USB type C / USB A cable for recharging
- Magnetic Neck Loop (iBT10 LOOP option)
- Lanyard
- A belt clip
- 1 User Guide

For product support and help visit our website at
www.geemarc.com
E-mail: help@geemarc.com
Telephone: 01707 387602
lines are open 09h00 to 16h00 Mon to Fri
Controls, Connections and Indicators (LEDs).
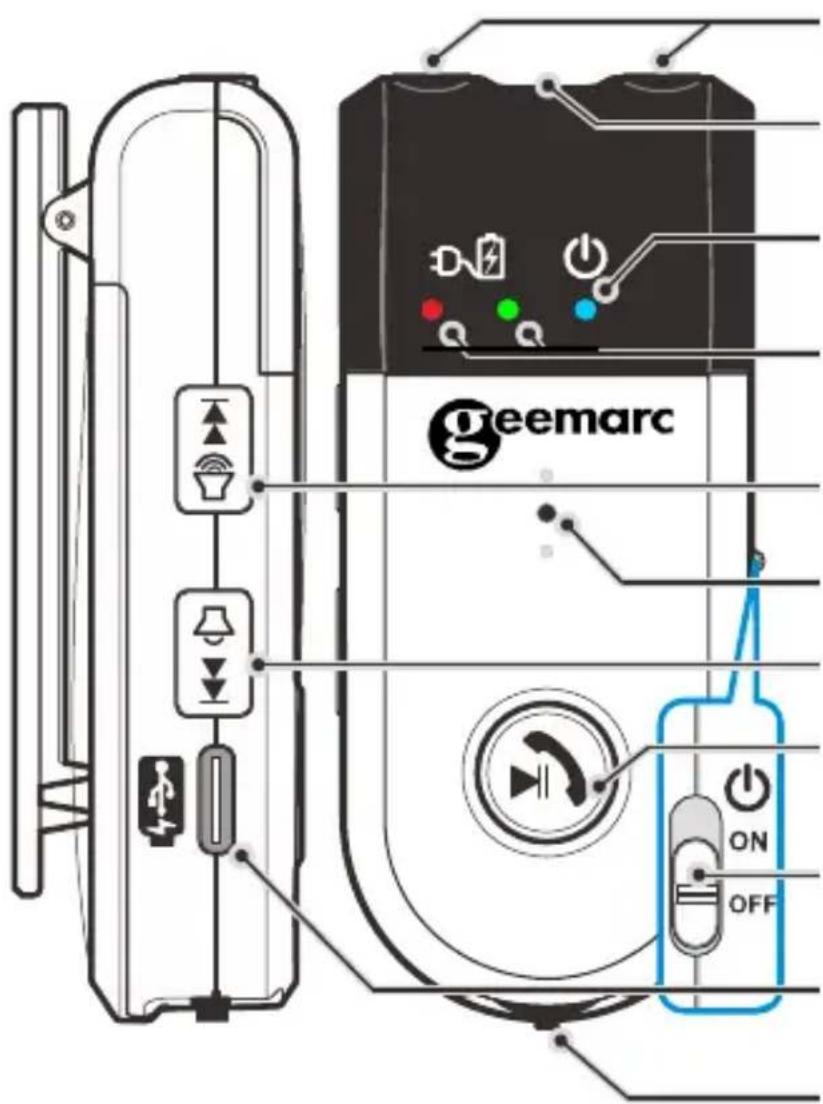
Neck Loop port
Headset port (https://)
Power ON indicator (Blue)
Charge indicators
Red:charging, Green:full
Volume + / Next
Internal microphone
Volume - / Previous
Multi-function button (Play / Call)
Power On/Off switch
Charging port USB type C 5.0V DC
Tone adjustment wheel
NOTE (Indicators):
- OFF: LED is off
- ON: LED is Blue
- Low battery: LED is Red
- Battery Charging: LED is Red
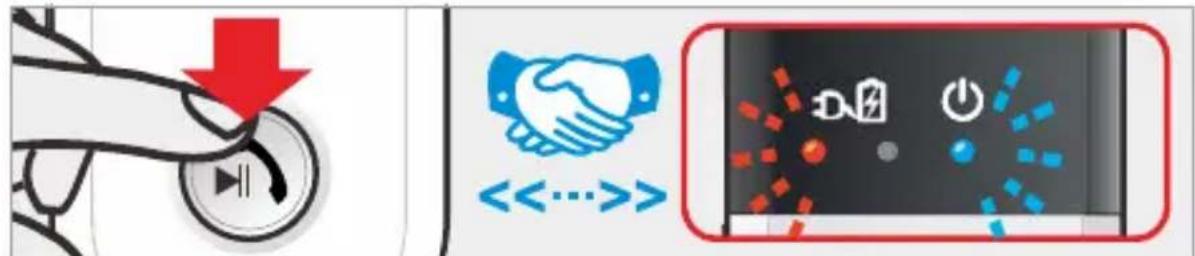
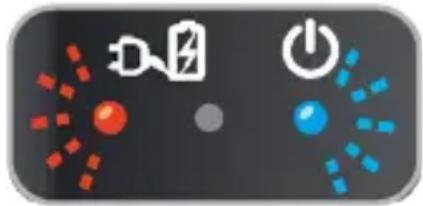
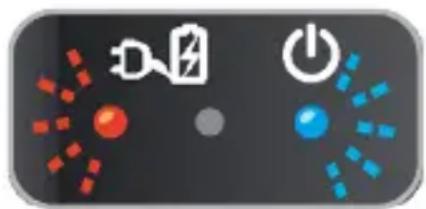
• Full charged: LED is Green - Pairing: Red and Blue LED is flashing
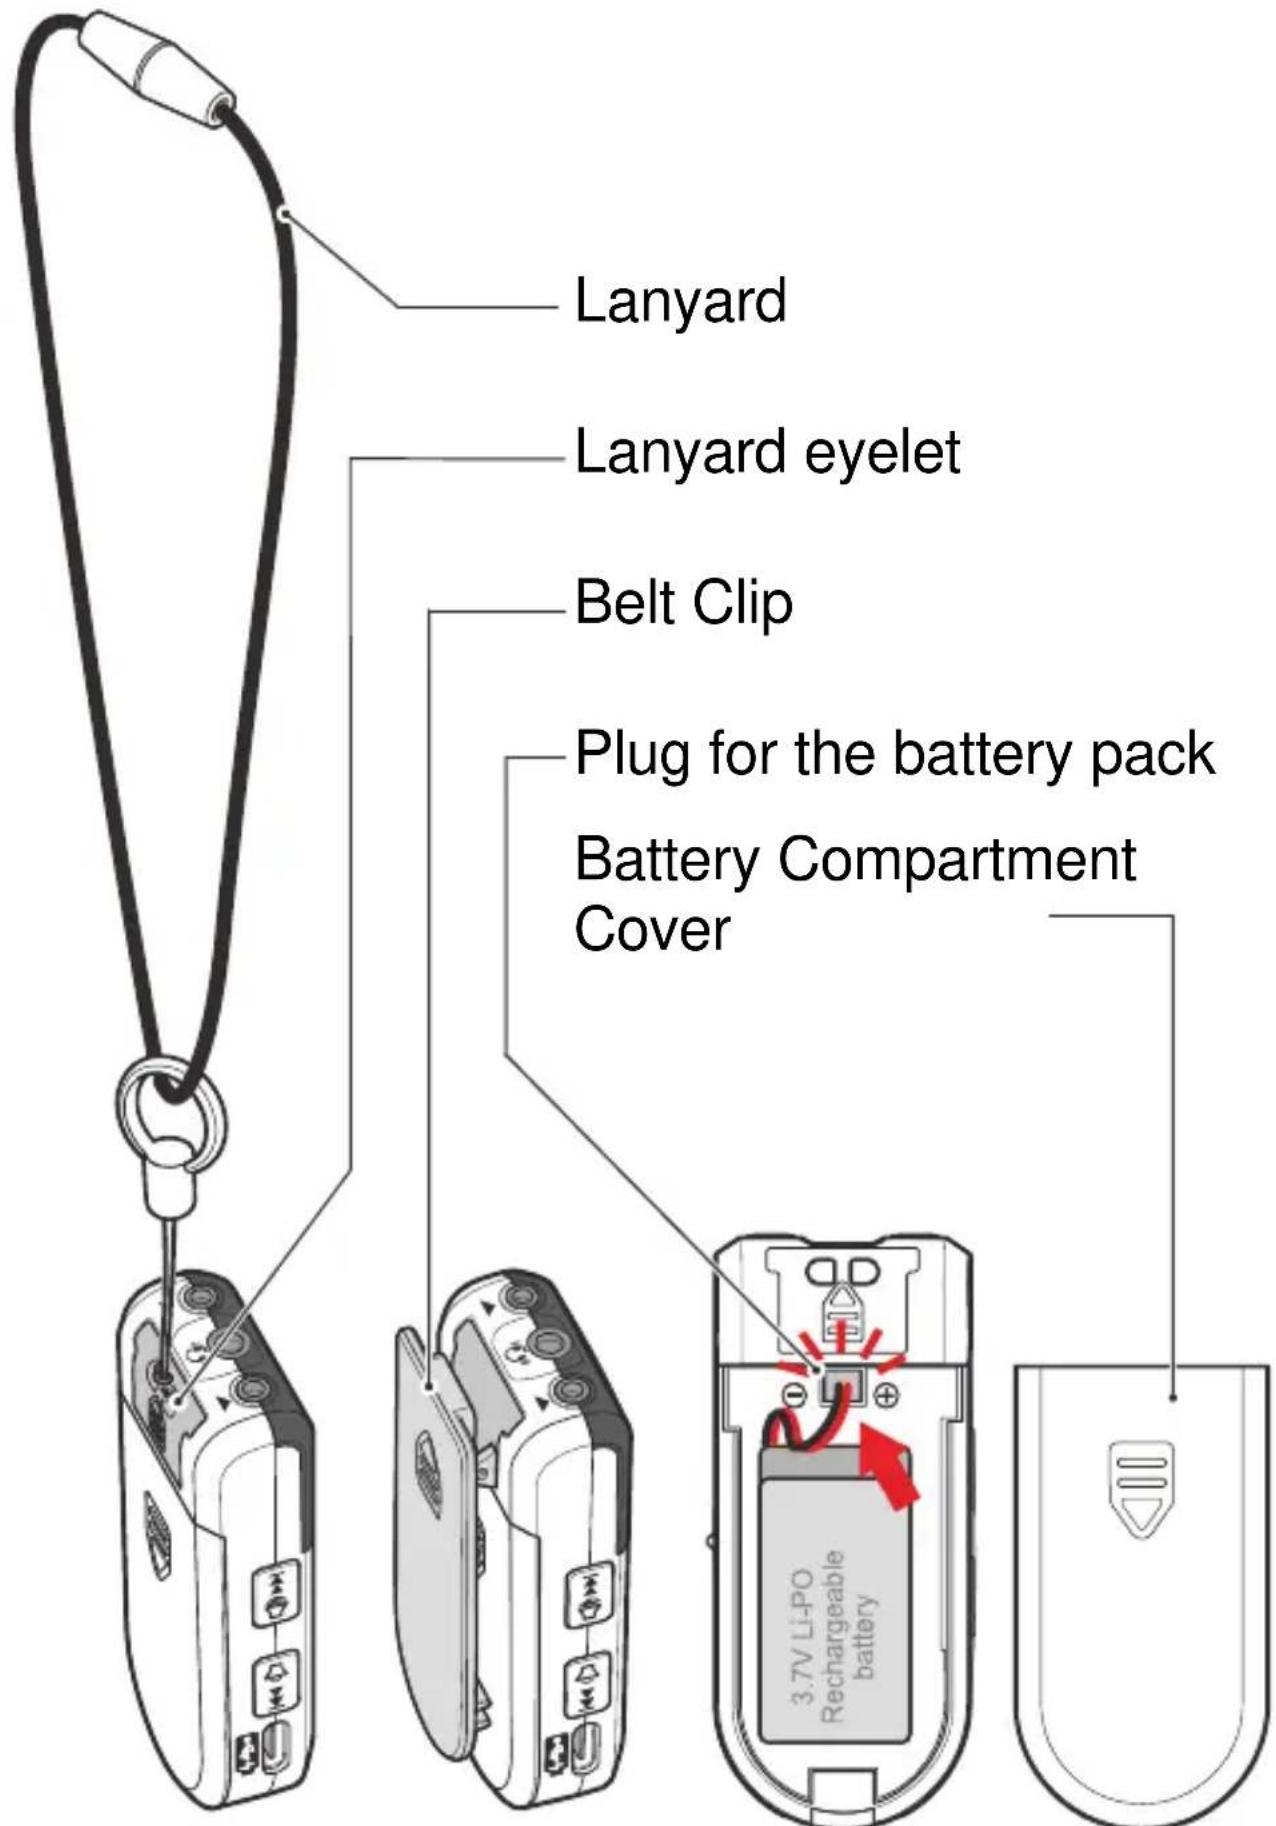
STEP 1: FIT AND CHARGE THE BATTERY
The iBT10 is supplied with a Lithium rechargeable battery.
NOTE:● Do not use any other type of rechargeable battery with this product.
● The battery must be charged for 7 hours before first time use.
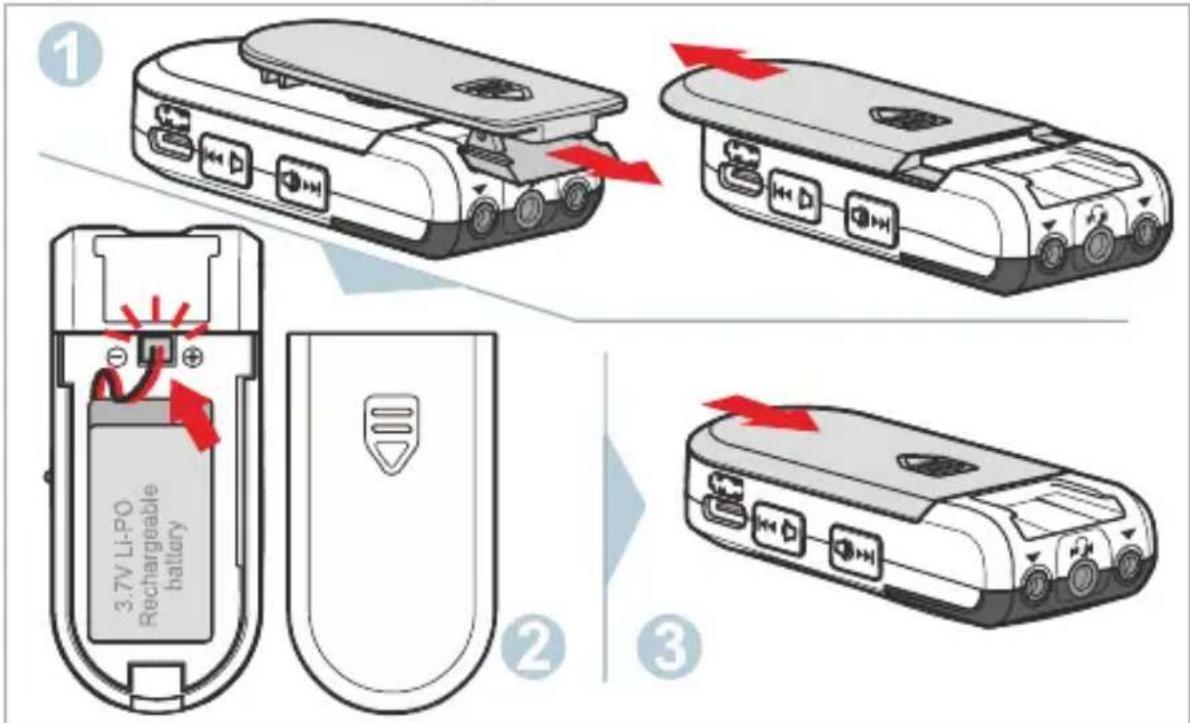
Fitting the Battery
IMPORTANT: Before fitting the battery, make sure the ON/OFF switch on the side of the iBT10 is set to the OFF position.
- Take off Belt clip and slide open the battery cover.
- Carefully connect the short black (−) and red (+) lead from the battery to the socket inside the battery compartment (marked − and +).
- Replace the battery cover.
Charging the Battery
Connect the supplied USB cable, to the USB Type -C connector on the side of the iBT10. Connect the other end of the cable to an approved standard USB 5V mains adapter (not supplied).
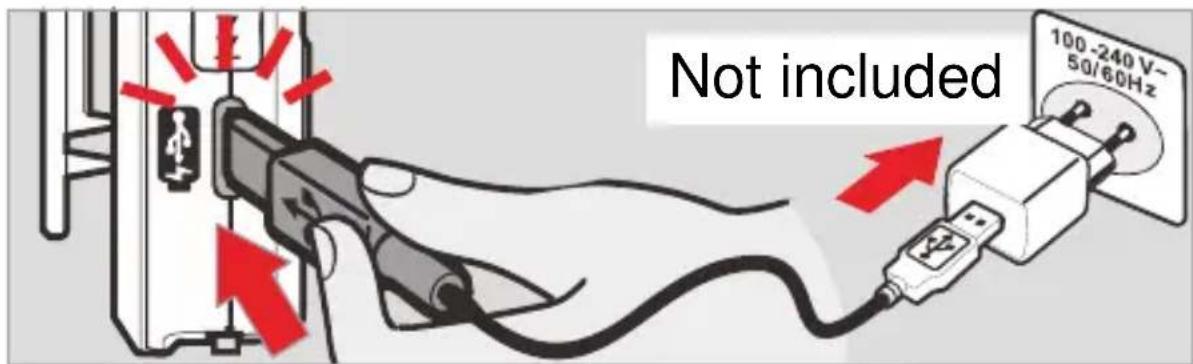
Plug the USB adapter into a mains electrical outlet socket. The charge indicator LED on the iBT10 will show RED. This means the battery is charging.
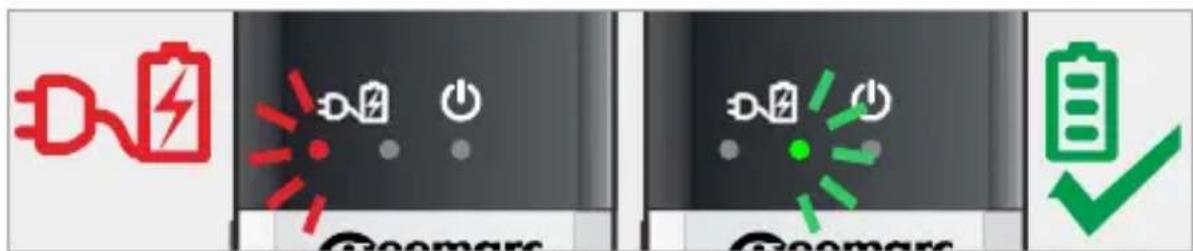
Continue charging until the charge indicator on the iBT10 shows GREEN. This means the battery is now fully charged.
Disconnect the USB charging cable from the iBT10.
NOTE :We recommend you also switch off and remove the USB adapter from the main electrical outlet socket.
Low Battery
When the battery is low and needs charging, you'll hear 5 audible 'beeps' through the earphones / neck loop.
To avoid reducing the life of the battery charge it as soon as possible.
STEP 2: PLUG IN THE EARPHONE HEADSET OR NECK LOOP
Earphone Headset (non-hearing aid users)
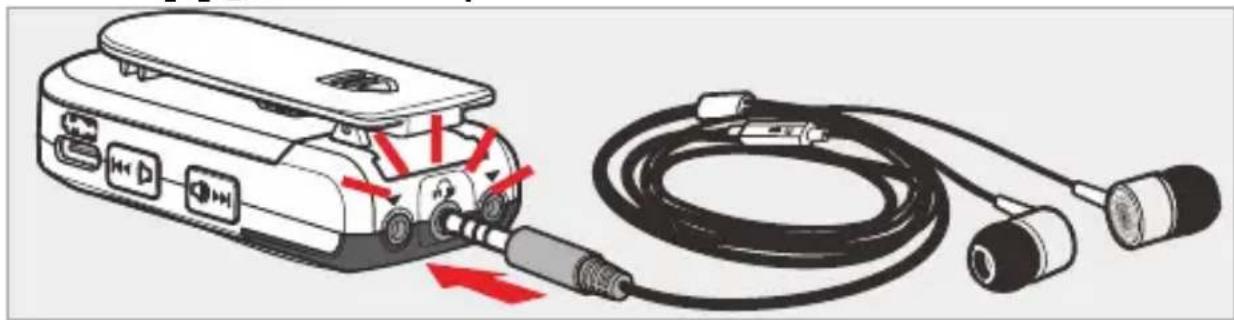
Plug the earphone headset into the 3.5mm jack socket [ ] at the top of the iBT10.
natural_image
Diagram of a portable electronic device connected to a cable with two connectors and red arrows indicating ports (no text or symbols present)Neck Loop (iBT10 LOOP, option)
natural_image
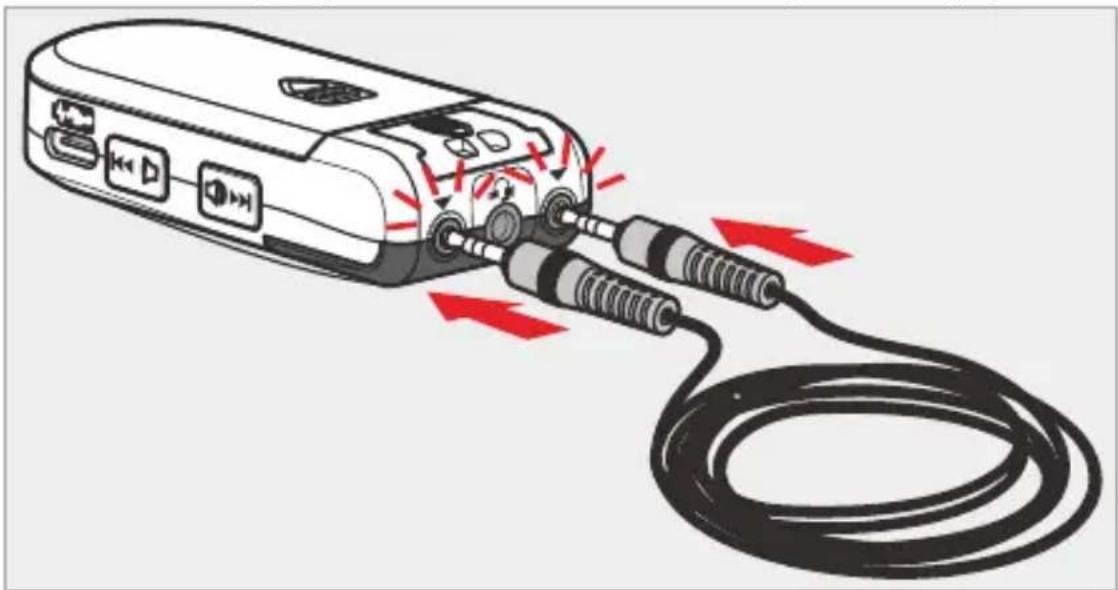
Illustration of a handheld electronic device connected to a coiled cable with red arrows indicating signal or connection (no text or symbols present)The neck loop is for use with hearing aids that have a T (Telecoil) setting. Plug the neck loop into the two small 2.5mm jack sockets that are located either side of the earphone socket.
Place the neck loop over your head so that it rests on the back of your neck and shoulders.
Switch your hearing aid to the T setting / program. It may be necessary to adjust the volume setting on the iBT10 and / or your hearing aid to achieve optimum performance.
NOTE:
- Not all hearing aids have a T setting, or it may not be enabled. Consult your audiologist / hearing care professional for further guidance.
- The neck loop will release from the iBT10 should it become entangled. Plug the neck loop back in to resume operation.
- Do not plug the earphone headset and neck loop into the iBT10 at the same time.
STEP 3: PAIRING THE iBT10
In order to use the iBT10 it will need to be paired to your Bluetooth™ device, such as your smartphone, smart TV, computer or tablet.
The iBT10 can connect to two devices that have Bluetooth™ version 5.1 – see section on Using the iBT10 with Two Devices.
How to pair the iBT10 to your smartphone?
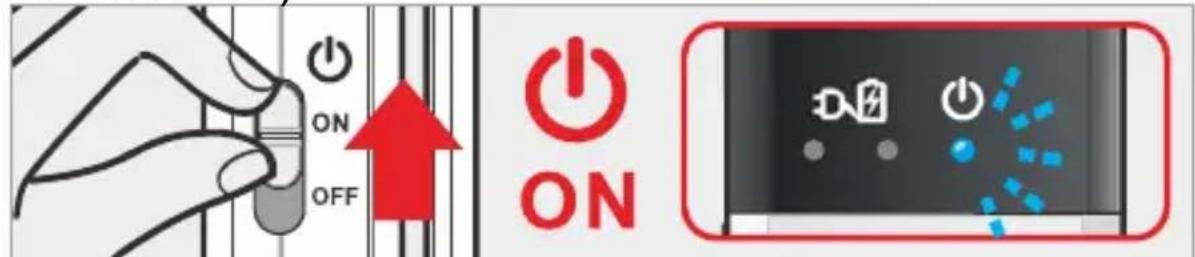
- Set the ON/OFF switch located at the side of the iBT10 to the ON position (Blue LED blinks on and off).
- Press and hold the PLAY / CALL button [播放] until the RED and BLUE LED's blink.
-
On your smartphone, go to Settings → Connections → Bluetooth and launch the research.
-
See iBT10 listed under 'available devices' – click / select iBT10 to pair. If you are required to enter a PIN code use 0000.
-
The iBT10 should now be listed in 'paired devices' on your smartphone.
NOTE: the exact procedure may vary depending on smartphone make and model.
- The BLUE LED [ ⏻ ] will be ON.
The iBT10 is now paired to the smartphone for calls and media audio.
NOTE: To pair the iBT10 to another device, repeat the above procedure from (1.) and refer to the device's manual for Bluetooth pairing. Ensure that you are out of range of any device that is already paired to the iBT10, or switch off that devices Bluetooth connection.
How to Pair the iBT10 to a Smart TV
Many smart TVs have Bluetooth ^TM .
- Set the ON/OFF switch located at the side of the iBT10 to the ON position (Blue LED blinks on and off).
- Press and hold the PLAY / CALL button [播放] until the RED and BLUE LED's blink.
- On your TV remote, press the MENU button, then go the TVs SETTINGS menu.
- In the settings menu, look for 'Bluetooth remotes & accessories' or similar menu listing. Follow your TVs on-screen prompts to pair with the iBT10.
The exact procedure above may vary depending on the make and model of your TV. Refer to your TV user guide for further guidance.
How to Pair the iBT10 to a device that doesn't have a display / menu
NOTE: Check the device accepts 0000 PIN codes. This information should be stated in the user guide for the device.
- Set the ON/OFF switch located at the side of the iBT10 to the ON position (Blue LED [ 🔊 ] blinks on and off).
- Press and hold the PLAY / CALL button [播放] until the RED and BLUE LED's blink.
- Activate the search mode on the Bluetooth ^TM device that you want the iBT10 to pair with.
- When the Blue LED [💡] is ON, this means the iBT10 is paired to your Bluetooth™ device.
Using the iBT10 with Two Devices
It is possible to pair the iBT10 with two devices and to easily switch between them.
First pair the iBT10 with DEVICE A (for example a smartphone as described above).
Switch OFF the Bluetooth function on DEVICE A.
Now pair the iBT10 with another device – DEVICE B (for example a smart TV as described above).
Switch ON the Bluetooth function on DEVICE A.
Check that both devices are paired and connected with the iBT10.
Play sounds from both DEVICE A and B. The iBT10 will play the sound from DEVICE B.
Double press the PLAY / CALL button [] to play the sound from DEVICE A, double press the PLAY / CALL button [ ] again to switch back to DEVICE B.
NOTE:
- Both DEVICE A and DEVICE B must be playing sounds in order to be able to switch between them.
- The iBT10 treats phone calls as a priority. For example, if DEVICE A is a smartphone, and DEVICE B a smart TV, and you are listening to the smart TV, the iBT10 will automatically switch to DEVICE A when there is a phone call. When the call is ended, the iBT10 will automatically revert back to DEVICE B.
STEP 4: LISTEN TO AUDIO / TV FROM A PAIRED DEVICE
Having paired the iBT10 to your smartphone/smart TV / another device, you can now listen to audio / TV. Plug the cable from the supplied headset earpiece into the 3.5mm jack socket [ ] located at the top of the iBT10, or, if you use a hearing aid, plug the Neck Loop (iBT10 LOOP option) into the two smaller 2.5mm jack sockets [ ] either side of the headphone socket. You may wish to adjust the volume and tone – see section on volume and tone adjustment.
With some devices, such as a smartphone, you can pause the audio track using the PLAY / CALL button [播放图标], and skip to the next audio track using the volume controls [播放图标 Previous/播放图标 Next] on the iBT10 (this may not work with all file formats, platforms and devices).
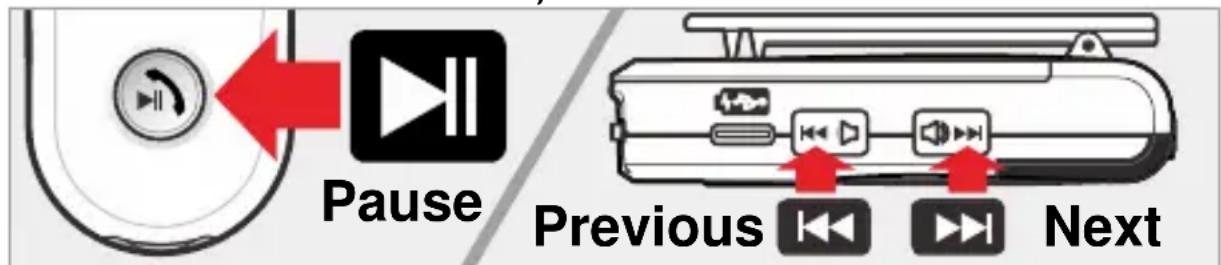
To PAUSE the audio track. Press the PLAY / CALL button [播放] on the iBT10. To resume playing the audio, press the PLAY / CALL button [播放] again.
To skip to the next audio track, or go to the previous track, press and hold the VOLUME buttons [
Previous/ Next] on the side of the iBT10.
Press and hold the [ Next] button to skip to the next audio track.
Press and hold the [◀◀◀ Previous] button to go to the preceding track.
NOTE: You can also adjust the volume level of the device by using the VOLUME buttons [播放器/播放器] located at the side of the iBT10.
Volume Adjustment
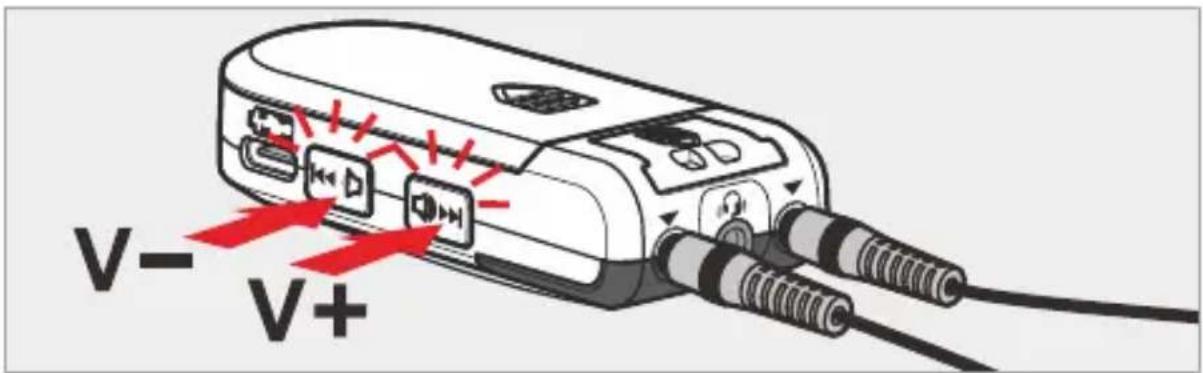
You can adjust the sound level from the headset earpiece / Neck Loop while listening to the audio by pressing the VOLUME adjustment controls located at the side of the iBT10.
Press the [ Volume+] button to increase the volume level.
Press the [ Volume -] button to decrease the volume level.
NOTE : An audible beep is heard during volume adjustment. A single high-pitched tone during volume adjustment means the volume is at maximum. A single lower-pitched tone during volume adjustment means the volume is at minimum.
HEARING ADVISORY: Set the volume to a level that is comfortable. Listening to loud sound levels for a prolonged period may cause damage to your hearing.
Tone Adjustment
You can adjust the tone from the headset earpiece / neck loop while listening to the audio by sliding the tone control lever located at the bottom of the iBT10. You can use the control to increase the treble (high-frequency) or bass (low-frequency) tones.

Slide the lever to the left to increase the treble (decrease the bass).
Slide the level to the right to decease the treble (increase the base).
Push the lever to set the tone to the default (mid-tone) setting.
NOTE : During tone adjustment, a double audible ‘beep’ tone is heard at maximum treble and bass settings. A single ‘beep’ tone is heard at the default (mid-tone) setting.
Using the iBT 10 with neck loop Listening the music / TV, Making / Receiving Calls
- Paired the iBT10 with your smart device.
- Switch your hearing aid to T mode.
- Insert the neck loop 2.5mm leads into the Neck Loop Port [ ] found on the top of the
iBT10 Bluetooth Device, then place the loop around your neck. - Now you can listen the music from your smart device. You are ready to speak through your iBT10 if it is paired with your smart phone.
- Buttons and controls are the same as we described above.
Microphone
The iBT10 is built with an internal microphone which enables you to make/receive calls when you use neck loop system.
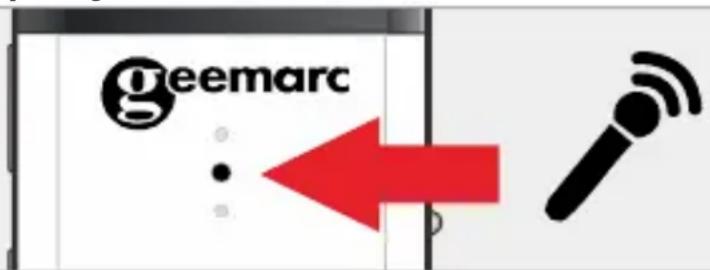
NOTE : The connectors (leads) of neck loop will release if the unit gets entangled with the cables, so as to avoid injury to the neck. If this happens, plug back the connector in the jack to resume normal operation.
MAKING / RECEIVING CALLS
With the iBT10 paired to your smartphone, it is possible to make and receive calls through the iBT10 (via the earpiece headset or neck loop).
NOTE: The iBT10 has a built-in microphone that allows you to speak to your caller.
How to Make a Call via the iBT10?
Set the ON/OFF switch located at the side of the iBT10 to the ON position.
Select your phone contact or dial the phone number on your Smartphone then start the call. You can start the call with your iBT10 automatically.
You may need to adjust the volume level on the iBT10 to hear the call better.
Receiving a Call
Set the ON/OFF switch located at the side of the iBT10 to the ON position
When receiving a call, the Red and Blue LEDS will flash, and the ringtone or melody from the
natural_image
Pure electrical circuit symbols without any text or labelssmartphone will be heard through the earpiece headset / neck loop. Press the CALL / PLAY button

take the call.
NOTE : If the ringtone on your smartphone is set to OFF / VIBRATE ONLY, the ringtone will be heard through the earphone headset / neck loop when there is an incoming call.
RECEIVING A CALL WHILE PLAYING MUSIC / LISTENING TO THE TV
If you receive a call while listening to music (from your paired device) or when listening to your smart TV (with the iBT10 paired to your smartphone and smart TV – SEE STEP 3: Using the iBT10 with
two devices), the RED and BLUE LED's will flash and the ringtone from the smartphone will be heard through the
natural_image
Pure electrical circuit symbols without any text or labelsearpiece headset / neck loop. Press the CALL / PLAY button [] to take the call. You will now be able to converse with the caller via the iBT10 (via the earpiece headset or Neck Loop, depending on which you are using).
At the end of the call, press the CALL / PLAY button [icon]. The iBT10 will automatically revert to playing the music from your paired device / audio from your smart TV.
NOTE: If the iBT10 doesn't automatically revert to playing music / smart TV audio, press the CALL / PLAY button [播放] again.
Turning the iBT10 OFF and ECO mode
To switch off the iBT10, slide the POWER ON/OFF slide switch on the side of the iBT10 to the OFF position.

If there is no Bluetooth connection for more than 15 minutes, the iBT10 will automatically power off. To switch back on, slide the POWER ON/OFF slide switch to the OFF position, then slide it to the ON position.
TECHNICAL SPECIFICATION
Battery: Li-ion rechargeable 3.7V/500mA
Charging Time: About 2.5 hours
Bluetooth Version: Bluetooth 5.1
Bluetooth Chip-set: QCC3024
Frequency Range: 2.402GHz-2.480GHz
Operation Range: 10 meters
Radio Frequency (RF) power: <250 mW
TROUBLESHOOTING GUIDE
If the iBT10 appears not to work, check the following:
- Make sure the battery is plugged in / plugged in correctly.
- Make sure the battery is charged.
- Make sure the iBT10 is paired to a device (smartphone, smart TV, another device).
- Make sure the earphone headset is plugged in securely.
- Make sure the neck loop is securely plugged in and that the hearing aid is set to the T setting / program.
- If the iBT10 battery is not charging (no LEDs are on), make sure the USB charging cable is securely plugged into the USB mains adapter and the iBT10. Make sure the USB mains adapter is securely plugged in to the mains electrical wall socket.
BATTERY SAFETY & DISPOSAL
Only use the battery supplied with this product. See RECYCLING DIRECTIVES for product and battery disposal.
GUARANTEE
From the moment your Geemarc product iBT10 / iBT10 Loop is purchased, Geemarc guarantee it for the period of two years. During this time, all repairs or replacements (at our option) are free of charge. Should you experience a problem then contact our helpline or visit our website at www.geemarc.com. The guarantee does not cover accidents, negligence or breakages to any parts. The product must not be tampered with or taken apart by anyone who is not an authorised Geemarc representative. The Geemarc guarantee in no way limits your legal rights.
IMPORTANT: YOUR RECEIPT IS PART OF YOUR GUARANTEE AND MUST BE RETAINED AND PRODUCED IN THE EVENT OF A WARRANTY CLAIM.
The guarantee applies to the United Kingdom only.
DECLARATION : Geemarc Telecom SA hereby declares that this iBT10™ / iBT10™ Loop is in compliance with the essential requirements and other relevant provisions of the Radio and Telecommunications Terminal Equipment Directive 2014 / 53 / UE.
The declaration of conformity may be consulted at www.geemarc.com
RECYCLING DIRECTIVES
Recycling directives:The WEEE (Waste Electrical and Electronic Equipment) Directive has been put in place so that products at the end of life are recycled in the best way.
When this product is out of order, please do not put it in your domestic waste bin. Please use one of the following disposal options:
- Remove the batteries and deposit them in an appropriate WEEE skip. Deposit the product in an appropriate WEEE skip.
- Or hand the old product to the retailer. If you purchase a new one, they should accept it.
Thus if you respect these instructions you ensure human health and environmental protection.

For product support and help visit our website at www.geemarc.com
E-mail:help@geemarc.com / Tel:01707 387602
lines are open 09h00 to 16h00 Mon to Fri
TABLE DES MATIÈRES
Fr
natural_image
Diagram of a portable electronic device connected to a cable with red arrows indicating ports (no text or symbols present)natural_image
Illustration of a handheld electronic device connected to a coiled cable with red arrows indicating signal flow (no text or symbols present)natural_image
Pure electrical circuit symbols without any text or labelsnatural_image
Pure electrical control icons without any text or symbolsBatterie laden
natural_image
Diagram of a handheld electronic device connected to a cable with two connectors and red arrows indicating connection points (no text or symbols present)natural_image
Illustration of a handheld electronic device connected to a coiled cable with red arrows indicating signal flow (no text or symbols present)natural_image
Pure electrical circuit symbols without any text or labelsnatural_image
Pure electrical circuit symbols without any text or labelsCargar las baterías
natural_image
Diagram of a portable electronic device connected to a cable with connectors and ports (no text or symbols visible)natural_image
Illustration of a handheld electronic device connected to a black cable with red arrows indicating signal or connection (no text or symbols present)natural_image
Pure electrical control icons without any text or symbolsnatural_image
Pure electrical control icons without any text or symbols
natural_image
Close-up of a white geemarc device with black cables and a blue indicator light, no visible text or symbols on the device itself.
UGiBT10™_EnFrGeSp_Ver1.1
- CONTENTS 1
- GENERAL 3
- DESCRIPTION 5
- STEP 1: FIT AND CHARGE THE BATTERY.... 7
- STEP 2: PLUG IN THE EARPHONE HEADSET OR NECK LOOP....9
- STEP 3: PAIRING THE iBT10 ...... 11
- STEP 4: LISTEN TO AUDIO / TV FROM A PAIRED DEVICE....15
- USING WITH NECK LOOP 18
- MAKING / RECEIVING CALLS 19
- RECEIVING A CALL WHILE PLAYING MUSIC / LISTENING TO THE TV 20
- INTRODUCTION
- Warning: For Users with a Pacemaker
- Unpacking the iBT10
- Controls, Connections and Indicators (LEDs).
- NOTE (Indicators):
- STEP 1: FIT AND CHARGE THE BATTERY
- Fitting the Battery
- Charging the Battery
- Low Battery
- STEP 2: PLUG IN THE EARPHONE HEADSET OR NECK LOOP
- Earphone Headset (non-hearing aid users)
- Neck Loop (iBT10 LOOP, option)
- NOTE:
- STEP 3: PAIRING THE iBT10
- How to pair the iBT10 to your smartphone?
- How to Pair the iBT10 to a Smart TV
- How to Pair the iBT10 to a device that doesn't have a display / menu
- Using the iBT10 with Two Devices
- STEP 4: LISTEN TO AUDIO / TV FROM A PAIRED DEVICE
- Volume Adjustment
- Tone Adjustment
- Using the iBT 10 with neck loop Listening the music / TV, Making / Receiving Calls
- Microphone
- MAKING / RECEIVING CALLS
- How to Make a Call via the iBT10?
- Receiving a Call
- RECEIVING A CALL WHILE PLAYING MUSIC / LISTENING TO THE TV
- Turning the iBT10 OFF and ECO mode
- TECHNICAL SPECIFICATION
- TROUBLESHOOTING GUIDE
- BATTERY SAFETY & DISPOSAL
- GUARANTEE
- The guarantee applies to the United Kingdom only.
- RECYCLING DIRECTIVES
- TABLE DES MATIÈRES
- Batterie laden
- Cargar las baterías
Brand : GEEMARC
Model : iBT10
Category : Built-in kit