
CL8350 - Mobile Phone GEEMARC - Free user manual and instructions
Find the device manual for free CL8350 GEEMARC in PDF.


| Product Type | Amplified Cordless Phone |
| Brand | Geemarc |
| Model | CL8350 |
| Dimensions (H x W x D) | 200 mm x 150 mm x 100 mm |
| Weight | 500 g (handset + base) |
| Power Supply | AC adapter (input 100-240V, output 6V DC) and 2x AAA Ni-MH rechargeable batteries |
| Display | Backlit LCD with large characters |
| Keypad | Large, high-contrast buttons with Braille markings |
| Amplification | Up to 40 dB gain with adjustable tone control |
| Speakerphone | Yes, hands-free with loudspeaker |
| Caller ID | Supports Caller ID and call waiting (network dependent) |
| Phonebook | 50 entries with name and number |
| Ringtones | 10 polyphonic ringtones with adjustable volume and visual flash |
| Range | Up to 50 meters indoors, 300 meters outdoors (DECT) |
| Battery Life | Up to 10 hours talk time, 100 hours standby |
| Charging Time | Approximately 8 hours for full charge |
| Headset Compatibility | 3.5 mm jack for optional headset |
| Hearing Aid Compatible | Yes, M3/T3 rating |
| Wall Mountable | Yes, base unit can be wall mounted |
| Cleaning | Wipe with a soft, dry cloth. Do not use liquids or abrasives. |
| Operating Temperature | 0°C to 40°C |
| Spare Parts Available | Replacement batteries, AC adapter, and handset cords |
| Certifications | CE, RoHS |
Frequently Asked Questions - CL8350 GEEMARC
User questions about CL8350 GEEMARC
0 question about this device. Answer the ones you know or ask your own.
Ask a new question about this device
Download the instructions for your Mobile Phone in PDF format for free! Find your manual CL8350 - GEEMARC and take your electronic device back in hand. On this page are published all the documents necessary for the use of your device. CL8350 by GEEMARC.
USER MANUAL CL8350 GEEMARC
GSM Telephone with Voice Amplification

English
CONTENTS
CONTENTS 1
INTRODUCTION 5
Unpacking the Telephone 6
DESCRIPTION 7
General Description 7
Menu Navigation 14
SETTING UP 16
Network Services 16
Passwords 16
Install SIM Card and Battery 17
Charging the battery 18
Battery Use 20
Switching On/Off 21
USING THE TELEPHONE 22
Standby Mode 22
Energy Saving Mode 22
Making a Call 22
Making a Call from the Call List 23
Making a Call from the Phone Book 23
Making a Call using Quick Dial 24
Receiving a Call 24
Rejecting a Call 25
CONTENTS
Hands Free 26
End Single Call 26
Start a New Call 27
Phonebook 27
Write an SMS 28
Mute Function 28
DTMF Tones 29
Receiving Volume and Tone 29
Call Timer 29
MESSAGES 30
Send a Text Message 30
Receiving a Text Message (Inbox) 31
Reviewing Stored Text Messages (Inbox) 31
Outbox 32
Templates 32
SMS settings 32
Voicemail Server 33
PHONEBOOK 34
Create a Phonebook Entry 35
Create a Phonebook Entry from Standby 37
View Phonebook Entries 38
Editing and Deleting a Phonebook Entry 39
Copying and Deleting All Phonebook Entries 40
Phonebook Groups 42
CONTENTS
Editing Phonebook Groups Name 43
Phonebook Settings 44
Extra Numbers 45
CALL CENTER 46
View Call Logs 46
Call history 46
Delete Call Logs 47
Call Settings 48
Call waiting 49
Call divert 49
Call barring 49
Advance settings 50
Black list/ auto redial 50
Call time display/ Call time reminder 51
SOS SETTINGS 52
SETTINGS 55
Tone control 55
Boost function 55
Direct number 55
User profiles 57
Wall paper 59
Phone settings 59
Network settings 60
CONTENTS
Security settings 61
Restore factory setting 63
ORGANISER 64
Calendar 64
Calculator 64
Alarm 66
Bluetooth 66
Tasks 67
Stopwatch 68
OPTIONAL ACCESSORIES 69
TROUBLESHOOTING 70
SAFETY INFORMATION 73
HEARING AID INFORMATION 76
NETWORK SERVICES 77
GUARANTEE 78
RECYCLING DIRECTIVES 80
INTRODUCTION
Congratulations on purchasing your Geemarc CL8350 telephone. This telephone is also hearing aid compatible. It offers many functions such as an alarm, a calendar, SMS text messaging, a phone book, handsfree speakerphone, an automatic keylock and speed dial buttons. It has an emergency function in which five numbers can be programmed as emergency contacts and in case of emergency these contacts will be called with the flick of just one switch.
The font size on the LCD display is large and the buttons on the keypad are easy to see and use. This mobile telephone has a loud ringer and speakerphone and strong vibrating setting. All these features add up to make this a highly suitable telephone for the elderly, hard of hearing or sight people and anyone who simply wants to keep in touch with a great degree of ease.
Its is important that you read the instructions below in order to use your Geemarc telephone to its full potential. Keep this user guide in a safe place for future reference.
This guide explains how to use the following telephone:
GSMCL8350
Unpacking the Telephone
When unpacking the telephone, you should find the following in the box:
• 1 CL8350 mobile telephone handset
• 1 Desktop charging unit
• 1 Mains power adaptor
• 1 x Li-ion rechargeable battery
- 1 User Guide

eemarc™
Hear the Difference
For product support and help visit our website at
www.geemarc.com
Telephone 01707 384438
Or fax 01707 832529
DESCRIPTION
General Description
Handset Description (front)

DESCRIPTION

DESCRIPTION
| M1 M2 M3 | One touch dialing keys/Soft keysA telephone number can be assigned to each of these buttons. To dial the number all you have to do is to press the button once and the number will be dialled automaticallyM1 and M3 are also softkeys i.e. they take on different functions depending on the menu displayed. The current function is always displayed by the text directly above the key |
 | Power key/On-hook keyLong press to power the telephone on and offEnd a callCancel current process |
 | Navigation ButtonUp KeyScroll up through lists and menu options.Press this key in standby to enter a menu quickly via the shortcut settings you have set up. |
DESCRIPTION
| Increase the earpiece / speakerphone volume during a call. Down Key Scroll down through lists and menu options. Press this key in standby to enter a menu quickly via the shortcut settings you have set up. Decrease the earpiece / speakerphone volume during a call. | |
 | Call Key Make a call after dialling the number Receive a call Enter Caller list |
 | Hash key In standby, long press(approx 3s) to lock or unlock the keypad When entering text: toggles between case and numbers. |
 | Mailbox Hold key 1 to connect to voice mailbox |
DESCRIPTION
 | Asterisk keyPress this key to insert one or more symbols while composing a message or editing a phonebook entry name. Then use ▲, ▼, + and - as navigation keys to select the symbols you want to insert. |
 | Amplify KeyPress this key on the right side of the phone during a conversation to amplify the volume. |
 | Tone KeyPress this key on the right side of the phone during a conversation to alter the tone. There is tone control of up to 10dbm |
  | Volume Up Key/Navigation Button+/- keys: - In standby: adjusts the volume level of the key tone - Whilst on a call -> adjusts the earpiece or Hands-free volume. This key is also used to scroll through lists of options. |
DESCRIPTION
LCD Screen Description
The LCD screen is split into three distinct areas:
The icon area. This is found at the top of the screen. This displays the various system icons which help you to use the telephone.
The main area. This is found across the centre of the screen. It displays the following:
• number being dialled
- caller ID information
- phonebook
- menu information
- in standby mode current time, date and service provider name
The soft key area. This is found at the bottom of the screen.

Signal Strength icon
This is always displayed when your telephone is switched on. It shows the current signal strength. More bars indicate more signal strength.

Alarm icon
Alarm is activated

New Call icon
This indicates that you have missed one or more calls. More calls have been added to the call list
DESCRIPTION

Key Lock icon
This indicates the keys are locked

Battery Status icon
This is always displayed when your telephone is switched on. It shows the level of battery charge. More bars indicate more battery charge

Message icons
A new SMS (text message) has been received
A new service message has been received

Mute icon
Mute is on

Silent icon
The telephone is in silent mode. There will be no call alert

Ring tone icon
The telephone is in ring tone mode. The call alert will be a ring tone

Vibrate icon
The telephone is in vibrate mode. The call alert will be the telephone vibrating

Vibrate followed by ring icon
The telephone is in vibrate followed by
DESCRIPTION

ring mode. The call alert will start with the telephone vibrating followed by the ringing tone
Vibrate and ring icon
The telephone is in vibrate and ring mode. The call alert will be the telephone vibrating together with the ringing tone

Headset icon
The headset is plugged in

Bluetooth icon
Bluetooth is activated Bluetooth is connected
Menu Navigation
M1 and M3 are softkeys i.e. they take on different functions depending on the menu displayed on the LCD. The current function is always displayed by the text above the key.
The MENU soft key is used to activate the menu. The BACK soft key is used to go back a level in the menu system. Press 📄 to deactivate the menu and return to standby mode from any menu.
The ▲ and ▼ keys are used to scroll through the menu.
DESCRIPTION
The OK soft key is used to confirm/ select an action or choice on a screen.
Normally, the submenus and the options have the shortcut numbers. Input the shortcut number of the submenu in the list, the relevant option will be displayed.
The + and - keys on the left hand side of the telephone are also used to scroll through options within menus.
SETTING UP
Network Services
To use this mobile telephone you must subscribe to a service from a wireless service provider. Different service providers offer different features (at a variety of charges). This may effect the features made available to you through the mobile telephone.
Passwords
This mobile telephone allows you to set up passwords to help protect your telephone from unauthorized use.
The PIN and PIN2 codes are supplied with your SIM card. The PIN code hellps to protect the SIM card from unauthorized use. The PIN2 code is required to access certain services.
The PUK and PUK2 codes may be supplied with the SIM card. If you enter the PIN code incorrectly three times in succession, the PUK will be required. If the codes are not supplied, contact your service provider.
SETTING UP
Install SIM Card and Battery
The rechargeable battery pack is supplied with your mobile phone. Insert the battery and valid SIM card before using the phone.
Always switch the telephone off and disconnect the charger before removing/inserting the battery or SIM card. Take care when handling the SIM card. The SIM card and its contacts can be easily damaged by scratches or bending.
To remove the battery compartment cover, press down and slide the cover off completely.
Remove the battery (if battery already inside)
Slide the SIM card with the gold coloured contacts face down into the SIM card holder.

SETTING UP
Observe the battery contacts (the gold coloured contacts must face towards the bottom right). and insert the battery.
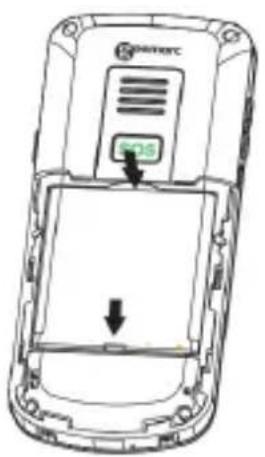
Slide the back cover back into place.
Charging the battery
Charging via the Charging Unit
Plug the charger into a wall socket.
Connect the lead from the charger into the the socket on the back of the charging unit.
Place the mobile telephone onto the charging unit. The battery indicator on the LCD will fill and empty whilst charging.
When the battery is fully charged, the indicator will remain full and stop flickering.
SETTING UP

Note: Only use batteries and chargers supplied with the telephone. The guarantee will be invalid if an unapproved cable is used. Keep the battery contacts clean and free of dirt. Try and avoid removing the battery as this could short circuit the battery.
If the battery is completely discharged, it may take a few seconds before the charging indicator appears on the display or before any calls can be made (the telephone may be used during the charging process)
Before the handset can be used, the battery must be charged for a minimum of 4 hours.
After inserting the SIM card and charging the battery, the mobile will search the registered network or any other
SETTING UP
available networks. Once connected, the name of network supplier will show in the middle of the LCD.
Note: If ‘emergency call only’ is displayed on the LCD, you are out of range for a network service. However, you can still make emergency calls according to the signal strength.
Battery Use
The icon is continuously displayed at the top right corner of the LCD display. The icon indicates the level of battery power. The more bars displayed, the more power available.

natural_image
Four battery icons in a row: one green, one gray, two black (no text or symbols)When the battery charge is low, a warning message will be displayed ‘Charge the battery’. The back lighting and certain other functions may cease to work. When the battery is too weak for the telephone to operate, the handset will automatically switch off.
The battery talk and standby times are subject to change. Replace the battery when its power has deteriorated noticeably.
SETTING UP
Switching On/Off
Press for 3 seconds or longer to switch the telephone on.
WELCOME will be displayed on the LCD (dependant on settings).
If no SIM card has been inserted, LIMITED SERVICE will be displayed. Only emergency calls can be made until the SIM has been inserted.
Press again for 3 seconds to switch the telephone off. GOODBYE will be displayed then the display disappears (dependant on settings).
USING THE TELEPHONE
Standby Mode
When the telephone is ready for use and you have not entered any characters, the telephone is in standby mode. You can set the telephone to standby mode
by pressing
Energy Saving Mode
Your telephone has an energy saving mode in order to save battery power in the standby mode when no keys are pressed. The display will switch off. Press any button to re-activate standby.
Making a Call

To place an international call you need to press a "+" before the country code, which you get by pressing
USING THE TELEPHONE
the „*“ key twice. Some foreign telephone networks have extension lines that cannot be dialled as dial-through, but need to be entered by the keypad. To dial these directly, press the „*“ key quickly three times in a row after the telephone number. The „p“ character appears and then you can enter the dial extension.
Making a Call from the Call List
You can find numbers dialled, received or missed in the call list.

flowchart
graph TD
    A["Press"] --> B["to access the Call List"]
    C["Use ▲ and ▼ to scroll through the call list"] --> D
    E["Press"] --> F[", the number is automatically dialled"]
    G["To end the call simply press"] --> H
Making a Call from the Phone Book
If you have stored numbers in the phone book, you can dial numbers using the phone book.
Press Names soft key to activate the Phone book
USING THE TELEPHONE
Use ▲ and ▼ to scroll through the phonebook or type in the first letter of the name required and your search will be filtered to all contacts starting with that letter. If you type the second letter of the contact, your search will be further filtered to all contacts starting with those two letters etc
Press

, the number is automatically dialled
To end the call simply press

Making a Call using Quick Dial
If you have stored numbers in the quick dial location, long-press either M1, M2 or M3 (dependant on who you wish to ring) for 3 seconds. The chosen telephone number will be dialled automatically.
Receiving a Call
When an incoming call is received the telephone rings and/or vibrates. The caller's telephone number will be displayed. If this caller's number is stored on the Phonebook, the associated name will be displayed
USING THE TELEPHONE
Press

to answer
To end the call simply press

An alternative way to answer is press Answer to answer.
Rejecting a Call
When an incoming call is received the telephone rings. The caller's telephone number will be displayed. If this caller's number is stored on the Phonebook, the associated name will displayed
To reject an incoming call, simply press SILENT then REJECT

or
Note: if the headset is inserted, you can receive the call with headset. If auto answer function is on, and the headset is inserted, the call will be auto answered after 2 seconds
USING THE TELEPHONE
Hands Free
You can turn on the speakerphone built into the telephone during a call. In this mode there is no need to hold the handset. You will hear the third party through the speaker and the microphone will pick up your voice.
| During a call, press H-FREE soft key | |
| To switch hands free off, press H-HELD soft key | |
End Single Call
You can end the call if required

flowchart
graph TD
    A["During a call, press OPTION soft key"] --> B["Use ▲ and ▼ to scroll through the menu to select END SINGLE CALL"]
    B --> C["Select the OK to confirm"]
USING THE TELEPHONE
Start a New Call
You can make a second call while your initial call is placed on hold (if your service provider allows)

Phonebook
You can browse the phonebook during a call

flowchart
graph TD
    A["During a call, press OPTION soft key"] --> B["Use ▲ and ▼ to scroll through the menu to select PHONEBOOK"]
    B --> C["Use the phonebook as described in the phonebook chapter"]
USING THE TELEPHONE
Write an SMS
You can write/edit an SMS during a call
| During a call, press OPTION soft key | |
| Use ▲ and ▼ to scroll through the menu to selectMESSAGES | |
| Write or edit an SMS text | |
Mute Function
If you wish, you can speak privately to someone else in the room with you without your caller overhearing. You will still be able to hear the caller but they cannot hear you during the mute operation.
| During a call, press OPTION soft key | |
| Use ▲ and ▼ to scroll through the menu to selectMUTE. This can be toggled on or off. | |
| Select either the On or Off Soft key to activate/deactivate the mute | |
USING THE TELEPHONE
DTMF Tones
| During a call, press OPTION soft key | |
| Use ▲ and ▼ to scroll through the menu to select DTMF | |
| Select either the On or Off Soft key to activate/deactivate the DTMF tones | |
Receiving Volume and Tone
During a conversation, the and keys on the left or the up and down navigation keys will adjust the ear piece volume level. Alternatively, press the Boost key to switch amplify on/off. There are three tone settings: soprano/bass/alt. Base is the default setting. You can toggle between these settings using the TONE key on the right hand side of the telephone.
Call Timer
Your handset automatically times the duration of every external call. The time is shown during the call and for a few seconds after the call has ended.
MESSAGES
Send a Text Message
A text message using this telephone can contain up to 160 characters, this includes spaces.
Press MENU soft key to activate the menu
Use ▲ and ▼ to scroll through the menu to select MESSAGES
Press OK soft key to select
Press OK soft key to select WRITE MESSAGE
Enter the text message using the numeric keypad (see Phone book Chapter about entering text using the numeric keypad)
Press OPT soft key. If you wish to insert templates, name or phone number – now is the time to do it.
1) Select SEND TO followed by OPT soft key. Dial the number or SEARCH for required number using the Phone book
2) Select SAVE to drafts followed by Select soft key. Dial the number orSEARCH for
MESSAGES
required number using the Phone book. The text is saved in the OUTBOX
While you are writing your message, you can press the # key to switch the input method.
Receiving a Text Message (Inbox)
On receiving a text, a ringing tone will be audible (see Profiles Chapter on how to set ring tone). NEW MESSAGE UNREAD will be displayed on the LCD.
Press VIEW soft key to display the message
Reviewing Stored Text Messages (Inbox)
Press MENU soft key to activate the menu
Use ▲ and ▼ to scroll through the menu to select MESSAGES
Press OK soft key to select
Use ▲ and ▼ to scroll through the menu to select INBOX (received text messages are stored in the Inbox)
Press OPTION soft key to see all the options
MESSAGES
available that can be performed on this selected text message.
These options include VIEW, REPLY, ADVANCED, CALL SENDER, FORWARD, DELETE, COPY, MOVE TO PHONE, DELETE ALL, COPY ALL, MOVE ALL
Outbox
You can check the messages you have saved in the outbox. These maybe sent or unsent. Options available are View, Resend, Delete, Edit, Delete all Advanced, Copy to phone, Move to phone, Copy all, Move all.
Templates
You can set some common templates for ease of use. You can create a new template or edit or delete existing templates.
SMS settings
SIM card: you have the possibility to set the Validity Period, message type, delivery report, replay path and the voicemail server number.
Save sent message Memory status Preferred storage
MESSAGES
Voicemail Server
Any voicemails you may have received are saved on the network. You have to dial the number of the mail box to access your voicemail messages. You can enter the voicemail mail box number via this Voicemail Server option. You could access at your Voice mail server in press and hold the key one for 3 seconds.
PHONEBOOK
Telephone numbers and names can be stored in the phonebook. This is held both on the SIM and in the phone memory. If you are storing the contact details on the phone you can also store other details such as home number, office number, caller ringtone.
Phonebook allows you to store frequently used numbers so that you can easily make a call without having to remember or enter the telephone number. You can search and recall numbers in order to make a call, create a message or use an entry as an emergency contact. The phone book in the phone memory can contain 300 entries. If you try to add a new entry when all the memory is filled, a warning message will be displayed. You will need to delete an existing entry in order to add the new telephone number. The contacts saved in the SIM card memory are indicated by SIM (capacity of the SIM storage depends on the SIM itself). The advantage of saving to SIM means you can transfer the information to another telephone (the capacity of the SIM will depend on the SIM being used).
PHONEBOOK
Create a Phonebook Entry
| Press NAMES soft key to activate the Phonebook | |
| Press OPTIONS and use ▲ and ▼ to scroll through the menu to select ADD NEW CONTACT | |
| Press Select soft key to select | |
| Option to Save to Sim or Phone | |
| Enter the name using the numeric keypad | |
| Use ▲ and ▼ to scroll through the menu to select the next field of information to enter e.g. NUMBER | |
| Enter the number using the numeric keypad (always include the local area code) | |
| Press Options soft key | |
| Use ▲ and ▼ to scroll through the menu to select Save or Cancel | |
PHONEBOOK
Press Select soft key to confirm
If saving the contact to phone, continue through the menu until all relevant information has been entered home number, office number and the caller ringtone. The numeric keypad also has characters printed on the keys. These characters are used for entering text for the purposes of phonebook entry and modification, SMS text writing and when searching for contacts in the phone book.
Press each key the relevant number of times to get the letter you need e.g. to get the letter J, press the 5 key once, to get the letter S, press the 7 key four times in quick succession.
To move on to the next letter, wait a few seconds and the cursor will appear | after the last letter you entered. You may now enter the next letter. To switch between different input modes e.g. upper and lower case and numbers, use the # key.
Press 0 to insert a space.
You can add punctuation and special features by pressing *. Use ▲ and ▼ and + and – or the keys 2/4/6/8 to scroll through the list and press OK to select and insert.
PHONEBOOK
Character Map
| Key | Characters | Key | Characters |
| 1 | .,-?!'@:#$/1 | 6 | MNO6 |
| 2 | ABC2 | 7 | PQRS7 |
| 3 | DEF3 | 8 | TUV8 |
| 4 | GHI4 | 9 | WXYZ9 |
| 5 | JKL5 | 0 | Space 0 |
Create a Phonebook Entry from Standby
| Enter the number using the numeric keypad (always include the local area code) | |
| Press OPTIONS soft key | |
| Use ▲ and ▼ to scroll through the menu to select Save to Phonebook | |
| Press Select soft key to select | |
| Use ▲ and ▼ to scroll through the menu to select memory location, either TO SIM or TO PHONE | |
| Press OK soft key to select | |
| Enter the name using the numeric keypad | |
PHONEBOOK
If storing to the phone memory, continue through the menu until all relevant information has been entered home number, office number and Caller ringtone
Press OPTION and select Save
View Phonebook Entries
This method will place you in the phonebook list as near as possible to your search criteria.
Press MENU followed by PHONEBOOK soft keys or via the shortcut
Type in the first letter of the name required and your search will be filtered to all contacts starting with that letter. If you type the second letter of the contact, your search will be further filtered to all contacts starting with those two letters etc
PHONEBOOK
Editing and Deleting a Phonebook Entry
Press MENU followed by PHONEBOOK soft keys or via the shortcut NAMES
Type in the first letter of the name required and your search will be filtered to all contacts starting with that letter. If you type the second letter of the contact, your search will be further filtered to all contacts starting with those two letters etc
Press OPTIONS soft key
Options available to be performed on that contact record are as follows:
CALL
VIEW
Send text message
EDIT
DELETE – delete the entry
COPY (SIM < --- > Phone)
MOVE (SIM < --- > Phone)
Speed dial: Quick dial setting for the keys 2 to 9
Add to block list: add the phone number at
PHONEBOOK
| the block list Caller groups | |
| Perform the option and then confirm | |
Copying and Deleting All Phonebook Entries
| Press MENU followed by PHONEBOOK soft keys or via the shortcut NAMES | |
| Press OPTIONS soft key to select | |
| Use ▲ and ▼ to select Phonebook settings and select either: DELETE ALL CONTACT – delete all entries (SIM or phone) COPY CONTACTS– copy all entries (SIM or phone) | |
| Perform the option and then confirm | |
Speed dial
There are 8 other speed dial numbers (keys 2-9 on the numeric keypad).
PHONEBOOK
| Press soft keys NAMES and press OPTIONS | |
| Use ▲ and ▼ to scroll through the menu to select SPEED DIAL | |
| Scroll to Speed Dial | |
| Use ▲ and ▼ to scroll through the menu to select SET NUMBER | |
| Press OK soft key | |
| Use ▲ and ▼ to scroll through the list to select the quick dial location 2,3,4,5,6,7,8,9, | |
| Press OK soft key to select EDIT Choose From Phonebook and press Select | |
| Use ▲ and ▼ to scroll through the phone book to find the required telephone number | |
| Press OK soft key to confirm | |
PHONEBOOK
Phonebook Groups
You can place phone book contacts into groups.
These groups can be assigned different ring tones.
| Press MENU followed by PHONEBOOK soft keys or via the shortcut NAMES | |
| Press OPTIONS and Use ▲ and ▼ to scroll through the menu to select CALLER GROUPS | |
| Press Select soft key to select and choose Add new group then OK | |
| Enter Name a group that you wish to add the contact to e.g.FAMILY. Options - Save Choose the Caller ringtone for the Group with the keys 4 and 6 After Pressing 2 – Details | |
| Press OPTIONS followed by SAVE soft key to confirm | |
| Choose the Group and press OPTIONS to select | |
PHONEBOOK
Use ▲ and ▼ to scroll through the menu to select View MEMBERS
Press ADD soft key to select
Use ▲ and ▼ to scroll through the menu to select OK (if there are no members in this group only the ADD option is available, you will not have to take OPTIONS)
Select a contact from the phone book (from phone memory) and add it to the group..
Editing Phonebook Groups Name
Press soft keys NAMES and press OPTIONS
Use ▲ and ▼ to scroll through the menu to select CALLER GROUPS
Press Select soft key to select
Use ▲ and ▼ to scroll through the menu to select the type of group you wish to modify e.g.FAMILY
Press OPTIONS soft key to select
PHONEBOOK
Press GROUP SETTINGS soft key to edit the name
Use the numeric keypad to change the group name or the Caller Ringtone
Press OPTIONS followed by SAVE soft key to confirm
Phonebook Settings
Press soft keys NAMES and press OPTIONS
Use ▲ and ▼ to scroll through the menu to select PHONEBOOK SETTINGS
Press SELECT soft key to select
The following settings are available PREFERRED STORAGE (SIM card, Phone support or both) MEMORY STATUS
Owner Number (4 extra numbers) Copy contacts (Copied all the contact from SIM card to Phone memory or reverse)
PHONEBOOK
Move contacts (Moved all the contact from SIM card to Phone memory or reverse)
Delete all contacts (Deleted all the contact from SIM card to Phone memory)
Extra Numbers
Press MENU followed by PHONEBOOK soft keys or via the shortcut NAMES
Use ▲ and ▼ to scroll through the menu to select PHONEBOOK SETTINGS
Press SELECT soft key to select
Select OWNER NUMBER and press OK Choose the memory, enter the Name and the phone number and press OK to save
CALL CENTER
View Call Logs
Information about all calls is stored on this telephone. These calls include:
Missed calls
Dialled calls
Received calls
Delete call
Up to 20 numbers can be held in each log.
Call History
| Press MENU soft key to activate the menu | |
| Use ▲ and ▼ to scroll through the menu to select CALL CENTER | |
| Press OK soft key to select | |
| Press OK soft key to select CALL HISTORY | |
CALL CENTER
Use ▲ and ▼ to scroll through the menu to select either MISSED CALLS or DIALLED CALLS or RECEIVED CALLS or Delete call logs
Press OK soft key to select
Use ▲ and ▼ to scroll through the list to select a call
Press Options soft key to select and choose the functions View, Call, Send text message, add to block list, edit before call, delete
Information about the call will be displayed e.g. name, number, date and time
Delete Call Logs
Press MENU soft key to activate the menu
Use ▲ and ▼ to scroll through the menu to select CALL CENTER
Press OK soft key to select
CALL CENTER
Press OK soft key to select CALL HISTORY
Use ▲ and ▼ to scroll through the menu to select DELETE CALL LOGS
Press OK soft key to select
Use ▲ and ▼ to scroll through the menu to select either MISSED CALLS, DIALLED CALLS or RECEIVED CALLS or delete ALL CALLS
Call Settings
There are a number of call settings.
You can access the call settings as shown below followed by a description of each call setting available.
Press MENU soft key to activate the menu
Use ▲ and ▼ to scroll through the menu to select CALL CENTER
Press OK soft key to select
CALL CENTER
Use ▲ and ▼ to scroll through the menu to select CALL SETTINGS
Use ▲ and ▼ to scroll through the menu to select either, CALL WAITING, CALL DIVERT, CALL BARRING and ADVANCED SETTINGS
Press OK soft key to select
Call Waiting
Call waiting can be activated or deactivated. Please check that this service is available from your service provider. You can QUERY STATUS to find out if your service provider offers this service.
Call Divert
Incoming calls can be diverted to a specified telephone number (voicemail number generally). There are 5 options available with this function:
- Divert all voice calls: call divert in all conditions.
- Divert if unreachable: call divert when you cannot be contacted
- Divert if no answer: call divert when there is no answer
CALL CENTER
- Divert if busy: call divert when the line is busy
- Divert all data calls: call divert when it is data calls
- Cancel all diverts: cancel all the call divert
Call Barring
Incoming and outgoing calls to and from your phone can be limited. There are 2 options available with this function:
- Bar all outgoing calls
3 options available:
All voice calls
International voice calls
International voice calls except to home
- Bar all incoming calls
You can cancel all barring (the password is required for this). The password by default is 1122.
Advance Settings
- Black list: Set the numbers you don’t want to answer in the black list, you can specify up to 20 numbers
- Auto redial: If this setting is activated, when you make a call but cannot get through as the other line is engaged, your telephone will automatically redial this number after a certain amount of time.
CALL CENTER
This will take place provided you have not cancelled the call.
- Call time display: whether to display the call duration.
- Call time reminder: You can estimate the call duration accurately by activating the prompt. There are 3 options, off, one sound and sound periodically.
SOS SETTINGS
Once you have pressed the SOS button at the back of the phone for 2-3 seconds, an alarm will be set off instantly. Meanwhile, the phone will make calls automatically to the predefined emergency contacts one by one. The moment the phone is connected, the alarm will stop immediately, and the conversation can begin.
Once connected, there will be a pre-recorded voice message as follows: “this is emergency call, Please press “0” to make sure.”
If “0” is pressed, a conversation can begin. Alternatively it will conclude after 30 seconds and the next number on the list will be dialled until one person press on the key 0.
When your helper presses “0” once connected, it will dial this cycle number after hook off. If he presses another “1” or “2”, it will conclude this call after 30 seconds. After calling, it will send messages to preset emergency contacts one by one (send out the phone position coordinates).
| Press MENU soft key to activate the menu | |
| Use ▲ and ▼ to scroll through the menu to select SOS SETTINGS | |
| Press OK soft key to select | |
SOS SETTINGS
SOS Settings
SOS mode setting
There are 3 modes:
Set 5 numbers: The SOS function use the 5 SOS numbers to contact the different persons.
Set call center: the SOS function use the call center number for the SOS function
OFF: The SOS function is deactivating.
Set SOS Numbers
A maximum of five SOS numbers can be set.
Press EDIT function key and choose From Phone book to select one contact else choose Edit Number to enter directly the phone number of the contact.
Call center number
Enter the call center phone number and press OK to confirm.
Set outgoing voice MSG
You have the possibility to choose to use the emergency message of the Phone or your personal vocal message
Default: If you choose the menu Select, the SOS message of the phone is selected.
Play: You can listen the message selected
SOS SETTINGS
User recorded
You have the possibility to:
Select: You select the personal SOS message
Record: function to record one personal SOS message
Play: Function to listen the message
Delete: Function to delete the SOS personal message
Record SOS message
You have the possibility to record one SOS message from 20 seconds maximum.
Press the key M2 to start the recording, during the
recording you can press the key M2 to have a pause If you press on the key M1, you continue the recording, M3 to stop the recording and save the new SOS message.
SETTINGS
Tone control
You have the possibility to set your phone with a tonality normal, with more low frequency (more bass) or more high frequency (more treble)
Boost function
You have the possibility to activate or deactivate the boost function automatically when you are on a call
Direct number
Telephone numbers from the phone book can be stored at any of the three quick dial locations (M1, M2 and M3). To dial a quick dial telephone number, simply press and hold the required memory button.
| Press MENU soft key to activate the menu | |
| Use ▲ and ▼ to scroll through the menu to select SETTINGS | |
| Press OK soft key to select | |
| Use ▲ and ▼ to scroll through the menu to select DIRECT NUMBER | |
SETTINGS
| Press OK soft key to select | |
| Use ▲ and ▼ to scroll through the menu to select M1/M2/M3 SETTING | |
| Press OK soft key to select | |
| Use ▲ and ▼ to scroll through the list to select the quick dial location 1,2 or 3 | |
| Press OK soft key and select EDIT when you are on the line phone number and choose From phonebook | |
| Use ▲ and ▼ to scroll through the phone book to find the required telephone number | |
| Press OK soft key to confirm and press on the soft key YES to confirm the saving | |
SETTINGS
User profiles
The mobile is supplied with four profiles. Each profile has a number of settings which are configurable.
Therefore you can set up a profile for different contexts e.g. outdoor profile would have a louder ring than general, meeting profile will have no ring but will vibrate on receiving a call etc.
| Press MENU soft key to activate the menu | |
| Use ▲ and ▼ to scroll through the menu to selectSettings - USER PROFILES | |
| Press OK soft key to select | |
| Use ▲ and ▼ to scroll through the menu to select a profile. Options available areGENERAL, , SILENT, MEETING, OUTDOOR. | |
| Press OPTIONS soft key to select | |
| Use ▲ and ▼ to scroll through the menu to select either ACTIVATE or CUSTOMIZE. If you choose CUSTOMIZE see below for list of customizable features. | |
SETTINGS
Incoming call: for Incoming calls (up to 10 melodies available)
Ring tone volume: volume for Ringtone
Message Tone: For the receiving from one SMS
Message volume: Volume level to receive a SMS
Alarm tone: 10 melodies available for the function Alarm
Alarm volume: Volume of the Alarm function
Keypad: 4 possibilities (Silent, Click, tone or Talking)
Key tone volume: Volume for the Key tone function.
Power On: animation shown when you switch your mobile telephone on
Power Off: animation shown when you switch your mobile telephone off
System alert: Switch On/Off the tones for Warning, Error, Camp On, Connect
SETTINGS
Alert Type. The options available are Ring Only, Vibrate Only, Vibrate and Ring, Vibrate then ring
Ring Type. The options available are Beep once and Repeat
Wallpaper
Select from 10 images for standby mode.
Phone settings
| Press MENU soft key to activate the menu | |
| Use ▲ and ▼ to scroll through the menu to select SETTINGS | |
| Press OK soft key to select | |
| Press OK soft key to select PHONE SETUP | |
Time and Date
Set Time Zone: Select your city
Set Time/ Date: Set the current date and time using the numeric keypad.
Schedule Power On/Off
SETTINGS
You can set 4 different time for the phone to switch on or off automatically
Language
You can choose from 12 languages.
Preferred Input Method
You can choose from 6 text input methods.
LED Mode
You have 3 modes for the LED
ON, always activate
Off: always turn off
Night mode: doesn't work the night
LCD backlight
Brightness: You can adjust the illumination level with

TIME: you can specify how long to wait before the screen saver is displayed: 5sec/15 sec/30 sec/1 minute
Network settings
Press MENU soft key to activate the menu
Use ▲ and ▼ to scroll through the menu to select
SETTINGS
| SETTINGS | |
| Press OK soft key to select | |
| Use ▲ and ▼ to scroll through the menu to select NETWORK SETTING | |
| Press OK soft key to select | |
New search: to find the different network accessible Select network: display the networks found Selection mode: 2 modes, Automatic and Manual
Security settings
| Press MENU soft key to activate the menu | |
| Use ▲ and ▼ to scroll through the menu to select SETTINGS | |
| Press OK soft key to select | |
| Use ▲ and ▼ to scroll through the menu to select SECURITY SETTINGS | |
SETTINGS
Press OK soft key to select
This mobile telephone allows you to set up passwords to help protect your telephone from unauthorized use. The PIN and PIN2 codes are supplied with your SIM card. The PIN code helps to protect the SIM card from unauthorised use. The PIN2 code is required to access certain services.
The PUK and PUK2 codes may be supplied with the SIM card. If you enter the PIN code incorrectly three times in succession, the PUK will be required. If the codes are not supplied, contact your service provider.
SIM security SIM lock
The SIM lock (PIN) can be switched on or off. To switch on, the Code PIN is required.
Change Password
Change the password for the PIN code
Auto keypad lock
You can select between no keypad lock or lock switched on after standing idle for either 5 seconds, 30 seconds, 1 minute or 5 minutes.
SETTINGS
Restore factory setting
| Press MENU soft key to activate the menu | |
| Use ▲ and ▼ to scroll through the menu to select SETTINGS | |
| Press OK soft key to select | |
| Use ▲ and ▼ to scroll through the menu to select RESTORE FACTORY SETTINGS | |
| Press OK soft key to select | |
If you choose to reset the handset to restore the initial settings, all the user selectable features are restored to the factory setting
Note: The default password is 1122; please change it to your own personal password as soon as possible.
ORGANIZER
Calendar
You can review the calendar and move to a certain date quickly.
Press the ▼ button down
To move daily/ right and left, press

To move weekly/ up and down, press ▲/▼.
To move monthly, press

You can check or edit an event scheduled for an appointed date.
• View: check or edit the event.
• View all: look at all scheduled events
- Add event: add new event
- Delete event: delete all/ delete certain events
- Jump to date: skip to the appointed date to check or edit the event
- Go to today: You select directly the date of the day.
Calculator
There is a calculator on the telephone. This is operated via the numeric keypad.
ORGANIZER
| Press MENU soft key to activate the menu | |
| Use ▲ and ▼ to scroll through the menu to select ORGANIZER | |
| Press OK soft key to select | |
| Press OK soft key to select CALCULATOR | |
| Enter the first number using the numeric keypad (use # to insert a decimal point) | |
▲ is +
▼ is -
is ×M1 is = M2 is ÷ | |
| Enter the second number using the numeric keypad | |
Note: Press CLEAR soft key to clear the last digit. Press and hold CLEAR soft key to clear the display completely.
ORGANIZER
Alarm
You can set up to 5 alarms. Each with the following settings:
Press Edit soft key:
- On/Off
- Alarm time
- Alarm Repeat: once, everyday or custom.
- Snooze: choose from 1 to 10 minutes.
- Alert type: ring only, vibration only, ring and vibration,
- When an alarm rings, if you do not switch it off or snooze is on, the alarm will ring again after 4 minutes. This will happen 3 more times and then the alarm will stop.
Bluetooth
This phone can be connected with a Bluetooth device which is in the range of 10m.
- Bluetooth activation: on/off
- Visibility: on/off
- My device: The name of audio device will be displayed after pairing.
- Search audio device: activate Bluetooth and the headset before entering this menu, and then begin to search for audio device. You will be asked to input the password of headset. And then you can use Bluetooth for talking after pairing.
ORGANIZER
Note: the password is different for each factory; please refer to the Bluetooth manual for the detail.
• My name: device name
- Advanced:
• My address: Address of the phone
- Audio path: Leave in the phone or transfer to the audio device about
Tasks
In one tasks, you have the possibility to enter the information (Date/Hour, subject, Alarm (On, Off, 5 min before, 10 min before, 15 min before, 30 min before, custom), Repeat (Once, Every day, custom, weekly, monthly, yearly), priority (Low, high, medium), Details, Status (undone, done)
Check all the tasks saved and edit them as follows:
• View: view the selected task details
- Add: add a new task
- Edit: edit the task
- Delete: delete the task
- Delete overdue: delete the overdue tasks
- Delete all: delete all tasks
- Jump to date: skip to view or edit the designated date of schedule
• View uncompleted: Display all the uncompleted file
- Send vCalendar: send the task out through a message, Bluetooth, or save it to the folder
ORGANIZER
Stopwatch
There are two timing functions:
- Split Timing: Maximum of 20 split timings for each record.
- Lap Timing: Maximum of 20 lap timings for each record
- View records: enter to check the timing record. To clear the stopwatch, press STOP first, and then press RESET key to clear it.
OPTIONAL ACCESSORIES
Wired headset with microphone and one touch receive call button
- Bluetooth Headset
TROUBLESHOOTING
Telephone cannot be switched on
- Check battery is inserted and check that it is inserted correctly
Nothing appears on the display
- Check the handset is switched on
- Check the battery and SIM are inserted correctly
Display is locked when the telephone is switched on
- Enter the PUK to unlock the SIM
No signal icon is displayed
- There is no network connection. Move around to try and get to an area where there may be coverage
- Contact your service provider
Message to say that a function is not possible
- Your service provider might not provide the function in question or you may need to subscribe to that service. Contact the service provider.
No display during the charging process
- The battery charge is very low. Wait a few minutes.
"Insert Sim" or "Limited Service" message is displayed
- Ensure the SIM is inserted correctly
The battery is discharged quickly or cannot be charged at all.
- Charge the battery for 4 hours
TROUBLESHOOTING
- Place the phone correctly in the charging unit or connect the charging unit properly. Clean the contact surfaces on the mobile phone and charging unit with a soft, dry cloth.
- Try a new battery
Failure to link to the network
- The signal is too weak, or there may be some radio interference
- Is the SIM card installed incorrectly or damaged? If the SIM card is damaged, please ask your service provider for a replacement.
Cannot make a Call
- Is the SIM card registered to the network
- Is the bar outgoing calls feature enabled
- There may be a problem with the network, call your service provider
- Check the service provider number, local area number or NMC number (see Handset Settings)
Cannot answer a call:
- Is the bar incoming calls feature enabled
- Is the call diverting function enabled
The keys appear to be locked
• Power the phone off and then on
- Unlock the keylock
Caller Number is not displayed
- Ensure you have subscribed to the Caller ID service. Contact your service provider
TROUBLESHOOTING
- The caller may have withheld their details
- Let the phone ring a few times as there may be a delay in receiving the Caller ID information
Any problems not referred to above
- Check through the User Guide
- Power off and then on again. Check to see if the problem persists
SAFETY INFORMATION
General
Only use the power supply included with the product.
Only use the approved rechargeable battery supplied.
Do not open the handset (except to replace the handset batteries) or base. Contact the helpline for all repairs.
Never dispose of batteries in a fire. There is a serious risk of explosion and/or the release of toxic chemicals.
If you are sure you are not going to use the telephone for over a month, remove the battery
Cleaning
Clean the telephone with a soft cloth. Keep the base and handset charging contacts clean. Never use polishes or cleaning agents - they could damage the finish or the electrics inside.
Environmental
Do not expose to direct sunlight.
Always ensure there is a free flow of air over the surfaces of the telephone.
SAFETY INFORMATION
Do not place any part of your product in water and do not use it in damp or humid conditions e.g. bathrooms. Do not expose your product to fire or other hazardous conditions.
The telephone is designed for working within a temperature range of -20^ to 60^ .
Usage
In summary, read these simple guidelines. Not following them may be dangerous or illegal.
SWITCH ON SAFELY
Do not switch the device on when wireless phone use is prohibited or when it may cause interference or danger.
ROAD SAFETY COMES FIRST
Obey all local laws. Always keep your hands free to operate the vehicle while driving. Your first consideration while driving should be road safety.
INTERFERENCE
All wireless devices may be susceptible to interference.
This could affect performance.
SWITCH OFF IN HOSPITALS
Follow any restrictions. Switch the device off near medical equipment.
SWITCH OFF IN AIRCRAFT
Follow any restrictions. Wireless devices can cause interference in aircraft.
SWITCH OFF WHEN REFUELLING
SAFETY INFORMATION
Do not use the device at a refueling point. Do not use near fuel or chemicals.
SWITCH OFF NEAR BLASTING
Follow any restrictions. Do not use the device where blasting is in progress.
USE SENSIBLY
Use only in the normal position as explained in the product documentation.
BACK-UP COPIES
Remember to make back-up copies or keep a written record of all-important information.
CHARGING
Do not use the telephone during charging
HEARING AID INFORMATION
Some phones are measured for compatibility with hearing aids. If the box for your particular model has “Rated for Hearing Aids” printed on it, the following explanation applies. When some mobile phones are used near some hearing devices (hearing aids and cochlear implants), users may detect a buzzing, humming, or whining noise. Some hearing devices are more immune than others to this interference noise, and phones also vary in the amount of interference they generate. The wireless telephone industry has developed ratings for some of their mobile phones, to assist hearing device users in finding phones that may be compatible with their hearing devices. Not all phones have been rated. Phones that are rated have the rating on their box or a label on the box. The ratings are not guarantees. Results will vary depending on the user’s hearing device and hearing loss. If your hearing device happens to be vulnerable to interference, you may not be able to use a rated phone successfully. Trying out the phone with your hearing device is the best way to evaluate it for your personal needs.
NETWORK SERVICES
To use the phone you must have service from a wireless service provider. Many of the features in this device depend on features in the wireless network to function. These network services may not be available on all networks or you may have to make specific arrangements with your service provider before you can utilize network services. Your service provider may need to give you additional instructions for their use and explain what charges will apply. Some networks may have limitations that affect how you can use network services. For instance, some networks may not support all language-dependent characters and services.
Your service provider may have requested that certain features be disabled or not activated in your device. If so, they will not appear on your device menu. Your device may also have been specially configured. This configuration may include changes in menu names, menu order and icons. Contact your service provider for more information.
GUARANTEE
From the moment your Geemarc product is purchased, Geemarc guarantee it for the period of two year. During this time, all repairs or replacements (at our discretion) are free of charge. Should you experience a problem then contact our help line or visit our website at www.geemarc.com. The guarantee does not cover accidents, negligence or breakages to any parts. The product must not be tampered with or taken apart by anyone who is not an authorized Geemarc representative. The Geemarc guarantee in no way limits your legal rights.
IMPORTANT: YOUR RECEIPT IS PART OF YOUR GUARANTEE AND MUST BE RETAINED AND PRODUCED IN THE EVENT OF AWARRANTY CLAIM.
Please note: The guarantee applies to the United Kingdom only
DECLARATION: Geemarc Telecom SA hereby declares that this product is in compliance with the essential requirements and other relevant provisions of the Radio and Telecommunications Terminal Equipment Directive 1999/5/EEC and in particular article 3 section 1a, 1b and section 3. The telephone does not operate if the line current is lower than 18 mA.
The declaration of conformity may be consulted at www.geemarc.com

GUARANTEE
Electrical connection: The apparatus is designed to operate from a 230V 50Hz supply only. (Classified as 'hazardous voltage' according to EN60950 standard). The apparatus does not incorporate an integral power on/off switch. To disconnect the power, either switch off supply at the mains power socket or unplug the AC adaptor. When installing the apparatus, ensure that the mains power socket is readily accessible.
RECYCLING DIRECTIVES
The WEEE (Waste Electrical and Electronic Equipment) has been put in place for the products at the end of their useful life are recycled in the best way.
When this product is finished with, please do not put it in your domestic waste bin.
Please use one of the following disposal options:
- Remove the batteries and deposit them in an appropriate WEEE skip. Deposit the product in an appropriate WEEE skip.
- Or, hand the old product to the retailer. If you purchase a new one, they should accept it.
Thus if you respect these instructions you ensure human health and environmental protection.


For product support and help visit our website at
www.geemarc.com
Telephone 01707 384438
Or fax 01707 832529


UGCL8350_En_v1.6
geemarc UNITED KINGDOM
5 Swallow Court Swallowfields Welwyn Garden City Hertfordshire, AL7 1SB For product support. 01707 384438
www.geemarc.com
geemarc FRANCE
Parc de l'Etoile 2, rue Galilée 59791 GRANDE SYNTHE CEDEX TEL. SERVICE APRES VENTE. 03 28 58 75 99
www.geemarc.com
- GSM Telephone with Voice Amplification
- CONTENTS
- CONTENTS 1
- INTRODUCTION 5
- DESCRIPTION 7
- SETTING UP 16
- USING THE TELEPHONE 22
- MESSAGES 30
- PHONEBOOK 34
- CALL CENTER 46
- SOS SETTINGS 52
- SETTINGS 55
- ORGANISER 64
- INTRODUCTION
- Unpacking the Telephone
- DESCRIPTION
- General Description
- Handset Description (front)
- LCD Screen Description
- Signal Strength icon
- Alarm icon
- New Call icon
- Key Lock icon
- Battery Status icon
- Message icons
- Mute icon
- Silent icon
- Ring tone icon
- Vibrate icon
- Vibrate followed by ring icon
- Vibrate and ring icon
- Headset icon
- Bluetooth icon
- Menu Navigation
- SETTING UP
- Network Services
- Passwords
- Install SIM Card and Battery
- Charging the battery
- Charging via the Charging Unit
- Before the handset can be used, the battery must be charged for a minimum of 4 hours.
- Battery Use
- Switching On/Off
- USING THE TELEPHONE
- Standby Mode
- Energy Saving Mode
- Making a Call
- Making a Call from the Call List
- Making a Call from the Phone Book
- Making a Call using Quick Dial
- Receiving a Call
- Rejecting a Call
- Hands Free
- End Single Call
- Start a New Call
- Phonebook
- Write an SMS
- Mute Function
- DTMF Tones
- Receiving Volume and Tone
- Call Timer
- MESSAGES
- Send a Text Message
- Receiving a Text Message (Inbox)
- Reviewing Stored Text Messages (Inbox)
- Outbox
- Templates
- SMS settings
- Voicemail Server
- Press Select soft key to confirm
- View Phonebook Entries
- Editing and Deleting a Phonebook Entry
- Copying and Deleting All Phonebook Entries
- Speed dial
- Phonebook Groups
- Editing Phonebook Groups Name
- Phonebook Settings
- Extra Numbers
- CALL CENTER
- View Call Logs
- Call History
- Delete Call Logs
- Call Settings
- Call Waiting
- Call Divert
- Call Barring
- Advance Settings
- SOS SETTINGS
- SOS mode setting
- Set SOS Numbers
- Call center number
- Set outgoing voice MSG
- User recorded
- Record SOS message
- SETTINGS
- Tone control
- Boost function
- Direct number
- User profiles
- Wallpaper
- Phone settings
- Time and Date
- Language
- Preferred Input Method
- LED Mode
- LCD backlight
- Network settings
- Security settings
- Press OK soft key to select
- SIM security SIM lock
- Change Password
- Auto keypad lock
- Restore factory setting
- ORGANIZER
- Calendar
- Calculator
- is ×
- Alarm
- Bluetooth
- Tasks
- Stopwatch
- OPTIONAL ACCESSORIES
- TROUBLESHOOTING
- Telephone cannot be switched on
- Nothing appears on the display
- Display is locked when the telephone is switched on
- No signal icon is displayed
- Message to say that a function is not possible
- No display during the charging process
- "Insert Sim" or "Limited Service" message is displayed
- The battery is discharged quickly or cannot be charged at all.
- Failure to link to the network
- Cannot make a Call
- Cannot answer a call:
- The keys appear to be locked
- Caller Number is not displayed
- Any problems not referred to above
- SAFETY INFORMATION
- General
- Cleaning
- Environmental
- Usage
- HEARING AID INFORMATION
- GUARANTEE
- RECYCLING DIRECTIVES
Brand : GEEMARC
Model : CL8350
Category : Mobile Phone