
CL8360 - Mobile Phone GEEMARC - Free user manual and instructions
Find the device manual for free CL8360 GEEMARC in PDF.


| Product Type | Amplified Mobile Phone with Dual SIM and Camera |
| Brand | Geemarc |
| Model | CL8360 |
| Dimensions (approx.) | 120 x 55 x 15 mm (estimated) |
| Weight (approx.) | 150 g (incl. battery, estimated) |
| Display | Color LCD with large font |
| SIM Card | Dual SIM (standard size) |
| Memory | Up to 300 phonebook entries; expandable via microSD up to 4 GB |
| Battery | Li-Polymer rechargeable (approx. 1000 mAh, estimated) |
| Charging | Micro USB (5V 0.5A) or desktop charging cradle |
| Talk Time | Approx. 4 hours (estimated) |
| Standby Time | Approx. 200 hours (estimated) |
| Amplification | Adjustable receiving volume up to 35 dB with boost key |
| Ringer | Loud ringer and strong vibrating alert |
| Keypad | Talking keypad (human voice option) |
| Camera | Built-in camera for photos and video |
| Radio | FM radio with 10 preset channels |
| Bluetooth | Yes, for headset and file transfer (password 0000) |
| Torch | LED torch, activated by dedicated key |
| SOS Button | Rear button sends alert to up to 5 contacts |
| Connectivity | 2G/GSM networks |
| SAR Values | Head: 0.402 W/kg; Body: 1.08 W/kg; Limbs: 3.415 W/kg |
| Cleaning | Soft cloth; keep charging contacts clean; no polishes |
| Operating Temperature | -10°C to 55°C |
| Power Supply | 230V 50Hz AC adapter (included) |
| Warranty | 2 years (UK only) |
Frequently Asked Questions - CL8360 GEEMARC
User questions about CL8360 GEEMARC
0 question about this device. Answer the ones you know or ask your own.
Ask a new question about this device
Download the instructions for your Mobile Phone in PDF format for free! Find your manual CL8360 - GEEMARC and take your electronic device back in hand. On this page are published all the documents necessary for the use of your device. CL8360 by GEEMARC.
USER MANUAL CL8360 GEEMARC
geemarc™ Hear the Difference
CL8360
Amplified Mobile Phone with dual SIM and Camera

natural_image
Black Geemarc portable electronic device with visible grille and ventilation slots (no text or symbols on body)
English
!!! Please refer to our website: www.geemarc.com for an up to date user guide, as there may be important updates and changes you need to be aware of.!!!
CONTENTS
CONTENTS 2
INTRODUCTION....5
Unpacking the Telephone....6
DESCRIPTION....7
General Description 7
LCD Screen Description 12
Menu Navigation 14
Menu Map 14
Network Services & Password.... 16
SETTING UP, Install SIM Card and Battery ...... 17
Charging the Battery 18
Switching On/Off & Battery Use 19
USING THE TELEPHONE, Standby Mode, Making a Call.... 20
Making a Call from the Call Record & Phone Book.... 21
Making a Call from the Phone Book 21
Receiving a Call, Rejecting a Call, Switch Off Alerts .. 21
Options During a Call 22
Receiving Volume 23
Call Timer 23
Tone response.... 23
SMS 24
Write & Send a Text Message.... 24
Inbox - Receiving a Text Message 24
CONTENTS
Options for a Text Message 25
Reviewing Stored Text Messages (Inbox) 25
Sent Messages 25
Draft box.... 26
Delete SMS 26
Text Message Settings 27
Service Messages.... 29
Service Loading 29
VOICEMAIL 30
Voicemail Number Setting 30
Listen to Voicemail 30
PHONEBOOK.... 31
Create a Phone Book Entry 31
Create a Phone Book Entry from Standby 32
View Phone Book Entries 33
Options within Phone Book 33
Create a Picture Phone Book Entry 34
Dial a Picture Phone Book Entry 35
Storing a Speed Dial Number.... 35
Dialling a Speed Dial Number 35
CALL RECORD 36
Display Missed Calls 36
Display Dialled Calls 36
Display Received Calls 37
Delete Call Logs 37
Call Settings 37
CONTENTS
HANDSET SETTINGS.... 40
I.C.E 40
Profiles 40
Boost Settings 41
Tone control.... 41
Phone Settings 42
Network Settings 43
Security Settings 43
Restore Default 43
SOS....44
SOS Function.... 44
SOS Number Settings...... 45
SOS Message Record 45
ADVANCED SETTINGS...... 46
Tools 46
Multimedia.... 48
File Manager 48
TROUBLESHOOTING 49
SAFETY INFORMATION...... 52
HEARING AID INFORMATION .... 55
NETWORK SERVICES 56
GUARANTEE 57
RECYCLING DIRECTIVES 58
INTRODUCTION
Congratulations on purchasing your Geemarc CL8360 telephone. This telephone offers many functions such as an alarm, calendar, camera, video, SMS text messaging, a phone book and picture phone book, human voice options with talking keypad, and a speakerphone and speed dial buttons. It has an SOS function in which five numbers can be programmed as emergency contacts. In case of emergency these contacts will be called and SMS messages sent by pressing a single button.
The font size on the colour LCD display is large and the buttons on the keypad are easy to see and use. This mobile telephone has a loud ringer and strong vibrating setting. There is adjustable receiving volume control reaching up to 35dB with boost key. The handset earpiece, speakerphone and ringer can be set to loud volume levels – please use with care. Increase volume gradually to a comfortable level. All these features add up to make this a highly suitable telephone for the elderly, or for people who are hard of hearing or who are vision impaired and anyone who simply wants to keep in touch with a great degree of ease.
It is important that you read the instructions below in order to make the best use of your Geemarc telephone. Keep this user guide in a safe place for future reference.
This guide explains how to use the following telephone: L8360
INTRODUCTION
Unpacking the Telephone
When unpacking the telephone, you should find the following in the box:
• 1 CL8360 mobile telephone handset
• 1 Desktop charging unit
• 1 Mains power adaptor
- 1 x Li-Polymer rechargeable battery
- 1 User Guide

eemarc™
Hear the Difference
For product support and help visit our website at
www.geemarc.com
E-mail: help@geemarc.com
telephone 01707 387602
lines are open 09h00 to 16h00 Mon to Fri
DESCRIPTION
General Description
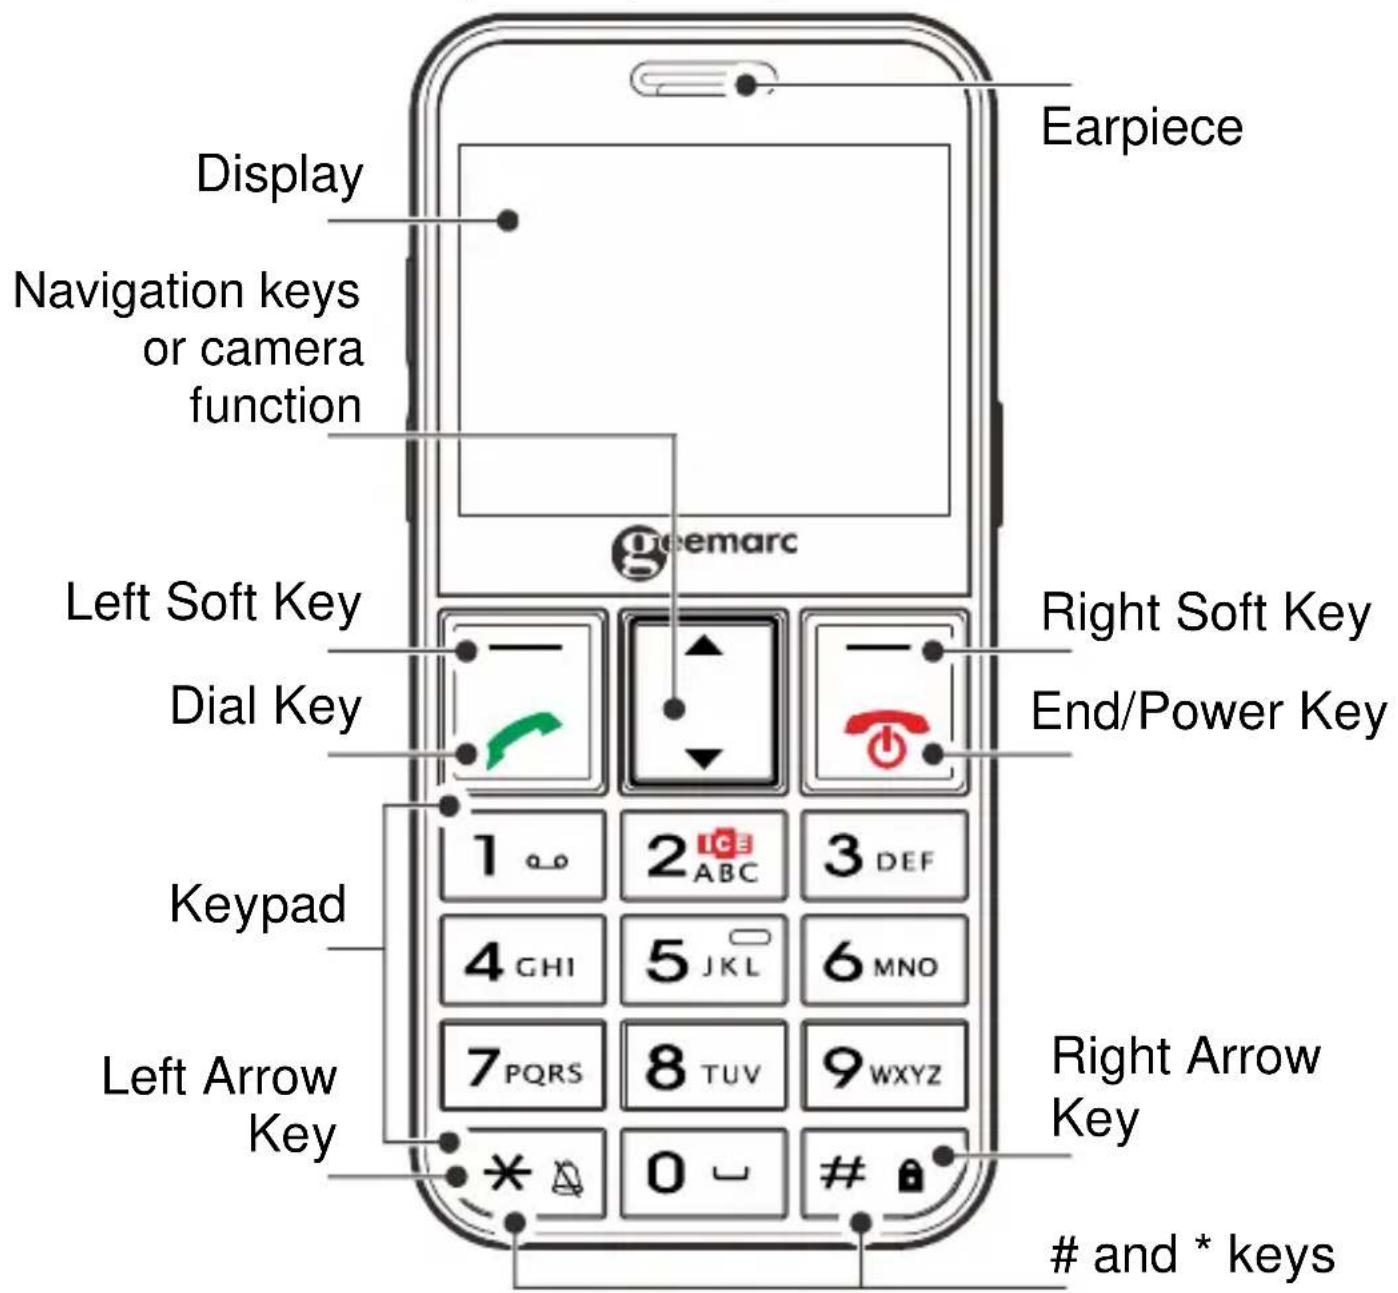
Handset Description (front)
DESCRIPTION
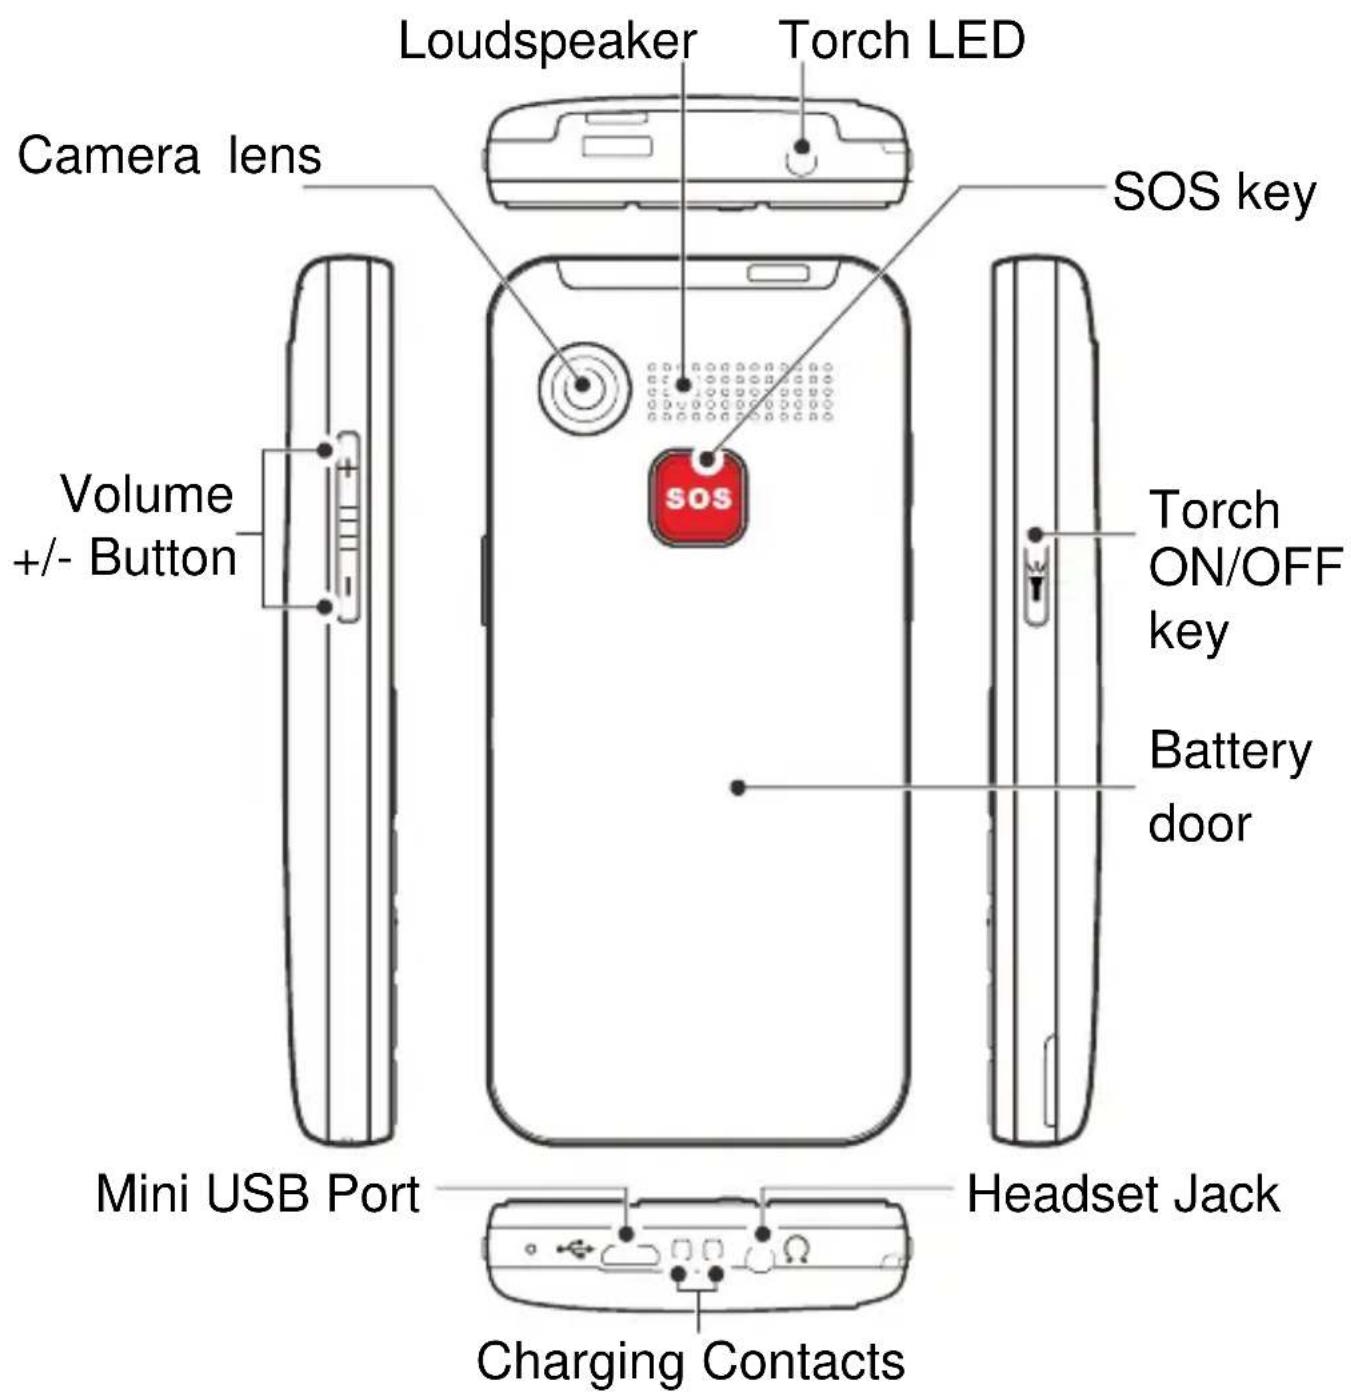
Handset Description (Rear, Sides)
DESCRIPTION
Charging Contacts

natural_image
Pure diagram of a circular container with internal compartments and a central vertical structure (no text or symbols)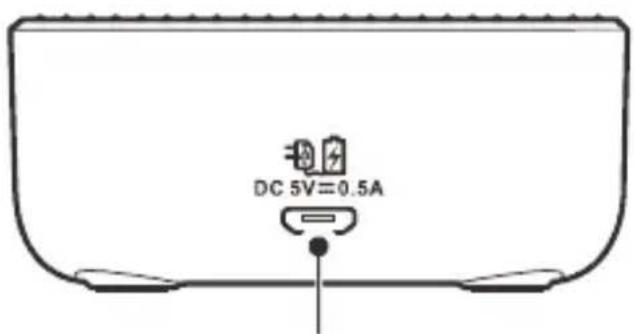
Micro USB port
DESCRIPTION
 | Power key/On-hook key• Long press to power the telephone on and off• End a call• Cancel current process and return to standby |
 | Call Key• Make a call after dialling the number• Receive a call |
 | Navigation ButtonUp Key• Scroll up through lists and menu options. • This is a dedicated key in Standby. It can be set up in Handset Settings or Camera function in standby modeDown Key• Scroll down through lists and menu options. • This is a dedicated key in Standby. It can be set up in Handset Settings |
 | Left / Right key• These are soft keys: they take on different functions depending on the menu displayed. The current function is always displayed by the text above the key. |
DESCRIPTION
 | Asterisk key• Press this key to insert one or more symbols while composing a message or editing a phonebook entry name. Then use the navigation keys to move to the symbols you want to insert. |
 | Hash Key• Press to switch between different input modes while composing a text message or editing a contact name. |
 | Torch Key• In standby, press and hold for a few seconds and the torch will shine steadily. Press once more to turn it off. |
 | Volume Up and Down Key• Use this key to increase ringer volume when you access Profiles menu or when receiving an incoming call. Increase the earpiece / speakerphone volume during a call. There are 7 volume levels available.Volume Down Key• Use key to decrease the ringer volume when you access Profiles menu or when receiving an incoming call. Increase the earpiece/speakerphone volume during a call. There are 7 volume levels available. |
DESCRIPTION
General Description
Your CL8360 phone can be equipped with the following items, which are not included:
- One or two SIM cards
- Memory card
You can choose to install a single SIM card, in which case you will be receiving service from a single cellular service provider, or two SIM cards—in which case you will be able to receive service from two different service providers. This is useful if you want to ensure you have better network coverage and to avoid having to rely on a single service provider.
The memory card is needed to provide space for your photographs and other multimedia content, as well as for storing your SOS message, phone book and more.
The maximum capacity is 4G.
LCD Screen Description
The LCD screen is split into three distinct areas:
The icon area. At the top of the screen. This area displays the various system icons which help you to use the telephone.
The main area. Across the centre of the screen. It displays the following:
• Number being dialled
- Caller ID information
- Phonebook
- Menu information
- In standby mode current time, date and service provider name
DESCRIPTION
The soft key area. At the bottom of the screen.
 | Signal Strength iconThis is always displayed when your telephone is switched on. It shows the current signal strength.More bars indicate more signal strength. There is one of these icons per SIM. | |
 | Alarm iconThe alarm has been set to ring at a specified time. | |
 | Battery Status iconThis is always displayed when your telephone is switched on. It shows the level of battery charge.More bars indicate more battery charge | |
 | Roaming iconA roaming call is taking place i.e. international call – outgoing or incoming | |
 | SMS iconA new SMS (text message) has been received | |
 | Mute iconThe microphone is temporarily muted during the conversation | |
 | Silent iconThe telephone is in silent mode. There will be no call alert | |
 | Boost iconTelephone sounds are set to extra-loud. | |
DESCRIPTION
 | Headset iconThe headset is plugged in |
 | Missed Call |
Menu Navigation
The MENU soft key or central square key is used to activate the menu. The BACK soft key is used to go back a level in the menu system.
The ▼ and ▲ keys are used to scroll through the menu.
▲ move backward through the menu
▼ move forward through the menu
Sometimes < and > are used to navigate through sub menus. The OK soft key key is used to confirm/ select an action or choice on a screen.
The central square key is used to go to Menu or to confirm/select an action or choice on a screen.
Menu Map
| Messages | Write MessageInboxDraftsOutboxSent MessagesMessage Settings |
| Phonebook | Picture PhonebookNormal Phonebook |
DESCRIPTION
| Call Center | Call HistoryCall Settings |
| Multimedia | CameraGalleryAudio PlayerSound RecorderFM Radio |
| File Manager | PhoneMemory card (if available) |
| Services | Internet ServiceSIM ToolkitSIM Toolkit |
| SOS | SOSRecord SOS Message |
| Settings | I.C.EProfilesBoost SettingTone controlPhone SettingsNetwork SettingsSecurity SettingsRestore Settings |
| Tools | CalendarTasksAlarmBluetoothCalculator |
DESCRIPTION
Network Services
To use this mobile telephone you must subscribe to a service from a service provider. Different service providers offer different features (at a variety of charges). This may effect the features made available to you through this mobile telephone.
Using 1 or 2 SIM Cards
Your phone will work just fine with one SIM card installed from one service provider.
However it is possible to install two SIM cards in your CL8360 - there are many reasons to do this – here are some of the main reasons:
- If you use two SIMS from different providers you will probably get better network coverage.
- You can add your professional SIM and keep your personal SIM.
Passwords
This mobile telephone allows you to set up passwords to help protect your telephone from unauthorized use.
The PIN and PIN2 codes are supplied with your SIM card. The PIN code help to protect the SIM card from unauthorized use. The PIN2 code is required to access certain services.
The PUK and PUK2 codes may be supplied with the SIM card. If you enter the PIN code incorrectly three times in succession, the PUK will be required. If the codes are not supplied, contact your service provider.
SETTING UP
Install SIM Card and Battery
Always switch the telephone off and disconnect the charger before removing the battery.
Take care when handling the SIM card. The SIM card and its contacts can be easily damaged by scratches or bending.
To remove the battery compartment cover, slide the cover in the direction shown and pull it off.

natural_image
Line drawing of a smartphone case with an upward arrow indicating compression or shift (no text or symbols)Remove the battery (if battery already inside).
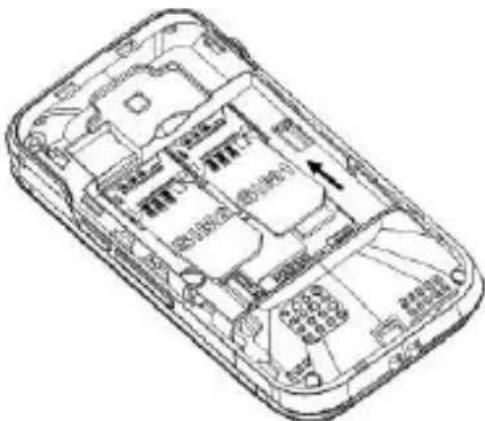
Slide a SIM with the gold contacts face down under the silver SIM holder as shown below.
You can insert 2 SIM cards into this telephone. There are many reasons to do this, however, one important reason is that if you use two SIMS from different providers you will probably get better network coverage. However, just using one will be fine too!
natural_image
Technical line drawing of a smartphone internal compartments and casing (no text or symbols)Observe the battery contacts (the gold coloured contacts must face towards the top left). and insert the battery.
Place the battery cover into position and press down lightly.
SETTING UP
Charging the Battery
Charging via the Mini USB Port
Plug the charger into a wall socket.
Connect the lead from the charger into the Micro USB port on the bottom of the telephone.
During charging, the battery icon [starts to fill.

natural_image
Line drawing of a smartphone rear panel with USB cable inserted (no text or symbols)Charging via the Charging Unit
Plug the charger into a wall socket.
Connect the lead from the power adapter into the Micro USB port on the charging cradle.
Place the mobile telephone in the charging cradle with the power lead facing backwards and the phone display screen and keypad facing you. If you place the phone in the cradle facing the wrong way, it will not charge.
Note: Only use batteries and chargers supplied with the telephone. The guarantee will be invalid if an unapproved cable is used. Keep the battery contacts clean and free of dirt. Try and avoid removing the battery as this may cause it to short circuit.

SETTING UP
If the battery is completely discharged, it may take a few seconds before the charging indicator appears on the display or before any calls can be made.
Before the handset is first used, the battery must be charged for a minimum of 4 hours.
Switching On/Off
Press for 3 seconds or longer to switch the telephone on.
If no SIM card has been inserted, INSERT SIM will be displayed. Only emergency calls can be made until the SIM has been inserted.
Press 📷 again for 3 seconds to switch the telephone off.
Battery Use
The icon is continuously displayed at the top right corner of the LCD display. The icon indicates the level of battery power. The more bars displayed, the more power available.

natural_image
Five pixelated battery icons in a row, varying from green to black to red (no text or symbols)When the battery charge is low, a warning message will be displayed. The back lighting and certain other functions may stop working. When the battery is too weak for the telephone to operate, the handset will automatically switch off.
Battery talk and standby times are subject to change. Replace the battery when the battery power has deteriorated noticeably (requires charging more frequently).
USING THE TELEPHONE
Standby Mode
In standby mode, your telephone is ready for use but it conserves the battery power by switching off the battery-consuming functions such as the LCD display.
If you do are not using it, the telephone goes into standby mode after a few seconds. You can also switch the telephone to standby
mode by pressing

To re-activate the LCD screen, simply press the Menu soft key

Making a Call
| Dial the number on the keypad. The phone will audibly repeat the numbers you enter. | |
| Press the CLEAR soft key to delete an incorrect digit | |
| Press , the number is automatically dialled | |
| To end the call simply press | |
To place an international call you need to press + before the country code. Simply, press * key twice. Some foreign telephone networks have extension lines that cannot be dialled as dial-through, but need to be entered by the keypad. To dial these directly, press * quickly three times in a row after the telephone number. The p character will appear and then you can enter the extension.
USING THE TELEPHONE
Making a Call from the Call Record
Press

to display the "All calls" list
Use ▼ or ▲ to scroll through the list and find the desired number
Highlight the desired number. Press is automatically

again, the number
Making a Call from the Phone Book
If you have stored numbers in the phone book, you can dial numbers using the phone book.
- Menu ‡ Phonebook ‡ Picture Phonebook or Normal Phonebook ‡ Select the telephone number required
-
On finding the desired number, press 📄, the number is automatically dialled
-
To end the call simply press

Receiving a Call
When the phone rings with an incoming call:
- If the Caller ID service is activated, the caller's telephone number will be displayed.
- If this caller's number is stored in the Phonebook, the associated name will displayed.
Press

answer
To end the call simply press

USING THE TELEPHONE
You can increase or decrease the phone volume using the Volume Up + and Down - key on the left side of the phone.

Rejecting a Call
To reject an incoming call, simply press

Switch Off Alerts
You can temporarily switch off all of the alerts and vibrations for an incoming call.
On receiving an incoming call, press the SILENT soft key
Options During a Call
You can use a variety of functions during a call by pressing the OPTION soft key.
You get the option to do the following :
- Hold a Call
- End a Single Call
- Enter the Phonebook
- View Call History
- Messages
- Sound Record - Record the call
- Background Sound (you can create a background noise to the opposite caller)
- Mute
Call diverting", "multiparty calls", "call hold" and "call waiting" functions require network support, so please contact your network provider.
USING THE TELEPHONE
Receiving Volume
During a conversation, you can use the V+ and V- buttons on the left side of the phone to adjust the ear piece volume level. There are 7 volume levels.
Hands free Function
You can turn on the phone's built-in speakerphone. Press the right soft key. In this mode there is no need to hold the handset. You will hear the third party through the speaker and the microphone will pick up your voice.
Note: Before putting the handset to your ear, please ensure you have switched the speakerphone off.
Call Timer
Your handset automatically times the duration of every external call. The time is shown during the call and for a few seconds after the call has ended.
Tone response
In standby mode, you have the possibility to change the tone response. You must press and hold the key 0 until you see the setting on the display.
SMS
Messages Menu
The Messages menu is where you can perform all the available actions on Short Text Messages (SMS).
A text message sent using this telephone can contain up to 160 characters including spaces.
This menu enables the following functions:
- Write message
- Inbox
- Drafts
- Outbox
- Sent messages
- Message settings.
Write & Send a Text Message
- Menu‡ Messages‡ Write Message‡ Text Message or MMS
- Write your text message (See text entry in the Phonebook Chapter)
- Options‡ Send to‡ Enter Number and then enter the actual number or Select from the Phonebook List
- Options‡ Send
Inbox - Receiving a Text Message
Upon receiving a text message, the phone plays an audible alert. 1 UNREAD MESSAGE will be displayed on the LCD screen.
- Press the VIEW soft key to display the message
- Press the OPTIONS soft key to see all the options available that can be performed on this selected text message.
SMS
Options for a Text Message
You can do various things with the messages on your phone. Press the Options soft key. You can now see the options available:
- View
- Reply by SMS
- Reply by MMS
- Call Sender
- Forward
- Delete
- Delete all
- Save to Phonebook (enables saving the number in the phonebook)
- Delete Several
Reviewing Stored Text Messages (Inbox)
Received text messages are kept on the phone until you delete them. You can view old messages here.
- Menu ‡ Messages ‡ Inbox
- Scroll to the message you wish to review
- Press the OPTIONS soft key ± view
To view the message.
Sent Messages
The outbox stores successfully sent and saved messages (if the phone is set up to save outbound text messages in Message Settings).
- Menu ‡ Messages ‡ Sent Messages
- Scroll to the message you wish to review
- Press the left soft key to view
SMS
- Press the OPTIONS soft key to see all the options available for this selected text message
- These options include:
View
Forward
Delete
Delete All
Delete Several
Details – shows the details of the message
Draftbox
The draft box stores messages that you have saved but not sent yet. You now get the chance to send the message, resume editing or delete it.
- Menu ‡ Messages ‡ Draft Messages
- Scroll to the message you wish to review
- Press the central square key to view
- Press OPTIONS soft key to see all the options available that can be performed on this selected text message
- These options include Send, Edit, Delete and Advanced Options
Delete SMS
You can delete messages in the Inbox, Outbox, Draft box or Sent Messages.
- Menu ± Messages ± Select either Inbox, Drafts, Outbox or Sent Messages ± Options ± Delete All ± Delete All?
SMS
Text Message Settings
Service Centres distribute SMS messages. Your mobile telephone must have the telephone number for the service centre programmed into memory. Generally, this will have already been set up by your service provider.
Menu ‡ Messages ‡ Message settings ‡ Text message or multimedia message.
There are many settings options:
SIM
In which you can alter settings such as
Profile settings
You can choose the operator
Validity period
You can stipulate how long an attempt at delivering a message should be
Message type
You can choose the type of message in the list
Delivery Report
Every time a text is sent you will get a message to say it has been sent successfully (or not).
Reply Path
If you activate this feature, when you reply to a message, the cost of sending it is charged to the recipient's account instead of your own.
SMS
Preferred connection
You have the possibility to choose the connection on
GPRS, GSM or GSM only.
Voicemail Server
Set up the location of the voicemail server
Memory Status
A useful option is to request to see how much memory is occupied and how much is free on both the SIM card and the telephone. For example:
SIM1: 17/100
SIM2: 2/100
Phone: 19/200
Text Message Counter
Shows how many messages have been sent and received via the SIM cards installed in your phone, in other words, how many messages have been sent and received via the respective providers of each of the SIM cards. This is useful for keeping track of the charges that will be applied by each provider for the messages sent via their respective networks.
These counts can be reset by pressing the Reset soft key.
Save Sent Message
Enables turning on or off the saving of text messages and multimedia messages.
To change between saving sent messages (On) of not saving (Off), use the * or # keys.
SMS
Preferred storage
If you select SIM PREFERRED, when you receive a new message it will be stored on the SIM card by default. When the SIM card memory is full new messages will stored in the phone.
To change between saving to the phone or the SIM, use the * or # keys.
Service Messages
This telephone supports receipt of service messages, which are information services from your service provider.
Menu ‡ Messages ‡ Message Settings ‡ Service Message ‡ Enable Push ‡ Accept all or Disable
Service Loading
You can select how you want to receive the service messages: either “Prompt” – to be prompted to view the incoming message, or “Auto Launch” – to have the service message launch automatically for you to read it, or you can disable the loading.
VOICEMAIL
Voicemail Number Setting
The voicemail function allows you to listen to any voicemail messages people may have left for you.
The voice mailbox is a network service to which you may need to subscribe. Contact your service provider if in doubt.
If your service provider does give you access to voice mail, the telephone number used to access the voice mail system will normally be set up on your telephone. If it is not, when you receive a message for the first time you will be prompted to enter the name and number settings to access your provider's Voicemail system.
Listen to Voicemail
If you have missed a call, you will receive a message on the phone's display, 1 MISSED CALL. Press VIEW, you will see a list of all missed calls in the Call Record.
From standby, you can access voicemail by simply pressing and holding 1. You will be connected to voice mail and can listen to your messages. To use the voicemail system, follow the instructions your voicemail provider gives.
PHONE BOOK
Telephone numbers and names can be stored in the phone book. This is held both on the SIM and in the phone memory. It allows you to store frequently used numbers so that you can easily make a call without having to remember or enter the telephone number. You can search and recall numbers in order to make a call, send a message or use an entry as an emergency contact. The phone book can contain up to 300 entries. If you try to add a new entry when all the memory is filled, a warning message will be displayed. You will need to delete an existing entry in order to add the new telephone number. The contacts saved in the SIM card memory are indicated by SIM. The advantage of saving to SIM means you can transfer the information to another telephone.
Create a Phone Book Entry
- Menu ‡ Phonebook ‡ Normal Phonebook ‡ Add new Contact
- Select ‡ SIM or Phone
- Create a name for the Phonebook Entry using the numeric keypad (see below)
- Enter a number for the phonebook entry
- Options ‡ Save
The numeric keypad also has characters printed on the keys. These characters are used for entering text for the purposes of phonebook entry and modification, SMS text writing and searching for an entry in the phonebook.
Press each key the relevant number of times to get the letter
PHONE BOOK
you need - for example, to get the letter J, press the 5 key once, to get the letter S, press the 7 key four times in quick succession.
To move on to the next letter, wait a few seconds and the cursor will appear | after the last letter you entered. You may now enter the next letter. To switch between upper and lower case use the # key. You can also switch to numbers using # key. The input mode will be indicated on the right hand side of the name entry field indicated by a pencil.
Press 0 to insert a space.
Press the CLEAR soft key to delete the last character typed in while entering a number or a name. Press and hold the CLEAR soft key to clear the screen.
Create a Phone Book Entry from Standby
Enter the number using the numeric keypad (always include the local area code)
- Options ‡ Save to Phonebook
- Select either SIM1 or SIM2 or Phone
- Create a name for the Phonebook Entry using the numeric keypad (see above)
- If you are saving the contact to the Phone, you get many more options to save extra detail such as:
Email address Caller Ringtone - Options ‡ Save
PHONE BOOK
View Phone Book Entries
- Menu ‡ Phonebook ‡ Normal Phonebook ‡
- Use ▼ and ▲ to scroll through the list until you find the desired contact. Or, you can search for a contact in the phonebook via an alphabetic search. Simply, type the first character of their name and you will be automatically positioned at the correct part of the phonebook.
Options within Phonebook
- Menu ‡ Phonebook ‡ Normal Phonebook ‡
- Use ▼ and ▲ to scroll through the list until you find the desired contact
- Press OPTIONS soft key
- Options available to be performed on that contact record are as follows:
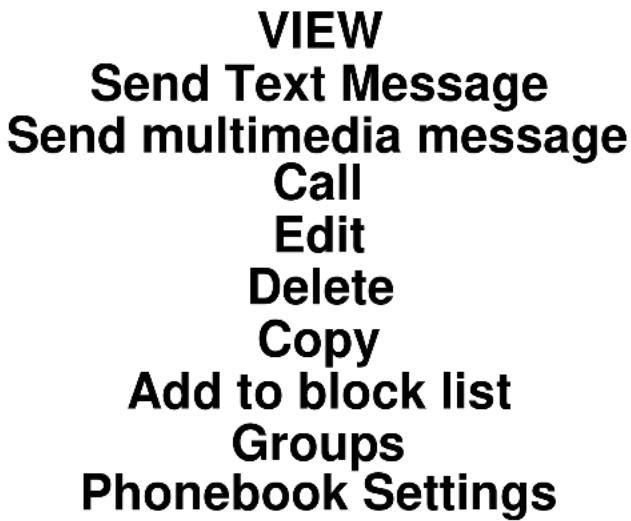
Within Phonebook Settings you can do the following:
1) Assign the default storage location (SIM, Phone or all)
PHONE BOOK
2) Assign Phonebook entries to a Speed dial number (3, 4, 5, 6, 7, 8, 9 can have a telephone number assigned to them)
3) Set Extra numbers – Fixed dial – you can set this ON or OFF, and you can enter a Fixed Dial number.
4) View the memory status - how much storage has been used on the SIM and the Phone.
Create a Picture Phone Book Entry
You can also create a Phonebook entry with a picture associated with it. This is particularly useful when you receive an incoming call as the photograph will be displayed while the phone is ringing. Therefore you can see who is calling by simply looking at the photograph.
- Menu ± Phonebook ± Picture Phonebook ± Add (Use ▼ and ▲ to locate the green button) ± Add ± Picture
- Take a photograph of the person that you are adding to the phonebook (press the 5 key). Press the Save soft key (or the Delete key).
Do not forget to select in Multimedia ± Camera ± Options ± storage ± Memory card so the pictures are saved
-
Name Create a name for the Phonebook Entry using the numeric keypad (see above)
-
Enter a number for the phonebook entry
-
Save ‡ Back
PHONE BOOK
Dial a Picture Phone Book Entry
Use ▲ and ▼ to move to the desired photo to call.
Press

Storing a Speed Dial Number
You can assign a speed dial number to a phonebook entry. This means you can dial a number very easily whenever you want simply by pressing the associated number.
- Menu ‡ Phonebook ‡ Normal Phonebook ‡ Add new contact ‡ Phonebook settings ‡ Speed dial
- Select Status: either On or Off
- Set numbers – Scroll down to the name of the contact you want to assign. The name is automatically filled, do not edit.
- Press OK to save the speed dial contact.
Dialling a Speed Dial Number
Press and hold the desired speed dial number (3, 4, 5, 6, 7, 8, 9) to dial out the corresponding number.
Information about all calls is stored on this telephone in the Call Record. These calls include:
- Missed calls
- Calls dialled
- Calls received
CALL RECORD
Display Missed Calls
When you have a missed call, a message n MISSED CALLS will appear on the display e.g. 3 MISSED CALLS. Press VIEW soft key to review the details or press CANCEL to exit. You can also review missed calls via the menu as follows:
- Menu ‡ Call Centre ‡ Call History ‡ Missed Calls
- Use ▼ and ▲ to scroll through the list until you find the desired contact
- Press the soft key OPTIONS, the following will be available to perform on that call record entry:
View Call Send Text Message Send Multimedia message Save to Phonebook Add to block list Delete
Display Dialled Calls
- Menu ‡ Call Centre ‡ Call History ‡ Dialled Calls
- Use ▼ and ▲ to scroll through the list until you find the desired contact
- Press the soft key OPTIONS, the following will be available to perform on that call record entry:
View Call Send Text Message Send Multimedia message
CALL RECORD
Save to Phonebook
Add to block list
Delete
Display Received Calls
- Menu ‡ Call Centre ‡ Call History ‡ Received Calls
- Use ▼ and ▲ to scroll through the list until you find the desired contact
- Press the soft key OPTIONS, the following will be available to perform on that call record entry:
View
Call
Send Text Message
Send Multimedia message
Save to Phonebook
Add to block list
Delete
Delete Call Logs
- Menu ‡ Call Centre ‡ Call History ‡ Delete Call Logs
- Select either Dialled calls, Missed calls, Received Calls or All Calls to set to zero.
Call Settings
Within Call Settings there is SIM Call Settings and Advance Settings.
You can access SIM Call Settings as follows: Menu ‡ Call Centre ‡ Call Settings ‡ SIM Call Settings
CALL RECORD
There are many settings available:
Caller ID: - You can choose whether this is set by network, hidden or shown
Call waiting: This can be activated or deactivated. Please check that this service is available from your service provider. You can QUERY STATUS to find out if your service provider offers this service.
Call Divert: Incoming calls can be diverted to a specified telephone number (usually a voicemail number). There are 5 options available with this function:
- Divert all voice Calls: Call divert is applied to all incoming calls
- Divert if Unreachable: Call divert is applied to all incoming calls if your phone is switched off or you are not in a service area
- If No Answer: Call divert is applied to all incoming calls if you do not answer the call
- If Busy: Call divert is applied to all incoming calls if your line is busy
- Divert All Data Calls
- Cancel all diverts
Call Barring: Incoming and outgoing calls to and from your phone can be limited. There are 4 options available with this function:
- Outgoing Calls: No outgoing calls can be made
- All Incoming Calls: No incoming calls can be received
- Cancel all
- Change barring password
CALL RECORD
Line Switching: To select the line 1 or 2
You can access Advance Settings as follows:
Menu ‡ Call Centre ‡ Call Settings ‡ Advance Settings
There are many settings available:
Block List: The ability to Reject and blacklist numbers
Auto Redial: If this setting is activated, when you make a call but cannot get through as the other line is engaged, your telephone will automatically redial this number after a certain amount of time. This will take place provided you have not cancelled the call.
Call time Display
Call Time Reminder: customise if you want a reminder of how long you have been on the phone
Auto quick end: To automatically end a call after a specified number of seconds has elapsed:
- Menu ‡ Call Centre ‡ Call Settings ‡ Advance Settings ‡ Auto Quick End
- Press # to change the setting between On and Off
- Time – enter the number of seconds you allow the call to last before the auto quick end (1-9999 seconds)
- Options – ▼ and ▲ to Save or Cancel
Answer mode:
- Any key: If this setting is activated, when there is an incoming call you can press any key to answer it.
• Auto answer when on Headset mode
HANDSET SETTINGS
I.C.E In Case of Emergency
You can add 4 Names and Numbers of people who could be contacted in an emergency.
To specify the emergency contacts:
Menu ‡ Settings ‡ ICE ‡ Contacts
To input all of the phone owner's information:
Menu ‡ Settings ‡ ICE ‡ Owner info
You can enter the following essential information about the phone owner:
- Name
- Address
- Disease
- Allergy
- Blood group
- Doctor
Profiles
There are 4 types of profile available:
- General (you can: activate, customize or reset)
- Silent (you can: activate. To deactivate, you must choose a different profile)
- Meeting (you can: activate, customize or reset)
- Outdoor (you can: activate, customize or reset)
Menu ‡ Settings ‡ Profiles
HANDSET SETTINGS
To customize the details of the profile selected, you can change the following settings:
- Alert type
- Ring Type
- SIM 1 Ringtone
- SIM 2 Ringtone
- Ringtone Volume
- SIM 1 Message
- SIM 2 Message
- Message Volume
- Keypad (sound type, for example human voice))
- Key tone Volume
- Power On tone
- Power Off tone
- System alert
Boost Settings
Whenever you make or receive a call, the amplify feature can be set to On as a default.
Menu ‡ Settings ‡ Boost Settings
Tone control
You have the possibility to set the receiving response choice from the following three:
Normal frequency
Low frequency: increase the low frequencies
High frequency: increase the high frequencies
HANDSET SETTINGS
Phone Settings
Within Phone Settings you can adjust the following functions:
Time and date: - Set home city
- Set the time and date
- Set format (12hr or 24hr and DD MM
Scheduled Power On or Off
This function enables setting times when the phone will automatically switch itself on and off, enabling the user to enjoy uninterrupted rest time and activity time.
Schedule power on/off ‡ (on/off) 1 or 2 Enable/Disable ‡ Set time
Language: There are 13 languages available for displaying the phone menus, including English, French, Spanish, Dutch, German and others.
Preferred input methods: Capitals, lower case or numeric
Display Settings: You can set: - Wallpaper
- Power on display
- Power off display
Dedicated keys: You can set the phone so as you only need to press one navigation key to enter the desired menu on the telephone.
Flight mode: Switching this mode on disables some of the phone's functions. This is useful if you want to keep the phone on during a flight without fear of interfering with the aircraft flight systems.
HANDSET SETTINGS
The other setting here is: Normal mode.
Backlight Settings: Brightness and Time (the length of time before the phone display fades off)
Network Settings
SIM and GPRS settings can be changed
Security Settings
This mobile telephone allows you to set up passwords to help protect your telephone against unauthorized use. The PIN and PIN2 codes are supplied with your SIM card. The PIN code helps to protect the SIM card against unauthorized use. The PIN2 code is required to access certain services.
Screen auto lock: enables setting the time before the display locks and can only be re-opened by entering a password. The possible settings are: Off /15sec /30sec /1min and 5min.
Phone security:
- Phone lock: activates or cancels the auto lock function.
- Change password: enter the old PIN code, then enter the new lock code.
Restore Default
You can undo all the changes you have made to the telephone settings and restore to the factory settings. The default password is 1122.
SOS
SOS Function
In an emergency, you can sound an alarm by pressing the SOS button (on the rear of the handset) for 3 seconds. An audible alarm will sound and alarm messages (which you can define) will be sent to recipients you have specified under this function.
This function includes the following functions, which you must use to configure your SOS function:
- SOS
1.SOS Mode Setting – choose whether your SOS message will go out to phone numbers you select (see Set SOS Number below). You can configure up to 5 phone numbers. You can alternatively set a call centre number which will be contacted, or you can turn this function OFF.
2. Set SOS Number - you can configure up to 5 phone numbers which will be contacted in case you press the SOS button. The phone will dial numbers on this SOS list automatically one by one. If a busy tone is detected or a call is aborted by user, the next number will be dialled immediately. The phone will dial these numbers until the handset is powered off.
3. Call Centre number – enter the number here.
4. Set outgoing voice MSG – you can choose the voice message that will go out to the destinations you have chosen (the default message or the custom message)
SOS
- Record SOS Message – pressing this button starts a 20-second-long recording. You can record your SOS message here and it will be sent if you press the SOS button.
If you want to quit the SOS mode press the SOS button again for 3 seconds.
Note : When SOS is switched ON, you cannot turn the telephone OFF. You must switch the SOS mode OFF before turning the phone off.
SOS Number Settings
You can set up to 5 SOS numbers or set a number for a call centre.
- Menu ‡ SOS ‡ SOS ‡ Set SOS number ‡ Set up to 5 Numbers Or (depending on whom you would like to call at a time of emergency) ‡ Set Call centre.
- Menu ‡ SOS ‡ SOS ‡ Set SOS Number ‡ Edit ‡ Either add from Phonebook or Enter Number or
- Menu ‡ SOS ‡ Call Centre Number ‡ Enter the call centre number using the numeric keypad
SOS Message Record
Record an informative message that will assist your helpers in time of emergency. For example, "This is Jane Smith calling, I have hurt myself. Please come to my house and help me." Menu ± SOS ± Record SOS MSG ± Recite your message clearly ± Press Stop on completion (the message can be up to 20 seconds long).
TOOLS
Tools
There are many useful functions within organizer.
Calendar - You can review the calendar, move to a certain date quickly and add events (with an alarm) if required.
Use the * key to move left and the # key to move right. To move up or down, use the ▼ and ▲ keys.
Tasks - You can set up a prioritised To Do list (with alarm reminders if required).
Alarm - An alarm can also be set to sound at specific times if required. The alarm can be set to go off only once or repeatedly on a weekly schedule. Five different alarm times can be set up. Press any key to stop the alarm sound. The alarm will keep ringing every 5 minutes until you actually turn
the alarm setting to Off or press

The alarm still works when the telephone is switched off.
Ensure the phone ringing tones are not set to silent, otherwise you will not hear the alarm!
TOOLS
Bluetooth -The CL8360 supports bluetooth. Other bluetooth devices can be searched for and likewise the CL8360 can be found. The bluetooth password is 0000. You can connect with a bluetooth headset or perhaps with another phone. This would enable file transfer via bluetooth – for example, photo transfer, MP3 and MP4 files.
You can also stop the bluetooth function so that other devices will not find it.
Calculator - Press Up (▲) or Down (▼) to move cyclically through the mathematical functions: + - x / (÷)
Press the Up (▲) or DOWN (▼) or TALK ( ) key to get the result.
MULTIMEDIA
Multimedia
There is superb multimedia options available on the CL8360:
- Camera ●Gallery ●Audio Player ●Sound Recorder ●FM Radio
Camera : Press 5 to take photo
▼ and ▲ to ZOOM
Press 2 to set image quality
Press 1 to set image size
Press 4 to set white balance
Press 6 to set delay timer
FM Radio: Press 0 ON / OFF
- * key to search (skip)
- # key to search (backward)
Press 1-0 to select 10 x channels.
Press and hold 1 (from 0-9) to store a channel in the phone memory. You can store up to 10 channels.
Torch: Press and hold the torch key → to turn ON the torch. Press and hold the torch key until the torch Turn OFF.
File Manager
All the files used in the many applications on the phone can be found within File Manager. There is a folder for each of the following:
- Answer Machine
- Audio
- Download
- My Music
- Photos
- Picture Phone book
You can do standard file manipulation for each of the files within the folder: View, Rename, Delete, Sort, Copy, Move, Details, Send.
TROUBLESHOOTING
Telephone cannot be switched on
- Check battery is inserted and check that it is inserted correctly
Nothing appears on the display
- Check the handset is switched on
- Check the battery and SIM are inserted correctly
Display is locked when the telephone is switched on
- Enter the PUK to unlock the SIM
No signal icon is displayed
- There is no network connection. Move around to try and get to an area where there may be coverage
- Contact your service provider
Message to say that a function is not possible
- Your service provider might not support the function in question or you may need to subscribe to that service. Contact the service provider.
No display during the charging process
- The battery charge is very low. Wait a few minutes.
"Insert Sim" or "Limited Service" message is displayed
- Ensure the SIM is inserted correctly
The battery is discharged quickly or cannot be charged at all.
- Charge the battery for 4 hours
TROUBLESHOOTING
- Place the phone correctly in the charging unit or connect the charging unit properly. Clean the contact surfaces on the mobile phone and charging unit with a soft, dry cloth.
- Try a new battery
Unable to Charge the phone
- Check the adaptor connections
- If temperature is below -10^ or higher than 55^ move to a place without such extremes of temperature
- Try a new battery
Failure to link to the network
- The signal is too weak, or there may be some radio interference
- Is the SIM card installed incorrectly or damaged? If the SIM card is damaged, please ask your service provider for a replacement.
Cannot make a Call
- Check that mobile fees have been paid
- Check that the SIM card is valid
- Check if fixed dialling is set
- Ensure you have pressed the green dial button
- Is the SIM card registered to the network?
- Is the Bar Outgoing Calls feature enabled?
- There may be a problem with the network, call your service provider
- Check the service provider number, local area number or NMC number (see Handset Settings)
TROUBLESHOOTING
Cannot answer a call:
- Check that mobile fees have been paid
- Check that the SIM card is valid
- Check if fixed dialling is set
- Is the bar incoming calls feature enabled
• Is the call diverting function enabled
The keys appear to be locked
• Power the phone off and then on
Caller Number is not displayed
- Ensure you have subscribed to the Caller ID service. Contact your service provider
- The caller may have withheld their details
- Let the phone ring a few times as there may be a delay in receiving the Caller ID information
Any problems not referred to above
- Check through the User Guide
- Power off and then on again. Check to see if the problem persists
SAFETY INFORMATION
General
Only use the power supply included with the product.
Only use the approved rechargeable battery supplied.
Do not open the handset (except to replace the handset batteries or SIM) or base. Contact the helpline for all repairs.
Never dispose of batteries in a fire. There is a serious risk of explosion and/ or the release of toxic chemicals.
If you are sure you are not going to use the telephone for over a month, remove the battery.
Cleaning
Clean the telephone with a soft cloth. Keep the base and handset charging contacts clean. Never use polishes or cleaning agents - they could damage the finish or the electrics inside.
Environmental
Do not expose to direct sunlight.
Always ensure there is a free flow of air over the surfaces of the telephone.
Do not place any part of your product in water and do not use it in damp or humid conditions e.g. bathrooms.
Do not expose your product to fire or other hazardous conditions.
The telephone is designed for working within a temperature range of -10^ to 55^ .
SAFETY INFORMATION
Usage
In summary, read these simple guidelines. Not following them may be dangerous or illegal.
SWITCH ON SAFELY
Do not switch the device on when wireless phone use is prohibited or when it may cause interference or danger.
ROAD SAFETY COMES FIRST
Obey all local laws. Always keep your hands free to operate the vehicle while driving. Your first consideration while driving should be road safety.
INTERFERENCE
All wireless devices may be susceptible to interference.
This could affect performance.
SWITCH OFF IN HOSPITALS
Follow any restrictions. Switch the device off near medical equipment.
SWITCH OFF IN AIRCRAFT
Follow any restrictions. Wireless devices can cause interference in aircraft.
SWITCH OFF WHEN REFUELLING
Do not use the device at a refuelling point. Do not use near fuel or chemicals.
SAFETY INFORMATION
SWITCH OFF NEAR BLASTING
Follow any restrictions. Do not use the device where blasting is in progress.
USE SENSIBLY
Use only in the normal position as explained in the product documentation.
BACK-UP COPIES
Remember to make back-up copies or keep a written record of all-important information.
CHARGING
Do not use the telephone during charging.
HEARING AID INFORMATION
Some phones are measured for compatibility with hearing aids. If the box for your particular model has “Rated for Hearing Aids” printed on it, the following explanation applies. When some mobile phones are used near some hearing devices (hearing aids and cochlear implants), users may detect a buzzing, humming, or whining noise. Some hearing devices are more immune than others to this interference noise, and phones also vary in the amount of interference they generate. The wireless telephone industry has developed ratings for some of their mobile phones, to assist hearing device users in finding phones that may be compatible with their hearing devices. Not all phones have been rated. Phones that are rated have the rating on their box or a label on the box. The ratings are not guarantees. Results will vary depending on the user’s hearing device and hearing loss. If your hearing device happens to be vulnerable to interference, you may not be able to use a rated phone successfully. Trying out the phone with your hearing device is the best way to evaluate it for your personal needs.
NETWORK SERVICES
To use the phone you must have service from a wireless service provider. Many of the features in this device depend on features in the wireless network to function. These network services may not be available on all networks or you may have to make specific arrangements with your service provider before you can utilize network services. Your service provider may need to give you additional instructions for their use and explain what charges will apply. Some networks may have limitations that affect how you can use network services. For instance, some networks may not support all language-dependent characters and services.
Your service provider may have requested that certain features be disabled or not activated in your device. If so, they will not appear on your device menu. Your device may also have been specially configured. This configuration may include changes in menu names, menu order and icons. Contact your service provider for more information.
GUARANTEE
From the moment your Geemarc product is purchased, Geemarc guarantee it for the period of two years. During this time, all repairs or replacements (at our discretion) are free of charge. Should you experience a problem then contact our help line or visit our website at www.geemarc.com. The guarantee does not cover accidents, negligence or breakages to any parts. The product must not be tampered with or taken apart by anyone who is not an authorized Geemarc representative. The Geemarc guarantee in no way limits your legal rights.
IMPORTANT: YOUR RECEIPT IS PART OF YOUR GUARANTEE AND MUST BE RETAINED AND PRODUCED IN THE EVENT OF AWARRANTY CLAIM.
Please note: The guarantee applies to the United Kingdom only
DECLARATION: Geemarc Telecom SA hereby declares that this product is in compliance with the essential requirements and other relevant provisions of the Radio Equipment Directive 2014/53/UE.
The CE declaration of conformity may be consulted at www.geemarc.com
Electrical connection: The apparatus is designed to operate from a 230V 50Hz supply only. (Classified as ‘hazardous voltage’ according to EN60950 standard). The apparatus does not incorporate an integral power on/off switch. To disconnect the power, either switch off supply at the mains power socket or unplug the AC adaptor. When installing the apparatus, ensure that the mains power socket is readily accessible.
RECYCLING DIRECTIVES
The WEEE (Waste Electrical and Electronic Equipment) has been put in place for the products at the end of their useful life are recycled in the best way.
When this product is finished with, please do not put it in your domestic waste bin.
Please use one of the following disposal options:
- Remove the batteries and deposit them in an appropriate WEEE skip. Deposit the product in an appropriate WEEE skip.
- Or, hand the old product to the retailer. If you purchase a new one, they should accept it.
Thus if you respect these instructions you ensure human health and environmental protection.

For product support and help visit our website at www.geemarc.com
E-mail: help@geemarc.com
telephone 01707 387602
lines are open 09h00 to 16h00 Mon to Fri
SAR Test:
Head: 0.402 W/kg
Body: 1.08 W/kg
LIMBS: 3.415 W/kg


UGCL8360_En_v1.3

eemarc™ UNITED KINGDOM
Telecom SA
5B Swallow Court
Swallowfields
Welwyn Garden City
Hertfordshire, AL7 1SB
For product support:
01707 387602
www.geemarc.com
- geemarc™ Hear the Difference
- CL8360
- Amplified Mobile Phone with dual SIM and Camera
- CONTENTS
- CONTENTS 2
- INTRODUCTION....5
- DESCRIPTION....7
- SETTING UP, Install SIM Card and Battery ...... 17
- USING THE TELEPHONE, Standby Mode, Making a Call.... 20
- SMS 24
- HANDSET SETTINGS.... 40
- I.C.E 40
- SOS....44
- ADVANCED SETTINGS...... 46
- TROUBLESHOOTING 49
- SAFETY INFORMATION...... 52
- HEARING AID INFORMATION .... 55
- NETWORK SERVICES 56
- GUARANTEE 57
- RECYCLING DIRECTIVES 58
- INTRODUCTION
- Unpacking the Telephone
- DESCRIPTION
- General Description
- and * keys
- LCD Screen Description
- Menu Navigation
- Network Services
- Using 1 or 2 SIM Cards
- Passwords
- SETTING UP
- Install SIM Card and Battery
- Charging the Battery
- Charging via the Mini USB Port
- Charging via the Charging Unit
- Switching On/Off
- Battery Use
- USING THE TELEPHONE
- Standby Mode
- Making a Call
- Making a Call from the Call Record
- Making a Call from the Phone Book
- Receiving a Call
- Rejecting a Call
- Switch Off Alerts
- Options During a Call
- Receiving Volume
- Hands free Function
- Call Timer
- Tone response
- SMS
- Messages Menu
- Write & Send a Text Message
- Inbox - Receiving a Text Message
- Options for a Text Message
- Reviewing Stored Text Messages (Inbox)
- Sent Messages
- Draftbox
- Delete SMS
- Text Message Settings
- SIM
- Profile settings
- Validity period
- Message type
- Delivery Report
- Reply Path
- Preferred connection
- Voicemail Server
- Memory Status
- Text Message Counter
- Save Sent Message
- Preferred storage
- Service Messages
- Service Loading
- VOICEMAIL
- Voicemail Number Setting
- Listen to Voicemail
- PHONE BOOK
- Create a Phone Book Entry
- Create a Phone Book Entry from Standby
- View Phone Book Entries
- Options within Phonebook
- Create a Picture Phone Book Entry
- Dial a Picture Phone Book Entry
- Storing a Speed Dial Number
- Dialling a Speed Dial Number
- CALL RECORD
- Display Missed Calls
- Display Dialled Calls
- Save to Phonebook
- Add to block list
- Delete
- Display Received Calls
- Delete Call Logs
- Call Settings
- Call time Display
- Answer mode:
- HANDSET SETTINGS
- I.C.E In Case of Emergency
- Profiles
- Boost Settings
- Tone control
- Normal frequency
- Phone Settings
- Scheduled Power On or Off
- Network Settings
- Security Settings
- Phone security:
- Restore Default
- SOS
- SOS Function
- - SOS
- SOS Number Settings
- SOS Message Record
- TOOLS
- MULTIMEDIA
- File Manager
- TROUBLESHOOTING
- Telephone cannot be switched on
- Nothing appears on the display
- Display is locked when the telephone is switched on
- No signal icon is displayed
- Message to say that a function is not possible
- No display during the charging process
- "Insert Sim" or "Limited Service" message is displayed
- The battery is discharged quickly or cannot be charged at all.
- Unable to Charge the phone
- Failure to link to the network
- Cannot make a Call
- Cannot answer a call:
- The keys appear to be locked
- Caller Number is not displayed
- Any problems not referred to above
- SAFETY INFORMATION
- General
- Cleaning
- Environmental
- Usage
- SWITCH ON SAFELY
- ROAD SAFETY COMES FIRST
- INTERFERENCE
- SWITCH OFF IN HOSPITALS
- SWITCH OFF IN AIRCRAFT
- SWITCH OFF WHEN REFUELLING
- SWITCH OFF NEAR BLASTING
- USE SENSIBLY
- BACK-UP COPIES
- CHARGING
- HEARING AID INFORMATION
- GUARANTEE
- RECYCLING DIRECTIVES
Brand : GEEMARC
Model : CL8360
Category : Mobile Phone