
MyDECT 100+ - Cordless phone GEEMARC - Free user manual and instructions
Find the device manual for free MyDECT 100+ GEEMARC in PDF.


| Product Type | Cordless DECT Phone |
| Brand | Geemarc |
| Model | MyDECT 100+ |
| Dimensions (Base) | Approximately 16 x 12 x 8 cm |
| Dimensions (Handset) | Approximately 20 x 5 x 3 cm |
| Weight (Handset) | Approximately 130 g (including batteries) |
| Power Supply | Base: AC adapter 230V; Handset: 2 x AAA NiMH rechargeable batteries |
| Display | Backlit LCD with large characters |
| Audible Features | Amplified volume up to 40 dB, adjustable tone control |
| Visual Features | Flashing LED for incoming calls, large illuminated keypad |
| Main Functions | Caller ID, phonebook up to 50 entries, redial, mute, intercom, handsfree speakerphone |
| Range | Up to 50 meters indoors, 300 meters outdoors |
| Battery Life | Up to 10 hours talk time, 100 hours standby |
| Maintenance | Clean with a soft dry cloth; do not use harsh chemicals |
| Safety | Complies with CE standards; use only supplied adapters |
| Spare Parts | Replacement batteries and chargers available from Geemarc |
| Repairability | Designed for easy battery replacement; other repairs by authorized service |
| General Information | Suitable for hearing impaired users; hearing aid compatible (HAC) |
Frequently Asked Questions - MyDECT 100+ GEEMARC
User questions about MyDECT 100+ GEEMARC
0 question about this device. Answer the ones you know or ask your own.
Ask a new question about this device
Download the instructions for your Cordless phone in PDF format for free! Find your manual MyDECT 100+ - GEEMARC and take your electronic device back in hand. On this page are published all the documents necessary for the use of your device. MyDECT 100+ by GEEMARC.
USER MANUAL MyDECT 100+ GEEMARC
Amplified Digital Cordless Telephone with Large Buttons

CONTENTS
!!!Check our website to see if an update version of this User Guide is available.
www.geemarc.com !!!
CONTENTS....1
INTRODUCTION 4
Unpacking the Telephone 4
DESCRIPTION 5
General Description 5
INSTALLATION 12
Location 12
Setting Up 12
Battery Use 14
On/Off Settings 14
HANDSET SETTINGS 15
Alarm Setting 15
Audio Setup 16
Ringer Setup 17
Tone Setup 19
Range Alarm 20
Language Setting 21
HS Label 22
Auto Answer 23
LCD Settings 24
Date & Time Setting 25
CONTENTS
Select Base 28
Handset Default 29
BASE SETTINGS 30
Terminate Handset 30
Dial Mode Setting 31
Flash Time Setting 32
Modify PIN 33
Base Default 34
USING THE TELEPHONE 35
Making a Call 35
Receiving a Call 36
Hands Free 36
Mute Function 37
Receiving Volume 37
Last Number Redial 37
Recalling Recent Numbers 38
Adding Recent Numbers to the Phone Book ...... 39
Deleting Recent Numbers 40
Flash Signal 41
Paging the Handset 41
Call Timer 41
Key Lock 41
CALLER ID 42
View Caller ID Book 42
Dial a Number from the Caller ID Book 43
Add a Number from the Caller ID Book to the Phone
Book 43
Delete a Number from the Caller ID Book 44
CONTENTS
Delete all Numbers from the Caller ID Book 45
PHONE BOOK 46
Create a Phone Book Entry 46
View Phone Book Entries 48
Dialling using a Phone Book Entry 48
Modify a Phone Book Entry 48
Delete a Phone Book Entry 50
Delete all Phone Book Entries 50
Phone Book Status 51
ADDITIONAL HANDSETS & BASES 52
Register a New Handset 52
Select a Base 53
Release a Handset 53
Internal Calls 54
Call Transfer between Handsets 55
Three Way Conference Call 56
CALL WAITING 57
Caller ID on Call Waiting 57
TROUBLESHOOTING 58
SAFETY INFORMATION 60
GUARANTEE 61
RECYCLING DIRECTIVES 62
INTRODUCTION
Congratulations on purchasing your Geemarc MyDECT100+ telephone. This telephone offers all the advantages of cordless technology (compliant with Digitally Enhanced Cordless Telecommunications-DECT standard) together with an easy to see big button keypad, ideal for those who suffer with poor sight.
This telephone is hearing aid compatible.
Its is important that you read the instructions below in order to use your Geemarc telephone to its full potential. Keep this user guide in a safe place for future reference.
This guide explains how to use the following telephone:
MyDECT100+
This guide applies to single and multiple handset systems.
Unpacking the Telephone
When unpacking the telephone, you should find the following in the box:
• 1 MyDECT100+ handset
• 1 MyDECT100+ base
• 1 Mains power adaptor
• 1 Telephone line cord
- 2 x AAA Ni-MH rechargeable batteries
- 1 User Guide

eemarc™
Hear the Difference
For product support and help visit our website at
www.geemarc.com
Telephone 01707 384438
Or fax 01707 832529
DESCRIPTION
General Description
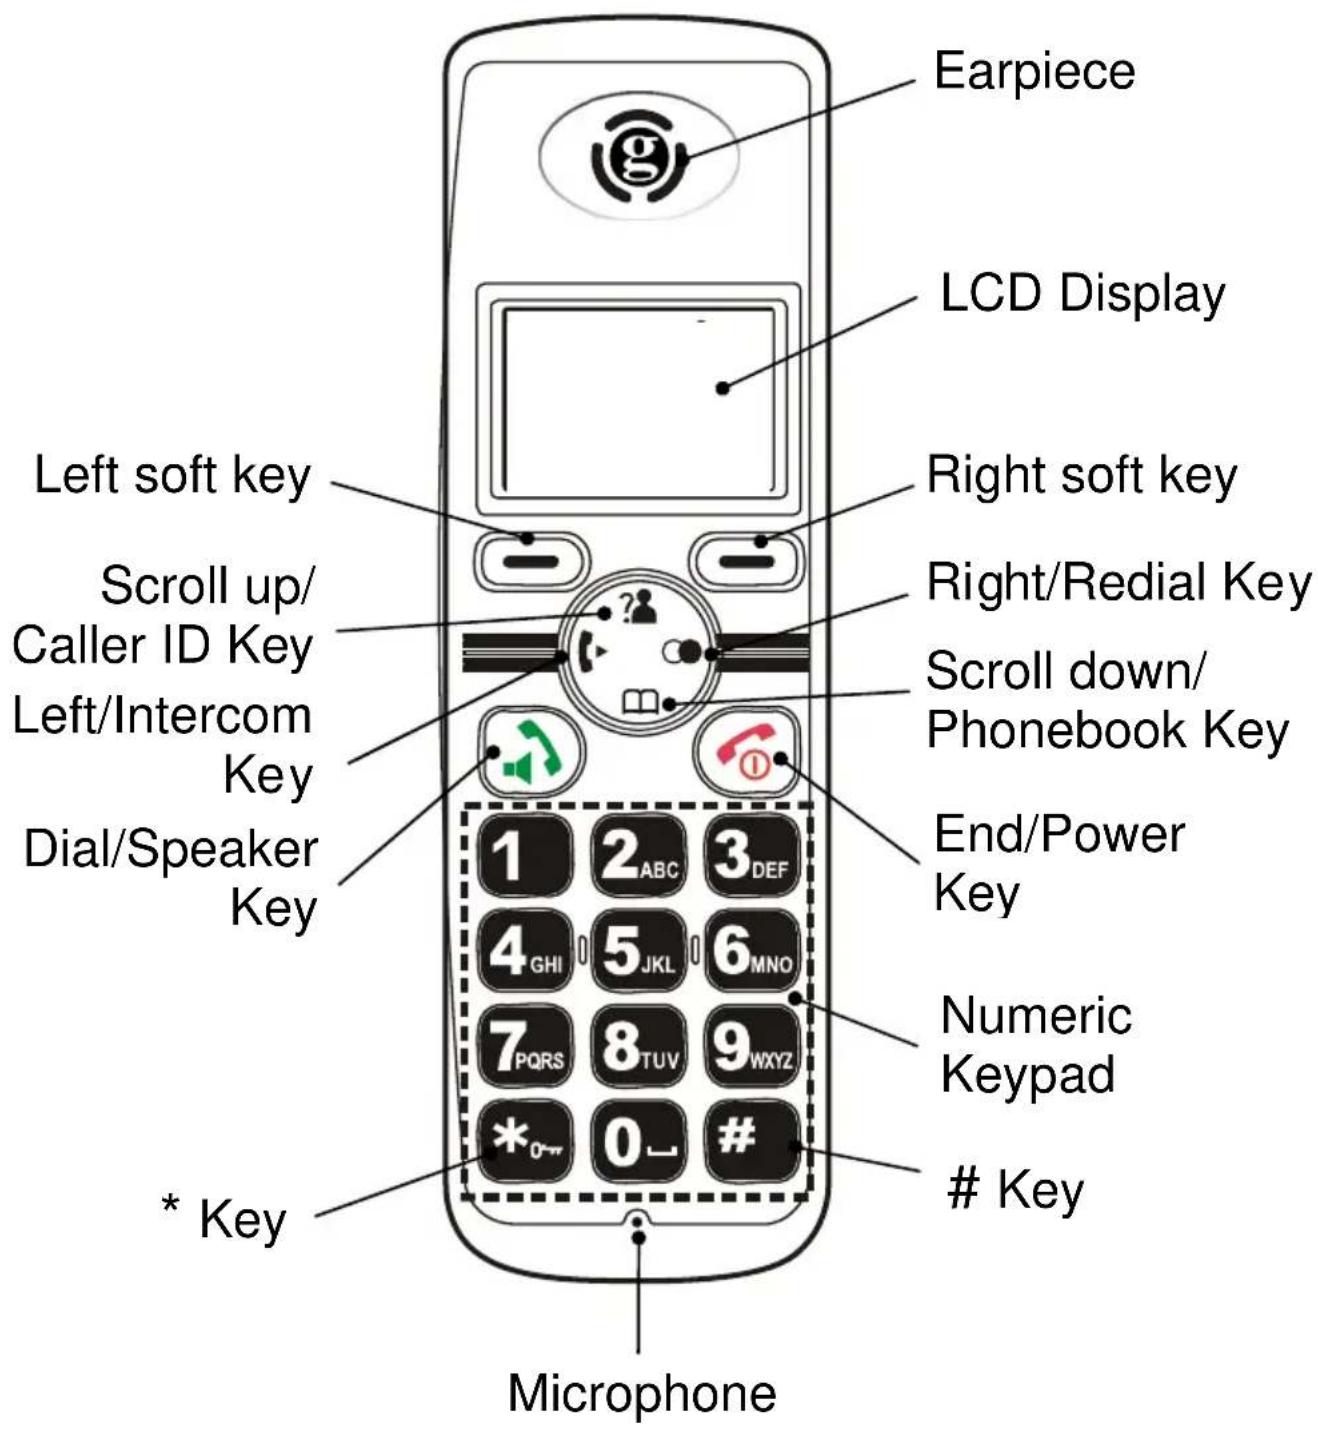
Handset Description (front)
DESCRIPTION
Handset Description (Rear)

DESCRIPTION
Base Description (Top)

Base Description (Base)

DESCRIPTION
 | Dial/Speaker keyMake/Answer a callActivates the speakerphone if pressed during a call |
 | End/Power keyEnd a call.Long press to power the telephone on and off |
 | Navigation Button Up/CID keyScroll up through lists and menu options.Increase the earpiece/speakerphone volume during a call.Enter the Caller ID book Up/CID keyScroll up through lists and menu options.Increase the earpiece/speakerphone volume during a call.Enter the Caller ID book Down/Phonebook keyScroll down through lists and menu options.Decrease the earpiece/speakerphone volume during a call.Enter the Phonebook Down/Phonebook keyScroll down through lists and menu options.Decrease the earpiece/speakerphone volume during a call.Enter the Phonebook Left/INT keySet up an internal call to another handset.Transfer an incoming call to another handset.Set up a conference call with an external line and an internal handset. Left/INT keySet up an internal call to another handset.Transfer an incoming call to another handset.Set up a conference call with an external line and an internal handset. Right/Redial keyEnter the redial bookInsert a pause when pre-dialing a number. Right/Redial keyEnter the redial bookInsert a pause when pre-dialing a number. |
 | Menu key (left)Enter the menu functions in standby mode.Confirm selections & actions.Performs "Flash" function. |
 | Menu key (right)Return to the previous menu.Activate mute during a call.Delete an incorrect character/digit |
 | Star keyPress and hold to turn on/off keypad lock function.Set up a conference call |
DESCRIPTION
LCD Screen Description
The LCD screen is split into two distinct areas:
The icon area. This is found at the top of the screen. This displays the various system icons which help you to use the telephone.
The main area. This is found across the centre of the screen. It displays the following:
• number being dialled
- caller ID information
- phonebook
- menu information
- in standby mode, handset number and current time

Signal Strength icon
This is always displayed when your telephone is switched on. It shows the current signal strength.
More bars indicate more signal strength. If the handset is too far from the base, this icon will blink on the LCD.

Line icon
This indicates that the line is engaged i.e. off hook

Hands-free
This indicates that hands-free is activated

New Call icon
This indicates that you have missed one or more calls

Key Lock icon
This indicates the keys are locked

Battery Status icon
This is always displayed when your telephone is switched on. It shows the level of battery charge.
More bars indicate more battery charge

Alarm Icon
This indicates that the alarm has been set to ring at a specified time
DESCRIPTION
LCD Screen Navigation
The ☐ Menu soft key (left side) key is used to activate the menu. The 🔒 is used to deactivate the menu and return to standby mode from any menu.
The ? and keys are used to scroll through the menu.
?: move backward through the menu
: move forward through the menu
The ☐ Select soft key (left side) key is also used to confirm an action or choice on a screen.
The ☐ Back soft key (right side) key is used to cancel an action/entry.
If you press ⏻ (right side) from any menu (except whilst in number input mode), the telephone returns to the previous screen.
If you press and hold ⏻ (right side) from any menu (except whilst in number input mode), the telephone returns to standby mode.
The telephone will automatically return to standby mode from any menu if no button is pressed for 40 seconds.
DESCRIPTION
Menu Map
| Caller ID Book | |
| Phone Book | |
| New | |
| Edit | |
| Delete | |
| Delete All | |
| PB Status | |
| BS Setting | |
| Terminate HS | |
| Dial Mode | |
| Flash Time | |
| Modify PIN | |
| BS Reset | |
| HS Setting | |
| Alarm | |
| Audio Setup | |
| Ring Setup | |
| Tone Setup | |
| Language | |
| HS Name | |
| Auto Answer | |
| LCD Contrast | |
| Date & Time | |
| Select Base | |
| HS Reset | |
| Registration |
INSTALLATION
Location
Ensure you situate the telephone close enough to the power socket so that the cable will reach safely without stretching. Also, the mains power needs to be easily accessible in case you need to disconnect the power.
Make sure the telephone is at least 1 metre away from other electrical products e.g.TV, radio and monitors so as to avoid interference. Also, avoid direct heat and sunlight.
We advise you to place the telephone on a table cloth or similar, as the rubber feet on the base can mark some surfaces
Handset Range
The telephone has a range of 30-50 metres indoors and up to 300 metres outdoors. The range will be reduced when there is no clear line of sight between the base and handset. Place the base as high as practically possible to ensure the best signal between the base and the handset. The 🎨icon at the top left of the LCD display will blink and the signal strength bars will disappear to warn you if you have moved out of range of the base. You will need to move closer to the base station as the telephone line might be disconnected and the handset will return to standby.
Setting Up
Plug the power cable into the power socket on the base.
Plug the adaptor end of the power cable into the mains supply and switch the supply on. (*)
Connect the line cord plug to the line socket on the base.
Connect the other end of the line cord to the PTT socket. (**)
INSTALLATION


natural_image
Exploded view diagram of a remote control device showing internal components and battery casing (no text or labels)Install the rechargeable batteries in the handset. The handset requires two Nickel Metal Hydride (NiMH) AAA batteries. These are supplied with your telephone. Slide the battery cover in the direction of the arrow and pull it out. Check the battery polarity diagrams on the handset when inserting the batteries. Fit the battery cover by sliding the cover on to the back of the handset until it snaps shut.
(*) Classified "hazardous voltage" according to EN60950 standard
(**) Classified TNV-3 according to EN60950 standard.
Place the handset on the base, a short beep will be heard.
The battery symbol 📁 will be displayed on the handset. Once the handset is fully charged, the display will show a full battery symbol.
The telephone has an automatic charging control to avoid excessive charging.
Before the handset can be used, the handset batteries must be charged for a minimum of 15 hours on the MyDECT100+ base.

natural_image
Line drawing of a mobile phone with keypad and control panel (no text or symbols)INSTALLATION
Battery Use
The icon is continuously displayed at the top right corner of the LCD display. The icon indicates the level of battery power. The more bars displayed, the more power available.

When the battery is too weak for the telephone to operate, the handset will automatically switch off. Place the handset on the base to charge the handset battery. Under ideal conditions, the handset battery should give about 6 hours talktime or 150 hours standby on a single charge.
On/Off Settings
When the handset is placed on the charger it automatically
switches on. Alternatively, press

for about 5 seconds. The telephone will enter subscription mode in which the handset is searching for a registered base.

On successfully finding a base, the LCD window will display the time (either set by yourself – see Handset Settings – Set Date & Time or it will be set automatically when you receive a call provided that you subscribe to a Caller ID service) and the handset number. The telephone is now in standby mode and is ready for use.
To turn the handset off, press 📞 for about 5 seconds again. The LCD display will then switch off.
Note: When battery power is very low, the following is displayed. You must recharge immediately i.e. replace the handset on the base.
Charging...
HANDSET SETTINGS
Alarm Setting
You are able to set an alarm and adjust the settings using the handset. 📁 will be displayed if you set the alarm to ring.
| Press (left side) to activate the menu | |
| Use and to scroll through the menu to select 'HS SETTING' | |
| Press (left side) to confirm | |
| Press (left side) to select 'ALARM' | |
| Use and to scroll through the menu to select 'ON' or 'OFF' Press (left side) to confirm | |
| If you select 'ON' you will be prompted to enter the time in HH:MM format (24 hour format). Enter the alarm time using the numeric keypad. | |
| Press (left side) to select 'NEXT' | |
| Use and to scroll through the menu to select 'SNOOZE ON' or 'SNOOZE OFF' | |
| Press (left side) to SAVE. Either press to return to standby or wait 30 seconds |
Notes: Press any key to silence the alarm. If you select 'SNOOZE ON', the alarm will ring at regular intervals of 11 minutes. Set snooze to off by pressing 🔒.
HANDSET SETTINGS
Audio Setup
The hands free speaker volume can be adjusted. Likewise, if using an earpiece, the volume heard through the earpiece can be adjusted.
| Press (left side) to activate the menu | |
| Use and to scroll through the menu to select 'HS SETTING' | |
| Press (left side) to confirm | |
| Use and to scroll through the menu to select 'AUDIO SETUP' | |
| Press (left side) to confirm | |
| Use and to scroll through the menu to select 'SPEAKER VOL' or 'EARPIECE VOL'. | |
| Press (left side) to confirm | |
| Use and to scroll through the menu to select required volume. There are 5 volume settings | |
| Press (left side) to SAVE. Either press to return to standby or wait 30 seconds | |
HANDSET SETTINGS
Ringer Setup
Ringer Tones
There is a choice of 10 handset ringer tones to notify you of incoming calls. You can select different tones to notify you if the call is internal (from other handsets registered to the same base) or external (from the telephone network).
| Press (left side) to activate the menu | |
| Use and scroll through the menu to select 'HS SETTING' | |
| Press (left side) to confirm | |
| Use and scroll through the menu to select 'RING SETUP' | |
| Press (left side) to confirm | |
| Use and scroll through the menu to select 'INT RING/EXT RING' | |
| Press (left side) to confirm | |
| Use and scroll through the menu to select 'MELODY' Use and scroll through the menu to select desired ringer tone/melody (1-10). As you scroll through, the telephone demonstrates the selected tone/melody | |
| Press (left side) to SAVE. Either press to return to standby or wait 30 seconds |
HANDSET SETTINGS
Ringer Volume
There is a choice of five handset ringer volumes. The handset ringer can also be turned off.
| Press (left side) to activate the menu | |
| Use and to scroll through the menu to select 'HS SETTING' | |
| Press (left side) to confirm | |
| Use and to scroll through the menu to select 'RING SETUP' | |
| Press (left side) to confirm | |
| Use and to scroll through the menu to select 'INT RING/EXT RING' | |
| Press (left side) to confirm | |
| Use and to scroll through the menu to select 'VOLUME'Use and to scroll through the menu to select desired ringer volume (1 to 5 or OFF position). As you scroll through, the telephone demonstrates the selected volume | |
| Press (left side) to SAVE. Either press to return to standby or wait 30 seconds | |
HANDSET SETTINGS
Tone Setup
A key tone is heard every time you press a key on the handset. This can be switched to silent.
Note: Warning tones will still be emitted when an incorrect key is pressed.
| Press (left side) to activate the menu | |
| Use and to scroll through the menu to select 'HS SETTING' | |
| Press (left side) to confirm | |
| Use and to scroll through the menu to select 'TONE SETUP' | |
| Press (left side) to confirm | |
| Press (left side) again to select 'KEY TONE' | |
| Use and to scroll through the menu to select 'ON' or 'OFF' | |
| Press (left side) to SAVE. Either press to return to standby or wait 30 seconds |
HANDSET SETTINGS
Range Alarm
A beep will be heard when the handset is out of range from the base. You are able to enable/disable this audible warning.
| Press (left side) to activate the menu | |
| Use ? and to scroll through the menu to select 'HS SETTING' | |
| Press (left side) to confirm | |
| Use ? and to scroll through the menu to select 'TONE SETUP' | |
| Press (left side) to confirm | |
| Press to select 'RANGE ALARM' | |
| Press (left side) to confirm | |
| Use ? and to scroll through the menu to select 'ON' or 'OFF' | |
| Press (left side) to SAVE. Either press to return to standby or wait 30 seconds |
HANDSET SETTINGS
Language Settings
The handset supports 8 languages (English, French, Spanish, German, Italian, Dutch, Polish and Traditional Chinese.). You can select the language used to display menu options.
| Press (left side) to activate the menu | |
| Use and to scroll through the menu to select 'HS SETTING' | |
| Press (left side) to confirm | |
| Use and to scroll through the menu to select 'LANGUAGE' | |
| Press (left side) to confirm | |
| Use and to scroll through the menu to select the desired language. Each language will be displayed in its own native translation | |
| Press (left side) to SAVE. Either press to return to standby or wait 30 seconds |
HANDSET SETTINGS
HS Label
The handset has a name - “HS n” (where n is either 1,2,3,4 or 5). This number indicates that the handset is the nth handset registered to the base i.e. HS 1 is the 1^st handset registered to the base. The Handset name is displayed in standby mode. If desired, it can be changed.
| Press (left side) to activate the menu | |
| Use and to scroll through the menu to select 'HS SETTING' | |
| Press (left side) to confirm | |
| Use and to scroll through the menu to select 'HS NAME' | |
| Press (left side) to confirm | |
| Enter the new handset name (up to 12 characters) using the numeric keypad (see Phonebook – Add New Entry). Press (right side) to ERASE the previous character if incorrect. | |
| Press (left side) to SAVE. Either press to return to standby or wait 30 seconds |
HANDSET SETTINGS
Auto Answer
Auto answer allows you to answer a call by simply picking up the handset from the base without pressing any key.

HANDSET SETTINGS
LCD Settings
There are 17 LCD contrast settings available. This enables you to optimise the display visibility by changing its contrast according to the light available.
| Press (left side) to activate the menu | |
| Use and to scroll through the menu to select 'HS SETTING' | |
| Press (left side) to confirm | |
| Use and to scroll through the menu to select 'LCD CONTRAST' | |
| Press (left side) to confirm | |
| Use and to scroll through the 17 available contrast levels. | |
| Press (left side) to SAVE. Either press to return to standby or wait 30 seconds |
HANDSET SETTINGS
Date and Time Setting
Date Format
The date format displayed on the handset can be changed. The format can be either dd//mm or mm/dd.
| Press (left side) to activate the menu | |
| Use and to scroll through the menu to select 'HS SETTING' | |
| Press (left side) to confirm | |
| Use and to scroll through the menu to select 'DATE & TIME' | |
| Press (left side) to confirm | |
| Use and to scroll through the menu to select 'DATE FORMAT' | |
| Press (left side) to confirm. | |
| Use and to scroll through the menu to select 'DD-MM' or 'MM-DD' | |
| Press (left side) to SAVE. Either press to return to standby or wait 30 seconds |
HANDSET SETTINGS
Time Format
The time format displayed on the handset can be changed.
The format can be either 12 hour or 24 hour.
| Press (left side) to activate the menu | |
| Use and to scroll through the menu to select 'HS SETTING' | |
| Press (left side) to confirm | |
| Use and to scroll through the menu to select 'DATE & TIME' | |
| Press (left side) to confirm | |
| Use and to scroll through the menu to select 'TIME FORMAT' | |
| Press (left side) to confirm. | |
| Use and to scroll through the menu to select '12-Hour' or '24-Hour' | |
| Press (left side) to SAVE. Either press to return to standby or wait 30 seconds |
HANDSET SETTINGS
Date & Time Setting
| Press (left side) to activate the menu | |
| Use and to scroll through the menu to select 'HS SETTING' | |
| Press (left side) to confirm | |
| Use and to scroll through the menu to select 'DATE & TIME' | |
| Press (left side) to confirm | |
| Use and to scroll through the menu to select 'SET DATE' or 'SET TIME' | |
| Press (left side) to confirm. | |
| Enter the current date or time (24 hour format) using the numeric keypad | |
| Press (left side) to SAVE. Either press to return to standby or wait 30 seconds |
Notes: If you have selected 12-Hour time format, AM/PM will appear on the right hand side of the time in standby.
HANDSET SETTINGS
Select Base
You can select a base from those already registered to the handset
| Press (left side) to activate the menu | |
| Use and to scroll through the menu to select 'HS SETTING' | |
| Press (left side) to confirm | |
| Use and to scroll through the menu to select 'SELECT BS' | |
| Press (left side) to confirm | |
| Use and to scroll through the list of registered bases to select the base required | |
| Press (left side) to confirm | |
| `SELECT BS n' will be displayed (n is the number of the registered base). Press (left side) to confirm, a confirmation beep will be heard |
HANDSET SETTINGS
Handset Reset
You can reset the handset settings to the factory default. (LCD contrast is the only setting that will not be restored).
| Press (left side) to activate the menu | |
| Use and to scroll through the menu to select 'HS SETTING' | |
| Press (left side) to confirm | |
| Use and to scroll through the menu to select 'HS RESET' | |
| Press (left side) to confirm | |
| You will be prompted to enter the PIN code (default is 0000). Enter the PIN using the numeric keypad. | |
| Press (left side) to RESET | |
| If the PIN code is accepted, all handset settings will be reset to the factory default. You will be returned to standby mode automatically. | |
BASE SETTINGS
Terminate Handset
You can delete a handset registration from a base.
| Press (left side) to activate the menu | |
| Use and to scroll through the menu to select 'BS SETTING' | |
| Press (left side) to confirm | |
| Press (left side) again to select 'TERMINATE HS' | |
| You will be prompted to enter the PIN code (default is 0000). Enter PIN using the numeric keypad. | |
| Press (left side) to confirm OK | |
| Use and to scroll through the list of registered handsets to select the handset required | |
| Press (left side) to confirm (if the current handset or a non existant handset is selected, a warning beep will be heard) | |
| The selected handset will be deregistered | |
BASE SETTINGS
Dial Mode Setting
In the UK, all telephone exchanges now use Tone dialling. The dial mode setting is pre-set to Tone.
If your telephone does not dial out, it is probably being used from an older private switchboard (PBX). In this case, the dial mode must be changed to Pulse.
| Press (left side) to activate the menu | |
| Use and to scroll through the menu to select 'BS SETTING' | |
| Press (left side) to confirm | |
| Use and to scroll through the menu to select 'DIAL MODE' | |
| Press (left side) to confirm | |
| Use and to scroll through the menu to select 'TONE' or 'PULSE'. | |
| Press (left side) to SAVE. Either press to return to standby or wait 30 seconds |
BASE SETTINGS
Flash Time Setting
The flash time setting can be changed.
| Press (left side) to activate the menu | |
| Use and to scroll through the menu to select 'BS SETTING' | |
| Press (left side) to confirm | |
| Use and to scroll through the menu to select 'FLASH TIME' | |
| Press (left side) to confirm | |
| Use and to scroll through the menu to select 'Flash 1' or 'Flash 2'. | |
| Press (left side) to SAVE. Either press to return to standby or wait 30 seconds |
Flash 1= 100ms
Flash 2= 300ms
BASE SETTINGS
Modify PIN
The PIN is pre-set to ‘0000’. This can be changed – this is recommended for confidentiality.
| Press(left side) to activate the menu | |
| Use [IMAGE] and [IMAGE] to scroll through the menu to select 'BS SETTING' | |
| Press [IMAGE] (left side) to confirm | |
| Use [IMAGE] and [IMAGE] to scroll through the menu to select 'MODIFY PIN' | |
| Press [IMAGE] (left side) to confirm | |
| You will be prompted to enter the old PIN code (default is 0000). Enter the old PIN using the numeric keypad.Press [IMAGE] (left side) to confirm NEXTIf the old PIN code is accepted, you will be prompted to enter a new PIN code. | |
| Enter new PIN code and press [IMAGE] NEXT soft key (left side) | |
| You will be prompted to confirm the new PIN code. Enter new PIN code again.. | |
| Press [IMAGE] (left side) to SAVE. Either press [IMAGE] to return to standby or wait 30 seconds | |
BASE SETTINGS
Base Default
You can reset the base settings to the factory default.
| Press (left side) to activate the menu | |
| Use and to scroll through the menu to select 'BS SETTING' | |
| Press (left side) to confirm | |
| Use and to scroll through the menu to select 'BS RESET' | |
| Press (left side) to confirm | |
| You will be prompted to enter the PIN code (default is 0000). | |
| Press (left side) to RESET | |
| If the PIN code is accepted, all base settings will be reset to the factory default. You will be returned to standby mode automatically. |
USING THE TELEPHONE
Making a Call
Pick up handset.
Press

will be displayed on the LCD
When you hear dialing tone, dial the number on the keypad.
To end the call simply press on the

or place the handset
Pre-Dialling
Pick up handset. Dial the number on the keypad (up to 32 digits)
Press 📐, the number is automatically dialled
To end the call simply press handset on t

again or place the ase
Note: If you make an incorrect entry while pre-dialling the telephone number :
- Press ☐ ERASE soft key (right side) to clear the last digit and then enter the correct number
- Press ⬇ ERASE soft key (right side) for more than one second to clear all digits entered and return to standby mode.
USING THE TELEPHONE
Receiving a Call
When an incoming call is received the telephone rings. If the caller can be identified (due to subscription to a Caller ID service), the caller's telephone number will be displayed. If this caller's number is stored on the Phonebook, the associated name will be displayed.
Press 📌. to answer Or
If auto answer is activated, simply lift the handset out of the base
To end the call simply press 📞 or replace the handset on the base
Call duration is always displayed once you hang up.
Note: You can alter the ringer volume whilst the telephone is ringing. Simply use 📷 and 📄 to select the desired volume.
Hands Free
You can turn on the speakerphone built into the handset either before or during a call. In this mode there is no need to hold the handset. You will hear the third party through the speaker and the microphone will pick up your voice.
Before making a call, press twice to turn hands free on. The icon will be displayed on the LCD.
Press 📋 during a call to turn hands free on. The 📋 icon will be displayed on the LCD.
Press 📋 again during a call to turn hands free off. The 📋 icon will disappear from the LCD.
Note: To adjust the speakerphone volume use Audio Setup in Handset Settings or use 🔒 and 🔒 to select the desired volume.
USING THE TELEPHONE
Mute Function
If you wish, you can speak privately to someone else in the room with you without your caller overhearing.
You will still be able to hear the caller but they cannot hear you during the mute operation.
| During a call, press ➕ MUTE soft key (right side) | |
| The LCD will show `CALL MUTED' which indicates that your voice is muted to the call and the caller cannot hear you speaking | |
| Press ➕ MUTE soft key (right side) again to resume the coverage. `CALL MUTED' will disappear from the LCD display | |
Receiving Volume
During a conversation, the and keys adjust the ear piece volume level. The volume can be adjusted from level 1 to 5. The selected volume is displayed in the LCD display.
Last Number Redial
To redial the last number dialled:
Pick up handset. Press ○ or REDIAL soft key in standby mode
Press

to dial the number
USING THE TELEPHONE
Recalling Recent Numbers
You can call back any of the last 10 numbers dialled as follows:
Pick up handset. Press ○ or REDIAL soft key in standby mode
Use ? and to scroll through the dialled numbers until you find the number you wish to call
Press 📋 to dial the number
Notes:
- When no numbers are found, EMPTY is displayed
- If the redial memory is full i.e. 10 numbers stored, each time you dial a new number, the oldest number stored is automatically erased and the redial memory is updated.
USING THE TELEPHONE
Adding Recent Numbers to the Phone Book
Pick up handset.
Press ○ in standby mode

dialled numbers until you find the number you wish to add to phone book
Press ☐ (left side) to confirm
Press ☐ (left side) again to select 'ADD TO PB'
The display will show `NAME?' Enter the name you wish using the numeric keypad (see character map below)
Press ☐ (left side) to confirm
The display will show the selected number from the recently dialled list
Press ☐ (left side) to confirm
Use ? and to scroll through the melody menu to select desired ringer tone. As you scroll through, the telephone demonstrates the selected melody. If you want to set a VIP number, you should select a special ring tone. The ring tone should be different from the external ring you have set. You can set up to 9 VIP ring tones associated with 9 numbers
Press ⏱ (left side) to confirm. Press Ⓗ to return to standby or wait 30 seconds
USING THE TELEPHONE
Deleting Recent Numbers
To delete a specific number in the redial memory

To delete all numbers in the redial memory

USING THE TELEPHONE
Flash Signal
The (left side) key can also be used with special services such as Call Waiting (if provided by your service provider) or transferring external calls to another extension within a private switchboard. The LCD will display 'R'.
Paging the Handset
If you wish to locate the handset simply follow the instructions below:
| Press 🎨, located on the bottom of the base for less than 2 seconds | |
| All registered handsets will be paged and will ring for about 60 seconds | |
| Press any button on the located handset or press 🎨 on the base again to stop paging mode | |
Call Timer
Your handset automatically times the duration of every external call. The time is shown during the call and for a few seconds after the call has ended.
Key Lock
When this feature is turned on, all buttons except for 📋 will be locked and will not function. You can use 📋 for answering incoming or intercom calls. When you complete the call and hang up, the telephone returns to lock mode. This lock feature is useful to avoid pressing buttons by mistake.
Switch lock On: Press *0\~ until the -0 icon and 'HS LOCKED' appear in the LCD display Switch lock Off: Press *0\~ until the -icon disappears in the LCD display.
CALLER ID
The features described in this section are only available if you subscribe to a Caller ID service from your network provider.
Caller ID means you can see who is calling on your handset display (provided the number is not withheld, unavailable or is an international call).
The display shows 'PRIVATE' for a withheld number.
The display shows 'OUT OF AREA' when someone calls from an area where the telephone company is not offering caller identification services or is not yet providing number delivery to your area.
Whether you take a call or not, the caller's details are stored in the Caller ID book. This book stores the last 40 incoming calls.
The ←icon will be shown on the LCD if you missed one or more calls. If the Caller ID book is full, the ←icon will blink.
View Caller ID Book
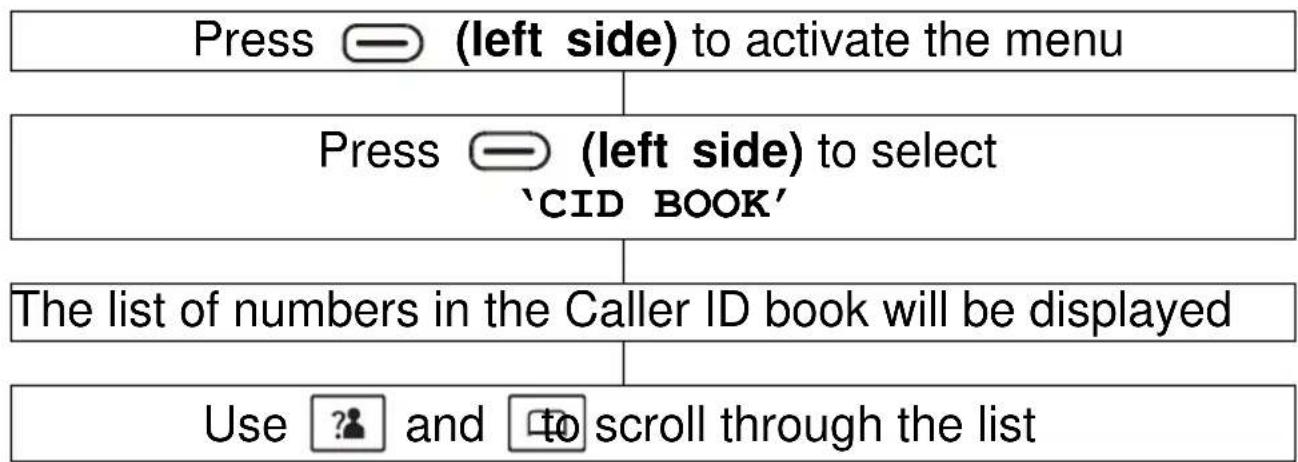
flowchart
graph TD
    A["Press (left side) to activate the menu"] --> B["Press (left side) to select 'CID BOOK'"]
    B --> C["The list of numbers in the Caller ID book will be displayed"]
    C --> D["Use ? and to scroll through the list"]
Alternatively, you can access the book by pressing key whilst in standby mode.
Note: If there are no caller ID telephone numbers in the call book, 'EMPTY' is displayed.
CALLER ID
Dial a Number from the Caller ID Book
Press ⏻ (left side) to activate the menu
Press ☐ (left side) to select 'CID BOOK'
The list of numbers in the Caller ID book will be displayed
Use ? and to scroll through the list to find the required number
Press 📄, the number is automatically dialled
Add a Number from Caller ID to the Phone Book
Press MENU soft key. Use SELECT soft key to choose 'CID Book'
The list of numbers in the Caller ID book will be displayed
Use ? and to scroll through the list until you find the required number
Press ☐ (left side) again to select 'MORE'. You will enter 'ADD TO PB' menu. Press 'SELECT' soft key
The display will show `NAME?' Enter the name you wish using the numeric keypad (see character map in Phonebook Chapter)
Press ➕ NEXT soft key (left side)
CALLER ID
The display will show the selected number from the CID book. Modify if required.
Press ➕ NEXT soft key (left side)
Use 📷 and 📞 to scroll through the melody menu to select desired ringer tone. As you scroll through, the telephone demonstrates the selected melody. If you want to set a VIP number, you should select a special ring tone. The ring tone should be different from the external ring you have set. You can set up to 9 VIP ring tones associated with 9 numbers
Press ☐ (left side) to SAVE.
Delete a Number from the Caller ID Book
Press MENU soft key. Use SELECT soft key to choose 'CID Book'
Use ? and to scroll through the list until you find the number you wish to delete
Press ⏻ MORE soft key (left side)
Use ? and to scroll through the menu to select 'DELETE'
Press ☐ (left side) to select
You will be prompted to confirm ?, press ⏻ DEL soft key (left side) again to confirm
CALLER ID
Delete All Numbers from the Caller ID Book
| Press MENU soft key. Use SELECT soft key to choose 'CID Book' | |
| Press MORE soft key (left side) | |
| Use ? and to scroll through the menu to select 'DELETE ALL' | |
| Press (left side) to select | |
| You will be prompted to confirm?, press DEL ALL soft key (left side) again to confirm | |
PHONE BOOK
Telephone numbers can be stored in the phone book. It allows you to store frequently used numbers so that you can easily make a call without having to remember or enter the telephone number
The phone book can contain 50 entries. Each phone number can contain up to 20 digits and have a name of up to 12 characters.
Create a Phone Book Entry
| Press (left side) to activate the menu | |
| Use and to scroll through the menu to select 'PHONE BOOK' | |
| Press (left side) to select | |
| Press (left side) again to select 'NEW' | |
| The display will show 'NAME?' Enter the name you wish using the numeric keypad (see character map below). Up to 12 characters | |
| Press NEXT soft key (left side) to confirm | |
| The display will show 'NUMBER?' Enter the telephone number you wish using the numeric keypad (up to 20 digits). | |
| Press NEXT soft key (left side) to confirm | |
| Use and to scroll through the melody menu to select desired ringer tone. As you scroll through, the telephone demonstrates the selected melody. If you want | |
PHONE BOOK
to set a VIP number, you should select a special ring tone for it. The ring tone should be different from the external ring you have set. You can set up to 9 VIP ring tones associated with 9 numbers
Press ← (left side) to SAVE. You can then repeat the process again and add another entry to the phonebook or press 🔒 to return to standby or wait 30 seconds
Note: Press ☐ ERASE soft key (right side) to clear the last digit and then enter the correct number
Press ☐ ERASE soft key (right side) for more than one second to clear all digits entered and return to standby mode.
Insert Pause
Inserting a pause provides a delay of 3 seconds. This is necessary with some telephone systems.
To insert a dialling pause between numbers when storing a number, press ⚙ until P appears in the LCD display.
Character Map
| Key Characters in the displayed order | |||||||||
| 0 | (spc) | 0 | ? | & | / | . | , | ! | |
| 1 | 1 | @ | - | + | - | " | ( | ) | |
| 2 | A | B | C | a | b | c | 2 | ||
| 3 | D | E | F | d | e | f | 3 | ||
| 4 | G | H | I | g | h | i | 4 | ||
| 5 | J | K | L | j | k | l | 5 | ||
| 6 | M | N | O | m | n | o | 6 | ||
| 7 | P | Q | R | S | p | q | r | s | 7 |
| 8 | T | U | V | t | u | v | 8 | ||
| 9 | W | X | Y | Z | w | x | y | z | 9 |
PHONE BOOK
View Phone Book Entries

flowchart
graph TD
    A["Pick up handset.<br>Press in standby mode"] --> B["The list of names in the phone book will be displayed"]
    B --> C["Use and to scroll through the list to find the required name"]
    C --> D["Press (left side) to view the telephone number"]
Dialling using a Phone Book Entry
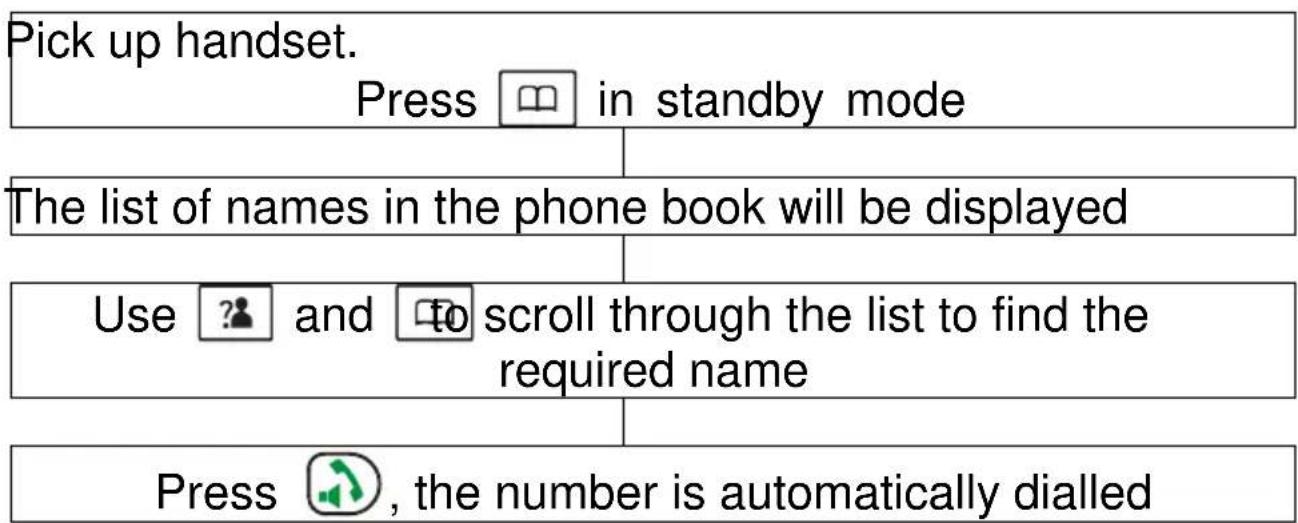
flowchart
graph TD
    A["Pick up handset. Press in standby mode"] --> B["The list of names in the phone book will be displayed"]
    B --> C["Use and to scroll through the list to find the required name"]
    C --> D["Press, the number is automatically dialled"]
Modify a Phone Book Entry

flowchart
graph TD
    A["Press"] --> B["(left side) to activate the menu"]
    C["Use"] --> D["? and to scroll through the menu to select 'PHONE BOOK'"]
    E["Press"] --> F["(left side) to select"]
PHONE BOOK
Use ? and to scroll through the menu to select 'EDIT'
Press ☐ (left side) to select
Use ? and to scroll through the list to find the required phone book entry to be modified
Press ☐ (left side) to confirm
The curser will start to flash on the right hand side of the name. Modify name using ⏻ (right side) to clear the previous digits and then enter the correct character(s)
Press ➕ NEXT soft key (left side) to save
The curser will start to flash on the right hand side of the number. Modify name using ⏻ (right side) to clear the previous digits and then enter the correct digit (s)
Press ➕ NEXT soft key (left side) to save
Use 📷 and 📞 to scroll through the melody menu to select desired ringer tone. As you scroll through, the telephone demonstrates the selected melody. If you want to set a VIP number, you should select a special ring tone for it. The ring tone should be different from the external ring you have set. You can set up to 9 VIP ring tones associated with 9 numbers
Press SAVE soft key (left side) to confirm. You can then repeat the process again and modify another entry in the phonebook or press to return to standby or wait 30 seconds
PHONE BOOK
Delete a Phone Book Entry
| Press (left side) to activate the menu | |
| Use and to scroll through the menu to select 'PHONE BOOK' | |
| Press (left side) to select | |
| Use and to scroll through the menu to select 'DELETE' | |
| Press (left side) to select | |
| Use and to scroll through the list to find the required phone book entry to be deleted | |
| Press (left side) to select | |
| You will be prompted to confirm?, press DEL soft key (left side) again to confirm |
Delete All Phone Book Entries
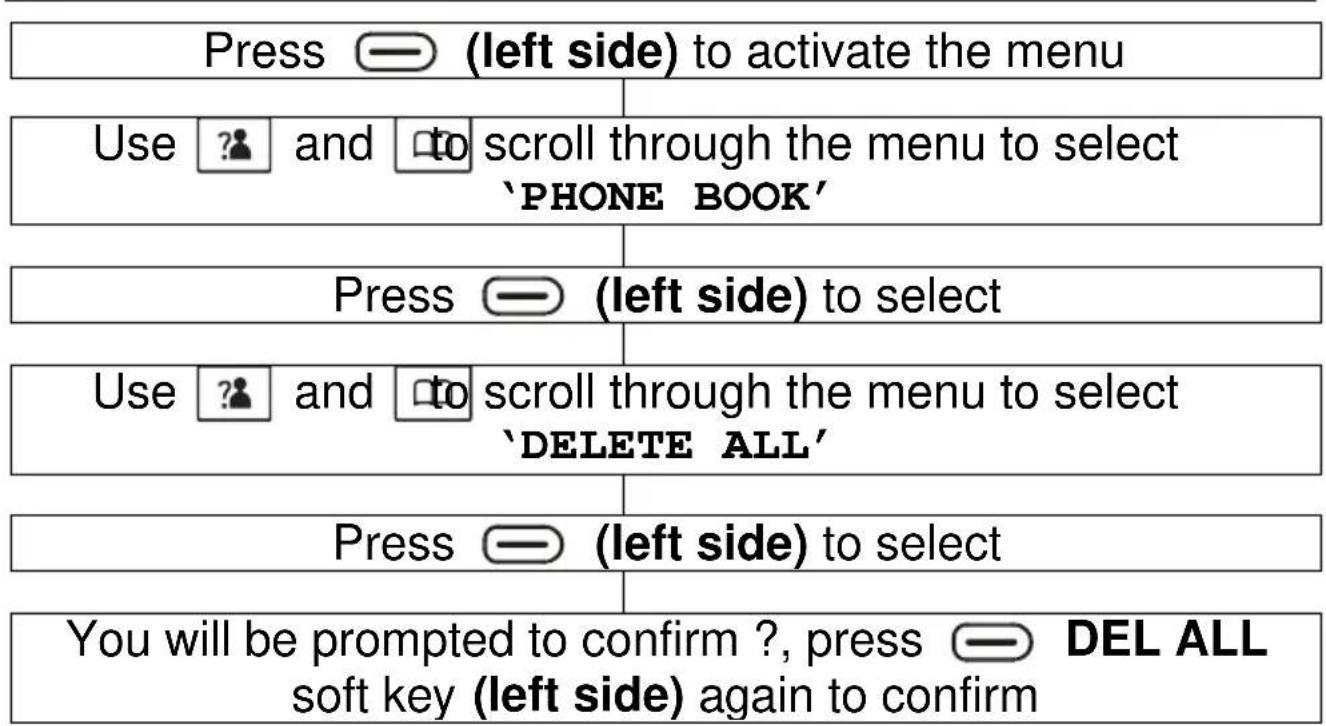
PHONE BOOK
Phone book Status
The phone book status shows the number of entries already stored in the phone book e.g. 05/50
| Press (left side) to activate the menu | |
| Use and to scroll through the menu to select 'PHONE BOOK' | |
| Press (left side) to select | |
| Use and to scroll through the menu to select 'PB STATUS' | |
| Press (left side) to select | |
| The number of entries already stored in the phone book will be displayed | |
| Press to return to standby or wait 30 seconds |
ADDITIONAL HANDSETS & BASES
The handset that came with your base is already registered to the base (factory setting). This is registered as handset 1. Each additional handset you purchase must be registered to the base.
Up to 5 handsets can be registered to one base unit. This means you can make internal calls between registered handsets, transfer an incoming call between handsets and answer a call anywhere in the office/home at any time as all the handsets will call at the same time.
You can also register up to 4 base units to each handset. This will increase the phone range, allowing you to move between the increased telephone coverage areas.
Register a new Handset
Before registering a handset to the base, you should press and hold the ☐ key on the bottom of the base for about 5 seconds and then release it.
| Press (left side) to activate the menu | |
| Use and to scroll through the menu to select 'REGISTRATION' | |
| Press (left side) to select | |
| Use and to scroll through the base names list | |
| Press (left side) to select desired base. The handset will search for the requested base and the relevant information will flash on the LCD. | |
ADDITIONAL HANDSETS & BASES
If the base is found, you will be prompted to enter the PIN code (the default is 0000).
Press ☐ (left side) to select
If the PIN code is accepted, the registration tone will sound and the base assigns a number to the handset. If the PIN code entered is invalid, a warning tone will sound, the handset will return to the previous registration state
Select a Base
Your handset can be used with up to 4 bases. See Select Base in Handset Settings.
Note: In order to use the handset with more than one base unit, the handset must be registered with each base (see Register a New Handset section).
Release a Handset
A registered handset can be removed from a base if necessary. See Terminate Handset in Base Settings.
ADDITIONAL HANDSETS & BASES
Internal Calls
When using several handsets registered to the same base unit, you can make internal calls and transfer external calls between handsets.
Make an Internal Call

flowchart
graph TD
    A["Press"] --> B["Enter the handset number you wish to page (1-5)"]
    B --> C["12345"]
Notes:
If an incorrect handset number is entered i.e. one that does not exist, the handset wil sound an error tone
Receive an Internal Call

Notes:
If there is an external call during the course of an internal call, the caller's telephone number will be displayed. The internal call can be finished by pressing 🔒. The normal external call ring tone will be heard, press 🔒 to answer the call.
ADDITIONAL HANDSETS & BASES
Call Transfer between Handsets
An external call can be transferred from one handset to another (provided they are registered to the same base).
During an external call, when you wish to transfer the call. press 📋. Your external caller will be placed on hold
Enter the handset number you wish to transfer to (1-5)
The paged handset will ring. The calling handset number will be dsisplayed on the LCD display 'HS n CALLING'
To answer the paged handset, press

If required, you may now speak to the paged user.
To transfer the external call to the paged handset, press

O|R
To cancel the call transfer and talk to the external caller
again, press

Notes:
On transferring a call, you may hang up before the paged handset answers. The connection between the external caller and the paged handset is complete once you hang up.
If the paged handset does not answer a call within a predetermined time, the call will be transferred back to your handset.
ADDITIONAL HANDSETS & BASES
Three Way Conference Call
When you have both an external call and an intercom call in progress, you can set up a three way conference call
During an external call. press

Your external caller
will be placed on hold
Enter the handset number you wish to join the three way conference call (1-5)
The paged handset will ring. The calling handset number will be displayed on the LCD display
'HS n CALLING'
To answer the paged handset, press

The caller can now press

to start the three way call
Either of the two internal handsets can press leave the conference call at any time.

to
CALL WAITING
Caller ID on Call Waiting
When you subscribe to a Call Waiting service from your service provider, the LCD will display the name and number of the second caller while you are having a conversation with the first caller.
Press ← (left side) FLASH key to answer the second caller
When you have finished with the second caller press (left side) FLASH key again to resume your conversation with the first caller.
Note: If you have transferred an external call to another handset, the call waiting function will not work via the second handset.
TROUBLESHOOTING
General Checks
- Make sure that the telephone line cord and adaptor are correctly plugged in and they are not damaged.
- Make sure the batteries are inserted correctly.
- Make sure that the batteries are fully charged.
- Connect another telephone to the telephone PTT socket or move your telephone to another socket to track if the failure is coming from your telephone or your PTT socket.
- Make sure the power adaptor is properly connected
Handset not registering
• See general checks.
No display
• See general checks
- Check the handset is switched on
No connection between handset and base
- You may be out of range of the base. Move closer to the base
Handset on the base does not charge
- Make sure the handset is placed properly on the base. When charging, the battery symbol should be shown filling up.
Handset does not ring
• See general checks
- Ensure the ringer volume is not switched off
TROUBLESHOOTING
No tone when you press

• See general checks.
- Check for the handset number on the LCD display e.g. HS1. If this is not present you must register the handset (see Handset Registration section)
A warning tone is heard during a call:
- The batteries are empty. The handset needs to be replaced in the base in order to recharge.
- You are out of the base coverage area.
No number is displayed when the telephone rings:
- Please contact your telephone network provider to get the caller ID service.
- Even if you have subscribed to a caller ID service, if the caller does not want to show their number (private number), the display will show 'PRIVATE'. 'OUT OF AREA' might also be displayed if it is an international call
- It could be a call from a PBX. Caller ID may not work properly if the telephone is connected to a PBX.
Consistently short battery life
- Clean the charge contacts
- Replace the batteries
Nothing happens when you press any button
- Check the the keylock is switched off
SAFETY INFORMATION
General
Only use the power supply included with the product.
Only use the approved rechargeable batteries supplied.
Do not open the handset (except to replace the handset batteries) or base. Contact the helpline for all repairs.
Never dispose of batteries in a fire. There is a serious risk of explosion and/ or the release of toxic chemicals.
Do not place objects on the line cord or power cable that may cause damage.
If you are sure you are not going to use the telephone for over a month, remove the batteries.
Cleaning
Unplug the telephone. Clean the telephone with a soft cloth. Keep the base and handset charging contacts clean. Never use polishes or cleaning agents - they could damage the finish or the electrics inside.
Environmental
Do not expose to direct sunlight.
Always ensure there is a free flow of air over the surfaces of the telephone.
Do not place any part of your product in water and do not use it in damp or humid conditions e.g. bathrooms.
Do not expose your product to fire or other hazardous conditions.
Unplug your phone from the telephone socket during thunderstorms because it could damage your telephone. Your guarantee does not cover thunderstorm damage.
The telephone is designed for working within a temperature range of 5^ C to 45^ C.
GUARANTEE
From the moment your Geemarc product is purchased, Geemarc guarantee it for the period of two years. During this time, all repairs or replacements (at our discretion) are free of charge. Should you experience a problem then contact our help line or visit our website at www.geemarc.com. The guarantee does not cover accidents, negligence or breakages to any parts. The product must not be tampered with or taken apart by anyone who is not an authorized Geemarc representative. The Geemarc guarantee in no way limits your legal rights.
IMPORTANT: YOUR RECEIPT IS PART OF YOUR GUARANTEE AND MUST BE RETAINED AND PRODUCED IN THE EVENT OF AWARRANTY CLAIM.
Please note: The guarantee applies to the United Kingdom only
DECLARATION: Geemarc Telecom SA hereby declares that this product is in compliance with the essential requirements and other relevant provisions of the Radio and Telecommunications Terminal Equipment Directive 2014/53/UE and in particular article 3 section 1a, 1b and section 2. The telephone does not operate if the line current is lower than 18 mA.
The declaration of conformity may be consulted at www.geemarc.com

Electrical connection: The apparatus is designed to operate from a 230V 50Hz supply only. (Classified as ‘hazardous voltage’ according to EN60950 standard). The apparatus does not incorporate an integral power on/off switch. To disconnect the power, either switch off supply at the mains power socket or unplug the AC adaptor. When installing the apparatus, ensure that the mains power socket is readily accessible.
Telephone connection: Voltages present on the telecommunication network are classified TNV-3 (Telecommunication Network Voltage) according to the EN60950 standard.
RECYCLING DIRECTIVES
The WEEE (Waste Electrical and Electronic Equipment) has been put in place for the products at the end of their useful life to ensure they are recycled in the best way.
When this product is finished with, please do not put it in your domestic waste bin.
Please use one of the following disposal options:
- Remove the batteries and deposit them in an appropriate WEEE skip. Deposit the product in an appropriate WEEE skip.
- Or, hand the old product to the retailer. If you purchase a new one, they should accept it.
Thus if you respect these instructions you ensure human health and environmental protection.


eemarc™
Hear the Difference
For product support and help visit our website at
www.geemarc.com
Telephone 01707 384438
Or fax 01707 832529

UGMyDECT100+_En_v1.6
- Amplified Digital Cordless Telephone with Large Buttons
- CONTENTS
- CONTENTS....1
- INTRODUCTION 4
- DESCRIPTION 5
- INSTALLATION 12
- HANDSET SETTINGS 15
- BASE SETTINGS 30
- USING THE TELEPHONE 35
- CALLER ID 42
- PHONE BOOK 46
- ADDITIONAL HANDSETS & BASES 52
- CALL WAITING 57
- TROUBLESHOOTING 58
- SAFETY INFORMATION 60
- GUARANTEE 61
- RECYCLING DIRECTIVES 62
- INTRODUCTION
- MyDECT100+
- Unpacking the Telephone
- DESCRIPTION
- General Description
- Handset Description (front)
- Key
- LCD Screen Description
- Signal Strength icon
- Line icon
- Hands-free
- New Call icon
- Key Lock icon
- Battery Status icon
- Alarm Icon
- LCD Screen Navigation
- INSTALLATION
- Location
- Handset Range
- Setting Up
- Battery Use
- On/Off Settings
- HANDSET SETTINGS
- Alarm Setting
- Audio Setup
- Ringer Setup
- Ringer Tones
- Ringer Volume
- Tone Setup
- Range Alarm
- Language Settings
- HS Label
- Auto Answer
- LCD Settings
- Date and Time Setting
- Date Format
- Time Format
- Date & Time Setting
- Select Base
- Handset Reset
- BASE SETTINGS
- Terminate Handset
- Dial Mode Setting
- Flash Time Setting
- Modify PIN
- Base Default
- USING THE TELEPHONE
- Making a Call
- Pre-Dialling
- Receiving a Call
- Hands Free
- Mute Function
- Receiving Volume
- Last Number Redial
- Recalling Recent Numbers
- Notes:
- Adding Recent Numbers to the Phone Book
- Deleting Recent Numbers
- To delete a specific number in the redial memory
- To delete all numbers in the redial memory
- Flash Signal
- Paging the Handset
- Call Timer
- Key Lock
- CALLER ID
- View Caller ID Book
- Dial a Number from the Caller ID Book
- Add a Number from Caller ID to the Phone Book
- Delete a Number from the Caller ID Book
- Delete All Numbers from the Caller ID Book
- PHONE BOOK
- Create a Phone Book Entry
- Insert Pause
- View Phone Book Entries
- Dialling using a Phone Book Entry
- Modify a Phone Book Entry
- Delete a Phone Book Entry
- Delete All Phone Book Entries
- Phone book Status
- ADDITIONAL HANDSETS & BASES
- Register a new Handset
- Select a Base
- Release a Handset
- Internal Calls
- Make an Internal Call
- Receive an Internal Call
- Call Transfer between Handsets
- O|R
- Three Way Conference Call
- CALL WAITING
- Caller ID on Call Waiting
- TROUBLESHOOTING
- General Checks
- Handset not registering
- No display
- No connection between handset and base
- Handset on the base does not charge
- Handset does not ring
- No tone when you press
- A warning tone is heard during a call:
- No number is displayed when the telephone rings:
- Consistently short battery life
- Nothing happens when you press any button
- SAFETY INFORMATION
- General
- Cleaning
- Environmental
- GUARANTEE
- RECYCLING DIRECTIVES
Brand : GEEMARC
Model : MyDECT 100+
Category : Cordless phone