
TI Shape Plus - Boiler Ariston Thermo - Free user manual and instructions
Find the device manual for free TI Shape Plus Ariston Thermo in PDF.
| Product type | Electric boiler |
| Model | TI Shape Plus |
| Brand | Ariston Thermo |
| Capacity | 50 L, 80 L or 100 L |
| Weight (empty) | 50 L: 20 kg, 80 L: 26 kg, 100 L: 31 kg |
| Power supply | 230 V ~ 50 Hz, cable H05VV-F 3x1.5 mm² |
| Electrical protection | Bipolar magneto-thermal differential switch 30 mA |
| Maximum water pressure | See nameplate – install a pressure reducer if necessary |
| Temperature range | 40 °C to 75 °C |
| Heating modes | Instant, Night, Economy, Smart Timer |
| Smart functions | Overheat protection, anti-freeze, shutdown memory, heat retention, error codes E1/E2/E3 |
| Child lock | Yes, by holding the Mode key |
| Display | Screen with time, temperature and mode |
| Installation | Vertical on wall, free space 50 cm, dowels ≥10 mm |
| Hydraulic connection | Cold water inlet (blue collar), hot water outlet, safety valve, drain cock |
| Periodic maintenance | Descaling of heating element every 2 years, replacement of magnesium anode every 2 years |
| Cleaning | Hot water and liquid detergent without ammonia or alcohol, avoid abrasives |
| Standards | Compliant with IEC-EN, EMC directive 89/336/EEC |
Frequently Asked Questions - TI Shape Plus Ariston Thermo
User questions about TI Shape Plus Ariston Thermo
0 question about this device. Answer the ones you know or ask your own.
Ask a new question about this device
Download the instructions for your Boiler in PDF format for free! Find your manual TI Shape Plus - Ariston Thermo and take your electronic device back in hand. On this page are published all the documents necessary for the use of your device. TI Shape Plus by Ariston Thermo.
USER MANUAL TI Shape Plus Ariston Thermo

MTS MAKES USE OF RECYCLED PAPER
25.060,190.1.04 1006 Stampa: Lllograf srl. Jesi
Merloni TermoSanitari SpA
Viale Aristide Merloni, 45
60044 Fabriano (AN)
Tel.0732.601
Telefax.0732.602331
Telex 560160
http://www.mtsgroup.net

GROUP

ARISTON

Electric water heaters

EJIeKTPnHnBBOHOHaPbBaY

F Jchauffe-eau electriques

JIeKTop JIK cy KaHaT KooIap

Water heater description (figure 1)
a) Control panel c) Front panel
b) Cap d) Cap spacer
① "on/off"button
② "mode" button
③ "set" button
④ “+” button
⑤“-”button
| ⑥ | heating indicator | ⑫ | children-lock |
| ⑦ | anti-freezing indicator | ⑬ | timing mode |
| ⑧ | keep warm indicator | ⑭ | instant mode |
| ⑨ | first time heating indicator | ⑮ | night mode |
| ⑩ | second time heating indicator | ⑯ | economic mode |
| ⑪ | time/temperature |
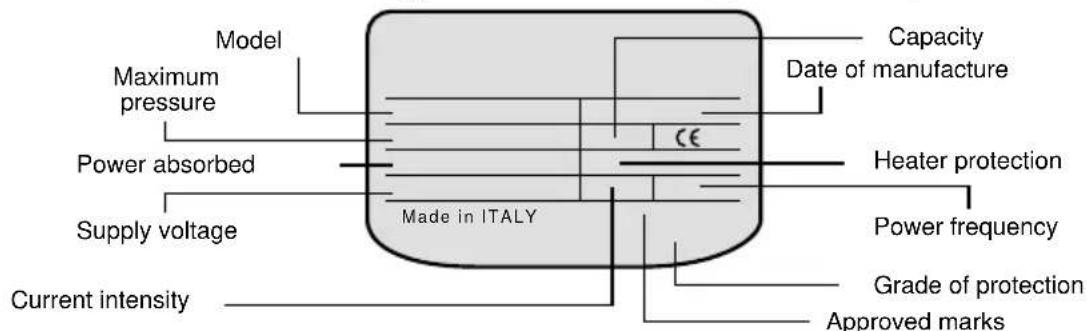
Technical characteristics
For technical characteristics, please refer to the appliance data plate.
| APPLIANCE WEIGHT WITHOUT WATER CONTENT | |||
| Model | Capacity | ||
| 50 80 100 | |||
| TI-SHAPE PLUS EE 20 26 31 | |||
This appliance conforms to the provisions of the EMC 89/336/CEE regulation for electromagnetic compatibility.
General instructions
National regulations could provide for restrictions as to the installation in bathrooms. The installation is the responsibility of the buyer. The manufacturer is only liable for damage caused by manufacturing defects. Therefore any responsibility for damages that cannot be attributed to such defects is excluded, such as for example damages caused by incorrect installation, usage not conforming to the safety regulations, installation or use not conforming to the instructions contained within this booklet; in particular:
1) The electrical connection must be carried out in conformance with the instructions given in the relative paragraph.
2) The safety valve, if supplied together with the appliance, must not be tampered with.
3) A qualified professional must perform the installation.
4) The earthing must be carried out according to good practice.
5) Should the user be absent for a considerable amount of time, we recommend that the appliance's electricity and water supply to be disconnected from the mains supply.
6) The appliance is first and foremost for domestic use.
Safety precautions

The appliance should only be installed and switched on for the first time by a qualified professional according to the instructions given in this manual.
- Avoid installing the appliance in rooms where the conditions could favour the formation of ice inside.
- Do not use electrical extensions or reduction gears.
- Do not plug in or unplug the electricity supply cable with wet hands.
It is strictly forbidden for children to use the appliance without suitable supervision.
The outlet water, if not mixed, can reach temperatures which could cause scalding. Take care before using the water
Installation instructions
The appliance (A fig. 2) should be installed as close as possible to the points of use so as to limit the loss of heat along the piping.
To make maintenance operations easier, allow for 50~cm of free space to access the electrical parts.
Wall assembly
The hooks for fastening the appliance to the wall must be capable of bearing three times the load of the water heater filled with water. We recommend you use 10mm diameter hooks that are suitable for the type of wall onto which they are fixed.
Vertical installation:
Hang the appliance up onto the hooks (fig. 3-4); for models that go up to 100 litres (equipped with just one bracket) vertical alignment is possible by acting on the adjustable device "X" (fig.3), whereas 120 and 150 litre models come with two brackets (fig.4).
Horizontal installation:
Hang the appliance up by inserting the hooks into the special slot of the bracket (fig.5).
N.B. once the appliance has been installed, check the stability of the appliance by pulling it downwards.
Plumbing connection
Connect the water heater's inlet and outlet with pipes or fittings that are resistant to the working pressure as well as to the temperature of the hot water that can usually reach and exceed 80^ . We therefore advise against the use of materials that do not resist such high temperatures.
Screw a tee union (H fig.6) to the water inlet pipe of the appliance, marked by a small blue collar. On the one side of this fitting (tee union), screw a valve for draining the water heater (B fig.6) that can only be operated with the use of a tool, and on the other the safety valve (D fig.6). Connect the latter to the cold water mains supply pipe. Also, should the drain tap be opened, allow for a water drain pipe to be attached to the outlet C fig. 6.
When screwing the safety valve tight, do not force it too much and do not tamper with it.
Some dripping from the safety valve drain aperture is completely normal during heating.
For this very reason, we recommend you connect this drain, leaving it always open, to a drain pipe installed inclined continuously downwards and in a place without condensation. Should the mains supply pressure be close to the maximum pressure value indicated on the data plate, then a pressure reducing valve should be fitted as far away from the appliance as possible. Should you decide to install the mixer assemblies (taps and fittings or shower), make sure the piping is cleared of any impurities that could cause damage.
Electrical connection
The appliance must be connected to the mains electricity supply by means of a differential bipolar thermo-magnetic switch (30 mA) complying with the CEI-EN regulations in force (contact break of at least 3 mm, even better if they are provided with fuses), or by means of a plug.
Whenever the appliance needs to be disconnected from the mains electricity supply, then use this switch to do so. The appliance is equipped with a H05VV-F cable with a 3 × 1.5 ~mm^2 cross-section, 8.5 ~mm in diameter. The yellow-green earth wire must be slightly longer than the phase wires. Before putting the appliance into operation, check that the mains voltage conforms to the value on the appliance's data plate.
Putting into operation and testing
Before connecting the appliance to the electricity supply, fill the boiler up with water from the mains supply. To do this, allow water to enter the appliance by opening the main tap of your home system while at the same time turning a hot water tap on until water comes out from it.
Check to see whether there are any water leaks from the flange (F fig.11). If there are any, then tighten in moderation the corresponding fixing nuts (C fig. 10). Turn the appliance on by pressing the switch.
Maintenance instructions
A qualified professional must perform all maintenance and servicing operations. Before calling on our Technical Assistance for a suspected failure, make sure that the malfunction is not due to other causes such as, for example, the temporary lack of water or of electricity.
The replacement of any spare parts
Disconnect the appliance from the mains electricity supply. Remove the cap to have access to the electrical parts (fig. 8).
To act on the thermostat and power PCB (fig. 9), disconnect them from the supply cable and remove them from their housing.
For any servicing of the heating element and anode, first of all empty the appliance of its contents as follows:
wait for the water within it to cool down, close the main tap and let the water flow out of the appliance through the inlet pipe after having opened the drain tap as well as a hot water tap.
Unscrew the 5 bolts (C fig.10) and remove the flange (F fig.11). The heating element and the anode are connected to the flange. When reassembling, make sure that the position of the flange gasket, of the thermostat and of the heating element are the original ones (fig. 10). After each removal, we advise you to replace the flange gasket (Z fig.12).
Make sure you respect the polarity of the electrical connections as in (fig.10) and (fig.13).
Periodical maintenance
For a good and efficient output of your appliance, you should remove the limescale built up on the heating element (R fig.12) about every two years. This operation should be carried out on the dismounted heating element and, if you do not want to use purpose-made acids, this can be done by breaking up the calcareous incrustation, taking care not to damage the protective layer of the heating element. To guarantee the long life of your appliance, the magnesium anode (N fig.12) must be replaced every other year. To remove it, take out the heating element and unscrew it from the supporting bracket.
Bipolar safety device
In the event of abnormal overheating of the water, a thermal safety switch, complying with CEI-EN regulations, shuts off the electric circuit on both the phases supplying the heating element; in this case, call for Technical Assistance.
Safety valve
In those models equipped with a safety valve with a lever, the latter can be used, by lifting it up, to:
-
empty out the appliance, if necessary,
-
check on a regular basis (every month) that the valve is operating correctly.
Handy tips
Upon heating, you may hear some normal sounds within the water heater that are due to the heat exchange between the heating element and the water touching it. If hot water does not come out of the utilisation taps, check that the water and electricity connections have been carried out as specified in the corresponding paragraphs, or after having dismounted the thermostat, check the continuity of the phases between the terminals and the relative fastons. If this is not the case, the bipolar safety device could have come into operation (see the paragraph on periodical maintenance). For the water heater's galvanic protection system to function properly, the permanent hardness of the water should not be less than 12^ French hardness degrees. During the normal functioning of the appliance, the water connections could become hot.
Instructions for use (user)
1. Buttons
- On/Off button (U)
Turn on/turn off the machine.
Mode button
This button affords two functions. One is to select the required mode. Press this button for short term and select immediate heating mode, night heating mode, economic mode and timing mode. The second function is to open and close childrenlock. Press this button for long term just to open children-lock. Re-press this button to release children-lock.
- Set button
Three functions are available. One is to press this button for short term at definite mode. Then setting process starts. Now you can change parameters under this mode. The second is to confirm each setting during setting process by pressing this button for short term. The third is to press this button for long term at definite mode. Then start modifying local time.
- “+/-” button
In the setting condition, add or deduct time or temperature. Select it to work keep warm function during setting process at the intelligent timing mode.
2. Functions
- Intelligent dry heating protection
System automatically works the safety protection upon occurrence of dry heating to for safety of water heater. Meanwhile system will show E1 error code. If it exists, please contact local service agency.
- Intelligent over heating protection
System automatically works the safety protection upon occurrence of excess application temperature. The purpose is to protect safety of water heater. Meanwhile system will show E2 error code. Please contact local over heating sections.
- Intelligent self-check
System makes unintermitted check on the temperature sensor in the working situation. As temperature sensor is founded error, system automatically works the safety protection to protect safety of water heater. Meanwhile system will show E3 error code to give user hint. If it exists, please contact local after-sales sections.
- Intelligent power-off memory
As power off, system automatically records heating mode and settings prior to power off. When it is re-energized, system works on conditions same as that prior to power off automatically. Therefore it is no need for user to set parameters once more. However system cannot memorize local time. It is necessary for user to define local time in following order after system is re-energized. As system is re-energized, all marks on the screen are bright and system works local time setting automatically. First step is to set hour. Hour indication blinks then change hour figure with +/- button. Press +/- button once for short term thereafter add or deduct one hour. If press +/- button for long term, add or deduct hour figures automatically till the button is released. After user finishes defining hour figure, press down set button to confirm. Then set minute and minute indication blinks. Set minute in the manner same as mentioned. This operation is necessary otherwise default local time is 12:00.
- Intelligent anti-freezing safety
As water heater is energized and application temperature is lower than 5^ , system heats water automatically till temperature reaches to 15^ . The purpose is to prevent heater from freezing damage.
Children-lock
No matter heater is in Open or Close situation, press the mode button for long term to open children-lock. After setting, all actions are invalid except for releasing childrenlock. Re-press the mode button for long term for unlocking.
- Intelligent water-application timing
If user selects intelligent timing heating, system automatically calculates heating time so that user can apply favorably hot water at defined water-application time.
- Intelligent keep warm
As water heater works at intelligent timing mode and if user selects intelligent keep warm, system automatically heats water till temperature reaches to 50^ in that case water heater does not run and application temperature is lower than 45^ . The function can guarantee user favorably hot water and save electricity to the extreme extent.
3. Handling introduction
3.1 Preliminary power on / power recovery after failure
For preliminary plug in, system works at the preliminary plug in status and all marks on the screen are bright. Then start setting local time. Setting method refers to intelligent power-off memory function. As user finishes local time setting, system works at the waiting status. Screen only displays local time. After user presses down On/ Off button, system works at the preliminary power on status and default heating mode is instant mode. In addition default heating temperature is 70^ . Screen displays local time, setting and current temperature by turns. After it is re-energized, system works at the power recovery status. All marks on the screen are bright. Thereafter work local time setting. Setting method refers to intelligent power-failure memory function. As user finishes real time setting, system works at the waiting status. Screen only displays real time. As user presses down On/ Off button, system works at the power-recovery status and runs memorized mode and parameters. For example, mode for last power-off is timing and temperature is 60^ . In addition first water-application time is defined 10:00pm and second time is 7:00am. After power recovery, system still follows mentioned mode and parameters.
3.2 Shift of heating mode and relative parameters setting
Press down the mode button for short term just for mode shift. System follows the shift cycle, instant heating mode to night mode to economic mode to intelligent timing mode back to instant mode. And system gives user hint to set parameters special to each mode. User can implement setting as per hints.
3.2.1 Set parameters of instant heating mode
Press down mode button and change from intelligent timing mode to instant heating mode. Screen shows temperature setting for last time by blinking. Preliminary default temperature setting is 70^ . Blinking reminds user whether it is necessary to change heating temperature on this mode. If it is required, user can press down +/- button. Press +/- button once for short term thereafter add or deduct 1^ . If press +/- button for long term, add or deduct heating temperature automatically till the button is released. Temperature regulating range is 40 - 75^ . After user finishes temperature change, press down set button, or carry on no action within 10seconds, for confirming setting. If it is not necessary to change heating temperature, user does not act and system enters
into instant heating mode in 10seconds. If user needs to change temperature setting under instant heating mode, simply press down set button and enter into temperature change process. Change the temperature as mentioned.
3.2.2 Set parameters of night heating mode
Press down the mode button and change from instant heating mode to night heating mode. Screen shows temperature setting for last time by blinking. Preliminary default temperature setting is 70°C. Blinking reminds user whether it is necessary to change heating temperature on this mode. If it is required, user can change the temperature as per instant heating mode. Temperature regulating range is 40-75°C. After user finishes temperature change, press down set button, or carry on no action within 10seconds, for confirming setting. If it is not necessary to change heating temperature, user does not act and system enters into night heating mode in 10seconds. If user needs to change temperature setting at the night heating mode, simply press down set button and enter into temperature change process. Change the temperature as mentioned.
3.2.3 Economic heating mode
If user selects economic heating mode, it is not required to set any parameter. System heats water to 60C in the manner of instant heating and maintain the temperature.
3.2.4 Intelligent timing heating mode
Press down mode button and change from economic heating mode to intelligent timing heating mode. Screen shows time setting for last time by blinking. (Preliminary default value is 7:00.) Meanwhile timing indication "1" blinks, giving user hint to set first waterapplication time. Press down + / - button once for short term and water-application time increases/ reduces 0.5hour. Press down set button for confirmation when user finishes setting first water-application time. And system memorizes the setting thereafter enters into successive parameter, i.e. setting first application temperature. Screen shows application temperature for last time by blinking. (Preliminary default value is 70C.) Set application temperature as per immediate heating mode. Press down set button for confirmation when user finishes setting. And system memorizes the setting thereafter enters into successive parameter, i.e. setting second water-application time. Screen shows time setting for last time by blinking. (Preliminary default value is 21:00.) Meanwhile timing indication "2" blinks. Set time as mentioned. Press down set button for confirmation when user finishes setting second water-application time. And system memorizes the setting thereafter enters into successive parameter, i.e. setting second application temperature. (Preliminary default value is 70C.) Screen shows same as mentioned. And set temperature as before.
Press down set button for confirmation when user finishes setting second application temperature. And system selects intelligent keep warm. Screen shows selection for last time by blinking. (Default status is open.) Press down "+" button to open intelligent keep warm. Press down "-" button to close intelligent keep warm. After setting, press down set button and system memorizes setting. Then setting process exits.
Note: a. For any setting, if user does not act within 10seconds, system still maintains prior setting. Setting process exists. System enters into intelligent timing mode. b. There are two timing, user can cancel any one. Press down +/- button at the same time for 3seconds when to set certain water-application time. Then user can cancel corresponding timing. And it is not required to set relevant application temperature. Or user can set the same time for two water applications to cancel one timing.
4. Change local time
If user demands to change local time, press down set button for long term. System works to change of local time. Change the local time in the manner same as intelligent power-failure memory.
Cleaning
To clean the appliance, use hot water and liquid detergents that do not contain ammonia or alcoholic substances, so as not to damage the surfaces.
Warning: the use of powder detergents could cause the surfaces of the appliance to become scratched.
The data and characteristics indicated herein do not commit the Manufacturer, who reserves the right to make all alterations and modifications deemed necessary without having to give prior notice or to make replacements.
F
Installation horizontal:
Raccordement hydraulique
- Auto diagnostic intelligent
Characteristicas techniques
Horizontale Installation:

- Water heater description (figure 1)
- Technical characteristics
- General instructions
- Safety precautions
- Installation instructions
- Wall assembly
- Vertical installation:
- Horizontal installation:
- N.B. once the appliance has been installed, check the stability of the appliance by pulling it downwards.
- Plumbing connection
- Electrical connection
- Putting into operation and testing
- Maintenance instructions
- The replacement of any spare parts
- Periodical maintenance
- Bipolar safety device
- Safety valve
- Handy tips
- Instructions for use (user)
- Buttons
- Functions
- - Intelligent anti-freezing safety
- Children-lock
- - Intelligent water-application timing
- - Intelligent keep warm
- Handling introduction
- Preliminary power on / power recovery after failure
- Shift of heating mode and relative parameters setting
- Set parameters of instant heating mode
- Set parameters of night heating mode
- Economic heating mode
- Intelligent timing heating mode
- Change local time
- Cleaning
- F
- Installation horizontal:
- Raccordement hydraulique
- Characteristicas techniques
- Horizontale Installation:
Brand : Ariston Thermo
Model : TI Shape Plus
Category : Boiler