Voxtel D85 triple - Cordless phone AEG - Free user manual and instructions
Find the device manual for free Voxtel D85 triple AEG in PDF.

| Product type | DECT cordless telephone |
| Brand | AEG |
| Model | Voxtel D85 triple |
| Number of handsets included | 3 |
| Network compatibility | Public analog telephone network or PABX |
| Display | LCD screen with icons |
| Directory | Up to 50 names and numbers |
| Redial list | Last 10 dialed numbers |
| Call log | Last 20 received calls |
| Integrated answering machine | Yes, up to 59 messages (15 min recording) |
| Hands-free function | Yes |
| Intercom | Yes (internal calls between handsets) |
| Maximum number of handsets | Up to 5 handsets |
| Eco mode | Yes (Eco and Eco+) |
| Base power supply | Mains adapter 7.5 V DC, 300 mA |
| Handset batteries | 2 NiMH AAA 300 mAh batteries (rechargeable) |
| Standby time | Up to 200 hours |
| Talk time | Up to 10 hours |
| Battery charging time | 24 hours for first charge |
| Indoor range | Up to 50 meters |
| Outdoor range | Up to 300 meters |
| Frequency | DECT 1.88 - 1.9 GHz |
| Operating temperature | 0 °C to 40 °C |
| Warranty | 24 months |
| Care and cleaning | Clean with a soft, dry cloth. Do not use abrasive products. |
| Safety | Use only the supplied adapter. Do not open the handset or base. Avoid moisture. |
| Spare parts and repairability | Contact after-sales service via www.aegtelephones.eu |
| General information | Compliant with R&TTE Directive 1999/5/EC. Declaration of conformity available on the website. |
Frequently Asked Questions - Voxtel D85 triple AEG
User questions about Voxtel D85 triple AEG
0 question about this device. Answer the ones you know or ask your own.
Ask a new question about this device
Download the instructions for your Cordless phone in PDF format for free! Find your manual Voxtel D85 triple - AEG and take your electronic device back in hand. On this page are published all the documents necessary for the use of your device. Voxtel D85 triple by AEG.
USER MANUAL Voxtel D85 triple AEG
natural_image
Black AEG mobile phone with a digital display and keypad (no visible text or symbols on the device body)AEG
P2
P3
P4 P5

natural_image
Pure electrical circuit lines without any symbols1. BECAUSE WE CARE
Thank you for purchasing this product. This product has been designed and assembled with utmost care for you and the environment. This is why we supply this product with a quick installation guide to reduce the number of paper (pages) and therefore save trees to be cut for making this paper.
A full and detailed user guide with all the features described can be found on our website www.aegtelephones.eu. Please download the full user guide in case you want to make use of all the advanced features of your product. To save the environment we ask you not to print this full user guide. Thank you for supporting us to protect our environment.
2. GETTING STARTED
2.1 Location
Place the base within 1.5 metres of a mains power outlet easy to access so that in case of any problem you can disconnect the device from the power.
Make sure that it is at least 1 metre away from other electrical appliances to avoid interference. The phone works by sending radio signals between the handset and base. The strength of the signal depends on where the base is placed. Placing it as high as possible ensures the best signal.
2.2 Signal strength
The icon on the handset indicates that it is within range of the base. When out of range of the base, the icon flashes. When on a call, a warning beep will be heard.
IMPORTANT
The base station must be plugged into the mains power at all times. Use only the power adapter supplied with the product.
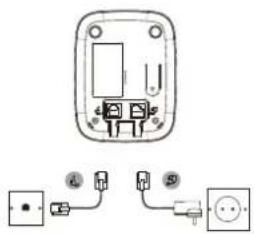
2.3 Connecting the base(see P5)
-
Plug the telephone line cord into the socket marked on the underside of the base. Plug the other end of the telephone line cord into the telephone wall socket.
-
Plug the power adapter connector into the socket marked 1 of the base and plug the other end into the mains power wall socket.
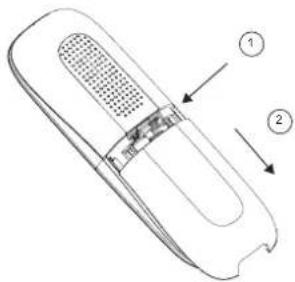
2.4 Installing and charging the handset(see P3)
- Remove the battery cover from the back of the handset and insert the 2 x AAA NiMH rechargeable batteries supplied. Please note the '+' and '-' markings inside the battery compartment and insert in the correct direction.
- Slide the battery cover back into place.
- When charging the batteries for the first time, place the handset on the base to charge for at least 24 hours continuously.
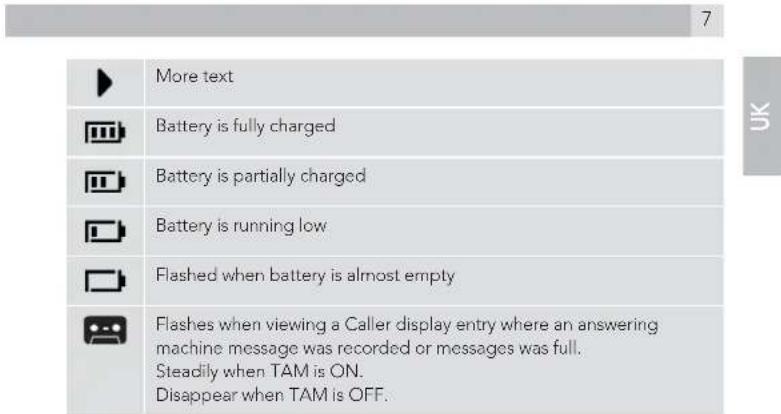
- When the handset is fully charged, icon will appear steadily on the display.
Note: Press and hold Menu to switch the idle screen between handset name and number and the time and handset number.
2.5 Set display language
To change the display language :
- Press ☐/OK and △/▼ to select "PERSONAL SET".
- Press ☐/OK and △/ to select "LANGUAGE".
- Press ☐/OK and △/▼ select the desired language.
- Press ☐/OK to confirm.
2.6 Date and time
When subscribed to Caller ID, the date and time is set automatically for all handsets when the first call is received. If there is no Caller ID, the date and time can be set manually.
Set the date and time manually
- Press ☐/OK, scroll ▼ to «CLOCK/ALARM» and press ☐/OK. The display shows «DATE & TIME».
- Press ☐/OK to select.
- Enter the date using the keypad (e.g. 12--08--14 for 12th of August 2014) and press ☐/OK to confirm.
- Enter the time using the keypad (e.g. 06--30 for 6.30) then scroll △/▽ to choose AM or PM and press ☐/OK to confirm.
3. GETTING TO KNOW THE PHONE
3.1 Overview of the handset(see P1)
| A Earpiece | ||
| B Display | ||
| C | △ | During a call, press to increase earpiece volume.When the phone is ringing, press to increase the handset ringer volume.Press to scroll through the menu options, redial list, call list and phonebook entries. |
| D | 目/OK ✘ | Menu key:Press to open the Menu.Press to select menu options and to confirm a displayed option.During a call, press to turn mute on/off. |
| E | Press to make and answer a call.Press to switch hands-free on or off during a call. | |
| F | *目 | Press and hold to lock or unlock the keypad. |
| G | R | To generate a FLASH signal used with PABX or some network services. |
| H | In standby mode, press to open the phonebook menu.In editing mode, press to delete characters and digits.Go back to the previous menu level. | |
| I | Press to end a call.When viewing the redial / call list / phonebook or when in the menu, press to exit and return to standby.Press and hold for 3 seconds to switch the handset on / off. | |
| J | During a call, press to decrease earpiece volume. | When the phone is ringing, press to decrease the handset ringer volume.Press to scroll through the menu options, redial list, call list and phonebook entries.In standby mode, press to open the call list. |
UK

6
| K | Press and hold to enter a pause (P) when pre-dialling or storing numbers. | |
| L | INT | Used to make internal calls and transfer calls to other handsets registered to the base. |
| M | Redial key |
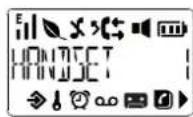
3.2 Handset LCD Display icons(see P2)
| Signal strenght icon | |
| Eco mode is ON | |
| Eco + is ON (zero emission) | |
| Handset ringer is off | |
| Indicates a missed call | |
| Steady on when making an outgoing callFlashes to indicate an incoming or internal call | |
| Indicates an incoming call when viewing the calls list | |
| Indicates an outgoing call when viewing the calls list | |
| Hands-free mode is ON | |
| Menu is open | |
| Keypad is locked | |
| Alarm is set | |
| Indicates new voicemail message(s) received | |
| Phonebook is opened |


3.3 Overview of the base(see P4)

| A | Paging key: Press to find misplaced handsets registered to the base. Long press to start registration of handsets to the base. |

3.4 Navigating the menus
The phone has an easy to use menu system. When the handset is switched on and in standby:
- Press ☐/OK to open the main menu.
- Then use △/buttons to scroll through the available options.
- Press ☐/OK to select an option. To return to the previous menu level, press ⬆ To exit the menu and return to standby, press ⏻.
Note: If no buttons are pressed for 30 seconds, the handset returns to standby automatically.
8
4. USING THE PHONE
4.1 Switch the handset on/off
Press and hold to switch the handset on or off.
4.2 Calls
4.2.1 Make a call
- Press
- When there is a the dial tone, dial the number.
Note: The handset will automatically time the duration of all external calls. The call timer will display after 10 seconds. When the call ends, the total duration of the talk time flashes for 3 seconds.
4.2.2 Preparatory dialling
- Dial the number first. If a mistake is made press ↩ to delete the last digit.
- Press (to dial.
4.2.3 End a call
Press or place the handset on the base or charger.
4.2.4 Receive a call
When an external call is received, the phone rings and icon flashes on the display.
- Press (a) to answer the call or lift the handset from the base or charger to answer the call.
Note: To answer calls by pressing (even when the handset is lifted, switch Auto answer off.
4.3 Adjust the earpiece volume
During a call, press A to increase or decrease the volume.
4.4 Redial
The last 10 dialled numbers are stored in the redial list.
View or dial an entry
- Press Ⓐ to open the Redial list.
- Scroll △/▽ to the required entry.
- Press ( ≤slant to dial the displayed entry or press to return to standby.
Note: If you have Caller ID and the caller's number exactly matches an entry stored in the phonebook, the name is displayed.
4.5 Lock/unlock the keypad
The keypad can be locked so that it cannot be operated accidentally while carrying it around.
Note: When the keypad is locked an incoming call can still be answered and the handset will operate as normal. When the call ends, the keypad lock comes on again.
-
Press and hold *. KEYS LOCKED and icon is displayed.
-
Press and hold again to unlock the keypad.
4.6 Mute
The handset can be muted so that a conversation can be held without the caller hearing.
- During a call, press ✗. The display shows « MUTE ON » and the caller cannot hear. Press ✗ again to resume the call.
4.7 Intercom
4.7.1 Make an internal call
If more than one handset is registered to the base, internal calls can be made between two handsets.
-
If only 2 handsets are registered to the base, press INT and the other handset rings automatically.
-
If more than 2 handset are registered to the base press INT and scroll ▼ the handset number and press ▼ to call this handset.
4.7.2 Receive an internal call
When an internal call is received, icon flashes and the handset number that is calling is displayed. Press C to answer the call.
4.7.3 Transfer a call
To transfer an external call to another handset registered to the base.
During an external call:
-
If only 2 handsets are registered to the base, press INT and the other handset rings automatically.
-
If more than 2 handset are registered to the base press INT and scroll ▼ the handset that is to be called and press C.
-
When the other handset answers, press Ⓞ to complete the transfer.
Note: If there is no answer from the other handset press into return to the external caller. The external call resumes automatically after 60 seconds if there is no answer.
10
4.8 Hands-free
To talk to the caller without holding the handset and for other people in the room to listen to the conversation over the loudspeaker simply use the hands-free function.
4.8.1 Make a hands-free call
-
Press twice, then dial the number. icon is displayed and the call can be heard over the handset loudspeaker.
-
Press C to switch the call between the earpiece and the loudspeaker.
Note: During a hands-free call, press A to adjust the volume.
4.9 Paging/Find handset
Page can be used to locate a missing handset.
-
Press ● on the underside of the base. All handsets registered to the base will ring.
-
To stop the ringing, press • on the base again or press any button on the handset.
5. PHONEBOOK
The phonebook can store up to 50 names and numbers. Names can be up to 12 characters long and numbers up to 24 digits.
5.1 Store a name and number
When subscribed to Caller ID, to display the name of the caller instead of the number, save the full telephone number including the area code to the phonebook. To prevent unnecessary duplicated entries, the same name can be stored only once.
- Press ☐/OK. The display shows «PHONEBOOK».
- Press ☐ /OK scroll ▼ to «ADD NEW».
- Press ☐/OK the display shows «ENTER NAME».
- Enter the name and press ☐/OK. The display shows «ENTER NUMBER»
- Enter the number and press ☐/OK the entry is saved.
- Press ① to return to standby.
5.1.1 Entering names
Use the keypad letters to enter names, e.g. to store TOM:
Press 8 once to enter T.
Press 6 three times to enter O.
Press 6 once to enter M.
5.1.2 Writing tips
Press ↗ to delete the last character or digit. Press ↗ to move between characters/digits. Press 1 to insert a space.
5.2 View or dial an entry
-
Press to open phonebook.
-
Scroll △ to the required entry. OR Enter the first letter of the name to search alphabetically. The first name that starts with this letter or the nearest letter in the alphabet will be displayed.
Scroll / to the required entry.
- Press (to dial or to return to standby.
Note: When the name is displayed, to switch between the name and number press OK.
5.3 Edit a name and number
- Press ☐/OK. The display shows «PHONEBOOK».
- Press ☐ /OK, scroll ▼ to «EDIT» and press ☐ /OK.
- Scroll △/▼ to the entry that needs to be edited or search alphabetically and press 📄/OK. The existing name is displayed.
- Press ↩ to delete the name if required, then enter the new name and press ☐ /OK. The existing number is displayed.
- Press ☐ to delete the number if required, then enter the new number and press ☐/OK the entry is saved.
- Press Ⓤ) to return to standby.
5.4 Delete an entry
- Press ☐/OK. The display shows «PHONEBOOK».
- Press ☐/OK, scroll ▼ to «DELETE» and press ☐/OK
- Scroll △/▽ to the entry that you want to delete or search alphabetically and press ☐/OK. The display shows «CONFIRM?».
- Press ☐/OK to confirm or ↗ to cancel.
12
6. CALLER ID AND CALLS LIST
IMPORTANT
To use Caller ID, first subscribe to the service from the telephone provider. A subscription fee may be payable. To ensure that the caller's name is displayed, make sure the full telephone number, including the area code is stored in the phonebook.
If the caller's number is stored in the phonebook, the name assigned to it will be displayed.
If the number is unavailable, «UNKNOWN» will be displayed.
If the call is from an international number, «INTERNATION.» will be displayed.
6.1 Caller Display
If subscribed to Caller ID, the caller's number will be displayed (provided it is not withheld) prior to answering the call. The display can show the first 12 digits or characters of the phone numbers and name.
If the caller's name and number are stored in the phonebook and a number match is found, the caller's name will be displayed instead.
6.2 Call list
The Call list stores details of the last 20 received calls, including the phone number and date and time of the call.
The Call list also displays if there are unanswered calls.
The caller's details are stored in the Call list whether or not the call has been answered. When the list is full and a new call is received, the oldest entry will be deleted automatically.
6.2.1 View the Call list
-
Press ▼ to open the Call list. If there are no calls in the list, the display shows «LIST EMPTY».
-
Scroll △/▼ the required entry.
-
Press ☐ /OK the display show «VIEW», press ☐ /OK.
-
The display shows the date and time of the call.
6.2.2 Dial a number in the Call list
-
Press ▼ to open the Call list.
-
Scroll △/▼ to the required entry.
-
Press (to dial the displayed entry.
6.2.3 Delete an entry
-
Press ▼ to open the Call list.
-
Scroll ▲ to the required entry.
-
Press ☐ /OK scroll ▼ to «DELETE».
-
Press ☐/OK the display shows «CONFIRM?».
-
Press ☐ /OK to confirm or ↗ to cancel.


7. PERSONAL SET
7.1 Handset tones
7.1.1 Handset ringer volume
The handset ring volume can be set to different volume level. Choose from 5 volume levels or Off.
- Press ☐ /OK, scroll ▼ to « PERSONAL SET » and press ☐ /OK.
- Press △/to select « HANDSET TONE » and press 📄/OK.
- The display shows « RING VOLUME », press 📄/OK.
- Press △/▼ to select the volume (1 - 5 or « OFF »).
- Press ☐ /OK to confirm or ↗ to return to the previous menu.
Note: When the phone is ringing, adjust the ringer volume by pressing △/▽
7.1.2 Handset ringer melody
Different ringer melodies can be set. Choose from 5 different ringer melodies.
- Press ☐/OK, scroll ▼ to «PERSONAL SET» and press ☐/OK.
- Press △/▼ to select «HANDSET TONE» and press 📄/OK.
- Press △/▼ to select «RING MELODY» and press □/OK.
- Press △/▼ to select the ringer melody (1 - 5).
- Press ☐/OK to confirm or ↗ to return to the previous menu.
7.1.3 Key tones
- Press ☐/OK, scroll ▼ to «PERSONAL SET» and press ☐/OK.
- Press △/to select «HANDSET TONE» and press ☐/OK.
- Press △ / to select «KEY TONE» and press 📄/OK.
- Press △/ to select ON or OFF.
- Press ☐ /OK to confirm or ↗ to return to the previous menu.
7.2 Auto answer
The phone is set to answer calls by lifting the handset off the base or charger. This feature can be switched off so that calls can only be answered by pressing (
- Press ☐/OK, scroll ▼ to «PERSONAL SET» and press ☐/OK.
- Scroll ▼ to «AUTO ANSWER» and press ☐ /OK.
- Press △ / to select «ON» or «OFF».
- Press ☐/OK to confirm or ↗ to return to the previous menu.
14
8. BASE SETTINGS
8.1 Eco mode
By operating the phone in Eco mode the power emissions level can be reduced.
When the Eco mode is set to ON, the base transmission power will be reduced.
This feature is set to OFF by default.
-
Press ☐/OK, scroll ▼ to «ADVANCED SET» and press ☐/OK.
-
The display shows «ECO MODE», press ☐/OK.
-
Press △/▼ to select «ON» or «OFF».
-
Press ☐/OK to confirm or ↗ to return to the previous menu.
Note: When ECO mode is set to ON, the handset range will be reduced.
8.2 Zero Emission (Eco +)
When Zero emission is activated and the unit has been idle for 1 minute the transmitted power between the handset and the base will stop. An incoming call or pressing any key on handset will activate the unit and it will revert back to the normal mode. This feature is set to OFF by default.
- Press ☐/OK, scroll ▼ to «ADVANCED SET» and press ☐/OK.
- Scroll ▼ to «ZERO EMIT», press 📄/OK.
- Press A to select «ON» or «OFF»
- Press ☐/OK to confirm or ↗ to return to the previous menu.
8.3 Restore default settings
The phone can be restored to its default (original) settings. All the handsets that are registered to the base will be retained and not deleted.
IMPORTANT
Resetting the phone to its default settings will delete all entries in the Call list. Current handset and base settings will also be reset. Entries stored in the phonebook are retained.
- Press ☐/OK, scroll ▼ to «ADVANCED SET» and press ☐/OK.
- Scroll ▼ to «RESET» and press ☐/OK.
- The display shows «RESET?».
- Press ☐ /OK to confirm or ↗ to return to the previous menu. The phone will restart automatically.
8.4 Answering machine
Your phone includes a telephone answering machine that records unanswered calls when it is on, and it can store up to 59 messages, including memos that you can record for other users of the phone, within the maximum recording time of approximately 12 minutes.
If the answering machine memory is full, the Handset will display MEMORY FULL alternately with the handsets name or time, depending on the handset standby. You will have to delete some messages before any new ones can be recorded. The answering machine is controlled and set up using the handset menu functions, as below.
8.4.1 Turn On/Off the Answering Machine
You can turn the answering machine on or off using the handset, and when it is set to ON and in ANS & REC mode (see 8.4.5), calls will be answered after the set answer delay and the caller can then leave you a message.
When the answering machine is set to OFF, calls will be answered after 10 rings and the answer only message will be played to your callers. They will not be able to leave you a message.
- Press ☐/OK and △to select «ANS. MACHINE».
- Press ☐ /OK and △ to select «RECORD ALSO/OFF».
- Press ☐/OK and △ to select «RECORD ALSO/OFF».
- Press ☐/OK to confirm.
If the answering machine is set to ON, the
8.4.2 Listen to the Messages in the Answering Machine
When new messages are recorded on the answering machine, the
-
Press ☐/OK and △ to select «ANS. MACHINE».
-
Press ☐/OK to show «PLAY».
-
Press ☐/OK to start message playback through the handset loudspeaker and the screen displays the date and time of when the message was received.
Note: If there are no messages, the handset display will briefly show NO MESSAGE then return to PLAY.
-
During message playback, press / to increase or decrease the playback volume, or press C to listen through the earpiece.
-
Press ☐/OK and △ for the following options during playback.
STOP: Stop the current message playback to Press ↩ and return to the ANS. MACHINE menu.
REPEAT: Repeat to play the current message.
NEXT: Skip to play the next message.
PREVIOUS: Repeat playing the current message from the beginning.
DELETE: Delete the current message and the next message will be played.
Note: Alternatively, you can use the following shortcut keys for the options during playback.
Press
Press
8.4.3 Delete All Messages in the Answering Machine
-
Press ☐/OK and ▲ to select «ANS. MACHINE».
-
Press ☐/OK and ▲ to select «DELETE ALL».
-
Press ☐/OK to display «CONFIRM?».
-
Press ☐/OK to delete all old messages.
Note: Any new messages will not be deleted, but NO MESSAGE will display before returning to the ANS. MACHINE menu.
8.4.4 OGM SETTING
You can record your own OGM for ANS & REC mode or ANSWER ONLY mode. When you record your own OGM, it will be used when the answering machine answers the call. If your personal OGM is deleted, the pre-set OGM will be restored automatically.
- Press ☐/OK and △ to select «ANS. MACHINE».
- Press ☐/OK and ▲ to select «OGM SETTINGS».
- Press ☐/OK and △/▽ to select «RECORD ALSO» or ANSWER ONLY».
- Press ☐/OK to show «PLAY».
-
Press ☐ /OK to play your current OGM and «PLAY» is displayed.
-
Press △/▼ to select «RECORD».
-
Press ☐/OK to start recording your personal «OGM» after the beep and when «RECORDING» is displayed on the screen.
-
Press ☐/OK to stop recording. The new OGM will play back automatically for you to check. Press ☐/OK or leave the OGM to finish playing, to save the message Alternatively, press ↩ to return to the previous screen without saving the personal OGM.
Note: If a personal OGM has not been recorded, the pre-set OGM will be played.
8.4.5 Set the Answer Mode
By default, the answer machine is set in «RECORD ALSO & ANSWER ONLY» mode which allows callers to leave a message. This mode can be changed to «ANSWER ONLY» which does not allow callers to leave a message. In that case, your callers will be prompted to call back later.
- Press ☐/OK and △ to select «ANS. MACHINE».
- Press ☐/OK to show «ANSWER MODE».
-
Press ☐/OK and △/▽ to select «RECORD ALSO» & «ANSWER ONLY» or «OFF».
-
Press ☐/OK to confirm.
When your answering machine memory is full and the answer mode is in «RECORD ALSO & ANSWER ONLY», the answer mode will change to «ANSWER ONLY» automatically. It will return to «RECORD ALSO & ANSWER ONLY» mode automatically after some messages have been deleted.
9. GENERAL INFORMATION
IMPORTANT
This equipment is not designed to make emergency telephone call when the power fails. Alternative arrangements should be made for access to emergency services. This product is intended for connection to analogue public telephone networks or a private switchboard. (pabx)
Safety and Electromagnetic information
- Use only the power supply supplied with this product. Using an unauthorised power supply will invalidate the guarantee and may damage the telephone.
• Use only the approved rechargeable batteries supplied. - Do not open the handset (except to replace the handset batteries) or the base. This could cause exposure to high voltages or other risks.
- Radio signal transmitted between the handset and base may cause interference to hearing aids.
- The product may interfere with other electrical equipment, e.g. TV and radio sets, clock/alarms and computers if placed them too close. It is recommended that the product is placed at least one metre away from such appliances to minimize any risk of interference.
- All batteries can cause property damage and/or bodily injury such as burns if a conductive material such as jewellery, keys, or beaded chains touch the exposed terminals. The conductive material may complete an electrical circuit (short circuit) and become quite hot. Exercise care in handling any charged battery, particularly when placing it inside a pocket, purse, or other container with metal objects.
- Never dispose of batteries in a fire. There is a serious risk of explosion and/or the release of highly toxic chemicals.
Environmental
• Do not expose to direct sunlight.
- The handset may become warm when the batteries are being charged or during prolonged periods of use. This is normal. However, we recommend that to avoid damage, do not place the product on antique/veneered wood.
- Do not place the product on carpets or other surfaces which generate fibres, or place it in locations preventing the free flow of air over its surfaces.
- Do not submerge any part of the product in water and do not use it in damp or humid conditions, such as bathrooms.
- Do not expose the product to fire, explosives or other hazardous conditions.
- There is a slight chance that the phone could be damaged by an electrical storm. We recommend that it is unplugged from the power and telephone line cord during an electrical storm.


10. GUARANTEE AND SERVICE
The phone is guaranteed for 24 months from the date of purchase shown on your sales receipt. This guarantee does not cover any faults or defects caused by accidents, misuse, fair wear and tear, neglect, faults on the telephone line, lightning, tampering with the equipment, or any attempt at adjustment or repair other than through approved agents.
Please keep your sales (till) receipt this is your proof of guarantee.
10.1 While the unit is under Guarantee
- Disconnect the base unit from the telephone line and the mains electricity supply.
• Pack up all parts of your phone system, using the original package. - Return the unit to the shop where you bought it, making sure you take your sales receipt.
• Remember to include the power adapter.
10.2 After the Guarantee has expired
If the unit is no longer under Guarantee, contact us via www.aegtelephones.eu
This product works with rechargeable batteries only. If you put nonrechargeable batteries in the handset and place it on the base, the handset will be damaged and this in NOT covered under the warranty conditions.
20
- TECHNICAL DETAILS
| Standard DECT | |
| 1.88 to 1.9 GHz (bandwidth = 20 MHz) | |
| Channel bandwidth | 1.728 MHz |
| Operating range | Up to 300m outdoors; Up to 50m indoors |
| Operating time Standby: 200 hours, Talking: 10 hoursBattery charge time:24 hours | |
| Temperature range | Operating 0°C to 40°C,Storage -20°C to 60°C |
| Electrical power | Base/Charger :MN-A002-A080input 100-240VAC 50/60Hz 200mA,output 7.5VDC 300mABattery InformationSANIK-SN-AAA30H, Type Ni-MH(Rechargeable battery)Voltage Rating 300mAh, 2 X 1.2V AAA SizeKAIFENG-KF-HAAAJ300, Type Ni-MH(Rechargeable battery)Voltage Rating 300mAh, 2 X 1.2V AAA Size |
12. CE DECLARATION

This product is in compliance with the essential requirements and other relevant provisions of the R&TTE directive 1999/5/EC.
The Declaration of conformity can be found on: www.aegtelephones.eu
5
13. DISPOSAL OF THE DEVICE (ENVIRONMENT)

At the end of the product lifecycle, you should not throw this product into the normal household garbage but bring the product to a collection point for the recycling of electrical and electronic equipment. The symbol on the product, user guide and/or box indicate this. Some of the product materials can be re-used if you bring them to a recycling point. By reusing some parts or raw materials from used products you make an important contribution to the protection of the environment. Please contact your local authorities in case you need more information on the collection points in your area.
Batteries must be removed before disposing of the device. Dispose of the batteries in an environmental manner according to your country regulations.

22
Opmerking: Alternatively, you can use the following shortcut keys for the options during playback.
© 2014 Binatone Electronics International Limited
All rights reserved
Subject to availability. Rights of modification reserved.
AEG is a registered trademark used under license from AB Electrolux (publ)
www.aegtelephones.eu