
PCM20A - Receiver Pyle - Free user manual and instructions
Find the device manual for free PCM20A Pyle in PDF.

| Product Type | Stereo Power Amplifier 25 V/70 V |
| Brand | Pyle |
| Model | PCM20A |
| Max Output Power | 40 Watts |
| Frequency Response | 50 Hz - 15 kHz |
| Total Harmonic Distortion (THD) | < 1% |
| Power Supply | Selectable 120 V / 240 V, 50/60 Hz |
| Fuse | 110-120 V: T1.2AL 250 V; 220-240 V: T0.63AL 250 V |
| Microphone Inputs | 2 x 1/4" (6.35 mm) Jack for low impedance mic |
| Auxiliary Input | 1/4" (6.35 mm) Jack for high impedance source |
| Speaker Outputs | COM / 8 Ω / 25 V / 70 V terminals |
| Maximum Number of Speakers | Up to 4 |
| Bluetooth | Version 4.0, network name: PYLEUSA, range up to 9 meters |
| Media Player | USB (charge only), SD/MMC, FM, Bluetooth |
| Talkover Function | Automatic -40 dB attenuation on AUX when microphone 1 is active |
| Tone Controls | Bass and treble: +/- 10 dB at 100 Hz / 10 kHz |
| Display | Blue LED for playback information |
| Remote Control | Included, requires CR-2025 button battery (included) |
| Dimensions (W x D x H) | 15 x 20 x 8.1 cm |
| Weight | Not specified |
| Housing Material | Iron |
| Maintenance | Wipe with a damp cloth; do not use harsh chemicals |
| Safety | Do not expose to water or moisture; unplug if not in use for a long period |
| Warranty | Product registration required to benefit from warranty |
Frequently Asked Questions - PCM20A Pyle
User questions about PCM20A Pyle
0 question about this device. Answer the ones you know or ask your own.
Ask a new question about this device
Download the instructions for your Receiver in PDF format for free! Find your manual PCM20A - Pyle and take your electronic device back in hand. On this page are published all the documents necessary for the use of your device. PCM20A by Pyle.
USER MANUAL PCM20A Pyle
Microphone Audio/Speaker Control Amp, 1/4" Mic Inputs, 40 Watt
USERGUIDE
About PyleUSA
Pyle, founded in the 1960s, has evolved into a renowned manufacturer of high-quality advanced woofers. Our journey started with the iconic Pyle Driver, becoming a household name in original speakers. In the late 20th century, we expanded into replacement speakers, car audio, home audio, marine audio, and professional audio & musical instruments with our Pyle Pro line.
Pyle Car:
Transform your car into a perfect listening environment with our competitively priced speakers, amplifiers, and head units. Upgrade from factory speakers to enhance your music experience. Explore accessories like navigation systems, DVD players, iPod interfaces, and safety-focused cameras.
Pyle Home:
Discover a range of home entertainment products, including projectors, TVs, mounts, stands, and HD technology. Pyle Home offers bass-expanding mini speakers, headphones, vintage turntables, power amplifiers, horn speakers, and more for an enriched media experience at home and on the go.
Pyle Pro:
As the leading source of audio equipment worldwide, Pyle Pro caters to musicians, studio engineers, and amateurs. Our PA Systems, featuring wireless microphones, rechargeable batteries, and iPod/iPhone docks, are ideal for various events. Explore our emerging guitar line, effects pedals, and USB-to-analog converters without compromising on quality.
IMPORTANT SAFETY INSTRUCTIONS
- Read Instructions - All the safety and operating instructions should be read before operating the appliance.
- Retain Instructions - The safety and operating instructions should be retained for future reference.
- HeadWarnings - All warnings on the appliance and in the operating instructions should be adhered to.
- Follow Instructions
- Water and Moistant - The appliance should not be used near water for example, near a bathtub, washbowl, kitchen sink, laundry tub, swimming pool, or a wet basement.
- Ventilation - The appliance should be situated so that its location or position does not interfere with its proper ventilation. For example, the appliance should not be situated on a bed, sofa, rug, or similar surface that may block the ventilation openings or placed in a built-in installation, such as a bookcase or cabinet that may impede the flow of air through the ventilation openings.
- Heat - The appliance should be situated away from heat sources such as radiators, heat registers, stoves, or other appliances including amplifiers that produce heat.
- Power Sources - The unit should be connected to a power supply only of the type described in the operating instructions or as marked on the appliance.
- Grounding or Polarization - Precaution should be taken to insure that the grounding or polarization means of an appliance is not defeated.
- Power-Cord Protection - Power supply cords should be routed so that they are not likely to be walked on or pinched by items placed upon or against them, paying particular attention to cords at plugs, convenience receptacles, and the point at which they exit from the appliance.
- Cleaning - The appliance should be cleaned only as recommended by the manufacturer.
- Power Lines - An outside antenna system should not be located in the vicinity of overhead power lines or other electric light or power circuits or where it can fail into such power lines or circuits. When installing an outside antenna system, extreme care should be taken to keep from touching such power lines or circuits as contact with them might be fatal.
-
Non-Use Periods - The power cord of the appliance should be unplugged from the outlet when the appliance is to be left unused for a long period of time.
-
Object and Uiquid Entry - Care should be taken so that objects do not fall and liquids are not spilled into the enclosure through openings.
-
Carts and Stands - If the appliance is used with a cart or stand, the cart or stand should be a type recommended by the manufacturer. An appliance and cart combination should be moved with care. Quick stops, excessive force, and uneven surface the appliance and cart combination to overturn.

-
Mounting - The appliance should be mounted only as recommended by the manufacturer.
-
Damage Requiring Service - The appliance should be serviced by qualified service personnel when:
A. The power-supply cord or plug has been damaged.
B. Objects have failen into, or liquid has been spilled into the appliance enclosure.
C. The appliance has been exposed to rain.
D. The appliance has been dropped, or the enclosure has been damaged.
E. The appliance does not appear to operate normally or exhibits a marked change in performance.
-
Servicing - The user should not attempt to service the appliance beyond that described in the user's operating instructions. All other servicing should be referred to qualified personnel.
-
Overloading - Do not overload wall outlets and extension cords as this can result in a risk of fire or electric shock.
-
Replacement Parts - When replacement parts are required, be sure the service technician has used replacement parts specified by the manufacturer or have the same characteristics as the original part. Unauthorized substitutions may result in fire, electric shock or other hazards.
-
Safety Check - Upon completion of any service or repairs to this appliance, ask the service technician to perform safety checks to determine that the appliance is in proper operating condition.
| WARNING: To reduce the risk of fire or shock hazard, do not expose this product to rain or moisture. | This symbol is intended to alert you to the - 6 presence of un-insulated dangerous voltage within the product's enclosure that might be of sufficient magnitude to constitute a risk of electric shock. Do not open the product's case. |
| CAUTION: To reduce the risk of electric shock, do not remove cover or back. No user-serviceable parts inside. Refer servicing to qualified personnel. | This symbol is intended to inform you that important operating and maintenance instructions are included in the literature accompanying this product. |
Your new PCM20A Stereo Power Amplifier
gives you the power and versatility that you need in a professional sound system. The wide frequency response is perfect for the amplification of vocals and music. The talkover function for the Mic 1 and Aux Input located on the front panel make it perfect meeting halls, auditoriums, sports events, schools and office paging systems. Great for anywhere you need to deliver a special announcement with excellent sound quality.
FEATURES AND CONTROLS
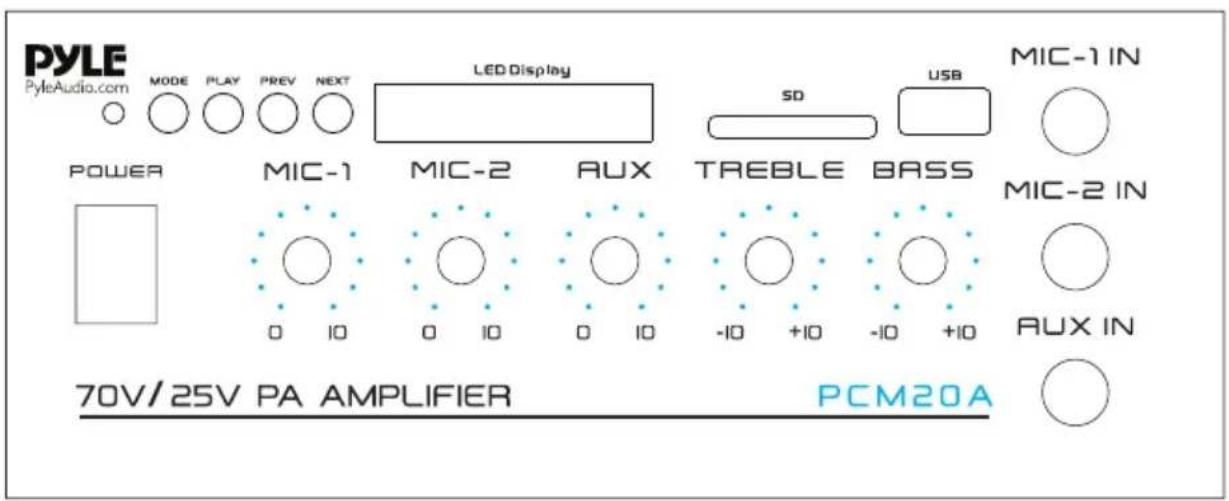
FRONT PANEL
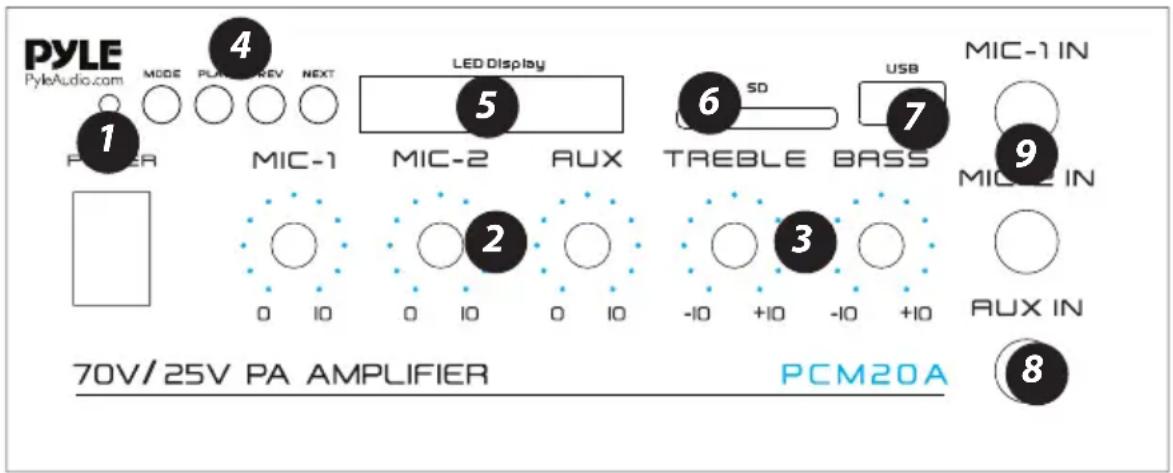
- Power ON/OFF and Indicator: Main power switch, the indicator lights when the amplifier is turned ON
- MIC 1 and MIC 2/AUX Volume Controls: Adjust the output signal level of the corresponding inputs.
- BASS and TREBLE Tone Controls: Adjust the bass and treble of the corresponding output signals.
-
MODE, PLAY, PREV and NEXT Function Control buttons:
-
MODE Button: For audio selection like WIRELESS BT/SD/LINE IN
- PLAY/PAUSE BUTTON: Play and Pause control button
-
PREV/NEXT: Quick backward or next song
-
LED Display
- SD/MMC Socket for playing SD/MMC cards
- USB Charge Port: USB port for smartphone charging only, no USB reader function
-
AUX Input: To connect the high impedance audio source such as Tape Deck, CD player, or Tuner with 1/4'' plug via audio plug adapter (two phono RCA plugs into 1/4'' mono jack).
-
MIC1 and MIC2 Inputs: To connect the low impedance microphone with 1/4'' plug. The MIC 1 is a "Priority" source, the signals from AUX will be attenuated automatically by -40dB , the signal from MIC 1 will override to page (auto talkover). it is good for paging system.
BACK PANEL
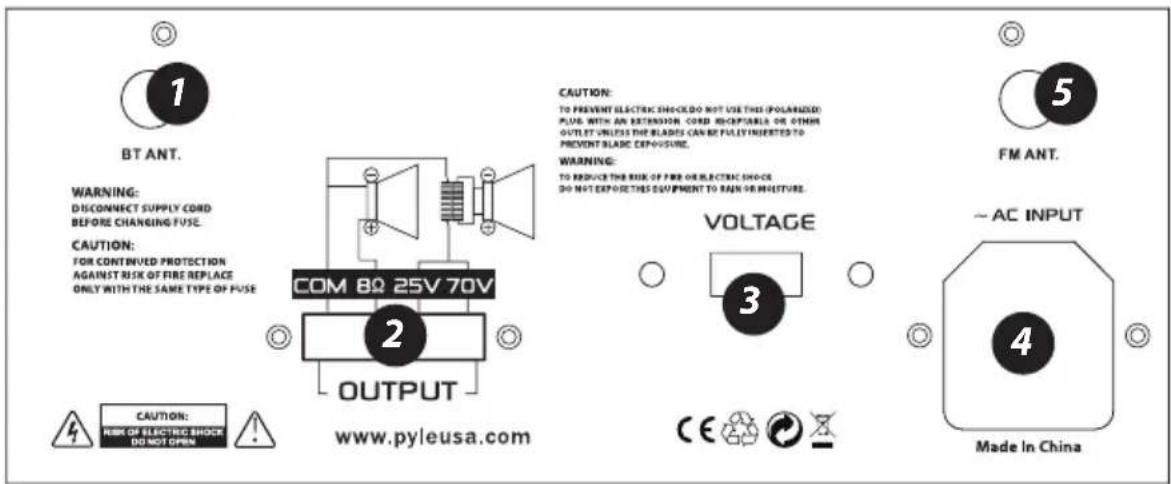
-
Wireless BT Antenna: Wireless BT Streaming receiver
-
Speaker Connection: One or more speakers (4,8 or 16 Ohms) can be connected to the amplifier with or without transformers. However, before you connect any speakers to the amplifier, the total impedance must be calculated in order to avoid damage to the amplifier. A total speaker impedance greater than 8 Ohms or less than 8 Ohms can cause this damage to occur.
-
Voltage Switch: This PA amplifier has selectable input voltage from 110V/60Hz (the standard in USA and CANADA) to 220V/50Hz (for EUROPEAN operation). Please make sure the switch is in the proper position before operating, otherwise severe damage will be incurred and not covered by warranty.
-
AC Input: Plug the included power cord into the unit while the power is switched off, then plug the AC power cord into a porper power outlet. Please also replace the fuse only with proper rating if needed (see the fuse rating of T 1.2AL 250V for 110-120V and T0.63AL 250V for 220V/240V printed at power inlet)
-
FM ANTENNA CONNECTOR: Connect for FM antenna
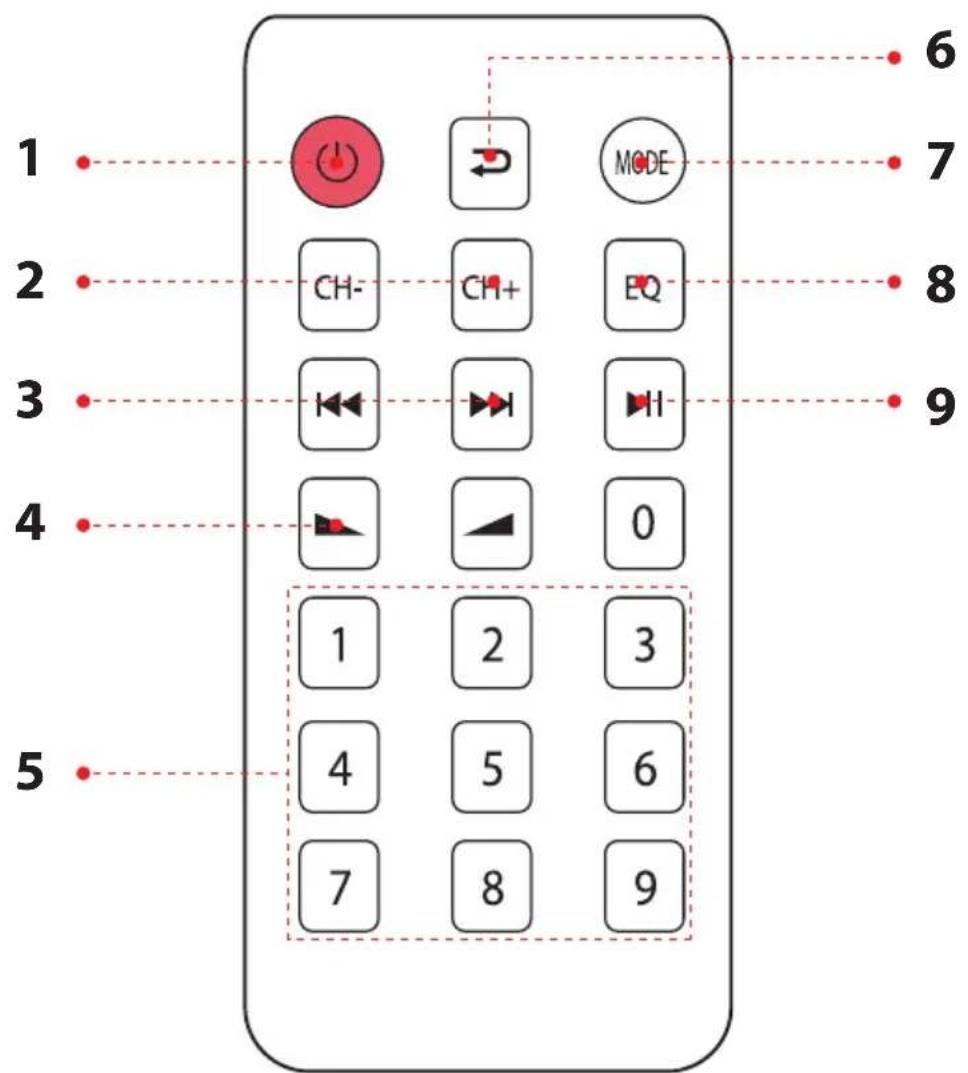
REMOTE CONTROL
- Press this button to turn ON or OFF the MP3
- When in the FM mode, press this two buttons to select previous or next channel.
- Press these two buttons to select the previous or next track in USB or SD or Wireless BT mode
- Volume up or down
- Press the numbers to select the tracks directly. The unit takes 1-2 seconds to response in USB or SD mode.
- Press this button to repeat mode.
- Press this button to select the playing mode, such as USB/SD/FM/WIRELESS BT
- EQ function: Select a pre-set mode of the equalizer that is designed accordingly.
- Play and Pause function for MP3
SPEAKER CONNECTION
One or more speakers (4, 8 or 16 Ohms) can be connected to the amplifier with or without transformers. However, before you connect any speakers to the amplifier, the total impedance must be calculated in order to avoid damage to the amplifier. A total speaker impedance greater than 8 Ohms or less than 8 Ohms can cause this damage to occur.
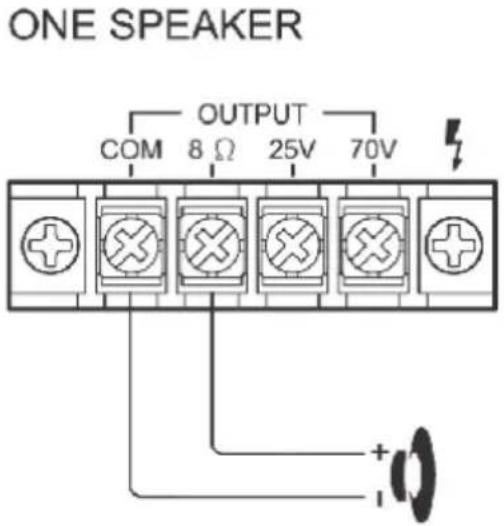
SYSTEM 1: Single Speaker System
NOTE: Connect the speaker (+) to the amplifier's 8-Ohm terminal.
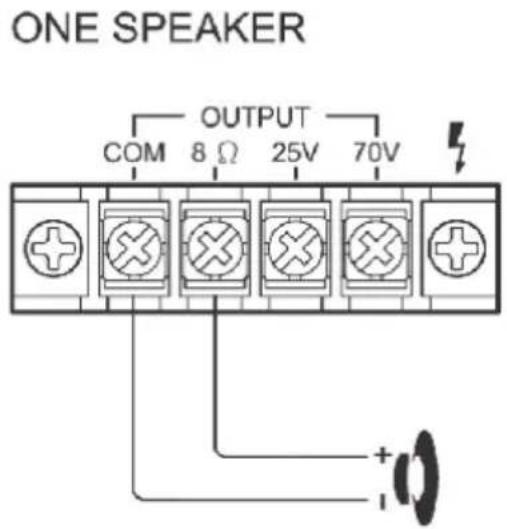
(8Ω SPEAKER)
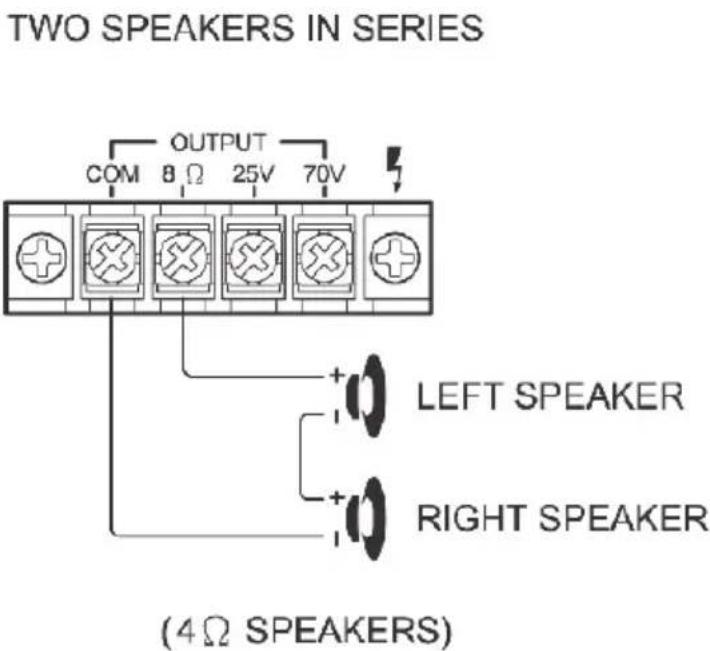
SYSTEM 2 : Two (or more) Speakers in Series
NOTE: Connect the speaker (+) to the amplifier's 8-Ohm terminal, depending on the TOTAL IMPEDANCE of the two speakers. If each speaker has an impedance of 4-Ohm, the total speaker impedance in this series configuration is 8 ohms.

SYSTEM 3 : Two (or more) Speakers in Parallel
NOTE: Connect the speaker (+) to the amplifier's 8-Ohm terminal, depending on the TOTAL IMPEDANCE of the two speakers. If each speaker has an impedance of 16-Ohm, the total speaker impedance in this series configuration is 8 ohms.
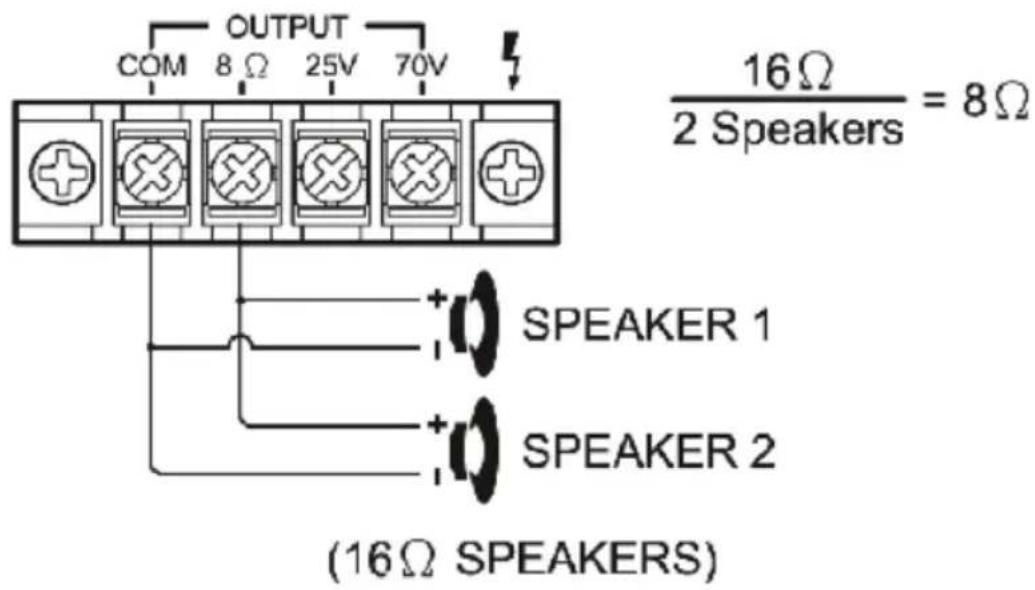
TWO SPEAKERS IN PARALLEL
SYSTEM 4: Four Speakers in Series and Parallel
NOTE: Although the description above is for connecting two series pairs of 8 Ohms speakers in a parallel hook up, you may also select to combine a series pair and a parallel pair in a parallel hook up, simply be sure you have calculated the total impedance, and attach the speaker (+) circuit wire to the proper amp terminal.
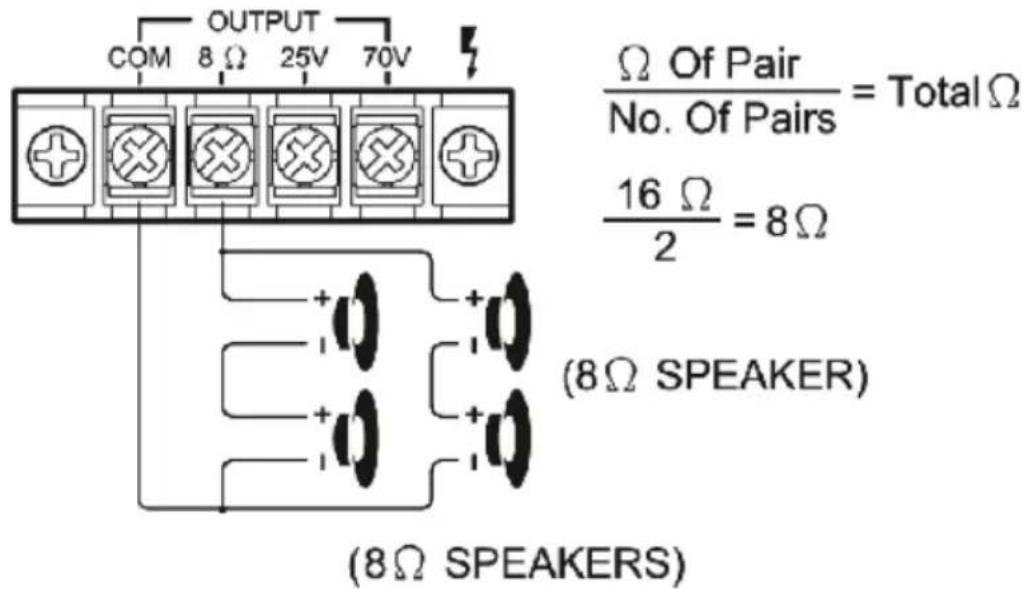
FOUR SPEAKERS IN SERIES / PARALLEL COMBINATION
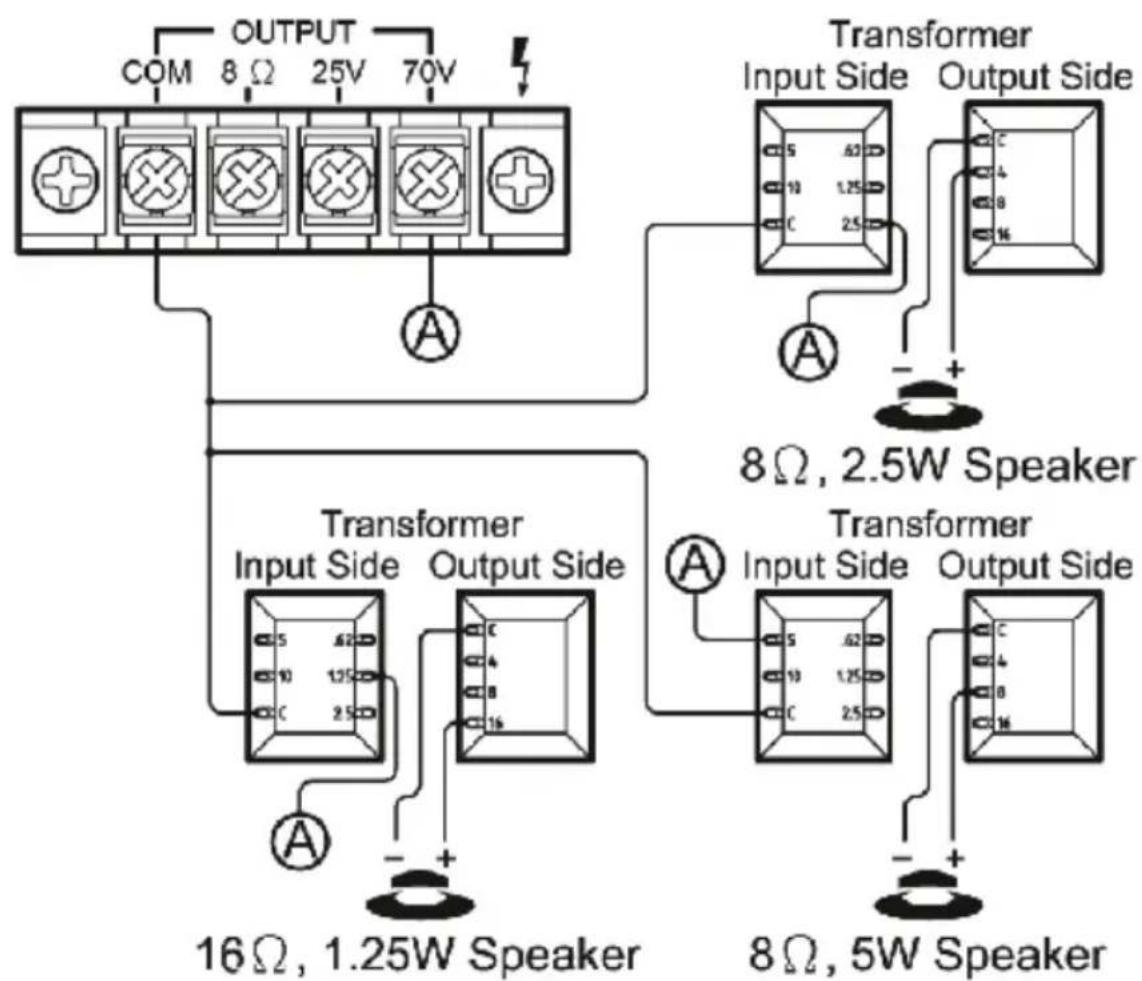
SYSTEM 5: Connecting Speakers with Transformers
NOTE: When the 25V or 70V constant line voltages are used, a line matching transformer must be used with each speaker. All transformers must be connected in parallel, never connect line transformers in series.
SPEAKER CONNECTION
External devices which have a built-in Wireless BT feature can be connected to this amplifier wirelessly to play through the amplifier's speakers. If your amp is connected to speakers, you will hear audible tones which will help for connecting.
-
At first be sure that the amplifier is powered on, and turn the volume to low. Please remember to connect the BT Antenna at the back panel for better receiving signal
-
Press the BT/Line button switch in on the front panel, you will hear the voice "POWER ON" and also "PAIRING", and then the unit is automatically ready to pair with your external device.
-
Turn ON the BT on your external device.
-
Search for available Wireless BT devices and make sure to be within range of your amp, and wait for your device to select "PYLEUSA" on the pairing devices lists of Wireless BT networks.
- Once connected you will hear a voice say, "Your Device is Connected", then the BT pairing is successful and your have established a Wireless BT connection.
- You can now play music on your external device through the amplifier.
Care and Maintenance
Your Pyle Amplifier is an example of superior design and craftsmanship. The following suggestions will help you care for your amplifier so you can enjoy years of use:
- Keep the amplifier dry. If it gets wet, wipe immediately.
- Use the amplifier only in well-ventilated installations.
- Handle the amplifier away from dust and dirt.
- Wipe occasionally with a damp cloth to keep it looking new.
- Do not use harsh chemical, solvents or detergents!
California Prop 65 Warning
WARNING:
This product may expose you to chemicals, which is known to the state of California to cause cancer, birth defects and other reproductive harm. Do not ingest.
For more info go to: www.P65 warnings.ca.gov
Features:
- Compact Power Amplifier Design
Automatic Mic-Talkover Priority Function (Mic 1)
(2) 1 / 4'' Microphone Inputs - Aux (1/4") Input Connector Jack
- Ability to Connect External Devices
- Speaker Terminal Outputs: COM/8-Ohm/25V/70V
- Independent Microphone/Aux Volume Controls
- Connect up to (4) Speakers
- Speaker Transformer Compatibility
- Bass and Treble Tone Controls
- Includes Detachable AC Power Cable
- Convenient Audio Control Amp
- USB/SD/FM/Wireless BT Playing
- Blue LED Display for Playing Information
- Extend Wireless BT Antenna
Wireless BT Connectivity:
- Works with All of Your Favorite Wireless BT Devices (iPhones, Androids, Smartphones, iPad, Tablet, PC, etc.)
- Wireless BT Network Name: 'PYLEUSA'
- Wireless BT Version: 4.0
Wireless Range up to 30^ + ft.
What's in the Box:
- PA Amplifier
- FM Antenna
Remote Control
Technical Specs:
MAX Power Output: 40 Watt
- Construction Material: Iron
- Bass/Treble: +/-10dB, 100-10kHz
Frequency Response: 50-15kHz
Attenuation (Mic): 61dB
- T.H.D.: <1%
- Battery Operated Remote, Requires (1) x CR-2025 Button Cell Battery, Included
- Replaceable Fuse
- Power: 120/240 Voltage Selector
- Dimensions (L x W x H): 5.9" x 7.87" x 3.15" -inc / 15 x 20 x 8.1 -cm
Register Product
Thank you for choosing PyleUSA. By registering your product, you ensure that you receive the full benefits of our exclusive warranty and personalized customer support. Complete the form to access expert support and to keep your PyleUSA purchase in perfect condition.

Start Here
Model Number:
PCM20A
PyleUSA.com/pages/register
PYLE®
PyleUSA.com

Questions? Comments?
We are here to help!
Phone: (1) 718-535-1800
PyleUSA.com/ContactUs
PCM20AEU - PCM20AUK
One or more speakers (4, 8 or 16 Ohms) can be connected to the amplifier with or without transformers. However, before you connect any speakers to the amplifier, the total impedance must be calculated in order to avoid damage to the amplifier. A total speaker impedance greater than 8 Ohms or less than 8 Ohms can cause this damage to occur.
SYSTEM 1: Single Speaker System
NOTE: Connect the speaker (+) to the amplifier's 8-Ohm terminal.
(8Ω SPEAKER)
SYSTEM 2 : Two (or more) Speakers in Series
NOTE: Connect the speaker (+) to the amplifier's 8-Ohm terminal, depending on the TOTAL IMPEDANCE of the two speakers. If each speaker has an impedance of 4-Ohm, the total speaker impedance in this series configuration is 8 ohms.
Questions? Commentaires?
- About PyleUSA
- Pyle Car:
- Pyle Home:
- Pyle Pro:
- IMPORTANT SAFETY INSTRUCTIONS
- Your new PCM20A Stereo Power Amplifier
- FEATURES AND CONTROLS
- FRONT PANEL
- BACK PANEL
- REMOTE CONTROL
- SPEAKER CONNECTION
- SYSTEM 1: Single Speaker System
- SYSTEM 2 : Two (or more) Speakers in Series
- SYSTEM 3 : Two (or more) Speakers in Parallel
- SYSTEM 4: Four Speakers in Series and Parallel
- SYSTEM 5: Connecting Speakers with Transformers
- Care and Maintenance
- California Prop 65 Warning
- WARNING:
- Features:
- Wireless BT Connectivity:
- What's in the Box:
- Technical Specs:
- Register Product
- PYLE®
- PyleUSA.com
- PCM20AEU - PCM20AUK
Brand : Pyle
Model : PCM20A
Category : Receiver